ABS AUDI Q3 2015 Owners Manual
[x] Cancel search | Manufacturer: AUDI, Model Year: 2015, Model line: Q3, Model: AUDI Q3 2015Pages: 258, PDF Size: 64.9 MB
Page 14 of 258
12 Instruments and warning/indicator lights
compartment, stop the engine and let it
cool down. Always exercise extreme cau
tion when work ing under the hood
c::> page 179.
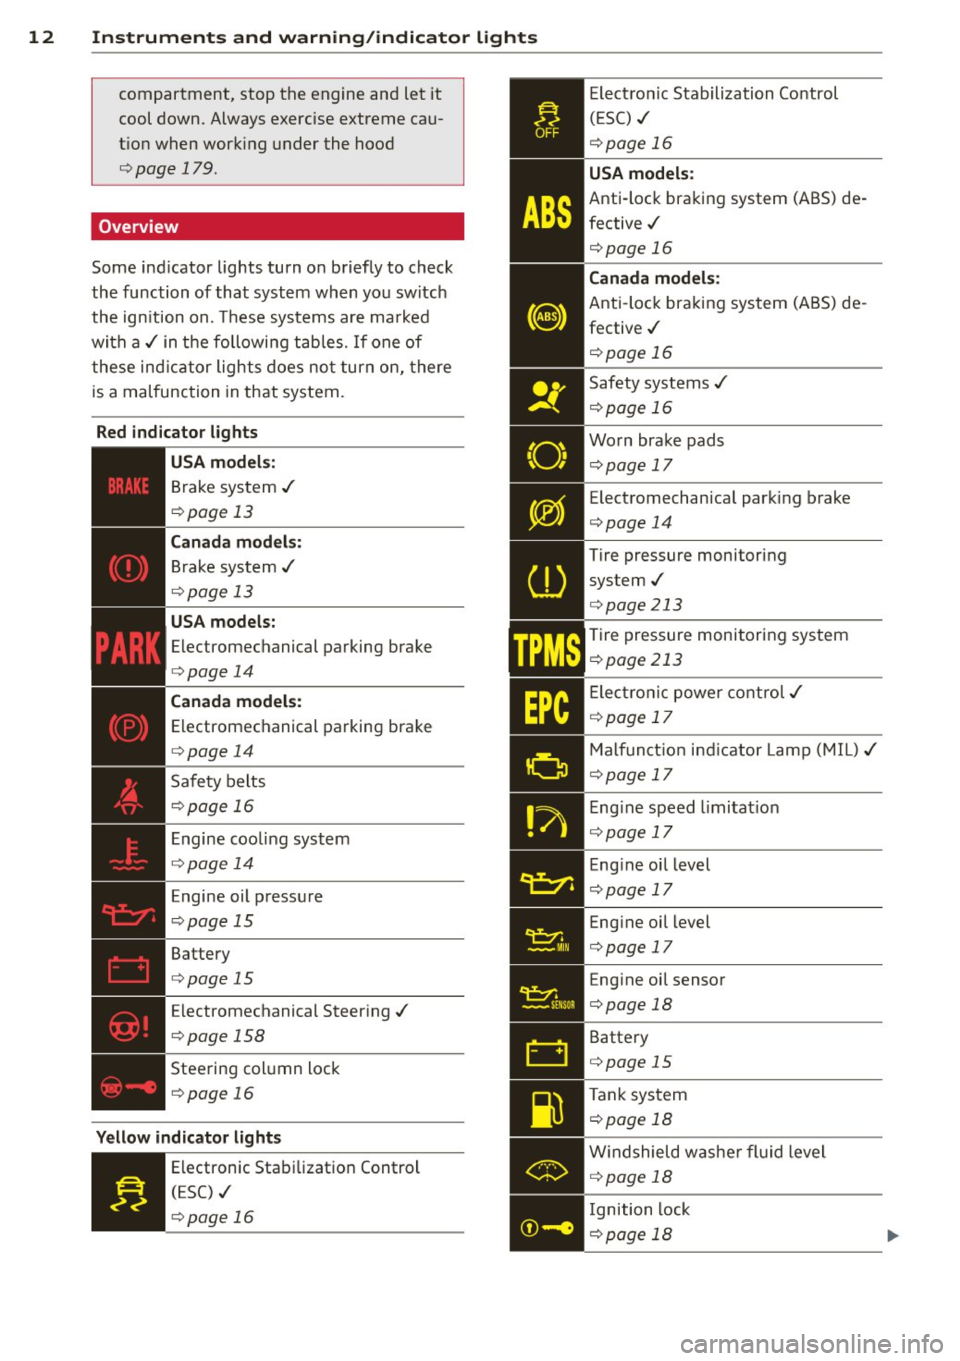
Overview
Some ind icator lights turn on briefly to check
the function of that system when you switch
the ign ition on. These systems are ma rked
with a ../ in the following tables. If one of
these indicator lights does not turn on, there
is a malfunction in that system.
Red indicator lights
USA models:
Brake system ../
c::>page 13
Canada models:
Brake system ../
c::>page 13
USA models:
Electromechanical parking brake
c::>page 14
Canada models:
Electromechanical parking brake
c::>page 14
Safety belts
c::>page 16
Engine cooling system
c::>page 14
Engine oil pressure
c::>page 15
Battery
c::>page 15
Electromechanical Steering../
¢ page 158
Steering column lock
¢page 16
Yellow indicator lights
Electronic Stabilization Control
(ESC) ../
¢page 16
TPMS
Electronic Stabilization Control
(ESC) ../
¢page 16
USA models:
Anti-lock braking system (ABS) de
fective../
¢page 16
Canada models:
Anti-lock braking system (ABS) de
fective../
c::> page 16
Safety systems ../
c::> page 16
Worn brake pads
c::> page 17
Electromechanical park ing brake
¢ page 14
Tire pressure monitoring
system../
¢page 213
Tire pressure monitoring system
¢page 213
Elect ronic power control../
c::> page 17
• M
alfunct ion ind icator Lamp (MIL)../ ¢page 17
Engine speed limitat ion
c::> page 17
- Engine oil level
- c::>pagel7
• ·
-. Engine oil level _
1 c::> page 17
• Engine oil sensor c::> page 18
Battery
c::> page 15
-
Tank system
... c::> page 18
• Windshield
washer fluid level c::> page 18
- Ignition lock
IYiiil c::> page 18
Page 15 of 258
M N
M N
0 ::i co ,...., \!) 1.1'1 ,...., 1.1'1 ,....,
Electromechanical steering
¢page 158
Steering column lock
¢page 16
Convenience key
¢page 70
• Convenience
key ¢page 69
Battery in remote control key
¢ page 30
Defective light bulb warn ing
¢ page 18
Headlight range control
¢page 18
- Adaptive light
- ¢page18
Light-/rain sensor
¢ page 19
Transmission
¢page 85
Adaptive dampers
USA models:
Speed warning system
¢page 73
Canada models:
Speed wa rning system
¢page 73
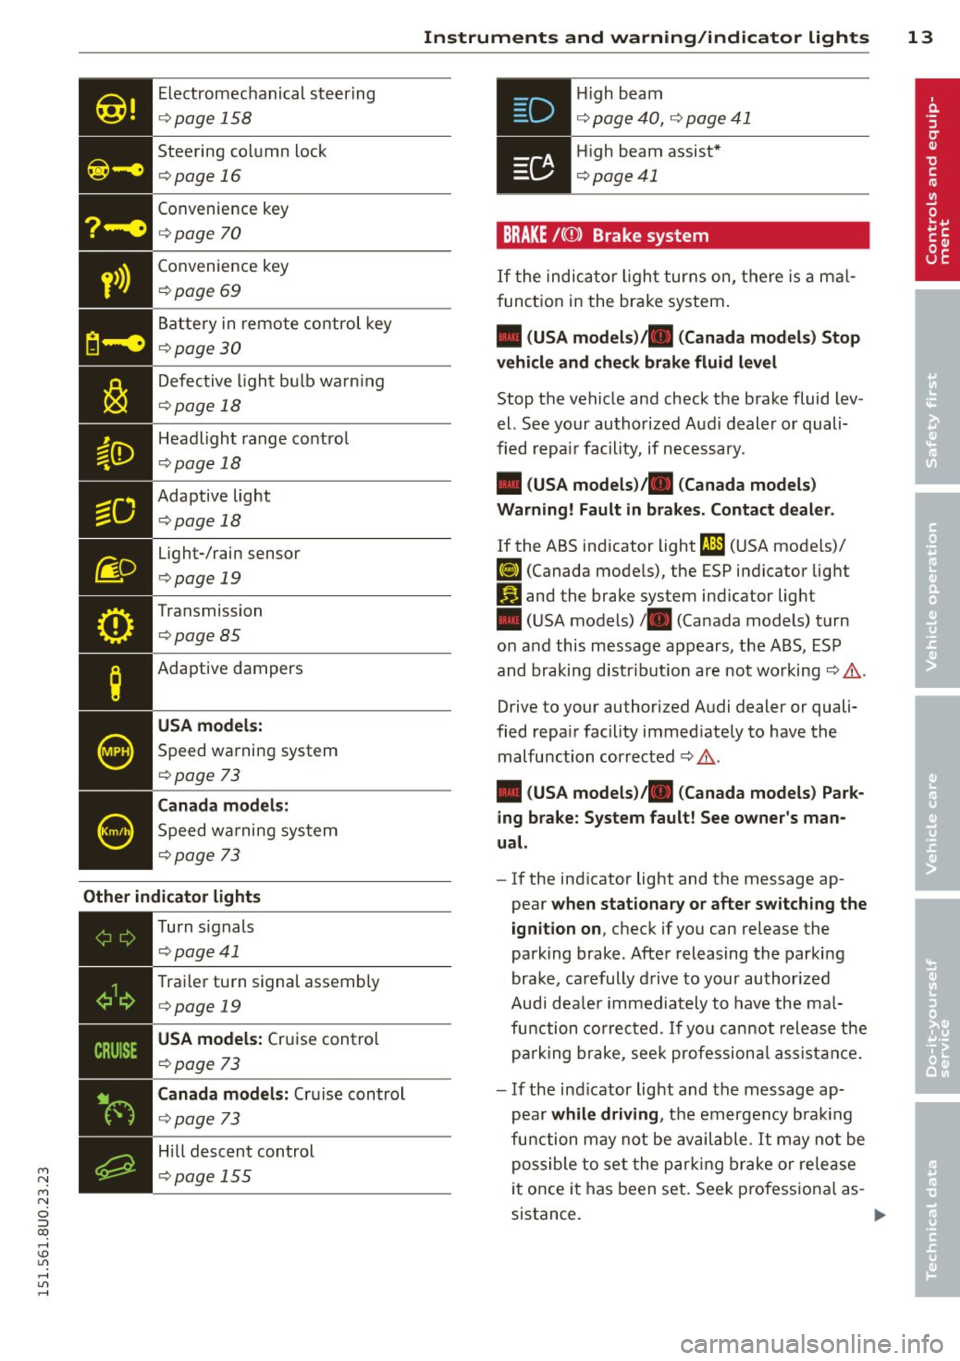
Other indicator lights
•iii
Turn
signals
¢ page41
• T
rai ler turn signal assembly ¢ page 19
• USA models:
Cruise control
¢
page 73
Canada models: Cruise control
¢page 73
Hill descent control
¢page 155
Instruments and warning/indicator lights 13
.Hi gh beam
• ¢ page 40, ¢ page 41
• High beam assist*
¢page41
BRAKE /((D ) Brake system
If the indicator light turns on, there is a mal
function in the brake system.
• (USA models)/ . (Canada models) Stop
vehicle and check brake fluid level
Stop the veh icle and check the brake fluid lev
el. See your authorized Aud i dealer or quali
fied repa ir facility, if necessary.
• (USA models)/ . (Canada models)
Warning! Fault in brakes. Contact dealer .
If the ABS indicator light t1l1 (USA models)/
fiJ (Canada models), the ESP indicator light
Iii and the brake system ind icator light
• (USA models)/ . (Canada models) turn
on and this message appears, t he ABS, ESP
and braking distr ibution are not working¢&.
Drive to your authorized Audi dealer or quali
fied repa ir facility immed iately to have the
malfunction corrected ¢ & .
• (USA models)/ . (Canada models) Park
ing brake: System fault! See owner's man
ual.
- If the indicator light and the message ap
pear
when stationary or after switching the
ignition on,
check if you can release the
park ing brake . After releasing the parking
brake, carefully drive to your author ized
Audi dea le r im mediately to have the mal
function corrected. If you can not release the
park ing brake , seek professional assistance.
- If the ind icator light and the message ap
pea r
while driving , the emergency brak ing
function may not be available. It may not be
possible to set the parking brake or release
it once it has been set. Seek pro fessiona l as-
sistance. .,.
Page 16 of 258
![AUDI Q3 2015 Owners Manual 14 Instrum ent s and w arn ing /indic ato r light s
(USA models): If the warning light . and the
warning light
ll] appear together, immedi
ately contact your authorized Audi deale AUDI Q3 2015 Owners Manual 14 Instrum ent s and w arn ing /indic ato r light s
(USA models): If the warning light . and the
warning light
ll] appear together, immedi
ately contact your authorized Audi deale](/img/6/57629/w960_57629-15.png)
14 Instrum ent s and w arn ing /indic ato r light s
(USA models): If the warning light . and the
warning light
ll] appear together, immedi
ately contact your authorized Audi dealer or
qua lified workshop to have all brake pads in
spected
¢ page 17.
When the light comes on, an audib le warning
signal is also given .
.&_ WARNING
- Always observe the warnings in
¢ page 179, before opening the hood
and checking the brake fluid.
- Driv ing with low brake fluid is a safety
hazard. Stop the car and get professional
assistance.
- If the . (USA models) . (Canada
models) brake system indicator light
turns on together with the ABS and ESC
indicator lights, the ABS/ESC regu lating
function may have failed. Functions that
stabilize the vehicle are no longer availa
ble. Th is could cause the vehicle to
swerve and increase the risk of sliding .
Drive carefully to the nearest a uthorized
Audi dealer or other qualified workshop
and have the malfunction corrected.
- If the brake warning/indicator light does
not go out after a few seconds and the
park ing brake is released, or lights up
wh ile you are driving, the fluid level in
the brake fluid reservoir is too low .
If you
believe that it is safe to do so, proceed
immediately at low speed to the nearest
authori zed Audi dealer o r qualified wo rk
shop and have the bra ke system inspect
ed.
- Always keep in m ind that after several
brake applicat ions, yo u will need greater
pressure on the brake peda l to stop your
vehicle. Do not re ly on strained brakes to
respond with maxim um stopping power
in critical situations. You must allow for
increased brak ing distances. The extra
distance used up by fad ing brakes could
lead to an acc ident.
PARK !<®> Electromechanical parking brake
The warning/indicator light monitors the
electromechanical parking brake .
If the indicator light. (USA models) •
(Canada models) turns on, the parking brake
was set.
• (USA model s)/. (Canada models ) Press
brake pedal to release parking b ra ke.
To re lease the park ing brake, press the brake
peda l and press the button(®) at the same
t ime or start driving with starting assist
¢ page 71, Starting from rest.
Ill Pa rking br ake : S ys tem f ault! See owne r's
manual.
If the I.II ind ic a tor light tu rns o n and this
message appears, there is a parking b rake
malfunction. Drive to your authorized A udi
dealer or qualified workshop immediately to
have the malfunct ion corrected.
@ Tips
More informat ion on the parking brake
¢page 70 .
-L Engine cooling system
A malfunction in the engine cooling system
must be repaired as soon as possible.
• Turn off engine and ch eck coolant level
T he coolant level is too low .
Do not continue dr iving and turn
off the en
gine. Check the coo lant level
¢ page 186.
-If the coo lant level is too low, add coo lant
¢ page 186. Only continue driving if the in
dicator light turns off.
- If the coo lant level is correct, then the ma l
function may be ca used by fa ilure of the
coolant fan. Do not continue driving. See
your authorized Audi dealer or qualified re pa ir fac ility .
• Coolant temperature! Let engine run
w ith vehicle stationar y.
Page 18 of 258
16 Instruments and warning/indicator lights
~ Safety belts
This warning/indicator light reminds you to
put on your safety belt.
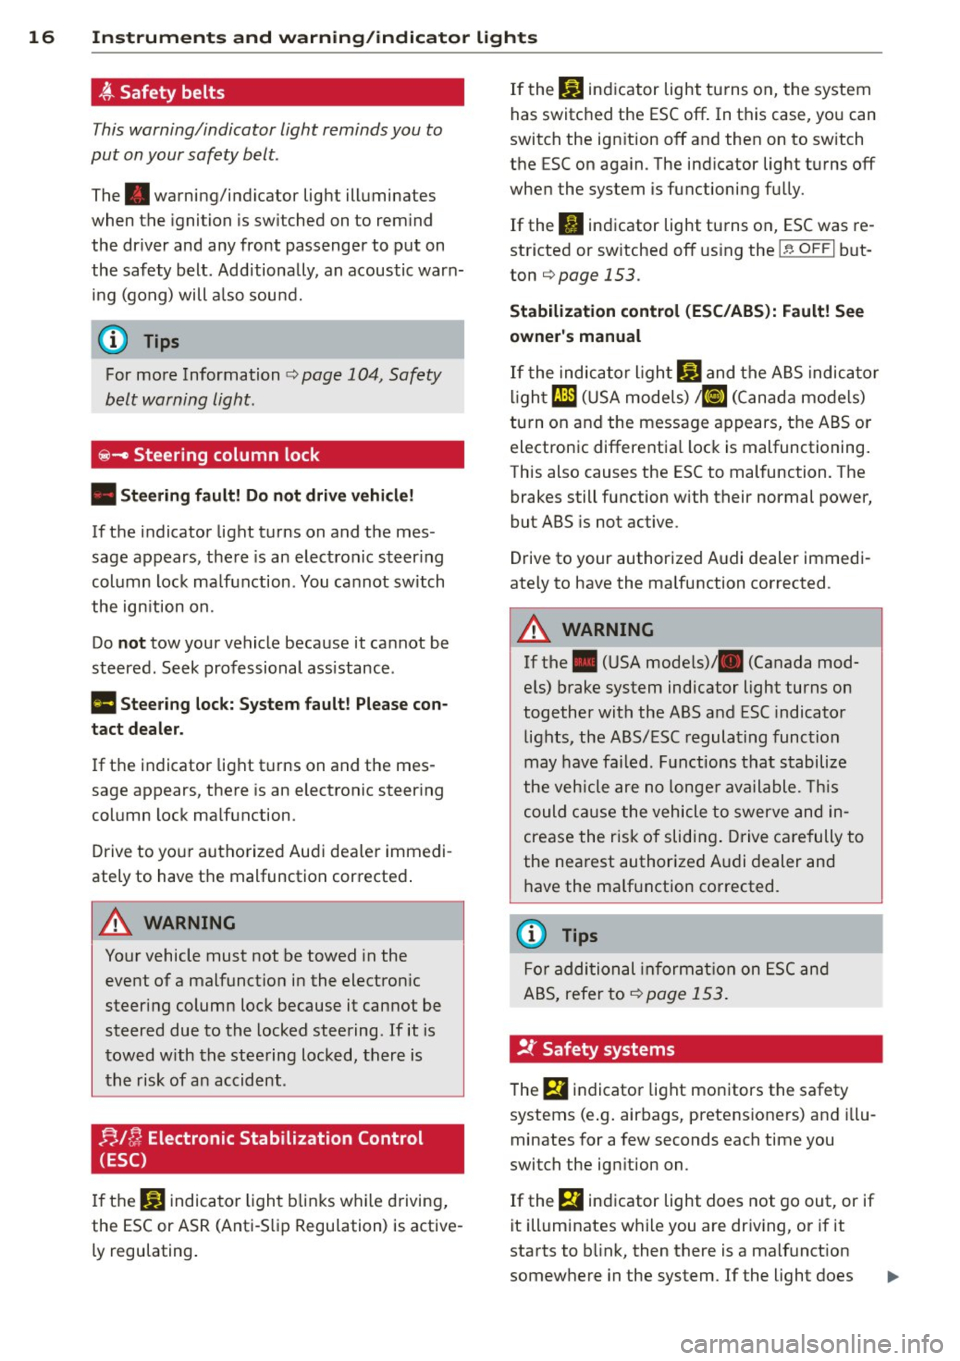
The. warning/indicator light illuminates
when the ignition is sw itched on to remind
the dr iver and any front passenger to put on
the safety belt. Additionally, an acoustic warn
ing (gong) will also sound.
(D Tips
For more Information c> page 104, Safety
belt warning light.
~- Steering column lock
• Steering fault! Do not drive vehicle!
If the indicator light turns on and the mes
sage appears, there is an electronic steering
column lock malfunction. You cannot switch
the ign ition on.
Do
not tow your vehicle because it cannot be
steered . Seek professional assistance.
Ill Steering lock: System fault! Please con
tact dealer.
If the indicator light turns on and the mes
sage appears, there is an electronic steer ing
column lock malfunction.
Drive to your authorized Audi dea ler immedi
ate ly to have the malfunction corrected .
A WARNING
-
Your vehicle must not be towed in the
event of a malfunct ion in the electron ic
steering column lock because it cannot be
steered due to the locked steering. If it is
towed with the steering locked, there is
the risk of an accident .
!;.IC; Electronic Stabilization Control
(ESC)
If the J;J indicator light blink s whi le driving,
the ESC or ASR (Anti-S lip Regulation) is active
ly regulating .
If the: JjJ indicator light turns on, the system
has switched the ESC
off. In this case, you can
switch the ign ition
off and then on to switch
the ESC on aga in. The indicator light turns
off
when the system is functioning fully.
If the II indicator light turns on, ESC was re
stricted or sw itched
off using the I~ OFFI but
ton
i=> page 153.
Stabilization control (ESC/ABS): Fault! See
owner's manual
If the indicator l ight GJ and the ABS indicator
light
t1l1 (USA mode ls) ;tiJ (Canada models)
tu rn on and the message appears, the ABS o r
electronic differentia l lock is malfunctioning.
This also causes the ESC to malfunction. The
brakes still function with their normal power,
but ABS is not active.
Drive to your authorized Audi dealer immedi
ate ly to have the ma lfunction corrected.
A WARNING "--
If the . (USA mode ls)/ . (Canada mod-
e ls) brake system indicator light turns on
together with the ABS and ESC indicator
lights, the ABS/ESC regulating function
may have failed. Functions that stabilize
the vehicle are no longer ava ilable. This
could cause the vehicle to swerve and in
crease the risk of slid ing. Drive carefully to
the nearest authorized A udi dealer and
have the ma lfunction corrected.
(D Tips
For additional informat ion on ESC and
ABS, refer to
c> page 153.
!t Safety systems
The fll indicator light monitors the safety
systems (e .g. airbags, pretensioners) and illu
minates for a few seconds each time you
switch the ign ition on .
If the
fll indicator light does not go out, or if
it illuminates while you are driving, or if it
starts to b link, then there is a malfunct ion
somewhere in the system. If the light does
Page 22 of 258
20 Driver in formation d ispl ay
Driver information
display
Overview
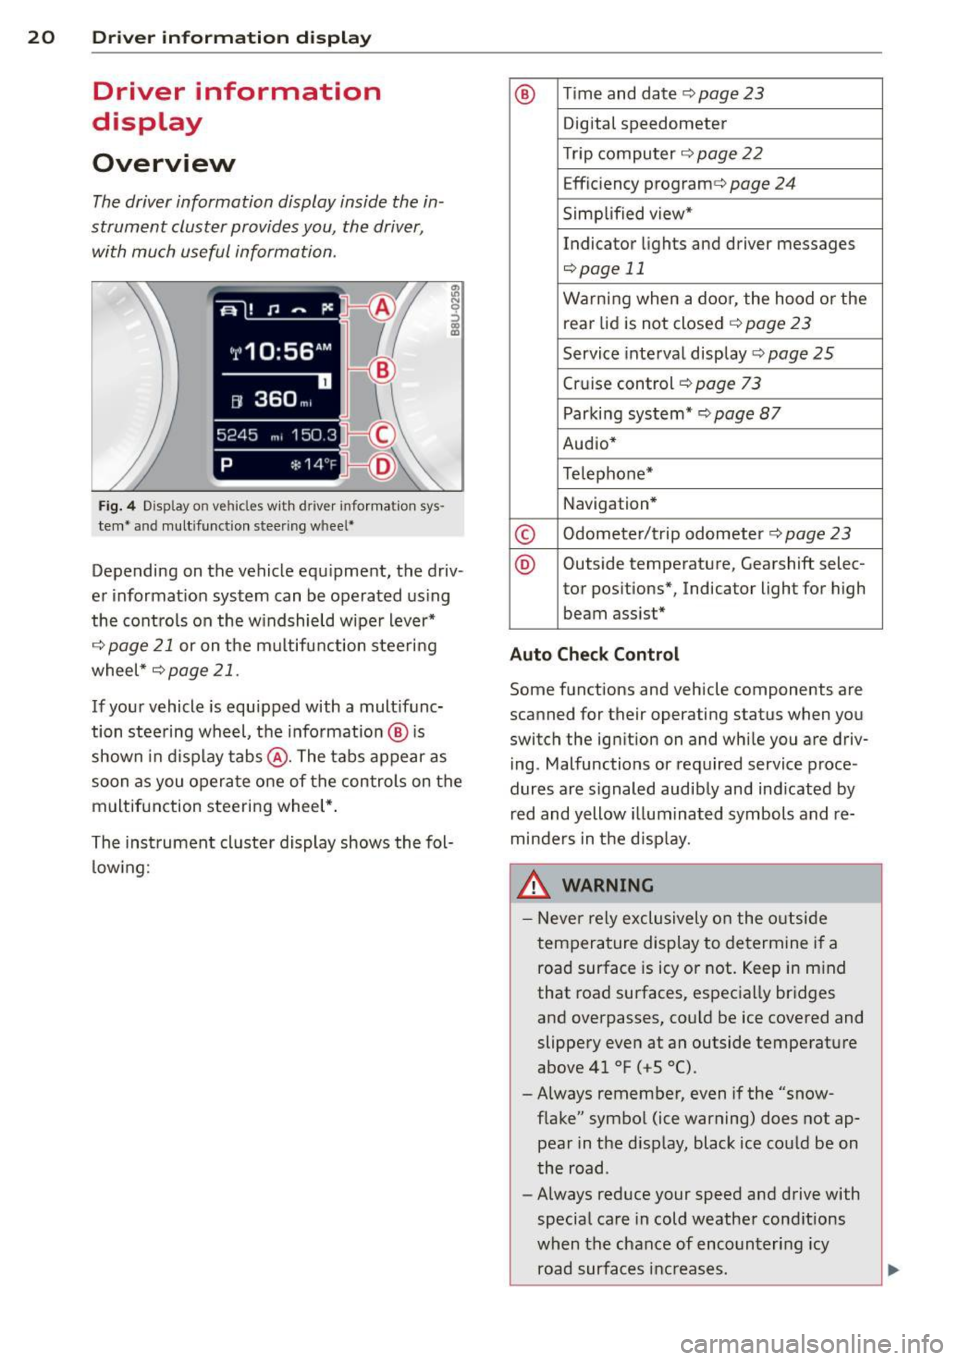
The driver information display inside the in
strument cluster provides you, the driver ,
with much useful information.
Fi g. 4 Dis play on vehicle s w it h dri ve r in fo rma tion sys
tem * and mult ifunc tion steering w hee l*
:ii N 9 ::> a, a,
Depending on the vehicle equ ipment, the driv
er informat ion system can be operated us ing
the cont rols on the w indshield wipe r lever*
¢
page 21 or on the m ultifunction steering
wheel *¢
page 21 .
If your vehicle is equ ipped with a mult ifunc
tion stee ring wheel, t he informat io n @ is
shown in d isplay tab s@ . The tabs appear as
soon as you opera te one of the controls on the
multif unction steering wheel* .
Th e inst rument cluster display shows the fol
l ow ing:
® T im e and date ¢ page23
Digital speedometer
Tr ip compu ter ¢
page 22
Effic iency program ¢ page 24
Simplified view*
Indicator lights and drive r me ssages
¢page 11
Warning when a door, the hood or the
rea r lid is not closed¢
page 23
Service inte rval display ¢ page 25
Cruise control ¢ page 73
Parking system* ¢page 87
Audio*
Telephone*
Navigation *
© Odometer/trip odometer ¢ page 23
® Outs ide temperature , Gearshift selec-
tor pos itions*, Indicator light for high
beam assist *
Auto Check Control
Some f unctions and vehicle components are
scanned for their operating status when yo u
switch the igni tion on and whi le you a re driv
i ng . Malfunctions or required service proce
dur es are s ignaled audib ly and ind icated by
red and yellow illuminated symbols and re
minders in the d isp lay.
8, WARNING -
- Never rely exclusively o n the o utside
t empera ture display to de termine i f a
road surface is icy or not. Keep in m ind
that road surfaces, espec ia lly bridges
and overpasses, co uld be ice
covered and
slippery
even at an outside tempe rature
above 41 °F ( +S 0
() .
-Always remember, even if the "snow
f lake" symbol (ice warning) does not ap
pear in the d isp lay, black ice cou ld be on
the road .
- Always reduce your speed a nd drive with
specia l care in cold weathe r cond itions
when the chance of encounter ing icy
road surfa ces inc reases .
Page 23 of 258
M N M N
0 ::i co
rl I.O
"' rl
"' rl
@ Tips
If the vehic le is stationary, or if you are
driving at a very low speed, the tempera
ture shown in the d isplay might be slightly
higher than the actual outside tempera
ture. This is caused by the heat being radi
ated from the engine.
Operation
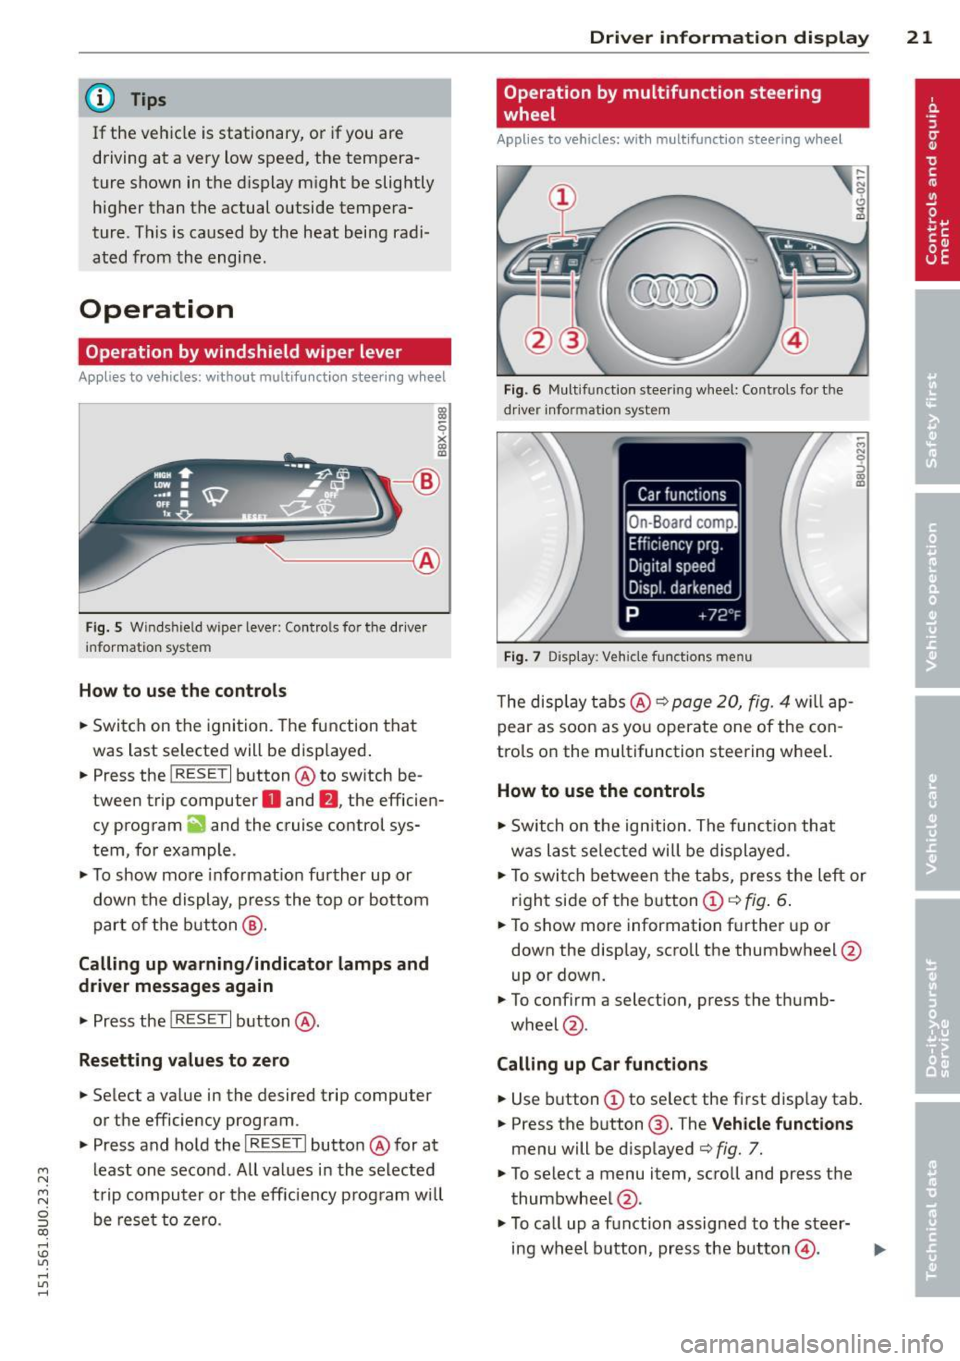
Operation by windshield wiper lever
Applies to vehicles: without multifu nct ion stee ring w heel
~------------------gi
0
x CX) a:,
'------ ®
Fig . 5 Wi nds hield w ipe r lever : Contro ls fo r the d river
i nforma tion sy stem
H ow to use the control s
.. Switch on the ignition. The function that
was last selected will be disp layed .
.. Press the
I RESET I button @ to sw itch be
tween trip computer
O and fJ , the efficien
cy program
ii and the cruise control sys
tem, fo r example .
.,. To show more informat ion further up or
down the display , press the top or bottom
part of the button @.
Calling up warning /indicato r lamps and
driver messages again
.,. Press the I RES ET I button @.
Resetting values to zero
.. Select a value in the desired trip computer
or the efficiency program .
.. Press and hold the
I R ESET I butto n @ for at
least one second . All values in the se lected
trip computer or the eff iciency p rogram will
be rese t to zero.
Dri ver inform ation di spl ay 21
Operation by multifunction steering
, wheel
Appl ies to vehicles: with multifunction steering w heel
Fi g. 6 Mul tifu nct io n stee ring wheel: Co ntrols for t he
dr iv er info rmatio n sy stem
Fig . 7 D is play: Veh icle fun ctions men u
The disp lay t abs @ ¢ page 20, fig. 4 will ap
pear as soon as you operate one of the con
trols on the multifunction steering wheel.
How to use the controls
.,. Switch on the ign ition . The funct io n that
was last selec ted will be d isplayed.
M N
.,. To swi tch between the tabs, press the left or
r ight side of the b utton
CD ¢ fig . 6.
.. To show more information further up or
down the display, scroll the thumbwheel @
up or down.
.. To confirm a selection , press the thumb-
wheel @.
Calling up Car function s
.. Use button CD to select the first disp lay tab.
.. Press the button @. T he
V ehicle fun ctions
menu will be d isplayed ¢ fig. 7.
.,. To selec t a menu item, scroll and press the
thumbwheel @.
.,. To ca ll up a function assigned to the steer-
ing wheel button, press the button@.
IJ,-
Page 24 of 258
22 Driver information display
Resetting values to zero
.,. Se lect Computer or Efficiency program
from the Vehicle functions menu.
.,. Se lect a value in the desired trip computer
or the efficiency program.
.,. To reset the figures in the selected memory
to zero, press the thumbwheel @for one
second.
Assigning a function to the steering wheel
button
.,. Se lect : I MENU I button > Systems or Car Sys
tems
> Vehicle settings > Steering wheel
button .
Calling up warning/indicator lamps and
driver messages again
.,. Select the display tab marked 0 .
The tab marked D is only visible if one or
more warning/indicator lamps or driver mes
sages are disp layed. Other tabs are only visi
b le if the corresponding system is switched
on .
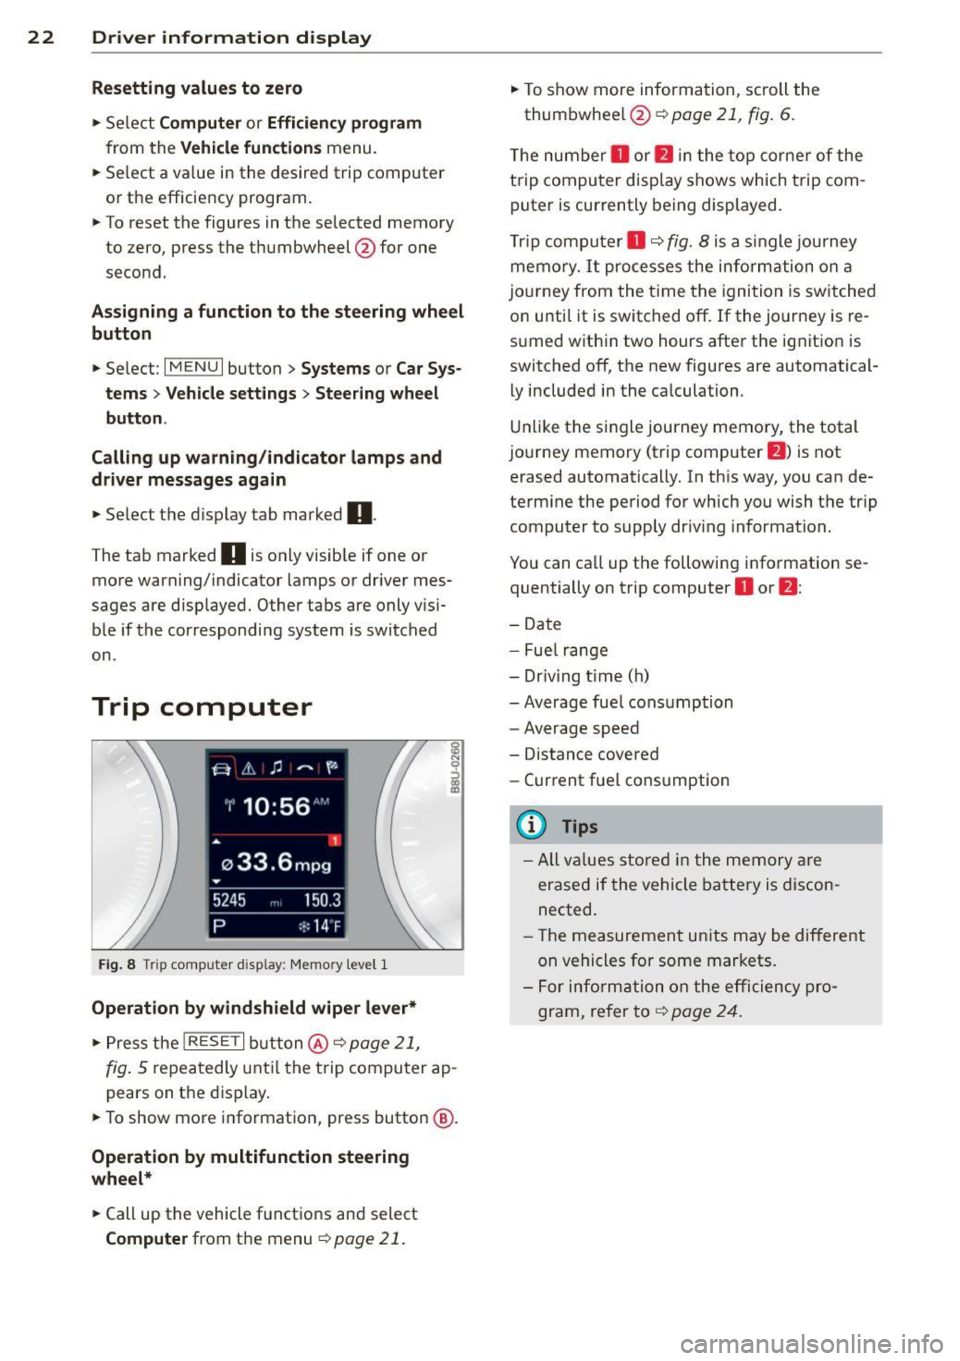
Trip computer
Fig. 8 Tri p computer d isp lay: Memo ry leve l 1
Operation by windshield wiper lever*
.,. Press the I RESET I button @¢ page 21,
fig. 5 repeatedly unti l the trip computer ap
pears on the display .
.,. To show more information, press button@.
Operation by multifunction steering
wheel*
.,. Call up the vehicle functions and select
Computer from the menu ¢ page 21.
.,. To show more information, scroll the
thumbwheel @9page21,
fig. 6 .
T he number
D or fl in the top corner of the
trip computer display shows which t rip com
puter is currently being displayed .
T rip computer
D ¢ fig. 8 is a s ingle journey
memory. It processes the information on a
jo urney from the time the ignition is switched
on until it is switched off. If the journey is re
sumed within two hours after the ignit ion is
switched off, the new figures are automatical
ly included in the calculation .
Unlike the single journey memory, the total
journey memory (trip computer
fl ) is not
erased automatically. In this way, you can de
termine the period for which you wish the trip computer to supply dr iv ing information.
You can call up the following information se quentially on trip computer
D or fl:
- Date
- Fue l range
- Dr iving t ime (h)
-Average fuel consumption
- Average speed
- Distance covered
- Current fuel consumption
(D Tips
-All va lues stored in the memory are
erased if the vehicle battery is discon
nected.
- Th e measurement units may be different
on vehicles for some markets.
- For information on the efficiency pro
gram, refer to ¢
page 24 .
Page 74 of 258
72 On the road
Starting off with a trailer
To prevent rolling back unintentionally on an
incline, do the follow ing:
.. Keep the switch@¢ page 70, fig. 77 pulled
and depress the accele rator. The park ing
brake stays applied and prevents the vehicle
from roll ing bac kward.
"' You can release the switch @ once you are
sure that you a re develop ing enough dr iv ing
f orce at the wheels by dep ress ing the accel
erator.
Depending on the weight of the r ig (veh icle
and tra iler) and the seve rity of the in cli ne, you
may roll backwards as you start . You can pre
vent rolling backwards by holding the parking
brake switch @ pulled out and accelerating -
just as you would when starting on a hill with a conventional hand brake.
Hill hold
Hill hold makes it easier to start on hills.
Requirement : The driver door must be closed
and the engine must be r unning .
The system is act ivated when the brake pedal
i s pressed wh ile the veh icle is sta tionary .
To prevent the vehicle from rolling back when
start ing , the brake power is held for a br ief
moment after re leas ing the b rake peda l. Dur
i ng th is t ime, yo u can easily begin to move
your ve hicle.
A WARNING
- The inte lligent technology of Hill Hold
cannot overcome the lim itations im
posed by natural phys ica l laws. The in
creased comfort offered by Hill Hold
should not cause you to take safety risks.
- Hi ll Hold cannot hold the veh icle in all
hill start situations (for examp le, if the
ground is slippery or icy).
- If you do not begin moving immediately
after releasing the brake pedal, the veh i
cle could begin to roll backward under
certai n circumstances . Press the b rake
-
pedal or set the parking brake immedi
ately .
- If the engine "stalls", press the brake
pedal or set the parking brake immedi
ately .
- Starting on inclines in stop-and-go traf
f ic: To help prevent the vehicle from roll
ing back when start ing, press and ho ld
the brake pedal for several seconds when
the vehicle is stationary.
Emergency braking
In the event tha t the conventional brake sys
tem fails or locks .
.. In an emergency, pu ll the switch @
¢
page 70, fig. 77 and continue to pull it to
slow your vehicle down with the parking
brake .
.. As soon as you release the switch @ or ac-
celerate, the b rak ing process stops.
If you pull the switch @ and hold it above a
speed of about S mph (8 km/h), the emergen
cy brak ing funct io n is initiated . T he veh icle is
braked at all fou r whee ls by activating the hy
draulic b rake system. The brake pe rfo rmance
is sim ila r to m akin g an emergency stop ¢_&. .
In order not to act ivate the eme rgency brak
ing by mistake, an audib le warning tone (buz
zer) sounds whe n the switch @ is pulled. As
soon as t he sw itch @ is re leased, or the acce l
erator pedal is depressed, eme rgency braking
stops.
A WARNING
=
Emergency braking should only be used in
an emergency, when the norma l foot bra ke
has fa iled or the brake pedal is obstructed.
Using the park ing brake to perform emer
gency braking will s low your veh icle down
as if you had made a full brake application .
The laws of phys ics cannot be suspended
even with ESC and i ts associa ted compo
nents (ABS, ASR, EDS). In corners and
when road or weathe r cond itions are bad
,
a full brake application can ca use the
Page 102 of 258
100 Driving Safel y
Stowing luggage
Loading the luggage compartment
All luggage and other objects must be prop
erly stowed and secured in the luggage com
partment.
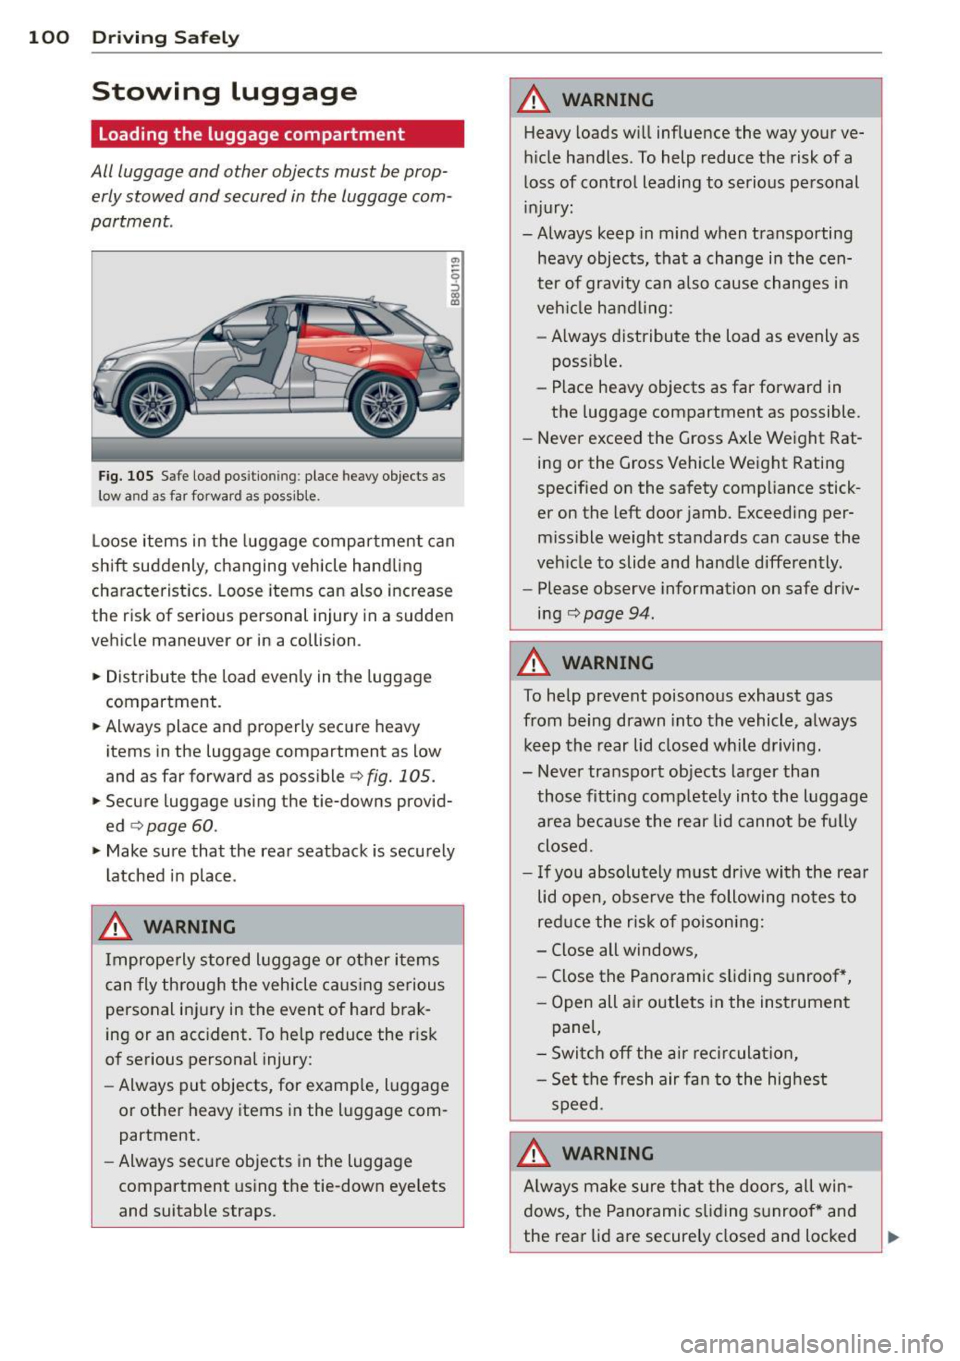
Fig. 105 S afe load pos itio nin g: place heavy objects as
low a nd as far forward as possible .
Loose items in the luggage compartment can
shift suddenly, changing vehicle hand ling
characteristics. Loose items can also increase
the risk of serious personal injury in a sudden
vehicle maneuver or in a collision .
.. Distribute the load evenly in the luggage
compartment .
.. Always place and properly secure heavy
items in the luggage compartment as low
and as far forward as possible
c> fig. 105.
.. Secure luggage using the tie-downs provid
ed
c> page 60.
.. Make sure that the rear seatback is securely
latched in place .
A WARNING
Improperly stored luggage or other items
can fly through the vehicle ca using serious
personal injury in the event of hard brak
ing or an accident. To help reduce the r isk
of serious personal injury:
- Always put objects, for examp le, luggage
or other heavy items in the luggage com
partment.
- Always secure objects in the luggage
compartment using the tie-down eye lets
and suitable straps.
A WARNING
-Heavy loads will influence the way your ve-
hicle handles. To help reduce the risk of a
loss of control leading to serious personal
injury:
-Always keep in mind when transporting
heavy objects, that a change in the cen
ter of gravity can also cause changes in
veh icle handling :
- Always distribute the load as evenly as
possible.
- Place heavy objects as far forward in
the luggage compartment as possible.
- Never exceed the Gross Axle Weight Rat
ing or the Gross Vehicle Weight Rating
specified on the safety compliance stick
er on the left door jamb. Exceeding per
missible weight standards can cause the
veh icle to slide and handle differently.
- Please observe information on safe driv
ing
c> page 94.
A WARNING
-
To help prevent poisonous exhaust gas
from being drawn into the vehicle, a lways
keep the rear lid closed while driving.
- Never transport objects larger than
those fitting comp letely into the luggage
area because the rear lid cannot be fully
closed .
- If you absolutely m ust dr ive with the rear
lid open, observe the following notes to
reduce the risk of poisoning:
- Close all windows,
- Close the Panoramic sliding sunroof *,
- Open all air outlets in the instrument
pane l,
- Switch off the air recirculat ion,
- Set the fresh air fan to the highest
speed.
A WARNING
A lways make sure that the doors, all win
dows, the Panoramic sliding sunroof * and
the rear lid are securely closed and locked
-
Page 107 of 258
M N M N
0 ::i co
rl I.O
"' ,....,
"' rl
-Failure to pay attention to the warning
light that come on, could lead to person
al injury.
Why safety belts?
Frontal collisions and the law of physics
Frontal crashes create very strong forces for
people riding in vehicles .
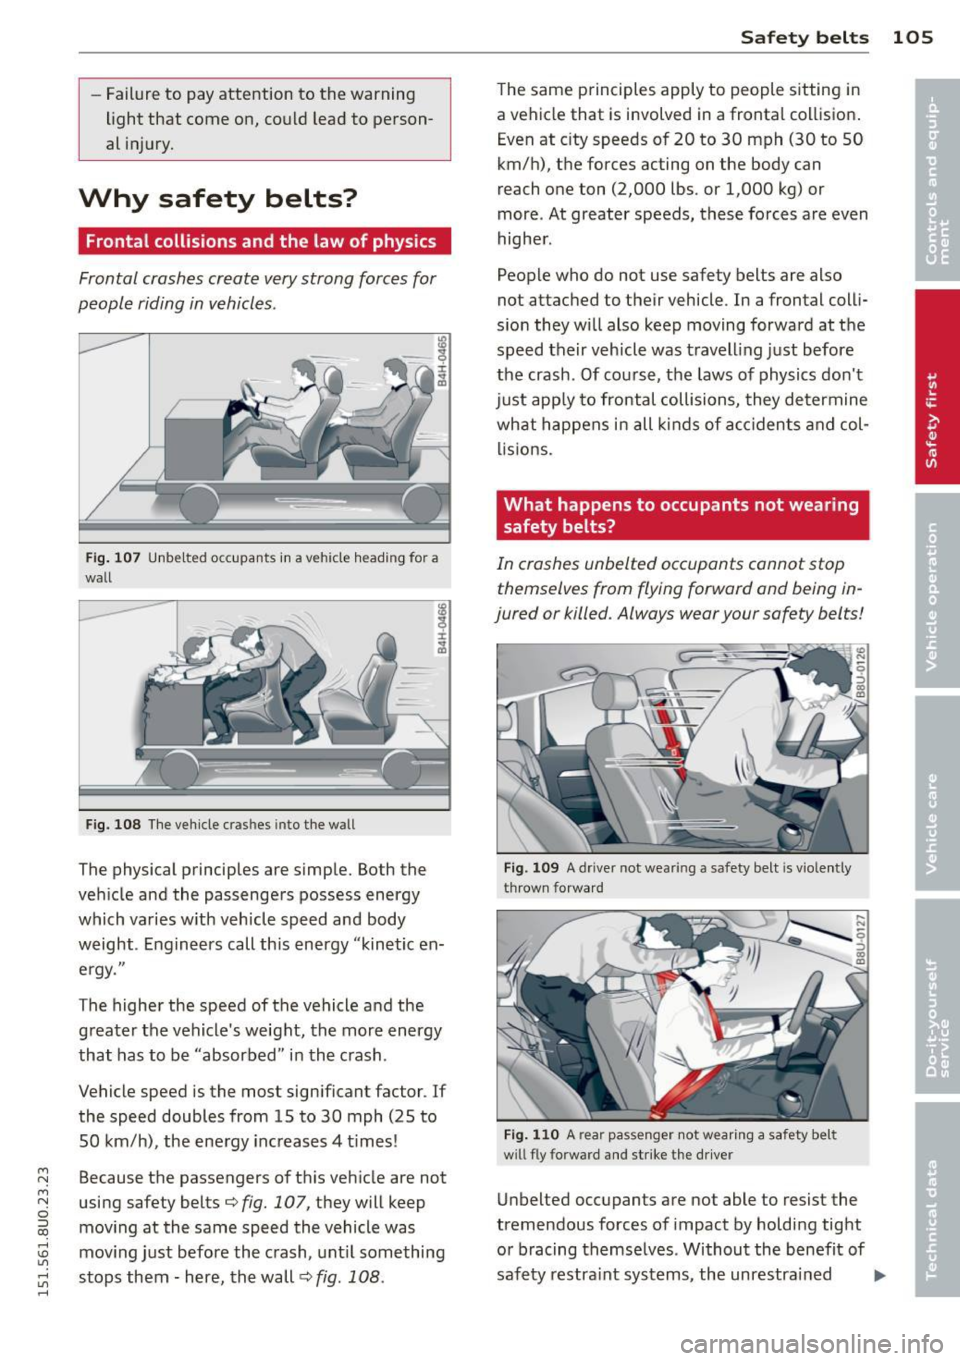
Fig. 107 Unbelted occupants in a ve hicle heading for a
wall
Fig. 108 The vehicle cras hes into the wall
The physical principles are simple. Both the
vehicle and the passengers possess energy
which varies w ith veh icle speed and body
weight . Engineers call this energy "kinetic en
ergy."
The higher the speed of the vehicle and the
greater the vehicle's weight, the more energy
that has to be "absorbed" in the crash.
Vehicle speed is the most significant factor . If
the speed doubles from 15 to 30 mph (25 to
SO km/h), the energy increases 4 t imes!
Because the passengers of this vehicle are not
using safety belts¢
fig. 107, they will keep
moving at the same speed the vehicle was
moving just before the crash, until something
stops them - here, the wall ¢
fig. 108.
Safety belts 105
The same principles apply to people sitting in
a vehicle that is involved in a frontal collision.
Even at city speeds of 20 to 30 mph (30 to 50
km/h), the forces acting on the body can
reach one ton (2,000 lbs. or 1,000 kg) or
more . At greater speeds, these forces are even
higher.
People who do not use safety belts are also
not attached to their vehicle . In a frontal colli
sion they will also keep moving forward at the
speed their vehicle was travelling just before
the crash . Of course, the laws of physics don't
just app ly to frontal collisions, they determine
what happens in all kinds of accidents and col
lisions.
What happens to occupants not wearing safety belts?
In crashes unbelted occupants cannot stop
themselves from flying forward and being in
jured or killed. Always wear your safety belts!
Fig. 109 A driver not wear ing a safety belt is v io lently
t hrown forward
Fig . 110 A rear pa ssenger not wearing a safety belt
w ill fly fo rwa rd and str ike the driver
Unbelted occupants are not able to resist the
tremendous forces of impact by holding tight
or bracing themselves . Without the benefit of
safety restraint systems, the unrestrained ..,_