change wheel AUDI Q3 2015 Owners Manual
[x] Cancel search | Manufacturer: AUDI, Model Year: 2015, Model line: Q3, Model: AUDI Q3 2015Pages: 258, PDF Size: 64.9 MB
Page 78 of 258
76 Audi side assist
General information
A pplies to vehicles: with Audi side assist
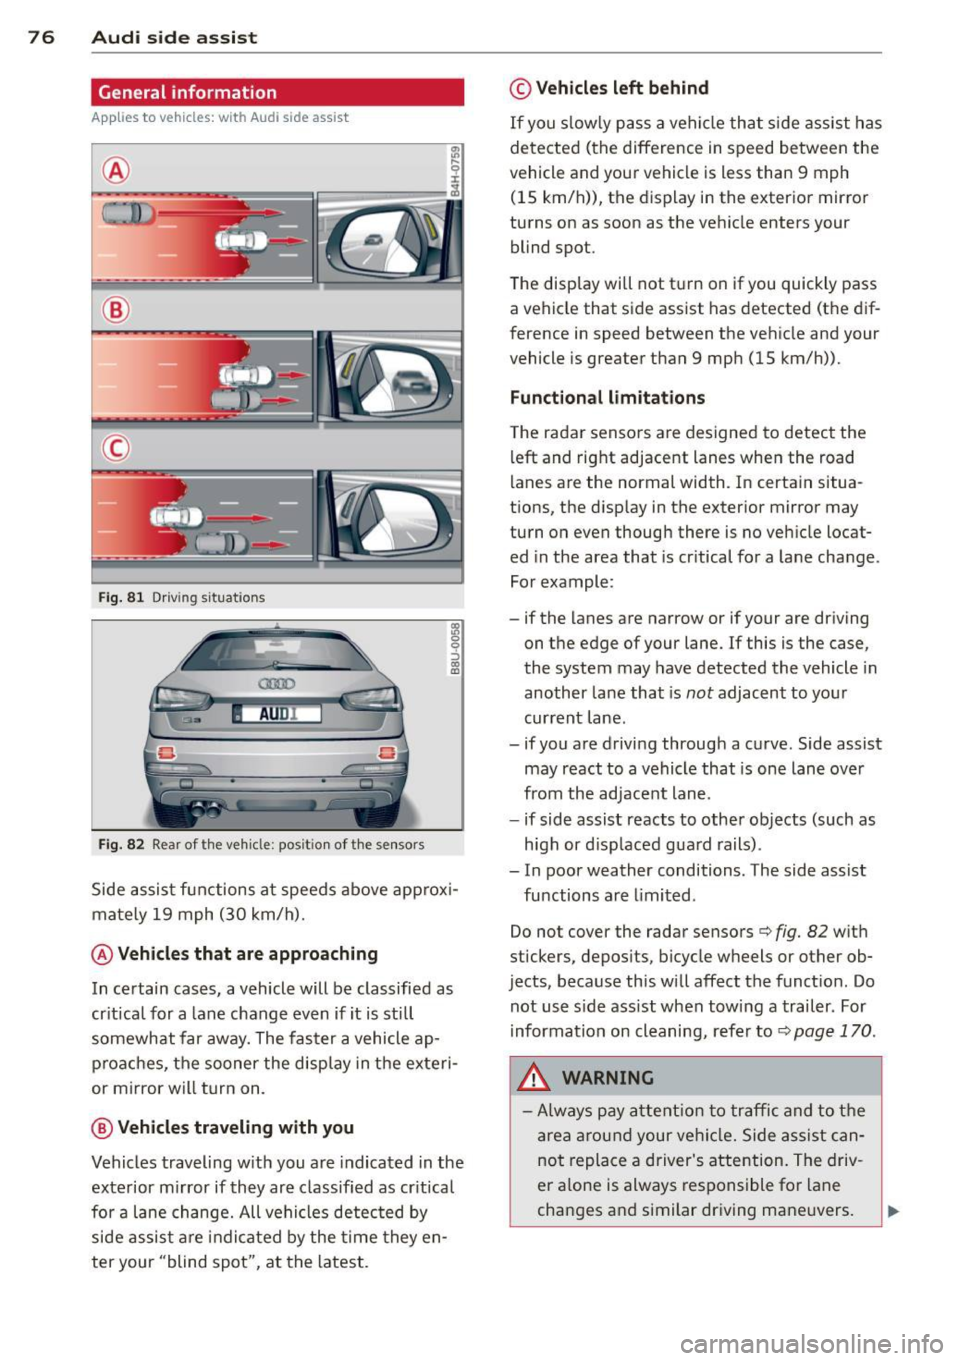
®
©
Fig. 81 Driving situations
AU Dr--
Fig. 82 Rear of the vehicle: posit ion of the sensors
1ll 0 0 :, a) a,
Side assist functions at speeds above approxi
mately 19 mph (30 km/h).
@ Vehicles that are approaching
In certain cases, a vehicle will be classified as
critical for a lane change
even if it is still
somewhat far away. The faster a vehicle ap
proaches, the sooner the display in the exteri
or mirror will turn on.
@ Vehicles traveling with you
Vehicles traveling with you are indicated in the
exterior mirror if they are classified as critical
for a lane change. All vehicles detected by
side assist are indicated by the time they en
ter your "blind spot", at the latest.
© Vehicles left behind
If you slowly pass a vehicle that side assist has
detected (the difference in speed between the
vehicle and your vehicle is less than 9 mph
(15 km/h)), the display in the exterior mirror
turns on as soon as the vehicle enters your blind spot.
The display wi ll not turn on if you quickly pass
a vehicle that side assist has detected (the dif
ference in speed between the vehicle and your
vehicle is greater than 9 mph (15 km/h)).
Functional limitations
The radar sensors are designed to detect the
left and right adjacent lanes when the road
lanes are the normal width. In certain situa
tions, the display in the exterior mirror may
turn on even though there is no vehicle locat ed in the area that is critical for a lane change.
For example:
- if the lanes are narrow or if your are driving
on the edge of your lane. If this is the case,
the system may have detected the vehicle in
another lane that is
not adjacent to your
current lane .
- if you are driving through a curve. Side assist may react to a vehicle that is one lane over
from the adjacent lane .
- if side assist reacts to other objects (such as
high or displaced guard rails).
- In poor weather conditions. The side assist
functions are limited.
Do not cover the radar sensors
c::> fig. 82 with
stickers, deposits, bicycle wheels or other ob
jects, because this will affect the function. Do
not use side assist when towing a trailer . For
information on cleaning, refer to
c::> page 170 .
&_ WARNING
-Always pay attention to traffic and to the
area around your vehicle. Side assist can
not replace a driver's attention. The driv
er alone is always responsible for lane
changes and similar driving maneuvers.
Page 79 of 258
M N M N
0 ::i co
rl I.O
"' rl
"' rl
-Improper reliance on the side assist sys
tem can cause collisions and serious
personal injury:
- Never rely only on side assist when
changing lanes.
- Always check rear view mirrors to make
sure that it is safe to change lanes.
- Side assist cannot detect all vehicles un
der all conditions- danger of accident!
- Please note that side assist indicates
there are approaching vehicles, or
vehicles in your blind spot, only after
your vehicle has reached a driving speed
of at least 19 mph (30 km/h).
- In certain situations, the system may not
function or its function may be limited.
For example:
- if vehicles are approaching or being left
behind very quickly. The display may
not turn on in time.
- in poor weather conditions such as
heavy rain, snow or heavy mist .
- on very wide lanes, in tight curves or if
there is a rise in the road surface .
Vehicles in the adjacent lane may not
be detected because they are outside
of the sensor range.
(D Note
The sensors can be displaced by impacts or
damage to the bumper, wheel housing and
underbody. This can affect the system .
Have your authorized Audi dealer or au
thorized Audi Service Facility check their
function.
(D Tips
- If the window glass in the driver's door
or front passenger's door has been tint
ed, the display in the exterior mirror may be misinterpreted.
- For Declaration of Compliance to United
States FCC and Industry Canada regula
tions~
page 240.
Audi side assist 77
Activating and deactivating
App lies to vehicles: wit h Aud i side ass ist
Fig. 83 Driver's door: Side assist bu tto n
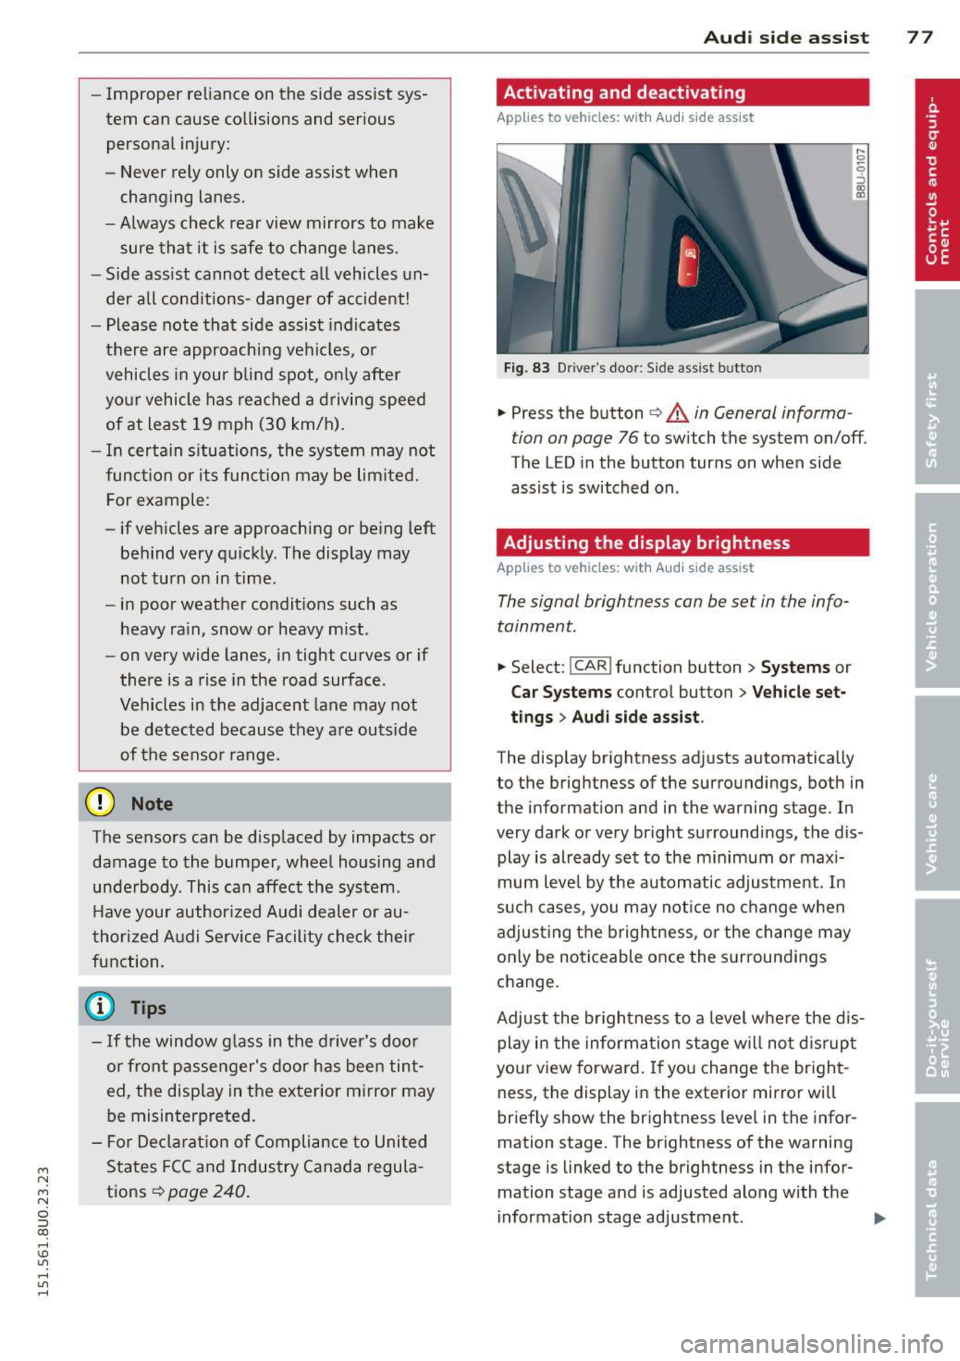
.,. Press the button ~ A in General informa
tion on page 76
to switch the system on/off.
The LED in the button turns on when side
assist is switched on .
Adjusting the display brightness
Applies to vehicles: wit h Aud i side ass ist
The signal brightness can be set in the info
tainment.
.,. Select: !CAR ! function button > Systems or
Car Systems control button > Vehicle set
tings
> Audi side assist .
The display brightness adjusts automatically
to the brightness of the surroundings, both in
the information and in the warning stage . In
very dark or very bright surroundings, the dis play is already set to the minimum or maxi
mum level by the automatic adjustment. In
such cases, you may notice no change when
adjusting the brightness, or the change may
only be noticeable once the surroundings
change.
Adjust the brightness to a level where the dis
play in the information stage will not disrupt
your view forward.
If you change the bright
ness, the display in the exterior mirror will
briefly show the brightness leve l in the infor
mation stage. The brightness of the warning
stage is linked to the brightness in the infor
mation stage and is adjusted along with the
information stage adjustment . .,,.
Page 89 of 258
M N
M N
0 ::i co ,...., \!) 1.1"1 ,...., 1.1"1 ,....,
Parking systems
General information
App lies to vehicles: with rea r parking sys te m /pa rk in g sys
tem plus w ith rear view camera
Depending on your vehicle's equipment, vari
ous parking a ids w ill help you when parking
and maneuvering.
The
r ea r pa rk ing sys te m is an audible parking
aid that warns you of obstacles
behind the ve
hicle
¢ page 88 .
The p ark in g syste m plus assists you when
parking by audibly and visually indicat ing ob
jects detected
in front of and behind the vehi
cle
¢ page 88.
The re ar view ca mera shows the area behind
the veh icle in the Infotainment d isplay. This
display assists you when you are c ross or par
allel parking ¢
page 89. In addition , you are
assisted by the functions from the parking
system plus
q pag e 88.
A WARNING
-Always look for traffic and check the area
around your vehicle by looking at it di
rect ly as well. The parking system cannot
replace the driver's attent ion. The driver
is always respons ible for safety during
park ing and for all other maneuvers .
- Please note that some surfaces, such as
clothing, are not detected by the system .
- Sensors and cameras have blind spots in
wh ich people and objects cannot be de
tected . Be especially cautious of children
and animals.
- The sensors can be displaced by impacts
or damage to the radiato r grille, bumper ,
wheel housing and the underbody . The
par king systems may become impaired
as a result. Have your authorized Audi
dealer or qualified workshop check their
function.
- Make su re the sensors are not covered by
stickers, deposits or any other obstruc
tions as it may impair the sensor func
tion . For information on cleaning, refer
to
¢ page 170.
Par king system s 87
@ Note
-Some objects are not detected by the
system under certain circumstances :
- Objects such as barrier chains, trailer draw bars, vertical poles or fences
- Objects above the sensors such as wall extensions
- Objects w ith specific surfaces or struc
tures such as chain link fences or pow
der snow .
- If you continue driving closer to a low -ly
ing object, it may disappear from the
sensor range. Note that you w ill no lon
ger be warned about this obstacle.
(D Tips
- T he system may provide a warning even
though there are no obstacles in the cov
erage area i n some situations, such as:
- certain road surfaces or for long grass.
- externa l ultrasonic sources e .g . from
cleaning vehicles.
- heavy rain, snow or thick vehicle ex
ha ust.
- We recommend tha t you prac tice park
ing in a traffic-free location or par king
lot to become familiar with the system.
When doing this, there should be good
light and weather cond itions.
- You can change the vo lume and pitch of
the signals as we ll as the disp lay
¢ page 93.
-Please refer to the instructions for tow
ing a trailer
¢ page 93.
-What appears in the infotainment dis
play is somewhat time-delayed .
Page 92 of 258
90 Parking systems
General information
Applies to vehicles: with park ing system p lus with rear
view camera
0
~ CX) ID
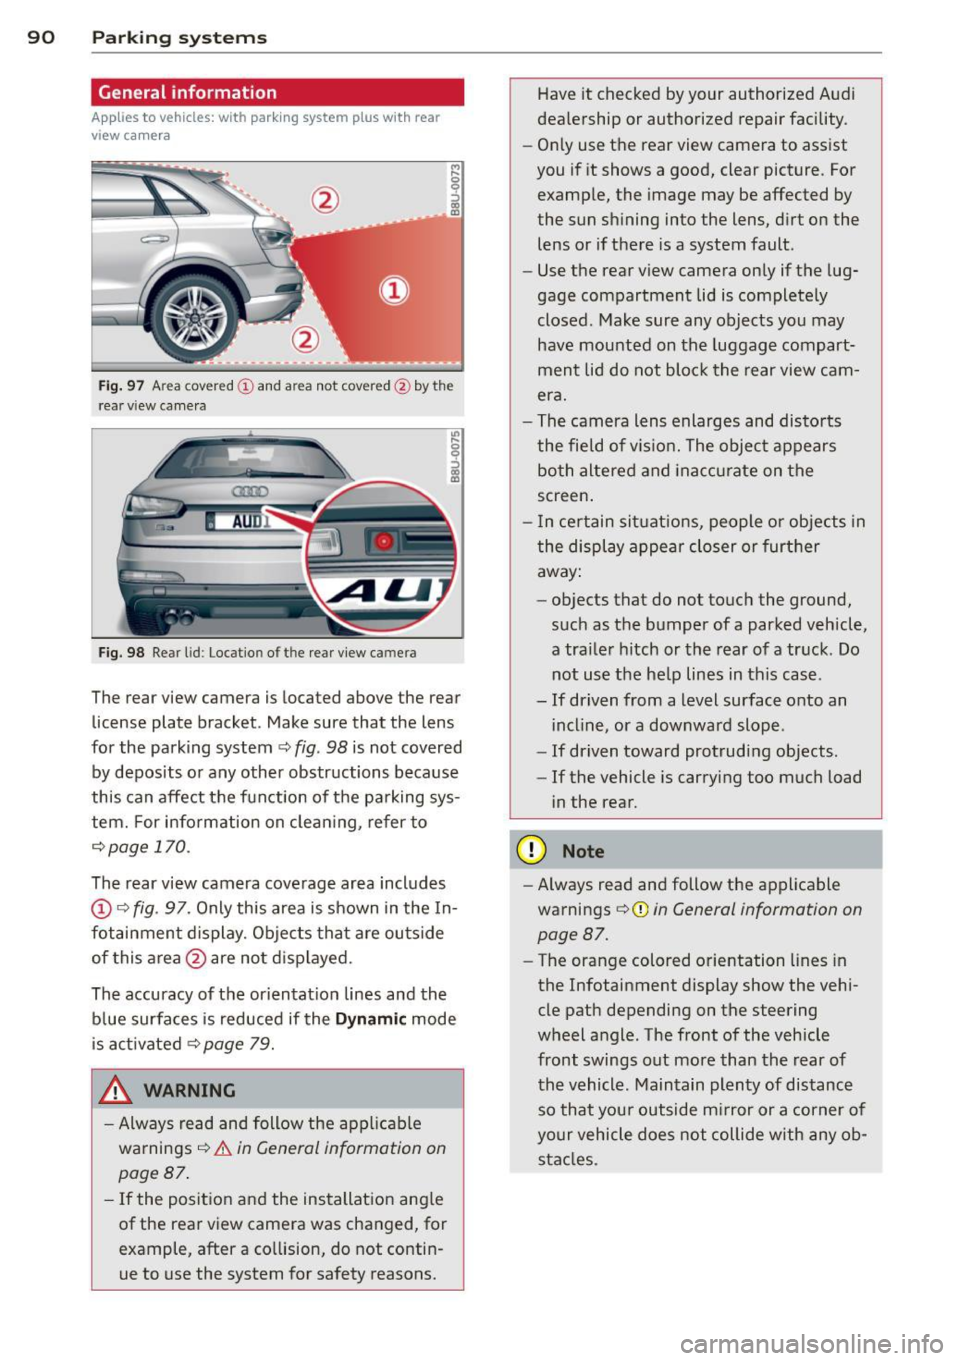
Fig. 97 Area covere d (!) and area not covered @by the
r ea r view came ra
Fig. 98 Re ar lid: Locatio n of the rear view camera
The rear view camera is located above the rear
license plate bracket . Make sure that the lens
for the parking system~
fig. 98 is not covered
by deposits or any other obstructions because
this can affect the function of the parking sys
tem. For info rmation on cleaning, refer to
¢page 170.
The rear view camera coverage area includes
@Q fig. 97. Only this area is shown in the In
fotainment display. Objects that are outside
of this area @are not displayed.
The accuracy of the orientation lines and the blue surfaces is reduced if the
Dynamic mode
is activated
~ page 79.
.&, WARNING
-Always read and follow the applicable
warnings ¢_&.
in General information on
page 87.
- If the position and the installation angle
of the rear view camera was changed, for example, after a collision, do not contin
ue to use the system for safety reasons. Have
it checked by your authorized Audi
dealership or authorized repair facility .
- Only use the rear view camera to assist
you if it shows a good, clear picture . For
example, the image may be affected by
the sun shining into the lens, dirt on the
lens or if there is a system fault.
- Use the rear view camera only if the lug
gage compartment lid is completely
closed . Make sure any objects you may
have mounted on the luggage compart
ment lid do not block the rear view cam
era.
- The camera lens enlarges and distorts
the field of vision. The object appears both altered and inaccurate on the
screen.
- In certain situations, people or objects in
the display appear closer or further
away:
- objects that do not touch the ground,
such as the bumper of a parked vehicle,
a trailer hitch or the rear of a truck . Do
not use the help lines in this case .
- If driven from a level surface onto an incline, or a downward slope .
- If driven toward protruding objects .
- If the vehicle is carrying too much load
in the rear.
(D Note
-Always read and follow the applicable
warnings ¢(I)
in General information on
page 87.
- The orange colored orientation lines in
the Infotainment display show the vehi
cle path depending on the steering
wheel angle . The front of the vehicle
front swings out more than the rear of
the vehicle . Maintain plenty of distance
so that your outside mirror or a corner of
your vehicle does not collide with any ob
stacles .
Page 128 of 258
126 Airbag sys te m
turned off , and PASSENGER AIR BAG OFF
will stay on.
Repair, care and disposal of the airbags
Parts of the a irbag system are installed at
many different places on your Audi. Installing,
removing, servicing or repairing a part in an
area of the vehicle can damage a part of an
a irbag system and prevent that system from
wo rking prope rly in a co llision.
There are some important things you have to know to make sure that the effect iveness of
the system will not be impa ired and that dis
carded components do not cause injury or po l
l ute the env ironme nt.
& WARNING
Imprope r ca re, servicing and repair proce
dures can increase the risk of personal in
jury and death by preventing an airbag from deploy ing when needed or deploying
an airbag unexpected ly:
- Never cover, obstr uct, o r change the
steering wheel horn pad or airbag cover
or the instrument pane l or modify them
in any way .
- Never attach any objects such as cu pholders or telephone mountings to the
surfaces covering the airbag units.
- For cleaning the horn pad or instrument
pane l, use only a soft, dry cloth or one
moistened w ith plain wate r. Solvents or
cleaners co uld damage the airbag cover
or change the stiffness o r strength of the
material so that the airbag cannot de
ploy and p rotect properly.
- Never repa ir, adjust, or change any parts
of the airb ag sy stem.
- All wo rk on the ste ering wheel, inst ru
me nt pane l, front sea ts or elec trical sys
tem (incl uding the installation of au di o
equipment, ce llular telephones and CB
radios, etc.) must be performed by a
qualifie d technician who has the t raining
and special equipment necessary. -
For any wo rk on the airbag system, we
strongly recommend that yo u see y our
author ized Audi dealer or qualified work
shop.
- Never modify the front b umper or parts
of the vehicle body .
- Always make sure that the s ide airbag
can inflate without interference:
- Never ins tall seat covers or re place
ment uphols te ry over the fron t seat
ba cks tha t have not been specifically
approved by Audi.
- Never use addi tional seat c ushio ns th at
cove r the areas where the si de a irbags
inflate .
- Dam age to the orig inal se at cove rs or
to the seam in the area of the side a ir
bag module must a lways be repaired
immediately by an author ized Audi
dealer.
- The airbag system can be activated only
once. After an airbag has in flated, it
m ust be replaced by an authorized Aud i
dealer or qualified technician w ho has
the techn ical information , training and
specia l equipm ent necessary .
- The airbag system can be deployed only
once . After an airbag has been deployed,
it must be re placed wit h new replac e
men t pa rts designed and ap proved espe
ci ally f or you r A udi model version. Re
p lacement of complete airbag systems
or airbag components must be pe r
formed by qualified workshops on ly .
Make sure that any airbag serv ice action
is entered in your Audi Warranty
& Main
tenance booklet under
AIRBAG REPLACE
MENT RECORD .
@ For the sake of the environment
Undeployed airbag modules and p reten
s ione rs might be classified as Perchlorate
Materia l -special handling may app ly, see
www .dtsc .ca.gov/hazardouswaste/per-
ch lo rate . When the veh icle or parts of the
r est raint system including airbag modu les
liJI,
Page 155 of 258
M N
M N
0 ::i co ,...., \!) ..,.,
,...., ..,., ,....,
@ Tips
Your vehicle may be equipped with Audi
connect. Your use of certain Aud i connect
features req uires wireless serv ices that are
provided by a third party wireless telecom
municat ions provider. For details regard
ing how information obtained through
Aud i connect is collected, processed,
transmitted, used, and shared, please see
your contra ct w ith the wire less telecom
municat ions provider and the "About A udi
connect" tab in your vehicle's MMI:
!MENU !
button > Audi connect > About Audi con·
nect .
Electronic Stabilization
Control (ESC)
Description
ESC helps to improve road holding and vehicle
dynamics to help reduce the probability of
skidd ing and loss of veh icle control. It works
only when the eng ine is running. ESC detects
certain difficult driv ing s ituations, including
when the vehicle is beginning to spin (yaw) out of cont ro l and helps you to get the vehicle
back under control by select ively brak ing the
wheels, and/or red ucing engine powe r and
p roviding steering assistance to help hold the
ve hicle on the driver's intended course . The in
dicator light
m in the instrument cluster
blinks when ESC is taking action to help you
control the vehicle.
ESC has limitations.
It is important to remem
ber that ESC cannot overcome the laws of
phys ics. It will not a lways be able to help out
under all conditions you may come up against.
For example, ESC may not always be able to
h elp you master situat ions where there is a
sudden change in the coefficient of fr iction of
the road surface. When there is a sect io n of
d ry road that is s udden ly cove red with water,
slush o r snow, ESC canno t perform the same
way it would on the dry su rface.
If the vehicle
hydroplanes (rides on a c ush ion of wate r in
stead of the road surface), ESC wi ll not be
ab le to he lp you steer the veh icle because con-
Int ellig ent technolog y 153
tact with the pavement has been interrupted
and the vehicle cannot be braked or steered .
D uring fast corner ing, particular ly on wind ing
roads, ESC cannot always deal as effectively
with difficult dr iv ing s ituations than at lower
speeds. When towing a trailer, ESC is not able
to help you regain control as it would if you
were not tow ing a trailer.
Always adjust your speed and driving style to road, traffic and weather conditions . ESC can
not override the vehicle's physical lim its, in
crease the availab le tract ion, or keep a veh icle
o n the road if road departu re is a result of
driver ina ttent io n. Instead , ESC imp roves the
poss ibility of keep ing the vehicle under con
trol and on the road during extreme maneu
vers by using the driver's steering i nputs to
help keep the vehicle go ing in the intended di
rect ion. If you are traveling at a speed that
causes you to run off the road before ESC can
provide any assistance, you may not experi
ence the benefits of ESC.
ESC includes and/or works together with the
anti-lock brake system (ABS), brake ass ist sys
tem, ant i-slip regu lation (ASR), electron ic dif
ferential lock (EDL), electron ic interaxle d iffe r
ential lock*/se lective wheel torque co ntrol*
and hill descent assist. ESC is swit ched on a ll
the time. In ce rtain sit uat io ns when yo u need
less traction, you can sw itch off ASR by press
ing the b utton
[fil ¢ page 155, fig. 13 7. Be
s u re to switch ASR on again when you no lon
ger need less traction .
Anti-lock braking system (ABS )
ABS prevents the whee ls from locki ng up
when b raking. The vehicle can st ill be stee red
even during hard braking . App ly steady pres
su re to the brake peda l. Do not pump the ped
al. A pulsing in the brake pedal indicates that
the system is helping you to brake the vehicle.
Brake a ssis t sy ste m
The brake ass ist system can decrease braking
distance . It increases braking power when the
driver presses the brake peda l quickly in emer
gency s ituations. You must press and hold the
brake pedal unti l the situation is over. .,,.
•
•
Page 156 of 258
154 Intellig ent technolog y
Anti-slip r egulation (ASR )
ASR reduces engine power when the drive
wheels begin to spin and adapts the force to
the road conditions. This makes it easier to
start, accelerate and drive up hills.
Electronic diffe rential lock (EDL )
The ED L brakes wheels that are spinn ing and
transfers the drive power to the o ther d rive
wheel or whee ls if the vehicle is equipped with
all-wheel drive* . This function is available up
to about 60 mph (100 km/h).
I n extreme cases , ED L automat ica lly switches
off to help keep the brake on the braked whee l
from overheating . EDL wi ll switch on again au
tomatically when conditions have returned to normal.
El ectron ic inte ra xle diff ere ntial lock */
se lec tive wheel t orque contr ol*
The electronic interaxle differential lock (front
wheel drive) or the select ive wheel torque
control (all-wheel drive) operates when driv
ing through curves. The front wheel on the in·
side of the curve or both wheels on the inside
of the curve are braked select ively as needed .
This minimizes s lid ing in the front wheels a nd
allows for more p rec ise driving through
curves. The app licab le system may not acti
vate when driving in wet or snowy conditions .
A WARNING
-ESC, ABS, ASR, EDL, the electronic inter
axle differentia l lock* /selective whee l
torque control* and the hill descent as
sist cannot overcome the laws of physics.
Th is is especially important on slippery
o r wet roads . If the systems begin acting to stabilize your vehicle, you should im
mediately change your speed to match
the road and traffic conditions. Do not let the increased safety provided by
these systems tempt you to take r isks .
Doing so will increase the risk of a loss of
veh icle cont ro l, collision and ser ious per
sonal injur ies.
- Always adapt your speed to road, traffic
and weather conditions. The risk of los
ing control of the vehicle increases when
driving too fast , espec ially through
curves and on slippery or wet roads, and
when driving too close to vehicles up
ahead. ESC, ABS, the brake ass ist sys
tem, ASR, EDL and the electronic inter
axle d ifferential lock*/selective wheel
torque control* cannot prevent colli
sions .
- Always accelerate with special care on
even, smooth surfaces such as those that
are wet or covered with ice and snow .
The drive wheels can spin even w ith
these assistance systems t hat cannot al
ways he lp to reduce the risk of loss of ve
hicle control.
(D Tips
- ABS and ASR only wo rk correct ly when
all four wheels are equipped with identi
cal tires. D ifferent tire sizes can lead to a
reduction in engine power.
- You may hear noises when the systems
described are working .
-If the ind icator light DJ or Ell (USA
mode ls)/ lCO)J
page 16.
Page 199 of 258
M N
M N
0 ::i co ,...., \!) 1.1"1 ,...., 1.1"1 ,....,
Tires and wheels 197
Gross Vehicle Weight Rating ("GVWR") Ply
means the maximum total loaded weight of
the vehicle .
Groove
means the space between two adjacent tread
ri bs.
Load rating (code)
means the maximum load that a tire is rated
to carry for a given inflat ion pressure . You
may not find this informat ion on all tires be
cause it is not requ ired by law.
Maximum load rating
means the load rating for a t ire at the max i
mum permissible inflation pressure for that
tire .
Maximum loaded vehicle weight
means the sum of:
(a) Curb weight
(b) Accesso ry weight
(c) Vehicle capacity weight, and
(d) Production opt ions we ight
Maximum (permissible) inflation pressure
means the maximum co ld inf lation pressure
to which a tire may be inflated . Also called
"maximum inflation pressure."
Normal occupant weight
means 150 lbs . (68 kilograms) times the
number of occupants seated in the vehicle up
to the tota l seating capacity of your vehicle.
Occupant distribution
means distribution of occupants in a veh icle.
Outer diameter
means the overall diameter of an inflated new
tire .
Overall width
means the linear distance between the exteri
ors of the sidewalls of an inflated tire, includ
ing e levations due to labeling, decorations, or
protective bands or ribs. means a layer of
rubber-coated parallel cords.
Production options weight
means the combined weight of those installed
regular production opt ions we ighing over 5
lbs. (2.3 kg) in excess of those standa rd items
which they replace, not previously considered
in curb weight or accessory weight, including
heavy duty brakes, ride levelers, roof rack,
heavy duty battery, and spec ial trim.
Radial ply tire
means a pneumatic tire in which the ply cords
that extend to the beads are laid at substan
tially 90 degrees to the centerline of the
tread.
Recommended inflation pressure
see r::!;> page 196, Cold tire inflation pressure .
Reinforced tire
means a tire design to operate at higher loads
and at higher inflation pressures than the cor
responding standard tire. Reinforced tires
may be identified as "XL", "xl", "EXTRA LOAD",
or "RF" on the sidewal l.
Rim
means a metal support for a tire or a t ire and
tube assembly upo n which the tire beads are
seated .
Rim diamete r
means nominal diameter of the bead seat. If
you change your wheel s ize, you wi ll have to
purchase new tires to match the new r im di
ameter .
Rim size designation
means rim diameter and width.
Rim width
means nominal distance between rim flanges.
Sidewall
means that portion of a t ire between the
tread and bead .
•
•
Page 202 of 258
200 Tires and wheels
you have stored. The system does not recog
nize the load condition of your vehicle.
The effectiveness of the tire pressure monito r
ing system* will be impaired if you store nor
mal load pressures but then operate the vehi
cle at its maximum load¢.&. .
See the illustration¢
fig. 152 for the location
of the label on driver's side 8-pillar (color of
the actua l label and exact location on the ve
hicle wi ll vary slightly).
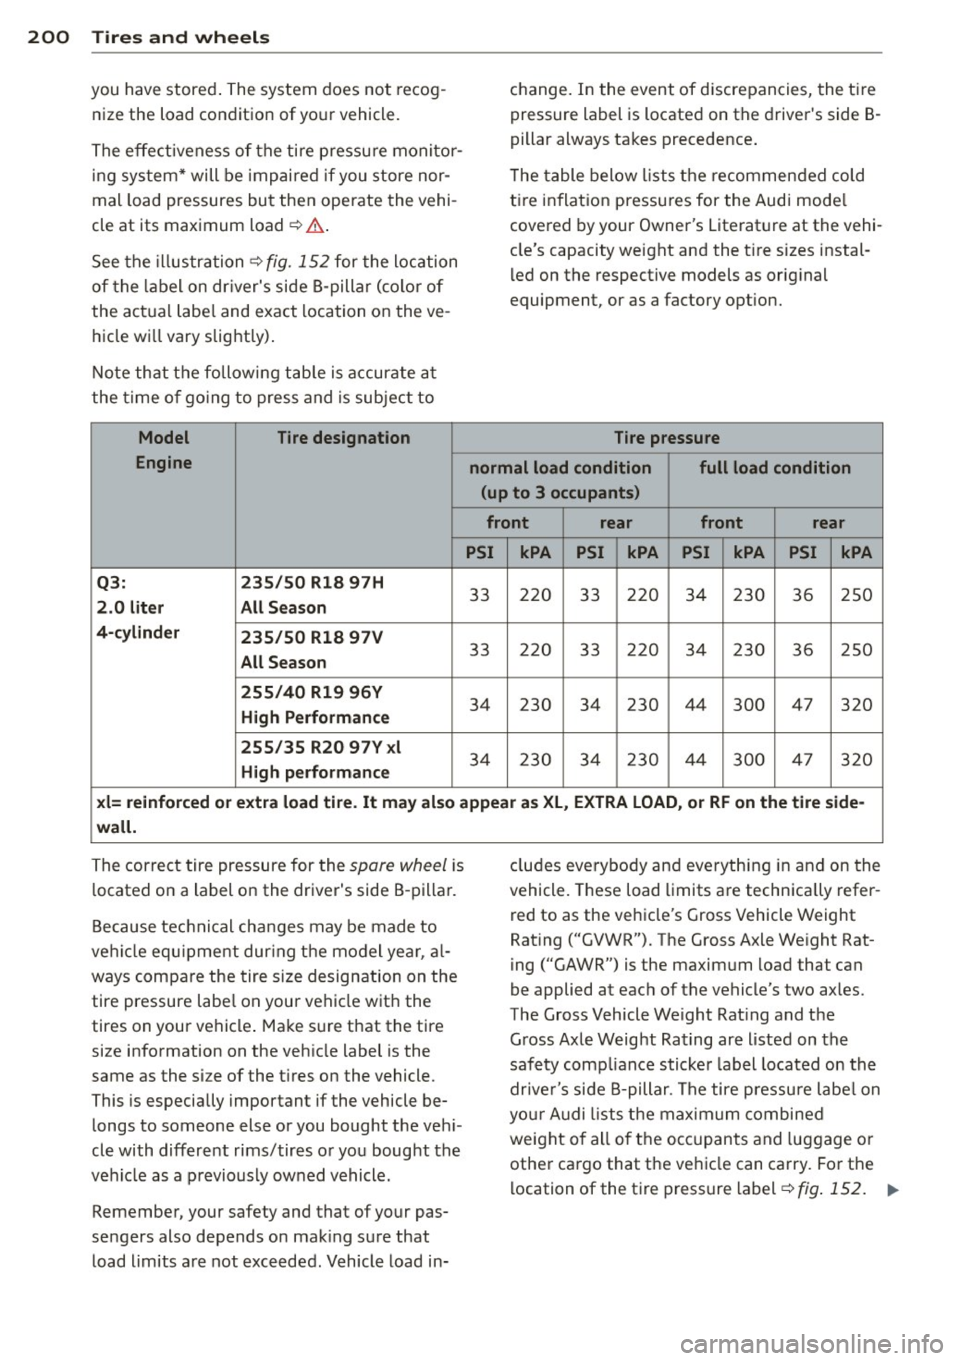
Note that the following table is accurate at
the time of going to press and is subject to
Model Tire designation
Engine
Q3: 235/50
Rl8 97H
2.0 liter All Season
4 -cylinder
235/50 Rl8 97V
All Season
255/40 Rl9 96Y
High Performan ce
255/35 R20 97Y xl
High performance
change. In the event of discrepancies, the tir e
pressure label is located on the driver's side 8-
pillar always takes precedence.
T he table below lists the recommended cold
ti re inflation pressures for the Audi mode l
covered by your Owner's Literature at the vehi
cle's capacity weight and the t ire sizes instal
l ed on the respective models as original
equipment, or as a factory option.
Tire pressure
normal load condition full load condition (up to 3 occupants)
front rear front rear
PSI kPA PSI kPA PSI kPA PSI kPA
33 220 33 220 34 230 36 250
33 220 33 220 34 230 36 250
34 230 34
230 44
300 47
320
34 230 34 230 44 300 47 320
xl= reinforced or extra load tire. It may also appear as XL, EXTRA LOAD, or RF on the tire side-
wall.
The correct tire pressure for the spare wheel is
located on a label on the driver's side 8 -pillar.
Because technical changes may be made to
vehi cle equipment dur ing the model year, al
ways compare the tire size designation on the
tire pressure labe l on your vehicle with the
tires on your vehicle . Make sure that the tire
size information on the veh icle label is the
same as the size of the t ires on the vehicle.
This is especially important if the vehicle be
longs to someone else or you bought the vehi
cle with different rims/tires or you bought the
vehicle as a previously owned vehicle.
Remember, your safety and that of your pas
sengers also depends on mak ing sure that
load limits are not exceeded . Vehicle load in- eludes
everybody and everything in and on the
vehicle. These load limits are technically refer
red to as the vehicle's Gross Vehicle Weight
Rat ing ("GVWR"). The Gross Axle We ight Rat
ing ("GAWR") is the maximum load that can
be applied at each of the vehicle's two axles.
The Gross Vehicle Weight Rating and the
Gross Axle Weight Rating are listed on the
safety compliance sticker label located on the
dr ive r's side 8-pillar. The tire pressure labe l on
you r Audi lists the max imum combined
weight of all of the occupants and luggage or
other cargo that the ve hicle can carry. For the
location of the tire pressure label
~fig . 152. .,..
Page 205 of 258
M N
M N
0 ::i co ,...., \!) ..,.,
,...., ..,., ,....,
-If the ti re is not flat and y ou do not have
to change a wheel immed iate ly, drive at
reduced speed to the nearest service sta
t ion to check the tire pressure and add
air as required.
(D Note
Dr iving without va lve stem caps can cause
damage to the t ire va lves . To prevent this,
always make sure that factory installed
valve stem caps on all wheels are secu re ly
mounted on the va lve .
@) For the sake of the environment
Underinflated tires will a lso increase the
fue l consumption.
Tires and vehicle load limits
There are limits to the amount of load or
weight t hat any veh icle and any t ire ca n car ry.
A vehicle that is overloaded w ill not handle
well and is more difficult to stop. Overload ing
can not on ly lead to loss of vehicle contro l,
but can a lso damage important parts of the
vehicle and can lead to sudden tire failure, in
cluding a blowout and sudden deflation that
can cause the ve hicle to crash.
Your safety and that of yo ur passenge rs a lso
depends on making sure th at load limits are
no t exceeded. Vehicle load includes everybody
and everyth ing in and on the vehicle. These
load limits a re tech nica lly referred to as the
ve hicle's
Gross Veh icle Weight Rating
("GVWR").
The "GVWR" includes the we ight of the basic
ve hicle, all factory installed accessories, a full
tank of f uel, oil, coo lant and othe r fluids plus
max imum load. The maximum load includes
the number o f passenger s that the ve hicl e is
intended to carry ("se ating capacity") w it h an
assumed weig ht o f 150 lbs. (68 kg) for each
passenger at a designated seating position
and the tota l weight of any luggage in the ve
h icle. If you tow a trailer, the weight of the
trailer hitch and the tong ue weight of the
Tire s an d wheel s 203
loaded tra ile r must be included as part of the
vehicle load .
T he
Gro ss Ax le Weight Rating (" GAWR") is
the max imum load th at can be applied at each
of the vehicle's two axles .
T he Gross Vehicle Weight Rat ing and t he
G ross Ax le Weig ht Ra ting are l iste d on the
s af ety comp liance s tic ke r la bel lo cated on the
driver's side 8 -pillar . Yo ur Audi has 5 seating
positions, 2 in the front and 3 in the rear fo r
total seating capacity of 5. Eac h seating posi
tion has a seat be lt
c::> page 104, Safety bel ts.
T he fac t that there is an upper limit to yo ur
vehicle's G ross Vehicle Weight Rating means
that the total weight of whatever is being car
ried in the vehicle ( includ ing the weight of a
trai ler hitch and the tongue weight of the
l oaded tra ile r) is lim ited . The more passen
gers in the vehicle or passe ngers w ho are
heavi er than the standard we ights assumed
mea n that less we ight can be ca rried as lug
gage.
T he t ire pressure label o n your Aud i also lis ts
the max imum combined weight of a ll of the
occupants and l uggage or o ther cargo t hat
the ve hicl e can carry . Fo r th e lo cat ion of the
l abel
c::> page 199, fig . 152.
A WARNING
-=
Overloading a vehicle can cause loss of ve -
h icle cont ro l, a c rash or other accide nt, se
rious pe rsonal injury, and even death.
- Ca rrying more we ight than your vehicle
was des igned to carry wi ll prevent the
veh icle from handling pr oper ly and in
crease the risk of the loss of vehicle con
trol.
- The brakes on a vehicle that has been
overloaded may not be able to stop the
ve hicle w it hi n a safe distance.
- Tires o n a vehicle that has been over load
ed can fail s uddenly, incl uding a blowout
a nd sudden defla tion, causing loss of
con trol an d a crash . ..,.
•
•