ECU AUDI Q3 2016 Owners Manual
[x] Cancel search | Manufacturer: AUDI, Model Year: 2016, Model line: Q3, Model: AUDI Q3 2016Pages: 252, PDF Size: 62.81 MB
Page 5 of 252
Safety belts . . . . . . . . . . . . . . . . . . . . . . . . 107
Belt tensioners . . . . . . . . . . . . . . . . . . . . . . 110
Airbag system ............... .... . 112
Important information . . . . . . . . . . . . . . . 112
Front airbags ...................... . 116
Monitoring the Advanced Airbag System . 122
Side airbags . . . . . . . . . . . . . . . . . . . . . . . . 126
Side curtain airbags . . . . . . . . . . . . . . . . . . 129
Child safety . . . . . . . . . . . . . . . . . . . . . . 132
Important information . . . . . . . . . . . . . . . 132
Child seats ............... ...... ... . 13 7
Securing child seats . . . . . . . . . . . . . . . . . . 141
LATCH system (Lower anchorages and
tethers for children) . . . . . . . . . . . . . . . . .
144
Addit ional information 149
Driver messages . . . . . . . . . . . . . . . . . 150
Intelligent Technology . . . . . . . . . . 150
Notice about data recorded by the Event
Data Recorder and vehicle control
modul es . . . . . . . . . . . . . . . . . . . . . . . . . . .
150
Electronic Stabilization Control ( ESC) . . . . 151
Brakes . . . . . . . . . . . . . . . . . . . . . . . . . . . . . 154
Electromechanical steering . . . . . . . . . . . . 156
All wheel drive (quattro) . . . . . . . . . . . . . . 156
Energy management . . . . . . . . . . . . . . . . . 157
Driving and the environment . . . . 159
Breaking in . . . . . . . . . . . . . . . . . . . . . . . . . 159
Avoid damaging the vehicle . . . . . . . . . . . 159
Catalytic converter . . . . . . . . . . . . . . . . . . . 159
Shutting down vehicle . . . . . . . . . . . . . . . . 160
Economical and environmentally-friendly
driving . . . . . . . . . . . . . . . . . . . . . . . . . . . .
160
Driving offroad . . . . . . . . . . . . . . . . . . . . . . 162
Trailer mode . . . . . . . . . . . . . . . . . . . . . 164
Driving with a trailer . . . . . . . . . . . . . . . . . 164
Trailer mode notes . . . . . . . . . . . . . . . . . . . 166
Operating instructions . . . . . . . . . . . 168
Care and cleaning . . . . . . . . . . . . . . . . 168
General information . . . . . . . . . . . . . . . . . 168
Car washes . . . . . . . . . . . . . . . . . . . . . . . . . 168
Cleaning and care information . . . . . . . . . 169
Table of contents
Fuel and Refueling . . . . . . . . . . . . . . .
173
Gasoline . . . . . . . . . . . . . . . . . . . . . . . . . . . 173
Refueling . . . . . . . . . . . . . . . . . . . . . . . . . . 17 4
Checking and Filling . . . . . . . . . . . . . 177
Hood . . . . . . . . . . . . . . . . . . . . . . . . . . . . . . 177
E ngine compa rtment . . . . . . . . . . . . . . . . . 179
Engine oil . . . . . . . . . . . . . . . . . . . . . . . . . . 179
Cooling system . . . . . . . . . . . . . . . . . . . . . . 183
Brake fluid . . . . . . . . . . . . . . . . . . . . . . . . . 186
Battery . . . . . . . . . . . . . . . . . . . . . . . . . . . . 187
Windshield washer system 190
Wheels ........ .. ................. 191
Wheels and Tires . . . . . . . . . . . . . . . . . . . . 191
Tire pressure monitoring system 208
Troubleshooting ............. .. .. 211
Emergency assistance . . . . . . . . . . . 211
General information . . . . . . . . . . . . . . . . . 211
Vehicle tool kit . . . . . . . . . . . . . . . . . . . . . . 211
Folding chocks . . . . . . . . . . . . . . . . . . . . . . 212
Removing the subwoofer............. . 212
Space-saving spare tire (compact spare
tire).. .. .. .. .. .. .. .... ... .. .. .. .. ..
212
Replacing wheels . . . . . . . . . . . . . . . . . . . . 213
Fuses and bulbs . . . . . . . . . . . . . . . . . . 219
Fuses. .... .. .. .. .. ....... ........ .. 219
Bulbs . . . . . . . . . . . . . . . . . . . . . . . . . . . . . . 221
Emergency s ituations . . . . . . . . . . . . 223
General . . . . . . . . . . . . . . . . . . . . . . . . . . . . 223
Starting by pushing or towing . . . . . . . . . . 223
Start ing with jumper cables ........... 223
Use of jumper cables . . . . . . . . . . . . . . . . . 224
Towing with a tow truck . . . . . . . . . . . . . . 225
Raising the vehicle . . . . . . . . . . . . . . . . . . . 227
Technical Data . . . . . . . . . . . . . . . . . . . 229
Technical data . . . . . . . . . . . . . . . . . . . . 22 9
Vehicle identification . . . . . . . . . . . . . . . . . 229
Weights . . . . . . . . . . . . . . . . . . . . . . . . . . . 229
D . . 1mens1ons
.. .. . ... ................ . 230
3
Page 30 of 252
Opening and closin g
(D Tips
- In the event of a crash with airbag deploy
ment all locked doors will be automat ica lly
unlocked to give access to the vehicle occu
pants from the outside.
- If the power locking system should mal
funct ion, you can lock the driver's door us
ing the ignit ion key
¢ page 32.
- If the power lock ing system should fail, you
can still open the fuel tank flap in an emer
gency ¢
page 176.
-You are well adv ised not to keep valuables
i nside an unattended vehicle, vis ible or not.
Even a properly locked vehicle cannot pro
v ide the secur ity of a safe .
- If the LED in the upper edge of the driver's
door panel comes on for about 30 seconds
after the vehicle is locked, there is a mal
funct ion in the power lock ing o r the anti
theft warning system. Have the malfunct ion
correc ted by an authorized Audi dea lership
or q ualified repair facility .
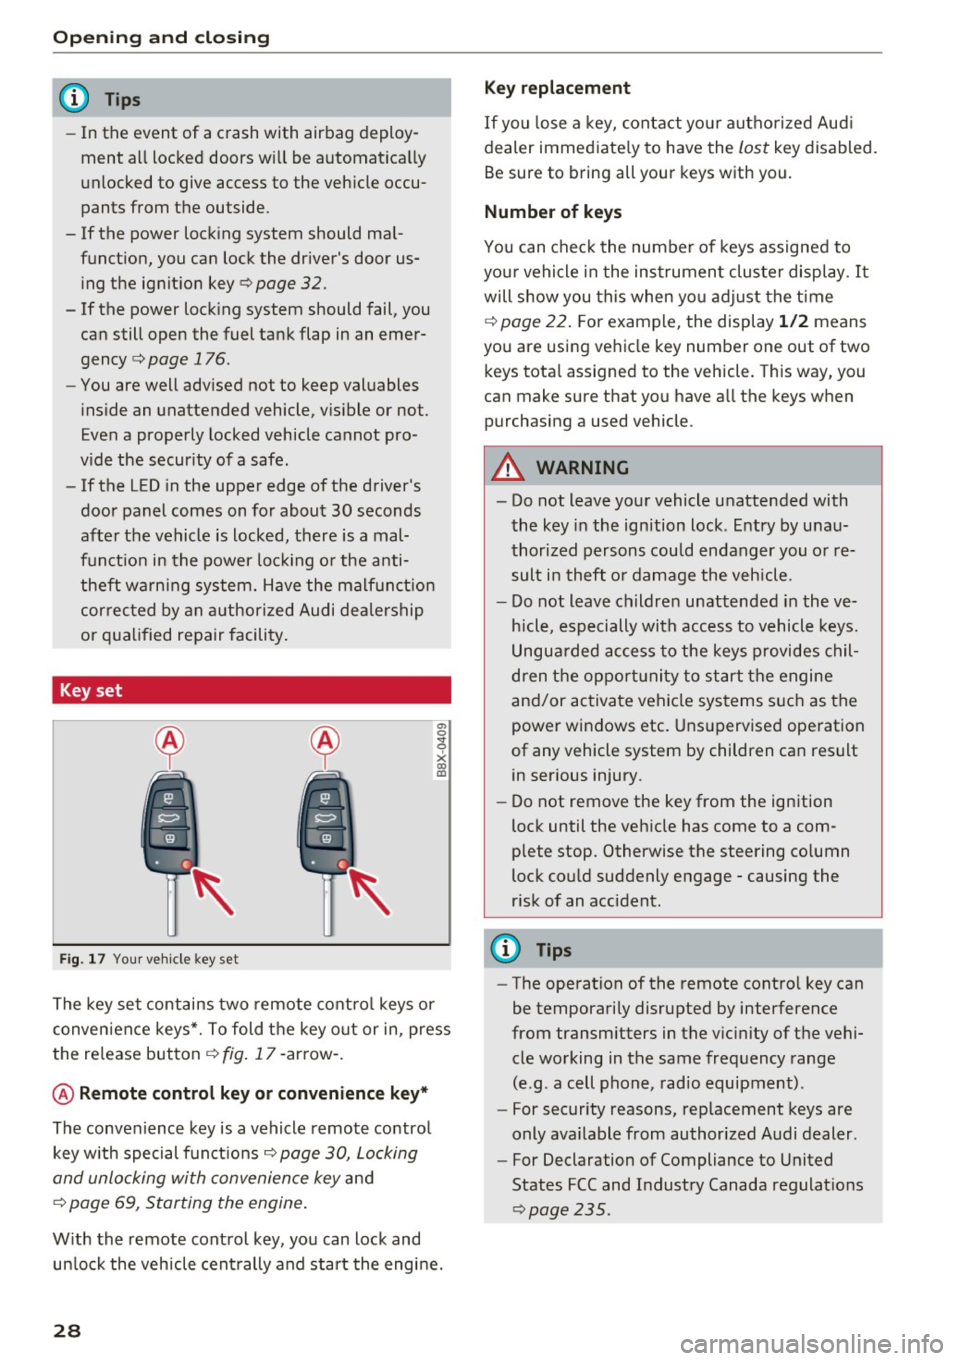
Key set
Fig . 17 You r ve hicle key set
a, 0
~
x (X) Cll
The key set contains two remote co ntro l keys or
conven ience keys*. To fold the key o ut or in, press
the re lease button
¢ fig . 17 -arrow -.
@ Remote control key or convenience key *
The convenience key is a vehicle remote contro l
key with special funct ions
Q page 30, Locking
and unlocking with convenience key
and
¢ page 69, Starting the engine .
With the remote control key, yo u can lock and
un lock the vehicle cent rally and start the engine.
28
Key replacement
If you lose a key, contact you r autho rized Aud i
dealer immed iate ly to have the
lost key disabled.
Be sure to bring all your keys w ith you.
Number of keys
You can chec k the numbe r of keys assigned to
you r vehicle in the ins trument cluster display .
It
will show you this when yo u adjust the t ime
¢
page 22. F or example, the display 1 /2 means
you are us ing vehicle key number one out of two
keys tota l assigned to the vehicle. This way, you
can make sure that you have a ll the keys when
purchasing a used vehicle .
.&, WARNING
-Do not leave your vehicle unatte nded with
the key in the ignition lock . E ntry by u nau
thori zed persons cou ld endanger you or re
sult in theft o r damage the vehicle.
- Do not leave childre n unattended i n the ve
h icle, especially with access to vehicle keys.
Ungua rded access to the keys provides chil
dren t he oppor tunity to start the engine
and/or activate vehicle systems s uch as the
power windows etc . Uns upervised ope ration
of any vehicle system by children can result in ser ious injury.
- Do not remove the key from the ign ition
lock until the veh icle has come to a com
plete stop. Otherwise the steering co lumn
lock cou ld suddenly engage -causing the
r isk of an accident.
(D Tips
- The operation of the remote contro l key can
be temporarily disrupted by interference
from transmitters in the v icinity of the vehi
cle working in the same frequency range
(e.g . a cell phone, radio equipment) .
- For security reasons, rep lacement keys are
only ava ilable from authorized Audi dealer .
- For Declaration of Compliance to United
States FCC and Industry Canada regulat ions
~ page 235.
Page 33 of 252
..... N
c:i ::J CX)
..... I.Cl U"I
N I.Cl ......
off unnecessary convenience functions. It is
possible that you will not be able to unlock
your vehicle using these convenience func tions .
- For Declaration of Compliance to United
States FCC and Industry Canada regulations
¢ page 235.
Locking and unlocking the vehicle from
inside
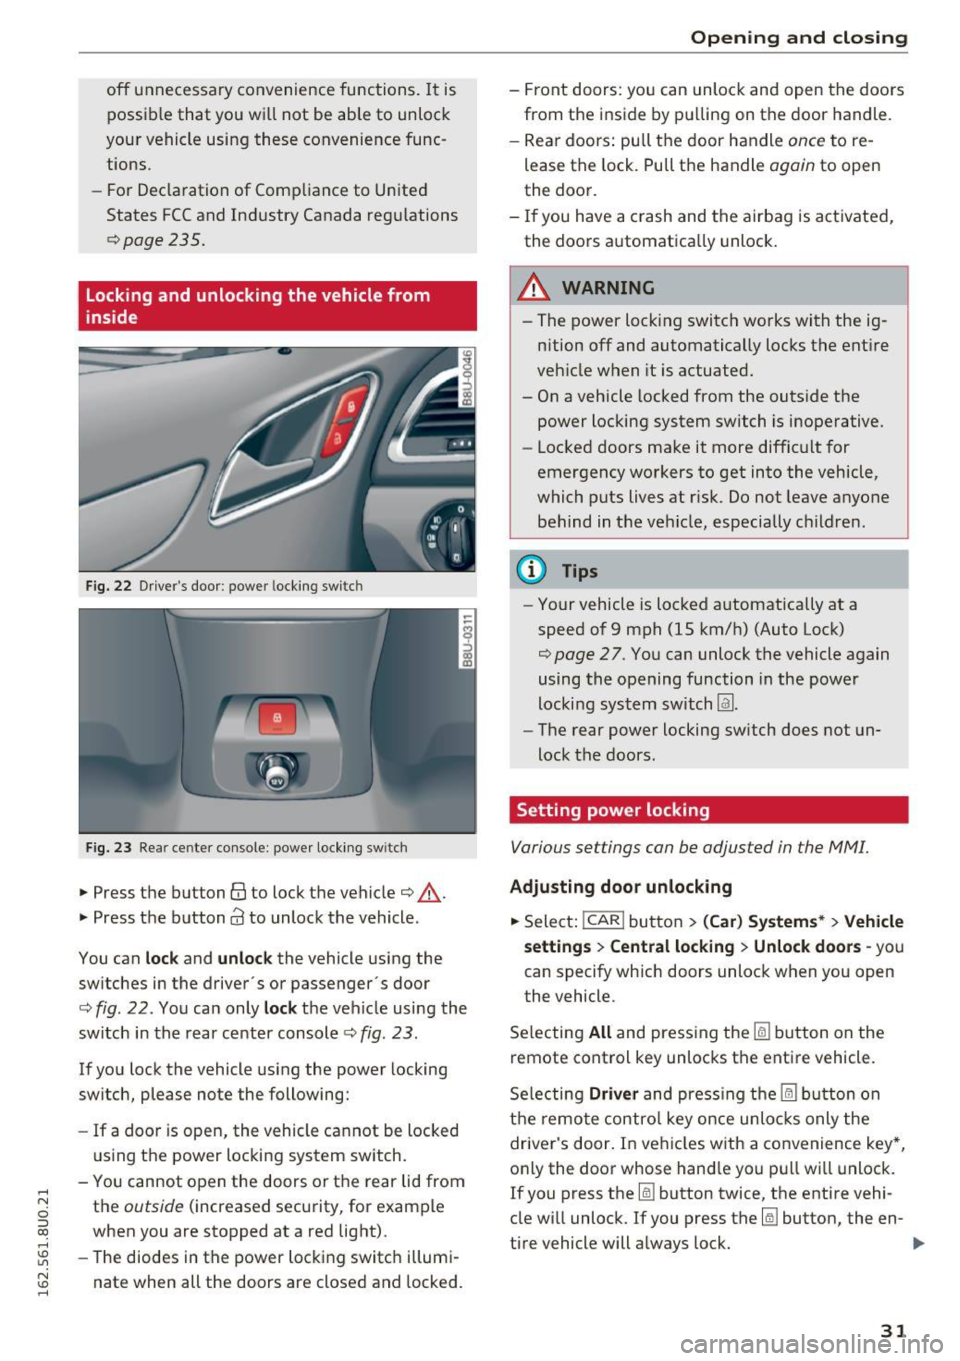
Fig. 22 Driver's door : power locking switc h
Fig. 23 Rear ce nter console: power locking switc h
• Press the button@ to lock the vehicle¢.&_.
• Press the button
Cd to unlock the vehicle .
You can
lock and unlock the vehicle using the
switches in the driver's or passenger· s door
¢
fig. 22. You can only lock the vehicle using the
switch in the rear center console
c:> fig. 23 .
If you lock the vehicle using the power locking
switch , please note the following:
- If a door is open, the vehicle cannot be locked
using the power locking system switch.
- You cannot open the doors or the rear lid from
the
outside (increased security, for example
when you are stopped at a red light).
- The diodes in the power locking switch illumi
nate when all the doors are closed and locked.
Opening and closing
-Front doors: you can unlock and open the doors
from the inside by pulling on the door handle.
- Rear doors: pull the door handle
once to re
lease the lock. Pull the handle
again to open
the door.
- If you have a crash and the airbag is activated,
the doors automatically unlock.
A WARNING
-- The power locking switch works with the ig-
nition off and automatically locks the entire
vehicle when it is actuated.
- On a vehicle locked from the outside the power locking system switch is inoperative.
- Locked doors make it more difficult for
emergency workers to get into the vehicle,
which puts lives at risk. Do not leave anyone
behind in the vehicle, especially children.
(D Tips
-Your vehicle is locked automatically at a
speed of 9 mph (1S km/h) (Auto Lock)
¢
page 27. You can unlock the vehicle again
using the opening function in the power
locking system switch
Im.
- The rear power locking switch does not un
lock the doors.
Setting power locking
Various settings can be adjusted in the MM!.
Adjusting door unlocking
• Select: !CAR ! button> (Car) Systems*> Vehicle
settings
> Central locking > Unlock doors -you
can specify which doors unlock when you open
the vehicle .
Selecting
All and pressing the~ button on the
remote control key unlocks the entire vehicle.
Selecting
Driver and pressing the~ button on
the remote control key once unlocks only the
driver's door. In vehicles with a convenience key*,
only the door whose handle you pull will unlock.
If you press the
[ru button twice, the entire vehi
cle will unlock. If you press the~ button, the en-
tire vehicle will always lock. ..,.
31
Page 55 of 252
.... N
c:i ::J CX)
.... I.Cl U"I
N I.Cl ......
Ashtray
Applies to vehicles: with ashtray
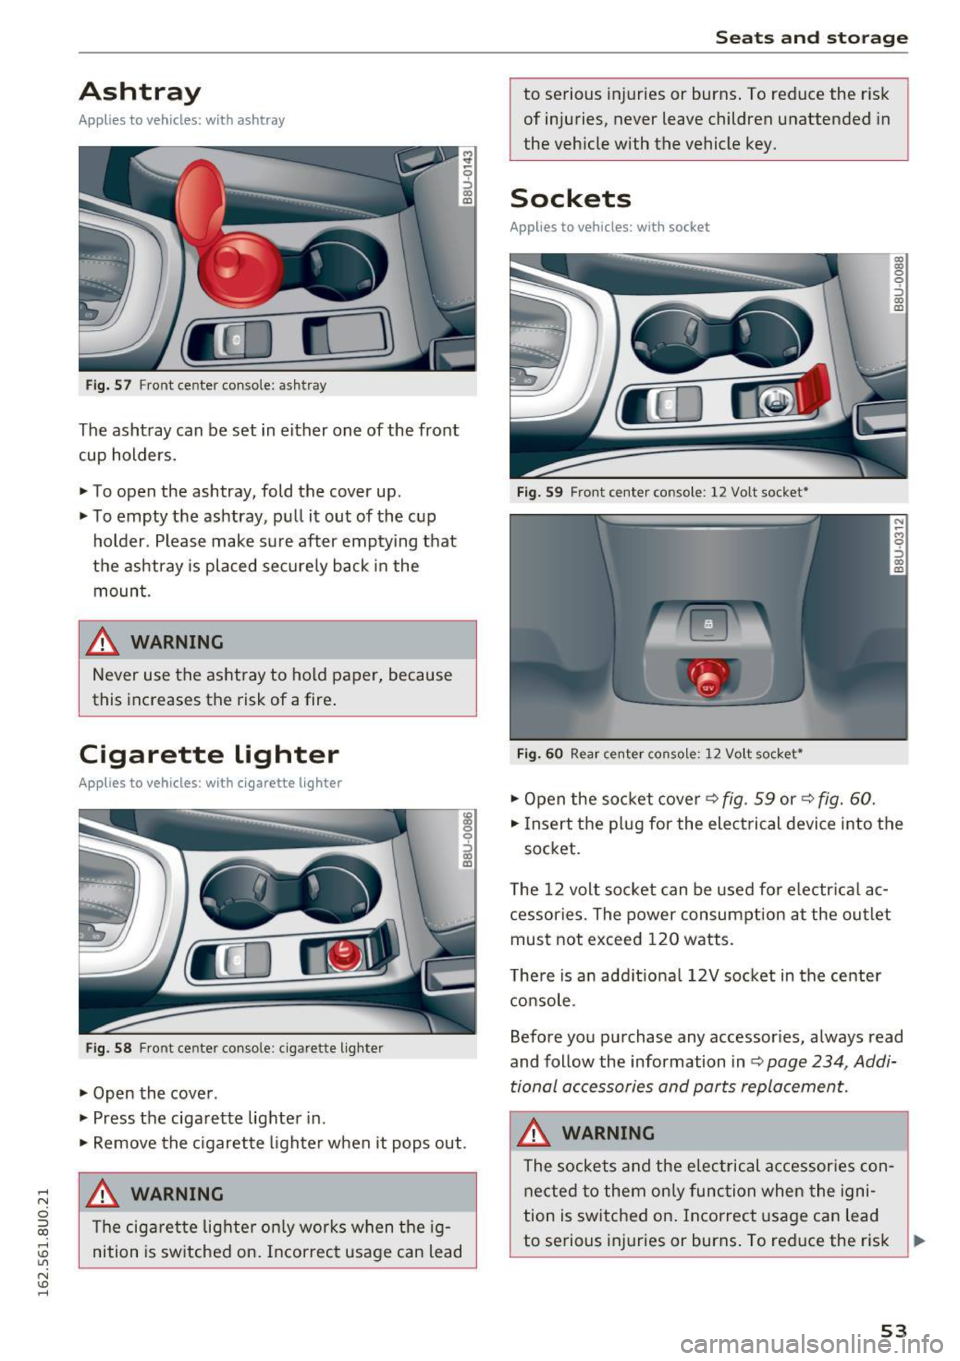
Fig. 57 Front center console: as htray
The ashtray can be set in either one of the front
cup holders.
~ To open the ashtray, fold the cover up.
~ To empty the ashtray, pu ll it out of the c up
holder . Please make sure after emptying that
the ashtray is placed securely back in the
moun t.
& WARNING
Never use the as htray to hold paper, because
this increases the risk of a fire .
Cigarette lighter
Applies to vehicles: with cigarette lighter
Fig. 58 Fr ont ce nter console: ciga rette lig hter
~ Open the cove r.
~ Press the ciga rette lighter in.
~ 9 ::::,
"' a,
~ Remove the c igarette lighter when it pops out .
& WARNING
The cig arette lig hter o nly wor ks w hen the ig
nition is sw itched on. Incorrec t usage can lead
Seats and storag e
to serious injuries or burns . To reduce the r is k
of injuries, never leave children unattended in
the veh icle with the vehicle key.
Sockets
Applies to vehicles: with socket
F ig . 59 Fro nt cente r conso le: 12 Vo lt socket•
Fi g. 60 Rea r ce nte r conso le: 12 Vo lt socket•
~ O pen the so cket cover~ fig . 59 or~ fig. 6 0.
~ 0
::> (10 m
~ Insert the p lug for the elect rical devi ce i nto the
socket.
T he 12 volt soc ket can be used fo r electr ical ac
cessories. The power consump tion at the ou tlet
mus t not exceed 120 watts.
T he re is a n add it iona l 12V soc ket in the center
c onsole .
Before you pu rchase any accessor ies, always read
and follow the information in
Q page 234, Addi
tional accessories and parts replacemen t.
& WARNING
The socke ts an d the e lec trical a ccessor ies con
ne cte d to them on ly func tion when the igni
tion i s switched on . Incorrect usage can lead
to se rious inj uries or burns . To reduce the risk ..,.
53
Page 59 of 252
.... N
c:i ::J CX)
.... I.Cl U"I
N I.Cl ......
Roof rack
Description and mounting locations
Additional cargo can be carried with a roof lug
gage rack.
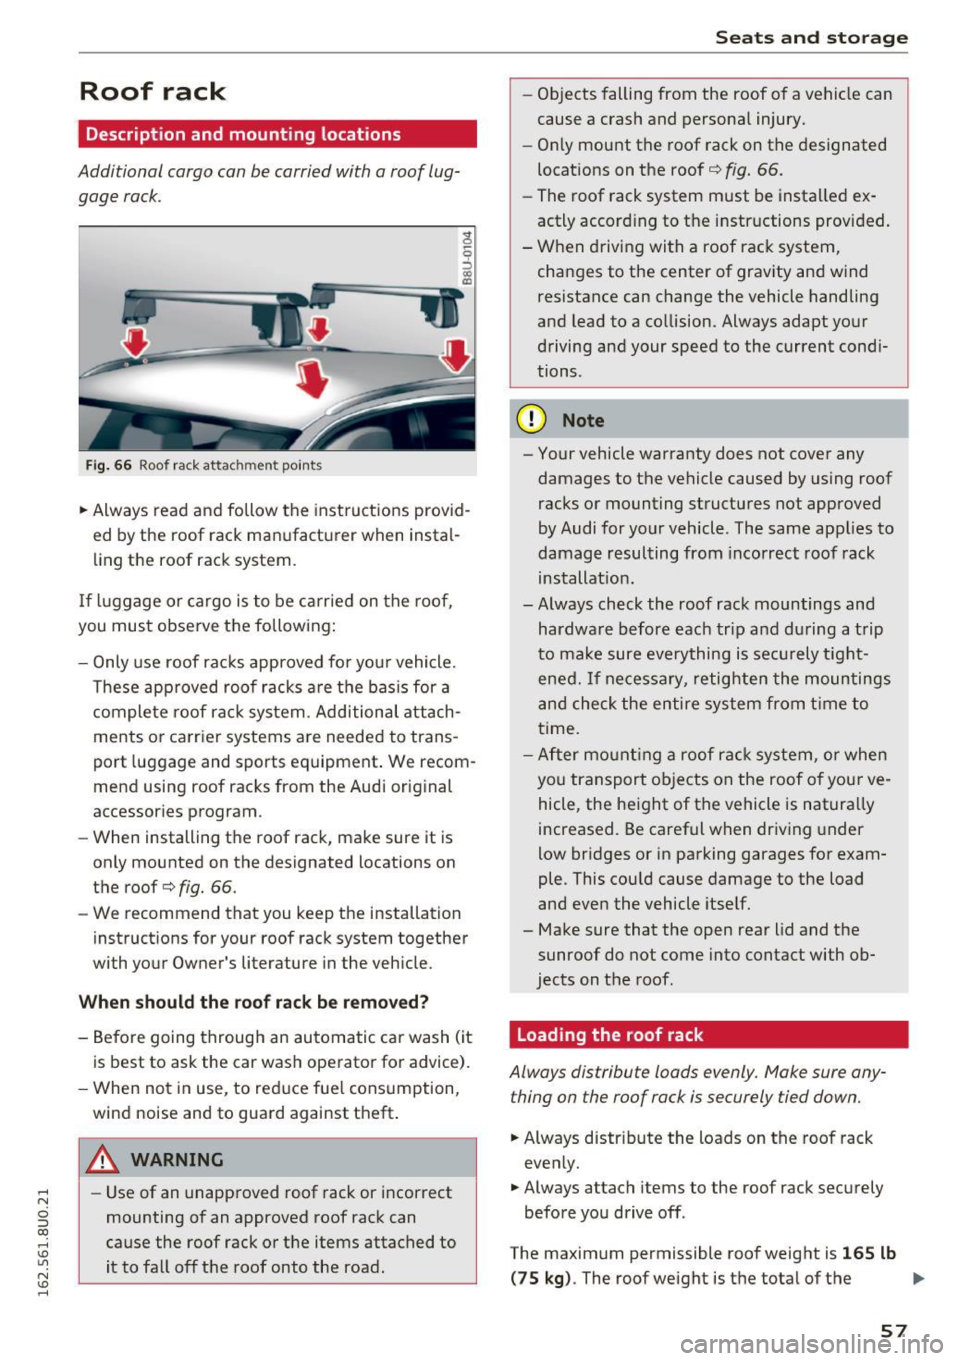
Fig. 6 6 Roof rack attach ment points
.. Always read and follow the inst ruct ions prov id
ed by the roof rack man ufacturer when instal
l ing the roof rack system .
If luggage or cargo is to be carried on the roof,
you must observe the following:
- Only use roof rac ks approved fo r you r vehicle.
T hese app roved roof racks a re the bas is for a
complete roof ra ck system . Additional attach
ments or carrier systems are needed to trans
port luggage and sports equipment . We recom
mend using roof racks from the Audi orig inal
accessor ies program .
- When installing the roof rack, make sure it is
only mounted on the designated locations on
the roof¢
fig. 66.
- We recommend that you keep the installat ion
instruct ions for your roof rack system together
with your Owner's literature in the veh icle.
When should th e roof rack b e re mov ed?
- Before going through an au tomatic car wash (it
is best to ask the car wash operator for advice).
- When not in use, to reduce fue l consumption,
wind noise and to guard against theft .
_& WARNING
-Use of an unapproved roof rack or i ncorrect
mounting of an approved roof rack can
cause the roof rack o r the items attached to
it to fall off the roof onto the road .
Seats and storage
-Objects falling from the roof of a vehicle can
cause a crash and personal injury.
- On ly mount the roof rack on the designated
locations on the roof¢
fig. 66.
- The roof rack system must be insta lled ex
actly accord ing to the instr uctions provided .
- W hen driving with a roof rac k system,
changes to the center of grav ity and w ind
resistance can change the vehicle handling
and lead to a co llision. Always adapt your
driving and your speed to the current cond i
tions.
(D Note
- Your vehicle warranty does not cover any
damages to the vehicle caused by using roof
racks or mount ing structu res not approved
by Audi for yo ur vehicle . The same app lies to
damage resulting from incorrect roof rack
installat ion.
- Always check the roof rack mountings and
hardwa re before each trip and during a t rip
to ma ke sure eve rything is se cu rely t ight
ened. If ne cess ary, retighte n the mountings
and check the entire sys tem from time to
t ime.
- After moun ting a roof ra ck system, or when
yo u transport objects on the roof o f you r ve
hicle, the he ight of the vehicle is natura lly
increased. Be caref ul when driving under
low bridges or in pa rking garages for exam
ple. This cou ld cause damage to the load
and eve n the vehicle itse lf.
- Make sure that the open rear lid and the sunroof do not come into contact with ob
jects on the roof.
Loading the roof rack
Always distribute loads evenly. Make sure any
thing on the roof rack is securely tied down.
.. Always distr ibute the loads on the roof rack
eve nly .
.. Always attach items to the roof rack secu rely
before you drive off .
The maxim um permissible roof weig ht is
165 lb
(75 kg) . The roof weight is the total of the Ill>
57
Page 61 of 252
Installing
• Place both sides of the cover into the mounts
on the side trim.
• Push the cover downward until both sides click
into place.
Storing*
Depending on the vehicle equipment, you can
store the cover under the cargo floor
¢page 61.
A WARNING
-To reduce the risk of accidents, the luggage
compartment cover should never be unse
cured under any circumstances .
- The luggage compartment cover is not a
surface for storing objects. Objects placed
on the cover could endanger all vehicle oc
cupants during sudden braking maneuvers
or in a crash.
CD Note
To avoid damage, let the luggage compart
ment cover roll up slowly after removing.
Increasing the size of the luggage
compartment
The rear seat backrests can be folded forward ei
ther separately or together .
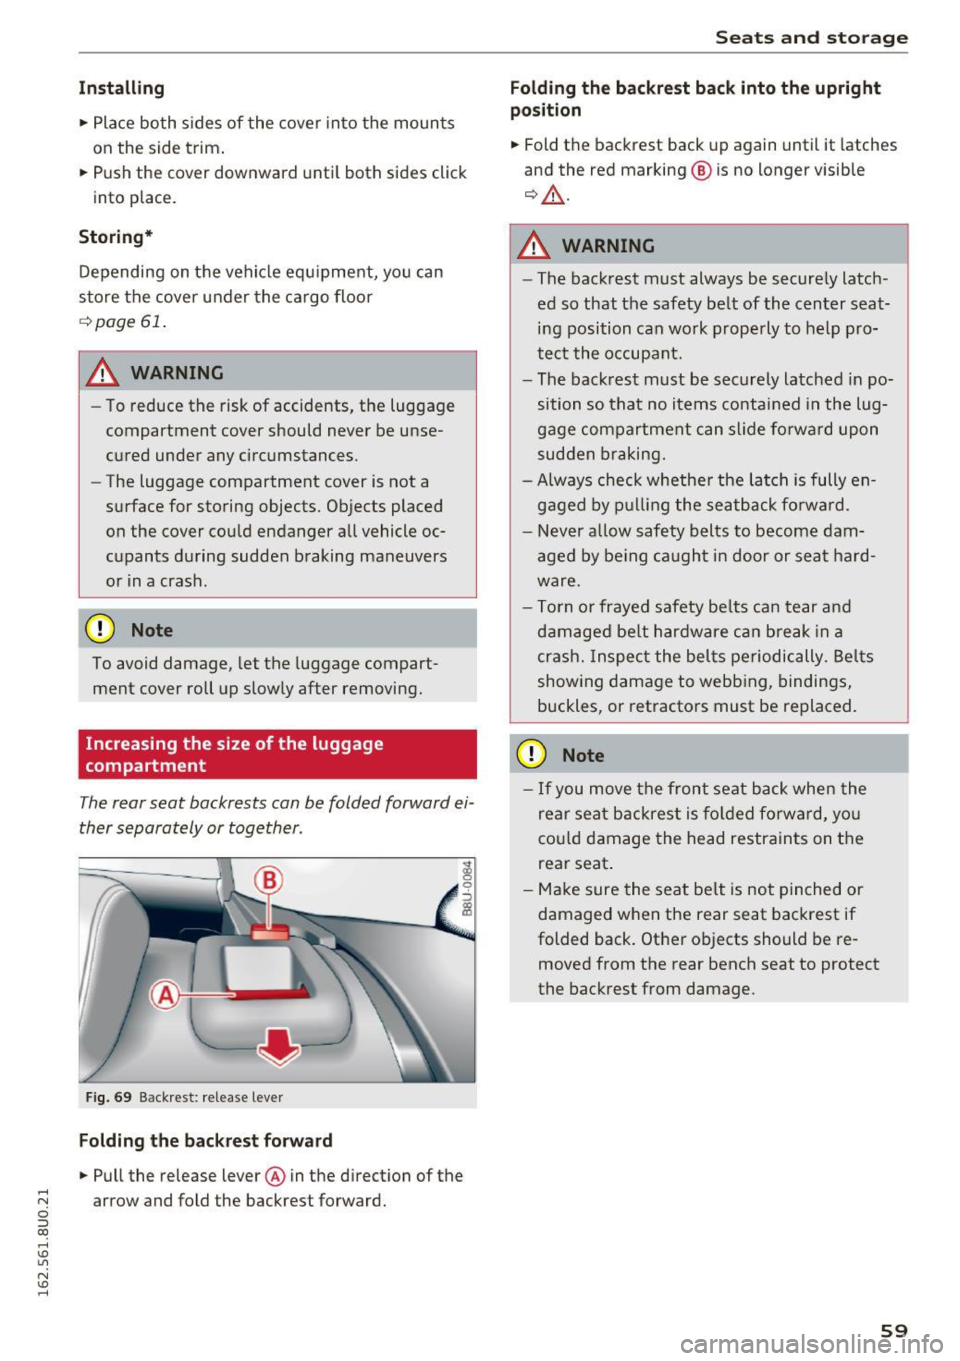
Fig. 69 Backrest: release lever
Folding the backrest forward
• Pull the release lever @in the direction of the .... N arrow and fold the backrest forward. c:i ::J CX)
.... I.Cl U"I
N I.Cl ......
Seats and storage
Folding the backrest back into the upright
position
• Fold the backrest back up again until it latches
and the red marking ® is no longer visible
¢ ,&..
A WARNING
--The backrest must always be securely latch-
ed so that the safety belt of the center seating position can work properly to help pro
tect the occupant.
- The backrest must be securely latched in po
sition so that no items contained in the lug
gage compartment can slide forward upon
sudden braking.
- Always check whether the latch is fully en
gaged by pulling the seatback forward.
- Never allow safety belts to become dam
aged by being caught in door or seat hard
ware.
- Torn or frayed safety belts can tear and
damaged belt hardware can break in a
crash. Inspect the belts periodically. Belts
showing damage to webbing, bindings,
buckles, or retractors must be replaced.
CD Note
- If you move the front seat back when the
rear seat backrest is folded forward, you
could damage the head restraints on the
rear seat.
- Make sure the seat belt is not pinched or
damaged when the rear seat backrest if
folded back. Other objects should be re
moved from the rear bench seat to protect
the backrest from damage.
59
Page 62 of 252
Sea ts and stor age
Tie-downs and cargo net
Applies to vehicles: with cargo net
The cargo net prevents small objects from slid
ing.
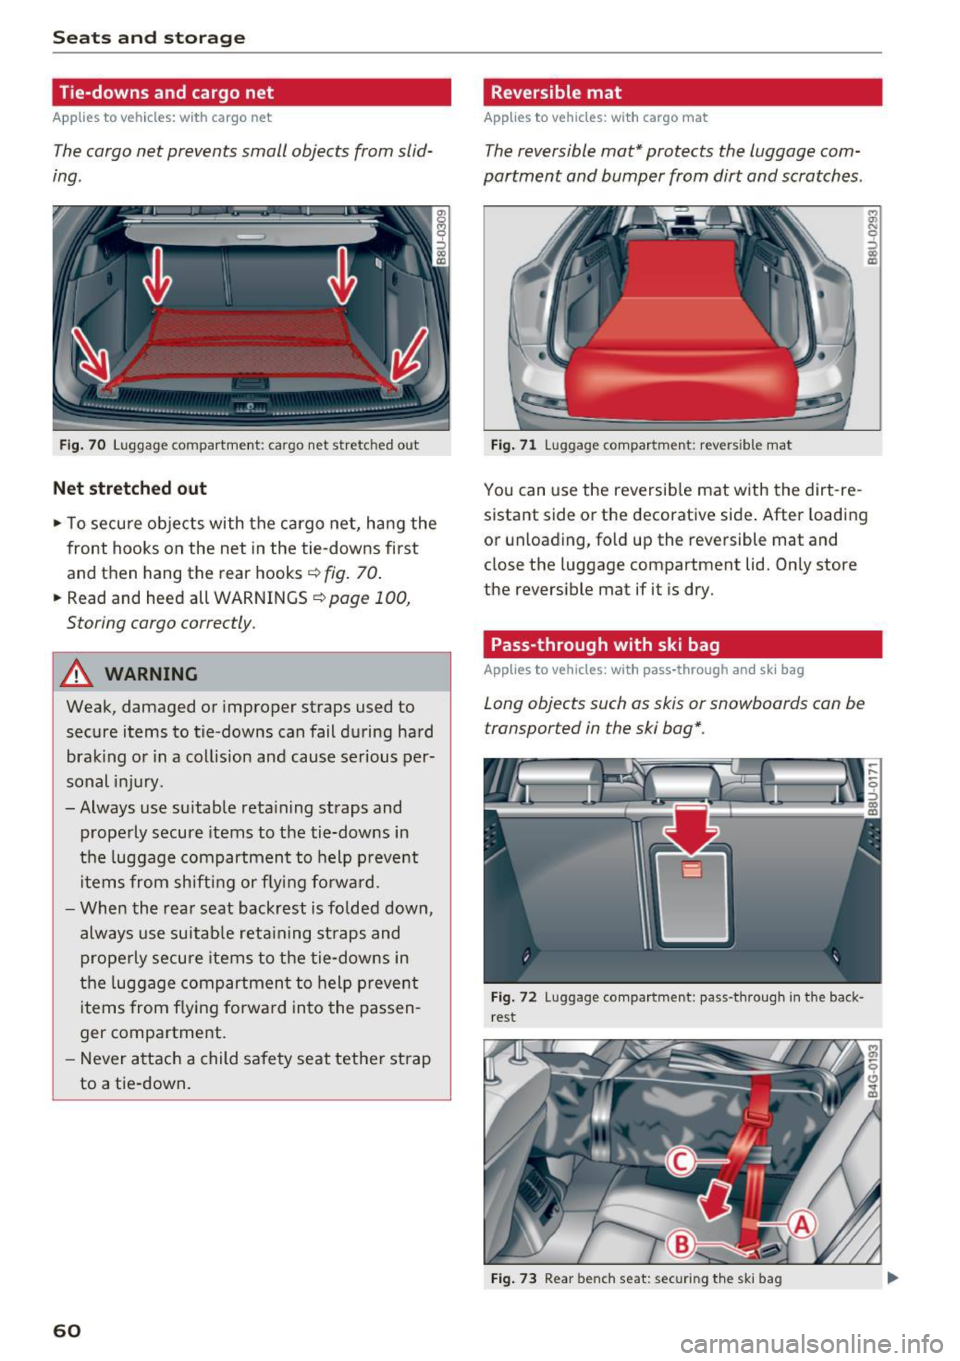
F ig. 70 Luggage compartment: cargo net stretched out
Net stret ched out
• To secu re objects with the ca rgo net, hang the
front hooks on the net in the tie -downs first
and then hang the rear hooks~
fig. 70.
• Read and heed all WARNINGS r:!) page 100,
Storing cargo correctly.
A WARNING
Weak, damaged or improper straps used to
secure items to tie-downs can fail during hard
bra king o r in a collision and cause serious per
sonal injury.
- Always use suitable reta in ing straps and
properly secure items to the tie-downs in
the luggage compartment to help p revent
items from sh ifting or f ly ing fo rwa rd.
- When the rear seat backrest is folded down,
always use suitab le reta ining st raps and
p rope rly secure items to the tie-downs in
the luggage comp artmen t to help preve nt
items from flying forwa rd into the passen
ger compartment.
- Never a ttach a child safety seat tet her strap
to a tie -down.
60
-
Reversible mat
Applies to vehicles: with cargo mat
The reversible mat* protects the luggage com
partment and bumper from dirt and scratches.
Fig . 71 Luggage compartment: revers ible mat
r, .,,
~ co C0
You can use the reversib le mat with the dirt -re
sistant side or the decorative side . After loading
or unloading, fold up the reversible mat and
close the luggage compartment lid. Only store
the reversible mat if it is dry.
Pass -through with ski bag
Applies to vehicles: with pass-through and ski bag
Long objects such as skis or snowboards can be
transported in the ski bag*.
Fig. 72 Luggage compartment: pass-through in the back·
rest
F ig . 73 Rear bench seat: securing the ski bag
Page 63 of 252
.... N
c:i :::J CX)
.... I.Cl U"I
N I.Cl ......
Loading
• Press the release button in the luggage com
partment
c:> fig. 72 and fold the pass-through
toward the front.
• Push the ski sack through the opening from the
luggage compartment . T he zipper must face
toward the rear
c:> ,& .
Securing
• Stick the strap @on th e bag in the center safe
ty belt @c:> fig. 73.
• Tighten and secure the strap©
A WARNING
-The ski sack is intended only for the trans
portation of skis and other light objects. To
reduce the risk of serious personal injury,
never transport heavy or pointed objects in
the ski sack.
- When braking rapidly or during an accident ,
the load could be displaced and cause injury
to occupants.
- Sharp edges on the load must be covered
for protection. Always fasten the belt tight
ly around the sack and its contents
c:>fig . 73.
- For safety reasons, do not transport more
than two pairs of skis in the ski sack .
- You must secure the ski sack with the strap
after loading.
- Make sure all objects that you are transport
ing in the pass-through are secured. Other
wise they could slide around during sudden
braking maneuvers and cause injury .
(D Tips
-Only fold the bag up if it is dry.
- When transporting skis or snowboards, tighten the securing strap between the
bindings.
- Lay skis in the bag with the points facing
forward and snowboards and ski pole points
facing the rear.
-
Seats and storage
Reversible cargo area floor
Applies to vehicles: with reversible cargo area floor
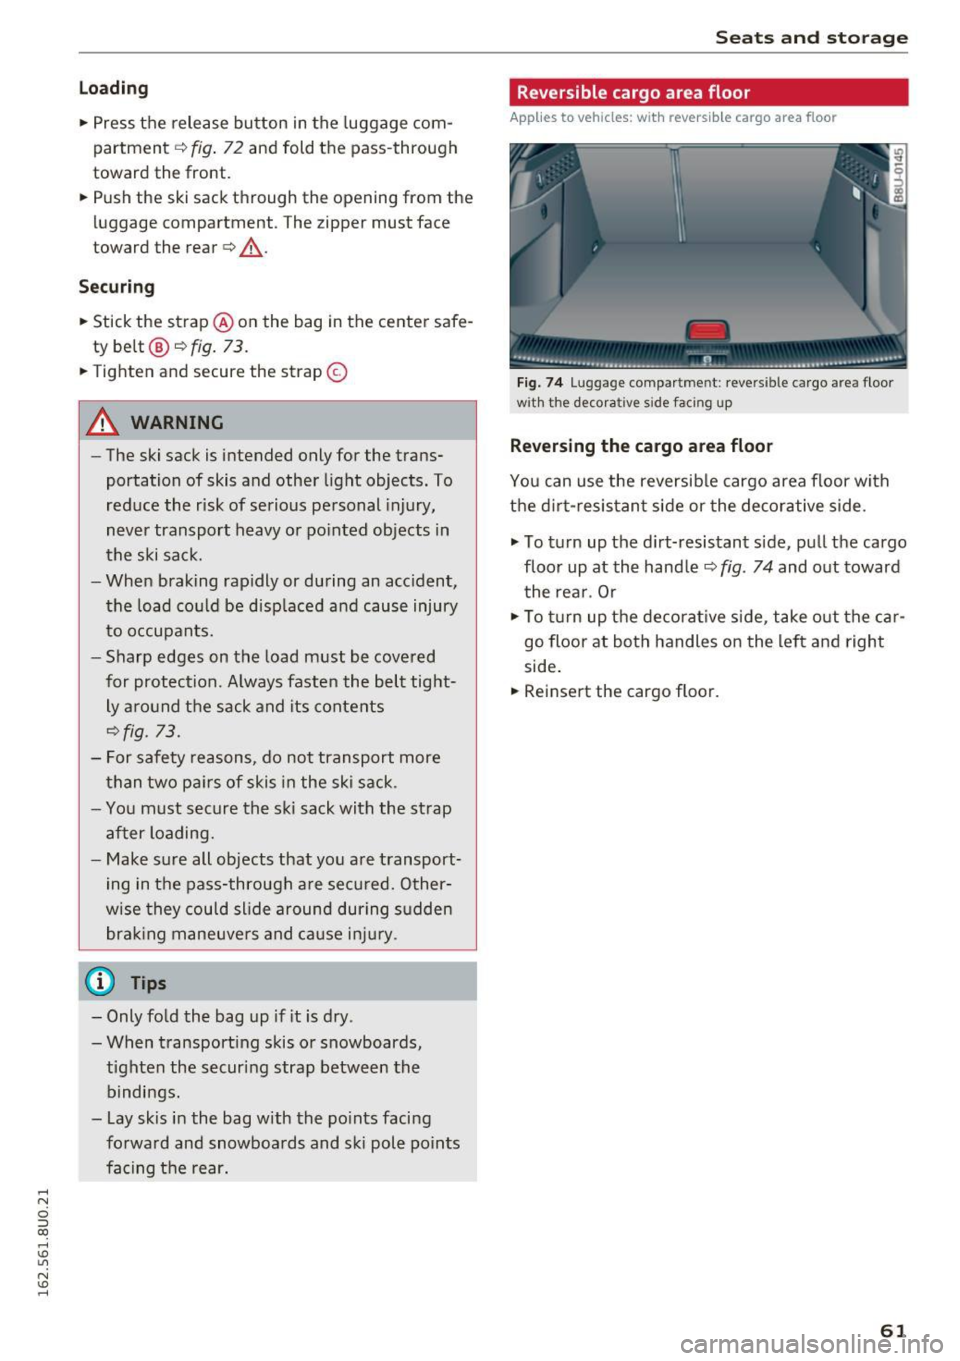
Fig. 74 Lug gag e compar tmen t: reve rs ibl e ca rgo area floor
w ith the decora tive s ide faci ng up
Reversing the cargo area floor
You can use the reversible cargo area floor with
the dirt-resistant side or the decorative side .
.,. To turn up the dirt-resistant side, pull the cargo
floor up at the handle c:>
fig. 74 and out toward
the rear . Or
.,. To turn up the decorative side , take out the car
go floor at both handles on the left and right
side.
• Reinsert the cargo floor.
61
Page 86 of 252
Automatic transmissio n
Stopp ing temporarily
.,. Press the b rake peda l to stop the vehicle, fo r
example at a traffic light. Do not press the ac
ce lerator peda l when doing this.
... To prevent the vehicle from rolling when you
start driving, set the parking brake when stop
ping on steep inclines ¢
,&..
.,. The park ing brake w il l release automatically
and the vehicle will start moving once you press
the accelerator pedal.
Stopp ing /park ing
If the selector lever is not in the P posit ion when
you open the driver's door, the vehicle could roll.
The message
S hift to P and turn off ign it ion ,
otherwi se vehicle can roll awa y
appears.
.,. Press and hold the brake pedal
c> ,&. .
.,. Set the parking brake.
.,. To engage the P selector lever posit ion, press
the button on the selector lever and sh ift into
the P position
i:> page 82.
Stopp ing on an incline
.,. Always press the brake peda l to hold the vehi
cle in place and prevent it from "rolling back"
c> ,&. . Do not try to prevent the vehicle from
"ro lling back" when a gear is engaged by in
c reasing the eng ine speed
i:> 0.
Starting on a hill
.,. Set the parking brake.
.,. Se lect the D posit ion .
.,. Press t he accelerator pedal carefully . If you r
safety belt is fastened, the pa rking brake is au
tomat ica lly released a nd your ve hicle beg ins to
move .
Unde r ce rtain c ircumstances, such as driv ing in
the mountains, it may be usef ul to sw itch tempo
rarily to the manua l shift program in o rde r to ad
just the gea rs to the d riving conditions by hand
i:>page 85 .
On inclines, act ivate the park ing brake first and
then move the se lector lever to the P pos it ion
c>page 72. This prevents the lo cking mechanism
from being loaded too heav ily and w ill make i t
easier to move the se lec tor lever out of the P po
sition.
84
A WARNING
- The vehicle can also ro ll when the eng ine is
stopped.
- Unintended vehicle movement can cause se
rious injury.
- Never leave your veh icle with the engine
running while in gear. If you must leave
your veh icle w hen the engine is r unning, ac
tivate t he pa rking brake a nd move the selec
tor lever to P .
- Power is still transmitted to the wheels
when the engine is running at idle . To p re
vent the vehicle from "creeping", yo u m ust
keep your foo t on t he b rake when the en
g in e is ru nning and the selector lever is in D/
Sor R or "tiptronic" mode is se lected .
- Do not press the a cce le ra to r peda l when
changing the se lec to r l ever posi tion while
the vehicle is s ta tionary and the engine is
r u nning .
- Never sh ift into R or P whi le driving.
- Before d riving down a s teep sl ope, redu ce
your spee d and sh ift into a lower gea r w ith
"t i ptronic" .
- Do not ride the brakes or press the bra ke
pedal too of ten o r too long when dr iv ing
down a hi ll. Constant braking ca uses the
brakes to ove rheat and substantially re
duces brak ing performance, increases b rak
ing d istance or causes comp lete failure of
the brake system.
- To prevent the veh icle from rol ling back
when stopp ing on inclines, always hold it in
place with the brake peda l or park ing brake .
- Never hold the vehicle on an incline with a
slipping clutch. The clutch opens automati
cally when it becomes too hot from the
overload. An ind icator lam p. illumina tes
and a dr iver message appears¢
page 86
w hen t he clu tch is overloade d.
- If the e ngine must rema in running, never
have a ny driving posi tion engaged when
checking unde r th e hood. Make s ure these
lec to r l ever has secu rely eng aged an d is
loc ked in P with the parking b rake set
Page 89 of 252
Preparations
"'To prevent your vehicle from ro lling un inten
tiona lly, set the parking brake<®) or press the
brake pedal¢_& .
"' Insert the flat side of the maintenance tool
sideways in the s lot near the shift cover and pry
off the shift cover¢
fig. 94.
"' Pull the frame and the cover upward. You can
fold the cover up over the sh ifter knob.
Selector lever emergency release
"' Press and hold the yellow release button
¢ fig . 95.
"' Press the button on the selector lever and move
the lever into N position.
"' Clip the frame to the cover again .
A WARNING
-
If you re lease the parking lock using the
emergen cy release , secure your vehi cle with
the parking brake or the brake pedal if the
parking brake is not work ing. The vehicle can
roll away if it is not secured and cause a crash.
Automatic transm ission
87