oil AUDI Q3 2019 User Guide
[x] Cancel search | Manufacturer: AUDI, Model Year: 2019, Model line: Q3, Model: AUDI Q3 2019Pages: 280, PDF Size: 72.73 MB
Page 211 of 280
83A012721BA
Checking and Filling
— Maintain enough distance when you are re-
moving the oil drain plug. While doing this,
keep your forearm parallel to the ground to
reduce the risk of hot oil dripping down your
arm.
— Drain the oil into a container designed for
this purpose that is large enough to hold the
full amount of oil in your engine.
— Engine oil is poisonous. Always store out of
reach of children.
— Prolonged contact of used engine oil with
the skin may cause skin damage. Always
wash oil off immediately with soap and wa-
ter to protect your skin.
@) Note
Do not mix any additives with the engine oil.
Additives may cause engine damage that is
not covered by your New Vehicle Limited War-
ranty.
() For the sake of the environment
— Before changing the engine oil, make sure
you can dispose of the used engine oil cor-
rectly.
— Engine oil must always be disposed of cor-
rectly. Do not dump it in the yard, in the for-
est, or in open water, river channels, or sew-
ers.
— Have your used engine oil recycled by bring-
ing it to a used oil collection site or contact
a gas station.
Cooling system
The engine cooling system is filled with a mixture
of purified water and coolant additive at the fac-
tory. This coolant must not be not changed.
The coolant level is monitored using the B indi-
cator light. However, we do recommend occa-
sionally checking the coolant level manually.
Messages
& Turn off engine and check coolant level. See
owner's manual
The coolant level is too low.
Do not continue driving and switch the engine
off. Check the coolant level > page 210.
— If the coolant level is too low, add coolant
=> page 210. Only continue driving once the in-
dicator light turns off.
/_E| Coolant temperature: too high. Let engine
run while vehicle is stationary
Let the engine run at idle for a few minutes to
cool off, until the indicator light turns off.
— If the indicator light does not turn off, do not
continue driving the vehicle. See an authorized
Audi dealer or authorized Audi Service Facility
for assistance.
Coolant additive
The coolant additive is made of anti-freezing and
corrosion protection agents. Only use the follow-
ing coolant additives. These additives may be
mixed with each other.
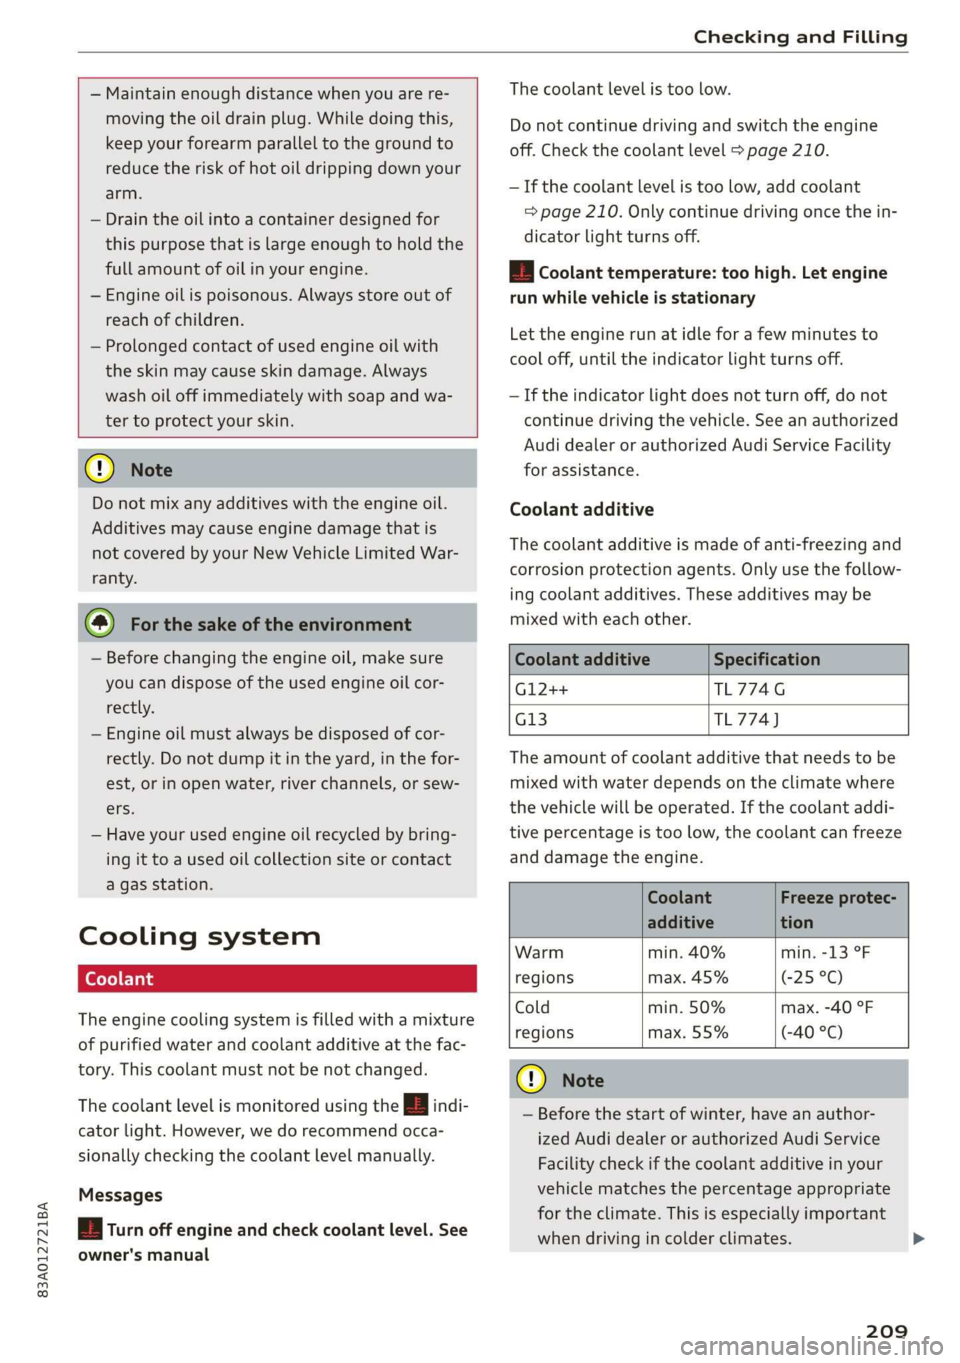
Coolant additive
G12++
G13
Specification
TL774G
TL774)
The amount of coolant additive that needs to be
mixed with water depends on the climate where
the vehicle will be operated. If the coolant addi-
tive percentage is too low, the coolant can freeze
and damage the engine.
Coolant Freeze protec-
additive tion
Warm min. 40% min. -13 °F
regions max. 45% (-25 °C)
Cold min. 50% max. -40 °F
regions max. 55% (-40 °C)
CG) Note
— Before the start of winter, have an author-
ized Audi dealer or authorized Audi Service
Facility check if the coolant additive in your
vehicle matches the percentage appropriate
for the climate. This is especially important
when driving in colder climates.
209
Page 212 of 280
Checking and Filling
— If the appropriate coolant additive is not
available in an emergency, do not add any
other additive. You could damage the en-
gine. If this happens, only use water and re-
store the correct mixture ratio with the
specified coolant additive as soon as possi-
ble.
— Only refill with new coolant.
— Radiator sealant must not be mixed with
the coolant.
Adding coolant
RAZ-0539
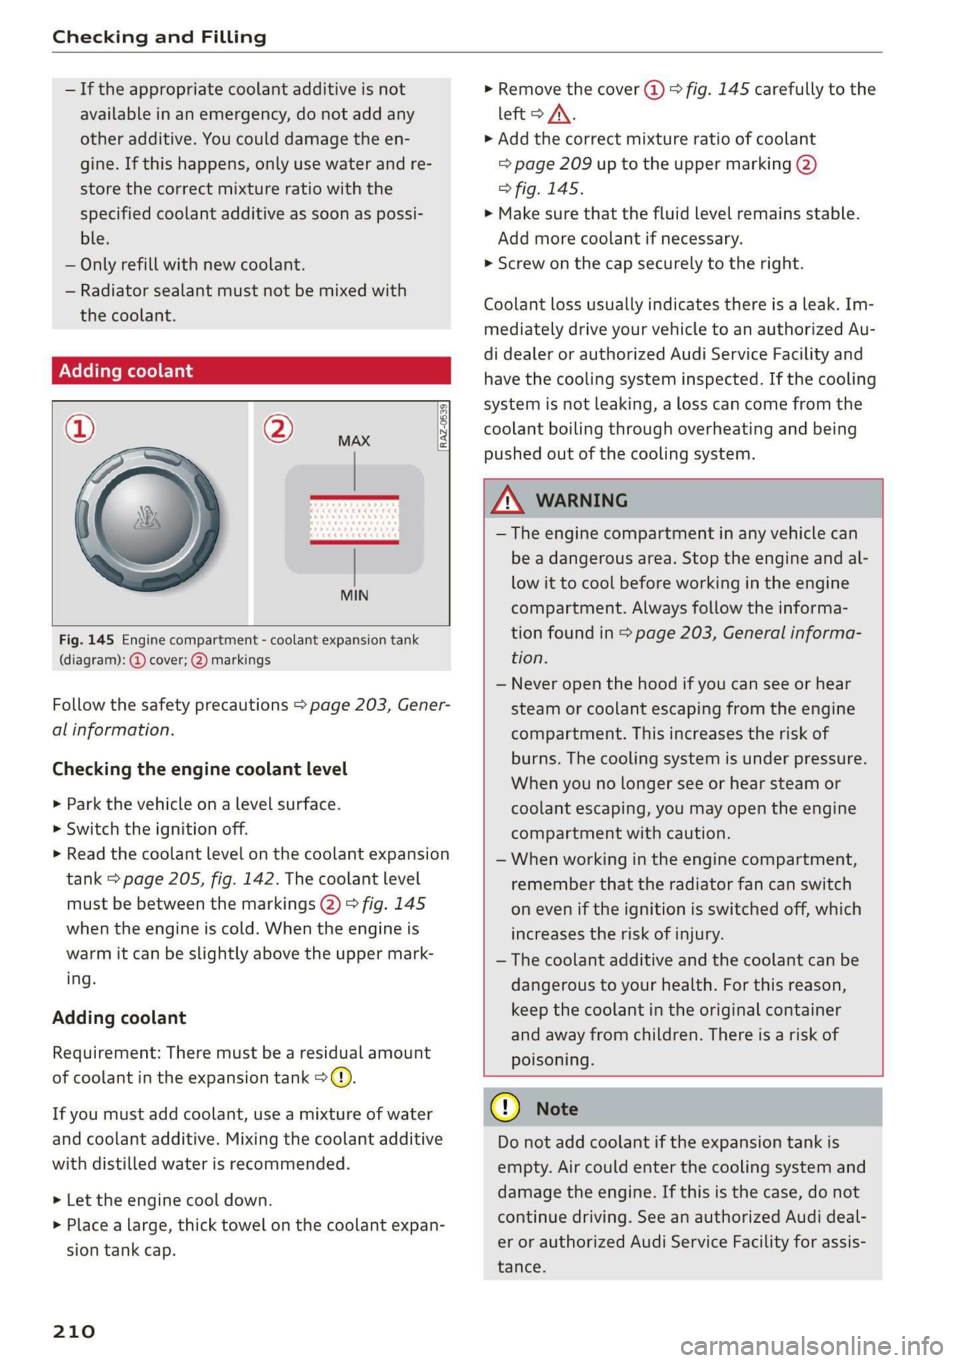
Fig. 145 Engine compartment - coolant expansion tank
(diagram): @ cover; @) markings
Follow the safety precautions > page 203, Gener-
al information.
Checking the engine coolant level
>» Park the vehicle on a level surface.
> Switch the ignition off.
> Read the coolant level on the coolant expansion
tank > page 205, fig. 142. The coolant level
must be between the markings @) 9 fig. 145
when the engine is cold. When the engine is
warm it can be slightly above the upper mark-
ing.
Adding coolant
Requirement: There must be a residual amount
of coolant in the expansion tank >@).
If you must add coolant, use a mixture of water
and coolant additive. Mixing the coolant additive
with distilled water is recommended.
> Let the engine cool down.
> Place a large, thick towel on the coolant expan-
sion tank cap.
210
» Remove the cover (@) > fig. 145 carefully to the
left > AX.
» Add the correct mixture ratio of coolant
> page 209 up to the upper marking @)
> fig. 145.
> Make sure that the fluid level remains stable.
Add more coolant if necessary.
> Screw on the cap securely to the right.
Coolant loss usually indicates there is a leak. Im-
mediately drive your vehicle to an authorized Au-
di dealer or authorized Audi Service Facility and
have the cooling system inspected. If the cooling
system is not leaking, a loss can come from the
coolant boiling through overheating and being
pushed out of the cooling system.
ZA WARNING
— The engine compartment in any vehicle can
be a dangerous area. Stop the engine and al-
low it to cool before working in the engine
compartment. Always follow the informa-
tion found in > page 203, General informa-
tion.
— Never open the hood if you can see or hear
steam or coolant escaping from the engine
compartment. This increases the risk of
burns. The cooling system is under pressure.
When you no longer see or hear steam or
coolant escaping, you may open the engine
compartment with caution.
— When working in the engine compartment,
remember that the radiator fan can switch
on even if the ignition is switched off, which
increases the risk of injury.
— The coolant additive and the coolant can be
dangerous to your health. For this reason,
keep the coolant in the original container
and away from children. There is a risk of
poisoning.
@) Note
Do not add coolant if the expansion tank is
empty. Air could enter the cooling system and
damage the engine. If this is the case, do not
continue driving. See an authorized Audi deal-
er or authorized Audi Service Facility for assis-
tance.
Page 217 of 280
83A012721BA
Checking and Filling
Service interval display
The service interval display detects when your ve-
hicle is due for service.
The service interval display works in two stages:
— Inspection or oil change reminder: After a cer-
tain distance driven, a message appears in the
instrument cluster display each time the igni-
tion is switched on or off. The remaining dis-
tance or time is displayed briefly.
— Inspection or oil change due: If your vehicle is
due for an inspection or oil change or both, a
message appears briefly in the instrument clus-
ter display when switching the ignition on or
off: Inspection due! or Oil change due! or Oil
change and inspection due!.
Checking service intervals
You can check the remaining distance or time un-
til the next oil change or next inspection in the
Infotainment system.
Select on the home screen: VEHICLE > Settings
& Service > Service intervals.
Resetting the indicator
An authorized Audi dealer or authorized Audi
Service Facility will reset the service interval dis-
play after performing service.
If you have changed the oil yourself, you must re-
set the oil change interval.
Select on the home screen: VEHICLE > Settings
& Service > Service intervals > Reset oil change
interval.
@) Note
— Only reset the oil change indicator if the oil
was changed.
— Following the service intervals is critical to
maintaining the service life and value of
your vehicle, especially the engine. Even if
the mileage on the vehicle is low, do not ex-
ceed the time for the next service.
215
Page 218 of 280
Wheels
Wheels Wheels
and Tires
General information
> Check your tires regularly for
damage (punctures, cuts, cracks
and bulges). Remove foreign ob-
jects from the tire tread.
>If driving over curbs or similar
obstacles, drive slowly and ap-
proach the curb at an angle.
>Have faulty tires or rims re-
placed immediately.
>Protect your tires from oil,
grease and fuel.
>Mark tires before removing
them so that the same running
direction can be maintained if
they are reinstalled.
>Lay tires flat when storing and
store them in a cool, dry location
with as little exposure to light as
possible.
AN WARNING
—Never drive faster than the
maximum permitted speed for
your tires. This could cause the
tires to heat up too much. This
increases the risk of an acci-
dent because it can cause the
tire to burst.
216
—Always adapt your driving to
the road and traffic condi-
tions. Drive carefully and re-
duce your speed on icy or slip-
pery roads. Even winter tires
can lose traction on black ice.
() Note
—Please note that summer and
winter tires are designed for
the conditions that are typical
in those seasons. Audi recom-
mends using winter tires dur-
ing the winter months. Low
temperatures significantly de-
crease the elasticity of summ-
er tires, which affects traction
and braking ability. If summer
tires are used in very cold tem-
peratures, cracks can form on
the tread bars, resulting in
permanent tire damage that
can cause loud driving noise
and unbalanced tires.
—Burnished, polished or
chromed rims must not be
used in winter driving condi-
tions. The surface of the rims
does not have sufficient corro-
sion protection for this and
could be permanently dam-
aged by road salt or similar
substances.
Page 221 of 280
83A012721BA
Wheels
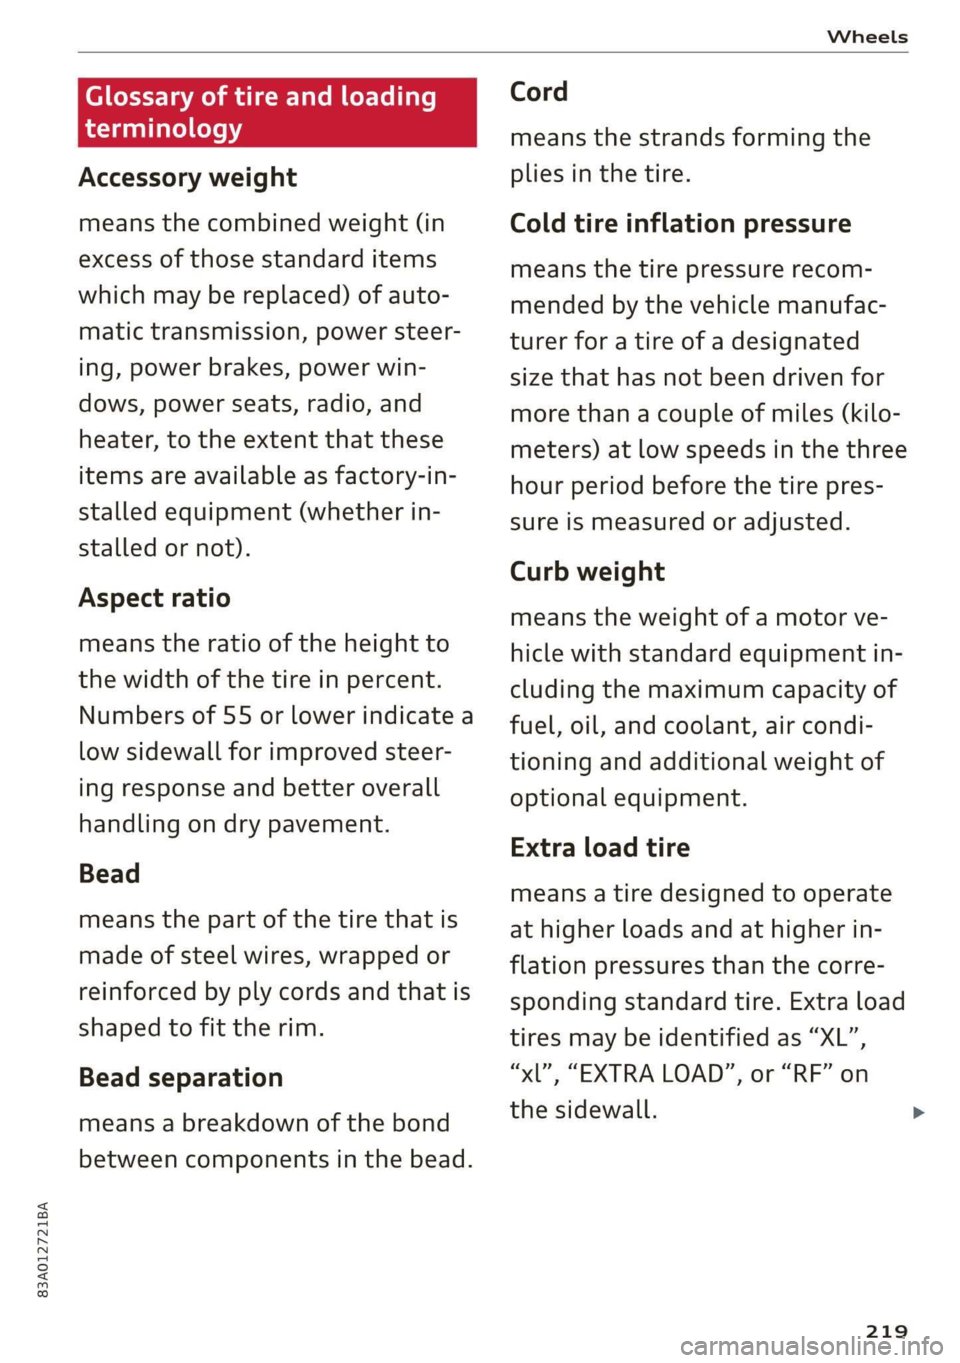
Glossary of tire and loading
terminology
Accessory weight
means the combined weight (in
excess of those standard items
which may be replaced) of auto-
matic transmission, power steer-
ing, power brakes, power win-
dows, power seats, radio, and
heater, to the extent that these
items are available as factory-in-
stalled equipment (whether in-
stalled or not).
Aspect ratio
means the ratio of the height to
the width of the tire in percent.
Numbers of 55 or lower indicate a
low sidewall for improved steer-
ing response and better overall
handling on dry pavement.
Bead
means the part of the tire that is
made of steel wires, wrapped or
reinforced by ply cords and that is
shaped to fit the rim.
Bead separation
means a breakdown of the bond
between components in the bead.
Cord
means the strands forming the
plies in the tire.
Cold tire inflation pressure
means the tire pressure recom-
mended by the vehicle manufac-
turer for a tire of a designated
size that has not been driven for
more than a couple of miles (kilo-
meters) at low speeds in the three
hour period before the tire pres-
sure is measured or adjusted.
Curb weight
means the weight of a motor ve-
hicle with standard equipment in-
cluding the maximum capacity of
fuel, oil, and coolant, air condi-
tioning and additional weight of
optional equipment.
Extra load tire
means a tire designed to operate
at higher loads and at higher in-
flation pressures than the corre-
sponding standard tire. Extra load
tires may be identified as “XL”,
“xL’, “EXTRA LOAD”, or “RF” on
the sidewall.
219
Page 230 of 280
Wheels
Make sure that the tire designa-
tion on your tire matches the des-
ignation on the tire pressure label
and the tire pressure table.
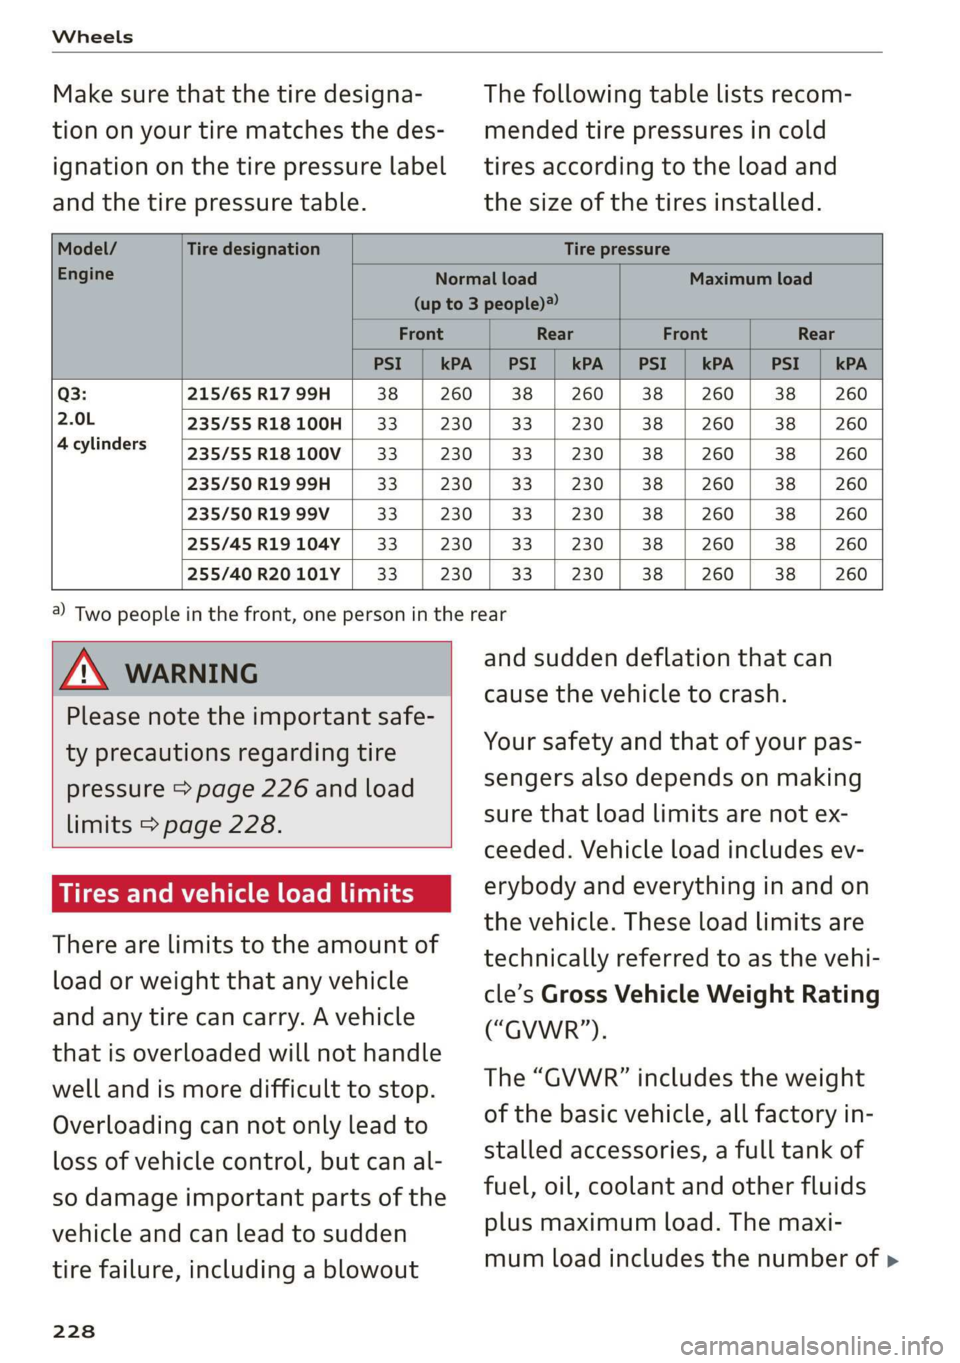
The following table lists recom-
mended tire pressures in cold
tires according to the load and
the size of the tires installed.
Model/ Tire designation Tire pressure
Engine Normal load Maximum load
(up to 3 people)?
Front Rear Front Rear
PSI | kPA | PSI | kPA | PSI | kPA | PSI | kPA
Q3: 215/65 R17 99H 38 | 260 | 38 | 260 | 38 | 260 | 38 | 260
2.0L 235/55R18100H | 33 230 | 33 | 230 | 38 | 260 | 38 | 260
4cylinders /535755R18100V| 33 | 230 | 33 | 230 | 38 | 260 | 38 | 260
235/50 R19 99H 33 230 | 33 | 230 | 38 | 260 | 38 | 260
235/50 R19 99V 33 230 | 33 | 230 | 38 | 260 | 38 | 260
255/45 R19104Y | 33 230 | 33 | 230 | 38 | 260 | 38 | 260
255/40 R20101Y | 33 230 | 33 | 230 | 38 | 260 | 38 | 260
AN WARNING
Please note the important safe-
ty precautions regarding tire
pressure > page 226 and load
limits > page 228.
Tires and vehicle load limits
There are limits to the amount of
load or weight that any vehicle
and any tire can carry. A vehicle
that is overloaded will not handle
well and is more difficult to stop.
Overloading can not only lead to
loss of vehicle control, but can al-
so damage important parts of the
vehicle and can lead to sudden
tire failure, including a blowout
228
@) Two people in the front, one person in the rear
and sudden deflation that can
cause the vehicle to crash.
Your safety and that of your pas-
sengers also depends on making
sure that load limits are not ex-
ceeded. Vehicle load includes ev-
erybody and everything in and on
the vehicle. These load limits are
technically referred to as the vehi-
cle’s Gross Vehicle Weight Rating
(“GVWR”).
The “GVWR” includes the weight
of the basic vehicle, all factory in-
stalled accessories, a full tank of
fuel, oil, coolant and other fluids
plus maximum load. The maxi-
mum load includes the number of >
Page 239 of 280
83A012721BA
Care and cleaning
—To reduce the risk of cuts, protect yourself
from sharp metal components when wash-
ing the underbody or the inside of the wheel
housings.
— After washing the vehicle, the braking effect
may be delayed due to moisture on the
brake rotors or ice in the winter. This in-
creases the risk of an accident. The brakes
must be dried first with a few careful brake
applications.
@) Note
— If you wash the vehicle in an automatic car
wash, you must fold the exterior mirrors in
to reduce the risk of damage to the mirrors.
Power folding exterior mirrors* must only
be folded in and out using the power folding
function.
—To reduce the risk of damage to the rims
and tires, compare the width between the
wheels on your vehicle with the distance be-
tween the guide rails in the car wash.
—To reduce the risk of damage, compare the
height and width of your vehicle with the
height and width of the inside of the car
wash.
—To reduce the risk of paint damage, do not
wash the vehicle in direct sunlight.
—To reduce the risk of damage, do not wash
decorative decals* with a pressure washer.
—To reduce the risk of damage to the surface,
do not use insect removing sponges, kitchen
sponges or similar items.
— Matte finish painted vehicle components:
—To reduce the risk of damage to the sur-
face, do not use polishing agents or hard
wax.
— Never use protective wax. It can destroy
the matte finish effect.
— Do not place any stickers or magnetic
signs on vehicle parts painted with matte
finish paint. The paint could be damaged
when the stickers or magnets are re-
moved.
@) For the sake of the environment
Only wash the vehicle in facilities specially de-
signed for that purpose. This will reduce the
risk of dirty water contaminated with oil from
entering the sewer system.
Cleaning and care information
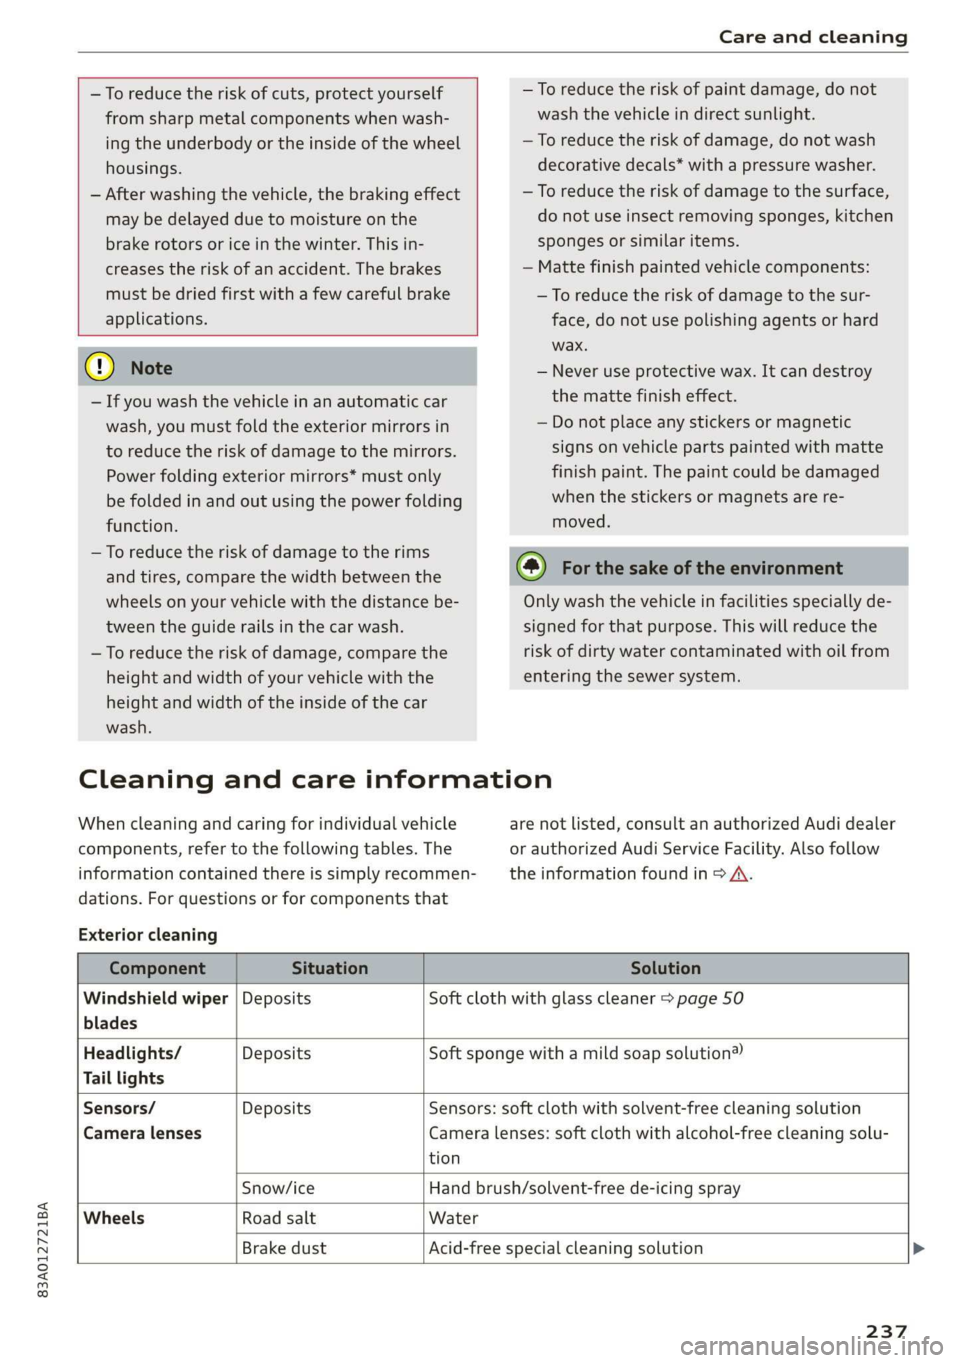
When cleaning and caring for individual vehicle
components, refer to the following tables. The
information contained there is simply recommen-
dations. For questions or for components that
Exterior cleaning
are not listed, consult an authorized Audi dealer
or authorized Audi Service Facility. Also follow
the information found in > A.
Component Situation Solution
Windshield wiper | Deposits Soft cloth with glass cleaner > page 50
blades
Headlights/ Deposits Soft sponge with a mild soap solution®
Tail lights
Sensors/ Deposits Sensors: soft cloth with solvent-free cleaning solution
Camera lenses Camera lenses: soft cloth with alcohol-free cleaning solu-
tion
Snow/ice Hand brush/solvent-free de-icing spray
Wheels Road salt Water
Brake dust Acid-free special cleaning solution >
237
Page 241 of 280
83A012721BA
Care and cleaning
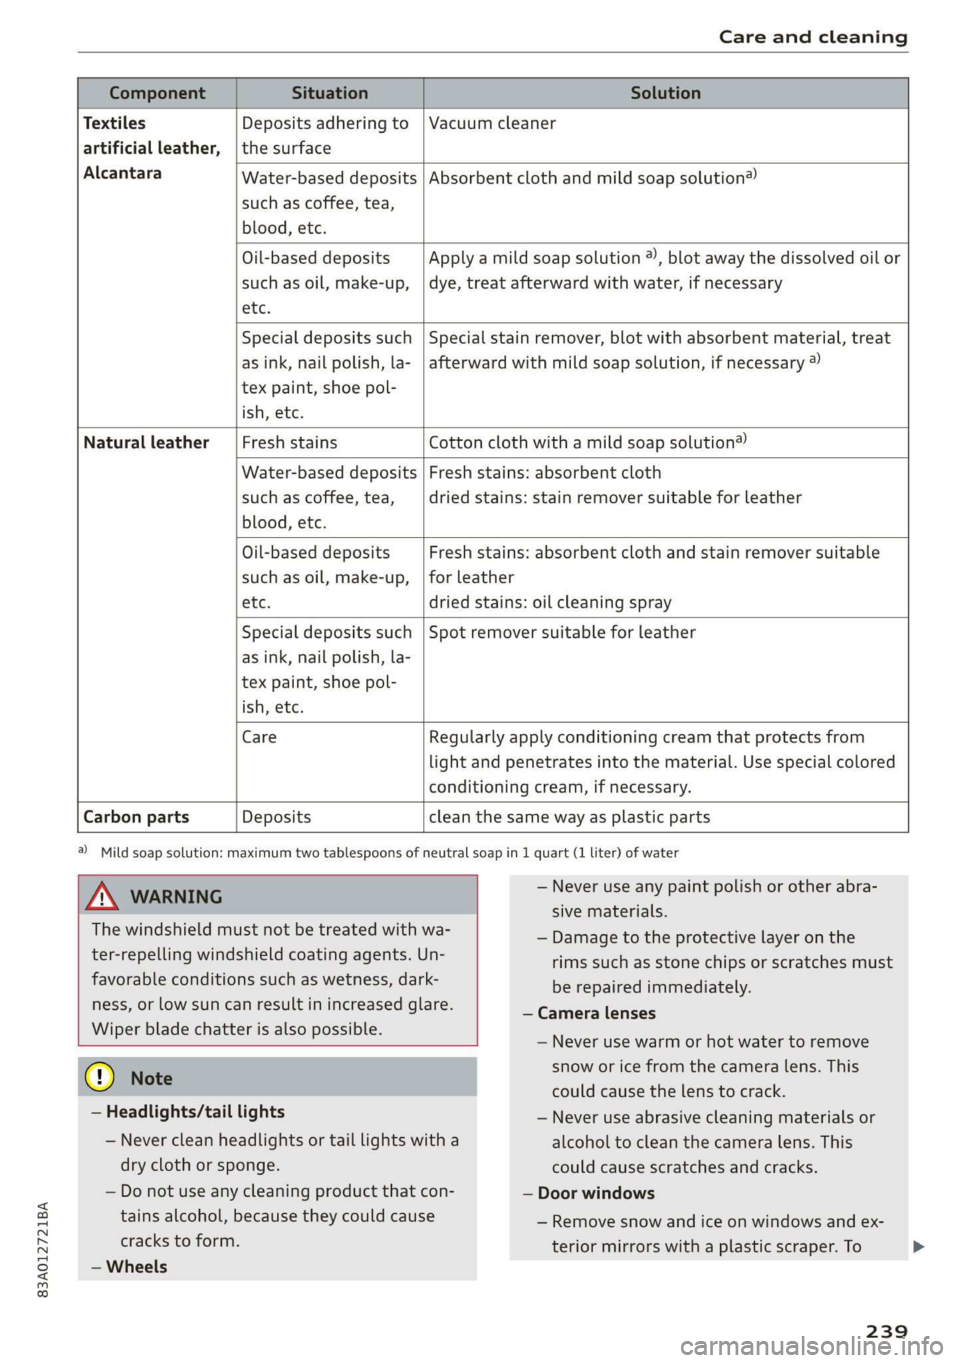
Water-based deposits
such as coffee, tea,
blood, etc.
Component Situation Solution
Textiles
Deposits adhering to | Vacuum cleaner
artificial leather, | the surface
Alcantara Absorbent cloth and mild soap solution®
Oil-based deposits
such as oil, make-up,
etc.
Apply a mild soap solution ®), blot away the dissolved oil or
dye, treat afterward with water, if necessary
Special deposits such
as ink, nail polish, la-
tex paint, shoe pol-
ish, etc.
Special stain remover, blot with absorbent material, treat
afterward with mild soap solution, if necessary ®
Natural leather Fresh stains Cotton cloth with a mild soap solution®
Water-based deposits
such as coffee, tea,
blood, etc.
Fresh stains: absorbent cloth
dried stains: stain remover suitable for leather
Oil-based deposits
such as oil, make-up,
etc.
Fresh stains: absorbent cloth and stain remover suitable
for leather
dried stains: oil cleaning spray
Special deposits such
as ink, nail polish, la-
tex paint, shoe pol-
ish, etc.
Spot remover suitable for leather
Care Regularly apply conditioning cream that protects from
light and penetrates into the material. Use special colored
conditioning cream, if necessary.
Carbon parts Deposits clean the same way as plastic parts
a) Mild soap solution: maximum two tablespoons of neutral soap in 1 quart (1 liter) of water
Z\ WARNING
The windshield must not be treated with wa-
ter-repelling windshield coating agents. Un-
favorable conditions such as wetness, dark-
ness, or low sun can result in increased glare.
Wiper blade chatter is also possible.
— Never use any paint polish or other abra-
sive materials.
— Damage to the protective layer on the
rims such as stone chips or scratches must
be repaired immediately.
— Camera lenses
— Never use warm or hot water to remove
@) Note
— Headlights/tail lights
— Never clean headlights or tail lights with a
dry cloth or sponge.
— Do not use any cleaning product that con-
tains alcohol, because they could cause
cracks to form.
— Wheels
snow or ice from the camera lens. This
could cause the lens to crack.
— Never use abrasive cleaning materials or
alcohol to clean the camera lens. This
could cause scratches and cracks.
— Door windows
— Remove snow and ice on windows and ex-
terior mirrors with a plastic scraper. To
239
Page 254 of 280
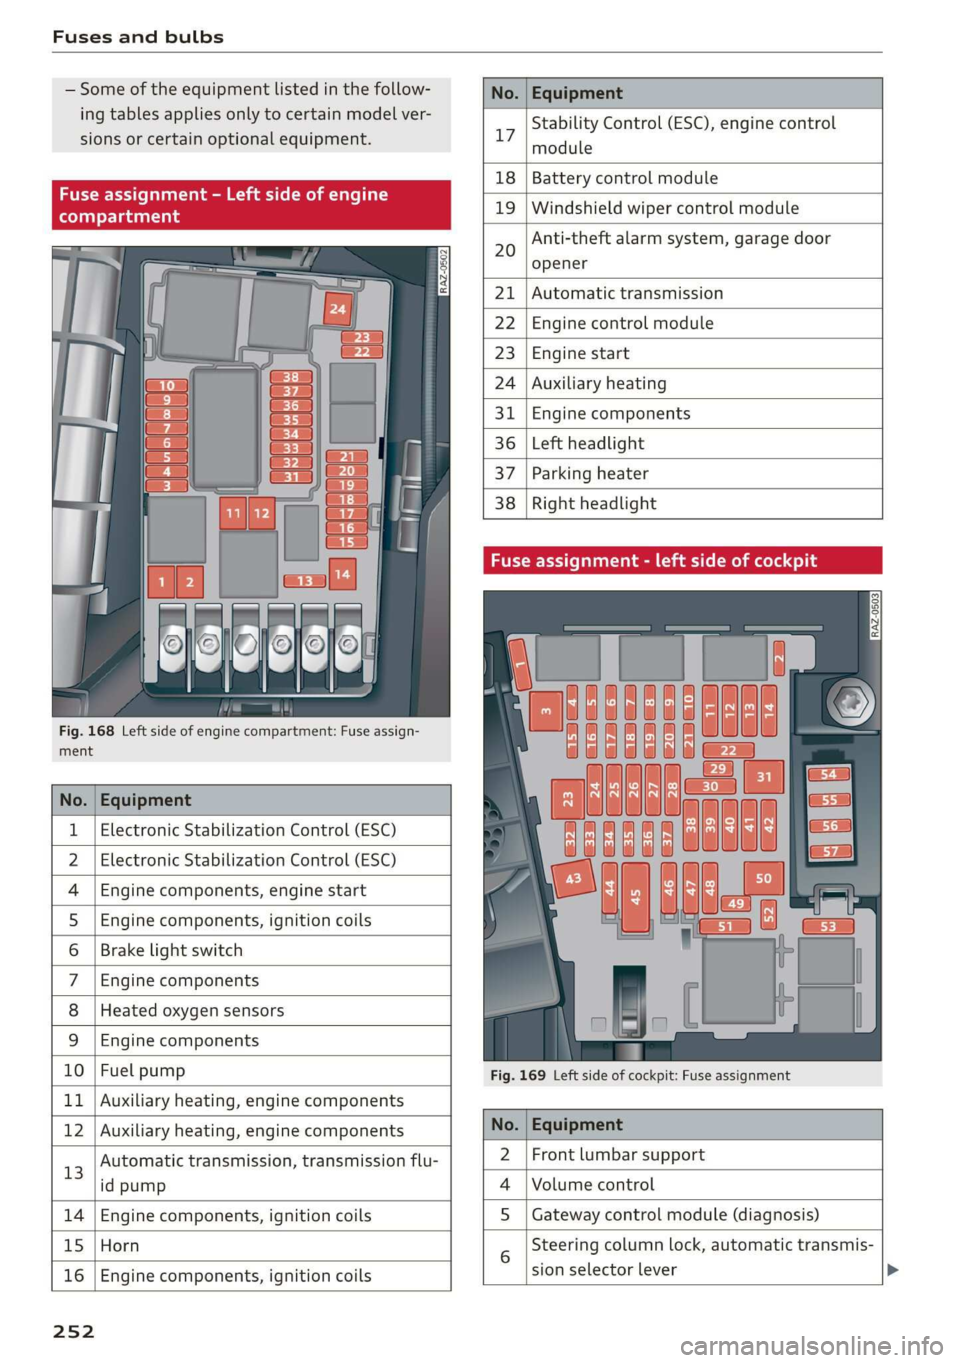
Fuses and bulbs
Some of the equipment listed in the follow-
ing tables applies only to certain model ver-
sions or certain optional equipment.
No. | Equipment
Stability Control (ESC), engine control
17
module
le of e
OVye OVOVO
Fig. 168 Left side of engine compartment: Fuse assign-
RAZ-0502
18 | Battery control module
19 | Windshield wiper control module
Anti-theft alarm system, garage door
opener
20
Automatic transmission
Engine control module
Engine start
Auxiliary heating
Engine components
Left headlight
Parking heater
Right headlight
ment
No. | Equipment
1 | Electronic Stabilization Control (ESC)
2 | Electronic Stabilization Control (ESC)
4 |Engine components, engine start
5 |Engine components, ignition coils
6 | Brake light switch
7 |Engine components
8 | Heated oxygen sensors
9 | Engine components
10 | Fuel pump
11 | Auxiliary heating, engine components
Fig. 169 Left side of cockpit: Fuse assignment
bh N Auxiliary heating, engine components No. | Equipment
13
Automatic transmission, transmission flu-
id pump
2 |Front lumbar support
Volume control
14 Engine components, ignition coils S | Gateway control module (diagnosis)
15 Horn
16
Engine components, ignition coils
sion selector lever
25 2
Steering column lock, automatic transmis-
Page 270 of 280
Index
Electroniciimmobilizetiiecs:. 2 sive 6 oes «2 ane 32
Electronic Stabilization Control............ 98
Embedded SIM’ card « savers ¢ « sways x 2 caw 9 a 155
Emergency assistance ..........eeeeveee 242
Emergency braking function.............. 91
Emergency call... .. 2... eee eee eee 146
Emergency flashers...............00000 45
Emergency mode.............-.000e00ee 85
Emergency operation
Doors... . eee 30
Fuel tillerdoop': = suo « s sense « = woe & 2 as 202
Luggage compartment lid............... 37
Panoramic glass roof.............000005 40
Emissions control system..............- 202
EMGNQy'CONSUIMIENSS. « » weceim o 9 eesmee «. oneness 15
Energy management.............-.00005 87
Engine
Breakingin........... 2... eee ee eee eee 86
GOGlANE sexes + = seme 5 3 fmeu so eee E Ea EE 209
EMe@rgeney:Stopis oo sis oo merce 2 2 warars & wane 80
Jump starting....................00. 246
Start/Stop system sss + ¢ eevee & x eaies ys ae 87
Starting/Stopping’« « «se. ss eees ee ew os 80
Engine compartment
Opening/closing the hood.............. 204
Overview... 2... cece eee eee 205
Safety precautions............-.00000e 203
Engine oil
AGING essa is 2 woxwon so sesma oe oraess ww mene 205
Changing.......-...... cee eee eee eee 208
Checking oil level... 02.2... cece eee 205
CONSUMPELON: ¢ & smc o sores.» o saws @ 3 cosas 205
TOdicatOrlight » serie «0 ose » mauesee © veer 206
Replacement interval................. 215
Engine sound
Audi GriveS@leCt s cas + = waves © » seaneie +» wee 96
Engine Start/Stop mode
refer to Start/Stop system........... 87, 88
Engine start system ...... cece ese eeee vee 81
Engine stop
refer to Start/Stop system........... 87, 88
Environment
Unleaded gasoline.................... 199
eSIM
refer to Embedded SIM card............ 155
Event Data Recorder (EDR).............. 255
268
Exterior lighting: «cscs + come + = over © = ove 43
EXteniOn MIRPONS sic omer ov mew @ wae a 8 47
Folding settings...............-.000005 29
External voice operation................. 25
E
Factory default settings
Multi Media Interface................. 196
Fast forwarding and rewinding (media file). 185
Fast forwarding (media files)............ 185
FaStrOute’s « sesces so scene vo meses 6 8 aeenes va 160
Favorites
Bluetooth. ......... 20.0.0... cece eee 197
NaWiGatiOliess ¢ ssa s + eeu & ¥ Rams & x BES 162
Tele PON ascna x a vow ve meas oo een ow ae 144
Federal Communications Commission (FCC) . 261
File formats (media drives) .............. 190
Folding the rear seats.............-.0005 75
For the sake of the environment
Disposing of engine oil................ 208
Fueling sis «2 encve 2 @ sovioe xo aename 2 6 come 3 ore 200
Leaks... eee eee eee eee 204
Forward gear
(EEF tO GESTS < = oss ¢ s Sues & ¥ ware = a ea ss 82
Free text search
Medldies « « cas 4 caw < were & & pee 6 x ees 189
Radio... 2... ee eee 177
also refer to Intelligent search.......... 160
Freeze protection
COOlAnt « sews s = sees ss ees s eee es BE 209
Front center armrest.................0.. 55
LO 199
Additives: : zoxs ss qewu so seen 2 y BeeE a Fe 200
CUrreNnt:CONSUMPTION’: « « sicsers s 6 covers a 6 sewnaie 14
Fuel gauge......... 2. eee eee eee eee ny
Fuel tank capacity.
Gasolines. « «ssw se cmon x mene © x ete w «aoe 199
Reducing fuel consumption............. 86
Fueling
FUL TILLERAOOF ec ¢ < eacee sy were se aecee ev 200
Fuel filler door emergency release....... 202
Fuel tank capacity...............00005 264
Fuse.aSSiQnMentis « ¢ wscce x owes oo stemme 2 oe 252
G
Garage:dooropene tiie. ov savas i x wracne ow anvenes 40