trailer AUDI Q3 2019 Owners Manual
[x] Cancel search | Manufacturer: AUDI, Model Year: 2019, Model line: Q3, Model: AUDI Q3 2019Pages: 280, PDF Size: 72.73 MB
Page 4 of 280
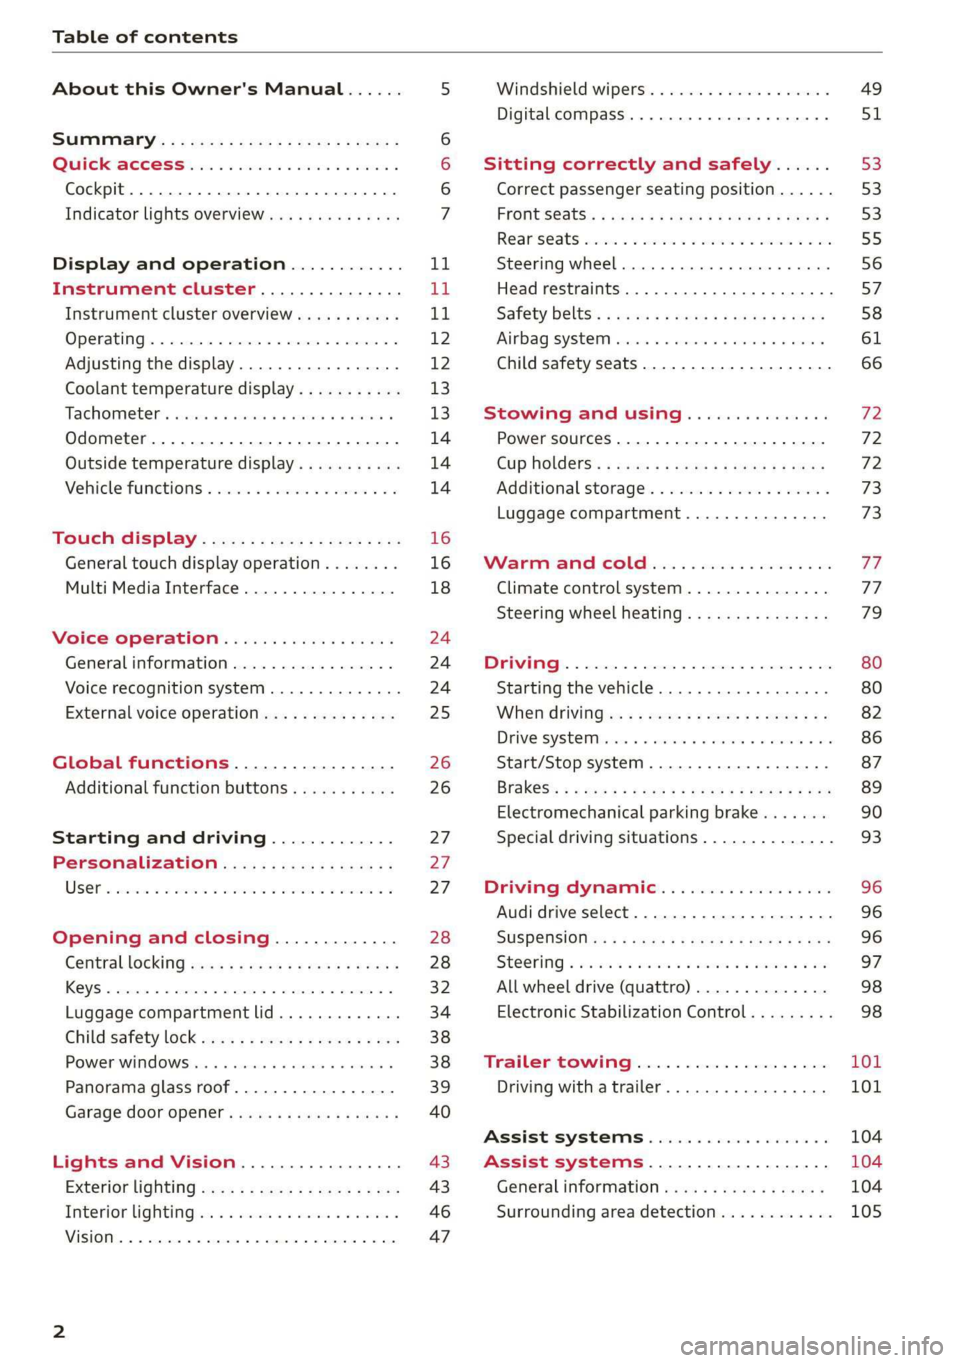
Table of contents
About this Owner's Manual......
SUMIMALY: ; « ss6% : osen ss sean cs poe s
QC CCeS Skis: si esis a 6 ores os ewe
Cockpit... 2... ee eee eee eee
Indicator lights overview...........0.
Display and operation............
Instrument cluster...............
Instrument cluster overview...........
Operating. ecco ws swacemn o © aero o erm 9
Adjusting the display.................
Coolant temperature display...........
Tachometer’. series s ewie so sie ¥ & overs
Odometer............ 0. cee eee eee eee
Outside temperature display...........
Vehicle functions « se-0 2. ese ve eee ees
Touch’ display . 22... : secs ie eses ees
General
touch display operation........
Multi Media Interface................
Voice operation..................
Generalinformation.................
Voice recognition system..............
External voice operation..............
Global functions.................
Additional function buttons...........
Starting and driving.............
Personalization..................
Luggage compartment lid.............
Child safety lock sa04 45 eec4 es eee e ee ees
Power Windows. . 6 sce « 6 umes #6 enna o
Panorama glass roof...............--
Garage door Opener’: sens ss esas se cess
Lights and Vision.................
Exterior lighting sees < = sees « « eee% sv oe
Interior liQhtingios . esas + exe ee ews x
VISION... eee eee
NOD
OO
13)
16 16 18
24 24 24
25
26 26 27 27 27 28 28
32
34
38 38 39
40
43 43
46 47
Windshield wipers............--..+-- 49
Digital compass............0 000 eens 51
Sitting correctly and safely...... 53
Correct passenger seating position...... 53
FROntSeats|; + acres s 2 sees ss aan ae ee a 53
Rearseats sic 2 sea oo awn oo coon 7 9 oe 55
Steering wheel............00--000 00s 56
Head restraints..................000. 57
Safety belts: « ssa: s 2 wens 5 2 worms x s sawn 58
Airbag system... .. cc eee eee eee 61
Child safety seats..............0.00.. 66
Stowing and using............... 72
Power SOUrCeES ...... eee eee eee 72
Cup Holders: « saws = ¢ seme + ¢ eas ¢ e ees 72
Additional storage...............005. 73
Luggage compartment............... 73
MVEA COLD css 2 3 asic ¥ & mame @ owe vag
Climate control system............... 77
Steering wheel heating............... 79
DOUNTINY 5 sressies oc & nensnte 6 0 eyertn © « suetans «ox 80
Starting the vehicle................-. 80
When driving:s: + csys = cece ee ees eee 82
DEIVE SYSEE Mc «0 ameneime 6 meneme 6 ot cuenet = ate 86
Start/Stop system ..........2..00 eee 87
Brak@s’: < « qemy + quvep x 2 mee gs meme es ew 89
Electromechanical parking brake....... 90
Special driving situations.............. 93
Driving dynamic.................. 96
Audi drive select..................00. 96
SUSPENSION s: « s sass < & ees § ¢ ees ee ee 96
STCOTING & wesw os soars wo woeaNe ww asteRTNG w Fae 97
All wheel drive (quattro).............. 98
Electronic Stabilization Control......... 98
Trailer towing.................... 101
Driving with atrailer................. 101
ASSISTISYSTEMMS © cssesic ss csssers & wassuers oa 104
Assist systems.................-. 104
General information . 00.4. ec0. 6 sews 104
Surrounding area detection............ 105
Page 89 of 280
83A012721BA
Driving
— Turn off electrical equipment that is not need-
ed, for example seat heating*.
— Anticipate upcoming traffic situations while
driving to avoid unnecessary acceleration and
braking.
— Avoid driving at high speeds.
— Avoid adding extra weight to the vehicle if pos-
sible, for example by not leaving roof racks or
bike racks installed when they are not needed.
— Make sure the tire pressure is correct.
— Have maintenance performed regularly on the
vehicle.
— Do not let the engine run while the vehicle
parked.
— Do not drive with winter tires during the summ-
er.
— Use the Start/Stop system.
— Utilize the engine braking effect.
— Avoid driving short distances when possible.
@ Tips
The amount of noise produced by the vehicle
can increase significantly when driving with a
sporty style. Show respect to others around
you and the environment with the way you op-
erate your vehicle, especially at night.
Energy management
Your vehicle is equipped with an intelligent ener-
gy management system for distributing electrici-
ty. This significantly improves the starting ability
and increases the vehicle battery life.
@ Tips
— If you drive short distances frequently, the
vehicle battery may not charge enough
while driving. As a result, convenience func-
tions for electrical equipment may be tem-
porarily unavailable.
— The vehicle battery will gradually drain if
the vehicle is not driven for long periods of
time, or if electrical equipment is used
when the engine is not running. To ensure
that the vehicle can still be started, the
electrical equipment will be reduced or
switched off.
B Drive system: malfunction! Safely stop vehi-
cle
There is a malfunction in the drive system. The
brake
booster and the power steering may stop
working. Stop the vehicle immediately or as soon
as possible and do not continue driving. Have the
problem corrected by an authorized Audi dealer
or authorized Audi Service Facility.
B Drive system: malfunction! Please contact
Service
There is a malfunction in the drive system. Drive
slowly to an authorized Audi dealer or authorized
Audi Service Facility to have the malfunction cor-
rected.
Start/Stop system
Applies to: vehicles with Start/Stop system
The Start/Stop system can help increase fuel
economy and reduce CO2 emissions.
In Start/Stop mode, the engine shuts off auto-
matically when stopped, for example at a traffic
light. The ignition and important assist systems
such as power steering and the brake booster will
remain available during the Stop phase. The en-
gine will restart automatically when needed.
The Start/Stop system is automatically activated
once the ignition is switched on.
Basic requirements
— The driver's door and hood must be closed.
—"P","N", or"D" must be engaged.
— The steering wheel must not be turned far in ei-
ther direction.
— The vehicle must have driven faster than 2 mph
(3 km/h) since the last time it stopped.
—The vehicle is not in trailer mode.
@) Note
Always switch the Start/Stop system off when
driving through water > page 88. >
87
Page 93 of 280
83A012721BA
Driving
> To start driving and release the parking brake
automatically, press the accelerator pedal as
usual.
In addition to releasing the parking brake auto-
matically, other convenience and safety functions
are available when you start driving > page 92,
Hold assist.
Preventing the automatic parking brake
release
The vehicle could begin rolling unintentionally,
depending on the hill or if towing a trailer.
> To prevent the parking brake from releasing au-
tomatically, pull and hold the switch and
press the accelerator pedal. The parking brake
remains set and prevents the vehicle from roll-
ing backward.
> You can release the ©) switch again once you
are sure that you are giving enough driving
force
to the wheels by pressing the accelerator
pedal.
Emergency braking function
You can use the emergency braking function in an
emergency situation, or if the standard brake op-
eration malfunctions or is disabled.
> Pull and hold the ©) switch.
> As soon as you release the ©) switch or acceler-
ate, the braking will stop.
Pulling and holding the ©) switch while driving
the vehicle activates the emergency braking func-
tion. The vehicle is braked at all four wheels by
activating the hydraulic brake system. The brak-
ing effect is similar to heavy braking > A\.
To reduce the risk of activating the emergency
braking by mistake, a warning tone (buzzer)
sounds when the ©) switch is pulled. Emergency
braking stops as soon as the ©) switch is released
or the accelerator pedal is pressed.
Parking
> Press the brake pedal to stop the vehicle.
> Pull the ©) switch to set the parking brake.
> Select “P”.
> Turn the engine off > A\.
> Turn the steering wheel when parking on in-
clines so that the wheels will roll into the curb
if the vehicle starts moving.
ZA\ WARNING
— Do not press the accelerator pedal inadver-
tently if a gear is selected when the vehicle
is stationary and the engine is running. Oth-
erwise, the vehicle will start to move imme-
diately and this could result in an accident.
— Emergency braking should only be used in
an emergency, when the normal brake pedal
has failed or the brake pedal is obstructed.
During emergency braking, your vehicle will
brake similar to heavy braking. ESC and the
associated components (ABS, ASR, EDL) can-
not overcome the laws of physics. Around
curves and when road or weather conditions
are bad, a full brake application can cause
the vehicle to skid or the rear end to swerve,
which increases the risk of an accident.
— Always set the parking brake when leaving
your vehicle, even if for a short period of
time. If the parking brake is not set, the ve-
hicle could roll away, increasing the risk of
an accident.
— If the power supply fails, you cannot set the
parking brake if it is released. In this case,
park the vehicle on level ground and secure
it by engaging the "P” gear. Contact an au-
thorized Audi dealer or authorized Audi
Service Facility for assistance.
— If you leave the vehicle, switch the ignition
off and take the key with you. This applies
particularly when children remain in the ve-
hicle. Otherwise, children could start the ve-
hicle, release the parking brake, or operate
electrical equipment such as power win-
dows, which increases the risk of an acci-
dent.
— No one, especially children, should remain in
the vehicle when it is locked. Locked doors
make it more difficult for emergency work-
ers to get into the vehicle, which puts lives
at risk.
91
Page 103 of 280
83A012721BA
Trailer towing
Trailer towing
Driving with a trailer
General information
Your vehicle is primarily intended for transport-
ing people and luggage. However, if you drive
with a trailer, follow the technical requirements,
the operation and driving tips, and the legal reg-
ulations.
Driving with a trailer affects the vehicle's energy
usage, performance, and wear. It also requires
higher concentration from the driver.
Z\ WARNING
Do not transport any people in a trailer due to
the risk of fatal injury.
Technical requirements
Certain requirements must be met when towing
a trailer.
Trailer hitch
Only use a trailer hitch with a removable ball
hitch mount and ball hitch. The trailer hitch must
be permitted for the vehicle, the trailer and the
permitted total weight of the trailer being
pulled. Above all, it must be securely and safely
attached to the vehicle trailer.
Never mount a trailer hitch on the bumper. The
trailer hitch must be mounted in a way that does
not impair the function of the bumper. Do not
make any changes to the exhaust system and the
brake system.
Check regularly if the trailer hitch is securely
mounted. Always follow the instructions given by
the trailer hitch manufacturer.
Trailer brakes
If the trailer has its own brake system, then fol-
low the manufacturer specifications. However,
the brake system on the trailer must never be
connected to the vehicle brake system.
Engine cooling system
Driving with a trailer means a higher load on the
engine and the cooling system. The cooling sys-
tem must be designed for additional load and
contain enough coolant > @.
Z\ WARNING
— Never mount a "weight-distributing" or
"load-balancing" trailer coupler as the trailer
hitch. The vehicle was not designed for
these types of trailer hitches. The trailer
hitch can malfunction and the trailer can
break off from the vehicle.
— If the trailer is equipped with electronic
brakes, these brakes cannot be activated by
a factory-installed control system, which in-
creases the risk of an accident.
—To reduce the risk of injury, always remove
the ball hitch mount if no trailer is mount-
ed
® Note
Longer inclines cannot be driven without a
suitable cooling system, especially if the out-
side temperatures are high. otherwise, this
increases the risk of engine damage.
Operating instructions
Towing capacity
Never exceed the maximum permitted weights
=> page 264.
In some scenarios, the load in trailer mode can
be reduced due to the permitted towing weight.
You can drive up larger inclines if you are not us-
ing the maximum towing capacity.
The towing capacities given only apply to eleva-
tions up to 3,200 ft (1,000 m) above sea level. As
the elevation increases, the engine power de-
creases due to the decreasing air pressures. This
reduces the hill climbing ability and towing ca-
pacity. For every additional 3,200 ft (1,000 m),
the maximum permitted towing weight must be
reduced by approximately 10%. The permitted
towing weight is the combined weight of the
(loaded) vehicle and the (loaded) trailer.
101
Page 104 of 280
Trailer towing
Tongue weight
The maximum permitted tongue weight of the
trailer drawbar on the trailer hitch ball head may
not be exceeded.
If the tongue weight is too low, this affects the
trailer's handling. For driving safety, we recom-
mend to always utilize the maximum permitted
tongue weight, but not exceed it. You can reach
it, for example, by distributing the cargo in the
trailer correctly.
You can determine the tongue weight using a
tongue weight scale, a bathroom scale, or a pub-
lic weigh station, for example.
The permitted tongue weight of your vehicle can
be found in the vehicle documentation or in
=> page 264.
Load distribution
Poor cargo load and distribution can negatively
impact vehicle handling. Load the trailer based
on the following criteria as much as possible:
— Store objects preferably in the vehicle luggage
compartment. The vehicle should always carry
the heaviest possible load and the trailer
should have the lightest possible load.
— Distribute the load in the trailer so that the
heavy objects are as close to the axle as possi-
ble.
— Secure objects from sliding out of place.
— Utilize the maximum permitted tongue weight
if possible.
Tires
Set the tire pressure on your vehicle for a “full
load”; see the tire pressure sticker > page 226. If
necessary, also adjust the tire pressure on the
trailer according to the manufacturer's recom-
mendation.
Winter tires should be mounted on the vehicle
and on the trailer during winter temperatures.
Outside mirrors
If you cannot see the traffic behind the trailer
with the standard exterior mirrors, then you
must attach additional exterior mirrors. Adjust
102
them so you have a sufficient visibility behind
you.
Exterior lighting
Follow the legal regulations for lighting on your
trailer that are applicable in the country where
you are operating the vehicle. Contact an author-
ized Audi dealer or authorized Audi Service Facili-
ty for more information.
Before starting to drive, check all lighting equip-
ment on the hitched trailer.
The headlight range control adjusts automatical-
ly to the light range of the headlights.
Safety chains
Make sure the safety chains are correctly applied
when pulling a trailer. The chains should hang
enough so that the trailer can drive around
curves. However, they must not touch the
ground.
@) Note
Attachments retrofitted on the vehicle may
cause damage, especially on the trailer hitch
ball head. In cases of damage, have the func-
tion checked by an authorized Audi dealer or
authorized Audi Service Facility.
G) Tips
— Use chocks when parking on inclines if the
trailer is loaded.
—We recommend also having the vehicle in-
spected between the inspection intervals if
you are towing a trailer frequently.
— Avoid driving with a trailer during the vehi-
cle break-in period.
Driving with a trailer
Driving with a trailer requires extra caution.
Speed
Adhere to the legal speed limits. Follow the legal
regulations that are applicable in the country
where you are operating the vehicle.
Page 105 of 280
83A012721BA
Trailer towing
As the speed increases, the driving stability of
the trailer decreases. Therefore you should not
exceed the maximum legal speed limit when
there are unfavorable road, weather and/or wind
conditions. This especially applies when driving
downhill.
Hill
When transitioning to hills, trailers may tilt or
sway sooner than when driving on a level surface.
If small swaying movements have already occur-
red, you can stabilize the trailer by firmly braking
immediately. Never try to “straighten out” the
trailer by accelerating.
Downshift before driving on hills to utilize the en-
gine braking effect > A\.
Brakes
When using a trailer with overrun brakes, first
brake gently then quickly. This reduces the risk of
jerking while braking if the trailer wheels lock up.
Engine coolant temperature
Pay attention specifically to the coolant tempera-
ture display when there are high outside temper-
atures, and when driving on long inclines
=> page 13. Shift to a higher gear in a timely man-
ner.
ZA WARNING
Constant braking causes the brakes to over-
heat and substantially reduces braking per-
formance, increases braking distance or caus-
es complete failure of the brake system.
103
Page 106 of 280
Assist systems
Assist systems
General information
Safety precautions
ZA WARNING
— As the driver, you are always completely re-
sponsible for all driving tasks. The assist
systems cannot replace the driver's atten-
tion. Give your full attention to driving the
vehicle, and be ready to intervene in the
traffic situation at all times.
— Activate the assist systems only if the sur-
rounding conditions permit it. Always adapt
your driving style to the current visual,
weather, road, and traffic conditions.
— Loose objects can be thrown around the ve-
hicle interior during sudden driving or brak-
ing maneuvers, which increases the risk of
an accident. Store objects securely while
driving.
— For the assist systems to be able to react
correctly, the function of the sensors and
cameras must not be restricted. Note the in-
formation on sensors and cameras
=> page 105 or > page 106.
@ Tips
— Pay attention to applicable local regulations
relating to driving tasks, leaving space for
emergency vehicles, vehicle distance, speed,
parking location, wheel placement, etc. The
driver is always responsible for following
the laws that are applicable in the location
where the vehicle is being operated.
— You can cancel a steering or braking inter-
vention by the system, by braking or accel-
erating noticeably, steering, or deactivating
the respective assist system.
— Always check the assist systems settings be-
fore driving.
104
System limitations
ZA WARNING
— The use of an assist system cannot over-
come the natural laws of physics. A collision
cannot be prevented in certain circumstan-
ces.
— Warnings, messages, or indicator lights may
not be displayed or initiated on time or cor-
rectly, for example, if vehicles are approach-
ing very fast.
— Corrective interventions by the assist sys-
tems, such as steering or braking interven-
tions, may not be sufficient or they may not
occur. Always be ready to intervene.
G) Tips
— Due to the system limitations when detect-
ing the surrounding area, the systems may
warn or intervene unexpectedly or too late
in certain situations. The assist systems may
also interpret a driving maneuver incorrectly
and then warn the driver unexpectedly.
— The systems may not function as expected
in unusual driving situations, such as driving
offroad, on unpaved roads, on loose ground,
on inclines, or on grooves in the road.
— The systems may not function correctly in
unclear traffic situations, such as turning
lanes, exit ramps, construction zones, rises
or dips that obstruct visibility, intersections,
toll stations, or city traffic.
—In trailer mode, some assist systems may be
limited, may not react as usual, or may be
unavailable. Please refer to the instructions
for towing a trailer located in > page 101.
— If accessories have been mounted on the
steering wheel, the ability for the steering
systems to react may be limited.
Page 107 of 280
83A012721BA
Assist systems
Surrounding area
detection
Sensor overview
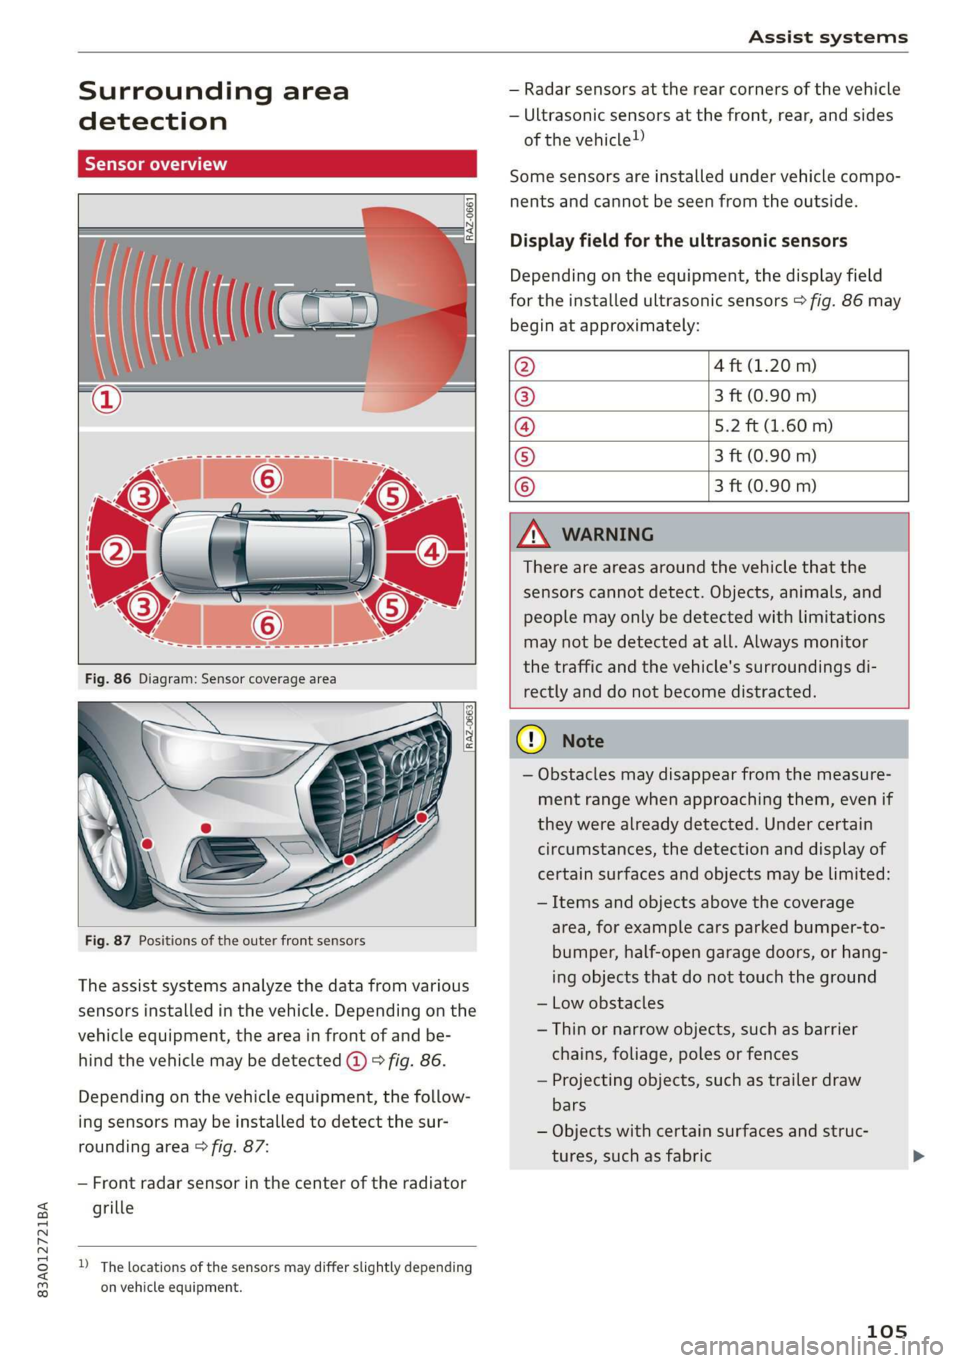
Fig. 87 Positions of the outer front sensors
The assist systems analyze the data from various
sensors installed in the vehicle. Depending on the
vehicle equipment, the area in front of and be-
hind the vehicle may be detected @) 9 fig. 86.
Depending on the vehicle equipment, the follow-
ing sensors may be installed to detect the sur-
rounding area > fig. 87:
— Front radar sensor in the center of the radiator
grille
D_ The locations of the sensors may differ slightly depending
on vehicle equipment.
— Radar sensors at the rear corners of the vehicle
— Ultrasonic sensors at the front, rear, and sides
of the vehicle)
Some sensors are installed under vehicle compo-
nents and cannot be seen from the outside.
Display field for the ultrasonic sensors
Depending on the equipment, the display field
for the installed ultrasonic sensors > fig. 86 may
begin at approximately:
4 ft (1.20 m)
3 ft (0.90 m)
5.2 ft (1.60 m)
3 ft (0.90 m)
OQ/@/@/E|© 3 ft (0.90 m)
ZA WARNING
There are areas around the vehicle that the
sensors cannot detect. Objects, animals, and
people may only be detected with limitations
may not be detected at all. Always monitor
the traffic and the vehicle's surroundings di-
rectly and do not become distracted.
@) Note
— Obstacles may disappear from the measure-
ment range when approaching them, even if
they were already detected. Under certain
circumstances, the detection and display of
certain surfaces and objects may be limited:
— Items and objects above the coverage
area, for example cars parked bumper-to-
bumper, half-open garage doors, or hang-
ing objects that do not touch the ground
— Low obstacles
— Thin or narrow objects, such as barrier
chains, foliage, poles or fences
— Projecting objects, such as trailer draw
bars
— Objects with certain surfaces and struc-
tures,
such as fabric
105
Page 109 of 280
Assist systems
83A012721BA
® Note sun shining into the lens, by dirt on the
lens, or if there is a malfunction.
— Obstacles may disappear from the measure- — The camera view on the display portrays an
ment range when approaching them, even if enlarged and distorted image. Under cer-
they were already detected. Under certain
circumstances, the detection and display of
certain surfaces and objects may be limited:
tain circumstances, objects may appear dif-
ferent and unclear on the display.
— Items and objects above the coverage
area, for example cars parked bumper-to-
bumper, half-open garage doors, or hang-
ing objects that do not touch the ground
— Low obstacles
—Thin or narrow objects, such as barrier
chains, foliage, poles or fences
— Projecting objects, such as trailer draw
bars
— Objects with certain surfaces and struc-
tures, such as fabric
@ Tips
— The coverage areas of the cameras > fig. 88
and > fig. 89 are diagrams and do not repre-
sent a true-to-scale image of the camera
coverage areas.
— Make sure all the cameras are clean and free
of snow and ice, and that the lenses are not
covered by stickers, deposits, or any other
obstructions, because this may impair the
function of the systems. Follow the infor-
mation about cleaning > page 236.
— Do not use a license plate bracket different
from the one installed by the factory in the
front of the vehicle, because it may impair
the function of dependent systems.
— The camera can shift from an accident, man-
ual force, impacts, or from damage to the
radiator grill, bumper, wheel housing or un-
derbody. Have an authorized Audi dealer or
authorized Audi Service Facility check their
function.
— The function of the cameras may be limited
when light and visibility conditions are poor,
for example when driving into a tunnel,
when there is glare, or when there are re-
flective objects.
— Use the image on the display to assist you
only if it shows a good, clear picture. For ex-
ample, the image may be affected by the
107
Page 125 of 280
83A012721BA
Driver assistance
of sharp braking. You will also be warned by an
indicator in the instrument cluster display. When
this warning occurs, it may only be possible to
avoid a collision by swerving or braking strongly.
Automatic deceleration
If you do not react to the acute warning, Audi pre
sense front can brake the vehicle to a full stop
within the limits of the system. This reduces the
vehicle speed in the event of a collision.
Automatic braking force increase
If Audi pre sense determines that you are not
braking strongly enough when a collision is immi-
nent, it can increase the braking force based on
the situation.
Take-over
If the message oa Please take over! appears, the
vehicle has been braked to a stop by Audi pre
sense and you must resume control of the vehi-
cle.
Z\ WARNING
— Follow the safety precautions and note the
limits of the assist systems, sensors, and
cameras > page 104.
— Audi pre sense front cannot overcome natu-
ral physical laws. It is a system designed to
assist and it cannot prevent a collision in ev-
ery circumstance. The driver must always in-
tervene. The driver is always responsible for
braking at the correct time. Do not let the
increased safety provided tempt you into
taking risks. This could increase your risk of
a collision.
— Among other things, Audi pre sense front
does not react to pedestrians who are sta-
tionary, stopped, oncoming, and crossing at
an angle. It also does not react to cyclists,
groups of people, animals, crossing vehicles,
or oncoming vehicles and objects, such as
posts, guardrails, and railway vehicles.
— Audi pre sense front may be limited or un-
available when driving in curves.
D_ In certain countries
— Loose objects can be thrown around the ve-
hicle interior during sudden driving or brak-
ing maneuvers, which increases the risk of
an accident. Store objects securely while
driving.
—In trailer mode, the braking behavior of the
trailer can be different than usual during au-
tomatic braking.
G) Tips
— If you switch off the ESC, Audi pre sense al-
so switches off automatically > page 99.
— Certain Audi pre sense front functions are
unavailable or have limited availability for
approximately 20 seconds after starting the
vehicle (may be longer depending on the
driving situation).
Adjusting Audi pre sense
Applies to: vehicles with Audi pre sense
You can adjust the Audi pre sense functions to
your preferences. The settings depend on the ve-
hicle equipment.
> Applies to: MMI: Select on the home screen:
VEHICLE > Driver assistance > Audi pre sense.
Possible settings:
The system can be switched off and on.
Prewarning!) - The prewarning can be switched
off or the Audi pre sense warning time can be set
(Early/Medium/Late).
Set the warning time for the early warning to
Early at first. If you feel that the prewarnings ap-
pear too early, then set the warning time to Me-
dium. The Late warning time should only be set
in special circumstances.
@) Tips
— If Audi pre sense is switched off, it switches
on again automatically once the ignition is
switched on again.)
— Switch Audi pre sense off when you are not
using public streets, when loading the
123
>