seat memory AUDI Q5 2014 Owners Manual
[x] Cancel search | Manufacturer: AUDI, Model Year: 2014, Model line: Q5, Model: AUDI Q5 2014Pages: 316, PDF Size: 78.41 MB
Page 11 of 316
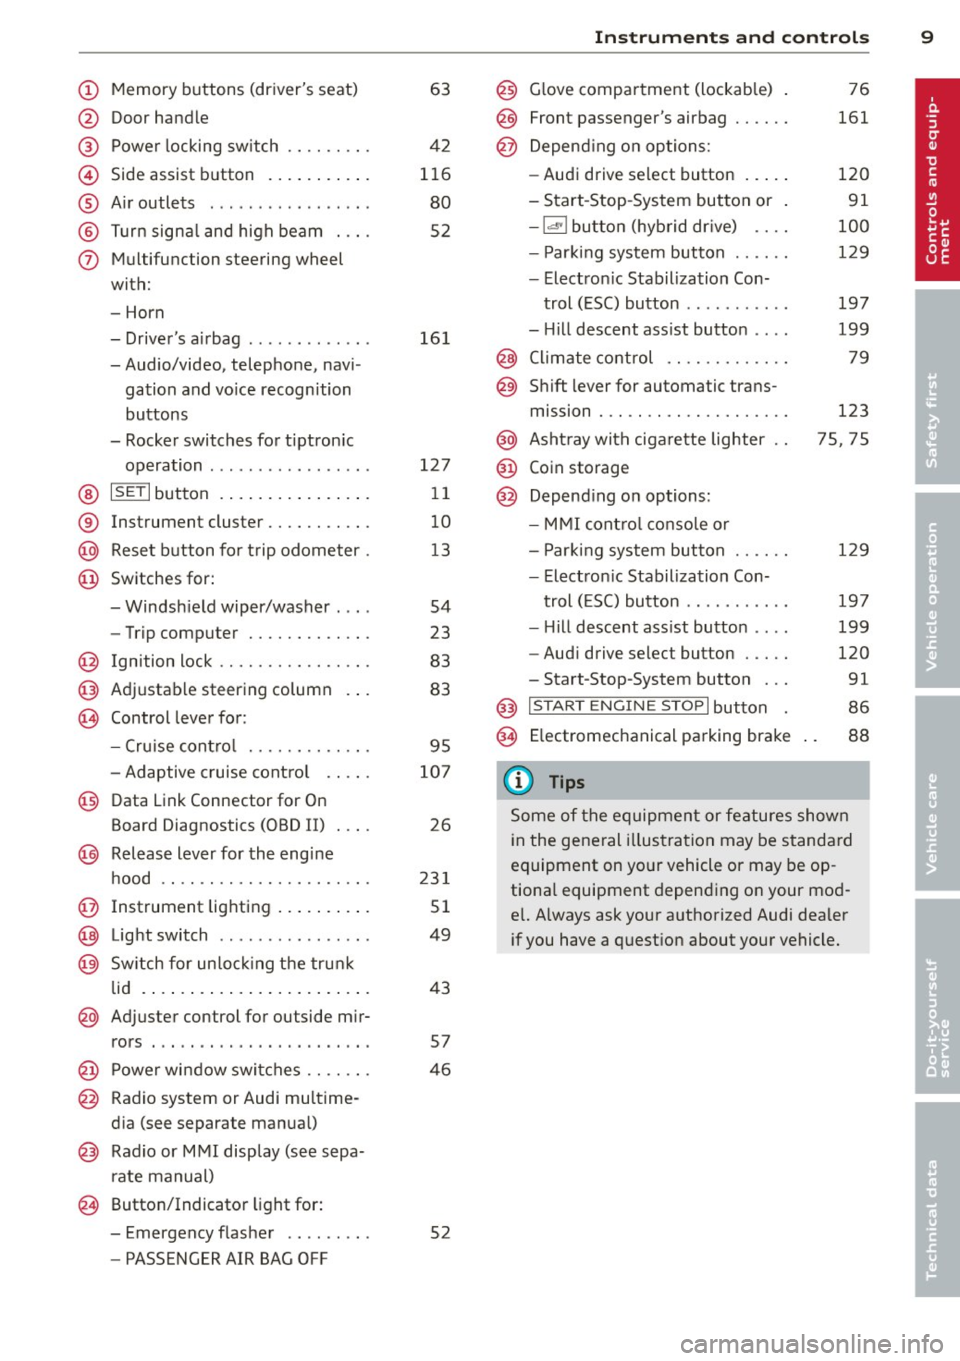
(!) Memory buttons (driver's seat)
@ Door handle
@ Power locking switch ........ .
© Side assist button ....... ... .
® A ir outlets .... .. ... ... .. .. .
@ Tu rn signa l and high beam . .. .
(j) Multifunction steering wheel
with:
- Horn
- Driver's airbag ............ .
- Audio/video, telephone, navi-
gation and vo ice recognition
buttons
- Rocker switches for tiptron ic
operation ................ .
@ ISETI button ... ..... ... ... . .
® Instrument cluster .......... .
@ Reset button for trip odometer .
@ Switches for:
- Windsh ield wiper/washer . .. .
- Trip computer ............ .
@ Ign ition lock ............... .
@ Adjustable steering column
€3J Control lever for:
- Cru ise contro l ........ .. .. .
- Adaptive cruise contro l .. .. .
@ Data Link Connector for On
Board Diagnostics (OBD II) . .. .
@ Release lever for the engine
hood .. .. .... ............. .
@ Instrument lighting .. ... .. .. .
@ Light switch ... .. ... ... .. .. .
@ Sw itch for un loc king the trunk
lid .... .. .. .... .. .... ... .. .
@ Adjuster control for outside mir-
63
42
116
80
52
16 1
127
11
10
13
54
23
83
83
95
107
26
23 1
51
49
43
rors . . . . . . . . . . . . . . . . . . . . . . . 57
@ Power wi ndow switches . . . . . . . 46
@ Radio system or Audi mu ltime-
d ia (see separate manual)
@ Radio or M MI display (see sepa
rate manual)
@ Button/Indicator light for:
- Emergency flasher . . . . . . . . . 52
- PASSENGER AIR BAG OFF
Instrument s and control s 9
@) Glove compartment (lockab le)
@
@
Front passenger's airbag ..... .
Depend ing o n options:
- Audi drive select button
- Start -Stop-System button or
- 1.cl •I butto n (hybrid drive) ... .
- Par king system button ..... .
- Electron ic Stabilization Con-
trol (ESC) button .......... .
- Hill descent ass ist button ... .
@ Climate control .... ........ .
@ Shift lever for automatic trans-
mission . .. .. .. .... ........ .
@ Asht ray with ciga rette lighter
@ Coin storage
@ Depend ing on options:
- MMI cont ro l conso le or
- Park ing system button ..... .
- Electron ic Stabilization Con-
trol ( ESC) button .......... .
- Hill descent ass ist button ... .
- Aud i drive select button .... .
-Start-Stop-System button .. .
@) I S T ART ENGI NE STOPI button
§) Electromechanical parking brake
{!) Tips
76
161
120
91
100
129
197
199
79
123
75, 75
129
19 7
199
120
91
86
88
Some of the equipment or features shown
in the general illustration may be standa rd
equipment on yo ur vehicle or may be op
tiona l equipment depending o n your mod
e l. Always ask your authorized Audi dealer
i f you have a quest ion about your vehicle.
Page 59 of 316
.. Fold the windshield wiper arm back onto the
windshield.
A WARNING
For safety reasons, the windshield wiper
blades should be replaced once or twice
each year.
Mirrors
Adjusting the exterior mirrors
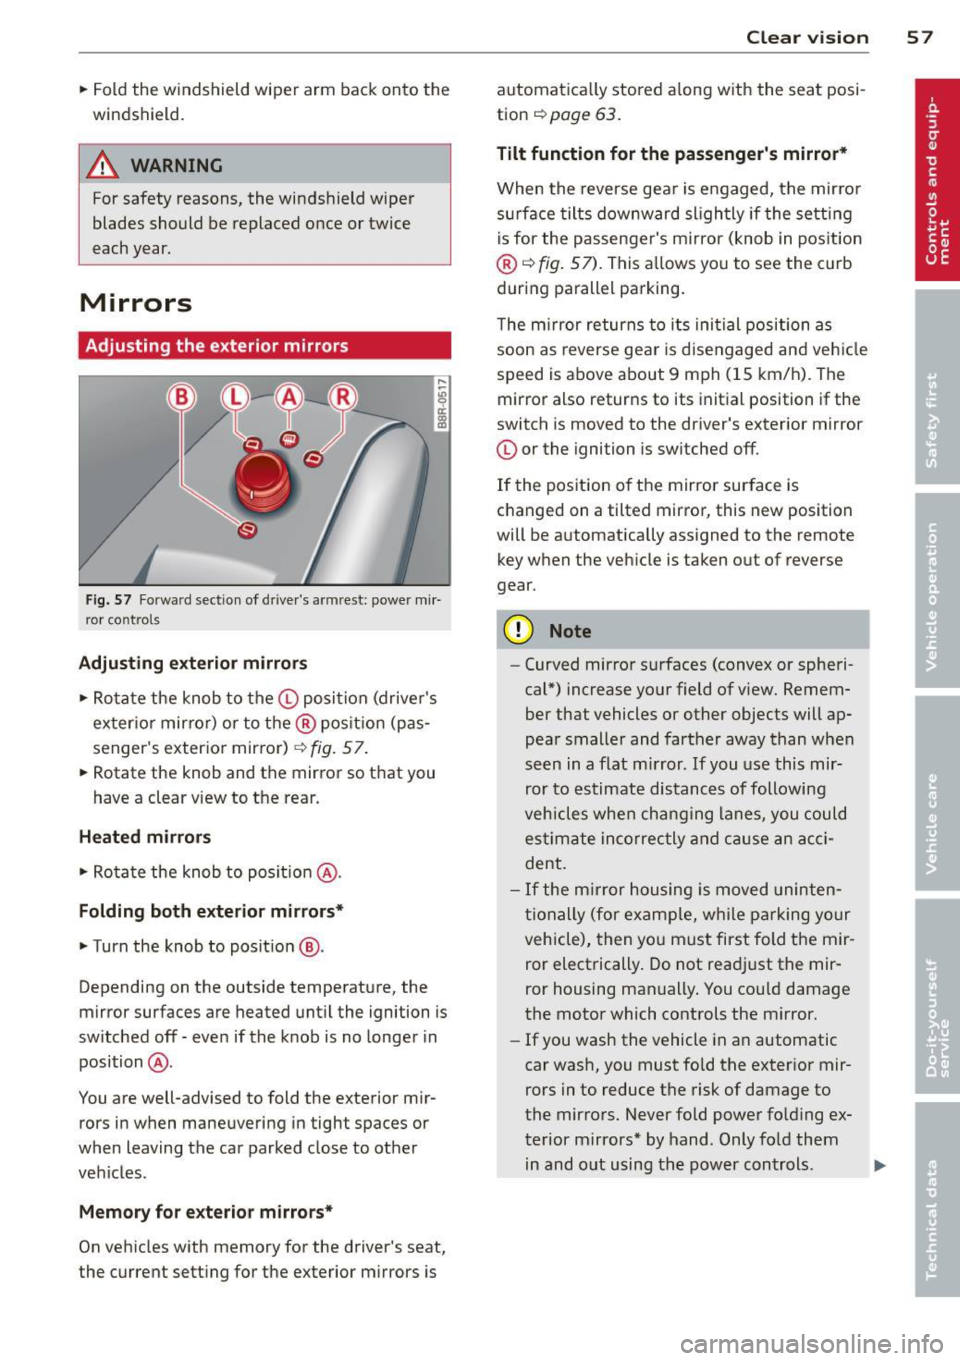
F ig. S7 Fo rwa rd sec tion of drive r's ar m rest : power mir
r or co ntro ls
Adjusting ext erior mirrors
.,. Rota te the knob to the© posi tion (drive r's
exter io r mirro r) or to the ® pos it ion (pas
senger's exter io r mirro r)
c::> fig. 57 .
.. Rotate the knob and the mirror so t hat you
have a clear view to t he rear.
Heated mirrors
.. Ro ta te the knob to pos it io n @ .
Folding both exterior mirrors*
.. Turn the knob to position @.
-
Depending on the outside temperature, the
mirror surfaces are heated unt il the ignition is
switched off -even if the knob is no longer in
position @.
You are well-advised to fold the exterior m ir
rors in when maneuveri ng in tight spaces or
when leaving the car parked close to other
vehicles .
Memory for exterior mirror s*
On vehicles with memory for the driver's seat,
the current sett ing fo r the exterior m irrors is Clear vi
sion 5 7
automatica lly stored a long with the sea t posi
tion
c::> page 63.
Tilt function for the passenger 's mirror*
When the reverse gea r is engaged, the mir ro r
s ur face tilts downward sl igh tly if the sett ing
i s for the passenge r's m irror (knob in pos it ion
®
c::> fig . 57). This a llows you to see the c urb
dur ing parallel pa rking.
T he m irror returns to its ini tial position as
soon as reverse gea r is disengaged and veh icle
s p eed is above about 9 mph (15 km/h) . The
mirror also returns to its init ial position if the
switch is moved to the dr iver's exterior m irror
© or the ignition is sw itched off.
If the position of the mirror surface is
c hanged on a tilted mirror, this new position
will be a utomatically ass igned to the remote
key w hen the veh icle is taken out of reverse
gear.
(D Note
- Curved mirror s urfaces (conve x or spheri
cal*) increase yo ur field of v iew. Remem
ber that vehicles or other objects will ap
pear smaller and farther away than when
seen in a flat m irror. If you use this mir
ror to estimate dis tances of following
vehicles whe n cha nging lanes, y ou coul d
es tim ate incorrec tly and c ause an ac ci
dent .
- I f the m irro r h ousing is moved uninten
ti onally (for e xam ple, w hile p arking yo ur
vehicle), then yo u must first fold the mir
ror elect rically . Do not read just the mir
ror housing man ually . You cou ld damage
the motor which controls the mirror.
- If you wash the vehicle in an automatic
car was h, you must fold the exterior mir
rors in to reduce the risk of damage to
the mirrors . Never fold power fo lding ex
terior mirrors* by hand . Only fo ld them
in and o ut using th e power controls .
liJl,
Page 65 of 316
Seat memory
Memory for driver's seat
Applies to vehicles: with seat memory
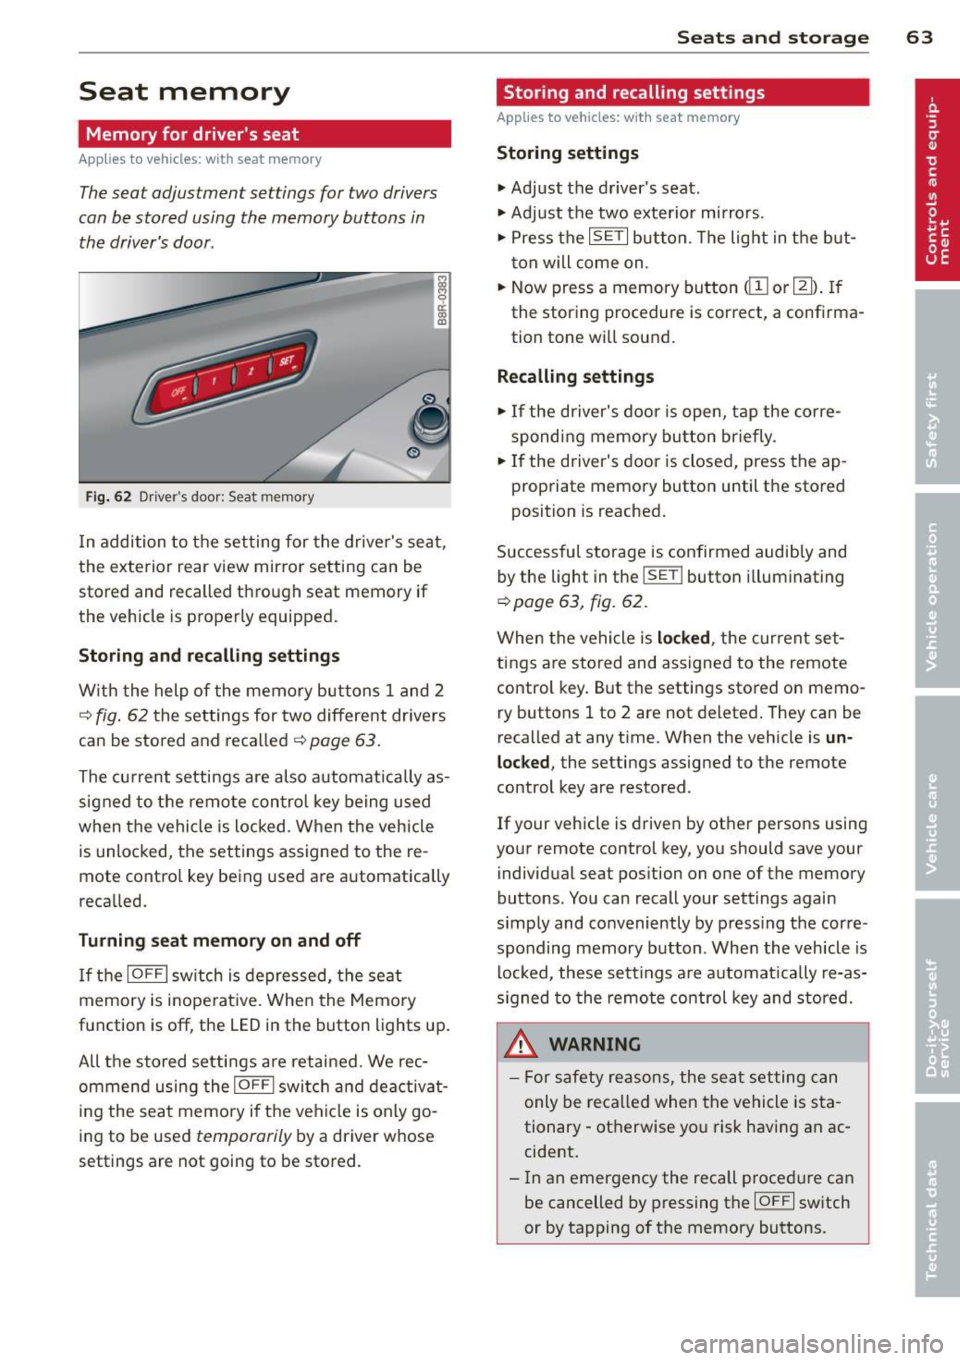
The seat adjustment settings for two drivers
can be stored using the memory buttons in
the driver's door.
Fig. 62 Driver's door: Seat memory
In addition to the setting for the driver's seat,
the exterior rear view mirror setting can be
stored and recalled through seat memory if
the vehicle is properly equipped.
Storing and recalling settings
With the help of the memory buttons 1 and 2
c::> fig. 62 the settings for two different dr ivers
can be stored and recalled
c::> page 63.
The current settings are also automatically as
signed to the remote control key being used
when the vehicle is locked . When the vehicle
is unlocked, the settings assigned to the re
mote contro l key being used are automatically
recalled.
Turning seat memory on and off
If the IOFFI switch is depressed, the seat
memory is inope rative. When the Memory
function is off , the LED in the button lights up.
A ll the stored settings are retained. We rec
ommend using the
I OFFI switch and deactivat
ing the seat memory if the vehicle is only go
ing to be used
temporarily by a driver whose
settings are not going to be stored.
Seats and storage 63
Storing and recalling settings
Applies to vehicles: wit h seat memory
Storing settings
.,. Adjust the driver's seat.
.,. Adjust the two exterior mirrors.
.,. Press the
ISET I button. The light in the but
ton will come on .
.,. Now press a memory button
<[II or m). If
the storing procedure is correct, a confirma
tion tone will sound.
Recalling settings
.,. If the driver's door is open, tap the corre
sponding memory button briefly .
.,. If the driver's door is closed, press the ap
propriate memory button until the stored
position is reached.
Successful storage is confirmed audibly and
by the light in the
ISETI button i lluminating
c::> page 63, fig. 62 .
When the vehicle is locked , the current set
tings are stored and assigned to the remote
control key. But the settings stored on
memo
ry buttons 1 to 2 are not deleted. They can be
recalled at any time. When the vehicle is
un
locked ,
the settings assigned to the remote
control key are restored.
If your vehicle is driven by other persons using
your remote control key, you should save your
individual seat position on one of the memory
buttons. You can recall your settings again
s imply and conveniently by press ing the corre
sponding memory button . When the vehicle is
locked, these settings are automatically re-as
signed to the remote control key and stored.
A WARNING
- For safety reasons, the seat setting can
only be recalled when the vehicle is sta
tionary -otherwise yo u risk having an ac
cident.
- In an emergency the recall p rocedure can
be cancelled by pressing the
IOFFI switch
or by tapping of the memory buttons.
Page 66 of 316
64 Seats and storage
Activating remote control key memory
Applies to vehicles: with seat memory
To assign the drive r's sea t settings to the re
mote contro l key when locking the vehicle, the
function must be activated in the radio or
MMI* .
• Se lect : I C AR I func tion button > Seat adjust
m ent > Driver's seat > Ke y mem . profile
>
O n. Or
· • Se lect :
~ I C- A - R-! funct ion button > Car system s*
control button > Vehicle setting s > Seat s >
Driver' s seat > Remote control key > On .
@ Tips
If you do not want another driver's set
tings to be assigned to the remote control
key, switch off the memory f unction using
the radio o r
MM!* or the IO FF I button
¢page 63.
Rear seats
General information
Safe transportation of pa ssengers on the rear
seats requires proper safe ty precautions.
All passenge rs on the rear seats must be seat
ed i n complia nce w ith the safety guidelines
explained in
i=:;, page 149 and¢ page 157.
The corre ct seating posi tion is critical fo r th e
safety o f fron t
and rear seat passengers alike
¢page 142.
~ WARNING
- Occ upants in the front and rear seats
must a lways be properly restrained.
- Do not let anyone ride i n the vehicle
without the head restraints provided.
Head restra ints help to reduce injuries.
-
- Loose items inside the passenger com
partment, can f ly forward in a crash or
sudden maneuver and i njure occupants.
Always store art icles in the luggage com
partment and use the fasten ing eyes, es
pecially when the rear seatbacks have
bee n folded down. -
Read and heed all WARNINGS
¢ page 142 , Proper seating positions
for passengers in rear seats.
Adjusting seat
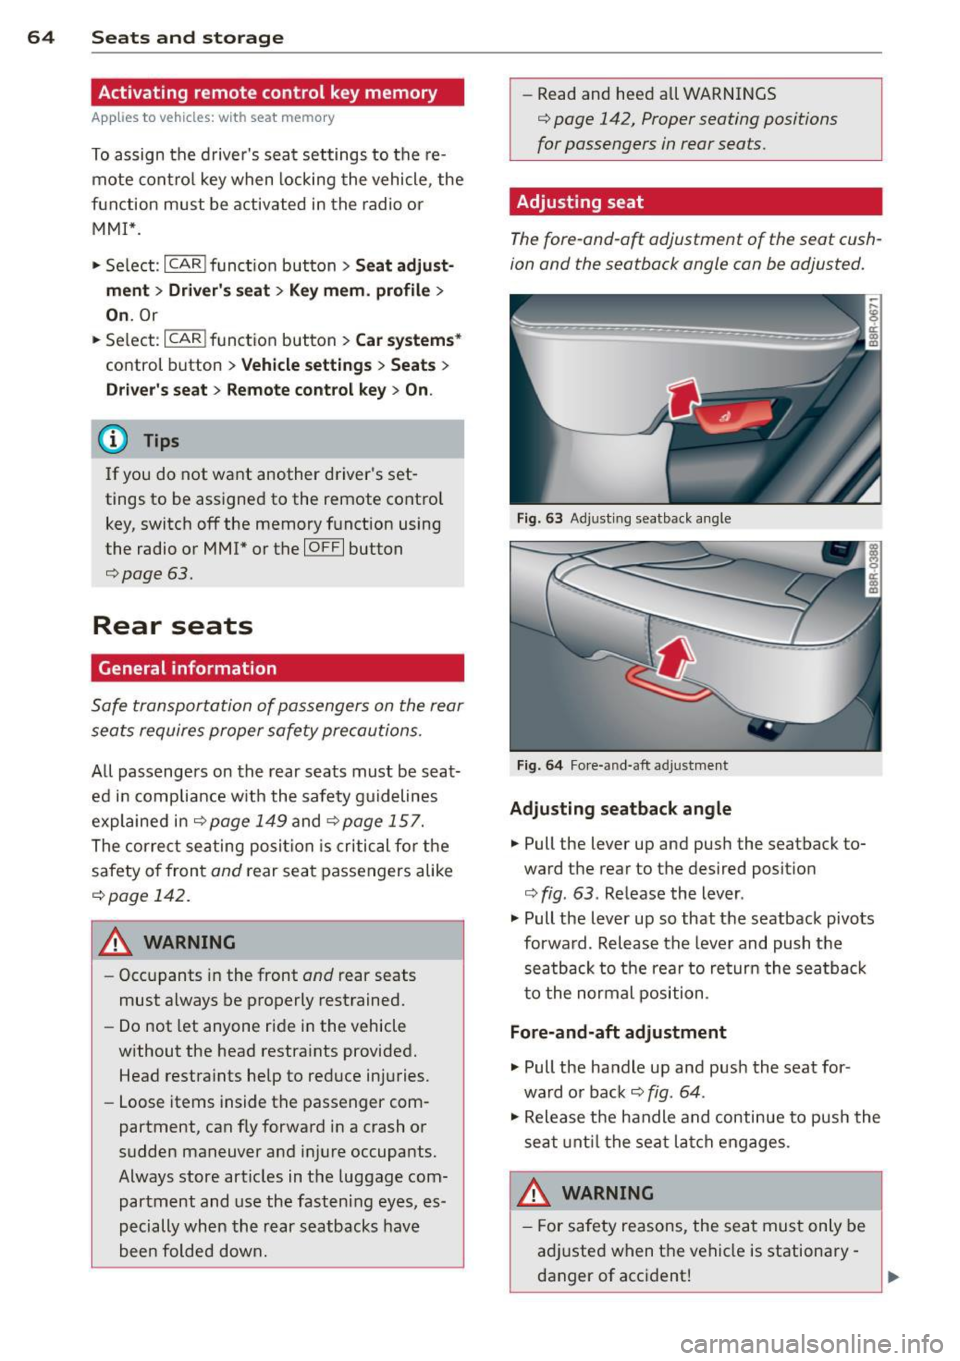
The fore-and-a~ adjustment of the seat cush
ion and the seatback angle can be adjusted.
F ig . 63 Adjus ting seatback a ngle
Fig. 6 4 Fore-and-aft adjust ment
Adjusting seatback angle
• Pull the lever up and pus h the seatback to
ward the rear to the desired posit io n
¢
fig . 63 . Release the lever .
• Pull the lever up so that the seatback pivots
forwa rd . Rel ease the lever and push the
seatb ack to the rear to re turn the sea tba ck
t o the normal position .
Fore-and-aft adjustment
• Pull the handle up and pus h the seat for
wa rd o r back ¢
fig. 64 .
• Release the handle and continue to push the
seat unt il t he seat lat ch engages .
_&. WARNING
- For safety reasons, the sea t must on ly be
a dj usted when t he vehicle is stationary
danger of acc ident!
Page 161 of 316

Even though your vehicle is equipped with an
Advanced Airbag System, make certain that
all ch ildren, especially those 12 years and
younger, a lways ride in the back seat properly
restrained for their age and size. The airbag
on the passenger side makes the front seat a
potentially dangerous place for a child to ride.
The front seat is not the safest place for a
child in a forward-facing child safety seat.
It
can be a very dangerous place for an infant or
a child in a rearward-facing seat.
The Advanced Airbag System in your veh icle
has been certified to comply w ith the Requ ire
ments of United States Federa l Motor Vehicle
Safety Standard 208 as applicable at the time
your vehicle was manufactured.
The Standard requires the front ai rbag on the
passenger side to be turned off ("sup
p ressed") if a ch ild up to about one year of
age restrained in one of the rear-facing or for
ward -facing infant restraints listed in Federal
Motor Vehicle Safety Standard 208 with wh ich
the Advanced Airbag System in your vehicle
was certified has been installed on the front passenger seat . For a listing of the child re
straints that were used to certify compliance
with the US Safety Standard
Q page 180.
The PASSENGER AIR BAG OFF light in the in
strument panel tells you when the front Ad
vanced A irbag on the passenger side has bee n
turned off by the electronic control unit.
Each t ime you turn on the ignition, the
PAS
SENGER AIR BAG OFF
light will come on for a
few seconds and :
- will stay on if the front passenger seat is not
occupied,
- will stay on if there is a small child or child restraint on the front passenger seat,
- will go off if the front passenger seat is oc
cupied by an adult as registered by the
weight-sensing mat
Q page 168, Monitor
ing the Advanced Airbag System .
The PASSENGER AIR BAG OFF light comes on
when the control un it detects a total weight
on the front passenger seat that requires the
front airbag to be turned off.
Airbag system 159
If the total weight on the front passenger
seat is more than that of a typical 1 year-o ld
c hild but less than the weight of a small
adult, the front airbag on the passenger side
can deploy (the
PASSENGER AIR BAG OFF
light does not come on). If the PASSENGER
AIR BAG OFF
light does not come on, the
front a irbag on the passenger side has not
been turned off by the electronic con trol unit
and can deploy if the contr ol unit senses an
impact that meets the cond itions stored in its
memory .
For example, the airbag may deploy if:
-a small ch ild that is heav ie r than a typical 1
year-old ch ild is o n the front passenger seat
(regard less of whether the child is in one of
the child safety seats listed
Q page 180), or
- a child who has outgrown child restraints is
on the front passenger seat.
If the front passenger airbag is turned off, the
PASSENGER AIR BAG OFF light comes on in
the instrument cluster and stays on.
The front airbag on the passenger side may
not deploy (the PASSENGER AIR BAG OFF
light does not illum inate and stay lit) even if a
small adult or teenager, or a passenger who is
not sitting uprig ht with their back against a
non-reclined backrest w ith their feet on the
vehicle floor in front of the seat is on the front
passenger seat~
page 140, Proper seating
position for the driver.
If the front passenger airbag deploys, the
Federal Standard requires the airbag to meet
the "low risk" deployment criteria to reduce
the risk of injury thro ugh interaction with the
airbag . "Low risk" deployment occ urs in those
crashes that take place at lower dece lerat ions
as defined in the electronic control unit
Q page 168, PASSENGER AIR BAG OFF light .
Always remember, a child safety seat or infant
carr ier installed on the front seat may be
struck and knocked out of posit ion by the rap
idly inflating passenger's airbag in a frontal
collision . The airbag could greatly reduce the
effectiveness of the child restraint and even
seriously injure the child during inflation. •
•
Page 164 of 316
162 Airbag system
old child is on the front passenger seat
and the other conditions for airbag de
ployment are met .
- Accident statistics have shown that chil
dren are generally safer in the rear seat
area than in the front seating position.
- For their own safety, all children, espe cially 12 years and younger, should al
ways ride in the back properly restrained
for their age and size.
Advanced front airbag system
Your vehicle is equipped with a front Advanced
Airbag System in compliance with United
States Federal Motor Vehicle Safety Standard
208 as applicable at the time your vehicle was
manufactured.
The front Advanced Airbag System supple ments the safety belts to provide additional
protection for the driver's and front passeng
er's heads and upper bodies in frontal crashes .
The airbags inflate only in frontal impacts
when the vehicle deceleration is high enough.
The front Advanced Airbag System for the
front seat occupants is not a substitute for
your safety belts. Rather, it is part of the over
all occupant restraint system in your vehicle.
Always remember that the airbag system can
only help to protect you , if you are sitting up
right, wearing your safety belt and wearing it
properly . This is why you and your passengers
must always be properly restrained, not just
because the law requires you to be.
The Advanced Airbag System in your vehicle has been certified to meet the "low risk" re
quirements for 3 and 6 year-old children on
the passenger side and very small adults on
the driver side . The low risk deployment crite
ria are intended to help reduce the risk of in
jury through interaction with the front airbag
that can occur, for example , by being too
close to the steering wheel and instrument panel when the airbag inflates.
In addition, the system has been certified to
comply with the "suppression" requirements of the Safety Standard
, to turn
off the front
airbag for infants 12 months old and younger
who are restrained on the front passenger
seat in child restraints that are listed in the
Standard
¢ page 180, Child restraints and
Advanced Airbags .
"Suppression" requires the front airbag on the
passenger side to be turned
off if:
- a child up to about one year of age is re
strained on the front passenger seat in one
of the rear-facing or forward-facing infant restraints listed in Federal Motor Vehicle
Safety Standard 208 with which the Ad
vanced Airbag System in your vehicle was
certified . For a listing of the child restraints
that were used to certify your vehicle's com pliance with the US Safety Standard
¢page 180,
-weight less than a threshold level stored in
the control unit is detected on the front pas
senger seat.
When a person is detected on the front pas
senger seat, weighing more than the total
weight of a child that is about 1 year old re
strained in one of the rear-facing or forward
facing infant restraints (listed in Federal Mo
tor Vehicle Safety Standard 208 with which
the Advanced Airbag System in your vehicle
was certified), the front airbag on the passen ger side may or may not deploy.
The
PASSENGER AIR BAG OFF light comes on
when the electronic control unit detects a to
tal weight on the front passenger seat that re
quires the front airbag to be turned
off. If the
PASSENGER AIR BAG OFF light does not
come on, the front airbag on the passenger
side has not been turned
off by the control
unit and can deploy if the control unit senses
an impact that meets the conditions stored in
its memory.
If the total weight on the front passenger
seat is more than that of a typical 1 year-old ,
but less than the weight of a small adult, the
front airbag on the passenger side may deploy
(the
PASSENGER AIR BAG OFF light does not
come on).
ll-
Page 303 of 316
----------------------------~I~n ~d ~e ~x 301
Switching on . ..... .... ... .. .. .. .... 95
Warning/indicator lights ... .. .. .. .. .. 1 7
C ruising range . . . . . . . . . . . . . . . . . . . . . . . 23
(upholders . . . . . . . . . . . . . . . . . . . . . 73, 74
H eated and cooled . . . . . . . . . . . . . . . . . . 7 4
D
Data recorder ............. .... .. .. . 197
D ate display . . . . . . . . . . . . . . . . . . . . . . . . 12
Daytime running lights . . . . . . . . . . . . . . . . SO
Declaration of comp liance
Adapt ive cruise control ............. 296
Aud i side assist .......... .. .. .. .. . 296
Cell phone package ................ 296
Conven ience key ................... 296
E lect ronic immobilize r ...... ... .. .. . 296
H omelink universa l remote cont ro l .. . 296
Remote control key ................ 296
Decorative parts/trim Cleaning . ..................... .. . 219
Defective light bulb warning ... .. .. .... 33
D efrosting (windows) ................. 81
Determin ing correct load limit ... ... .. 256
D iese l fue l ... ... .. ..... ... .. .. .. ... 224
D iese l particu late filter . . . . . . . . . . 34, 206
Dig ita l clock . .. .. ......... .. .. .. .... 12
D ig ita l compass ..................... 59
Dig ita l speedometer .................. 21
D imensions
.. .. .... .... ... .. .. .. ... 290
D imm ing the rearview mir ro r . . . . . . . . . . 58
Disp lays
C leaning . .. .. ........... .. .. .. ... 219
D oors
C hil d safety locks . ..... ... .. .. .. .. .. 46
Emergency locking . . . . . . . . . . . . . . . . . . 42
D river information system . . . . . . . . . . . . . 20
D efect ive light bulb warning .. .. .. .. .. 33
D ig ita l speedometer ... ... .. .. .. .. .. 21
Driver information messages ... .. .. .. 27
Indicator lights . . . . . . . . . . . . . . . . . . . . 99
Messages . . . . . . . . . . . . . . . . . . . . . . . . . 99
Open door or rear lid warning . . . . . . . . . 21
Outside temperature display .. .. .. .. .. 21
Sound system display . . . . . . . . . . . . . . . 20
Driver seat
refer to Seating pos ition 140 Driver
's seat memory
Activating remote contro l key . . . . . . . . . 64
D rive select . .. .. .. ................. 120
Adaptive dampers .... ......... .. .. 1 20
Dynam ic steer ing . ............. .... 120
Setting the dr iv ing mode ..... ... .. .. 121
D rivi ng lights ..... .. ................ 49
Driving messages . . . . . . . . . . . . . . . . . . . . 27
Drivi ng offroad
D riving through wate r ....... ... .. .. 211
Driving tips . ..... .. . .. .. ..... ... .. 210
Ru les
of behavior ... . .. ..... ... .. .. 210
Sand and mud . .. ................. 211
Snow-covered gro und . ............. 211
Un paved roads . .. ............. .. .. 211
Driving safely
Driving through wate r
Driving time .. .. .. ... ............ .. . 139
211
23
D uplicate key . .. .. ................. . 36
Dust filter
refer to Pollutant filter (climate co ntrol) 79
Dynam ic steering . . . . . . . . . . . . . . 120, 197
Ind icator light ... ................. 201
E
E85 ( Fuel)
223
E fficiency prog ram . .... ............. . 25
F uel economy messages ........ .. .. . 25
Memo ry levels . . . . . . . . . . . . . . . . . . . . . 23
Other equipment ... . ... ...... ... .. . 25
E lectrica l accessories
refer to So cket . .. ............. .. .. . 75
E lectrical seat adjustment
refer to Seat adjustment . . . . . . . . . . . . . 62
E lectromechanica l pa rking brake
Emergency braking ... ... ..... ... .. . 90
Malfunction . .. .. .. . .............. . 90
Operation . . . . . . . . . . . . . . . . . . . . . . . . . 88
Pa rking ... .. .. .. .. . .. .... ...... .. . 89
Re leas ing and closing ............... 88
Starting assist . . . . . . . . . . . . . . . . . . . . . 89
Star ting from rest ............. .... . 89
Star ting off w it h a tr ailer ........ .. .. . 90
Warning/ind ic at or lights ........ .. .. . 18
E lectromechanical powe r assist ....... . 201
Ind icator lig ht ... .. . .. .... ...... .. 201
•
•
Page 307 of 316
-----------------------------~I~ n~d~ e~ x 305
LA T CH
D escr ipt io n . .... .. .... ... .. .. .. .. .
Install ing a chi ld restraint . ... .. .. .. .
Locat ion
Mounting and releas ing the anchorage
hook
. . ' .. ... ................ ... '
19 1
192
193
192
193
L ateral angle ... .... .... ... .. .. .. ... 2 10
Leather clean ing/protection . .. .. .. .. . 220
Lefthand drive ............ .... .. .. .. 51
Lifting jac k . . . . . . . . . . . . . . . . . . . . . . . . 2 7 s
Lifting vehicle ..... .. ...... .. .. .. .. . 287
Light
Com ing home ............ .... .. .... SO
Daytime running lights . . . . . . . . . . . . . . SO
Driving light control .............. ...
49
E me rgency flashers . . . . . . . . . . . . . . . . . 52
E xterior ligh ting . . . . . . . . . . . . . . . . . . . . SO
H igh bea m .............. .... .. ....
52
H igh be am war ning/ indica to r li ght ... .. 17
Leaving home . . . . . . . . . . . . . . . . . . . . . . so
Sensor ..... .. .. .. .. .... ... .. .. .... 4 9
Sensor defective ... .... ... .. .. .. .. .. 33
Sw itch ing on and off .. .... .. .. .. .. .. 4 9
Travel mode ........ ..... .... .. .. .. 51
Tu rn signa ls . . . . . . . . . . . . . . . . . . . . . . . 52
Loading the l uggage compa rtment .. .. . 14 5
Loc king
P owe r locking switch . ..... .. .. .. .. ..
42
R ea r li d/tr unk l id ..... .... .. .. .. .. .. 4 3
Remote cont rol key . . . . . . . . . . . . . . . . . 4 0
Using the mechan ica l key . ... .. .. .. .. 41
Low beams 4 9
Defect ive .. ............. .... .. .... 3 3
Lower universal anchorages (Canada) .. . 191
Luggage compartmen t ... ... .. .. .. .. .. 6 7
Ca rgo net .. .... .. .... ... .. .. .. .... 70
Cover .. .. .. .. .... .. .... ... .. .. .... 69
Expanding . . . . . . . . . . . . . . . . . . . . 6 7, 68
Storage hooks . . . . . . . . . . . . . . . . . . . . . 70
Stowing . . . . . . . . . . . . . . . . . . . . . . . . . 145
Tie -down r ings .................. ... 68
also refer to Loading the l uggage com-
pa rtment .. .... ... ... ... .... .. .. .
14 5
Luggage comp artment lid
Emergency unlocking ...... .. .. .. .. ..
45
Lumbar s upport . ... .... ... .. .. .. .... 6 2
M
Maintenance .. . ' .. ... .. .. ..... ... . . 2 93
Malfunction Ind icator Lamp (MIL) 17 , 26
Master key
Battery replacement .. ...... ..... .. .
37
Check lig ht .. .. .. ........ ..... .... . 37
Matte finish pain t clean ing .... ... .. .. 2 17
Mechan ica l key ...... ..... ........... 37
Memory for d river 's seat .... ......... . 63
Recalling set tings .... ............. . 63
Storing settings .. ... ... .... ... .. .. . 63
Mileage
Ave rage ... .. .. .... . ... ...... ... .. .
23
Instantaneous . .. ...... ..... ...... . 23
Mirro rs
Activatin g the dig it al compass ... .. .. .
59
Adjusting the exterior mirrors . . . . . . . . . 57
d. . 1mming .. .. .... ... .. .. ..... ... .. . 58
Moni to ring the Advanced Ai rbag System 168
N
Natura l leather
Cleaning
New tire s and wheels
N HT SA
Contacting . ..... ... .. .. ..... ... . .
N itrogen oxide (NOx) catalyt ic converte r
refer to Ad Blue . .. .... ...... ..... . .
Number of seat s
... .... ... .... .... ..
0
Occ upant seating positions
220
258
146
22 8
149
140
O cta ne rat ing . .. .. ...... ... .. .. .. .. 22 2
Odome ter . . . . . . . . . . . . . . . . . . . . . . . . . . 13
Offroad mode ........ .. .. ..... ... .. 198
OFF (climate co ntrol) .. .. .. ... ... .. .. . 80
Oil
refer to E ng ine oil 233,236
Oil consumpt ion ..... . .. .. ..... ... .. 236
On-Boa rd D iagnost ic System (O BD)
Data Link Connector ( DLC) .... ....... .
26
El ec tronic s peed limi ter ...... ... .. .. . 2 7
M alfunction I nd ic a tor Lam p (M IL) .. .. . 26
Onboard too l kit ... .. . .. ... .... ... .. 268
Open door o r rea r lid wa rning .. ... .. .. . 21
•
•
Page 309 of 316
Rear seats Adjusting seat ... ..... ... .. .. .. .... 64
Rearview camera Park ing mode 1 .......... .. .. .. ... 132
Park ing mode 2 .......... .. .. .. ... 132
Rear v iew mir ror . . . . . . . . . . . . . . . . . . . . . 58
Rear window heating .... ... .. .. .. .. .. 81
Recirculation mode (cl imate control) .. .. 80
Red symbols . . . . . . . . . . . . . . . . . . . . . . . . 28
Refill engine oil . . . . . . . . . . . . . . . . . . . . . . 31
Refue lling ................... ... ... 226
Gasoline inhib itor f lap ..... .. .. .. .. . 226
Release lever for hood ...... .. .. .. .. . 231
Remote cont rol
Homelink . ... ... ..... ... .. .. .. ... 135
Remote control key Un loc king and locking ..... .. .. .. .. .. 40
Remote rear lid release ..... .. .. .. .. .. 43
Repa ir manua ls ... ...... ... .. .. .. ... 293
Repai rs
A irbag system ........... .... .. ... 170
Replacing A fuse . .. .. ................. .. .. . 279
Light bulbs . ................ ... ... 282
T ires and whee ls ...... .... ... ... .. 259
Replacing w iper blades ..... .. .. .. .. .. 55
Report ing Safety Defects . . . . . . . . 146, 147
Reset button ........... .... ... ... ... 13
Retractor .... ... .. ..... ... .. .. .. ... 152
Right hand d rive .. .. .... .... . .... .. .. 5 1
Rims Clean ing . .. ............. .... .. ... 219
Roof rac k . . . . . . . . . . . . . . . . . . . . . . . . . . . 70
Attac hment points ..... ... .. .. .. .. .. 71
Install ing the attachments . .. .. .. .. .. 72
Instal ling the roof rack .... .. .. .. .. .. 71
Roof load .. ............. .... .. .... 72
Rule of behavio r offroad .. ... .. .. .. .. . 2 10
s
Safe driving hab its ......... .. .. .. .. . 139
Safety belt position .. ...... .. .. .. .. . 153
Safety belt he ight adjustment .. ... .. 155
Safety belts worn by p regnant women . 154
Safety belt pretens ioner ..... .. .. .. .. . 155
Service and disposal ...... .. .. .. .. . 156
Inde x 307
Safety be lts ... .... .. . .. .. ..... ... .. 152
Cleaning . ... .. .... . ... ...... ... .. 219
Danger to passengers who do not wear a
safety belt .. .. .. ................. 150
Fastening . .. .. .. .... ............. 152
Height adj ustment .. .............. . 155
Improperly worn ... . .. .. .. ... ... .. 155
Not worn ....... .. ..... .......... 150
Safety be lt pos ition . ........... .... 153
S afety i nstr uctions .... ......... .. .. 152
Securing child safe ty seats ... ... .. .. 188
Spec ia l considerations for pregnant
women ... .. .. .... . ... ...... ... .. 154
U nfastening . .. .. ................. 154
Warning/ind icator light ......... 17,149
Why YOU MUST wear them ........ .. 149
Wor n properly .... ............... . 151
Safety comp liance sticker ..... ... .. .. 289
Safety eq uipme nt .. .... ......... .. .. 139
Safety features for occupant restraint and protection .. .. .. .. .... ... .... .... .. 139
Safety guidelines Seat adjustment . . . . . . . . . . . . . . . . . . . . 61
Safety instr uctions
E ngine comp art ment .. ......... .. .. 231
f or side c urtain airbags . ..... ... .. .. 177
for using child safety seats ... ... .. .. 181
for using safety belts . ... .... ... .. .. 152
Monitoring the Advanced Airbag Sys-
tem ........ .. .. ................. 170
Safety systems Warning/ind icator lights ..... ... .. .. . 16
Seat Heating ... .. .. .. ... ............ .. . 81
N umber of sea ts ..... ........... .. 149
Ventila tion . ... .... .. .. ...... ... .. . 81
Seat adjustment . . . . . . . . . . . . . . . . . . . . . 62
Drive r's seat . . . . . . . . . . . . . . . . . . . . . . . 61
Fron t passenger's seat . . . . . . . . . . . . . . . 62
F ron t se ats . . . . . . . . . . . . . . . . . . . . . . . . 61
Hea d restra ints .... . .. ..... ... .. .. 142
Memory . ... .. .... . ... ...... ... .. . 63
Seat be lts
refer to Safety belts . . . . . . . . . . . . . . . . 149
Seat covers Cleaning .. .. .. .... .. ........ ..... 220
Seating capacity ... .. . ... .... ... .. .. 149
•
•