engine overheat AUDI Q5 2016 Owners Manual
[x] Cancel search | Manufacturer: AUDI, Model Year: 2016, Model line: Q5, Model: AUDI Q5 2016Pages: 300, PDF Size: 75.02 MB
Page 13 of 300
..... N
co ~ CX)
Warning light in the instrument cluster
display
If the . warning light in the instrument cluster
display flashes, this can mean one of two things:
either the coolant
temperature is too high, or the
coolant
level is too low~ page 29.
If the needle is well in the upper area of the
gauge, the coolant temperature is too high.
Stop
the vehicle, switch the engine off, and allow it
to cool. If the warning light comes on again after
driving a short distance, contact an authorized
Audi dealer or other qualified workshop .
..&, WARNING
- Always observe the warning in ~ page 220,
before opening the hood and checking the
engine coolant level.
- Never open the engine hood if you see or
hear steam, or if you see engine coolant
dr ipping from the engine compartment. You
cou ld burn yourself. Let the engine cool off
first so that you cannot hear or see any
steam or engine coo lant.
CD Note
- Mounting additional lights or accessories in
front of the air inlets reduces the cooling ef
fect of the radiator. At high outside temper
atures or high engine load, the engine could
overheat.
- The front spoiler has been designed to prop
erly distribute the cooling air when the vehi
cle is moving. If the spoiler is damaged, this
could reduce the cooling effect and the en
gine could then overheat. Ask your author
iz ed Audi dealer for assistance.
Tachometer (engine rev counter)
The tachometer indicates the engine RPM (revo
lutions per minutes) .
If engine RPM drops below 1,500, you should
downshift to the next lower gear. The red area at
the end of the scale indicates max imum permis
sible engine RPM after the break-in period . Be-
~ fore reaching this area, move the selector lever U"I
..... \!) .....
Instruments and indicator lights
to posit ion D/S or ease your foot off the accelera
tor pedal.
CD Note
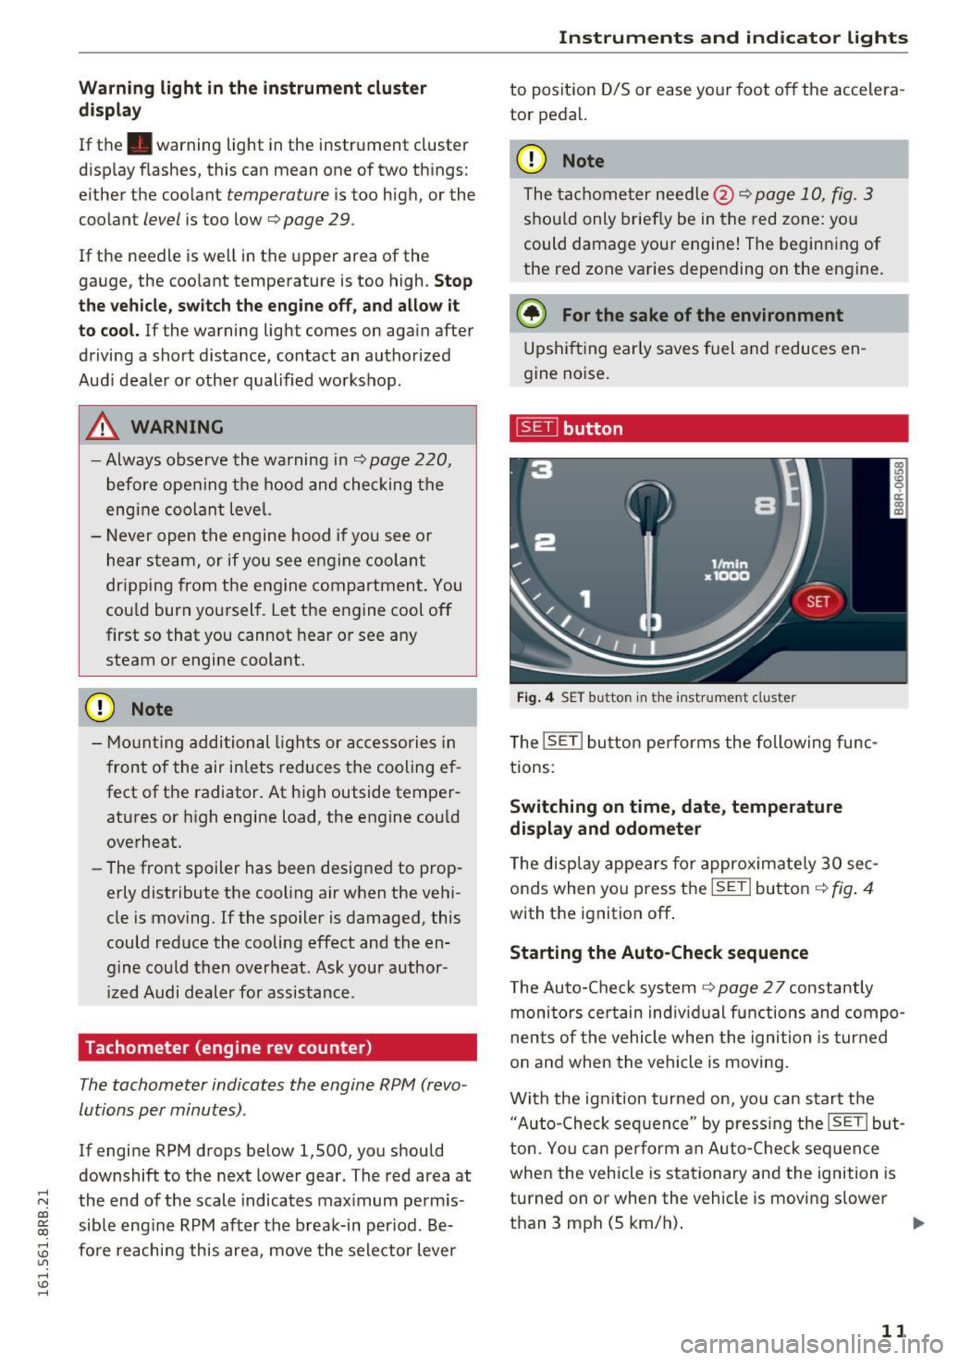
The tachometer needle@~ page 10, fig. 3
should only briefly be in the red zone: you
could damage your engine! The beginning of
the red zone varies depending on the engine.
@ For the sake of the environment
Upshifting early saves fuel and reduces en
gine noise.
~ button
Fig. 4 SET button in the instrument cluster
The !SET ! button performs the following func
tions:
Switching on time, date, temperature
display and odometer
The display appears for approximately 30 sec
onds when you press the
ISETI button ~fig . 4
with the ignition off .
Starting the Auto-Check sequence
The Auto-Check system ~ page 2 7 constantly
monitors certain individual functions and compo
nents of the vehicle when the ignition is turned
on and when the vehicle is moving.
With the ignit ion turned on, you can start the
"Auto-Check sequence" by press ing the
!SE TI but
ton. You can pe rform an Auto-Check seq uence
when the vehicle is stationary and the ignition is
turned on or when the vehicle is moving slower
than 3 mph (5 km/h).
IIJ,,,
11
Page 127 of 300
,....,
N
co
er::
co
,....,
running while in gear. If you must leave
your vehicle when the engine is running, ac tivate the parking brake and move the selec
tor lever to P.
- Power is still transmitted to the wheels
when the engine is running at idle. To pre
vent the vehicle from "creeping", you must keep your foot on the brake when the en
gine is running and the selector lever is in D/
5 or R or "tiptronic" mode is selected .
- Do not press the accelerator pedal when
changing the selector lever position while
the vehicle is stationary and the engine is running.
- Never shift into R or P while driving.
- Before driving down a steep slope, reduce
your speed and shift into a lower gear with "tiptronic" .
- Do not ride the brakes or press the brake
pedal too often or too long when driving
down a hill. Constant braking causes the
brakes to overheat and substantially re
duces braking performance, increases brak
ing distance or causes complete failure of
the brake system .
- To prevent the vehicle from rolling back
when stopping on inclines, always hold it in
place with the brake pedal or parking brake.
- Never hold the vehicle on an incline with a
slipping clutch. The clutch opens automati
cally when it becomes too hot from the
overload . An indicator lamp
[ijJ illuminates
and a driver message appears
c> page 126
when the clutch is overloaded .
- If the engine must remain running, never
have any driving position engaged when
checking under the hood.
Make sure these
lector lever has securely engaged and is
locked in P with the parking brake set
c> page 220. Otherwise, any increase in en
gine speed may set the vehicle in motion,
even with the parking brake applied.
(D Note
- When stopping on an incline, do not try to
hold the vehicle in place by pressing the ac
celerator pedal while a driving gear is se-
Automatic transmission
lected. This can cause the transmission to
overheat and can damage it. Activate the
parking brake or press the brake pedal to
prevent the vehicle from rolling.
- Allowing the vehicle to roll when the engine
is stopped and the selector lever is in N will
damage the transmission because it is not
lubricated under those circumstances.
(!) Tips
For safety reasons, the parking brake is re
leased automatically only when the driver's
safety belt is engaged in the buckle.
Hill descent control
The hill descent control system assists the driver
when driving down decline s.
Hill descent control is activated when the selec
to r lever is in D/S and you press the brake pedal.
The transmission automatically selects a gear
tha t is suitable for the incline. Hill descent con
trol tries to maintain the speed achieved at the
time of braking, within physical and technical
limitations. It may still be necessary to adjust the
speed with the brakes .
Hill descent control switches off once the decline
levels out or you press the accelerator pedal.
When the speed is set in the cruise control sys
tem
c> page 95 , hill descen t control is also ac ti
vated .
A WARNING
Hill descent control cannot overcome physical
limitations, so it may not be able to maintain
a constant speed under all conditions . Always
be ready to apply the brakes.
125
Page 128 of 300
Automatic transmission
Manual shift program
Using the manual shift program you can man
ually select gears .
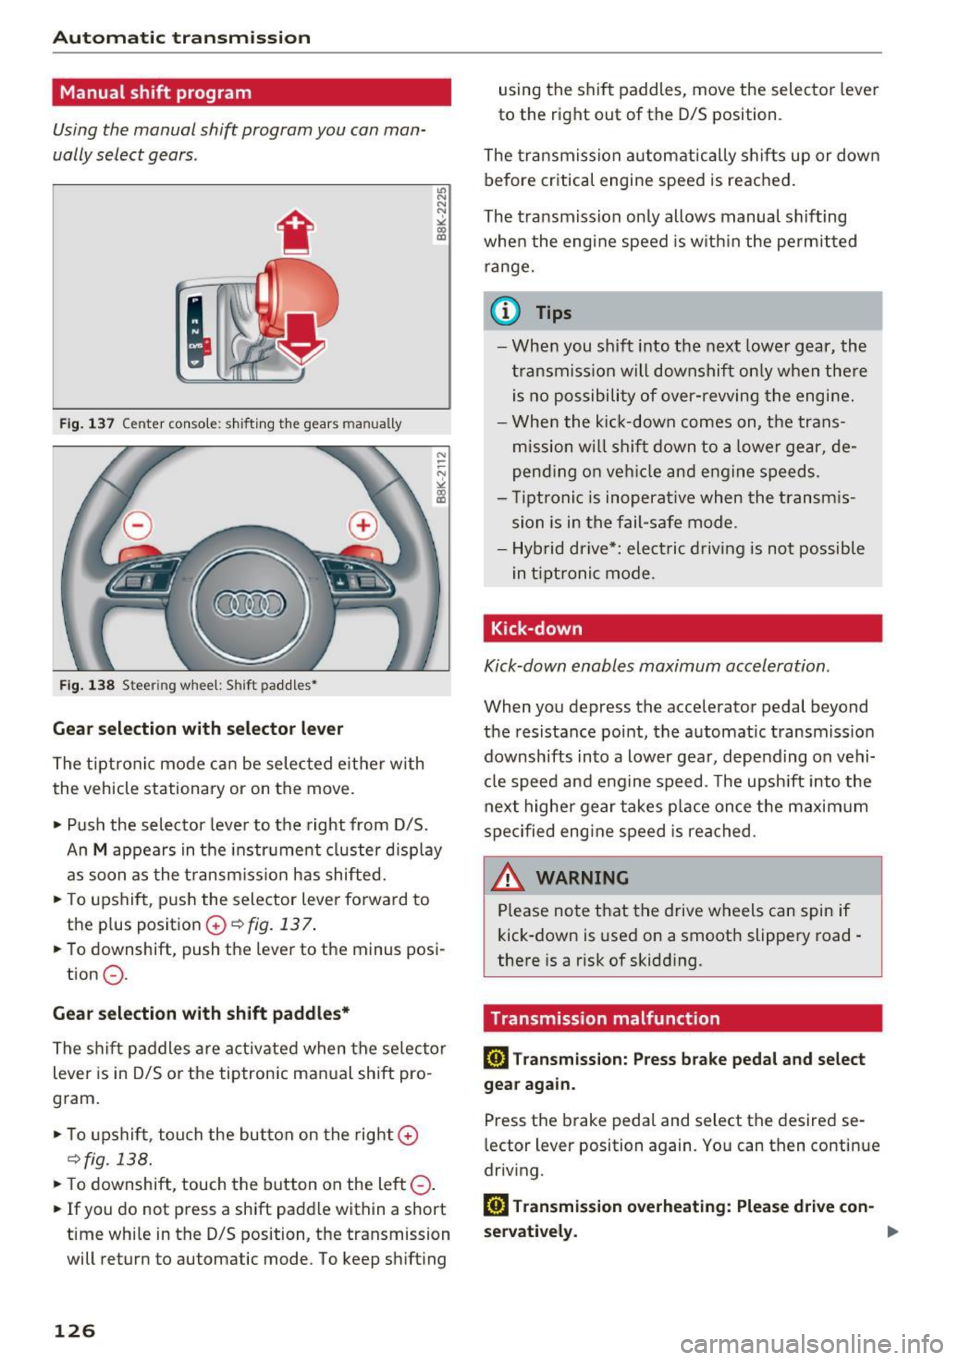
Fig. 137 Center console: shifting the gears man ually
Fig. 138 Stee rin g whee l: S hift paddles •
Gear selection with selector lever
The tiptronic mode can be selected eith er with
the vehicle stationary or on the
move.
• Push the selector lever to the right from D/S.
u, N
N
N
" ll1
An M appears in the instrument cluster displa y
as soon as the transmission has shifted.
• To upshift, push the selector lever forward to
the plus position
G) ¢ fig. 137 .
• To downshift, push the lever to the minus posi-
tion
0 .
Gear selection with shift paddles*
The shift paddles are activated when the selector
lever is in D/S or the tiptronic manual shift pro
gram.
• To upshift , touch the button on the right
G)
¢fig. 138.
• To downshift, touch the button on the left 0-
• If you do not press a shift paddle within a short
time while in the D/S position, the transmission
will return to automatic mode. To keep shifting
126
using the shift paddles, move the selector lever
to the right out of the D/S position .
The transmissron automatically shifts up or down
before critical engine speed is reached.
The transmission only allows manual shifting
when the engine speed is within the permit ted
range.
(D Tips
- When you shift into the next lower gear, the
t ransm ission will downshift only when there
is no possibili ty of
over-revving the engine.
- When the kick-down comes on, the trans
mission will shift down to a lower gear, de
pending on vehicle and engine speeds.
- Tiptr onic is inoperat ive when the transmis
sion is in the fail-safe mode.
- Hybrid drive*: elect ric driving is not possible
in t iptronic mode .
Kick-down
Kick-down enables maximum acceleration .
When you depress the accelerator pedal beyond
the resistance point, the automat ic transmission
downshifts into a lower gear, depending on vehi
cle speed and engine speed. T he upsh ift into the
next higher gear takes place once the maximum
specified eng ine speed is reached.
A.::!!. ARNING
-Please note that the drive wheels can spin if
kick-down is used on a smooth slippery road -
there is a risk of skidd ing.
Transmission malfunction
ml Transmission: Press brake pedal and select
gear again.
Press the brake pedal and select the desired se
lector lever position again. You can then continue
driving.
ml Transmission overheating: Please drive con-
servatively . .,,.
Page 196 of 300
Intelligent Technology
brake. This may cause the brakes to over
heat, premature wear and increased stop
ping distance.
- Under certain climatic and operating condi
tions such as passing through water, driving
in heavy rain or after washing the vehicle,
the effectiveness of the brakes can be re duced . In winter, ice can accumulate on the
brake pads, linings, discs and drums. Care
fully apply brakes for a test. Brakes will dry
and ice coatings will be cleaned off after a
few careful brake applications.
- Driving for an extended period of time on
salt-covered roads without using your
brakes can also affect braking efficiency.
Clean off accumulated salt coating from
brake discs and pads with a few carefu l
brake app lications .
-If you damage the front spoiler, or if you in
stall a different spoiler, be sure the air flow
to the front brakes is not obstructed. Other
wise the brake system could overheat reduc ing the effectiveness of the entire brake sys
tem .
- Failure of one brake circuit will impair the
braking capability resulting in an increased
stopping distance. Avoid driving the vehicle and have it towed to the nearest author ized
Audi dealer or qualified workshop.
- Never let the vehicle roll to a stop with the
engine shut off.
- If the brake booster is not working, the
brake pedal must be pressed considerably
harder to make up for the lack of booster
assista nee.
Electromechanical power
assist, Dynamic steering
The electromechanical power assist helps the
driver when steering.
Power steering adapts electronically based on
the vehicle speed.
Indicator lights and messages
• Steering defective! Do not drive vehicle!
194 If
this indicator light turns on and stays on and
this message appears, the power steering may
have failed.
Stop the vehicle in a safe location as soon as pos
sible. Do
not continue driving . See your author
ized Audi dealer or other qualified repair facility
for ass istance .
'-r, ij Dynamic steering: System fault! You can
continue driving
If the indicator l ight turns on and the message
appears, the steering may be more difficult to
move or more sensitive than usual. The steering
may also be at an angle when driving straight.
Drive slowly to your authorized Audi dealer or
qualified workshop to have the malfunct ion cor
rected.
1 :r- ij Dynamic steering: Initializing
Audi drive select* : if the indicator light blinks and
the driver message appears, the dynamic steer i ng* is reinitial ized. After start ing the engine, the
steering wheel will move slightly . Re-initial iza
tion might be necessary if the steering wheel was
moved hard to the left and right while the vehicle
was not moving. The display turns off if the initi
alization was successful.
(D Tips
- If the . or 1:r- ij in dicato r light only stays on
for a short time, you may continue driving.
- T he dynamic steering* stab ility systems
¢ page 190 are not available in the event of
a system malfunction.
- For additional information on dynamic
steering*
¢page 119.
Driving with your
quattro
With all-wheel drive, all four wheels are driven .
General information
With all-wheel drive, power is distributed to all
four wheels. This happens automatically depend
ing on your driving style and the road conditions
at the time. See also
c> page 190. ..,.
Page 200 of 300
Driving and th e en vironm ent
- Do not apply additional undercoating or
rustproofing on or near the exhaust mani
fold, exhaust pipes, catalytic converter or heat sh ields . During dr iv ing, the substance
used for undercoating could overheat and
cause a fire .
{U) Note
-Be aware that just one tank filling with
leaded fuel will already seriously degrade
the performance of the catalytic co nverter .
- Do not exceed the correct engine oil level
c:>page224 .
-Do not drive until the fuel tank becomes
completely empty . The engine could mis
fire. Unburned fuel could also get into the
exhaust system and this could cause the
catalytic converte r to overheat.
- Do not turn off the ignition while the vehicle
. . 1s moving.
- Do not continue to operate your vehicle un
der these cond itions, as otherwise fuel can
r each the catalytic converte r. This could re
su lt in overheating of the converter, requir
i ng its replacement .
- To assure efficient operation of the Emis
s ion Control System:
- Have your vehicle maintained properly and in accordance with the service recommen
dations in your Warranty
& Maintenance
booklet .
- Lack of proper maintenance as well as im
proper use of the vehicle will impair the
function of the em ission control system
and could lead to damage.
@ For the sake of the environment
Even when the Emission Control System is op
erat ing properly, the exhaust gas can have a
sulfur-like exhaust gas smell under some op
erat ing states . This depends on the su lfur
content of the fuel be ing used. Using a differ
ent brand of fue l may he lp, or filling the tank
with lead-free super grade gasoline.
198
Diesel particulate filter
Applies to vehicles: with diesel engine
The diese l particulate filter filters near ly all of
the soot particles out of th e exhaust. The filter
cleans itself automat ically under normal d riving
conditions. If the filter cannot clean itself (for ex
ample, because you are only driving shor t distan
ces), the filter becomes clogged with soot and
the
II symbol for the diesel part iculate filter il
luminates
c:> page 34 .
&_ WARNING
-Do not park your vehicle over flammable
materials such as grass or leaves because
the high temperature of the diesel particu
late filter could start a fire.
-
- Do not apply an underbody protectant in the
exhaust system area or a fire could start.
Avoid damaging the
vehicle
When you are driving on poor roads, or over
curbs, steep ramps, etc., make certain that low
lying parts such as spoilers and exhaust system
parts do no t bottom out and ge t damaged.
This is espec ially true for vehicles with low-s lung
chassis (sports chassis)* and fully loaded
vehicles.
Economical and environ
mentally-friendly driving
General
Your personal style of driving will determine the
economy of your vehicle, as well as exhaust and
noise levels.
Fuel economy, environmental impact, and wear
on your engine, brakes and tires largely depend
on three factors:
- your personal driving style
- operating conditions
- technical limitations
If you anticipate what you need to do next and
drive economically, you can easily cu t your fuel
Page 201 of 300
..... N
co
er::
co
.....
give you some tips on how you can he lp the envi
ronment and your pocketbook.
(D Tips
T he consumpt ion estimates as published by
ENVIRONMENTAL PROTECTION AGENCY
(EPA) and Transport Canada may not corre
spond to your act ual consumption on the
road, which will vary depending upon vehicle
load and speed, road and weather conditions,
trip length, etc.
Drive smoothly and keep a lookout ahead
Vehicles use the most fuel when they are acceler
ating .
.. Avoid unnecessary accelerating and braking.
Vehicles use the most fuel when they are acceler
ating . If you anticipate what is going to happen
next, you will need to brake less and, thus, accel
erate less . Let the vehicle coast whenever possi
b le -for example when you see that the next traf
fic light is red .
Avoid full throttle
Driving a t moderate speeds saves fuel and im
proves your mileage .
.. Try and keep well be low your car's max imum
speed.
Accelerating gent ly reduces f uel consumption,
engine wear, and does not disturb the environ
ment.
F ue l cons umption, exha ust emissions and engine
noise increase d isproportionately at high speeds.
If yo u drive at approximately three quarters of
top speed, fuel consumpt ion w ill be reduced by
one ha lf. Never drive faster than the posted
speed limit and weather conditions perm it .
Driving and the envir onment
Reducing unnecessary idling
Even when your car is just idling it burns up fuel .
.. Shut the eng ine off when you are not driving
the vehicle.
.. Do not warm up t he vehicle by lett ing the en-
gine run at idle .
The idling phase is automatically reduced for
vehicles with the Start-Stop-System*. It is effi c ient to sw itch off the engine in veh icles without
the Start-Stop-System* when stopped at ra ilroad
c ross ings and long red lights . T urning the engine
off fo r just 30-40 seconds saves mo re fue l th an is
bur ned by s tarti ng the eng ine again .
It takes a long time for the eng ine to warm up
fully when it is ru nning at id le. However, wea r
and noxious emissions are especially high w hen
t h e engine is war ming up. So yo u should dr ive
aw ay as soon as you star t the eng ine and avoid
runn ing at high rpms w hile the engine is sti ll
warming up .
(D Note
Do not leave eng ine idling unatt ended after
start ing. If wa rning lights sho uld come on to
i ndicate impro per operation, they would go
u nheeded. Extended idling also prod uces
heat, which could result in overheating or
other damage to the vehicle o r othe r proper
ty .
Regular maintenance
A badly tuned engine unnecessarily wastes a lot
of fuel .
.. Have your vehicle serviced at regular interva ls.
By hav ing your vehicle regular ly serv ice d by an
authorized Aud i dea ler helps to ensure that it
runs properly and economically . T he cond ition o f
yo ur vehicle not on ly affects its safety and ability
to hold its value , it also affects
fuel consump
tion .
Check your oil each time you fill your tank.
T he amou nt o f oil used is related to engine load
and speed. .,,.
199
Page 207 of 300
,....,
N
co
er::
co
,....,
Towing a loaded trailer with an empty car res ults
in a high ly unstable distribution of weight. If this
cannot be avoided, drive at very low speeds only
to avoid the risk of losing steering control.
A "balanced" rig is eas ier to operate and control.
This means that the tow vehicle should be loaded
to the extent possible and permissible, while
keeping the trailer as light as possible under the
circumstances. Whenever possible, transfer
some cargo to the luggage compartment of the
tow vehicle while observ ing tongue load require
ments and vehicle loading considerat ions.
Speed
The higher the speed, the more difficult it be
comes for the driver to contro l the rig. Do not
drive at the maximum permiss ible speed . Reduce
your speed even more if load, weather or wind
conditions are unfavorable - part icularly when
going downhill.
Reduce veh icle speed
immediately if the tra iler
shows the slightest sign of swaying .
Do not try
to stop the swaying by accelerating.
Observe speed lim its . In some areas, speeds for
veh icles towing trai lers are lower than for regular
veh icles.
Always apply brakes early. When driving down
h ill , shift into a lower gear to use the engine
braking effect to slow the veh icle. Use of the
brakes alone can cause them to overheat and fa il.
Coolant temperature
The coolant temperature gauge r=;, page 10 must
be observed carefully . If the needle moves close
to the upper end of the scale, reduce speed im mediately and/or turn off the air conditioner.
If the coolant temperature warning light in the
instrument cluster starts flashing., pull off
the road, stop and let the engine
idle for about
two minutes to prevent heat build-up.
A WARNING
Anyone not properly restrained in a moving
vehicle is at a much greater risk in an acci-
-
Trailer mode
dent. Never let anyone ride in your car who is
not properly wear ing the restraints provided
by Aud i.
Trailer mode notes
Important to know
Your vehicle handles differently when towing a
t railer because o f the additional weight and dif
ferent weight distribution. Safety, performance
and economy will greatly depend on how carefu l
ly you load your trai ler and operate your rig.
Before you actually tow your trailer, practice
tu rning, stopping and backing up in an area away
from traffic. Keep practicing until you have be
come comp lete ly familiar w ith the way your vehi
cle-tra iler combination behaves and responds.
Backing up is difficu lt and requires practice.
Backing up with a t railer generally requires steer
ing action opposite to that when backing up your
vehicle without a trailer.
Maintain a greater distance between your vehicle
and the one in front of you . You will need more
room to stop. To compensate for the trailer, you
will need a larger than normal turning radius.
When passing, remember that you cannot accel
erate as fast as you normally would because of
the added load. Make sure you have enough room
to pass. After passing, allow p lenty of room for
your trailer before c hanging lanes again.
Avoid jerky starts, sharp turns or rapid lane
changes.
(D Tips
- Do not tow a trailer during the break-in peri
od of your veh icle.
- If you tow a trailer, your Audi may requ ire
more frequent maintenance due to the ex
tra load
r=;, page 280.
205
Page 228 of 300
Checking and Filling
areas, into open streams or down sewage
drains.
- Recycle used engine oil by taking it to a used
engine oil collection facility in your area, or
contact a service station .
Cooling system
Coolant
The engine coolant performs two functions: it
keeps the engine from overheating and it pro tects the engine from freezing in the winter.
The cooling system is sealed and generally re
qu ires little attention .
The cooling system has been filled at the factory
with a permanent coolant which does not need to
be changed. The coolant consists of
a mixture of
specially conditioned water and the manufactur
er's g lycol-basedcoo lant additive G 13 antifreeze
w ith anticorrosion addi tives (50% for USA mod
e ls· 60% for Canadian mode ls). This m ix ture
'
both ass ures the ne cess ary fros t protection and
p rotects metal com ponents in the engi ne's coo l
ing system from corrosion and scaling .
It also
raises the boiling point of the coolant.
Do not red uce the concent ra tion of the cool ant in
the s ummer by addi ng p la in water.
The propor
tion of coolant additive must be at lea st 50 %
but not more than 60 %
to maintain antifreeze
protection and cooling efficiency. If the coolant
frost protection is too low, the coo lant could
freeze and damage the vehicle heat ing and en
g ine cooling system .
For year -round driving, antifreeze is added at the
factory for temperatures down to:
- -3 1 °F
c -3s0c) usA
- -4 0° F ( -40°C) Canad a.
I f you must add coolant, use a m ixt ure of wa ter
and coolant add it ive. M ixing the coolant additive
with d istilled water is recommen ded.
_& WARNING
B efore you che ck anyt hing i n the engine com
partmen t, a lways read and heed all WARN -
226
INGS ~ & in Working in the engine compart
ment on page 220.
(D Note
- Be fore w inter sets in, have the coolan t
checked to see if the coo lant additive in your
vehicle is suff ic ient to meet the climate con
ditions. This is especially important if you
live in a region where the winter is extreme
ly cold. If necessary, increase the proportion
of coolant addi tive to 60% .
- Whe n adding coolant additive to your cool
ing system, remember:
- We re commend usin g on ly coo lant addi
tive G12++ o r G13 fo r yo ur vehicle. This
coolant ad dit ive is availab le at authorized
Audi dealers. Other types of antifreeze can
significantly reduce corrosion protection.
The resulting corrosion can cause a loss of
coolant and serio us engine damage.
- Do not add any type of radiato r leak sealant
to your vehicle's engine coolant. Adding ra
diator repair fluid may adversely affect the
function and perfo rmance of yo ur cooling
system and cou ld resu lt in damage not cov
ered by your New Ve hicle Li mited War ranty.
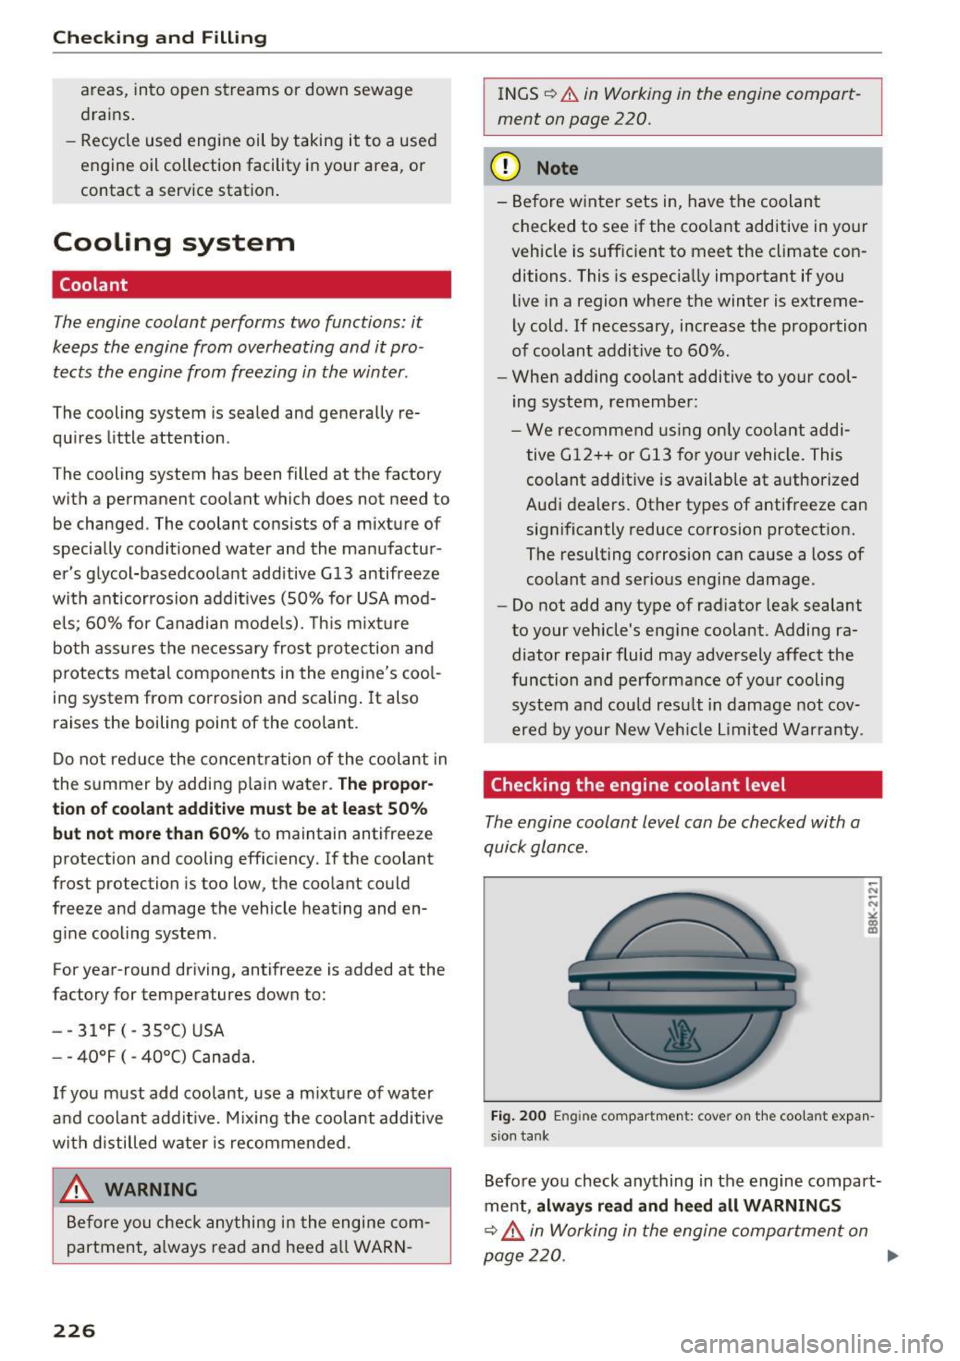
Checking the engine coolant level
The engine coolant level can be checked with a
quick glance.
Fi g. 20 0 Eng ine compartment: cover on the coo lant expan
s io n tank
Befo re yo u check anything in the engine compart
ment,
always read and heed all WARNINGS
~ ,& in Working in the engine compart,nen t on
page 220. ..,.
Page 229 of 300
.... N
co
er::
co
....
.,. Turn
off the ignition.
.,. Read the engine coolant level from the coolant
expansion tank
c> fig . 200, c> page 222,
fig. 197. With a cold engine, the coolant level
should be between the "MIN" and "MAX" mark
i ngs . When the engine is warm, the level may
be s light ly above the
"MAX " marking .
T he location of the coolant expans ion tank can be
seen in the engine compartment illustrat ion
i=> page 222.
To obtain an accurate reading, the engine must
be sw itched
off.
The expansion tank in your vehicle is equipped
with an electric coolant level sensor.
When the coo lant level is too low, the warning
light in the Auto-Check System
c:> page 29 wi ll
blink until you add coolant and the level has been
restored to normal. Even though there is an e lec
tr ic coolant level sensor, we still recommend you
check the coolant level from time to time.
Coolant loss
Coolant loss may indicate a leak in the cooling
syst em. In the event of coolant loss, the cooling
system should be inspected immediately by your
authorized Audi dealer. It is not enough merely
to add coolant .
In a
sealed system, losses can occur only if the
boiling point of the coo lant is exceeded as a re
sult of overheat ing .
(D Note
Do not add any type of radiator leak sealant
to your veh icle's engine coolant. Adding radia
tor repair fluid may adversely affect the func
tion and performance of your cooling system
and could result in damage not covered by
your New Vehicle Limited Warranty .
Adding coolant
Be very careful when adding engine coolant.
Before you check anyth ing in the eng ine compart
ment,
always read and heed all WARNINGS
Checking and Filling
c> .&. in Working in the engine compartment on
page
220 .
Requirement: The re must be a residual amount
of coolant in the expans io n tank
c>@.
.,. Turn off the engine .
.,. Let the engine cool down.
.,. Place a thick rag over the coolant expansion
ta nk
c:> page 226 , fig. 200 and carefully turn
the cap counter-clockwise
c> _&. .
.,. Add coo lant mixed in the correct ratio
c:> page 226, Coolant up to the MAX marking .
.,. Make sure that the f luid level remains stable.
Add more coolan t if necessary .
.,. Twist the cap o n again
tightly.
Replacement engine coolant must conform to ex
act specifications
c:> page 226, Coolan t.
We recommend using only coolant addit ive Gl2 +
+ , Gl3
or in an emergency Gl2+. Do not use a
different additive . In an emergency use plain wa
ter until you can get the correct addit ive and can
restore the correct ratio. This should be done as
soon as possible.
If you have lost a considerable amount of coo l
ant, then you shou ld add cold antifreeze and cold
water only whe n the engine is cold.
Always use
new e ngine coolant when refilling.
Do not fill coolant above the "MAX " mark. Excess
coolant will be forced out through the pressure
relief valve in the cap when the engine becomes
hot.
A WARNING
-- The cooling system is under pressure and
can get very hot. Reduce the risk of scalding
from hot coolant by following these steps .
- Turn
off the eng ine an d allow it to cool
down.
- Protect your face, hands and arms from
escaping fluid and steam by covering the
cap with a large, thick rag.
- Tu rn the cap slowly and very carefully in a
counter-clockwise direction whil e applying
light, downward pressure on the top o f
the cap .
~
227
Page 261 of 300
,....,
N
co
er::
co
,....,
Special care is required if you are repairing
the tire on a steep incline.
@ Tips
- Do not operate the compressor for more
than 12 minutes continuously, otherwise it
can overheat. Once the compressor has
cooled, you can continue to use it.
- If sealant has spi lled out, let it dry and then
you can remove it by peeling it away like a
foil.
- Remember to obtain a new bott le of sealant
from your authorized Audi dealer after re
pair ing a tire. After this, the functionality of
the tire repair set is restored .
- Obey all laws.
Replacing wheels
Before changing a wheel
Observe the following precautions for your own
and your passenger's safety when changing a
wheel.
""After you experience a tire failure, pull the car
well away from moving traff ic and try to reach
level ground before you stop¢_& .
.. All passengers sho uld
leave the car and move
to a safe location (fo r instance, behind the
guardrai l) ¢ .&_ .
.. Engage the
par king b rake to prevent yo ur vehi
cle from roll ing unintentionally ¢&_ .
.. Move
selecto r le ver to po sitio n P ¢ &_ .
"" If you are towing a trailer: unh itch the trailer
from your veh icle.
"" Block the diagonally opposite wheel with the
folding chocks o r other objects .
""T ake the
jac k* and the inflatable spa re tir e*
out of the luggage compartment ¢ page 254 .
A WARNING
You or your passengers cou ld be inj ured while
changing a wheel if you do not follow these
safety precautions:
- If you have a flat tire, move a safe distance
off the road. Turn off the engine, turn the
Em ergenc y ass is tanc e
emergency flashers on and use other wa rn
ing dev ices to alert other motorists.
- Make sure that passengers wait in a safe
place away from the vehicle and well away
from the road and traff ic.
- To help prevent the veh icle from moving
suddenly and possib ly slipping off the jack*,
always fully set the parking brake and block
the wheel diagonally opposite the wheel be i n g changed with the fold ing c hocks or oth
er objects . When one front whee l is lifted
off the ground, placing the Automatic
Transmission in P (Park) w ill
not prevent the
veh icle from moving.
- Before you change a wheel, be sure the
gro und is leve l and firm.
If necessary, use a
sturdy board under the jack*.
- Always s tore the vehicle too l kit, the jack*
and the replaced tire in the lugg age com
partment
¢ page 139.
Changing a wheel
When you change a wheel, follow the sequence
described below s tep-by -step and in exactly that
order.
1. Remove the de corative wheel cover* . For
more detai ls see also¢
page 260, Decaro-
tive wheel covers
o r¢ page 260, Wheels
with wheel bolt cops .
2. Loosen the w
heel bolt s ¢ page 260.
3 . Locate the proper mounting point for the
jack* and align the jack* below that point
¢ page 261.
4. Li ft the car with the jack*¢ page 261 .
s. Remove the wheel with th e flat tire and then
insta ll the
inflatable spar e tir e *
¢ page 262.
6. Tighte n all whee l bolts lightly.
7 .
Lo wer the vehicle wi th the jack *.
8 . Use the whee
l bolt wrench and
firml y tighten
all wheel bo lts ¢
page 260 .
9. Replace the decorat ive wheel co ver* .
259
...