sensor AUDI Q5 2016 Owners Manual
[x] Cancel search | Manufacturer: AUDI, Model Year: 2016, Model line: Q5, Model: AUDI Q5 2016Pages: 300, PDF Size: 75.02 MB
Page 33 of 300
,....,
N
co
er::
co
,....,
~ Drive immediate ly to an authorized Audi dealer
to have the malfunction corrected .
If there is a malfunction in the electronic ignition
lock, the ignition cannot be turned off . Drive im
mediately to an authorized service facility to have
the cause of the malfunction corrected.
On vehicles with Convenience key*, the engine
should not be switched off using the Start/Stop button because the engine cannot be started
again after the ignition has been switched off.
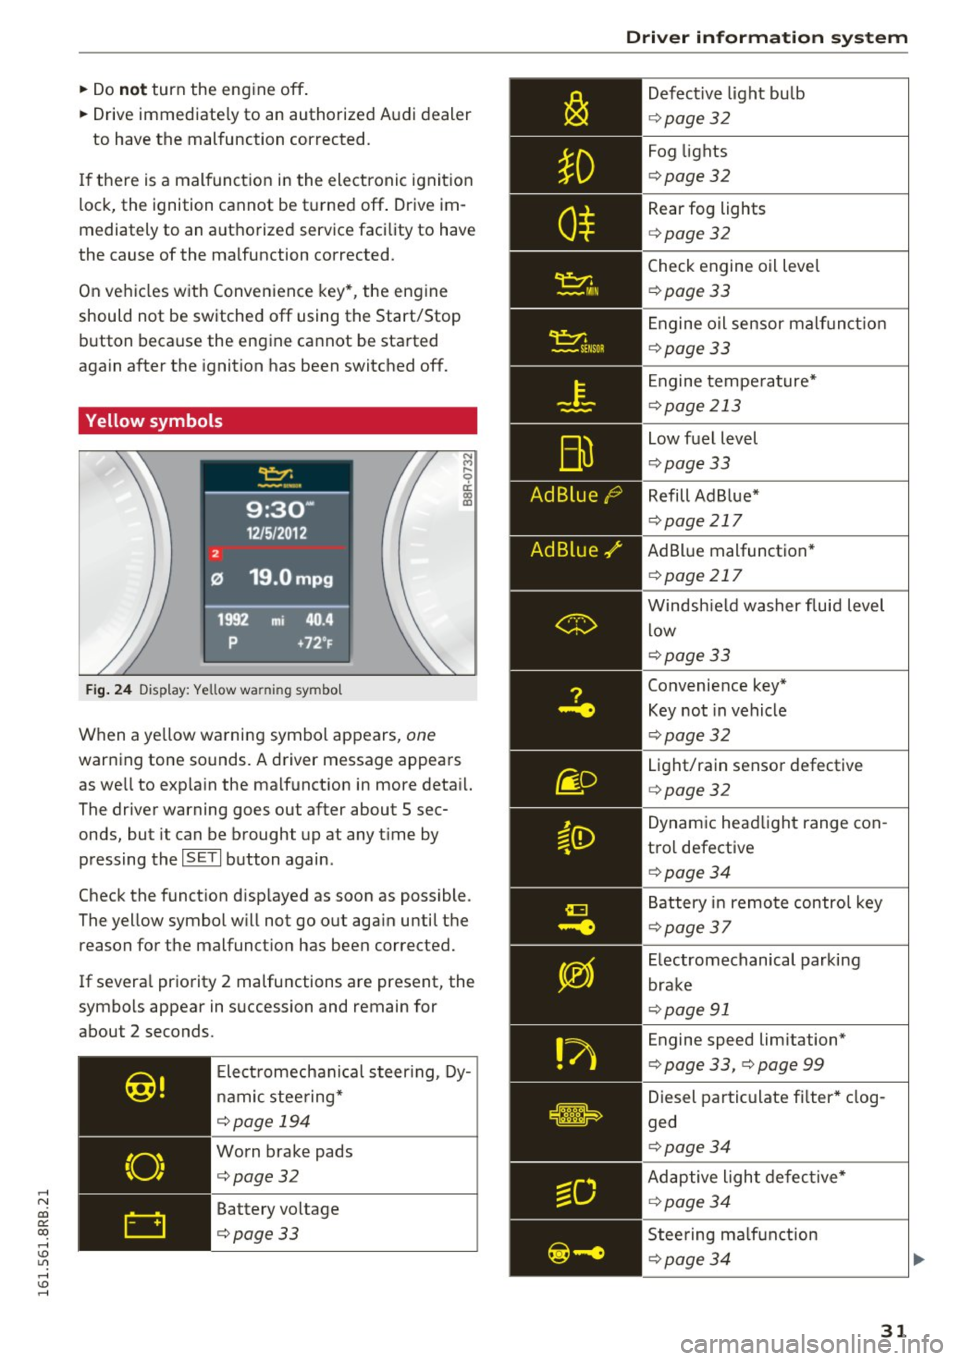
Yellow symbols
Fig. 24 Display: Yellow warning symbo l
N M
9 a: a, a,
When a yellow warning symbol appears, one
warning tone sounds. A driver message appears
as well to exp la in the malfunction in more detail.
The driver warning goes out after about 5 sec
onds, but it can be brought up at any t ime by
pressing the
ISETI button again.
Check the function disp layed as soon as possible.
The yellow symbol w ill not go out aga in until the
reason for the malfunct ion has been corrected.
If severa l priority 2 ma lfunctions are present, the
symbols appear in succession and remain for
about 2 seconds.
Elect romechan ical steering, Dy
nam ic stee ring*
¢page 194
Worn brake pads
¢page32
Battery voltage
¢page33
Driver information system
Defective light bulb
¢page 32
Fog lights
¢pag e 32
Rear fog lights
¢page 32
Check engine oil leve l
¢page 33
Engine oil sensor malf unc tion
¢page 33
Engine temperature*
¢page 213
Low fuel level
¢pag e 33
Refill Ad Blue*
¢page 217
AdBlue malfunction *
¢page 217
Windshield washer fluid level
low
¢page 33
Convenience key*
Key not in vehicle
¢pag e 32
Light/rain sensor defective
¢page 32
Dynamic headlight range con
trol defective
¢ page 34
Battery in remote control key
¢page 37
Electromechanical parking
brake
¢page 91
Engine speed limitation*
¢ page 33, ¢ page 99
Diesel particulate fi lter * clog
ged
¢pag e 34
Adaptive light defective*
¢page 34
Steering malfunction
¢page 34
31
Page 34 of 300
Driver information system
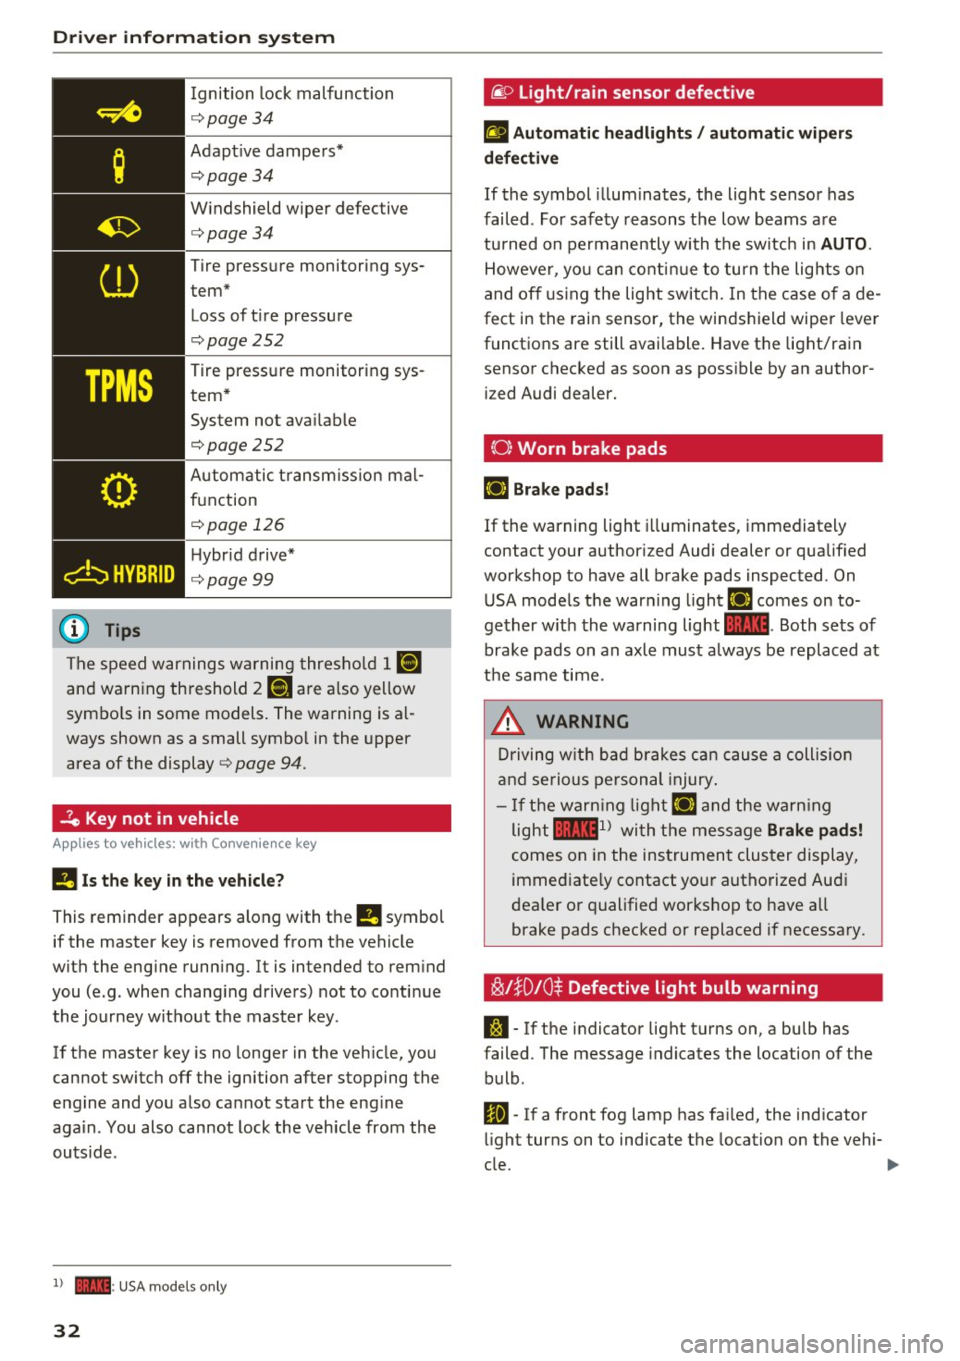
Ignition lock malfunction
<=>page 34
Adaptive dampers*
c:> page 34
Windshield wiper defective
c:>page34
Tire pressure monitoring sys
tem* Loss of tire pressure
c:>page252
Tire pressure monitoring sys
tem* System not available
c:>page252
Automatic transmission mal
function
<=> page 126
Hybrid drive*
c:> page99
The speed warnings warning threshold
J raj
and warning threshold 2 ISi are also yellow
symbols in some models. The warning is al
ways shown as a small symbol in the upper
area of the display
c:> page 94.
-?e Key not in vehicle
Applies to veh icles: w ith Conven ie nce key
II Is the key in the vehicle?
This reminder appears along with the
II symbol
if the master key is removed from the vehicle
with the engine running. It is intended to remind
you (e.g. when changing drivers) not to continue the journey without the master key .
If the master key is no longer in the vehicle, you
cannot switch off the ignition after stopping the
engine and you also cannot start the engine
again . You also cannot lock the vehicle from the
outside .
l) - : USA models only
32
·@ Light/rain sensor defective
fl Automatic headlights/ automatic wipers
defective
If the symbol illum inates, the light sensor has
failed. For safety reasons the low beams are
turned on permanently with the switch in
AUTO.
However, you can continue to turn the lights on
and off using the light switch. In the case of a de
fect in the rain sensor, the windshield wiper lever
functions are still available. Have the light/rain
sensor checked as soon as possible by an author ized Audi dealer.
(0) Worn brake pads
£i1 Brake pads!
If the warning light illuminates, immediately
contact your authorized Audi dealer or qualified
workshop to have all brake pads inspected. On USA models the warning light
£i1 comes on to
gether with the warning light
1111. Both sets of
brake pads on an axle must a lways be replaced at
the same time.
_8. WARNING
Driving with bad brakes can cause a collision
and serious personal injury.
-If the warning light £i1 and the warning
light
llll1 l with the message Brake pads!
comes on in the instrument cluster display,
immediately contact your authorized Audi
dealer or qualified workshop to have all
brake pads checked or replaced if necessary.
~l}D 10$ Defective light bulb warning
S:1 -If the indicator light turns on, a bulb has
failed. The message indicates the location of the
bulb .
Im-If a front fog lamp has failed, the indicator
light turns on to indicate the location on the vehi-
cle.
~
Page 35 of 300
,....,
N
co
er::
co
,....,
light tu rns on to indicate the location on the vehi
cle.
Vehicle light s: System fault!
If the message appears, there is a ma lfunction in
the head lights or light switch.
Drive to your authorized Aud i dealer immediately
to have the malfunct ion corrected .
A WARNING
-Light bu lbs are pressur ized and could ex
plode while they are being changed caus ing
ser ious persona l injury.
-
- Work with due care when handling the high
voltage section of gas dis charge (xenon)
ligh ts*. Failure to do so co uld result in death
or serious injury .
@ Tips
Have the bulb replaced or the connect ion re
pa ired by yo ur autho rized Aud i Serv ice depart
men t.
<:;::> Windshield washer flu id level too low
llt Plea se refill washer fluid
If the symbol illumi nates, add w indshield was her
fluid to the washer system and also to the head
light washer system
c::> page 233 .
Bil Fuel supply too low
When the liD symbol i llum inates, this means
there are about 2.6 ga llons ( 10 liters) of fue l left
in the fuel tank. Time to refuel!
c::> page 214.
If the symbol lights up, even when there is amp le
fuel in the tank, and the text
Fuel tank sy stem
malfun ction! Contact deale r
appears in the dis
p lay, there is a fault in the system. Contact an au
thor ized Audi dealer to have the fault rect ified.
D Battery voltage
If battery power drops into the range where it
can limit the ab il ity of the engine to start, th is
the symbol (•) ;ippears in the instrument cluster
Dri ver informa tion system
display with the following driver message Lo w
batter y: Batte ry will be char ged while dri ving.
While t his driver notification is disp layed , you
have to be prepared for limited start ing capabili
ty .
Driver message appears and goes out again
If this d rive r message appea rs after the ignition
is turned on or while d riving a nd it goes ou t again
after a whi le, the battery has been adequately re
charged .
Driver message appears and does not go out
again
If this drive r notificat ion appea rs after the igni
tion is tu rned on or while driv ing and does not go
out again, the battery's state of charge is not in
the optimal range. Start ing capability is restrict
ed . Have the battery checked at an authorized
Audi dealer or other qualified workshop as soon as possible.
~ Check engine oil
II Add oil, ma x x qt (l). You may cont. driv.
When the Ill symbol and dr iver message appear,
add the amount of oil appear ing in the disp lay at
the next opportunity
c::> page 224 .
'l:7;,.. Engine oil sensor defective
• Oil le vel! Sen sor defecti ve
If the symbol illuminates, contact your author
ized Audi dea ler and have the oil sensor inspect
ed . Until you have this done, check the oil level
each time you refuel just to be on the safe side
c::> page 224.
! ? Engine speed limitation
Applies to vehicles: with engine speed limitation
II! Do not exceed max. engine spe ed of XXXX
rpm
T he II! symbol illuminates when there is an en
gine co ntrol malf unct ion. The indi cator light ~
in t he i nstr ument cluster also illum ina tes. The
engine speed is limited to the speed displayed in ..,.
33
Page 42 of 300
Opening and clo sin g
Unlocking and locking the vehicle with the
remote control
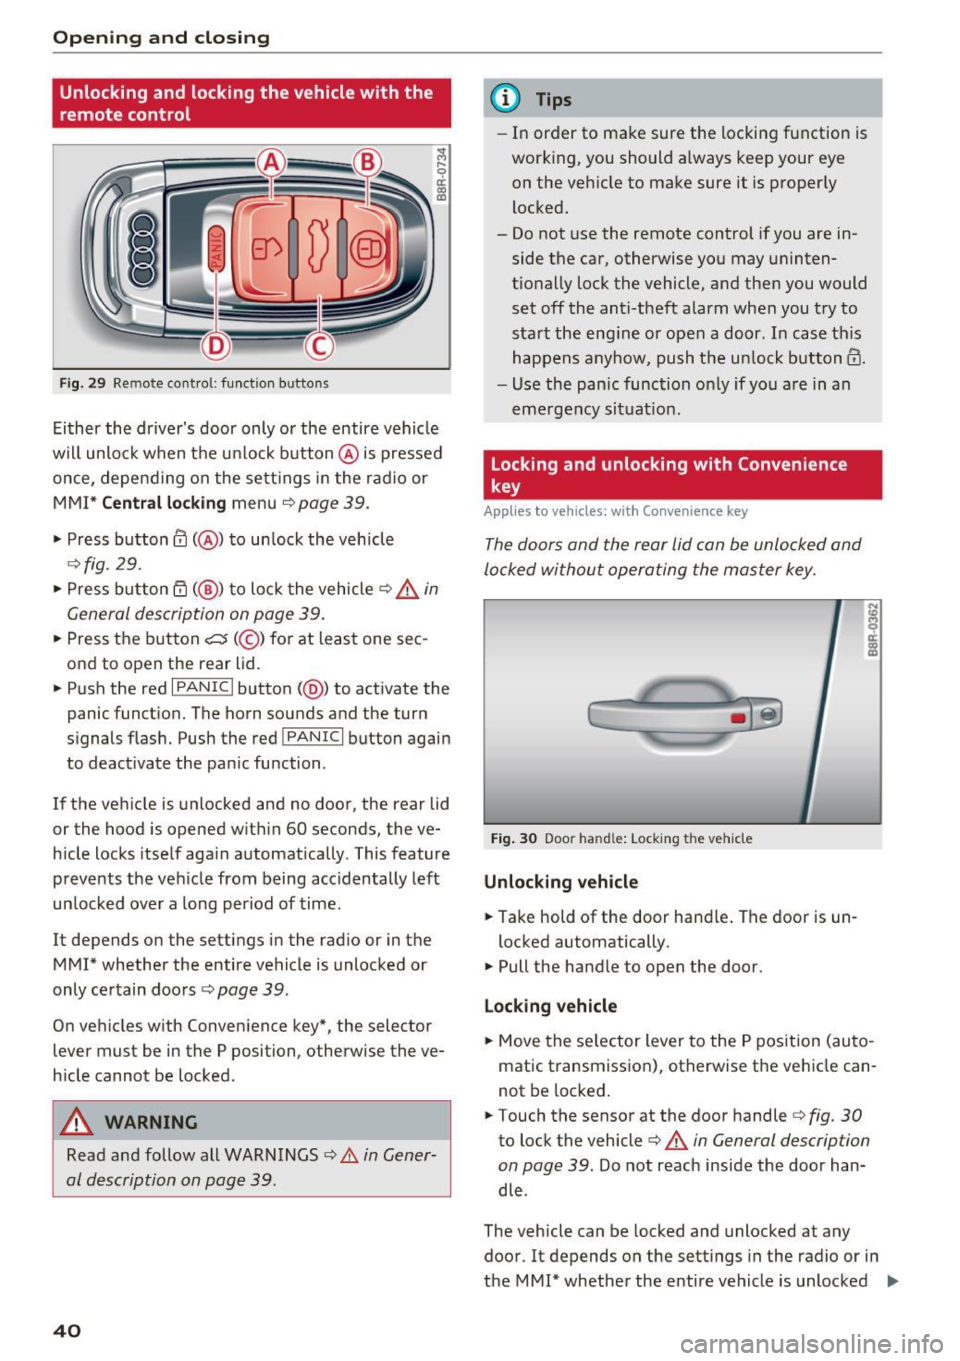
Fig. 29 Remo te cont ro l: function b uttons
Ei ther the driver's door only or the entire vehicle
wil l unlock when the u nlock button @is pressed
once, depe nd ing on the sett ings in the radio or
MMI*
C entral l ocking menu ¢page 39.
• Press button@( @) to un lock the vehicle
¢ fig. 29.
• Press button rfl (@ ) to lock the vehicle ~.&. in
General description on page 39.
• Press the button c::5 (@ ) for at least one sec
ond to open the rear lid.
• Push the red
I PANIC I button (@ ) to act ivate the
panic funct ion. The horn sounds and the turn
signals flash. Push the red
! PANIC I button again
to deactivate the pan ic function .
If the veh icle is unlocked and no door, the rear lid
or the hood is opened with in 60 seconds, the ve
h icle locks itself aga in automatically. This feature
prevents the veh icle from being accidentally left
un locked over a long period of time.
It depends on the settings in the rad io or in the
MMI* whether the entire vehicle is unlocked or
only ce rtain doo rs
r:!> page 39.
On veh icles w ith Conven ience key*, the selector
lever must be in the P position, otherw ise the ve
h icle cannot be locked .
A WARNING
Read and follow all WARNINGS ¢ A in Gener
al description on page 39.
40
@ Tips
- In order to make sure the locking function is
working, you should a lways keep your eye
on the vehicle to make sure it is properly
locked.
- Do not use the remote control if you are in side the car, otherwise you may uninten
tionally lock the vehicle, and then you would
set off the anti-theft alarm when you try to
sta rt the eng ine or open a door. In case this
happens anyhow, push the un lock button@.
- Use the pan ic function on ly if you are in an
eme rgency situat io n.
Locking and unlocking with Convenience
key
App lies to vehicles : wi th Convenience key
The doors and the rear lid can be unlocked and
locked without operating the master key.
Fig . 30 Door ha nd le: Lock ing the vehicle
Unlocking vehicle
• Take hold of the door hand le . The door is un -
locked automatically.
• Pull the handle to open the door .
Lo ck ing v ehicle
• Move the se lector lever to the P pos ition (au to
matic transmission), otherwise the vehicle can
not be locked.
• Touch the sensor at the door handler:!>
fig. 30
to lock the vehicle c:> A in General description
on page 39.
Do not reach inside the door han
dle .
The vehicle can be locked and unlocked at any
door. It depends on the sett ings in the radio or in
the MMI* whether the entire vehicle is unlocked
II>-
Page 43 of 300
,....,
N
co ~ CX) ,....,
I.Cl U"I ,....,
I.Cl ,....,
or one of the doors¢ page 39. The master key
must be within a range of about 5 feet (1.5 me
ters) from the appropriate door or the rear lid. It
makes no difference whether the master key is in
your jacket pocket or in your brief case .
If you grip the door handle while lock ing, this can
adversely affect the lock ing funct ion.
It is not possible to re-open the doo r for a brief
period directly after closing it. This allows you to
ensure that the doors are properly locked.
A WARNING
Read and follow all WARNINGS¢ & in Gener
al description on page 39.
@ Tips
If your vehicle has been standing for an ex
tended period, please note the following:
- The proximity sensors are deactivated after
a few days to save power. You then have to
pull on the door handle once to unlock the
vehicle and a second time to open the vehi
cle.
- To prevent the battery from being dis
charged and to preserve your vehicle's abili
ty to start for as long as possible, the ener
gy management system gradually switches
off unnecessary convenience functions.
It is
possible that you will not be able to unlock
your vehicle using these convenience func
tions.
- For Declaration of Compliance to United
States FCC and Industry Canada regulations
¢page 283.
Opening and closing
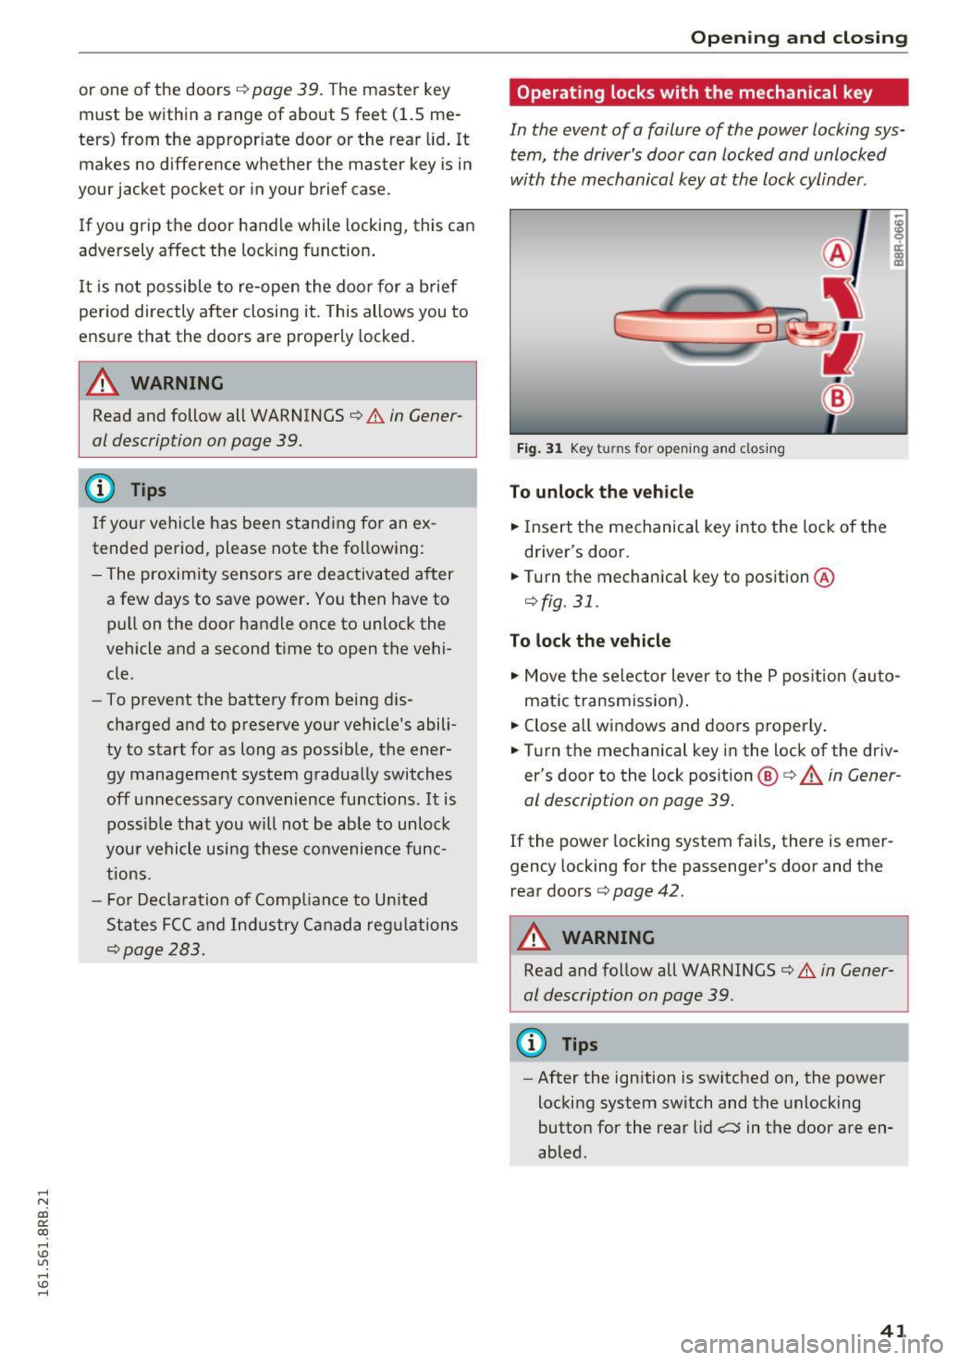
Operating locks with the mechanical key
In the event of a failure of the power locking sys
tem, the driver's door can locked and unlocked
with the mechanical key at the lock cylinder .
Fig. 31 Key turns for opening and closing
To unlock the vehicle
"" Insert the mechanical key into the lock of the
driver's door .
.. Turn the mechanical key to position ®
¢fig. 31.
To lock the vehicle
"" Move the selector lever to the P pos ition (auto
matic transmiss ion) .
.. Close all windows and doors properly .
.. Turn the mechanical key in the lock of the driv
er's door to the lock position @¢
A in Gener
al description on page 39.
If the power locking system fails, there is emer
gency locking for the passenger's door and the
rear doors ¢
page 42.
A WARNING
Read and follow all WARNINGS¢ & in Gener
al description on page 39 .
(D Tips
-After the ignition is switched on, the power
locking system switch and the unlocking
button for the rear lid,:::::;$ in the door are en
abled .
41
Page 54 of 300
Lights and Vision
Lights and Vision
Exterior lighting
Switching the lights on and off
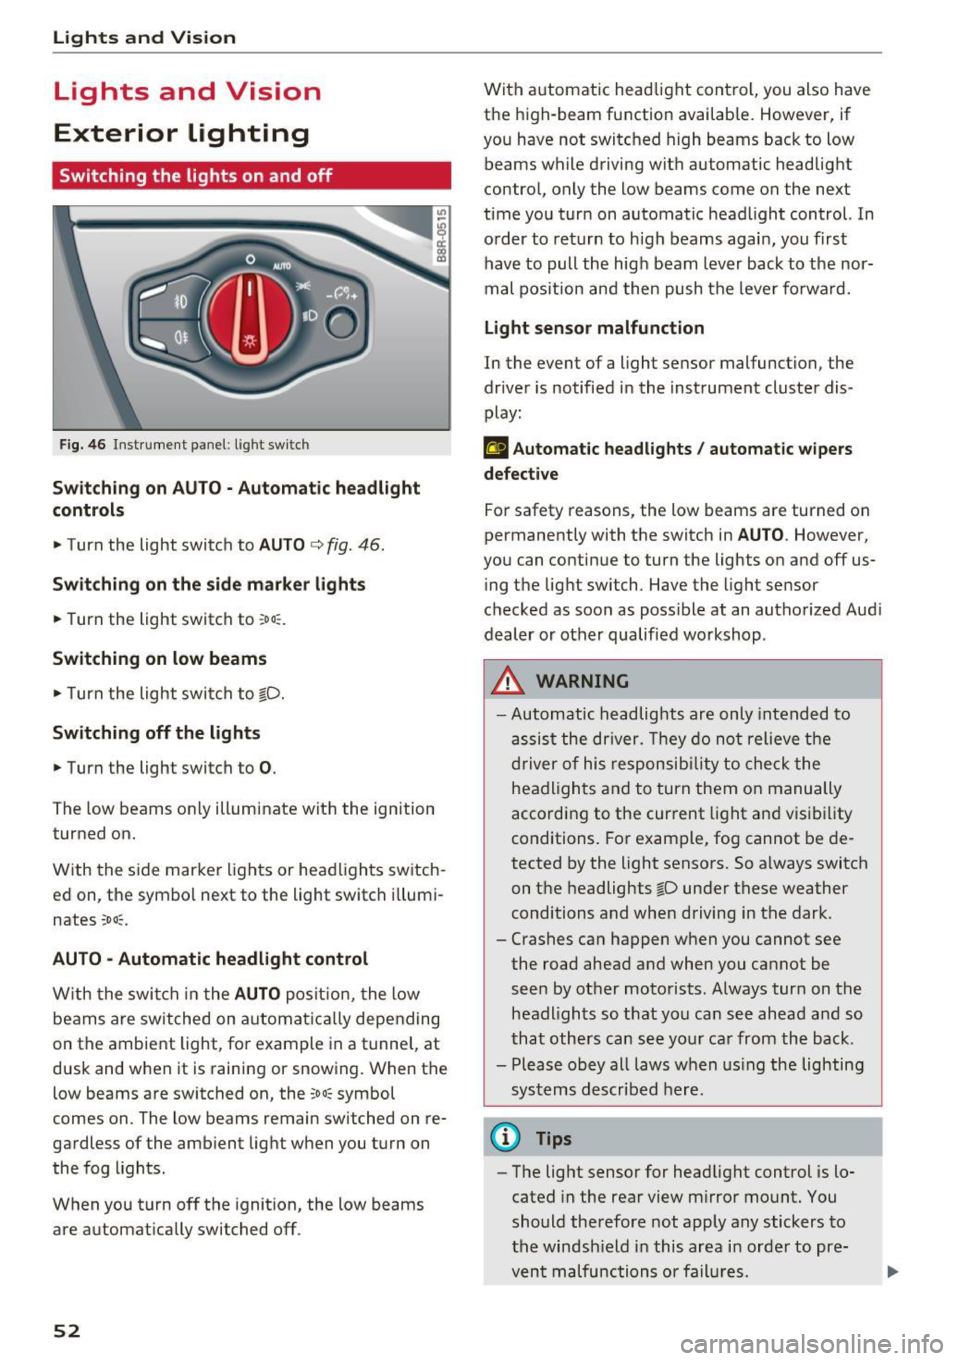
Fig. 46 Instrument panel: l ight sw itch
S wi tch in g on AUTO· Automatic headlight
controls
• Turn the light switch to AUTO c> fig. 46 .
Sw itch ing on the side marke r lights
• Turn the light switch to ~o o:.
Switching on low beams
• Turn the light swi tch to io.
Sw itch ing off the lights
• Turn the light switch to 0.
The low beams only illuminate with the ignition
turned on.
With the side marker lights or headlights switch
ed on, the symbol next to the light switch i llumi
nates
~oo~.
AU TO -Automatic headlight control
W ith the swi tch in the AUTO posit io n, the low
beams are switched on automat ic all y depending
on the ambient light, fo r example in a tunnel, at
dusk and when it is raining or snowing. When the
low beams are switched on, the
~oo~ symbol
comes on. The low beams remain switched on re
gardless of the amb ient light when you turn on
the fog lights .
When you turn off the ignition , the low beams
are automat ically switched off .
52
With automatic head light cont rol, you also have
the high-beam function available. However, if
you have not switched high beams back to low beams while driving with automatic headlight
contro l, only the low beams come on the next
time you turn on automatic headlight control. In
o rder to return to h igh beams agai n, you first
have to pull the hig h beam lever back to the nor
mal pos it ion and then push the leve r fo rwa rd.
Light sen sor malfunction
In the event of a light sensor malfunction, the
dr ive r is notified in the instrument cluster dis
play:
El Automat ic headlights / auto matic wipers
defective
For safety reasons, the low beams are turned on
permanently with the switch in
AU TO . However,
you can contin ue to turn the lights on and off us
i ng t he light switch. Have the light sensor
checked as soon as poss ible at an autho rized Aud i
dealer or other qualified workshop .
_&, WARNING
-Automatic headlights are only inte nded to
assis t the driver. They do not relieve the
driver of his respon sib ility to check the
headligh ts a nd to turn them o n manually
according to the cur rent light an d visibility
conditions. For example, fog cannot be de
tected by the light sensors. So a lways switch
on t he headlights
io under these weather
conditions and when driving in the dark .
- Crashes ca n happen when you cannot see
the road ahead and when you cannot be seen by other motorists. Always turn on the
headl igh ts so that you ca n see ahead a nd so
that others can see yo ur car from the back.
- Please obey all laws w hen us ing the lighting
sys tems described here.
@ Tips
- The light sensor for headlight control is lo
cated in the rear view m irror mount. You
should therefore not apply any stickers to
the windsh ield in this area i n order to pre
vent malfunctions or fail ures.
Page 55 of 300
..... N
co ~ CX)
..... I.Cl U"I
..... I.Cl .....
-Some exterior lighting functions can be a d
j u sted
¢page 53 .
-When yo u remove your key from the igni
tion while the vehicle's lights are t urne d on,
a buzzer sounds as long as the driver's door
i s open.
- In coo l or damp weather, the inside of the
headlights, turn signals and tai l lights can
fog over d ue to the temperature d ifference
between the inside and outs ide. They will
clea r short ly after switch ing them on. This
does not affect the serv ice life of the lig ht
i ng .
- In the event of a light sensor malfunct ion,
the d river is not ifi ed in t he i nstr ument clus
te r dis play¢
pag e 32.
Fog lights
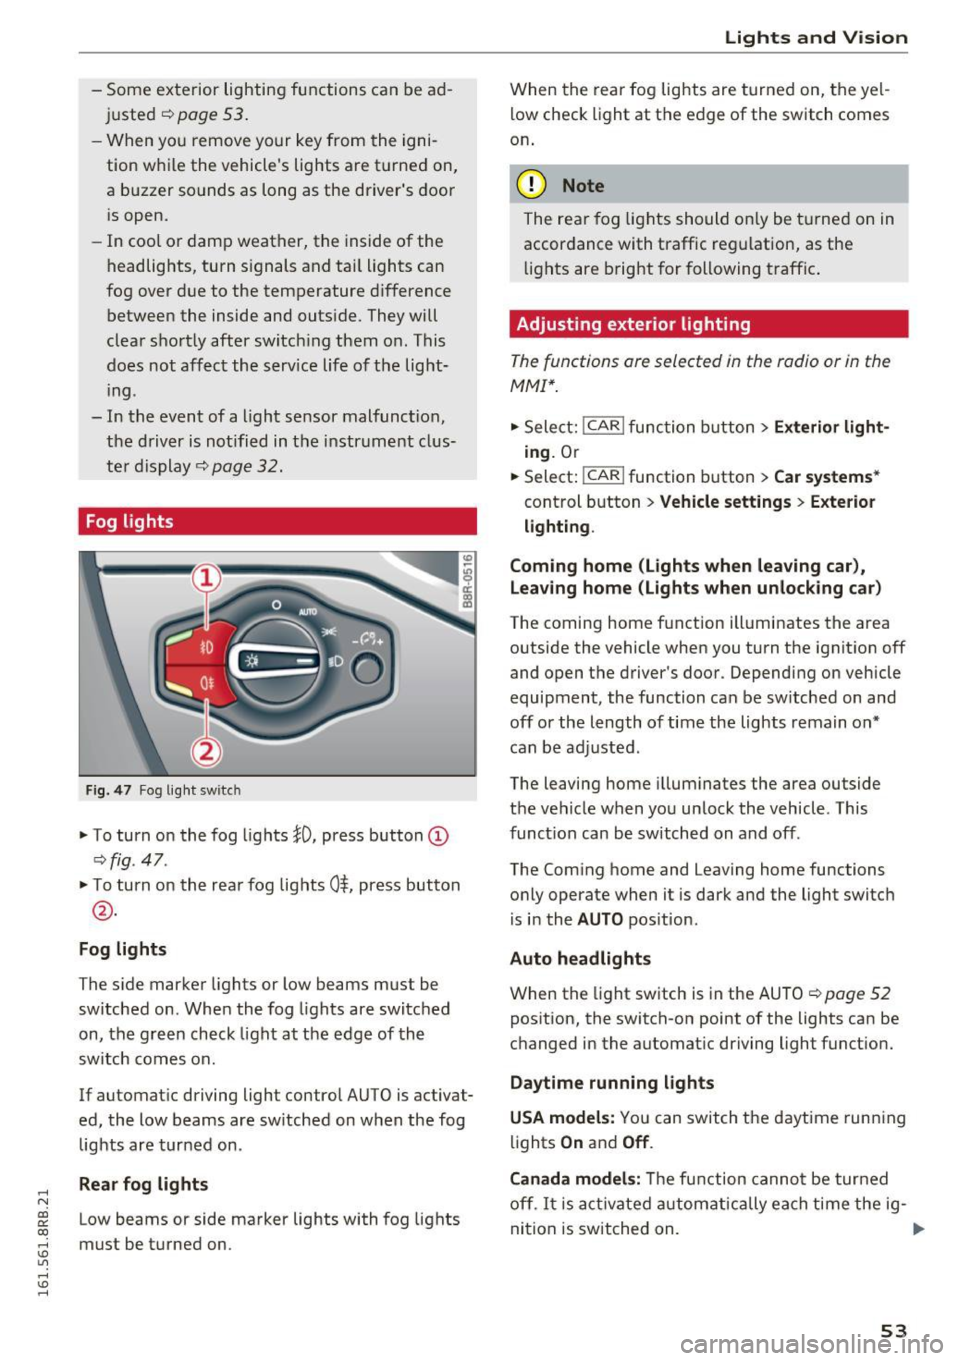
Fig . 4 7 Fog ligh t sw itc h
"To turn on the fog lights }O, press button (D
¢ fig. 47.
"T o turn on the rea r fog lights 0$, press but ton
@ .
Fog lights
The s ide marker lights or low beams must be
switche d on. When the fog lights are switc hed
on, the g reen check light at the edge of the
sw itch comes on.
If automat ic driving light control AUTO is activat
ed, the low beams are sw itched on w hen the fog
lights are tur ned on .
Rear fog lights
Low beams or side marker lights with fog lights
must be t urned on .
Lights and V ision
W hen the rear fog lights are t urned on, the yel
l ow check light at the edge of the switch comes
on .
(D Note
The rear fog lig hts should o nly be t urne d on in
accor dance with traffic reg ulation, as the
li g hts are b right for f ollowing traffic .
Adjusting exterior lighting
The functions are selected in the radio or in the
MMI*.
"Sele ct: !CAR ! func tion b utton> Exterior light
ing .
Or
.. Select:
-,c- A- R~I function button > Car systems *
control b utton > Vehicle settings > Exterior
lighting .
Coming home (Lights when leaving car ),
Leav ing home (Lights when unlock ing car )
The coming home f unction illuminates the area
outside the vehicle when you turn the ignit ion off
and open the d river's doo r. Dependi ng on vehicle
equipment, the function can be sw itched on and
off or the length of time the lights remain on*
c an be ad justed .
The leaving home i llum inates the area outside
t h e ve hicle when you un lock the vehicle . This
funct ion can be switched on and off .
The Com ing home and Leaving home functions
o nly operate when it is dark and the light switch
i s i n the
AUTO pos it ion.
Auto headlights
When the light sw itch is in the AU TO ¢ page 52
pos ition, the switch-on point of the lights can be
changed in the automat ic driving light funct ion.
Daytime running lights
USA models: You can switch the daytime runn ing
li ghts
On and Off .
Canada models:
Th e fu nction canno t be turned
off .
It is a ct ivate d automatica lly ea ch time the ig-
ni tio n i s switched on. ..,
53
Page 59 of 300
..... N
co ~ CX)
.....
"' U"I
.....
"' .....
Windshield wipers
Switching the windshield wipers on
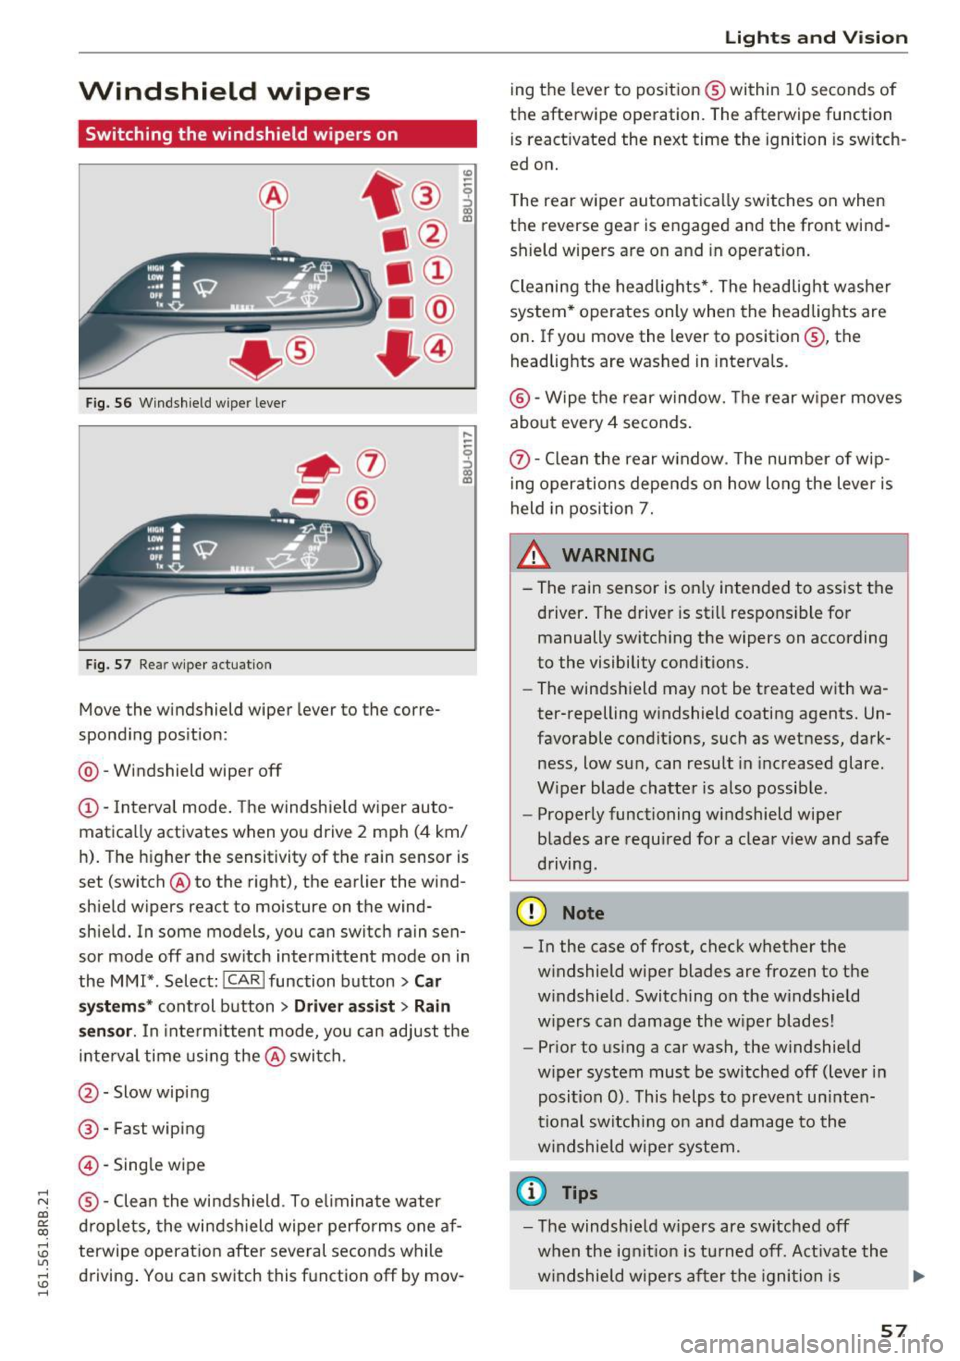
Fig. S6 Windshield wiper lever
Fig. S7 Rea r w ipe r actuation
Move the windshield wiper lever to the corre·
spond ing pos ition:
@ · Windshield wiper off
(D · Interval mode. The windshield w iper auto
matica lly activates when you drive 2 mph (4 km/
h ). The higher the sensitivity of the rain sensor is
set (switch @ to the right), the earlier the wind
shield w ipers react to moisture on the wind·
shie ld. In some models, you can switch rain sen·
sor mode off and sw itch intermittent mode on in
the MMI* . Select:
!CARI function button> Car
sy stem s*
control button > Dri ver assist > Rain
s e nsor .
In inte rm ittent mode, yo u can adjust the
i nte rval time using the @switch.
@ · Slow wiping
® ·Fast wiping
@· Single wipe
® ·Clean the windshield . To e liminate water
d rople ts, the windshield wipe r perfo rms one af
terwipe operat io n after several seconds while
d riving . You can switch this f unction off by mov-
Lights and V ision
ing the lever to posit ion ® within 10 seconds of
the afterwipe operation. The afterwipe function
is react ivated the next time the ignition is sw itch
ed on.
T he rear wiper automatically switches on when
t h e reverse gear is engaged and the front wind ·
shield wipers a re on and in ope ration.
Cleaning the headlights *. The headlight washer
system * operates only when the headlights are
on . If you move the lever to position ®, the
headlights are washed in interva ls.
@ ·W ipe the rear window. The rear w iper moves
about eve ry 4 seconds .
(!)-Clean the rear w indow . T he number of wip·
ing oper ations depends on how long the lever is
held in position 7.
_&. WARNING
-
- The rain sensor is on ly intended to ass ist the
d river. The drive r is st ill respons ible fo r
manually switch ing the wipers on according
to the visibility conditions.
- The win dshield may not be treated w ith wa
ter-repelling w indshield coating agents. Un
favorable condit ions, such as wet ness, dark·
ness, low su n, can result in increased glare.
W iper blade chatte r is also possib le.
- Properly functioning windshield wipe r
b lades are required for a clea r view and safe
driving.
(D Note
- In the case of frost, check w hether the
w indshield wiper blades are frozen to t he
w indshield . Switching on the w indshield
w ipers can damage the w iper blades!
- Pr ior to us ing a car wash , the w indshield
w iper system must be sw itched off (lever in
posi tion 0) . This helps to prevent un inten
ti onal sw itch ing o n and dam age to the
w indshield wiper system.
(D Tips
- T he windshie ld w ipers are switched off
when the ignit io n is tu rned off. Act ivate the
w indshield wipe rs af ter the igni tion is .,.
57
Page 60 of 300
Lights and Vi sion
switched back on by moving the windshield
wiper lever to any position .
- Worn or dirty windshield wiper blades result
in streaking. This can affect the rain sensor
function . Check your windshield wiper
blades regularly.
- The washer fluid nozzles of the windshield
washer system are heated at low tempera
tures when the ignition is on .
- When stopp ing temporarily, e .g . at a traffic
light, the set speed of the windsh ield wipers
i s automatically reduced by one speed .
Cleaning windshield wiper blades
Clean the windshield wiper blades when they be
gin to leave streaks . Use a soft cloth and g lass
cleaner to clea n the windshield wipe r blades .
Front wipe r
.,. Place the windshield wiper arms in the service
pos ition. Refer to¢
page 58.
.,. Lift the wiper arm away from the front window .
Rear wiper
.,. Lift the wiper arm away from the rear window .
A WARNING
Dirty windshield wiper blades can impair your
view. This can lead to accidents.
Replacing windshield wiper blades
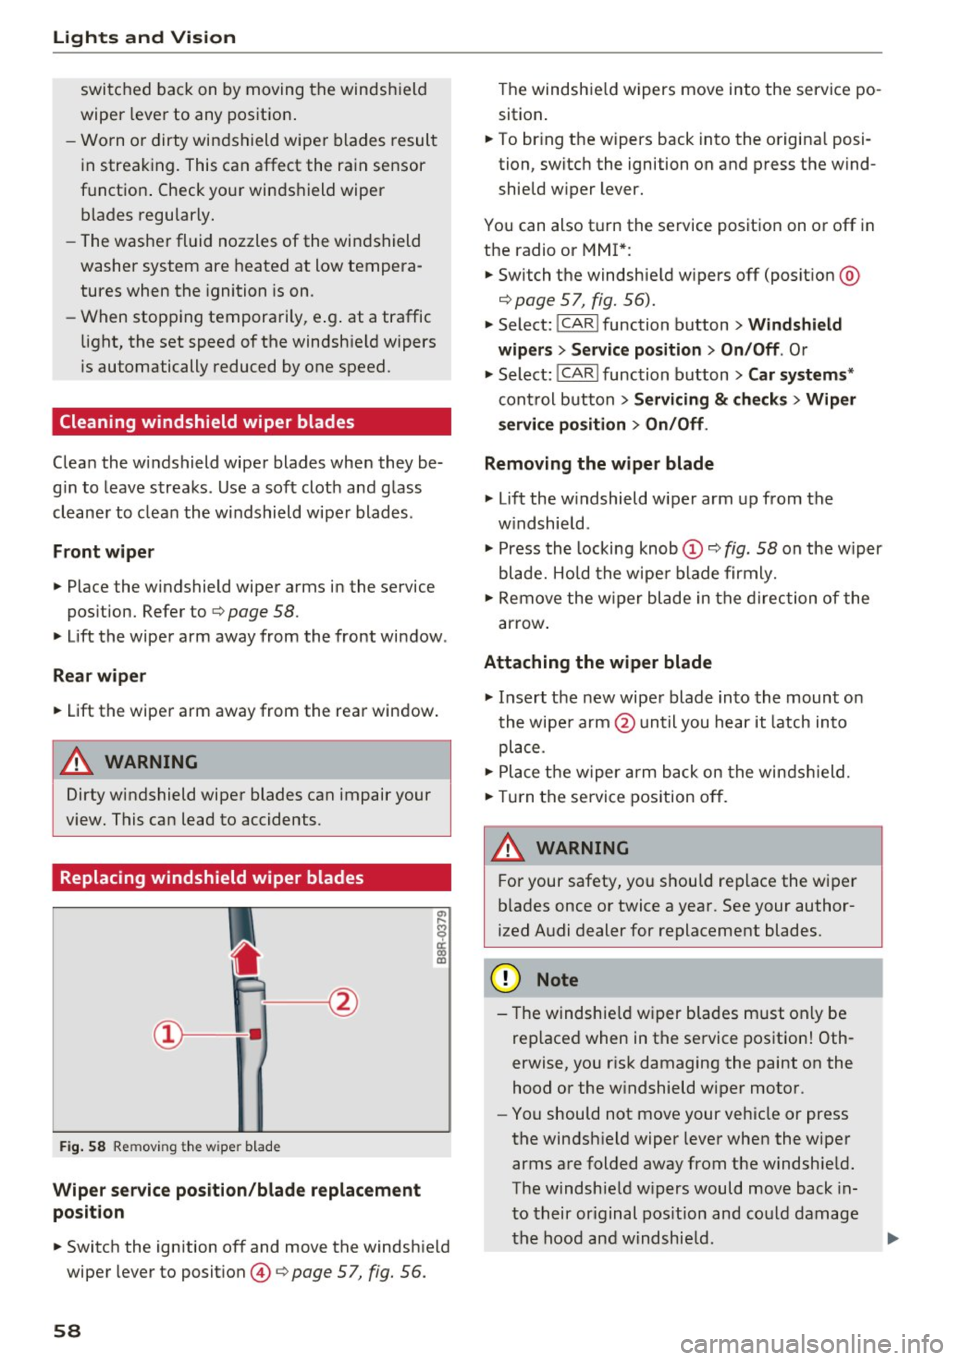
F ig. 58 Remov ing the w ipe r blad e
Wiper servic e position /blad e re placem ent
po sit ion
"' ij
a: CX) ID
.,. Switch the ignition off and move the windsh ie ld
wiper lever to position @ ¢
page 57, fig. 56.
58
The windshie ld wipers move into the service po
sition .
.,. To br ing the w ipers back into the origina l posi
tion, switch the ignition on and press the wind
shie ld w iper lever.
You can also turn the service position on or off in
the radio or MMI *:
.,. Switch the windshie ld w ipers off (posit ion @
¢page 57, fig. 56).
.,. Select:
!CAR I function button> Windshield
wiper s
> Servic e po sition > On /Off . Or
.,. Select :
!CAR I function button> Car system s*
control button > Ser vicing & ch eck s > Wiper
s ervi ce po sition
> On /Off .
Removing the wiper blade
.,. Lift the w indshield w iper arm up from the
w indshie ld .
.,. Press the locking knob@¢
fig. 58 on the w iper
blade. Ho ld the wipe r blade firmly .
.,. Remove the w iper blade in the direction of the
arrow .
Attaching the wiper blade
.,. Insert the new wiper blade into the mount o n
the wipe r arm @unt il you hear it latch into
place .
.,. Place t he w iper a rm back on the winds hield.
.,. Tur n the se rvice pos ition off.
A WARNING
F or your safety, you shou ld replace the wiper
b lades once or twice a year. See your author
ized Audi dealer for replacement blades.
(D Note
- The windshie ld wiper blades must only be
replaced when in the service pos ition! Oth
erwise, you r isk damaging the paint on the
hood or the w indshield wiper moto r.
- You should not move your vehicle or press
the windsh ield wiper lever when the wiper
arms are folded away from the windshie ld.
The windshie ld w ipers would move back in
to their or iginal pos ition and could damage
the hood and w indshie ld .
Page 108 of 300
Audi adaptive cruise control and braking guard
Audi adaptive cruise
control and braking
guard
Introduction
Applies to vehicles: with Audi adaptive cruise contro l
The adaptive cruise contro l system assists the
driver by regulating vehicle speed and helping to
maintain a set distance to the veh icle ahead ,
within the limits of the system. If the system de
tects a moving vehicle up ahead, adaptive cruise
control can brake and then accelerate your vehi
cle. This helps to make driving more comfortable
on long highway stretches.
The braking guard system can warn you about an
impending collision and initiate braking maneu
vers
c::> page 112.
Adaptive cruise control and braking guard have
technical limitations that you must know, so
please read th is section carefully, understand
how the system works and use them properly at
all times.
General information
General information
Applies to veh icles: with Audi adaptive cruise control
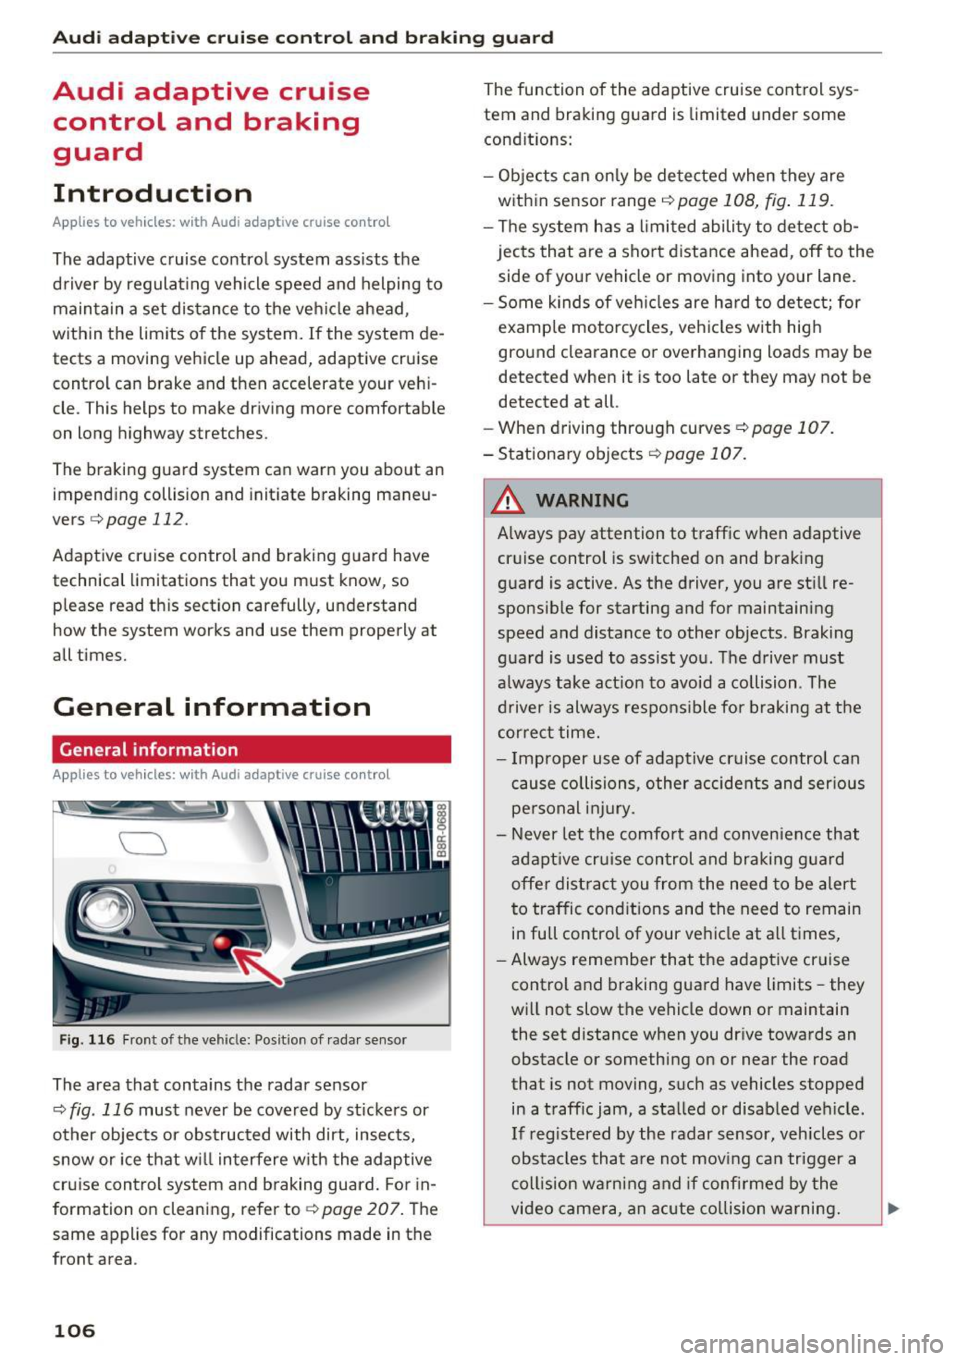
Fig. 116 Front of t he veh icle: Posit ion of radar sensor
The area that contains the radar sensor
c::> fig . 116 must never be covered by st ickers or
other objects or obstructed with dirt, insects,
snow or ice that w ill interfere w ith the adaptive
cruise control system and braking guard. For in
formation on cleaning, refer to
c::> page 207. The
same appl ies for any modifications made in the
front area .
106
The function of the adaptive cruise control sys
tem and braking guard is limited under some
condit ions:
- Objects can only be detected when they are
within sensor range
<:!) page 108, fig . 119.
-The system has a limited ability to detect ob
jects that are a short distance ahead, off to the
side of your vehicle or moving into your lane.
- Some k inds of veh icles are hard to detect; for
example motorcycles, veh icles with high
ground clearance or overhanging loads may be
detected when it is too late or they may not be
detected at all.
- When driving through curves ¢
page 107.
- Stationary objects i::!) page 107.
& WARNING
-Always pay attention to traffic when adaptive
cruise control is switched on and braking
guard is active. As the driver, you are still re
sponsible for starting and for maintaining
speed and distance to other objects . Braking
guard is used to assist you . The driver must
a lways take action to avoid a collision . The
driver is always responsible fo r braking at the
correct time.
- Improper use of adaptive cruise contro l can
cause collisions, other accidents and serious
personal injury.
- Never let the comfort and convenience that
adapt ive cr uise control and braking guard
offe r dist ract you from the need to be alert
to traffic cond itions and the need to remain
in full control of your ve hicle at all times,
- Always remember that the adaptive cruise
control and braking guard have limits -they
will not slow the vehicle down or maintain
the set distance when you dr ive towards an
obstacle or something on or near the road
that is not moving, such as vehicles stopped
in a traff ic jam, a stalled or disab led veh icle.
If registered by the radar sensor, veh icles o r
obstacles that are not moving can trigger a
coll ision warning and if confirmed by the
video camera, an acute collision warning. ..,