check engine AUDI Q5 2017 Owner's Guide
[x] Cancel search | Manufacturer: AUDI, Model Year: 2017, Model line: Q5, Model: AUDI Q5 2017Pages: 296, PDF Size: 74.43 MB
Page 229 of 296
a,
a,
..... N
" ('I ..... 0 0
0:
co
,&_ WARNING
California P roposition 65 Warn ing :
- B attery posts, termi na ls and re lated acces
sories contain lead and lead compounds,
chemicals known to the State of California
to cause cancer and reproductive problems.
Wash hands after handling.
(D Note
- Do no t disconnect the ve hicle bat tery when
t h e ignit ion is switched on or when the en
gine is runni ng, otherwise, you w ill damage
electron ic components in the e lectr ica l sys
tem.
- If your vehicle is going to stan d for a long
period of time without be ing driven, protect
the battery from "freez ing", otherwise it
will be damaged a nd will then have to be re
placed .
Battery charging
Starting the engine requires a well charged bat
tery .
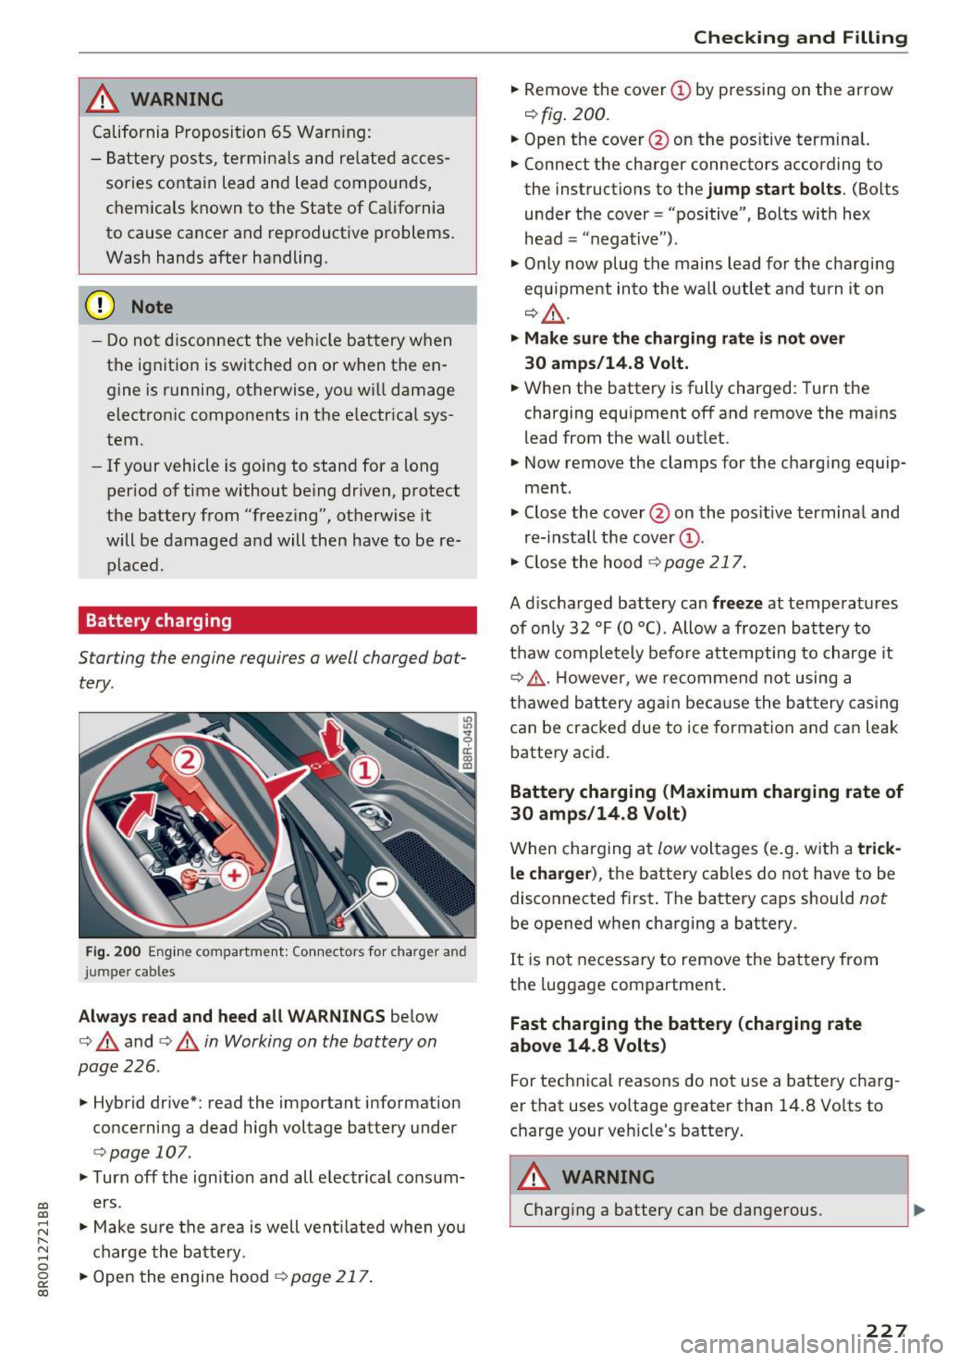
Fig. 200 Engin e co mpartme nt: Co nnectors for charger and
j um per ca bles
Always read and heed all WARNINGS below
c> & and <=> & in Working on the battery on
page 226 .
.. Hybrid dr ive*: read the important i nformation
co ncerning a dead high voltage battery under
<=> page 107.
.. Turn off the ignition and all e lectr ica l consum
ers.
.. Make s ure the a rea is well vent ilated w hen you
c harge the b attery.
.. Open the engine hood
c> page 217 .
Checking and Filling
.. Remove the cover@ by pressing on the arrow
<=>fig . 200.
.. Open the cover @on the pos itive terminal.
.. Connect the charger connecto rs according to
the instructions to the
jump start bolts . (Bolts
under the cover = "positive" , Bolts w ith hex
head = "n egative ").
.,. Onl y now plug the mains lead for the cha rgi ng
equ ipme nt in to the wa ll ou tlet and turn it on
<=> & .
.. Make sure the charging rate i s not over
30 amps/14.8 Volt.
.. When the battery is fully charged: Turn the
charging equ ipment off and remove the ma ins
lead from the wall out let .
.,. Now remove the clamps for the charg ing equip
ment .
.,. Close the cover @on the pos it ive termina l and
re- insta ll the cover
(D .
.,. Close the hood c> page 217.
A d ischarged battery can freeze at temperat ures
of on ly 32 °F (0 °C). Allow a frozen batte ry to
t h aw comple tely before attempting to charge it
c> .&, . However, we recommend not using a
t h awe d batt ery ag ain be ca use the bat tery ca sing
can be cracked due to ice formation and ca n leak
batte ry ac id.
Battery charging (Maximum charging rate of
30 amps/14.8 Volt)
W hen charging a t low voltages (e.g . w ith a trick
le charger ),
th e battery cables do not have to be
disconnected first. The battery caps should
not
be opened when cha rging a battery.
It is no t necessary to remove the bat tery from
the luggage compartment .
Fast charging the battery (charging rate
above 14 .8 Volts)
F or technical rea sons do not use a batte ry charg
er that uses vo ltage greater than 14.8 Vo lts to
c h arge your veh icle's battery .
A WARNING
-Charging a battery can be dangerous.
227
Page 230 of 296
Checking and Filling
-Always follow the operating instructions
provided by the battery charger manufactur
er when charging your battery.
- Never charge a frozen battery . It may ex
plode because of gas trapped in the ice. Al
low a frozen battery to thaw out first.
- Do not reuse batteries which were frozen .
The battery housing may have cracked and
weakened when the battery froze .
- Charge the battery in a well ventilated area.
Keep away from open flame or electrical
spark . Do not smoke. Hydrogen gas generat
ed by the battery is explosive .
- To reduce the danger of explosion, never
connect or disconnect charger cables while
the charger is operating .
- Fast charging a battery is dangerous and should only be attempted by a competent
technician with the proper equipment .
- Battery acid that may spill during charging should be washed off with a solution of
warm water and baking soda to neutralize
the acid.
(D Note
Never use a fast charger as a booster to start
the engine. This will seriously damage sensi
tive electronic components, such as control
units , relays , radio, etc., as well as the battery
charger.
Battery replacement
The new battery must have the same specifica
tions and dimensions as the original equipment
battery.
Intelligent energy management in your vehicle is
responsible for distributing the electrical energy
throughout your vehicle
~ page 192. The intelli
gent energy management system will keep the
engine battery charged better then vehicles with
out this system. To mak e sure the additional
electrical energy is available once again after you
have changed the battery, we recommend that
you install batteries of the same type and manu facture only (the same as those installed at the
time your vehicle was delivered) . Specifications
228
are listed on the battery housing. Your author
ized dealer must cod e the battery in the energy
management system to enable you to use the en
ergy management functions correctly after re
placing the battery.
If it is not possible to use a battery of this type,
the new battery must have the same capacity,
voltage (12 volts), amperage, construction and plug sealing.
When installing the battery, make sure the igni
tion and all electrical consumers are turned off.
([) Note
- Make sure the ventilation hose on the side
of the battery is connected, otherwise
fumes or battery acid can leak out.
- Vehicles with the Start-Stop-System* are
equipped with a special cycle-proof AGM
battery. Installing a different type of bat
tery can cause problems in the vehicle elec
trical system. When replacing the vehicle battery, always install one with the same
specifications as the original battery.
@ For the sake of the environment
Because of the problem of proper disposal of
a battery, we recommend your authorized
Audi dealer change the battery for you. Bat
teries contain sulfuric acid and lead and must
always be disposed of properly in compliance
with all environmental regulations. Disposing
of vehicle batteries improperly is
very danger
ous to the environment.
Page 231 of 296
a,
a,
.... N r-N .... 0 0
0:
co
Windshield/headlight washer container
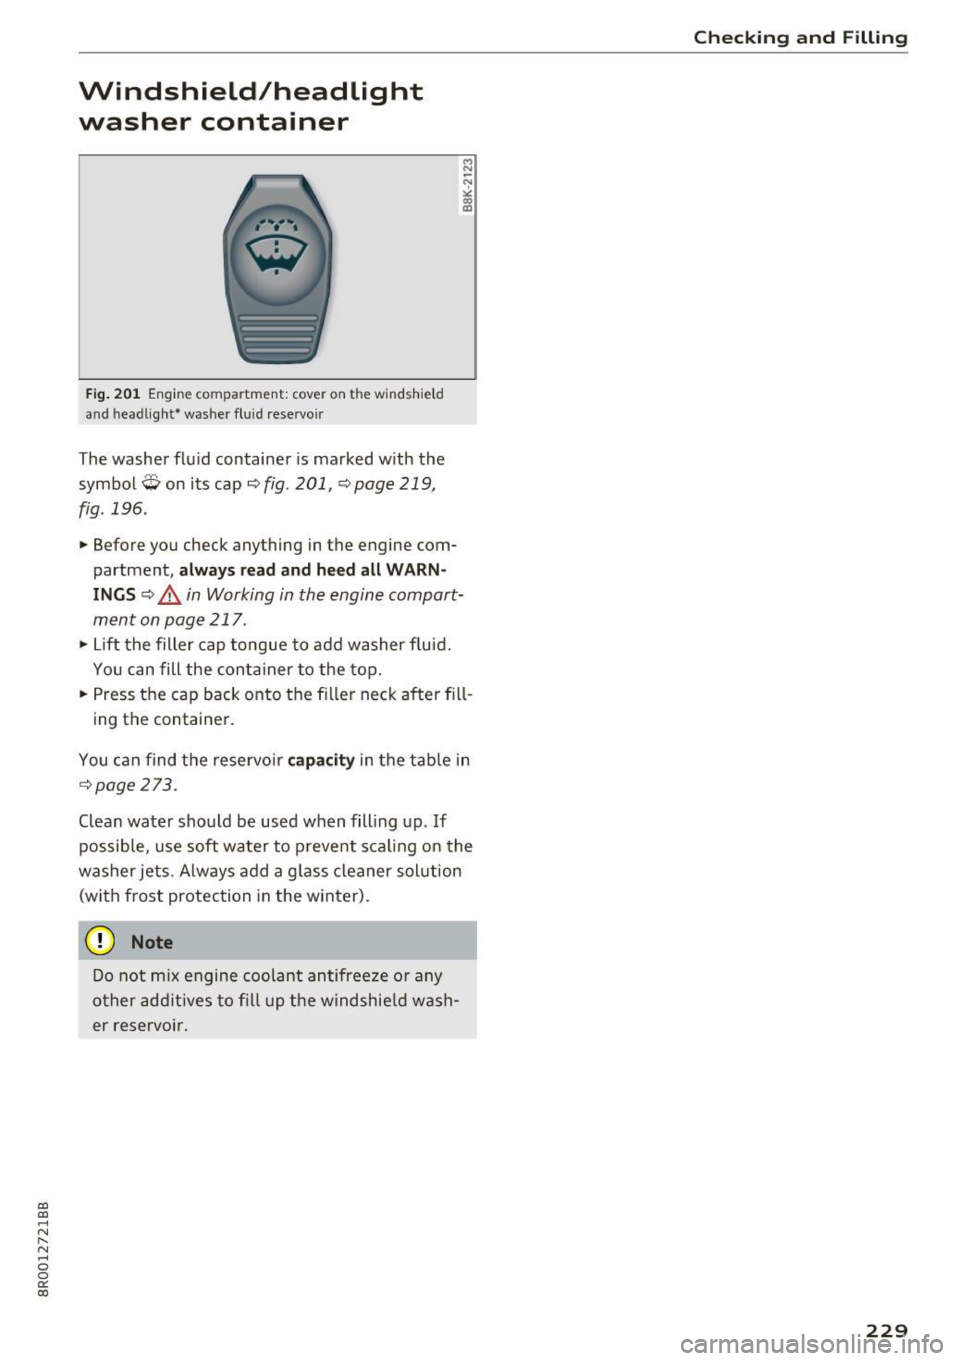
Fig. 201 Engine co mpartment: cover on t he windshie ld
an d h eadligh t* was her fluid reservo ir
The washer fluid container is marked with the
symbol
Q on its cap ¢ fig. 201, ¢ page 219,
fig . 196.
M N
-N ~ a, a,
• Before you check anything in the engine com
partment ,
always read and heed all WARN
INGS ~&, in Working in the engine compart
ment on page 217.
• Lift the filler cap tongue to add washer fluid.
You can fill the container to the top.
• Press the cap back onto the filler neck after fill -
ing the container.
You can find the reservoir
capacity in the table in
¢page 273.
Clean water should be used when filling up. If
possible, use soft water to prevent scaling on the
washer jets . Always add a glass cleaner solution
(with frost protection in the winter).
(D Note
Do not mix engine coolant antifreeze or any
other additives to fill up the windshield wash
er reservoir.
Checking and Filling
229
Page 268 of 296
Emergency situations
Emergency situations
General
This chapter is intended for trained emergency crews and working personnel who have the nec
essary tools and equipment to perform these
operations.
Starting by pushing or
towing
(D Note
Vehicles with an automatic transmission
cannot be started by pushing or towing.
Starting with jumper
cables
If necessary, the engine con be started by con
necting it to the battery of another vehicle.
If the engine should fail to start because of a dis
charged or weak battery, the battery can be con
nected to the battery of
another vehicle, using a
pair of jumper cables to start the engine.
Jumper cables
Use only jumper cables of sufficiently large cross
section
to carry the starter current safely. Refer
to the manufacturer's specifications.
Use only jumper cables with
insulated terminal
clamps which are distinctly marked :
plus(+) cable in most cases colored red
minus(-) cable
in most cases colored black.
A WARNING
Batteries contain electricity, acid, and gas.
Any of these can cause very serious or fatal in
jury. Follow the instructions below for
safe
handling of your vehicle's battery.
-Always shield your eyes and avoid leaning
over the battery whenever possible.
-A dead battery can freeze at temperatures
around 32 °F (0 °C) . If the vehicle battery is
frozen, you must thaw it before connecting
the jump start cables.
If you do not, this in-
266
creases the risk of an explosion and chemi
cal burns. After jump starting the vehicle,
drive to an authorized Audi dealer or author
ized Audi Service Facility immediately to
have the vehicle battery checked.
- Do not allow battery acid to contact eyes or
skin . Flush any contacted area with water
immediately.
- Improper use of a booster battery to start a
vehicle may cause an explosion .
- Vehicle batteries generate explosive gases.
Keep sparks, flame and lighted cigarettes
away from batteries.
- Do not try to jump start any vehicle with a
low acid level in the battery.
- The voltage of the booster battery must also
have a 12-Volt rating. The capacity (Ah) of
the booster battery should not be lower
than that of the discharged battery. Use of
batteries of different voltage or substantial
ly different "Ah" rating may cause an explo
sion and personal injury.
- Never charge a frozen battery. Gas trapped
in the ice may cause an explosion.
- Never charge or use a battery that has been
frozen. The battery case may have be weak
ened.
- Use of batteries of different voltage or sub
stantially different capacity (Ah) rating may
cause an explosion and injury. The capacity (Ah) of the booster battery should not be
lower than that of the discharged battery.
- Before you check anything in the engine
compartment, always read and heed all
WARNINGS
r=:> poge 217.
([) Note
-Applying a higher voltage booster battery
will cause expensive damage to sensitive electronic components, such as control
units, relays, radio, etc.
- There must be no electrical contact between
the vehicles as otherwise current could al
ready start to flow as soon as the positive
(+) terminals are connected.
Page 270 of 296
Emerg enc y s it uati ons
& WARNING
To avoid serious personal injury and damage
to the vehicle, heed all warn ings and instruc
tions of the jumper cab le manufacturer . If in
doubt, call for road service .
- Jumper cables must be long enough so that
the vehicles do not touch.
- When connecting jumper cables, make sure
that they cannot get caught in any mov ing
parts in the engine compartment .
- Do not bend over the batteries -danger of
chemical burns!
- The battery cell lock ing screws must be
t ightened securely .
- Before you check anything in the engine
compartment, always read and heed all
WARNINGS ¢page 217.
(D Note
Improper hook-up of jumper cables can ru in
the generator.
- Always connect POSITIVE(+) to POSITIVE
(+), and NEGATIVE( -) to NEGATIVE( -)
ground post of the battery manager control unit.
- Check that all screw p lugs on the battery
cells are screwed in firmly. If not, t ighten
plugs prior to connect ing clamp on negat ive
battery terminal.
- Please note that the procedure for connect
ing a jumper cable as desc ribed above ap
pl ies specifica lly to the case of yo ur vehicle
being jump s tarted. When you are giv ing a
j u mp sta rt to another vehicle , do not con
nect the negative( -) cab le to the negative
( - ) terminal on the discharged battery @
¢ fig. 226 . Instead, securely connect the
negative ( -) cable to either a solid metal
component that is f irm ly bolted to the en
gine block or to the engine block itself . If
the battery that is bei ng charged does not
vent to the outside, escap ing battery gas
could ignite and exp lode!
268
Towing with a tow truck
' General hints
Your Audi requires special handling for towing .
T he following info rmation is to be used by com
merc ial tow truck operators who know how to op
erate their equipment safely.
- Never tow your Audi , tow ing will cause dam
a ge to t he engine and t ran sm ission.
- Ne ver wrap the safety chains or winch cable s
around the brake l ines .
- To prevent un necessary damage , your Audi
must be t ran sported with a flat bed truck.
- To load the vehicle on to the fl at bed , use the
towing loop found in the vehicle tools and at
t ac h to the front o r rear ancho rage
¢ page 269 and ¢page 269.
& WARNING
A vehicle being towed is not safe for passen
gers . Never allow a nyone to ride in a vehicle
be ing towed, for any reason .
Page 273 of 296
mount ing point q fig . 23 2. Do not lift the vehi
cle at the vertical sill reinforcement.
Rear lifting point
The lift ing po int is located on the vert ica l re in
for ceme nt of the lower si ll fo r the on bo ar d ja ck*
q fig . 233 .
Lifting with vehicle jack*
Refer to qpage 257 .
A WARNING
- To reduce the risk of serio us in ju ry and vehi
cl e d amage.
- Always lift t he vehicle only at the s pecial
wo rksho p ho ist and floo r jack lift po ints
il
lustrated q fig. 232 and ¢fig. 233.
- Fa ilur e to li ft the vehicle at these points
could cause the vehicle to ti lt or fall from
a lift if there is a change in vehicle weight
d istr ibut ion a nd balance . This might hap
pen, for exam ple, when heavy compo
n ents su ch as th e engi ne b lock or trans
m iss io n ar e rem ove d.
- W hen removing heavy components like
th ese, a nch or vehicle to hoist o r add corre
s po nding weigh ts to mainta in t he cente r of
gr avity. Otherwise, the vehicle mi ght tilt or
s lip o ff the hoi st, causing ser ious persona l
injury .
(D Note
- Be aware o f the follo wi ng po ints b efore lift
i n g th e ve hicle:
-The vehicle should never be lifted or
jacked up from underneath the engine oil
pan, the transmission housing, the front
or rear axle or the body side members .
This could lead to serious damage .
- To avoid damage to the underbody or
chassis frame, a rubber pad must be in
serted between the floor jack and the lift
points.
- Before driving over a workshop hoist,
~ check that the vehicle weight does not ....
~ exceed the permissible lifting capacity of
~ the hoist . 0 0 C<'. 00
Emergency situations
-Before driv ing over a workshop hoist, en
sure that the re is sufficient clearance be
tween the hoist and low parts of the ve
h icle.
271
Page 274 of 296
Technical data
Technical data
Vehicle identification
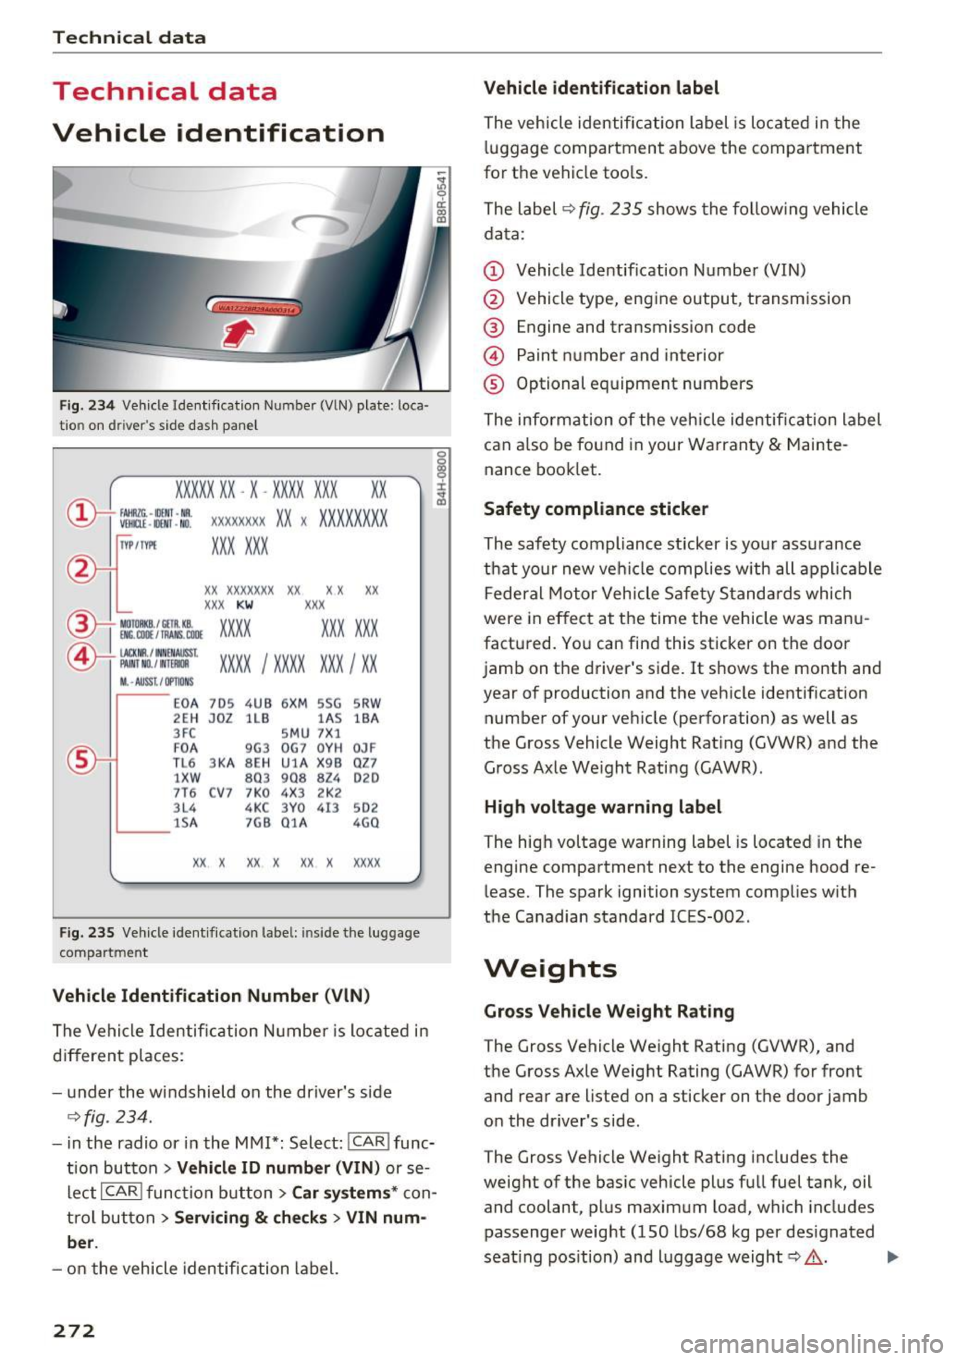
Fig. 234 Vehicle Ident if ication Numbe r (VlN) plate : loca·
tio n on d river 's side dash panel
XXXXX XX -X -XX XX XXX XX
@-+ ~J:~t::1 ::: xxxxxxxx xx x xxxx xxx x
IYP lf'VPE XXX X XX
xx xxxxxxx xx xx xx
XXX KW
XXX
EM:. COil / fAANS , COOE xxxx XXX XXX ®i MOIOlll
©-+ IAC KIIR . / tN NEN AIJSSt
XXXX I XXXX XXX I XX PAI NT NO./ WT£Jldl
II. -AUSST . / OPTIO NS
E0 A 7D5 4UB 6X
M SSG SR W
2EH JOZ lLB lAS
lBA
3FC SM U 7 X1
F0 A
9G3 0
G7 0Y H
0JF
TL 6 3 KA 8EH UlA X 9B Q
Z7
1 XW
803 908
824 020
7T6 C V7 7 K0 4X3 2K2
3L4 4KC 3Y0 413
502
lS A 7GB 01A
4G0
XX X XX X
XX X xxxx
Fig. 235 Vehicle identificat ion labe l: in side the luggage
compart ment
Vehicle Identification Number (VlN)
The Vehicle Identification Number is located in
different places :
- under the windshield on the driver's side
¢fig . 234.
-in the radio or in the MMI*: Select: !CAR i func·
tion button
> Vehicle ID number (VIN) or se·
Leet
I CAR ! function button > Car systems* con·
trol button
> Servicing & checks > VIN num
ber .
-on the vehicle identification label.
272
Vehicle identification label
The vehicle identification label is located in the
luggage compartment above the compartment
for the vehicle tools.
The label ¢
fig. 235 shows the following vehicle
data:
(D Vehicle Identification Number (VIN)
@ Vehicle type, engine output, transmission
® Engine and transmission code
@ Paint number and interior
® Optional equipment numbers
The information of the vehicle identification label
can also be found in your Warranty
& Mainte·
nance booklet.
Safety compliance sticker
The safety compliance sticker is yo ur ass urance
that your new vehicle complies with all applicable
Federal Motor Vehicle Safety Standards which
were in effect at the time the vehicle was manu
factured. You can find this sticker on the door
jamb on the driver's side. It shows the month and
year of production and the vehicle identification
number of your vehicle (perforation) as well as
the Gross Vehicle Weight Rating (GVWR) and the
Gross Axle We ight Rating (GAWR).
High voltage warning label
The high voltage warning label is located in the
engine compartment next to the engine hood re·
lease. The spark ignition system complies w ith
the Canadian standard ICES-002 .
Weights
Gross Vehicle Weight Rating
The Gross Vehicle Weight Rating (GVWR), and
the Gross Axle Weight Rating (GAWR) for front
and rear are listed on a sticker on the door jamb
on the dr iver's side .
The Gross Vehicle Weight Rating includes the
weight of the basic vehicle plus full fuel tank, oil
and coolant, plus maximum load, which includes
passenger weight (150 lbs/68 kg per designated
seat ing position) and luggage weight¢,&. .
Page 279 of 296
CD
CD
.... N ,-... N ..... 0 0 C<'. 00
today's automobiles, have steadily reduced the
scope of maintenance and repairs which can be
carried out by vehicle owners.
Also, safety and
environmental
concerns place very strict limits
on the nature of repairs and adjustments to en
gine and transmission parts which an owner can perform .
Maintenance, adjustments and repairs usually re
quire special tools, testing devices and other
equipment available to specially trained work
shop personnel in order to assure proper per
formance, reliability and safety of the vehicle and
its many systems.
Improper maintenance, adjustments and repairs
can impair the operation and reliability of your
vehicle and even void your vehicle warranty .
Therefore, proof of servicing in accordance with
the maintenance schedule may be a condition for upholding a possible warranty claim made within
the warranty period.
Above all , operational safety can be adversely af
fected, creating unnecessary risks for you and
your passengers.
If in doubt about any servicing, have it done by
your authorized Audi dealer or any other properly equipped and qualified workshop. We strongly urge you to give your authorized Audi dealer the
opportunity to perform all scheduled mainte nance and necessary repairs. Your dealer has the
facilities, original parts and trained specialists to keep your vehicle running properly .
Performing limited maintenance yourself
The following pages describe a limited number of
procedures which can be performed on your vehi
cle with ordinary tools, should the need arise and
trained personnel be unavailable. Before per
forming any of these procedures, always thor
oughly read all of the applicable text and careful ly follow the instructions given . Always rigorously
observe the
WARNINGS provided .
Before you check anything in the engine com
partment, always read and heed all WARNINGS
c::> .&. and c::> .&. in Working in the engine compart
ment on page 217 .
Consumer information
A WARNING
-Serious personal injury may occur as a result
of improperly performed maintenance, ad
justments or repairs .
- Always be extremely careful when working
on the vehicle. Always follow commonly ac
cepted safety practices and general com
mon sense. Never risk personal injury.
- Do not attempt any of the maintenance,
checks or repairs described on the following pages if you are not fully familiar with these
or other procedures with respect to the ve hicle, or are uncertain how to proceed.
- Do not do any work without the proper tools
and equipment. Have the necessary work
done by your authorized Audi dealer or an
other properly equipped and qualified work
shop.
- The engine compartment of any motor vehi cle is a potentially hazardous area. Never
reach into the area around or touch the radi
ator fan.
It is temperature controlled and
can switch on suddenly - even when the en
gine is off and the ignition key has been re
moved . The radiator fan switches on auto
matically when the coolant reaches a certain
temperature and will continue to run until
the coolant temperature drops.
- Always remove the ignition key before any
one gets under the vehicle.
- Always support your vehicle with safety
stands if it is necessary to work underneath
the vehicle . The jack* supplied with the vehi
cle is not adequate for this purpose and
could collapse causing serious personal in
jury.
- If you must work underneath the vehicle
with the wheels on the ground, always make
sure the vehicle is on level ground, that the
wheels are always securely blocked and that the engine cannot be started.
- Always make sure the transmission selector
lever (automatic transmission) is in P (Park
position) and the park brake is applied.
277
Page 280 of 296
Consumer inf orm ation
@ For the sake of the env ironment
- Changing the engine settings wi ll adversely
affect emission levels. Th is is detrimental to
the environment and increases fuel con
sumption.
- A lways observe environmental regu lations
when disposing of old engine o il, used brake
fl ui d, d irty engine coolant, spent batteries
or worn out tires.
- Undeployed airbag modules and pretension
ers mig ht be classified as Perchlorate Mate
rial -special handl ing may apply, see
www.dtsc .ca.gov/hazardouswaste/perchlo
r ate. When the vehicle or parts of the re
straint system including airbag modu les
safety be lts wi th pretensioners are scrap
ped, all applicab le laws and regulations
must be observed. Your authorized Audi
dealer is familiar with these requirements
and we recommend that you have your deal er perform this service for you.
Accessories and technical changes
Additional accessories and parts replacement
Always consult an authorized Audi dealer before
purchasing accessories.
Your vehicle incorporates the latest safety design
features ensuring a high standard of active and passive safety.
This safety could be comp romised by non-ap
proved changes to the vehicle . For this reason, if
parts have to be replaced, please observe the fo l
lowing points when insta lling addit ional accesso
ries:
Approved Audi accessories and genuine Audi parts are available from author ized Audi dealers.
These dealers also have the necessary facilities,
too ls and trained specialists to install the parts
and accessories properly.
278
A WARNING
-
Using the wrong spare parts or using non-ap-
proved accessories can cause damage to the
vehicle and serious personal injury.
- Use only accessories expressly approved by
Aud i and genuine Audi spare parts
- These parts and accessor ies have been spe
cially designed to be used on your vehicle.
- Never install accessor ies such as telephone
cradles or beverage holders on airbag covers
or w ith in the airbag deployment zones. Do
ing so will increase the risk of injury if a ir
bags are triggered in an accident!
- Before you check anything in the eng ine
compartment, always read and heed all
WARN INGS
Qpage 217.
(D Note
-If items other than genu ine Audi spare
parts, add-on equipment and accessory
items are used or if repair wor k is not per
formed a ccording to specified methods, this
c an resul t in severe damage to you r vehi
cle's eng ine and body (such as corrosion)
and adve rsely af fect your vehicle's war ranty.
- I f emergency repai rs must be performed
elsewhere, have the vehicle exam ined by an
authorized A udi dealer as soon as possib le .
- T he manuf acture r ca nnot be held liable for
damage which occurs d ue to failure to com
ply with these stipulations.
Technical Modifications '
Our guidelines must be complied with when tech
nical modifications are made .
Always consult an a uthorized Audi de aler bef ore
sta rt ing work on any modifica tions.
This will help ensure that vehicle fu nction, per
fo rmance and safety are not impaired
Q ,& .
Attempting to work on electronic components
and the software used with them can cause mal
funct io ns. Because of the way elect ronic compo
nen ts a re interconnected with each othe r, such
malfunc tions c an also have an adverse affect on
othe r systems that are not d irectl y involved. This ..,.
Page 282 of 296
Index
A
A/C (climate control) . . . . . . . . . . . . . . . . . . . 78
Accessories . . . . . . . . . . . . . . . . . . . . . . . . . . 278
Active lane assist
Cleaning the camera area . . . . . . . . . . . . . 205
Adaptive cruise control. . . . . . . . . . . . . . . . . 109
Cleaning the sensor . . . . . . . . . . . . . . . . . . 205
Indicator lamp . . . . . . . . . . . . . . . . . . . . . . 111
M essages . . . . . . . . . . . . . . . . . . . . . . . . . . 116
Request for driver intervention . . . . . . . . . 114
Setting the distance............... ... 113
Setting the driving program . . . . . . . . . . . 114
Adaptive dampers . . . . . . . . . . . . . . . . . . . . . 122
Adaptive light .. .. ............. .... .. .. 51
Defective . . . . . . . . . . . . . . . . . . . . . . . . . . . 31
AdBlue .... .. .. .... ........... ....... 214
Messages . . . . . . . . . . . . . . . . . . . . . . . . . . 214
Opening the tank door ............... . 215
Refilling . .. .. .... ........... .... ... 215
Adding Engine oil .......................... 221
Windshield washer fluid . . . . . . . . . . . . . . 229
Additional accessories
Additives 278
Engine oil . . . . . . . . . . . . . . . . . . . . . . . . . . 221
Adjusting Air distribution (climate control) . . . . . . . . 78
Instrument illumination . . . . . . . . . . . . . . . 53
Steering column manually . . . . . . . . . . . . . 81
Temperature (climate control) . . . . . . . . . . 78
Airbag . . . . . . . . . . . . . . . . . . . . . . . . . . . . . . 148
Airbag system . . . . . . . . . . . . . . . . . . . . . . . . 164
Advanced Airbag-System . . . . . . . . . . . . . . 152
Advanced Airbag System components . . . 154
Care . . . . . . . . . . . . . . . . . . . . . . . . . . . . . . 161
Children . . . . . . . . . . . . . . . . . . . . . . . . . . . 169
Child restraints . . . . . . . . . . . . . . . . . . . . . 170
Components (front airbags) . . . . . . . . . . . 154
Danger of fitting a child safety seat on the
front passenger seat . . . . . . . . . . . . . . . . . 149
Disposal . . . . . . . . . . . . . . . . . . . . . . . . . . . 161
Front airbags . . . . . . . . . . . . . . . . . . . 152, 153
How do the front airbags work? . . . . . . . . 156
How many airbags does my vehicle have? 154
How the Advanced Airbag System compo-
nents work together . . . . . . . . . . . . . . . . . 156
280
Important information . . . . . . . . . . . . . . . 148
Monitoring . . . . . . . . . . . . . . . . . . . . . . . . . 158
PASSENGER AIR BAG OFF light . . . . . . . . . 159
Repairs . . . . . . . . . . . . . . . . . . . . . . . . . . . . 161
Safety instructions . . . . . . . . . . . . . . . . . . . 160
Side airbags . . . . . . . . . . . . . . . . . . . . . . . . 162
Side curtain airbags . . . . . . . . . . . . . . . . . . 165
Warning/indicator lights . . . . . . . . . . . . . . . 13
Warning/Indicator lights . . . . . . . . . . . . . 158
Weight-sensing mat . . . . . . . . . . . . . . . . . 170
When must the system be inspected? . . . 158
Air transport . . . . . . . . . . . . . . . . . . . . . . . . . 108
All-wheel drive ....................... 192
Selective wheel torque control . . . . . . . . . 186
All season tires
Alternator 245
Malfunction . . . . . . . . . . . . . . . . . . . . . . . . . 25
Anti-lock brake system Warning/indicator lights . . . . . . . . . . . . 13, 14
Anti-Lock Braking System . . . . . . . . . . . . . . 186
Anti-slip regulation Warning/indicator lights . . . . . . . . . . . . . . . 13
Anti-Slip Regulation . . . . . . . . . . . . . . . . . . . 186
Anti-theft alarm warning system . . . . . . . . . 35
Electronic immobilizer . . . . . . . . . . . . . . . . . 35
Approach/departure angle....... ..... .. 198
Ashtray . . . . . . . . . . . . . . . . . . . . . . . . . . . . . . 73
Audi braking guard
refer to Braking guard 115
Audi drive select Indicator light . . . . . . . . . . . . . . . . . . . . . . 191
also refer to Drive select . . . . . . . . . . . . . . 122
Audi parking system plus with rearview cam-
era . . . . . . . . . . . . . . . . . . . . . . . . . . . . . . . . . 125
Adjusting the display . . . . . . . . . . . . . . . . . 130
Adjusting the warning tones . . . . . . . . . . . 130
Rearview camera -parking mode 1 . . . . . . 128
Rearview camera -parking mode 2 . . . . . . 129
Safety precautions . . . . . . . . . . . . . . . . . . . 125
Switching on and off . . . . . . . . . . . . . . . . . 127
Trailer hitch . . . . . . . . . . . . . . . . . . . . . . . . 130
Audi Service Repair Manuals and Literature 276
Auto-Check Control . . . . . . . . . . . . . . . . . . . . 24
Auto locking . . . . . . . . . . . . . . . . . . . . . . . . . . 35
Automatic belt retractor . . . . . . . . . . . . . . . 143
Automatic driving light control . . . . . . . . . . . 49
Automatic Shift Lock (ASL) . . . . . . . . . . . . . . 95