sensor AUDI Q5 2017 Owner's Guide
[x] Cancel search | Manufacturer: AUDI, Model Year: 2017, Model line: Q5, Model: AUDI Q5 2017Pages: 296, PDF Size: 74.43 MB
Page 168 of 296
Airbag system
since the circumstances will vary considerab ly be
tween one collision and another. Important fac
tors include, for example , the nature (hard or
soft) of the impacting object, the ang le of im
pact, vehicle speed, etc.<=>
page 166, How side
curtain airbags work .
Aside from their normal safety function, safety
belts work to help keep the driver or front pas
senger in position in the event of a collision so
that the side curtain airbags can provide protec
tion .
The airbag system is not a substitute for your safety belt. Rather, it is part of the overall occu
pant restraint system in your vehicle . Always re
member that the airbag system can only help to
protect you if you a re wearing your safety belt
and wearing it properly . This is another reason
why you should always wear your safety belts,
not just because the law requires you to do so
<=> page 140, General information.
It is important to remember that whi le the s ide
curtain airbag system is designed to help reduce
the likelihood of serious injuries, other injuries,
for example, swelling, bruising, and minor abra
s ions can a lso be associated with these airbags .
Remember too, these a irbags w ill deploy only
once and only in certa in kinds of accidents -your
safety belts are always there to offer protection.
The side curtain airbag system basically
consists of:
-The electronic control module and external side
impact sensors
- The side curtain airbags
above the front and
rear side windows
- The airbag indicator light in the instrument
panel
The airbag system is monitored electronically to
make certain it is f unctioning properly at all
times. Each time you turn on the ignition, the air
bag system ind icator light will come on for a few
seconds (self d iagnost ics) .
The side curtain airbag is not activated:
- if the ignition is turned off,
-in sid e collisions when the acceleration meas-
ured by the sensor is too low,
166
- in rear -end collisions.
./1. WARNING
-Safety belts and the airbag system will only
provide protect ion when occupants are in
the proper seat ing position
<=> page 60, Gen
eral information .
- If the airbag indicator light<=> page 13
comes when the veh icle is being used, have
the system inspected immediately by your
author ized Audi dealer. It is possible that
the airbag will inflate when it is not sup
posed to, or will not inflate when it should.
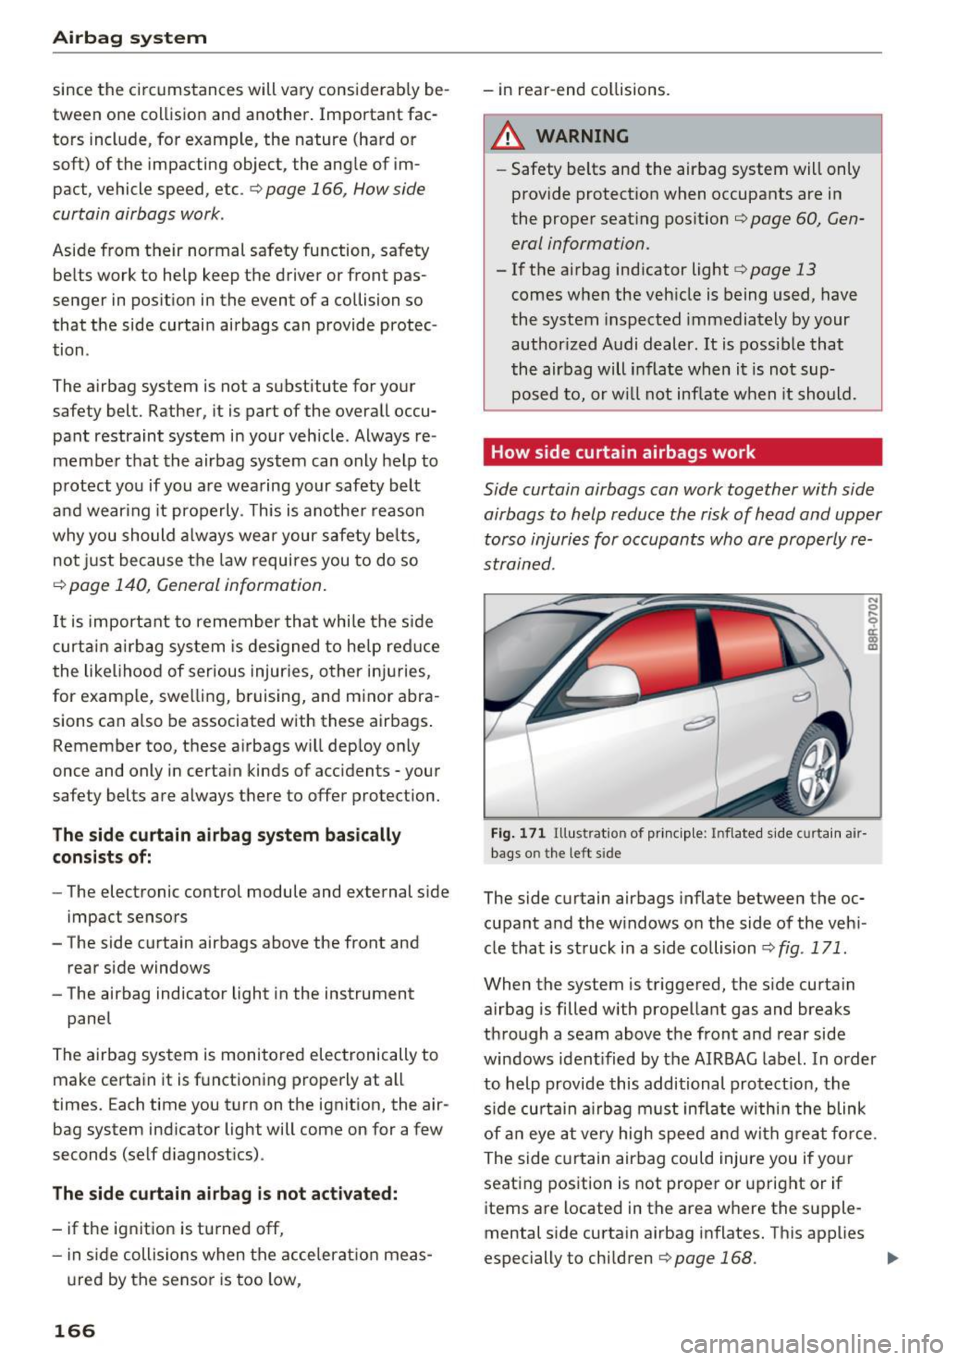
How side curtain airbags work
Side curtain airbags can work together with side
airbags to help reduce the risk of head and upper torso injuries for occupants who ore properly re
strained.
Fig. 171 Illus tratio n of principle: Inflated sid e c urta in a ir
bags o n the left s ide
The side curtain airbags inflate between the oc
cupant and the windows on the side of the vehi
cle that is struck in a side collision
<=> fig. 171 .
When the system is triggered, the s ide curtain
airbag is filled with propellant gas and breaks
through a seam
above the front and rear side
windows identified by the AIRBAG label. In order
to help provide this additional protect ion, the
s ide curtain a irbag must inflate withi n the blink
of an eye at very high speed and with great force.
The side curtain airbag could injure you if your
seating position is not proper or upright or if
items are located in the area w here the supple
mental side curtain airbag inflates. This applies
especially to ch ildren
r=> page 168 . .,..
Page 172 of 296
Child safety
Advanced Airbags and the weight-sensing mat in the front seat
The Advanced Airbag System in your vehicle de
tects the presence of an infant or child in a child
restraint on the front passenger seat using the
weight -sensing mat in the seat cushion and the
sensor below the safety belt latch on the front
passenger seat that measures the tension on the
safety belt .
The weight-sensing mat measures total weight
of the child and the child safety seat and a child blanket on the front passenger seat . The weight
on the front passenger seat is related to the de
sign of the child restraint and its "footprint ", the
size and shape of the bottom of the child re
straint as it sits on the seat. The weight of a child
restraint and its "footprint" vary for different
kinds of child restraints and for the different
models of the same kind of child restraint of
fered by child restraint manufacturers.
The weight ranges for the individual types,
makes and models of child restraints that the
NHTSA has specified in the Safety Standard to
gether with the weight ranges of typical infants
and typical 1 year-old child have been stored in
the control unit of the Advanced Airbag System .
When a child restraint is being used on the front
passenger seat with a typical 1 year-old child, the
Advanced Airbag System compares the weight
measured by the weight sensing mat with the in
formation stored in the electronic control unit.
The electronic control unit also registers the ten
sion on the front passenger safety belt. The ten
sion on the safety belt for the front passenger
seat will be different for an adult who is properly
using the safety belt as compared to the tension
on the belt when it is used to attach a child re
straint to the seat. The sensor below the latch for
the safety belt for the front seat passenger
measures the tension on the belt. The input from
this sensor is then used with the weight to "de
cide" , whether there is a child restraint with a
typical 1 year-old child on the front passenger
seat and whether or not the airbag must be
turned off.
170
· Child restraints and Advanced Airbags
Regardless of the child restraint that you use,
make sure that it has been certified to meet Safe
ty Standards and has been certified by its manu
facturer for use with an airbag. Always be sure
that the child restraint is properly installed at
one of the rear seating positions . If in exception
al circumstances you must use it on the front passenger seat, carefully read all of the informa
tion on child safety and Advanced Airbags and heed all of the applicable WARNINGS. Make cer
tain that the child restraint is correctly recog
nized by the weight-sensing mat inside the front
passenger seat, that the front passenger airbag
is turned off and that the airbag status is always
correctly signaled by the
PASSENGER AIR BAG
OFF
light.
Many types and models of child restraints have
been available over the years, new models are in
troduced regularly incorporating new and im
proved designs and older models are taken out of
production. Child restraints are not standardized.
Child restraints of the same type typically have
differen t weights and si zes and different 'foot
prints,' the size and shape of the bottom of the
child restraint that sits on the seat, when they
are installed on a vehicle seat. These differences
make it virtually impossible to certify compliance
with the requirements for advanced airbags with
each and every child restraint that has ever been
sold in the past or will be sold over the course of
the useful life of your vehicle.
For this reason, the United States National High
way Traffic Safety Administration has published a
list of specific type, makes and models of child
restraints that must be used to certify compli
ance of the Advanced Airbag System in your vehi
cle with the suppression requirements of Federal
Motor Vehicle Safety Standard 208. These child
restraints are:
Subpart A - Car bed child restraints
Model Manufactured on or
after
Angel Guard Angel September 25, 2007 Ride AA2403FOF
Page 194 of 296
Intelligent Technology
Driving with your
quattro
With all-wheel drive, all four wh eels are driven.
G eneral information
With all-whee l drive, power is distributed to all
four wheels. This happens automatically depend
ing on you r driv ing style and the road condit ions
at the time. See also¢
page 186 .
A center differentia l distrib utes the driving power
variably to the front and rear axle. It works to
gether with selective wheel torque control, which
activates when driving t hrough curves
~ page 186.
The all-wheel drive concept is designed for high
engine power. Your vehicle is exceptionally pow
erful and has excellent driving characterist ics
both under normal dr iv ing condit ions and on
snow and ice . Always read and fo llow safety pre
cautions ~
/1..
Winter tires
When driving in the winter, your vehicle with all
wheel drive has an advantage, even with regular tires. In winter road conditions it may be adv isa
b le to mount wi nte r tires (or all-season tires) for
improve d driveab ility and bra king: these tires
m ust be mounted on
all four wheel s. See also
¢ page 245, Winter tires.
Tire cha ins
Where tire chains are mandatory on certain
roads, this norma lly also applies to vehi cles w ith
all-whee l d rive ~
page 245, Snow chains.
Replacing wheels /tires
Veh icles with all-whee l dr ive must always have
tires of the same s ize. A lso avo id tires with d iffer
ent t read depths. For details see page
~ page 237, New tires or wheels.
.&, WARNING
Always adjust yo ur drivi ng to road and traff ic
c ondi tions . Do not let the extra safety afford
ed by all -wheel drive tempt you into ta king
extra risks .
192
-Although the all-wheel d rive is very e ffec
tive, always remember that braking capacity
is limited by tire tract ion. You shou ld there
fore not drive at excessive speeds on icy or
slippery road s urfaces.
- On wet road surfaces, be careful not to dr ive
too fast because the front wheels could be
gi n to slide on top of t he water (aquapla n
ing). If th is should occur, you will h ave no
warn ing from a s udden increase i n engine
spee d as wi th a front-wheel d rive vehicle.
Always d rive at speeds which are suited to
the road conditions -risk of crash.
Energy management
· Starting ability is optimized
Energy management controls the distribution of
electrical energy and thus optimizes the availa
bility of electrical energy for starting the engine .
If a vehicle with a conventional energy system is
not dr iven for a long period of time, the batte ry is
discharged by id ling current consumers (e.g. im
mobilizer) . In certain c ircumstances it can resu lt
i n the re being insuffic ient energy ava ilable to
start the eng ine.
Intelligent energy management in your vehicle
handles the d istribution of elec trical energy .
Start ing ability is markedly improved and the life
of the batte ry is ex tended.
Bas ically, energy management consists of
bat
tery diagnosis , idling current man agement
and
dynamic ene rgy management .
Battery diagnos is
Battery d iagnosis continuously determines the
state of the battery. Sensors determine battery
vo ltage , battery current and battery tempera
ture . This determines the current state o f charge
and the power of the battery .
Idling current management
Idling cur rent management reduces energy con
sumption while the vehicle is standing. With the ..,.
Page 206 of 296
Care and cleaning
Care and cleaning
General information
Regular, proper care helps to maintain your vehi
cle's value.
It can also be a requirement when
submitting warranty claims for corrosion damage
and paint defects on the body.
The necessary care products can be obtained
from an authorized Audi dealer or authorized
Audi Service Facility. Read and follow the instruc
tions for use on the packaging.
A WARNING
-Using cleaning and care products incorrectly
can be dangerous to your health .
- Always store cleaning and care products out
of reach of children to reduce the risk of poi
soning .
@ For the sake of the environment
- Preferably purchase environmentally-friend
ly cleaning products.
- Do not dispose of leftover cleaning and care
products with household trash.
Car washes
The longer that deposits such as insects, bird
droppings, tree sap or road salt remain on the ve hicle, the more the surface can be damaged. High
temperatures such as those caused by sunlight
increase the damaging effect .
Before washing, rinse off heavy deposits with
plenty of water.
Stubborn deposits such as bird droppings or tree
sap are best removed with plenty of water and a microfiber cloth.
Also, wash the underside of your vehicle once road salt stops being used for the season .
Pressure washers
When washing your veh icle w ith a pressure wash
er, always follow the operating instructions pro
vided with the pressure washer. This is especially
important in regard to the pressure and spraying
distance. Do not aim the spray directly at the
204
seals on the side windows, doors, lids or the sun
roof* or at tires, rubber hoses, insulating materi
al, sensors* or camera lenses* . Keep a distance of
at least 16 inches (40 cm).
Do not remove snow and ice with a pressure
washer.
Never use cone nozzles or high pressure nozzles.
The water temperature must not be above 140 °F
(60 °().
Automatic car washes
Spray off the vehicle before washing.
Make sure that the windows and roof* are closed
and the windshield wipers are off . Follow instruc
tions from the car wash operator, especially if
there are accessories attached to your vehicle.
If possible, use car washes that do not have
brushes.
Washing by hand
Clean the vehicle starting from the top and work
ing down using a soft sponge or cleaning brush.
Use solvent-free cleaning products.
Washing vehicles with matte finish paint by
hand
To avoid damaging the paint when washing, first
remove dust and large particles from your vehi
cle. Insects, grease spots and fingerprints are
best removed with a special cleaner for matte
finish paint .
Apply the product using a microfiber cloth. To
avoid damaging the paint surface, do not use too
much pressure.
Rinse the vehicle thoroughly with water. Then
clean using a neutral shampoo and a soft micro
fiber cloth .
Rinse the veh icle thoroughly again and let it air
dry. Remove any water residue using a chamois .
A WARNING
-
- Only wash the vehicle when the ignition is
off and follow the instructions from the car
Page 207 of 296
CD
CD
.... N ,-... N ..... 0 0 C<'. 00
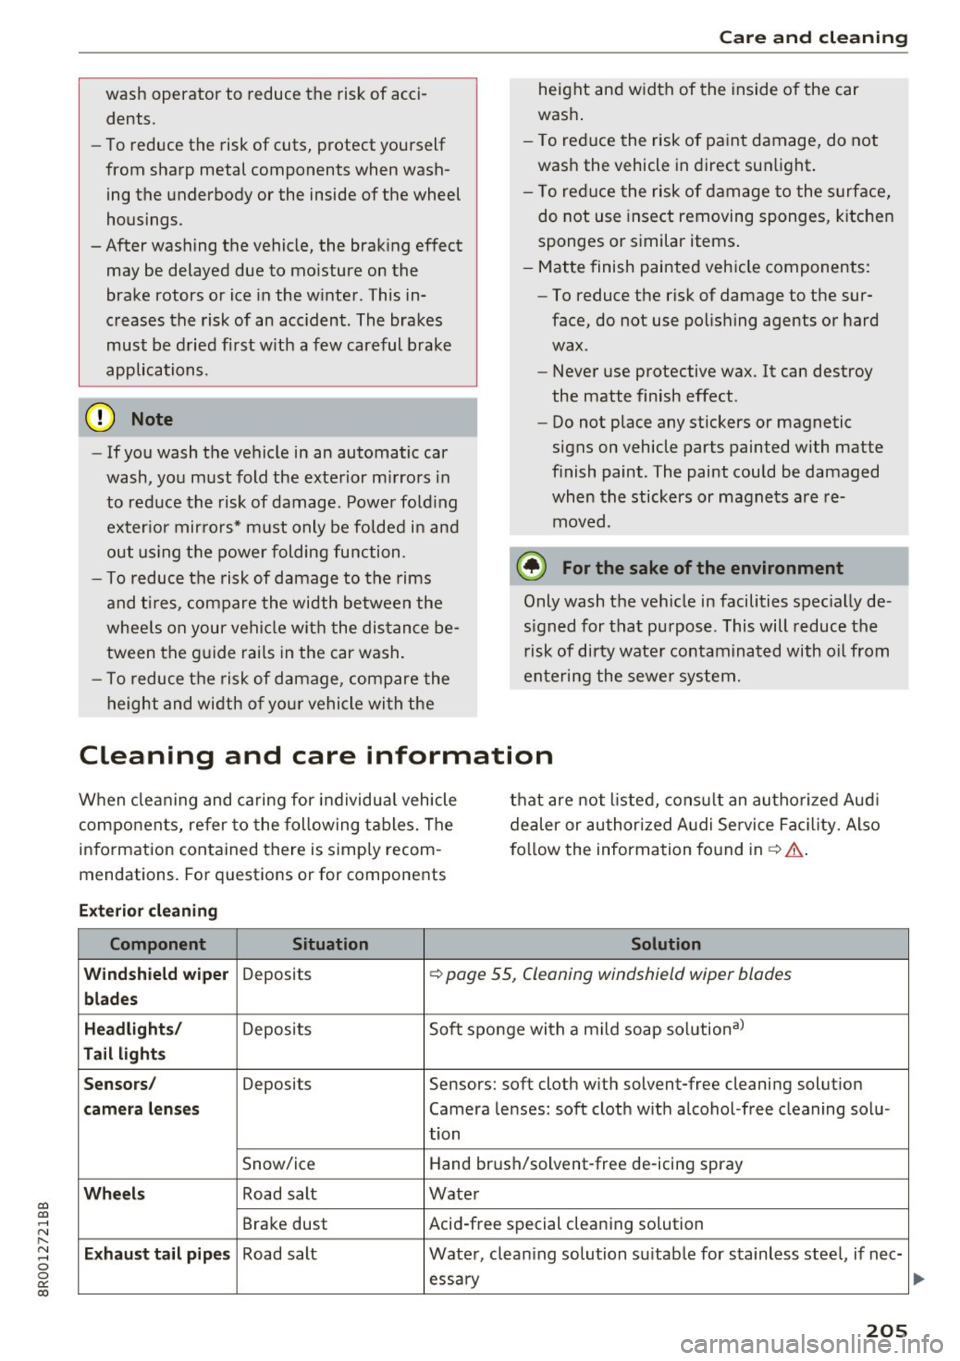
wash operator to reduce the risk of accidents.
- To reduce the risk of cuts, protect yourself
from sharp metal components when wash
ing the underbody or the inside of the wheel
housings .
- After washing the vehicle, the brak ing effect
may be delayed due to mo isture on the
brake rotors or ice in the w inter . This in
creases the risk of an acc ident. The brakes
must be d ried fi rst w ith a few careful b rake
applications.
(D Note
- If you wash t he vehicle in an automatic car
wash, yo u m ust fold the exte rior m irrors in
to reduce the risk of damage. Power fo ld ing
exter ior mir ro rs* m ust only be folded in and
out using t he power folding fu nction .
- To reduce the risk of damage to the rims
a nd ti res, compare the width between the
whee ls on your vehi cle w it h the dis tance be
tween the guide rai ls in the car wash.
- To reduce t he risk of damage, compare the
height and width o f yo ur vehicle wi th the
Ca re and cleaning
height and w idth of the inside of the car
was h.
- T o red uce the risk of pa int damage, do not
was h the vehicle in d irect sun light .
- T o red uce the risk of d am age to the s urf ace,
do not use insect removing sponges, k itche n
sponges or similar items .
- Mat te finish painted veh icle components:
- To reduce the risk of damage to the sur-
face, do not use polishing agents or hard
wax .
- Never use protective wax. It can destroy
the matte finish effect .
- Do not place any stickers or magnetic
signs on vehicle parts painted with matte
finish paint . The paint cou ld be damaged
when the stickers or magne ts are re
moved .
@ For the sake of the environment
Only wash t he vehicle in facilities s pec ially de
s igned for that pu rpose . This will reduce the
r isk of dirty wate r contaminated with oil from
ente ring the sewe r sys tem.
Cleaning and care information
When clea ning and caring for individua l vehicle
components, refer to the following tables. The
i nformation contained there is simply recom
mendations. For quest ions or for components t
h at are not listed, cons ult an autho rized Aud i
de aler or au thori zed Audi Se rvice Fac ility. Also
f o llow the information fo und in ~ .&. -
Exterior cleaning
Component Situation Solution
Windshield wiper
Deposits ~ page 55, Cleaning windshield wiper blades
blades
Headlights /
Deposits Soft spo nge with a m ild soap solution3>
Tail lights
Sensors /
Deposits Sensors: soft cloth wit h solvent-free cleaning solut ion
camera lens es Camera le nses: soft cloth w ith a lcohol -free cleaning solu-
tion
Snow/ice Hand br
ush/solvent-free de-icing spray
Wheels Road salt Water
Brake dust Acid-free special cleaning so
lution
E xhaust tail pipes Road salt Water, clean ing so lution su itab le for stainless stee l, if nee-
essary
205
Page 250 of 296
Wheels
check your tires as soon as possible, and inflate
them to the proper pressure. Driving on a signifi
cantly under-inflated tire causes the tire to overheat and can lead to tire failure. Under-inflation
also reduces fuel efficiency and tire tread life,
and may affect the vehicle's handling and stop
ping ability.
Please note that the TPMS is not a substitute for
proper tire maintenance, and it is the driver's re
sponsibility to maintain correct tire pressure,
even if under-inflation has not reached the level
to trigger illumination of the TPMS low tire pres
sure telltale.
Your vehicle has also been equipped with a TPMS malfunction indicator to indicate when the sys
tem is not operating properly. The TPMS mal
function indicator is combined with the low tire pressure telltale. When the system detects a
malfunction, the telltale will flash for approxi
mately one minute and then remain continuously
illuminated. This sequence will continue upon
subsequent vehicle start-ups as long as the mal
function exists .
When the malfunction indicator is illuminated,
the system may not be able to detect or signal low tire pressure as intended . TPMS malfunctions
may occur for a variety of reasons, including the
installation of replacement or alternate tires or
wheels on the vehicle that prevent the TPMS from functioning properly . Always check the
TPMS malfunction telltale after replacing one or
more tires or wheels on your vehicle to ensure
that the replacement or alternate tires and
wheels allow the TPMS to continue to function
properly.
248
· If the Tire Pressure Monitoring System
indicator appears
Applies to: vehicles with Tire Pressure Monitoring System
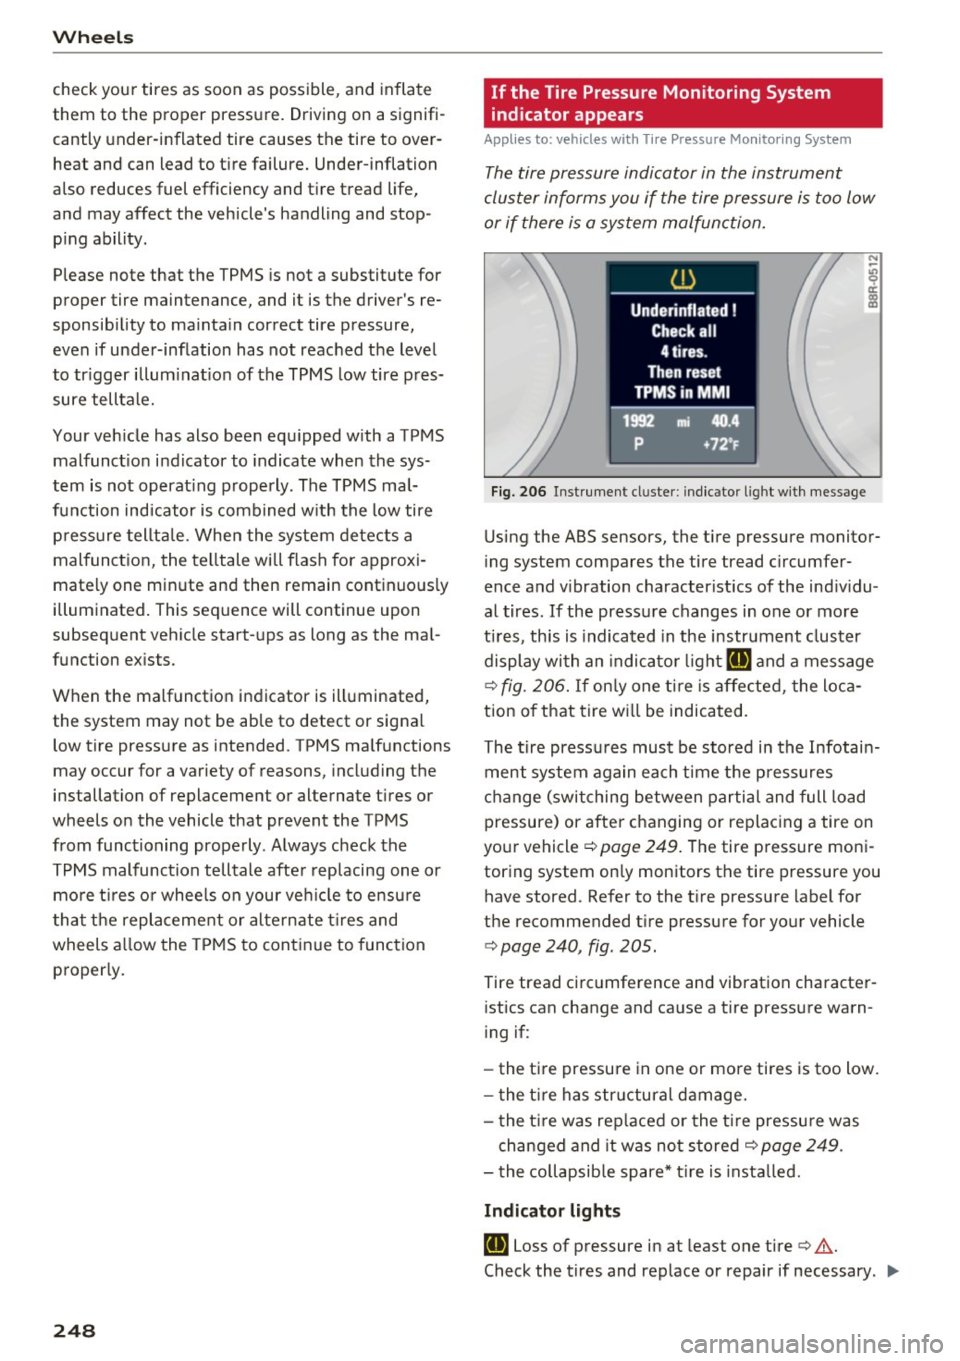
The tire pressure indicator in the instrument
cluster informs you if the tire pressure is too low
or if there is a system malfunction.
Fig. 206 Instrument cl uster: i ndic ator ligh t with message
Using the ABS sensors, the tire pressure monitor
ing system compares the tire tread circumfer
ence and vibration characteristics of the individu
al tires . If the pressure changes in one or more
tires , this is indicated in the instrument cluster
display with an indicator light
IE and a message
c>fig. 206. If only one tire is affected, the loca
tion of that tire will be indicated.
The tire pressures must be stored in the Infotain
ment system again each time the pressures
change (switching between partial and full load
pressure) or after changing or replacing a tire on
your vehicle
c> page 249. The tire pressure moni
toring system only monitors the tire pressure you have stored. Refer to the tire pressure label for
the recommended tire pressure for your vehicle
c> page 240, fig . 205.
Tire tread circumference and vibration character
istics can change and cause a tire pressure warn
ing if:
- the tire pressure in one or more tires is too low.
- the tire has structural damage.
- the tire was replaced or the tire pressure was
changed and it was not stored
c> page 249 .
-the collapsible spare* tire is installed.
Indicator lights
IE Loss of pressure in at least one tire c> &.
Check the tires and replace or repair if necessary . .,.
Page 264 of 296
Fuses and bulbs
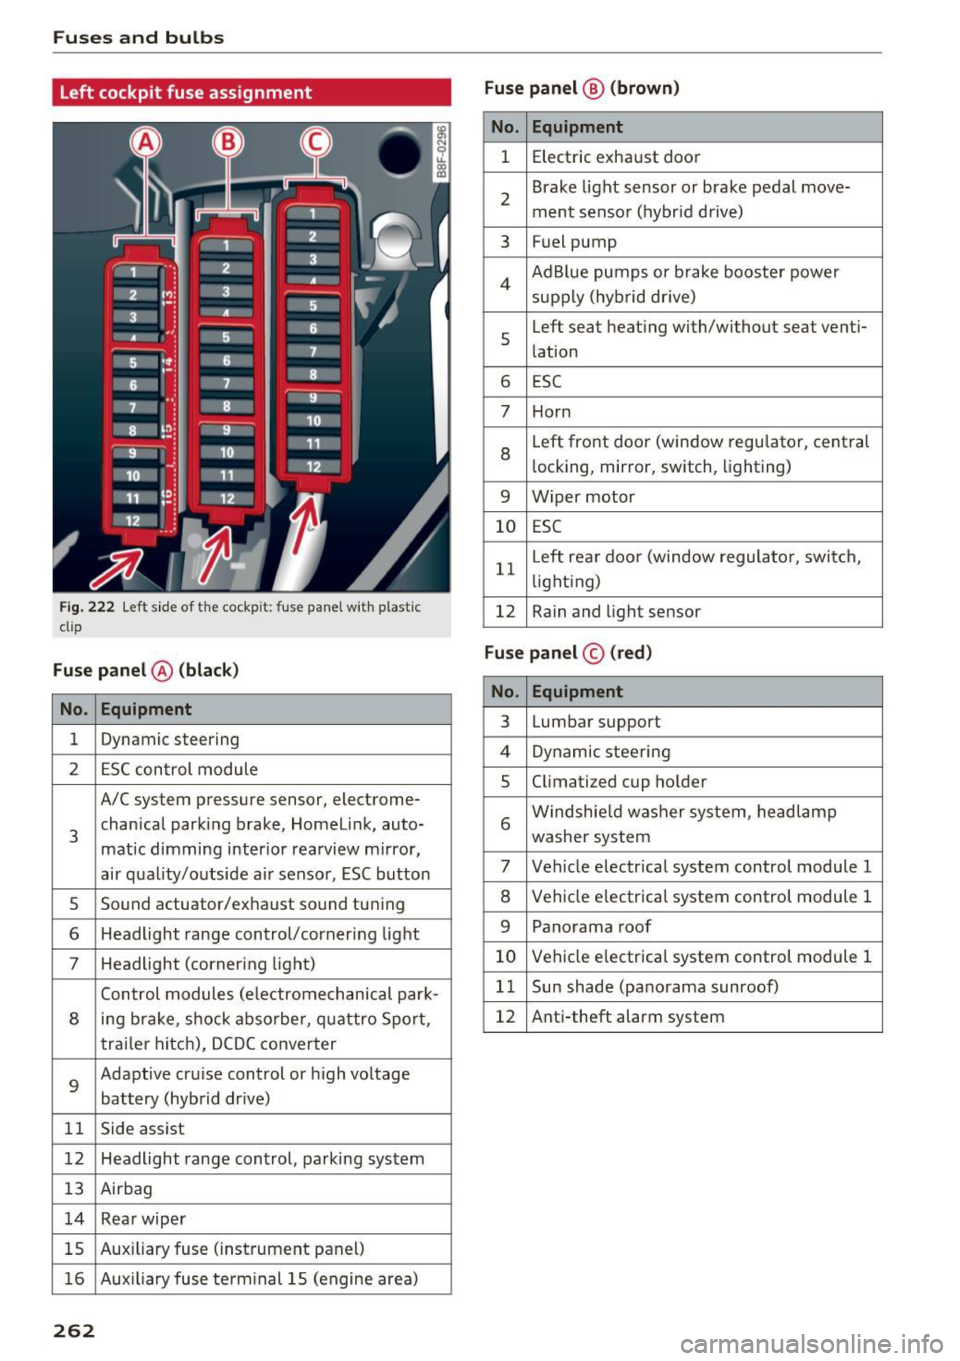
Left cockpit fuse assignment
Fig. 222 Left side of the cockp it: fuse panel with p lastic
clip
Fuse panel @ (black)
No . Equipment
1 Dynamic steering
2 ESC control module
A/C system pressure sensor, electrome-
3 chanical parking
brake, Homelink, auto-
matic dimming interior rearview mirror,
air quality/outside air sensor, ESC button
s Sound actuator/exhaust sound tuning
6 Headlight range control/corner ing light
7 Headlight (cornering light)
Control modules (electromechanical park-
8 ing brake, shock absorber, quattro Sport,
trailer hitch), DCDC converter
9
Adaptive cruise control or high voltage
battery (hybrid dr ive)
11 Side assist
12 Headlight range control, parking system
13 Airbag
14 Rear wiper
15 Auxiliary
fuse (instrument panel)
16 Auxiliary fuse te rm inal 15 (engine area)
262
Fuse panel ® (brown)
No. Equipment
1 Electric exhaust door
2 Brake
light sensor or brake pedal move-
ment sensor (hybrid drive)
3 Fuel pump
4 Ad
Blue pumps or brake booster power
supply (hybrid dr ive)
s
Left seat heating with/without seat venti-
lation
6 ESC
7 Horn
8
Left front doo r (window regulator, central
locking, mirror, switch, lighting)
9 Wiper motor
10 ESC
11 L
eft rear doo r (window regulator, switch,
li ght ing)
12 Rain and light sensor
Fuse panel
© (red)
No. Equipment
3 Lumbar support
4 Dynamic steering
5 Climatized cup holder
6 Windshie
ld washer system, headlamp
washer system
7 Vehicle electrical system control module 1
8 Vehicle electrical system control module 1
9 Panorama roof
10 Vehicle electrical system control module 1
11 Sun shade (panorama sunroof)
12 Anti-theft alarm system
Page 282 of 296
Index
A
A/C (climate control) . . . . . . . . . . . . . . . . . . . 78
Accessories . . . . . . . . . . . . . . . . . . . . . . . . . . 278
Active lane assist
Cleaning the camera area . . . . . . . . . . . . . 205
Adaptive cruise control. . . . . . . . . . . . . . . . . 109
Cleaning the sensor . . . . . . . . . . . . . . . . . . 205
Indicator lamp . . . . . . . . . . . . . . . . . . . . . . 111
M essages . . . . . . . . . . . . . . . . . . . . . . . . . . 116
Request for driver intervention . . . . . . . . . 114
Setting the distance............... ... 113
Setting the driving program . . . . . . . . . . . 114
Adaptive dampers . . . . . . . . . . . . . . . . . . . . . 122
Adaptive light .. .. ............. .... .. .. 51
Defective . . . . . . . . . . . . . . . . . . . . . . . . . . . 31
AdBlue .... .. .. .... ........... ....... 214
Messages . . . . . . . . . . . . . . . . . . . . . . . . . . 214
Opening the tank door ............... . 215
Refilling . .. .. .... ........... .... ... 215
Adding Engine oil .......................... 221
Windshield washer fluid . . . . . . . . . . . . . . 229
Additional accessories
Additives 278
Engine oil . . . . . . . . . . . . . . . . . . . . . . . . . . 221
Adjusting Air distribution (climate control) . . . . . . . . 78
Instrument illumination . . . . . . . . . . . . . . . 53
Steering column manually . . . . . . . . . . . . . 81
Temperature (climate control) . . . . . . . . . . 78
Airbag . . . . . . . . . . . . . . . . . . . . . . . . . . . . . . 148
Airbag system . . . . . . . . . . . . . . . . . . . . . . . . 164
Advanced Airbag-System . . . . . . . . . . . . . . 152
Advanced Airbag System components . . . 154
Care . . . . . . . . . . . . . . . . . . . . . . . . . . . . . . 161
Children . . . . . . . . . . . . . . . . . . . . . . . . . . . 169
Child restraints . . . . . . . . . . . . . . . . . . . . . 170
Components (front airbags) . . . . . . . . . . . 154
Danger of fitting a child safety seat on the
front passenger seat . . . . . . . . . . . . . . . . . 149
Disposal . . . . . . . . . . . . . . . . . . . . . . . . . . . 161
Front airbags . . . . . . . . . . . . . . . . . . . 152, 153
How do the front airbags work? . . . . . . . . 156
How many airbags does my vehicle have? 154
How the Advanced Airbag System compo-
nents work together . . . . . . . . . . . . . . . . . 156
280
Important information . . . . . . . . . . . . . . . 148
Monitoring . . . . . . . . . . . . . . . . . . . . . . . . . 158
PASSENGER AIR BAG OFF light . . . . . . . . . 159
Repairs . . . . . . . . . . . . . . . . . . . . . . . . . . . . 161
Safety instructions . . . . . . . . . . . . . . . . . . . 160
Side airbags . . . . . . . . . . . . . . . . . . . . . . . . 162
Side curtain airbags . . . . . . . . . . . . . . . . . . 165
Warning/indicator lights . . . . . . . . . . . . . . . 13
Warning/Indicator lights . . . . . . . . . . . . . 158
Weight-sensing mat . . . . . . . . . . . . . . . . . 170
When must the system be inspected? . . . 158
Air transport . . . . . . . . . . . . . . . . . . . . . . . . . 108
All-wheel drive ....................... 192
Selective wheel torque control . . . . . . . . . 186
All season tires
Alternator 245
Malfunction . . . . . . . . . . . . . . . . . . . . . . . . . 25
Anti-lock brake system Warning/indicator lights . . . . . . . . . . . . 13, 14
Anti-Lock Braking System . . . . . . . . . . . . . . 186
Anti-slip regulation Warning/indicator lights . . . . . . . . . . . . . . . 13
Anti-Slip Regulation . . . . . . . . . . . . . . . . . . . 186
Anti-theft alarm warning system . . . . . . . . . 35
Electronic immobilizer . . . . . . . . . . . . . . . . . 35
Approach/departure angle....... ..... .. 198
Ashtray . . . . . . . . . . . . . . . . . . . . . . . . . . . . . . 73
Audi braking guard
refer to Braking guard 115
Audi drive select Indicator light . . . . . . . . . . . . . . . . . . . . . . 191
also refer to Drive select . . . . . . . . . . . . . . 122
Audi parking system plus with rearview cam-
era . . . . . . . . . . . . . . . . . . . . . . . . . . . . . . . . . 125
Adjusting the display . . . . . . . . . . . . . . . . . 130
Adjusting the warning tones . . . . . . . . . . . 130
Rearview camera -parking mode 1 . . . . . . 128
Rearview camera -parking mode 2 . . . . . . 129
Safety precautions . . . . . . . . . . . . . . . . . . . 125
Switching on and off . . . . . . . . . . . . . . . . . 127
Trailer hitch . . . . . . . . . . . . . . . . . . . . . . . . 130
Audi Service Repair Manuals and Literature 276
Auto-Check Control . . . . . . . . . . . . . . . . . . . . 24
Auto locking . . . . . . . . . . . . . . . . . . . . . . . . . . 35
Automatic belt retractor . . . . . . . . . . . . . . . 143
Automatic driving light control . . . . . . . . . . . 49
Automatic Shift Lock (ASL) . . . . . . . . . . . . . . 95
Page 286 of 296
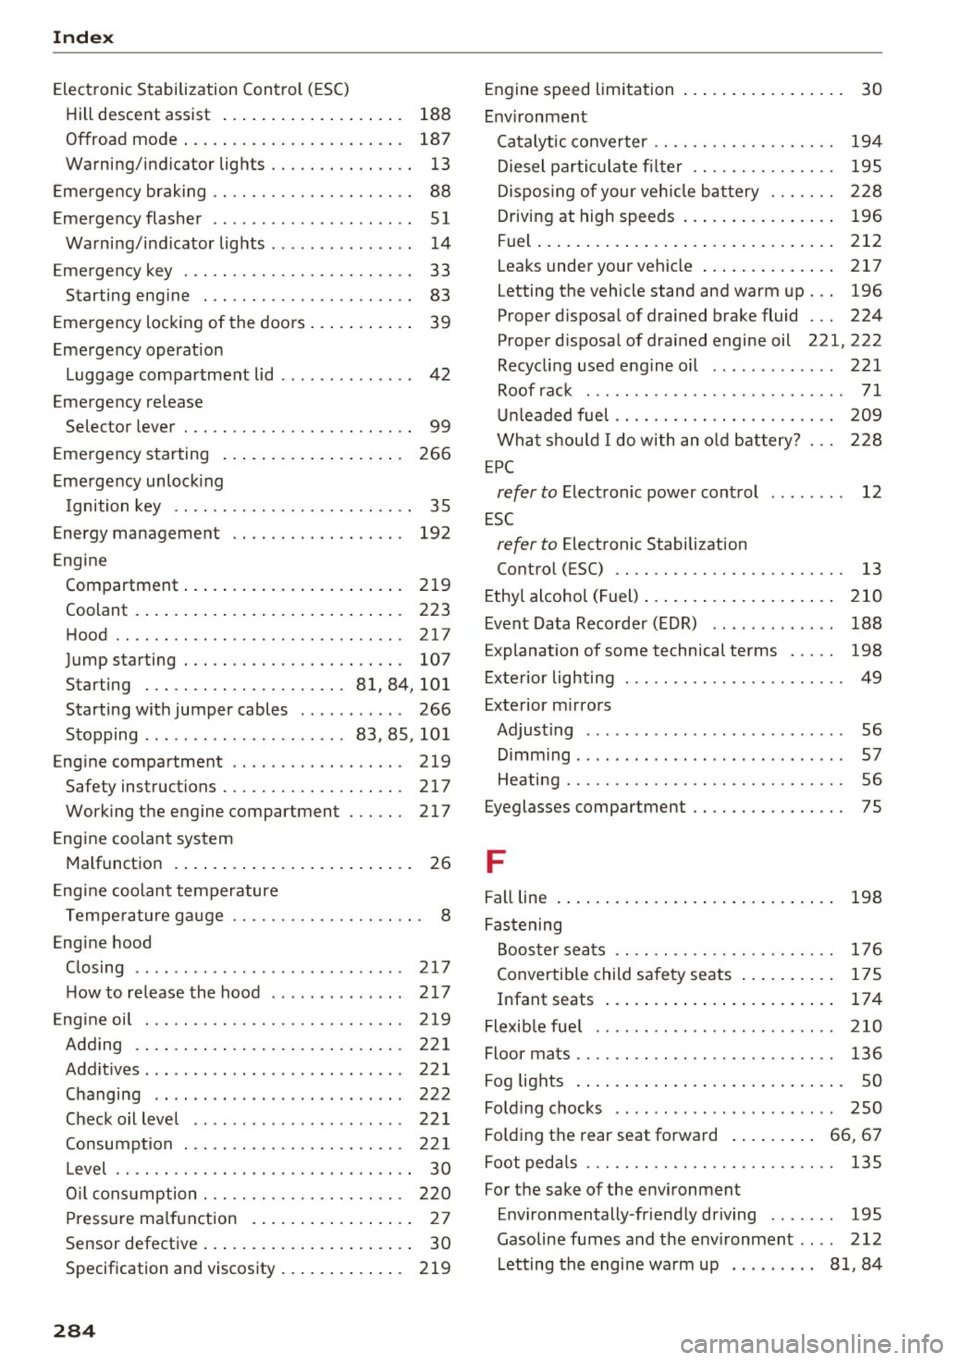
Index
Electronic Stabilization Control (ESC) Hill descent assist . . . . . . . . . . . . . . . . . . .
188
Offroad mode . . . . . . . . . . . . . . . . . . . . . . . 187
Warning/indicator lights . . . . . . . . . . . . . . . 13
Emergency braking . . . . . . . . . . . . . . . . . . . . . 88
Emergency flasher . . . . . . . . . . . . . . . . . . . . . S 1
Warning/indicator lights . . . . . . . . . . . . . . .
14
Emergency key . . . . . . . . . . . . . . . . . . . . . . . . 33
Starting engine . . . . . . . . . . . . . . . . . . . . . . 83
Emergency locking of the doors. . . . . . . . . . . 39
Emergency operation
Luggage compartment lid . . . . . . . . . . . . . .
42
Emergency release
Selector lever . . . . . . . . . . . . . . . . . . . . . . . .
99
Emergency starting . . . . . . . . . . . . . . . . . . . 266
Emergency unlocking
Ignition key . . . . . . . . . . . . . . . . . . . . . . . . .
35
Energy management . . . . . . . . . . . . . . . . . . 192
Engine
Compartment ................... ... .
219
Coolant . . . . . . . . . . . . . . . . . . . . . . . . . . . . 223
Hood ...... .. ................... ... 217
Jump starting . . . . . . . . . . . . . . . . . . . . . . . 107
Starting ... .. ................ 81, 84 , 101
Starting with jumper cables . . . . . . . . . . .
266
Stopping ... .. .. ... .... ...... . 83, 85, 101
Engine compartment ........... .... .. . 219
Safety instructions . . . . . . . . . . . . . . . . . . . 217
Working the engine compartment ...... 217
Engine coolant system
Malfunction . . . . . . . . . . . . . . . . . . . . . . . . .
26
Engine coolant temperature
Temperature gauge . . . . . . . . . . . . . . . . . . . . 8
Engine hood
Closing . . . . . . . . . . . . . . . . . . . . . . . . . . . .
217
H ow to release the hood . . . . . . . . . . . . . . 217
Engine oil . .. .. ................... ... 219
Adding . . . . . . . . . . . . . . . . . . . . . . . . . . . . 221
Additives. .. .. .. ... .. ..... ..... .. .. . 221
Changing . . . . . . . . . . . . . . . . . . . . . . . . . . 222
Check oil level . . . . . . . . . . . . . . . . . . . . . . 221
Consumption . . . . . . . . . . . . . . . . . . . . . . . 221
Level . . . . . . . . . . . . . . . . . . . . . . . . . . . . . . . 30
O il consumption . . . . . . . . . . . . . . . . . . . . . 220
Pressure malfunction . . . . . . . . . . . . . . . . . 27
Sensor defective . . . . . . . . . . . . . . . . . . . . . . 30
Specification and viscosity......... ... . 219
284
Engine speed limitation . . . . . . . . . . . . . . . . . 30
Environment
Catalyt ic converter . . . . . . . . . . . . . . . . . . .
194
Diesel particulate filter . . . . . . . . . . . . . . . 195
Dispos ing of your veh icle battery . . . . . . . 228
Driving at high speeds . . . . . . . . . . . . . . . . 196
Fuel......... ... .. .. ............... 212
Leaks under your vehicle . . . . . . . . . . . . . . 217
Letting the vehicle stand and warm up. . . 196
Proper disposal of drained brake fluid 224
Proper disposal of drained engine oil 221,222
Recycling used engine o il . . . . . . . . . . . . . 221
Roof rack . . . . . . . . . . . . . . . . . . . . . . . . . . . 71
Unleaded fuel . . . . . . . . . . . . . . . . . . . . . . . 209
What shou ld I do with an old battery? 228
EPC
refer to Electronic power control . . . . . . . . 12
ESC
refer to Electronic Stabilization
Control (ESC) . . . . . . . . . . . . . . . . . . . . . . . .
13
Ethyl alcohol (Fuel) . . . . . . . . . . . . . . . . . . . . 210
Event Data Recorder (EDR) . . . . . . . . . . . . . 188
Explanation of some technical terms . . . . . 198
Exterior lighting . . . . . . . . . . . . . . . . . . . . . . . 49
Exterior mirrors Adjusting . . . . . . . . . . . . . . . . . . . . . . . . . . .
56
D ' . rmmrng ...... .. ... .... ....... .... .. 57
Heating . . . . . . . . . . . . . . . . . . . . . . . . . . . . . 56
Eyeglasses compartment . . . . . . . . . . . . . . . . 75
F
Fall line 198
Fastening
Booster seats . . . . . . . . . . . . . . . . . . . . . . .
176
Convertible child safety seats . . . . . . . . . . 175
Infant seats . . . . . . . . . . . . . . . . . . . . . . . . 174
Flexib le fue l . . . . . . . . . . . . . . . . . . . . . . . . . 210
Floor mats . . . . . . . . . . . . . . . . . . . . . . . . . . . 136
Fog lights . . . . . . . . . . . . . . . . . . . . . . . . . . . . 50
Folding chocks . . . . . . . . . . . . . . . . . . . . . . . 250
Folding the rear seat forward . . . . . . . . . 66, 67
Foot pedals . . . . . . . . . . . . . . . . . . . . . . . . . .
135
For the sake of the environment
Environmentally -friendly driving . . . . . . .
195
Gasoline fumes and the environment .. .. 212
Letting the engine warm up . . . . . . . . . 81 , 84
Page 288 of 296
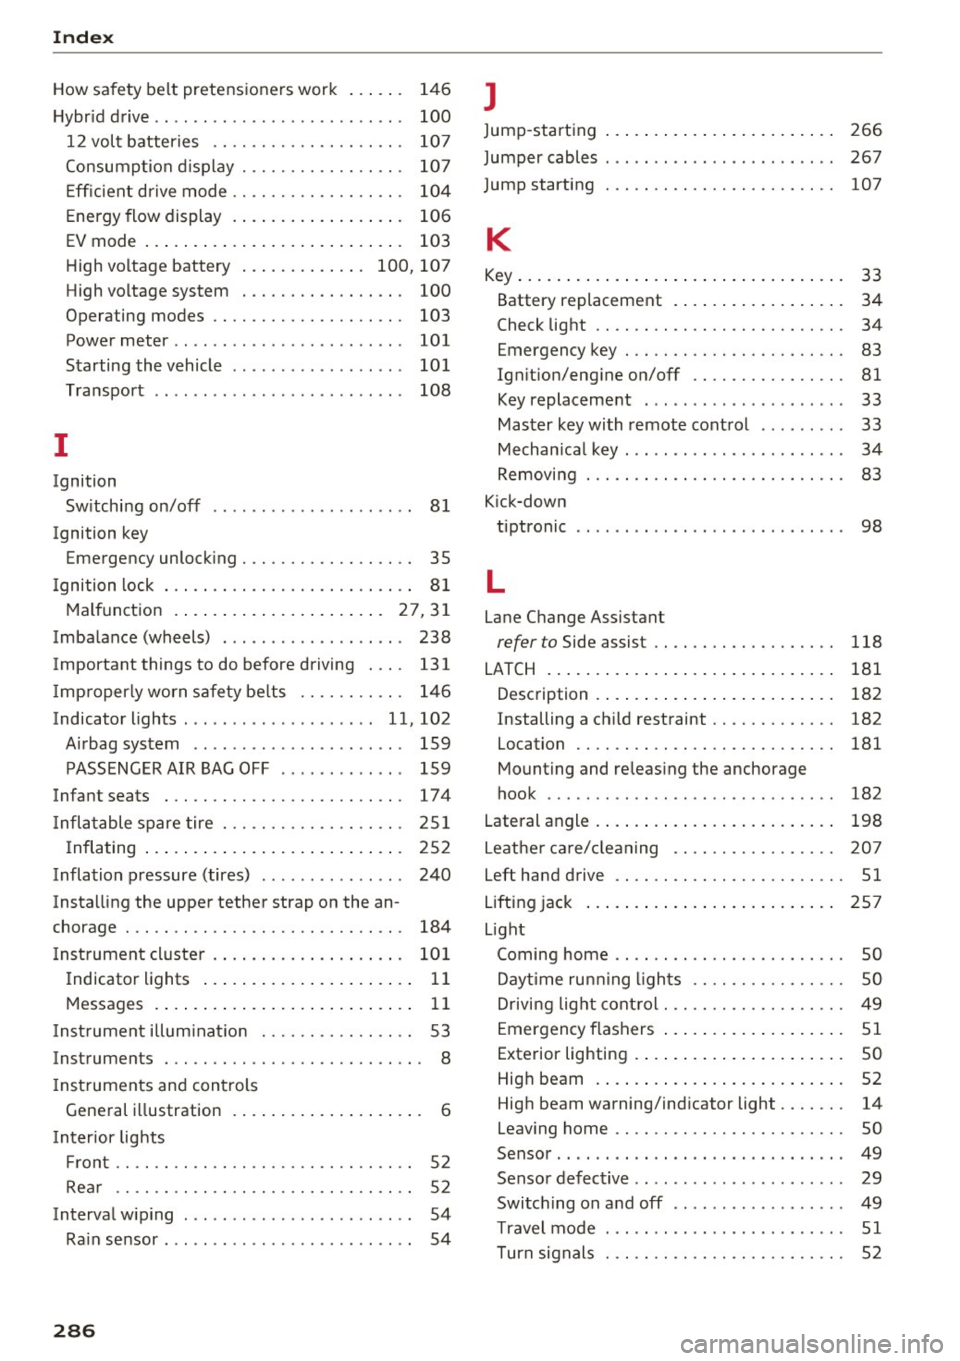
Index
How safety belt pretensioners work ..... .
Hybrid drive .. .. .. ................ ... .
12 volt batteries .. ........... .... .. . 146
100
107
Consumption display . . . . . . . . . . . . . . . . . 107
Efficient drive mode . . . . . . . . . . . . . . . . . . 104
Energy flow display . . . . . . . . . . . . . . . . . . 106
EV mode . . . . . . . . . . . . . . . . . . . . . . . . . . . 103
High voltage battery . . . . . . . . . . . . . 100, 107
High voltage system . . . . . . . . . . . . . . . . . 100
Operating modes . . . . . . . . . . . . . . . . . . . . 103
Power meter . . . . . . . . . . . . . . . . . . . . . . . . 101
Starting the vehicle . . . . . . . . . . . . . . . . . . 101
Transport 108
I
Ignition
Switching on/off . . . . . . . . . . . . . . . . . . . . . 81
Ignition key Emergency unlocking . . . . . . . . . . . . . . . . . . 35
I gnition lock . . . . . . . . . . . . . . . . . . . . . . . . . . 81
Malfunction .... ................ .. 27, 31
Imbalance (wheels) . . . . . . . . . . . . . . . . . . . 238
Important things to do before driving . . . . 131
I mproperly worn safety belts . . . . . . . . . . . 146
Indicator lights . . . . . . . . . . . . . . . . . . . . 11, 102
Airbag system . . . . . . . . . . . . . . . . . . . . . . 159
PASSENGER AIR BAG OFF . . . . . . . . . . . . . 159
Infant seats . . . . . . . . . . . . . . . . . . . . . . . . . 17 4
I nflatable spare tire . . . . . . . . . . . . . . . . . . . 251
I nflating . . . . . . . . . . . . . . . . . . . . . . . . . . . 252
Inflation pressure (tires) . . . . . . . . . . . . . . . 240
Installing the upper tether strap on the an
chorage . . . . . . . . . . . . . . . . . . . . . . . . . . . . . 184
I nstrument cluster . . . . . . . . . . . . . . . . . . . . 101
Indicator lights . . . . . . . . . . . . . . . . . . . . . . 11
Messages . . . . . . . . . . . . . . . . . . . . . . . . . . . 11
I nstrument illum inat ion . . . . . . . . . . . . . . . . 53
Instruments . . . . . . . . . . . . . . . . . . . . . . . . . . . 8
I nstruments and controls
General illustration . . . . . . . . . . . . . . . . . . . . 6
I nterior lights
Front . . . . . . . . . . . . . . . . . . . . . . . . . . . . . . . 52
Rear . . . . . . . . . . . . . . . . . . . . . . . . . . . . . . . 52
Interval wiping . . . . . . . . . . . . . . . . . . . . . . . . 54
Rain sensor . . . . . . . . . . . . . . . . . . . . . . . . . . 54
286
J
Jump-starting 266
Jumper cables . . . . . . . . . . . . . . . . . . . . . . . . 267
Jump starting 107
K
Key...........
... .. .. ................ 33
Battery replacement . . . . . . . . . . . . . . . . . . 34
Check light . . . . . . . . . . . . . . . . . . . . . . . . . . 34
Emergency key . . . . . . . . . . . . . . . . . . . . . . . 83
lg n ition/ engine on/ off . . . . . . . . . . . . . . . . 81
Key replacement . . . . . . . . . . . . . . . . . . . . . 33
Master key with remote control . . . . . . . . . 33
Mechanica l key . . . . . . . . . . . . . . . . . . . . . . . 34
Removing . . . . . . . . . . . . . . . . . . . . . . . . . . . 83
Kick-down tiptronic . . . . . . . . . . . . . . . . . . . . . . . . . . . . 98
L
Lane Change Assistant
refer to Side assist . . . . . . . . . . . . . . . . . . . 118
LATCH . . . . . . . . . . . . . . . . . . . . . . . . . . . . . . 181
Description . . . . . . . . . . . . . . . . . . . . . . . . . 182
Installing a child restraint . . . . . . . . . . . . . 182
Location . . . . . . . . . . . . . . . . . . . . . . . . . . . 181
Mounting and releasing the anchorage
hook . . . . . . . . . . . . . . . . . . . . . . . . . . . . . . 182
Lateral angle . . . . . . . . . . . . . . . . . . . . . . . . . 198
Leather care/cleaning . . . . . . . . . . . . . . . . . 207
Lefthand drive .. .. .. .. ............. ... 51
Lifting jack . . . . . . . . . . . . . . . . . . . . . . . . . . 257
Light Coming home . . . . . . . . . . . . . . . . . . . . . . . . 50
Dayt ime runn ing lights . . . . . . . . . . . . . . . . 50
Driving light control. . . . . . . . . . . . . . . . . . . 49
Emergency flashers . . . . . . . . . . . . . . . . . . . 51
Exterior lighting . . . . . . . . . . . . . . . . . . . . . . 50
High beam . . . . . . . . . . . . . . . . . . . . . . . . . . 52
High beam warning/indicator light. . . . . . . 14
Leaving home . . . . . . . . . . . . . . . . . . . . . . . . 50
Sensor .. .. .. .. .. .. .. ...... .... ... .. . 49
Sensor defective . . . . . . . . . . . . . . . . . . . . . . 29
Switching on and off . . . . . . . . . . . . . . . . . . 49
Travel mode . . . . . . . . . . . . . . . . . . . . . . . . . 51
Turn signals . . . . . . . . . . . . . . . . . . . . . . . . . 52