fuel pump AUDI Q5 2018 Owners Manual
[x] Cancel search | Manufacturer: AUDI, Model Year: 2018, Model line: Q5, Model: AUDI Q5 2018Pages: 392, PDF Size: 60.56 MB
Page 313 of 392

u co ..... N r-N .....
~ 0 co
-If you are unable to determine whether or
not a particular fuel blend meets the speci
fications, ask your service station or its fuel
supplier.
- Do not use fuel for which the contents can
not be identified.
- Fuel system damage and performance prob
lems resulting from the use of fuels differ
ent from those specified are not the respon
sibility of Audi and are not covered under
the New Vehicle or the Emission Control
System Warranties .
- If you experience a loss of fuel economy or
driveability and performance problems due
to the use of one of these fuel blends, we
recommend that you switch to unblended
fuel.
Gasoline additives
A major concern among many auto manufactur
ers is carbon deposit build-up caused by the type
of gasoline you use.
Although gasoline grades differ from one manu
facturer to another, they have certain things in
common. All gasoline grades contain substances
that can cause deposits to collect on vital engine
parts, such as fuel injectors and intake valves.
Al
though most gasoline brands include additives to keep engine and fuel systems clean, they are not
equally effective .
Audi recommends using TOP TIER Detergent Gas
oline. For more information on TOP TIER Deter
gent Gasoline, please go to the official website
(www.toptiergas .com) .
After an extended period of using inadequate
fuels, carbon deposit build-ups can rob your
en
gine of peak performance.
(D Note
Damage or malfunction due to poor fuel qual
ity is not covered by the Audi New Vehicle
Limited Warranty.
Checking and Filling
Refueling
Fueling procedure
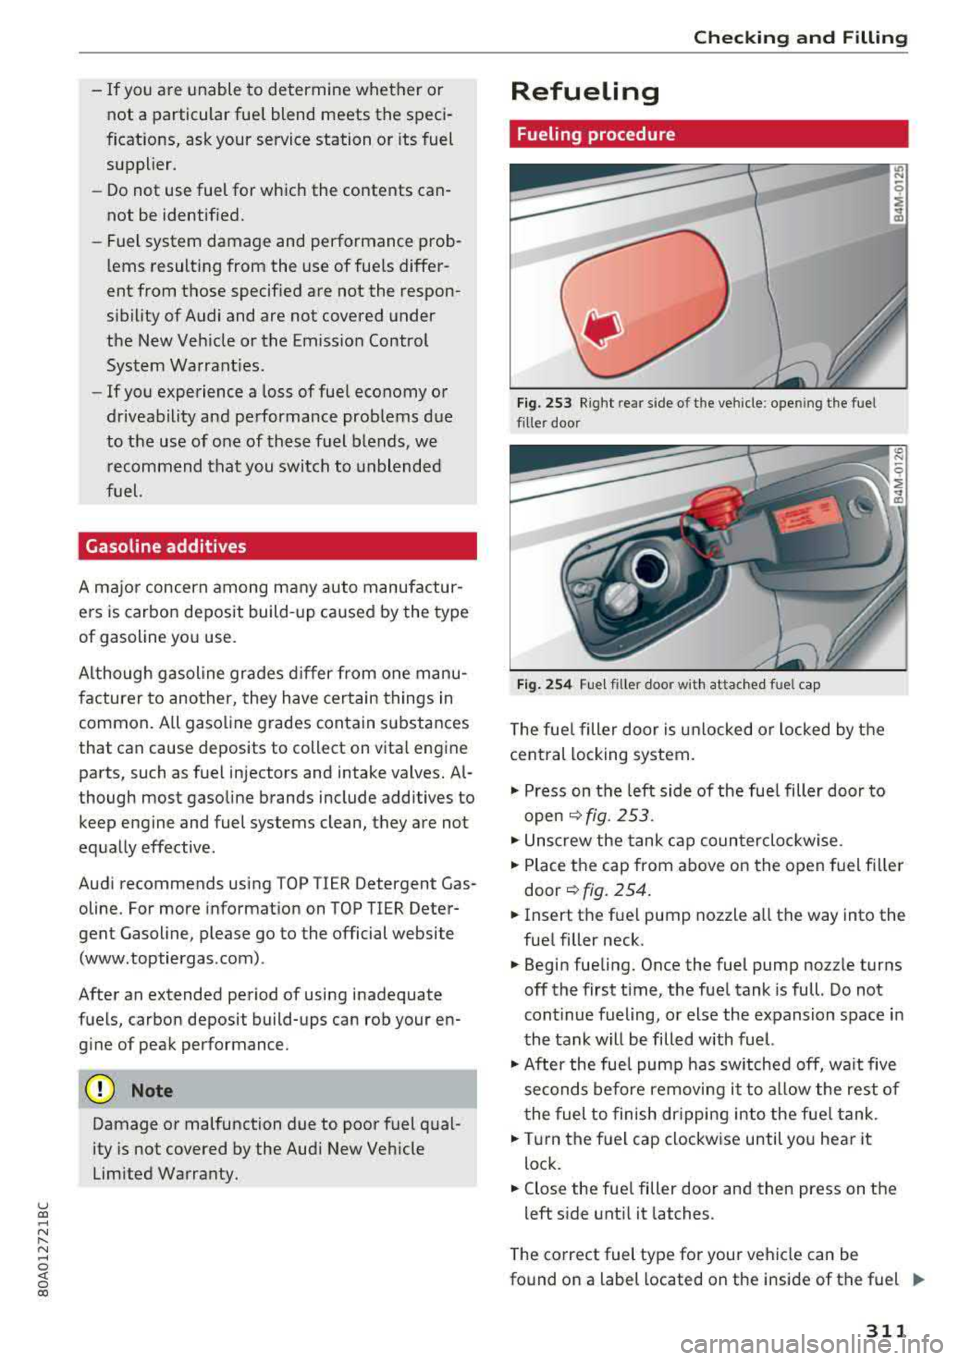
Fig. 253 Right rear s ide o f th e ve hicle : ope ning the fuel
filler door
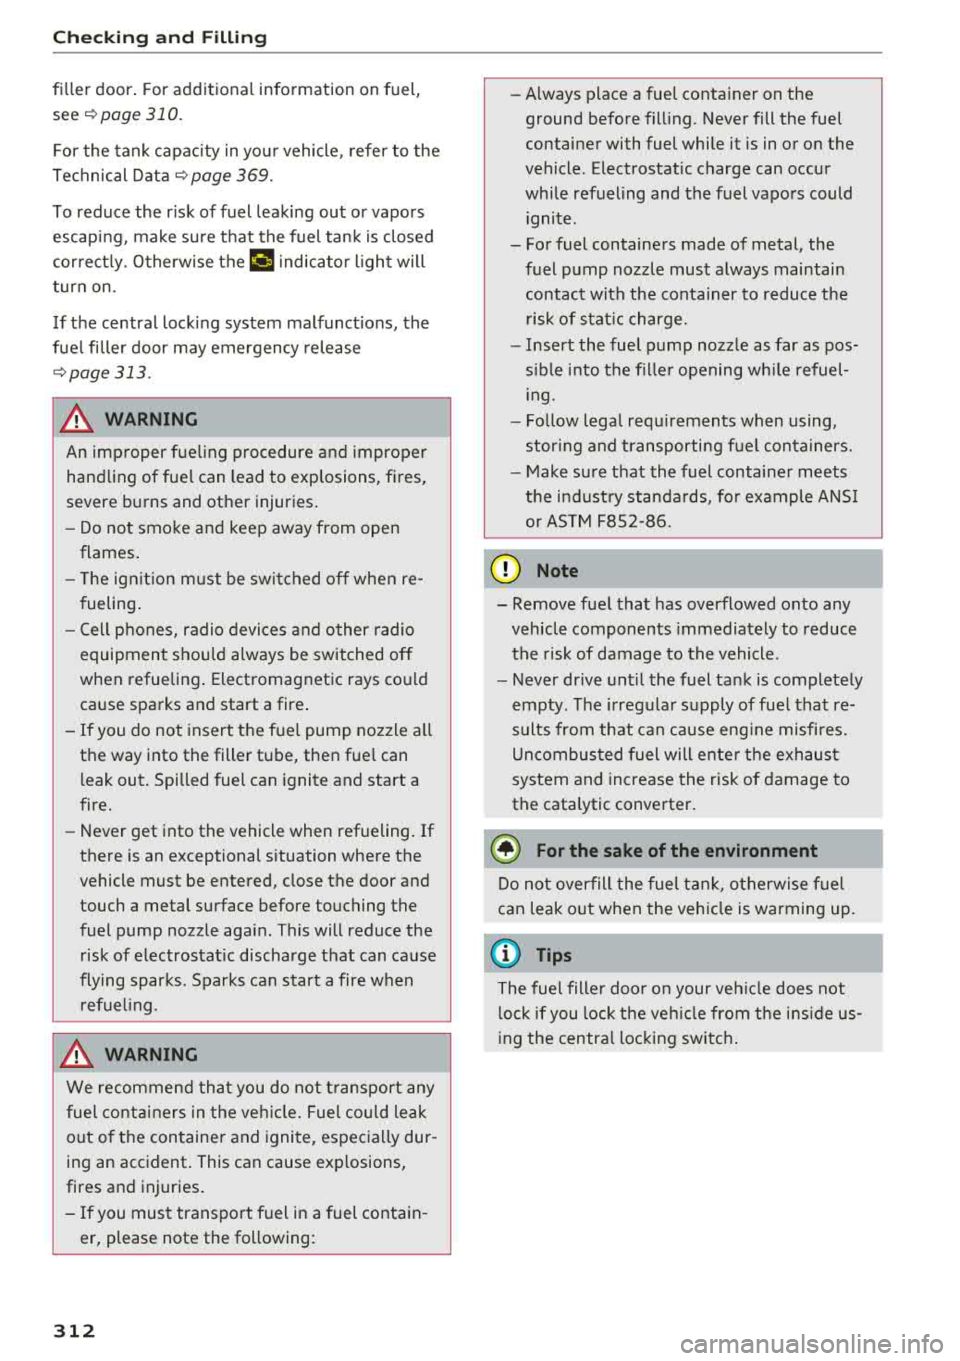
Fig. 254 Fuel filler door with attached fue l cap
The fuel filler door is unlocked or locked by the
central locking system.
"' Press on the left side of the fuel filler door to
open
r::::>fig. 253.
"' Unscrew the tank cap counterclockwise.
"'Place the cap from above on the open fuel filler
door
r::::> fig. 254.
"'Insert the fuel pump nozzle all the way into the
fuel filler neck.
.,. Begin fueling. Once the fuel pump nozzle turns
off the first time, the fuel tank is full. Do not
continue fueling, or else the expansion space in
the tank will be filled with fuel.
"'After the fuel pump has switched off, wait five
seconds before removing it to allow the rest of
the fuel to finish dripping into the fuel tank.
"'Turn the fuel cap clockwise until you hear it
lock.
"' Close the fuel filler door and then press on the
left side until it latches .
The correct fuel type for your vehicle can be
found on a label located on the inside of the fuel
Iii>
311
Page 314 of 392

Check ing and F illing
fi ller door . For additional information on fuel,
see
r=> poge 310.
For the tank capac ity in yo ur vehicle , refer to the
Technical Data
r:!> pog e 369.
To reduce the r isk of fuel leak ing out or vapors
escap ing , make sure that the fuel tank is closed
correct ly. Otherwise
thP ¢'4 i ndicato r light will
t ur n on.
I f the central lock ing system malfunct ions, the
fue l filler door may emergency release
r=> poge 313.
_& WARNING
An improper f ueli ng p rocedure and improper
hand ling of fue l can lead to exp losions, fires,
severe b urns and other injuries .
- Do not smoke and keep away from open
flames .
- T he ign it ion m ust be switched off when re
f ueling .
- Cell p hones, radio devices and other radio
equipment s hou ld always be switched off
when refueling . Electromagnetic rays cou ld
cause sparks and start a fire .
- If you do not insert the fue l pump nozzle a ll
the way into the filler tube, then fue l can
l eak out . Spi lled fue l can ignite and start a
fire.
- Never get into the vehicle when refueling. If
there is an exceptional situation where the
vehicle must be entered, close the door and
touch a metal surface before touching the
fuel pump nozzle again . This will reduce the
risk of electrostat ic discharge that can cause
flying sparks . Sparks can start a fire when
r efuel ing .
_& WARNING
We recommend that you do not t ransport any
fue l conta iners in t he ve hicle. Fue l cou ld leak
out of the container and ignite, espec ially dur
ing an accident. This can cause exp losions,
fires and injuries .
- If you must transport fuel in a fuel contain
er, please note the following:
312
- Always place a fue l container on the
ground before fill ing . Never fill the fuel
container with fuel while it is in or on the
vehicle . Electrostatic charge can occur
while refueling and the fuel vapors could i gnite .
- For fuel containers made of metal, the fuel pump nozzle must always maintai n
contact with the conta iner to reduce the
r isk of s tat ic charge.
- Insert the fuel pump nozz le as far as pos
s ible into the fi lle r opening w hile refuel
ing .
-Fo llow lega l requ irements when using,
stor ing and t ransporti ng f uel con ta iners.
- Make su re that the fuel containe r meets
t h e i nd ust ry standa rds, fo r example ANS I
o r ASTM F852 -86.
@ Note
- Remove fuel that has overflowed onto any
vehicle components immediately to reduce
the risk of damage to the vehicle.
- Never dr ive unt il the fuel tank is completely
empty . T he irregula r supply of fue l that re
s u lts from that can cause eng ine misfi res.
Uncombus ted fuel will ente r th e exhaus t
system and increase the risk of damage to
the cata lytic converter .
@ For the sake of the environment
Do not overfill the fuel t ank, o therwise f uel
can leak o ut w hen the veh icle is warming up.
(D Tips
The fuel fille r doo r on your veh icle does not
l ock if you lock t he ve hicle from t he i nside us
i ng the centra l locking switc h.
Page 362 of 392

Fuses and bulb s
Fuse panel@ (brown ) Fuse panel© (blac k)
N o. E quip ment No. Equipmen t
2
Mass airflow sensor, camshaft adjust-
ment, charge air cooler pump 1 Fr ont seat heating
2 Windshie ld wipers
3 Exhaust doors, fuel injectors, radiator inlet 3 Left head light elect ronics
4 Vacuum pump , hot water p ump, particu-
late sensor, biodiesel sensor 4 Panorama glass roof
s L eft front doo r contro l modu le
5 Brake light sensor 6 Sockets
6 Engine valves, camshaft adjustment 7 Right rear door cont rol mod ule
7
Heated oxygen sensor, mass airflow sen-8 All wheel drive
sor
8
Water pump, high pressure pump, high
pressure regulator va lve
9 Hot water pump
9 R ight headlight electronics
10
Windshield washer system/headlight
washer system
1 1 Left rear door contro l module
10
Oil pressure sensor, oil temperature sen-
sor
Fu se p anel @ (blac k)
11 Clutch pedal position sensor No. Equipment
12 Engine valves
Seat ventilation, rearv iew mirror, cl imate
13 Radiator fan 1 control system, rear cl imate control sys-
14 Fuel injectors tern controls
, windsh ie ld defogger
15 Ignition coils 2 Gateway, climate control system
16 Fuel pump 3 Sound act uator/exhaust sound tuning
Fuse panel @ (red )
4 Clutch pedal posit ion sensor
5 Engine start
N o. Equipment 7 Rear USB charging port
1 Anti-theft a larm system 8 Homelink
2 Engine control module 9 Adaptive cruise control
3 Lumbar support 11 Video camera
4 Automatic transm ission selector mecha-
nism 12 Matrix LED headlight/right LED headlight
5 Horn
13 Matrix LED headlight/ left LED headlight
6 Electromechan ica l park ing brake
14 Rear window wiper
7 Gateway control module Fu se panel © (red )
8 Interior headliner lights No . Equipmen t
10 Airbag control module 1 Ignition coils
11 Electronic Stabilization Control (ESC) 5 E ng ine mount
12 Diagnostic connector, light/rain sensor 6 Automatic transmiss ion
13 Climate control system 7 I nstrument panel
1 4 Right front door control module 8 C limate control system (blower)
lS A/C compressor
10 Dynamic stee ring
11 Eng ine start
36 0