ESP AUDI Q7 2009 Owner´s Manual
[x] Cancel search | Manufacturer: AUDI, Model Year: 2009, Model line: Q7, Model: AUDI Q7 2009Pages: 426, PDF Size: 97.13 MB
Page 357 of 426
Tires and wheels -_____________ .:.....::...=..____:__:_:_:_=-=----
•
& WARNING (continu ed )
• Incorrect tire pressure and /or under inflation can cause
in creased tire wear and can affect the handling of the vehicle and
stopping ability .
• Incorrect t ire pressures and /o r underinflat ion can also lead to
sudden tire failure, including a blowout and sudden deflation,
causing lo ss of vehicle control .
• The driver is respon sible for the correct tire pressures for all
tires on the vehicle. The applicable pre ssure values are located on
a sticker on the driver 's side 8-pillar or on the inside of the fuel
filler flap .
• Only when all tires on the vehicle are filled to the correct pres
sure , the tire pressure monitoring sy stem can work correctly .
• The use of incorrect tire pressure values can lead to accidents
or other damage . Therefore it is essential that the driver observe
the specified tire pressure value s for the tires and the correct pres
sures for the function of the tire pressure monitoring system.
• Always inflate tires to the re commended and correct tire pres
sure before driving off .
• Driving with underinflated tires bend more , letting them get
too hot resulting in tread separation , sudden tire failure and loss
of control.
• Ex cessive speed and /overloading can cause heat build-up ,
s udden tire failure and lo ss of control .
• If the tire pres sure is too low or too high , the t ires will wear
prematurely and the vehicle will not handle well .
• If the tire is not flat and you do not have to change a wheel
immediately , drive at reduced speed to the nearest service station
to check the t ire pressure and add air as required.
0 Note
Dr iving wi thout valve stem caps ca n cause damage to t he tire
valves. To prevent this, always make sure that factory instal led va lve
stem caps o n all wheels are sec urely mou nted on the va lve .
c£> For the sake of the environment
Underi nflate d tir es w ill a lso inc rease the fue l consu mptio n.•
Tires and vehicle load limits
There are li m its to the a mou nt o f load or weig ht th at any ve hic le and
any tire can carry . A vehicle that is overloaded wil l not handle wel l
and is more diff icu lt to stop . Overload ing ca n no t only lead to loss
of vehic le control, but can also damage important parts of the
ve hicle a nd can lead to sud den tire failu re, i nclu di ng a bl owou t and
sudden deflat ion that can cause the vehic le to crash.
Your safety an d that of your passengers also depends on ma kin g
su re tha t load l imits are not exceeded . Vehicle load includes eve ry
body and everything in and on the vehic le. These load limits are
t echnica lly re ferred to as the ve hicle's
Gross Vehicle Weight Rating
("GVWR"l.
The "GVWR" in clu de s th e we ig ht of t he basi c ve hicle, all fac tory
insta lled accessories, a ful l tank of fuel, oil, coolant and other fluids
plus m aximu m load. The maxi mum l oad inc lude s the n umber of
passen gers that the vehicle is intended to carry !"seating capacity")
with an assumed weight of 150 lbs (68 kg) fo r each passenger at a
designated seating position and the total weight of any lugga ge in
the vehicle. If you tow a trailer, the weight of the trailer hitch and the
to ngue we ig ht of th e loaded tra iler must b e included as par t of th e
vehic le load.
The
Gross Axle Weight Rating ("GAWR") is the m aximum loa d th at
can be applied at each of the vehicle's two ax les. _,,,
Vehicle care I t •
Page 360 of 426
-~_T_ ir_e_ s_ a_ n_d _ w_ h_ e_e _l_s _________________________________________________ _
make, there will be six to eight of them evenly placed around the
tire. Marks on the tire sidewall (for example "TWI" or other symbols)
indicate the positions of the tread wear indicators. Worn tires must
be replaced. Different figures may apply in other countries=>& .
Tire pressure
Incorrect tire pressure causes premature wear and can cause
sudden tire blow-out. For this reason, tire pressure must be checked
at least once a month =>
page 353.
Driving style
Driving fast around curves, heavy acceleration and hard braking
increase tire wear.
Rotating tires for more even wear
For all four tires on your vehicle to have the same service life, we
recommend that the front and rear tires are rotated according to the
tire manufacturer's suggested tire rotation intervals. Please
remember the following:
• Tire rotation intervals may differ from the vehicle service inter
vals outlined in your Warranty
& Maintenance booklet.
• The longer one tire is used in one location on the vehicle , the
more it wears at certain points; therefore, we recommend that you
follow the tire manufacturer's suggested tire rotation intervals .
• Vehicles with front-wheel drive experience more tread wear on
the front wheels compared to all-wheel drive (quattro ®l.
• Please rotate tires as shown =>
page 357, fig. 294.
• Extra care must be taken when rotating direction-specific tires
=>
page 379.
Wheel balancing
The wheels on new vehicles are balanced. However, various situa
tions during everyday driving can cause them to become unbal
anced, resulting in vibrations you can usually feel through the
steering wheel. Unbalanced
wheels must be rebalanced to avoid excessive wear on
steering, suspension and tires. A wheel must also be rebalanced
when a new tire is installed.
Incorrect wheel alignment
Incorrect wheel alignment can cause excessive tire wear , impairing
the safety of the vehicle. If tires show excessive wear, have the
wheel alignment checked by an authorized Audi dealer or qualified
workshop.
All Wheel Drive
Vehicles with quattro® must always have tires of the same size,
construction and tread type. For details see=>
page 294.
& WARNING
Sudden tire failure can lead to loss of control, a crash and serious
personal injury!
• Never drive a vehicle when the tread on any tire is worn down
to the wear indicators.
• Worn tires are a safety hazard, they do not grip well on wet
roads and increase your risk of "hydroplaning" and loss of control.
• Always keep chemicals that can cause tire damage, such as
grease, oil, gasoline and brake fluid away from tires .
• Tires age even if they are not being used and can fail suddenly,
especially at high speeds. Tires that are more than 6 years old can
only be used in an emergency and then with special care and at
lower speeds .
• Never mount used tires on your vehicle if you are not sure of
their "previous history." Old used tires may have been damaged
even though the damage cannot be seen that can lead to sudden
tire failure and loss of vehicle control. •
Page 363 of 426
__________________________________________________ T_ ir_e_ s_ a_ n_d _ w_ h_ e_ e_l_s __ _
•
U.S. DOT Tire Identification Number (TIN) and tire
manufacture date
This is the tire's "serial number". It begins with the letters "DOT"
and indicates that the tire meets all federal standards . The next two
numbers or letters indicate the plant where it was manufactured,
and the last four numbers represent the week and year of manufac
ture . For example, the numbers 2208 mean that the tire was
produced in the 22th week of 2008. The other numbers are
marketing codes that may or may not be used by the tire manufac
turer. This information is used to contact consumers if a tire defect
requires a recall.
Tire ply composition and materials used
The number of plies indicates the number of layers of rubber-coated
fabric in the tire. In general, the greater the number of plies, the
more weight a tire can support. Tire manufacturers also must indi
cate the materials in the tire, which include steel, nylon, polyester,
and others.
Maximum Load Rating
This number indicates the maximum load in kilograms and pounds
that can be carried by the tire.
Tire quality grading for treadwear, traction, and
temperature resistance
Tread wear, traction and temperature grades~ page 363.
Maximum Permissible Inflation Pressure
This number is the greatest amount of air pressure that should ever
be put in the tire under normal driving conditions.
Replacing tires or rims on vehicles equipped with tire
pressure monitoring system
The wheels on your vehicle are equipped with a sensor which
constantly monitors the air pressure inside the tire, and then trans
mits this information to the tire pressure monitoring system. If you
are going to replace the wheel rims on your vehicle, make sure the new rims also have these sensors
. The sensors must be compatible
with the tire pressure monitoring system on your vehicle.
If you install rims, which do not have the sensors, or have sensors
which are not compatible, then the tire pressure monitoring system
will not work properly. In this case, the tire pressure monitoring
system would not be able to monitor the tire pressure or warn you
if it is necessary.
• The battery inside of the tire pressure sensor has a limited
service life.
• Always drive with the valve stem caps securely mounted. We
recommend using factory installed valve stem caps. Ask your autho
rized Audi dealer to replace lost valve stem caps .
The installation of replacement tires with steel cord body plies in
the tire sidewall may cause malfunction of the tire pressure moni
toring system, and is not recommended (cord material information
in molded on the tire sidewall).
Always check your tire pressure monitoring system indicator after replacing one or more tires on your vehicle. If the tire pressure
monitoring system indicator flashes, or is on, your system is not
working properly. Your replacement tire might be incompatible with
your tire pressure monitoring system, or some component of the
tire pressure monitoring system may be damaged.
& WARNING
• Using incorrect or unmatched tires and/ or wheels or improper
tire and wheel combinations can lead to loss of control, collision and serious personal injury.
• Always use tires, rims and wheel bolts that meet the specifica
tions of original factory-installed tires or other combinations that
have been specifically approved by the vehicle manufacturer .
• Tires age even if they are not being used and can fail suddenly,
especially at high speeds. Tires that are more than 6 years old can
only be used in an emergency and then with special care and at
lower speeds . .,.
Vehicle care
I t •
Page 365 of 426
__________________________________________________ T_ ir_e_ s_ a_ n_d _ w_ h_ e_ e_l_s __ lllll
•
Uniform tire quality grading
• Tread wear
• Traction AA A B C
• Temperature A B C
Quality grades can be found where applicable on the tire side wall
between tread shoulder and maximum section width=>
page 359,
fig. 295.
For example: Tread wear 200, Traction AA, Temperature A.
All passenger car tires must conform to Federal Safety Require
ments in addition to these grades .
Tread wear
The tread wear grade is a comparative rating based on the wear rate
of the tire when tested under controlled conditions on a specified
government test course .
For example, a tire graded 150 would wear one and
one half (1 1/2)
times as well on the government course as a tire graded 100.
The relative performance of tires depends upon the actual condi
tions of their use, however, and may depart significantly from the
norm due to variations in driving habits, service practices and differ
ences in road characteristics and climate.
Traction
The traction grades, from highest to lowest, are AA, A, B and C.
Those grades represent the tire's ability to stop on wet pavement as measured under controlled conditions on specified government
test surfaces of asphalt and concrete. A tire marked C may have
poor traction performance => & .
Temperature
The temperature grades are A (the highest), B, and C, representing
the tire's resistance to the generation of heat and its ability to dissi
pate heat when tested under controlled conditions on a specified
indoor laboratory test wheel. Sustained high temperature can cause the material of the tire to
degenerate and reduce
tire life, and excessive temperature can lead
to sudden tire failure=>&.
The grade C corresponds to a level of performance which all passenger car tires must meet under the Federal Motor Vehicle
Safety Standard No. 109. Grades Band A represent higher levels of
performance on the laboratory test wheel than the minimum
required by law .
& WARNING
The traction grade assigned to this tire is based on straight-ahead
braking traction tests, and does not include acceleration,
cornering, hydroplaning or peak traction characteristics.
& WARNING
The temperature grade for this tire is established for a tire that is properly inflated and not overloaded. Excessive speed, underinfla
tion, or excessive loading, either separately or in combination, can
cause heat buildup and possible tire failure. •
Winter tires
Winter tires can improve vehicle handling on snow and
ice. At temperatures below 45 °F (7 °C) we recommend
changing to winter tires.
In some heavy snow areas, local governments may require true
winter or "snow" tires, those with very deeply cut tread. These tires
should only be used in pairs and be installed on all four wheels .
Make sure you purchase snow tires that are the same size and
construction type as the other tires on your vehicle .
Your vehicle is equipped with all -wheel drive, this will improve trac
tion during winter driving, even with the standard tires. However,
we strongly recommend that you always equip all four wheels on .,_
Vehicle care I t •
Page 368 of 426
-~_T_ ir_e_ s_ a_ n_d _ w_ h_ e_e _l_s _________________________________________________ _
0 Note
The specified torque for the wheel bolts is 120 ft lb (160 Nm) with a
tolerance of± 7,4 ft lb(± 10 Nm). Torque wheel bolts diagonally.
After changing a wheel, the torque must be checked as soon as
possible with a torque wrench -preferably by an authorized Audi
dealer or qualified workshop. •
Low aspect ratio tires
Your Audi is factory-equipped with low aspect ratio tires. These tires
have been thoroughly tested and been selected specifically for your
model for their superb performance, road feel and handling under
a variety of driving conditions . Ask your authorized Audi dealer for
more details.
The low aspect ratio of these tires is indicated by a numeral of
55 or
less
in the tire's size designation. The numeral represents the ratio
of the tire's sidewall height in relation to its tread width expressed
in percentage. Conventional tires have a height/width ratio of 60 or
more.
The performance of low-aspect-ratio tires is particularly sensitive to
improper inflation pressure. It is therefore important that low
aspect ratio tires are inflated to the specified pressure and that the
inflation pressure is regularly checked and maintained. Tire pres
sures should be checked at least once a month and always before a
long trip~
page 353, "Checking tire pressure".
What you can do to avoid tire and rim damage
Low aspect ratio tires can be damaged more easily by impact with
potholes, curbs, gullies or ridges on the road, particularly if the tire
is underinflated.
In order to minimize the occurrence of impact damage to the tires
of your vehicle, we recommend that you observe the following precautions: •
Always maintain recommended inflation pressures. Check your
tire pressure every 2,000 miles (3,000 km) and add air if necessary.
• Drive carefully on roads with potholes, deep gullies or ridges.
The impact from driving through or over such obstacles can
damage your tires. Impact with a curb may also cause damage to
your tires.
• After any impact, immediately inspect your tires or have them
inspected by the nearest authorized Audi dealer. Replace a
damaged tire as soon as possible.
• Inspect your tires every 2,000 miles (3,000 km) for damage and
wear. Damage is not always easy to see. Damage can lead to loss of
air and underinflation, which could eventually cause tire failure. If
you believe that a tire may have been damaged, replace the tire as
soon as possible.
• Th ese tires may wear more quickly than others.
• Please also remember that. while these tires deliver responsive
handling, they may ride less comfortably and make more noise than
other choices.
Reduced performance in winter/cold season
conditions
All tires are designed for certain purposes. The low aspect ratio,
ultra high performance tires originally installed on your vehicle are
intended for maximum dry and wet road performance and handling.
They are not suitable for cold, snowy or icy weather conditions. If
you drive under those circumstances, you should equip your vehicle
with all -season or winter tires, which offer better traction under
those conditions. We suggest you use the recommended snow or all -season tires specified for your vehicle, or their equivalent.
Refer to~
page 363for more detailed information regarding winter
tires. •
Page 383 of 426

_________________________________________________ F_ u_ s_ e_s _ a_n _d_ b_ u _ lb_ s _ __._
Fuses and bulbs
Fuses
Replacing a fuse
A problem in the electrical system may be caused by a
blown fuse.
Fig . 307 Ins trument
pa nel left: Face c over
F ig . 308 I nst rume nt
pa nel left: Co ntent
F ac e cover
- Locate the fuse which belongs to the component which
failed.
- Switch off the ignition and the e lectr ica l component
affected. - Carefully p
ry t he face cover off the instr umen t pane l
using the ignition key or a screwdriver~ fig. 307.
- Rem ove the plastic clip @ from i ts retainer in the face
cove r~ fig. 308, p lace i t over the questionable fuse and
remove the fuse.
- Replace a blown fuse (recognizable by the melted metal
str ip inside) wi th a f use of the
same amperage.
The individual circuits are protected by fuses. T he fuse panels with
the fuses are located on the left and right front faces of the instru
ment pane l behind a cover and in the right storage area in the
luggage compartment.
There is a plastic clip @ in the cover on the lef t side of the instru
ment pane l, which can be used to remove the fuses . The crank © is
used for emergency operation of the Panoramic sliding sun roof *.
You w ill also find a label on both covers in the instrument panel with
the fuse layout © for the corresponding fuse panel.
& WARNING
Nev er replac e a fuse with one that ha s a high er amperag e rati ng.
• A fu se w ith a to o high ampe rage could damage the ele ctr ical
pa rt a nd cause a fire .
0 Note
• On no account should fuses be repaired (e .g. patched up wi th tin
foil or wire) as this may cause serious damage elsewhere in the e lec
trica l circuit o r cause fire.
• If a fuse blows repeatedly, do not keep replacing it. Instead , have
the cause of the repea ted short circuit or overload located and fixed.
ti>
Vehicle care Do-it-yourself service Technical data
Page 385 of 426
Fuses and bul bs 11111 ________________________________ ..:....:,:_=-.::..:....:.;.:_.:..:..,_,;__,;____,J
....
No.
1
-
2
3
4
5
6
Eq uipm ent
Headlight electronic system (left side of vehi -
cle)
Adaptive Cruise Control
Not used
Audi lane assis t
Not used
Terminal 15 (interior)
Oil level sensor
8 Diagnostic connector
9 Automatic dipping interior mirror
10 Homelink
1 1 Control module Gateway
12 Headlight range adjustment
Amps
10
5
10
5
5
5
5
5
5
5
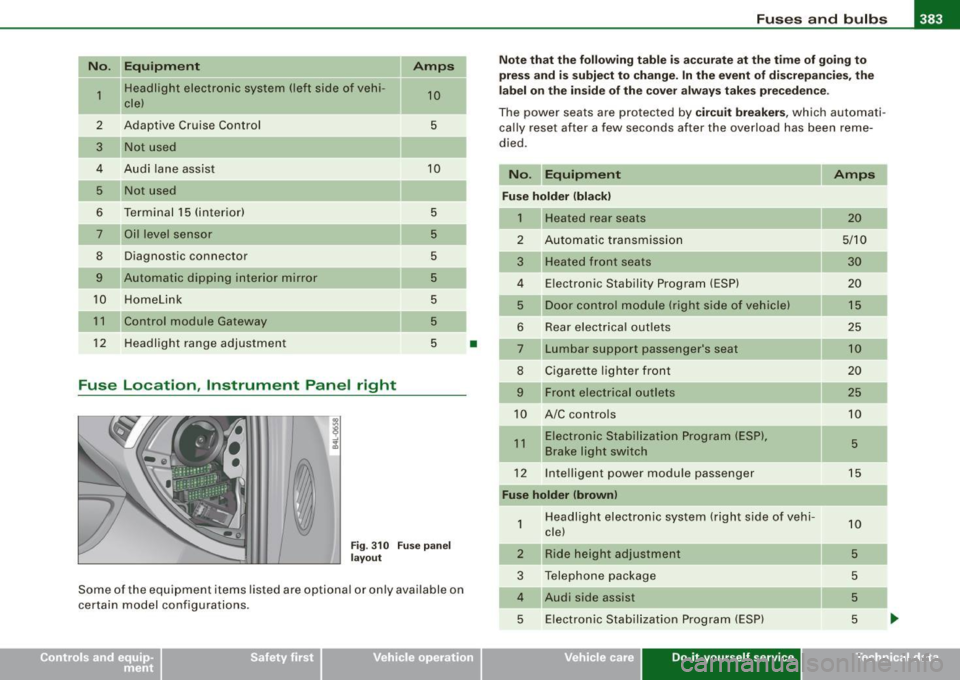
Fuse Location , Instrument Panel right
Fi g. 310 F use pane l
l ayo ut
Some of the equipment items listed are optional or only avai lable on
certain model configurations .
•
Note that th e fo llo wi ng ta ble is acc urate a t the time of goi ng to
pre ss and is subject to change. In th e event of di screpan cies, t he
l a b el on the ins ide o f th e cover a lw ays ta ke s prec eden ce.
The power seats are protected by circ uit breakers , which automati
ca lly reset af ter a few seconds after the overload has been reme
died .
No. Equipm ent
Fu se holder (bla ck )
1 Heated rear seats
2 Automatic transmission
3 Heated front seats
4 E lectronic Stability Program (ESP)
5 Door control module (right side of vehicle)
6 Rear electrical out
lets
7 Lumbar support passenger's seat
8 Cigarette lighter front
9 Front electrical outlets
10 A/C controls
1 1 Electronic Stabilization Prog ram (ESP),
Brake light switch
12 Inte lligent power modu le passenger
Fuse holder (brown )
1
2
3
Headlight electronic system (right side of vehi
cle)
Ride height adjustment
Telephone package
4 Audi side assist 5 E lectronic Stab ilizat ion Program (ESP)
Vehicle care Do-it-yourself service
Amps
20
5/10
30 20
15
25
10
20
25
10
5
15
1 0
5
5
5
5
-
irechnical data
Page 386 of 426
11111 Fuses and bulbs ..._ ____ .;__...;_;,;_ _______________________________ _
No. Equipment Amps
6 Automatic transmission
5/20
7 Electronic Stabilization Program (ESP) 5
8 Shift gate automatic transmission
5
9 Advanced Parking System 5
10 Airbag 5
1 1 Heated rear seats 5
12 Air-conditioning
5
Fuse holder (red)
1 Not used
2 Not used
3 Not used
4 MMI Display 5
5 Telephone, telematics, cell phone package
5
6 MMI, antenna amplifier
15
front light unit 5/7,5
7 Panoramic sliding sunroof segment 1 20
8 Panoramic sliding sunroof segment 2 20
9 Panoramic sliding sunroof sunblind 20
10 CD player, DVD drive
5
11 Window regulators (right side of vehicle) 35
12 Rear air-conditioning controls 10
•
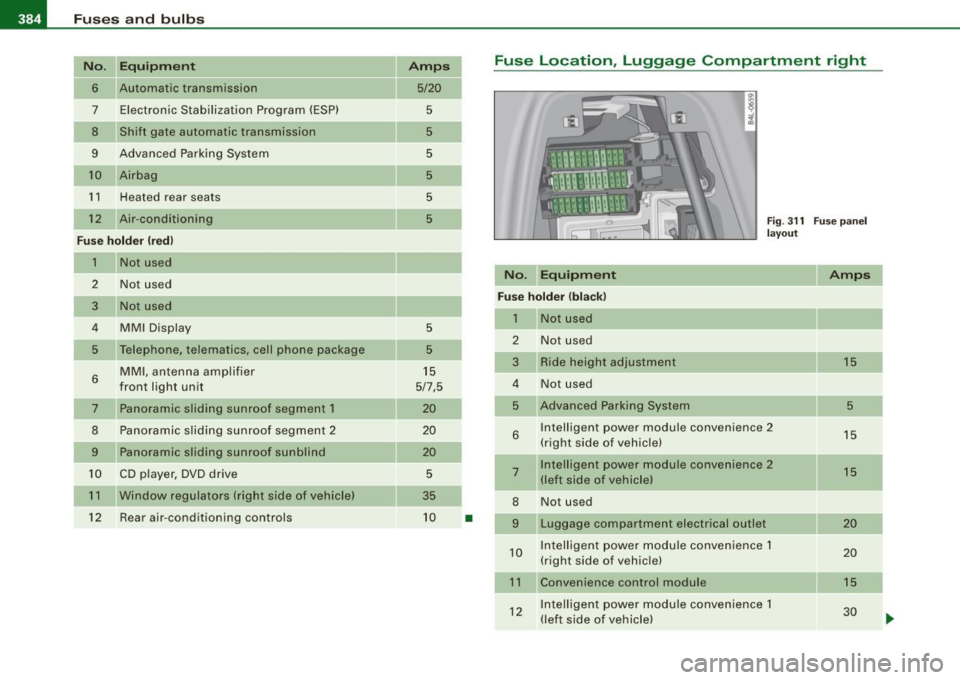
Fuse Location, Luggage Compartment right
No. Equipment
Fig. 311 Fuse panel
layout
Amps
Fuse holder (black)
1 Not used
2 Not used
3 Ride height adjustment
15
4 Not used
5 Advanced Parking System 5
6 Intelligent power module convenience 2
15
(right side of vehicle)
7 Intelligent power module convenience 2
15
(left side of vehicle)
8 Not used
9 Luggage compartment electrical outlet 20
10 Intelligent
power module convenience 1
20
(right side of vehicle)
11 Convenience control module 15
12 Intelligent power module convenience 1
30
(left side of vehicle)
Page 387 of 426

_________________________________________________ F_ u_ s_ e_s _ a_n _ d_ b_ u_lb _ s __ llll
No . Equipm ent Amps No. Equipm ent Amps
Fuse holder (brow n) 10 Trailer hitch (left side of vehicle) 20
1 Not used 11 Trailer hitch (right side of v ehicle) 20
2
Not used 12 Not used •
3 Not used
4 Not used Bulbs
5 K -box (MMll, antenna amplifier 5
Not used Replacing light bulbs
7 Navigation 5 For your safety, we recommend that you have your autho-
Digital Signal Processing (DSP)/ rized Audi dealer replace burned out bulbs for you .
8 BOSE amplifier 30
It is becoming increasingly more and more difficult to replace --
9 Digital Tuner 5 vehic le light bu lbs since in many cases, other parts of the car must
10 Bang & Olufsen amplifier 30 first be removed before you are able to get to the bulb. This applies
especially to the light bulbs in the front of your car which you can
11 Rear view camera 5 only reach through the engine compartment.
12 Not us ed
Sheet metal and bulb holders can have sharp edges that can cause
Fuse holde r (re d ) serious cuts, and parts must be correctly taken apart and then prop -
1 Not used erly put back together to he
lp prevent breakage of parts and long
term damage from water that can enter housings that have not
2 Not used been properly resealed.
3 Not used For your safety, we recommend that you have your authorized Audi
4 Not used dea
ler replace any bu lbs for you, since your dealer has the proper
tools, the correct bulbs and the expertise.
5 Not used Gas disch arge lamp s (Xeno n ligh ts)*:
6 Soft close 20 Due to the high electrica
l voltage, have the bulbs replaced by a qua I -
7 Power rear lid 30 ified technician. Headlights with Xenon light can be identified by the
8 Power rear lid 30 h igh voltage sticker . .,,,
9 Trailer hitch 15
• Do-it-yourself service
Page 395 of 426
________________________________________________ E _m_ e_r.:g :;,. e_ n_c ...: y:.- s_ i_ t _u _a_ t_ i_ o _ n_ s __ lllll
•
- Inse rt a rubbe r pad betwee n th e floo r ja ck/work shop
h oi st an d the lift ing p oin ts.
If you must lift your vehicle with a floor jack to wo rk underneath , be
sure the veh icle is safely supported on stands intended for this
purpose .
Front lifting point
T he lift ing p oint i s located o n th e flo or pan rei nforce men t about at
the same l eve l as th e jac k m ounting point=> page
392 , fig. 3 19 . Do
not lift the vehicle at the vertical sill reinforcement.
Rear lifting point
The li fti ng poi nt is located on the ve rt ical re in forceme nt of t he low er
sill for the on board jack=> page
392 , fig. 320.
Lifting with vehi cle ja ck
R efer to => page
376 .
& WARNING
• To reduce the risk of serious injury and vehicle damage.
-Always l ift the vehicle only at the special workshop hoist and
floor jack lift points illustrated => page
392 , fig. 319 and
=> page
392 , fig. 320.
- Failure to lift the vehicle at these points could cause the
vehicle to tilt or fall from a lift if there is a change in vehicle
weight distribution and balance . This might happen , for
e x ample , when heavy components such as the engine block or
transmission are removed .
• When remo ving heavy components like these, anchor vehicle
to hoist or add correspond ing we ights to maintain the center of
gravity. Otherwise , the vehicle might tilt or slip off the hoi st,
c ausing serious personal injury .
0 Note
• Be awar e of the fo llow ing po ints before l ifting t he ve hicle:
- The vehicle should never be lifted or jacked up from unde r
neath the engine oil pan , the transmission housing , the front or
rear a xle or the body side members. This could lead to serious
damage.
- To avoid damage to the underbody or chassis frame, a rubber
pad must be in serted between the floor jack and the lift po ints .
- Before driving over a workshop ho ist, check that the vehicle
weight does not exceed the permissible lifting capacity of the hoist.
- Before driving over a workshop hoist , ensure that there is
sufficient clearance between the hoist and low parts of the
vehicle. •
Do-it-yourself service