service AUDI Q7 2009 Owner´s Manual
[x] Cancel search | Manufacturer: AUDI, Model Year: 2009, Model line: Q7, Model: AUDI Q7 2009Pages: 426, PDF Size: 97.13 MB
Page 6 of 426

Table of contents
Do-it-yourself service ... 369
What do I do now? . . . . . . . . . . . . . 370
J ack, too ls and inflatable spa re t ire 3 70
Changing a wheel . . . . . . . . . . . . . . 3 73
Fuses and bulbs . . . . . . . . . . . . . . . . 381
Fuses . . . . . . . . . . . . . . . . . . . . . . . . . . 381
Bu lbs ............. ...... ....... 385
E m ergency si tuatio ns . . . . . . . . . . 387
Genera l ... ............ ... ..... .
Starting by pushing or towing ... .
Start ing with jumper cab les ..... .
u f. b l
se o Jumper ca es ........... .
Emerge ncy towi ng wi th comme rcia l 387
387
387
388
tow truck . . . . . . . . . . . . . . . . . . . . . . 390
Lif ting vehicle . . . . . . . . . . . . . . . . . . 392
Technical data
General i nform ati on 39
5
396
E xpl anation of technical data 396
Vehic le identification . . . . . . . . . . . . 396
Displaying Vehic le Identification
Number in the MMI . . . . . . . . . . . . . 397 Weights
Dimensions . ... ............ ... .
Da ta
280 hp, 6 -cylinde r engine, with a ll
w hee l d rive ... ......... ...... . .
350 hp, 8 -cylinder engine, with all
whee l drive ............. ...... .
Consumer Informat ion .... .... .
Wa rranty coverages ...... ..... .
Op erating yo ur vehicle outs ide th e
U.S.A. or Canada ...... ... .... . .
Audi Se rv ice Repa ir Manuals and
Literature ..................... .
Maint enance .. .. ... ... ... .... .
Add it ional accessor ies,
mod ificat ions and parts
rep lacement ... .. ... .. .. .. ... . .
Dec laration of Compliance,
Telecommunications and E lectronic
Systems ... .... ... ... .... ... .. . 397
398
399
399
400
4 01
401
401
401
401
403
40 4
Alphabetical index . . . . . . 407
Page 7 of 426

Vehicle literature
In addition to this Owner's Manual, your Audi comes with the
• MMI Operating Instructions
• Warranty
& Maintenance booklet.
If you are missing one of these publications, or if you believe that
the informat ion is not comp lete, contact your authorized Audi
dea ler for assistance .
MMI Operating Instructions
contain detailed description of the Audi Multi Media Interface (MMD
including the navigation system, the sound system and the hand
held phone .
The Warranty & Maintenance booklet
explains how you can keep your Audi in top driving condition by
having it serviced regu lar ly and contains detailed information about
the warranties covering your Audi. Always have the booklet with you
when you take your vehicle to an authori zed Audi dea ler for service.
Your Audi Service Adviser will record each schedu led service and
can answer any ques tions y ou may have regarding how to maintain
your vehicle.
In Canada,
the vehicle literature is a lso avai lable in French. To obtain a copy,
co ntact your dealer or write to :
Au Canada, on peut se procurer un exemplaire en fran9ais de ce
document aupres du concessionna ire ou de:
Volkswagen Canada, Inc .
Cl ient Assistance
Assistance a la Clientele
777 Bay ly Street, West,
Ajax , Ontario L 1 S 7G7
Controls and equip
ment Safety first Vehicle operation
V
ehi cle litera tur e
If you sell your Audi
a ll l iterature should be left in the vehicle to make the Warranty terms
as well as all operating, safety and ma intenance information avail
able to the next owner .
If you change your address or if you bought this
Audi used
be sure to send in a "Notice of Address Change"/ "Notice of Used
Car Purchase" post card. This card can be found in the Warranty
&
Ma intenance booklet or obtained from your authorized Aud i dealer.
It i s in your own int ere st t hat we are able to contact you should the
need arise .•
Vehicle care Do-it-yourself service Technical data
Page 9 of 426

Controls and equipment Safety first
Vehicle operation Vehicle care
About this Owner's Manual
Do-it-yourself service Technical data
Page 27 of 426

Driver information display
Introduction
General notes
The driver information display inside the instrument
cluster provides you, the driver, with much useful infor
mation.
F ig. 8 Inst rume nt
c luster: ce nte r display
Information from the Driver Information System is shown in the
display in the center of the instrument cluster.
When you turn on the ignition and whi le you are driving, some func
tions and vehicle components are scanned for their operating status . Malfunctions or required service procedures are signa lled
audibly and shown by red and yellow lighted symbols and
reminders to the driver in the display .
The driver is also shown information about radio and CD operation and directions for the navigation system . You can find additional
information on these subjects in the MMI manual.
The Driver Information System provides the following functions:
Con tro ls and eq uip
ment
Dri ver inf orm atio n di spl ay
Sound system display ~ page26
Outside air temperature ~ page26
Digital speedometer ~ page27
Door open indicator ~ page27
Defective light bulb ~ page27
Service interval display ~ page28
Auto Check system ~ page30
Driver informat ion ~ page30
Speed limiter ~ page29
Trip computer ~ page40
Adaptive Air Suspension* ~ page209
Tire pressure monitoring ~ page42
Selector lever position
~ page 185
[ i ] Tip s
In the event of a malfunction either a red or yellow icon appears in
the display. Red symbols indicate
D ange r~ page 31. Ye llow
symbols indicate a
Warning~ page 35. •
Vehicle care I I irechnical data
Page 30 of 426
Driver information display
[ i J Tips
Have the bulb replaced or the connection repaired by your autho
rized Audi Service department. •
Service interval display
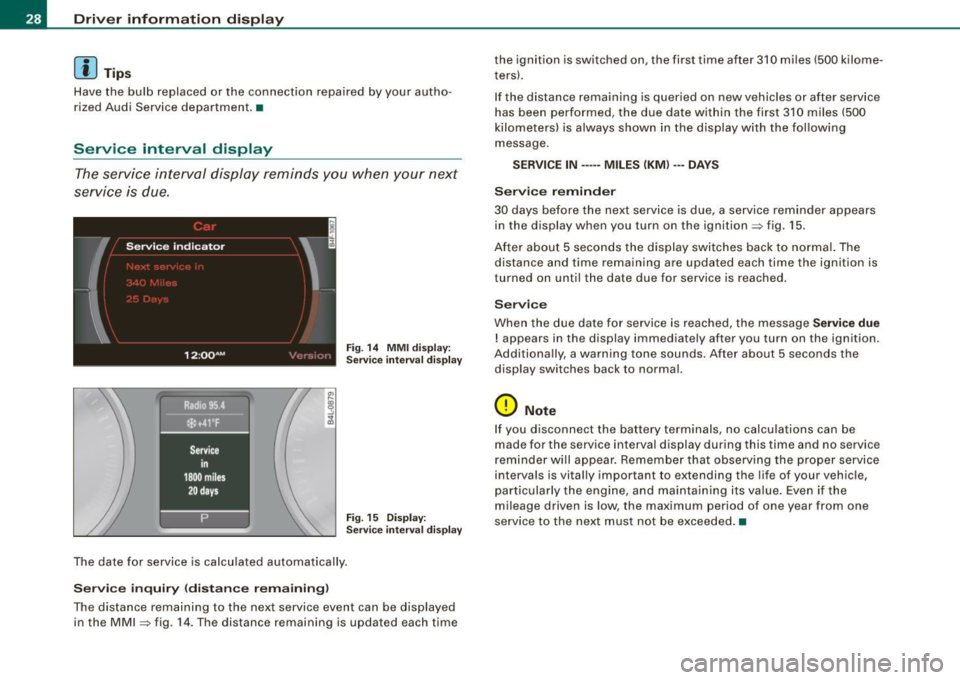
The service interval display reminds you when your next
service is due.
Fig . 14 MMI display:
Service interval display
Fig. 15 Display:
S er vice interval display
The date for service is calcula ted automatically .
Service inquiry (distance remaining )
The distance remaining to the next service event can be displayed
in the MMI => fig. 14. The distance remaining is updated each time the ignition is switched on, the first time after 310 miles (500 kilome
t
ers).
If the distance remaining is queried on new vehicles or after service
has been performed, the due date within the first 310 miles (500
kilometers) is always shown in the display with the following
message.
SERVICE IN ----- MILES (KM) ---DAYS
Service reminder
30 days before the next service is due, a service reminder appears
in the display when you turn on the ignition=> fig. 15.
After about 5 seconds the display switches back to normal. The
distance and time remaining are updated each time the ignition is
turned on until the date due for service is reached.
Service
When the due date for service is reached, the message Service due
! appears in the display immediately after you turn on the ignition .
Additionally, a warning tone sounds . After about 5 seconds the
display switches back to normal.
0 Note
If you disconnect the battery terminals, no calculations can be
made for the service interva l display during this time and no service
reminder will appear. Remember that observing the proper service
interva ls is vitally important to extending the life of your vehicle,
particularly the engine, and maintaining its value. Even if the
mileage driven is low, the maximum period of one year from one
service to the next must not be exceeded.•
Page 35 of 426
& WARNING (continued)
vehicle control and an accident. Have your vehicle repaired immediately by your authorized Audi dealer or a qualified workshop.
Drive slowly and avoid sudden, hard brake applications. •
Engine cooling system malfunction -L
A mo/function in the engine cooling system must be
repaired as soon as possible.
When the _ t symbol in the display blinks, then either the
engine coolant temperature is too high, or the coolant level
is too low. An additional driver message can also be
displayed by pressing the [ CHECK] button:
Switch off engine and check coolant level
- Pull off the road .
- Stop the vehicle.
- Turn off the engine.
- Check coolant level => page 338.
- Add coolant if necessary => page 339.
- Continue driving only after the engine coolant
warning/indicator light goes out.
- Contact your authorized Audi dealer for assistance if
necessary.
If the engine coolant level is correct, then the radiator fan may be
the cause of the malfunction.
If the O warning symbol (alternator malfunction) also lights up on
the instrument panel~
page 32, then the fan belt may be damaged .
Controls and equip
ment
Driver information display
& WARNING
• If your vehicle should break down for mechanical or other
reasons, park at a safe distance from moving traffic, turn off the
engine and turn on the hazard warning lights
~ page 76, "Emer
gency flasher
A".
• Never open the hood if you see or hear steam or coolant
escaping from the engine compartment -you risk being scalded.
Wait until you can no longer see or hear steam or coolant
escaping.
• The engine compartment of any vehicle is a dangerous area.
Before you perform any work in the engine compartment, turn of
the engine and allow it to cool. Follow the warning stickers
~ page 324, "Engine compartment".
0 Note
Do not continue driving if the _f_ symbol illuminates. There is a
malfunction in the engine cooling system -you could damage your
engine. •
Engine oil pressure malfunction "l::;r.
The red engine oil pressure warning symbol requires
immediate service or repair. Driving with a low-oil -pres
sure indication is likely to inflict severe damage to the
engine.
If the 'l::::11 symbol appears in the display and blinks, the oil
pressure is too low. An additional driver message can also
be displayed by pressing the [CHECK] button:
Switch off engine and check oil level
Immediate actions
- Pull off the road.
I • •
Page 36 of 426

Driver information display
-Stop the vehicle.
- Turn off the engine .
-Check the engine oil level with the dipstick=:, page 335.
Dipstick readings checks too low
-Top off oil to the proper level =:, page 336.
-Make sure that the oil pressure warning symbol "t=7':
appears no longer in the display before you start driving
again.
Dipstick reading checks OK
If the oil pressure warning symbol "t=7': starts flashing
again even though the engine oil level checks OK on the
dipstick,
do not continue driving and do not let the
engine run in idle.
Instead, contact your authorized Audi
dealer for assistance .
[ i] Tips
• The engine oil pressure symbol ~ is not an indicator for a low
engine oil level. Do not rely on it . Instead, check the oil level in your
engine at regular intervals, preferably each time you refuel, and
always before going on a long trip .
• The yellow oil level warning indication requires oil refill or
workshop service without delay . Do not wait until the red oil pres
sure warning
~ starts to flash before you respond to the low oil
level warning _ . By then, your engine may already have suffered
serious damage. •
Steering malfunction i
If there is a malfunction in the electronic steering column
lock, the steering cannot be unlocked.
If the i symbol in the display blinks, there is a malfunction
i n the electronic steering column lock. An additional dr iver
message can also be displayed by pressing the
I CHECK]
button:
Do not drive vehicle: Steering defective
-Contact your nearest authorized Audi dealer or qualified
workshop .
- Do
not tow your vehicle.
& WARNING
Your vehicle must not be towed in the event of a malfunction in the
electronic steering column lock because it cannot be steered due
to the locked steering .
If it is towed with the steering locked, there
is the risk of an accident. •
Ignition lock malfunction ~
A malfunction in the ignition lock must be repaired imme
diately.
If the .Pe symbol in the display blinks, there is a malfunction
in the electronic ignition lock. An additional driver message
can also be displayed by pressing the
(CHECK] button:
Ignition lock defective. Contact workshop!
-Do not turn the eng ine off.
- Drive immediately to an authorized Audi dealer to have
the malfunction corrected.
~
Page 50 of 426
Opening and closing
Opening and closing
Keys
Key set
C !
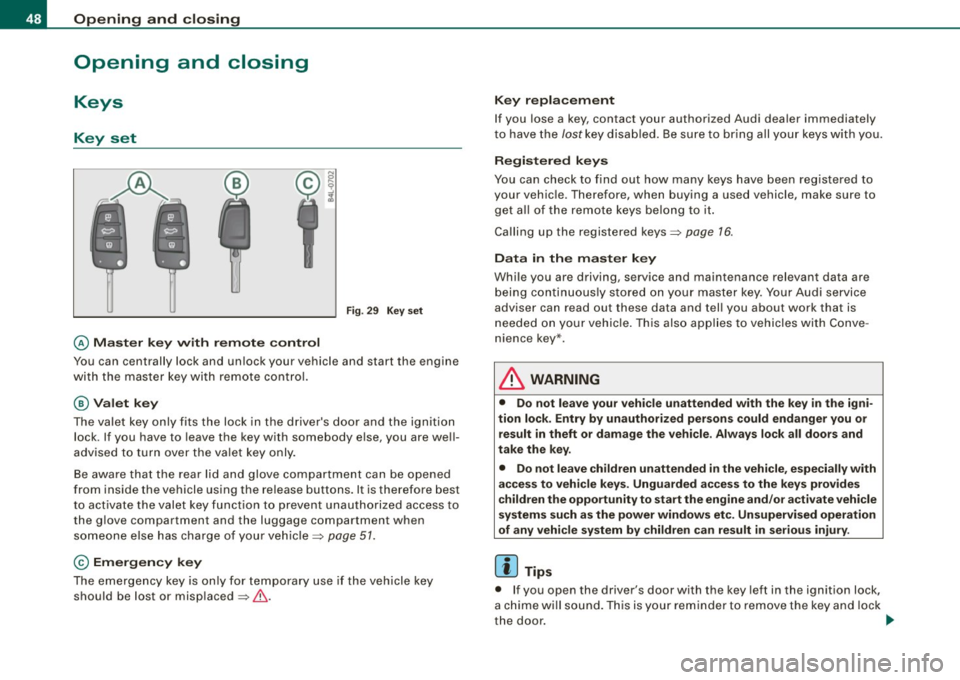
@ Master key with remote control
Fig. 29 Key set
You can centrally lock and unlock your vehicle and start the engine
with the master key with remote control.
@Valet key
The valet key only fits the lock in the driver's door and the ignition
lock . If you have to leave the key with somebody else, you are well
advised to turn over the valet key only.
Be aware that the rear lid and glove compartment can be opened
from inside the vehicle using the release buttons. It is therefore best
to activate the valet key function to prevent unauthorized access to
the glove compartment and the luggage compartment when
someone else has charge of your vehicle~
page 51.
© Emergency key
The emergency key is only for temporary use if the vehicle key
should be lost or misplaced ~& .
Key replacement
If you lose a key, contact your authorized Audi dealer immediately
to have the
lost key disabled. Be sure to bring all your keys with you.
Registered keys
You can check to find out how many keys have been registered to
your vehicle. Therefore, when buying a used vehicle, make sure to
get all of the remote keys belong to it.
Calling up the registered keys~
page 76.
Data in the master key
While you are driving, service and maintenance relevant data are
being continuously stored on your master key. Your Audi service
adviser can read out these data and tell you about work that is
needed on your vehicle. This also applies to vehicles with Conve
nience key*.
L1}. WARNING
• Do not leave your vehicle unattended with the key in the igni
tion lock. Entry by unauthorized persons could endanger you or result in theft or damage the vehicle. Always lock all doors and
take the key.
• Do not leave children unattended
in the vehicle, especially with
access to vehicle keys. Unguarded access to the keys provides
children the opportunity to start the engine and/or activate vehicle
systems such as the power windows etc. Unsupervised operation
of any vehicle system by children can result in serious injury.
[ i] Tips
• If you open the driver's door with the key left in the ignition lock,
a chime will sound. This is your reminder to remove the key and lock
the door.
~
Page 86 of 426
Clea r vis io n
Service position
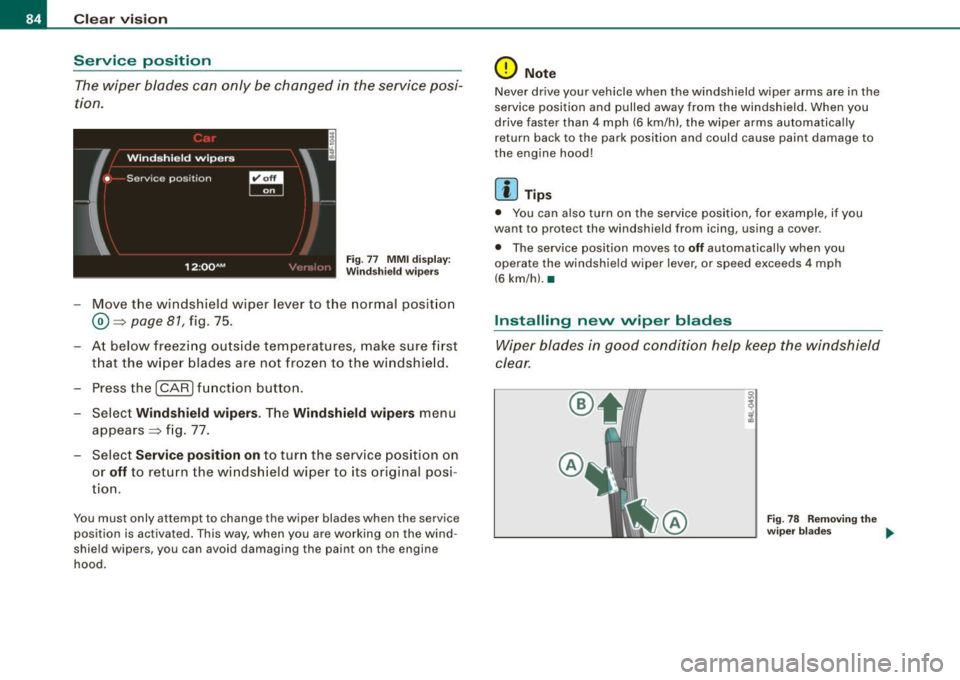
The wiper blades can only be changed in the service posi
tion.
Fig. 77 MMI d isp lay:
Winds hiel d wipers
- Move the windshield w iper lever to the normal posit ion
® =>page 81, fig. 75 .
- At below freezing outside temperatures, make sure first that the w iper blades are not frozen to the windshie ld .
- Press the !CAR) fu nction button .
- Select
Wind sh ield wipers . The Wind shield wipe rs menu
appears => fig . 77.
Select
Servi ce position on to turn the service position on
or
off to return the windshield wiper to its original posi
tion.
You must only attempt to change the wiper blades when the service
position is activated. This way , when you are working on the wind
shield wipers, you can avoid damaging the paint on the engine
hood.
0 Not e
Never drive your vehicle when the windshield wiper arms are in the
service position and pulled away from the windshield . When you
drive fas ter than 4 mph (6 km/h), the wiper arms automatically
return back to th e park position and could cause paint damage to
the eng ine hood!
[ i ] Tip s
• You can also turn on the service position, for example, if you
want to protect the windshi eld from icing, using a cover .
• The service position moves to
off automatically when you
operate the windshi eld wiper lever , or speed exceeds 4 mph
(6 km/h). •
Installing nevv wiper blades
Wiper blades in good condition help keep the windshield
clear.
®
Fig. 78 Remo ving the
wiper b lades ....
Page 87 of 426
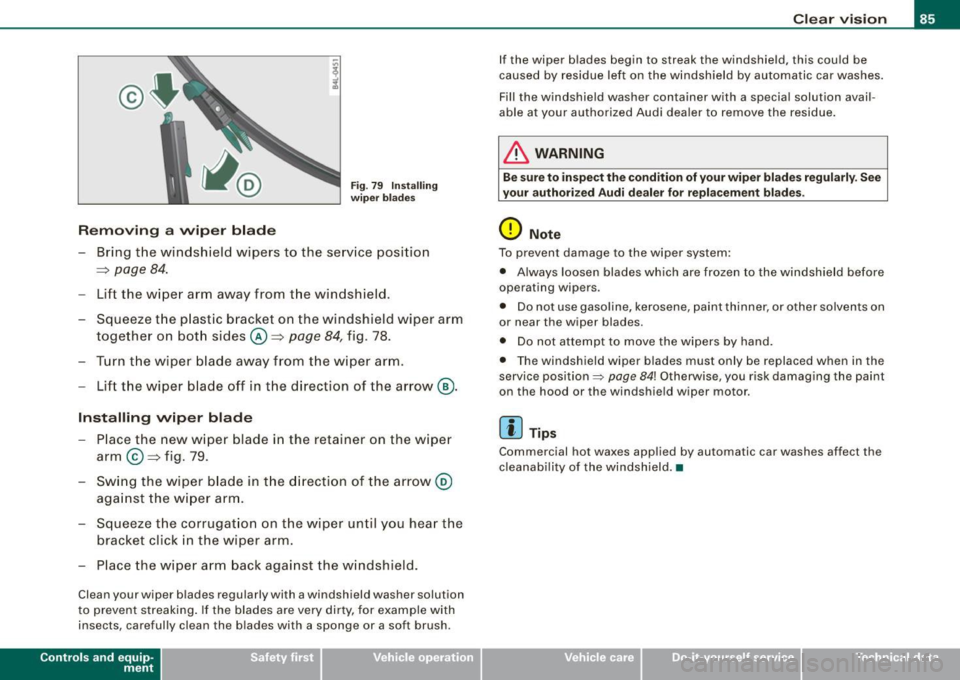
Removing a wiper blade
Fig. 79 Installing
wiper blades
-Bring the windshield wipers to the service position
=> page
84.
- Lift the wiper arm away from the windshield .
- Squeeze the plastic bracket on the windshield wiper arm
together on both sides©=> page
84, fig . 78.
- Turn the wiper blade away from the wiper arm.
- Lift the wiper blade off in the direction of the arrow ®·
Installing wiper blade
- Place the new wiper blade in the retainer on the wiper
arm ©=> fig. 79 .
- Swing the wiper blade in the direction of the arrow @
against the wiper arm.
- Squeeze the corrugation on the wiper until you hear the
bracket click in the wiper arm.
- Place the wiper arm back against the windshield.
Clean your wiper blades regularly with a windshield washer solution
to prevent streaking. If the blades are very dirty, for example with
insects, carefully clean the blades with a sponge or a soft brush .
Contro ls and eq uip
ment
Clear vision
If the wiper blades begin to streak the windshield, this could be
caused by residue left on the windshield by automatic car washes.
Fill the windshield washer con tainer with a special solution avail
able at your authorized Audi dealer to remove the residue.
& WARNING
Be sure to inspect the condition of your wiper blades regularly. See
your authorized Audi dealer for replacement blades .
0 Note
To prevent damage to the wiper system:
• Always loosen blades which are frozen to the windshield before
operating wipers .
• Do not use gasoline, kerosene, paint thinner, or other solvents on
or near the wiper blades .
• Do not attempt to move the wipers by hand.
• The windshield wiper blades must only be replaced when in the
service position~
page 84! Otherwise, you risk damaging the paint
on the hood or the windshield wiper motor.
[ i] Tips
Commercial hot waxes applied by automatic car washes affect the
cleanability of the windshield. •
Vehicle care I I irechnical data