tire pressure AUDI Q7 2010 Owner´s Manual
[x] Cancel search | Manufacturer: AUDI, Model Year: 2010, Model line: Q7, Model: AUDI Q7 2010Pages: 390, PDF Size: 93.04 MB
Page 5 of 390
Safety belts ................... 199
General notes ................. 199
Why safety belts? . . . . . . . . . . . . . 200
Safe ty be lts . . . . . . . . . . . . . . . . . . 203
Safety belt pretensioners . . . . . . . 207
Airbag system ................ 209
I mpor tant things to know . . . . . . 209
Front airbags ............ ..... 213
Monitoring the Advanced Airbag
System ................... ... 220
Side airbags . . . . . . . . . . . . . . . . . . 225
Side curtain airbags . . . . . . . . . . . . 228
Child Safety ................... 231
Important things to know ...... 231
Child safety sea ts . . . . . . . . . . . . . 236
Installing a child safety sea t . . . . 241
LATCH Lower anchorages and
t ethers for children . . . . . . . . . . . . 244
Additional Information ......... 251
Vehicle operation ...... 2s2
Intelligent technology ........ 252
Notice about data recorded by
vehicle control modules . . . . . . . . 252
Electronic Stabilization Program
( E SP) ........................ 252
Braking . . . . . . . . . . . . . . . . . . . . . . 255
Servotronic® -advanced power
steering system ............... 257
Dr iving with your quattro® . . . . . . 258
Energy management . . . . . . . . . . . 259
Driving and environment ...... 261
The first 1,000 miles (1,500 km)
and afterwards ........... .... 261
Catalytic converter . . . . . . . . . . . . 262
Diesel pa rt ic u late filter . . . . . . . . . 263
Controls and equip
ment Safety first
Avoid damaging
the veh icle 263
Ope rate your vehicle economically
and m inimize pollution . . . . . . . . 263
Driving off road ............... 266
Dr iving in difficult road cond itions
and offroad . . . . . . . . . . . . . . . . . . 266
Trailer towing . . . . . . . . . . . . . . . . 269
Driving with a trailer . . . . . . . . . . . 269
Trailer towing tips . . . . . . . . . . . . . 272
Vehicle care .............. 274
Cleaning and protection ...... 274
General informa tion . . . . . . . . . . . 274
Care of ex terior . . . . . . . . . . . . . . . 274
Care of interior . . . . . . . . . . . . . . . 281
Fuel supply and filling your fuel
tank ..........................
287
Fuel supply . . . . . . . . . . . . . . . . . . . 287
Diesel fuel
Fuel tank ............. ....... .
TOI clean diesel .... ....... ... . 288
289
292
Checking and filling . . . . . . . .
. . . 296
Engine hood . . . . . . . . . . . . . . . . . . 296
Engine oil . . . . . . . . . . . . . . . . . . . . 299
Engine cooling system . . . . . . . . . 304
Brake fluid . . . . . . . . . . . . . . . . . . . 307
Battery . . . . . . . . . . . . . . . . . . . . . . 308
W indshield/headl igh t washer
container .................... 312
Tires and wheels ......... ..... 314
T ires
Tire pressure monitoring system 314
333
Table of contents
Do-it-yourself service
What do I do now? ..........
.
Jack, tools and infla table spare
tire ........................ .
Changing a wheel .... ........ .
Fuses and bulbs ............. .
Fuses ...................... .
Bulbs ......... .......... ... .
Emergency situations ....... .
General ..................... .
Starting by pushing or towing ..
Starting with jumper cables ... .
Use of jumper cables ......... .
Emergency towing with
commercial tow truck ........ .
Lifting vehicle ............... .
Technical data
General information
Explana tion of technical data .. .
Vehicle iden tification ......... .
We ights .................... .
Dimensions ................. .
Data ........... ........ .... .. .
280 hp, 6-cylinder engine, with all
whee l dr ive ................. .
350 hp, a-cylinder engine, with all
whee l dr ive ................. .
225 hp, 6-cylinder engine, with all
wheel dr ive .............. ... .
Consumer Information ...... .
War ranty cove rages ......... . .
Operating your vehicle ou ts ide the
U.S .A. or Canada ......... .... .
Aud i Service Repair Ma nuals and
Li terature . .................. . 336
336
336
339
346
346
350
352
352
352
352
353
355
357
360
360
360
360
361
362
363
363
364
365
366
366
366
366
Ma intenance . . . . . . . . . . . . . . . . . 366
Vehicle operation Vehicle care Do-it-yourself service Technical data
Page 17 of 390
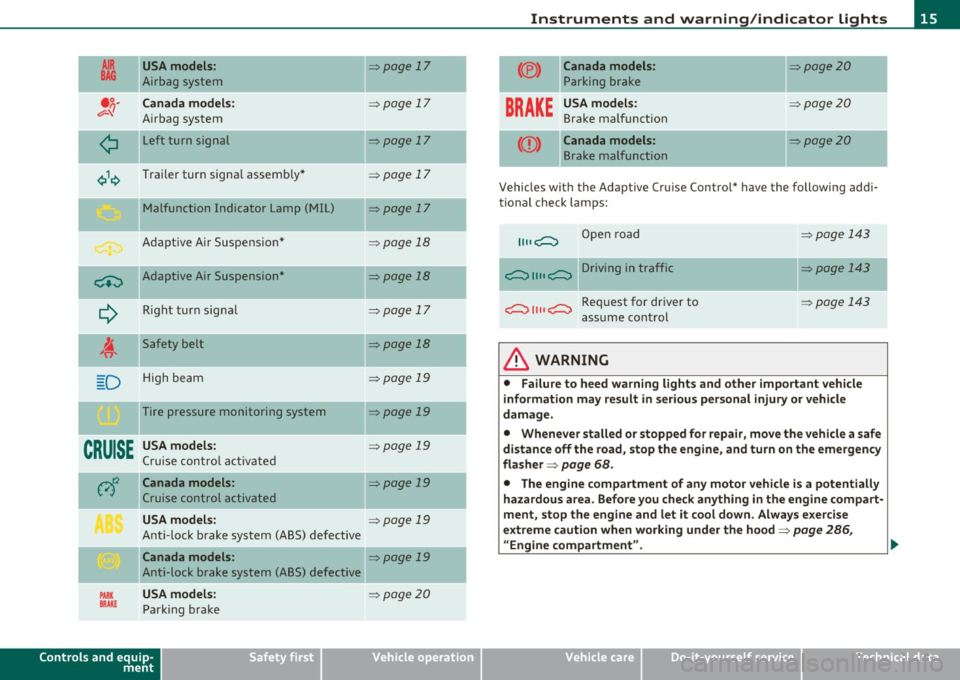
-
AIR
BAG
-
USA models:
Airbag system
Canada model s:
Airbag system
L eft turn signal
Trailer turn signa l assemb ly*
M alfunction Indicator Lamp (MIL)
Adapt ive Air Suspens ion*
ci::) Adaptive Air Suspension*
--
¢ Right turn sig na l
i Sa fety belt
D H igh beam
Tire pressure monitoring system
CRUISE
USA models:
C rui se contro l a ct ivate d
-
PARK
BRAKE
-
Canada models :
Cruise control activated
USA models:
Anti-lock brake system (ABS) defective
Canada models :
Anti-lock brake system (ABS) defective
USA models:
Park ing brake
Controls and equip
ment Safety first
=:>page 17
=:> page 17
=:>page 17
=:>
page 17
=:>page 17
=:>page 18
=> page 18
=:> page 17
=> page 18
=:> page 19
=> page 19
=> page 19
=:> page 19
=> page 19
=:> page 19
=> page 20
-
-
-
-
Instruments and warning /indicator lights
(® ) Canada models:
Parking br ake
=:>page20
---
BRAKE USA model s:
Brake ma lf u nct ion
:::::,page2 0
-- -
<
CD >
Canada models :
Brake malfunction
=:> page 20
Vehicles with the Adaptive Cru ise Control* have the following addi
ti onal check lamp s:
Open road
~ 1111 ~ Driving in traffic
~ 1111 ~ Request for dr iver to
assume con trol
& WARNING
=:> page 1 43
=:> page 143
=> page 143
• Failure to heed warning lights and other important vehicle
information may result in serious personal injury or vehicle
damage.
• Whenever stalled or stopped for repair, move the vehicle a safe
distan ce off the road, st op the engine, and turn on the emergency
flasher =:>
page 68.
• The engine compartment of any motor vehicle i s a potentially
hazardous area . Before you check anyth ing in the engine compart
ment, stop the engine and let it cool down. Always exercise
extreme caution when working under the hood=:>
page 286,
"Engine compartment".
Vehicle care Technical data
Page 21 of 390
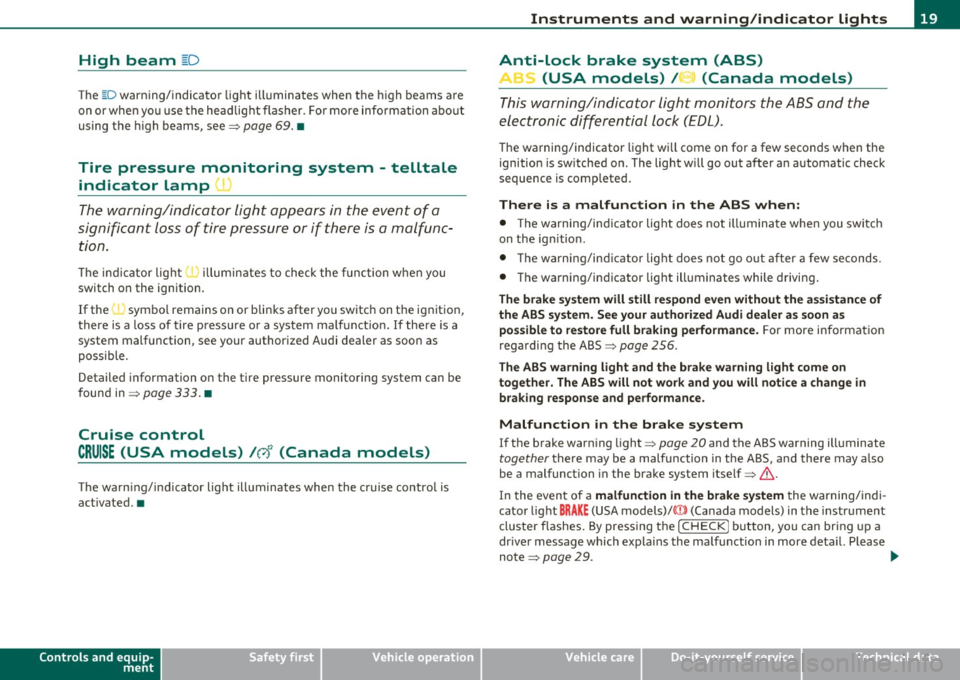
High beam ~D
The ~D warning/indicator light illuminates when the high beams are
on or when you use the headlight flasher. For more information about
using the high beams, see~
page 69. •
Tire pressure monitoring system - telltale
indicator lamp(.,
The warning/indicator light appears in the event of a
significant loss of tire pressure or if there is a malfunc
tion.
The indicator light 1.., illuminates to check the function when you
switch on the ignition.
If the
'll symbol remains on or blinks after you switch on the ignition,
there is a loss of tire pressure or a system malfunction. If there is a
system malfunction, see your authorized Audi dealer as soon as
possible.
Detailed information on the tire pressure monitoring system can be
found in~
page 333. •
Cruise control
CRUISE (USA models) /r,J' (Canada models)
The warning/indicator light illuminates when the cruise control is
activated. •
Controls and equip
ment Safety first
Instruments and warning/indicator lights
Anti-lock brake system (ABS)
A
.:> (USA models) / .... (Canada models)
This warning/indicator light monitors the ABS and the
electronic differential lock
(EDL).
The warning/indicator light will come on for a few seconds when the
ignition is switched on. The light will go out after an automatic check
sequence is completed.
There is a malfunction in the ABS when: • The warning/indicator light does not illuminate when you switch
on the ignition.
• The warning/indicator light does not go out after a few seconds .
• The warning/indicator light illuminates while driving.
The brake system will still respond even without the assistance of
the ABS system. See your authorized Audi dealer as soon as
possible to restore full braking performance.
For more information
regarding the ABS~
page 256.
The ABS warning light and the brake warning light come on
together. The ABS will not work and you will notice a change in
braking response and performance.
Malfunction in the brake system
If the brake warning light~ page 20 and the ABS warning illuminate
together there may be a malfunction in the ABS, and there may also
be a malfunction in the brake system itself~& .
In the event of a
malfunction in the brake system the warning/indi
cator light
BRAKE (USA models)/ ((D) (Canada models) in the instrument
cluster flashes. By pressing the [
CHECK! button, you can bring up a
driver message which explains the malfunction in more detail. Please
note ~
page 29. .,,_
Vehicle care Technical data
Page 24 of 390
Driver information display
Driver information display
Introduction
General notes
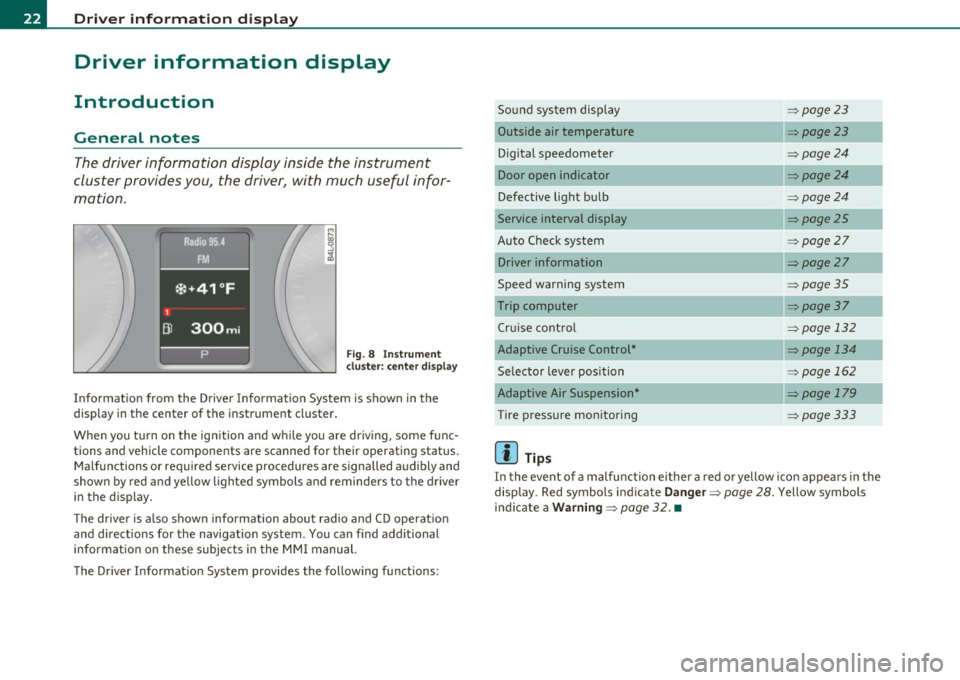
The driver information display inside the instrument
cluster provides you, the driver, with much useful infor
mation .
Fig. 8 Instrument
cl uste r: center display
Informat ion from the Driver Information System is shown in the
display in the center of the instrument cluster.
When you tu rn on the ig nition and while you are driving, some func
tions and vehicle components are scanned for their operating status. Malfunctions or required service procedures are signalled audibly and
shown by red and yellow lighted symbols and reminders to the driver
in the display.
Th e d river is also shown information about radio and CD operat ion
and directions for the navigation system. You can find additional
information on these subjects in the MMI manual.
The Driver Informat ion System provides the following functions: Sound system display
=>
page23
Outside air temperature =>page23
Digital speedometer =>page24
Door open indicator =>page24
Defective light bulb =>page24
Service interval display =>page25
Auto Check system => page27
Driver information =>page27
Speed warning system =>page35
Trip computer => page 37
Cruise control => page 132
Adaptive Cruise Control* => page 134
Selector lever position => page 162
Adaptive Air Suspension* =>page 179
Tire pressure monitoring =>page333
[ i ] Tips
In the event of a malfunction either a red or yellow icon appea rs in the
display. Red symbols indicate
Danger => page 28. Yellow symbols
ind icate a
Warning => page 32. •
Page 29 of 390
& WARNING
Always observe the post ed speed limits and adjust your speed to
s uit prevailing road , traffic and weather condition s. Never drive
your vehi cle faster than the m aximum sp eed rating of the tires
installed .•
Auto Check Control
Introduction
The Auto-Check control monitors the function of certain vehicle
featu res a nd compo nents. It s imp ly makes su re t hese featu res and
components are working properly. The Auto-Check contro l works as
long as the igni tion is on, as we ll as whenever the veh icle is d riven.
If a compone nt is malfunctioning or if the need for an urgent repair
has been detected, this will appea r in the instrument cluster display .
You will also hear an audible warn ing tone . The d isp lays are colo r
coded in e ither red or yellow depend ing on their level of prior ity.
A red symbol means
Danger , a yellow symbol ind ic a tes Warning . In
certain situations, information message for the driver appear in addi
t ion to the red and ye llow symbo ls.
Function test: automatic transmission
Th e Auto- Che ck Contro l will a utomat ica lly perfo rm a test ea ch t ime
you switch on the ignition. With the selector lever in
P or N, the
f ollowing mess age appears in t he disp lay:
When stationary apply foot brake while selecting gear.
When you a se lect a diffe rent gea r (for example : R, D , etc .), the
message w ill dis appea r and t he Auto-Check f unctio n is d isplayed.
If there is a ma lfunction, then the malfunction message will appear
abou t 15 seconds after the you start the veh icle . A t the same time
you will hea r a warni ng tone .•
Controls and equip
ment Safety first
Driver information display
Driver information messages
Dr
ive r inf orma tion messa ges a re sh ow n in the instru
ment clus ter dis play i n addition to t he red a nd yell ow
symbols.
Fig . 16 Instrumen t
clu ster: CHE CK button
For examp le, if the transm ission selector lever is not in the P posit ion
w hen the eng ine is tur ned off , the foll owing message appea rs :
Shift to P otherwise vehicle can roll away. Doors do not lock if
you are not in P.
Th e ig nitio n key can only be removed w ith the se lector in this pos i
tion. This and othe r messages are bro ught up if a function cannot be
c a rried out .
Driver messages and red symbols
If a red symbol appears i n the d isplay, a driver message can be s hown
by pressing the
! CHECK) button.
F or ex ample, the sym bo l for a prob lem wi th engine o il press ure~
appears in the display.
If you the n press the I CH ECK ) button, the
f ollowin g dr iver mes sage appears in the displ ay :
Switch off engine ! Oil pressure too low
The driver message in the display goes o ut after about 5 seconds . The
dr ive r m essage can be d isp laye d a gai n by briefly pres sing the
!CHECK ) button. .,.
Vehicle care Technical data
Page 35 of 390
Ignition loc k malfunction ~page35
liWindshield wiper d efective ~page35
-
T ire pressure monitoring sys-~ page334
tern
Loss of a ir pressure
Tire pressure monitoring sys-
~page334
tern System not available
-
Battery in remote contro l key ~page42
Automatic transmission mal-~page 166
function
Applies to vehicles: w ith Con venience key
Key not in vehicle
Key not in veh icle
Th is reminder appears along with the symbo l if the master key is
removed from the veh icle with the e ng ine runni ng . It is intended to
remind you (e.g. when changing drivers) not to continue the journey
without the master key.
If the master key is no longer in the ve hicle, you cannot sw itch off the
ignition after stopping the engine and you also cannot s tart the
eng ine aga in . What is more, you cannot lock the veh icle from the
outside. •
Applies to vehicles: with light and rain sens or
Light/rain sensor defective '
Automatic headlight s/ aut omatic wipers defective
Controls and equip
ment Safety first
•
Dri
ver information display
If the symbol illuminates, the light sensor has failed . For safety
reasons t he low be ams are tu rned o n permanent ly with the switch i n
AUTO . H owever, you can cont inue to turn the lights on and off using
the light switch. In the case of a defect in the rai n sensor, the wind
shield wiper lever functions are still ava ilable. Have the light/rain
sensor checked as soon as possib le by an authorized Audi dealer .•
Windshield washer fluid level too low
Plea se refill washer fluid
If the symbo l il luminates, add wi ndshield was he r fluid to the washer
system and a lso to the headlight washer system~
page 312. •
Fuel supply too low
BJ Please refuel
Whe n th is symbo l ,. illum inates fo r the first time, the fue l rese rve in
your vehicle is still between 2 .6 and 3 .2 gallons (10-12 liters) . Refuel
as soon as possible~
page 289 .
If the symbol lights up, even when there is ample fuel in the tank, and
the text Tank system m alfunction ! Contact wo rkshop appears in the
display, the re is a fa ult in the system. Contact a q ualified wor kshop to
have the fault rectified. •
Battery voltage n
If the battery's state of charge is not in the optima l range, the.::)
symbol is show n in the display and the dr ive r message Low battery
cha rge: battery will be charged while dr iving appears.
Wh ile this dr ive r not ifica tion is displayed, you have to be prepared fo r
limited starting capability . ..,_
Vehicle care Technical data
Page 191 of 390
______________________________________________ D_ ri_v _ i_n _,,g ,c.._ S_a_ f_ e_ l..:: y __ _
Important things to do before driving
Safety is everybody's job! Vehicle and occupant safety always depends on the informed and careful driver.
For your safety and the safety of your passengers, before
driving always:
- Make sure that all lights and signals are operating
correctly.
- Make sure that the tire pressure is correct.
- Make sure that all windows are clean and afford good visi-
bility to the outside.
- Secure all luggage and other items carefully::::>
page 105.
-Make sure that nothing can interfere with the pedals.
- Adjust front seat, head restraint and mirrors correctly for your height .
- Instruct passengers to adjust the head restraints according to their height.
- Make sure to use the right child restraint correctly to
protect children ::::,
page 231, "Child Safety".
- Sit properly in your seat and make sure that your passen gers do the same::::,
page 83, "General recommenda
tions".
- Fasten your safety belt and wear it properly. Also instruct
your passengers to fasten their safety belts properly
=:> page 199. •
Controls and equip
ment Safety first Vehicle operation
What impairs driving safety?
Safe driving is directly related to the condition of the
vehicle, the driver as well as the driver's ability to concen
trate on the road without being distracted .
The driver is responsible for the safety of the vehicle and all
of its occupants. If your ability to drive is impaired, safety
risks for everybody in the vehicle increase and you also
become a hazard to everyone else on the road::::,,& . There
fore:
Do not let yourself be distracted by passengers or by using
a cellular telephone.
NEVER drive when your driving ability is impaired (by
medications, alcohol, drugs, etc.).
- Observe all traffic laws, rules of the road and speed limits
and plain common sense .
- ALWAYS adjust your speed to road, traffic and weather
conditions.
- Take frequent breaks on long trips. Do not drive for more than two hours at a stretch.
- Do NOT drive when you are tired, under pressure or when
you are stressed .
& WARNING
Impaired driving safety increases the risk of serious personal
injury and death whenever a vehicle is being used.•
Vehicle care Do-it-yourself service Technical data
Page 198 of 390
• ....__D_ r_iv _i_ n_, g=-- S_ a _ f_e _,Ly _ ______________________________________________ _
in. WARNING
Improperly stored luggage or other items can fly through the
vehicle causing serious personal injury in the event of hard braking
or an accident. To help reduce the risk of serious personal injury:
• Always put objects, for example, luggage or other heavy items
in the luggage compartment .
• Always secure objects in the luggage compartment using the
tie-down eyelets and suitable straps.
& WARNING
Heavy loads will influence the way your vehicle handles. To help
reduce the risk of a loss of control leading to serious personal
injury:
• Always keep in mind when transporting heavy objects, that a
change in the center of gravity can also cause changes in vehicle
handling:
-Always distribute the load as evenly as possible.
- Place heavy objects as far forward in the luggage compart-
ment as possible.
• Never exceed the Gross Axle Weight Rating or the Gross Vehicle
Weight Rating specified on the safety compliance sticker on the
left door jamb . Exceeding permissible weight standards can cause
the vehicle to slide and handle differently.
• Please observe information on safe driving
=> page 188 .
in. WARNING
To help prevent poisonous exhaust gas from being drawn into the
vehicle, always keep the rear lid closed while driving.
• Never transport objects larger than those fitting completely
into the luggage area because the rear lid cannot be fully closed.
& WARNING (continued)
• If you absolutely must drive with the rear lid open , observe the
following notes to reduce the risk of poisoning:
-Close all windows,
- Close the Panoramic sliding sunroof*,
- Open all air outlets in the instrument panel,
- Switch off the air recirculation,
- Set the fresh air fan to the highest speed.
in. WARNING
Always make sure that the doors, all windows, the Panoramic
sliding sunroof* and the rear lid are securely closed and locked to
reduce the risk of injury when the vehicle is not being used .
• After closing the rear lid, always make sure that it is properly
closed and locked.
• Never leave your vehicle unattended especially with the rear lid
left open. A child could crawl into the vehicle through the luggage
compartment and close the rear lid becoming trapped and unable
to get out. Being trapped in a vehicle can lead to serious personal
injury.
• Never let children play in or around the vehicle.
• Never let passengers ride in the luggage compartment. Vehicle
occupants must always be properly restrained in one of the
vehicle's seating positions .
(I) Tips
• Air circulation helps to re du ce win dow fogging. Stale air escap es
to the outside th rough vents in the trim panel. Be sure to keep t hese
slots free and open.
• Th e tire pressure must correspond to the load . The tire pressure is
shown on the tir e pressure label. The tire pressure label is located on .,_
Page 199 of 390
______________________________________________ D_ ri _v _ i_n _,,g ,c.._ S_a_ f_ e_ l..:: y __ l!'II
the driver's s ide B-pillar. The tire pressure label lists the recom
mended co ld tire in flatio n press ures fo r th e ve hicle at its max imum
capacity weight and the tires that were on your vehicle at the time it
was manufactured . For recommended tire press ures for normal loa d
conditions, p lease see chapte r=>
page 318. •
Tie-downs
The luggage compartment is equippe d with four tie
do wns to sec ure lu gga ge a nd oth er items.
Use the t ie-downs to sec ure yo ur cargo properly=> page 195,
"Lo ad ing t he lugg age comp artmen t".
In a co llision, the laws of physics mean that even sma ller it ems that
are loose in the vehicle will become heavy missiles that can cause
ser iou s injury. Ite ms i n t he vehi cle pos se ss e ne rgy w hich va ry w it h
vehicle speed and the we ight of the item. Vehicle speed is t he most
s ig nifi ca nt f acto r.
For examp le, in a frontal coll is io n at a speed of 30 mph (48 km/h),
the forces acting on a 1 0-lb (4. 5 kg) object are a bout 20 times t he
normal weig ht o f the item. T his means that t he weight o f the ite m
wou ld s uddenly be a bo ut 200 lbs. (90 kg) . You can imagine the inju
r ies tha t a 200 lbs . (9 0 kg) item fly ing free ly throug h the p ass enge r
compartment cou ld cause i n a collision lik e this .
& WARNING
Weak , damaged or improper straps used to secure item s to tie
downs can fail during hard braking or in a collision and cause
serious personal injury.
• Always use suitable mounting straps and properly secure items
to the tie-downs in the luggage compartment to help prevent
items from shifting or flying forward as dangerous missiles.
• When the rear seat backre st is folded down, always use suit
able mounting straps and properly secure items to the tie-downs
Controls and equip ment Safety first Vehicle operation
& WARNING
(co ntinued )
in the luggage compartment to help prevent items from flying
forward as dangerous missiles into the passenger compartment.
• Never attach a child safety seat tether strap to a tie -down. •
Reporting Safety Defects
Applicable to U.S.A.
If you believe that your vehi cle has a defect
which could cause a crash or could cause injury
or death , you should immediately inform the
National Highway Traffic Safety Administration
(NHTSA) in addition to notifying Audi of
America, Inc.
If NHTSA receives similar complaints, it may
open an investigation, and if it find s that a
safety defe cts exist s in a group of vehicles, it
may o rder a recall and remedy campaign.
However , NHTSA cannot become involved in
individual problems between you, your dealer,
or Audi of America, Inc.
To contact NHTSA, you may call the Vehicle
Safety Hotline toll-free at:
Tel.: 1-888-327-4236 (TTY: 1-800-424-9153)
or write to:
Administrator
Vehicle care Do-it-yourself service Technical data
Page 255 of 390

_________________________________________ I_ n_ t_ e_ ll_,igent technology ,__E~-
fore-and-aft and lateral directions, the brake pressure and the
steering angle are all measured.
The direction in which the driver wishes to travel is determined with
the aid of the steering angle and vehicle speed and is continually
compared with the actual behavior of the vehicle. If the two do not
match, for example, when the vehicle starts hydroplaning on a wet
road, ESP will automatically brake the appropriate whee l to correct
the problem.
The vehicle is then stabi lized by the forces acting on the whee l during
braking. If the vehicle is
oversteering (rear tends to skid out of the
turn), the brakes are main ly applied on the wheel that is on the
outs ide of the curve. In the case of a vehicle that is
understeering
(tendency to slide out of the curve), the brakes are applied as needed
on the wheel that is on the inside of the curve or additionally on the
other wheels. An acoustic s ignal indicates when ESP brake application
cuts in=> &.
The system operates across the entire speed range in combination
with the ABS system ~
page 256 . If the Anti -Lock Brake System
(ABS) ma lfunctions, the ESP wi ll be out of action as well.
Activating
When you turn on the engine, ESP will automatically be activated and
will perform a self-test. As soon as the test is comp leted, the system
is in normal operating mode .
Offroad mode
ESP should normally be operated in normal mode because this
ensures maximum vehicle stability. If necessary, you can activate the
ESP offroad mode by pressing the button=>
page 252, fig. 220 to
obtain maximum traction and braking ability when driving off paved
roads at low speeds. In ESP offroad mode, the ESP indicator light
=> page 16 illuminates and the message ESP Offroad Caution!
Limited driving stability
appears briefly in the disp lay.
The ESP offroad mode can be useful in the following exceptiona l situ
ations when slip or a highly effe ctive different ial loc king funct ion is
desirable. Examples:
Controls and equip ment Safety first Vehicle operation
•
when driving w ith tire chains,
• when driving in deep snow or on loose ground,
• when driving on uneven surfaces with the wheels severely
unloaded (articulation), and
• when rocking the vehicle loose a fter it has become stuck.
When the unusual situation is past, you should sh ift back to the
normal ESP operating mode by pushing the button again. The
message
ESP/ ASR on then appears briefly in the display.
Hill descent control
The hill descent control is switched on in ESP offroad mode. When
slowly descending steep gradients on loose ground or when the axles
are art iculated, hill descent control provides assistance by automati
cally applying the brakes to keep vehicle speed constant. The vehicle
is also rende red easier to steer by select ive distribution of braking
force. Hill descent control intervenes when:
• the accelerator pedal is not pressed,
• the vehicle is travelling less than 12 mph (20 km/h),
• a steep gradient is detected,
• wheel behavior indicates loose ground or conditions with poor
adhesion (e.g. also axle articulat ion).
Hill descent control operates both dr iving forward and in reverse.
Active hi ll descent control is deactivated by pressing the accelerator
pedal until the conditions for activation already listed are met aga in .
& WARNING
• The Electronic Stabilization Program is nevertheless subject to
the laws of physics . It is particularly important to pay attention to
this fact on wet and slippery roads. It is therefore important that
you always adapt your driving to the condition of the road and
traffic conditions. Do not allow the increased safety provided by
the Electronic Stabilization Program system to lull you into
accepting additional safety risks. ..
Vehicle care Do-it-yourself service Technical data