wiper AUDI Q7 2011 Owner´s Manual
[x] Cancel search | Manufacturer: AUDI, Model Year: 2011, Model line: Q7, Model: AUDI Q7 2011Pages: 392, PDF Size: 93.29 MB
Page 81 of 392
• To help prevent damage to w iper blades, do not use gasoline,
kerosene, pa int thinner, or o ther solven ts on or near the w ipe r
blades.
• T o help prevent damage to the wiper a rms or othe r compo nents,
do not attempt to move the wipers by hand.
W Tips
Commercial hot waxes applied by automat ic car washes affect the
cleanability of the windshield. •
Changing the rear wiper blade
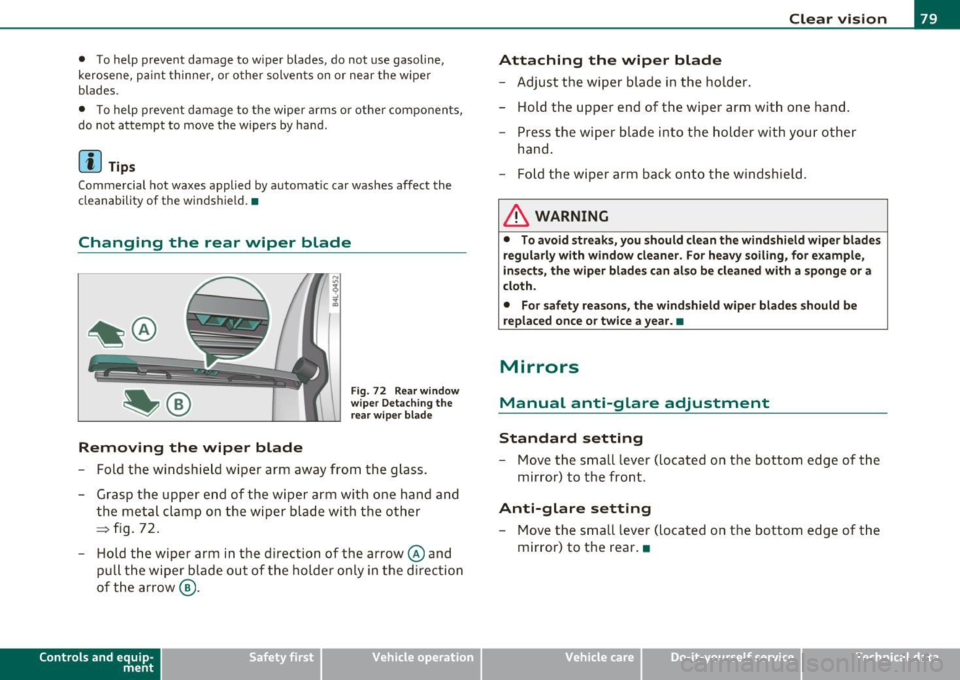
Removing the wiper blade
Fig. 7 2 R ear wind ow
wi per Det achi ng the
r e ar wiper blad e
- Fold the windsh ie ld wi per arm away from the glass .
- Grasp the upp er end of the wiper arm with one hand an d
the meta l clamp on the w iper blade w it h the o ther
=> fig. 72 .
- Hold the wiper arm in t he direction of the arrow@ and
pul l the wiper blade out of th e holder only in the dir ect ion
of th e arr ow @ .
Con tro ls a nd e quip
m en t Vehicle
OP-eration
Clear vision
Attaching the wiper blade
- Adjust t he wiper blade in the ho lder.
- Hold the upper end of the wiper arm with one hand .
- Press the wiper b lade into t he holde r with you r other
hand .
- Fold the wi per arm back onto th e windshield.
& WARNING
• To avoid streak s, you should clean the windshield wiper bl ade s
regularl y with window cleane r. Fo r heavy soili ng, for example,
inse ct s, the wiper blades can a lso be cleaned with a sponge or a
cloth .
• For safety reasons , th e wind shield wiper blades shou ld be
replaced on ce o r tw ice a ye ar. •
Mirrors
Manual anti-glare adjustment
Standard setting
- Move the small lever (located on t he bottom edge of the
mir ror) to t he front.
Anti-glare setting
- Move the small lever (located on the bottom edge of the
m irror) to the rear .•
Vehicle care Do-it-yourselt service iTechnical data
Page 114 of 392
-Warm and cold .,.,..__ ______________ _
Energy management
To prevent the battery from being discharge d and to res tore the
balance o f energy, compone nts wh ich require large amo unts o f
energy a re tempora rily cut back or sw itched off=>
page 263. Heating
systems in part icular requ ire a grea t dea l of energy . If you notice, for
example, that the seat* or rear w indow heating is not heating, they
have been t empo rar ily c ut b ack o r switched off by
energy manage
ment .
These systems are available aga in as soon as the energy
b ala nce has been resto red.
& WARNING
Reduced visibility is dangerous and can cause accidents.
• For safe driving it is very important that all windows be free of
ice, snow and condensation.
• Completely familiarize yourself with the proper use and func
tion of the heating and ventilation system and especially how to
defog and defrost the windows.
• Never use the windshield wiper /washe r system
in freezing
weather until you have warmed the windshield first , using the
heating and ventilation system . The washer solut ion may freeze
on the windshield and reduce vi sibility.
0 Note
• If you suspe ct that the clima te co ntro l system has been damaged,
switch the system off to avoid furt her damages, and have it inspected
by a qua lified deale rs h ip.
• Repa irs to the A udi a ir conditioner require special technica l know l
edge and special tools . Contac t an au thor ized A udi d ealer for assis
tance .
[I] Tips
• Keep the air inta ke s lot s (in front of the w in d shield) free from ice,
snow and debris in or der to maintain the proper function of the
cl ima te control sys tem .
• Air ins ide the veh icle escapes through air vents located in the si de
t rim panels be neat h the rea r side wi ndows . M ake sure that the outlet
slots are not covered by clothing, etc.
• Climate control works most effective ly i f the windows and the
Panoram ic sliding sunroof * are closed. However, if the interio r of a
pa rked vehi cle is ex tremely hot from the sun 's rays, br iefly ope ning
the windows can speed up the coo ling process .•
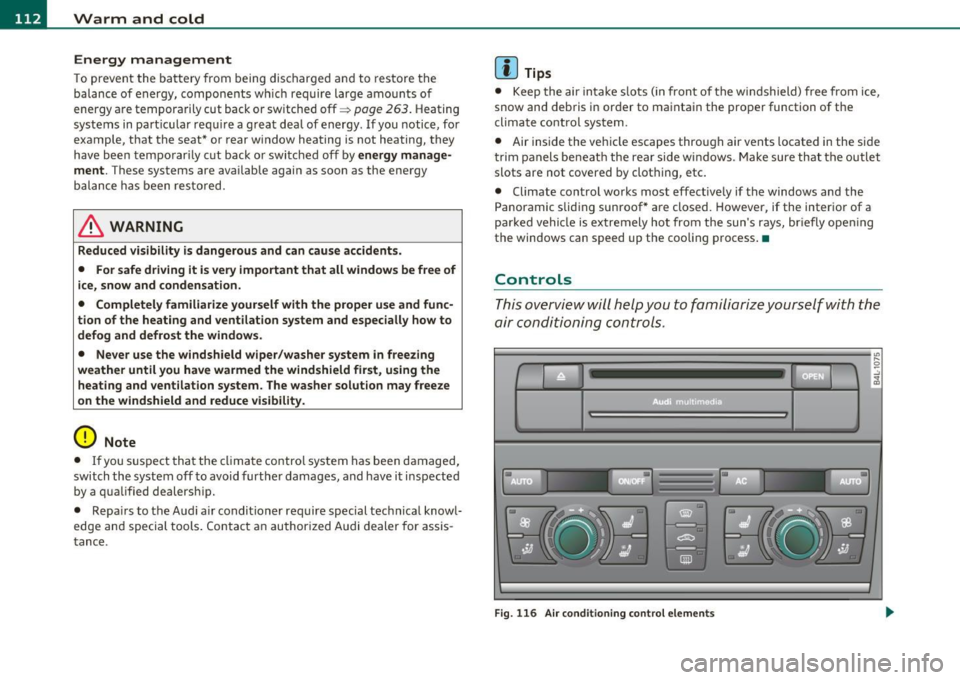
Controls
Thi s overvi ew will h elp y ou to fa miliari ze yours elf with the
air conditioning controls .
a • •
Fig. 116 Air co nd iti oning contr ol element s
Page 148 of 392

llffl..__A_ d_a_ p,__ t_iv _ e_ C_r _u _ i_ s _e _ C_ o_ n_t _ r_ o _ L ___________________________________________ _
Appli es to veh icles : wi th Adap tiv e Crui se Con tro l
Display in the instrument cluster
Fig. 141 Dis pl ay in
the instrum ent clu ster
Scroll throug h the available informa tion displays by briefly tapping
the
[ RESE T] button at the end of the windshie ld wiper lever . You can
select information from the tr ip comp uter, navigation sys tem * or
Adaptive Cr uise Control.
@ Vehicle symbol
@ Dis tance
© Status
© Vehicle symbol
Th e veh icle symbol i ndi cates w het her the sys tem has de te ct ed an
object traveling in front .
• Vehicle outline : Open road, no vehicle ahead .
• White vehicle : A vehicle is detected ahead.
• Red vehicle : Request for driver to ass ume control.
® Distance
Us ing the a rrows and scale, you can det ect how far it is to the vehi cle
in front of you.
• Open road : No ar row app ears when the ve hicle is o n an o pen road
and there is no ve hicle ahead.
• Driving in t raffic : If a vehicle is detected ahead, the arrow moves
on t he sc ale. The g ree n area represents the distan ce set . When
approaching slow ly, the arrow moves from the
gray zone to the green
zone on the scale .
• Driver intervention prompt: When appro aching rapid ly, the
arrow serves as an early warn ing signa l.
If the distance selected is
excee ded or poss ibly no t reache d, t he arrow moves in to the
red zon e
on t he scale. In certain dr iving s ituations , you as the driver wi ll have
t o take action =>
page 148, "Driver in tervent io n prompt".
@ Status
• T he text ACC OFF ap pears in wh ite le tters when Ad aptive Cr uise
Control is turned off .
• T he text
ACC AVAILABLE appears in wh ite lette rs when t he
system is turned on but no desired speed has been set .
• T he text
OVERRIDE appears in white l etters when you exceed the
desired speed by accelerating .
• T he text
DISTANCE! appears in red letters when the in terva l to a
vehicle traveling ahead is too short and you have to slow your vehicle
add itionally with the foot brake .
• T he te xt messages
DISTANCE 1 to DISTANCE 4 appea r in gree n
le tte rs to indicate the time interval you have se t and Adaptive Cruise
Con trol is in management mo de.
• If the driving program "standard" is replaced by "comfort" or
"dynam ic" usin g the M MI, the above text message is supp lemen ted
by an appropriate prom pt, e .g .
DISTANCE 1 -dyn .. •
Page 149 of 392

Adaptive Cruise Control I'll __________________________ ...:....:..;:_....;_,,!,_ ______ _
App lies to vehicl es: wi th Adaptive Cru ise Con trol
System status indicator
The text messages and symbols shown in this area of the
displ ay are not displayed permanently .
Time intervals (such as e::::, ____ e::::,)
Fig. 142 Sy stem
st atu s indicator
The d ifferent symbols for the time interva ls (distance) appear if you
change the settings~ fig . 142.
Thr ee wh ite dots .. . ap pear if a set ting c annot be made w ith the o pe r
ating lever . The following are possible reasons
• If you pull the control lever towa rds you to resume speed but no
requested speed was set .
• If you push the lever up to increase (or down to re d uce) speed
when no speed has been set previo usly .
• If yo u push the lever up to increase (o r down to red uce) spee d and
this speed is outside the 20 to 95 mph (30 to 150 km/h) speed ra nge .
ACC not available
The text message ACC not ava ilable appears, for examp le, if the
t empe ra tu re o f the brakes is excessive. Adap tive Cru ise Con trol is
temporar ily not avai lab le. A warning tone sounds as a reminder .
Controls and equip
ment Safety first
ACC not available !
Th
e text message ACC not available! appears in the event o f a
ma lfunction . Adaptive Cru ise Contro l is tur ned off .
A warn in g tone
so unds as a reminder. Have the system inspected by a q ualified dea l
ersh ip .
ACC sensor blocked !
The text message ACC sensor blocked ! appears w hen the ACC System
can no longer acc urately detect vehi cles movi ng up ahead in your lane
o f travel. Adaptive C ruise Cont rol is tu rned off. A wa rning tone a lso
so unds as a reminder .
T o decide w hethe r it is ne cess ary to switch off the ACC (ACC senso r
blocked
!) or if it is only a temporary condition (ACC Functionally
limited), the sys tem w ill also takes into considera tion the outside
temperature and/or the w indshield wiper operation .
T he ACC sensor is d irty or b locked (e .g . leaves, snow).
Th e ACC senso r is lo ca ted be hind t he a rea to the right o f th e front
license plate.
If the ACC sensor is dirty or blocked, clean the area to
restore sy stem o per ation.
ESP activation
T he text message ESP activation appears if the Electro nic St abil iz a
tion Program (ESP) has intervened. In this case the Adaptive Cruise
Con trol is au tomat ica lly tu rned off. This is accompan ied by a warn ing
tone.
Speed
The set speed in mph (Canada km/h) always appears when saving or
c hangi ng the speed in Ad aptive C ruise Cont rol~
page 14 0, "How is
the speed stored?" and~
page 140, "Changing stored speed" .
ACC functionality Limited
The message ACC functionality limited appears when the ACC
System does no t detec t any moving vehicles up a head in your lane of
trave l for a longer period of time. Dur ing t his time, the d istance to
movi ng ve hicles in you r lan e of tra ve l up ahead i s not being m ain-
~
Vehicle care Technical data
Page 183 of 392
____________________________________________ A_ d_a ..... p,__ t_iv _ e_ A_ i_r _ S_ u_s__, p_ e_n _ s_ i_ o _ n _ __.1111
While the vehicle is being raised or lowered, the target level is indi
cated by an arrow © next to the corresponding segment. The arrow
disappears again when the vehicle is at the target level.
Limitations to MMI settings
Please note that not every driving mode can be selected in every
dr iving s ituation . For example , it is not poss ible to switch to "lift"
mode at speeds above 12 mph (20 km/h) . This mode is then shown
greyed out in the MMI Display .
The vehicle can on ly be lowered when
all of the veh icle's doors are
closed.
If one doo r is open, all driving modes whose level setting is
below the current vehicle level appear greyed out in the MMI Display.
If a door is opened whi le the vehicle is being lowered , the lowering
process is interrupted until all doo rs are closed again.
I f the system is temporarily unavailable due to, for instance, an
empty compressed air tank, the driving modes that cannot be set
appear
greyed out in the MMI Display . As soon as the system is avail
able aga in, the driv ing modes can once more be selected in the
display .
(I] Tips
• For additional information on the driving modes=> page 179,
"Chassis controls".
• When the compressed air tank is empty , the compressor can be
switched on by starting the engine. The Adaptive Air Suspension is
once again available, after waiting a few minutes.
• T o prevent overload, the system switches off temporarily if
severa l adjustments are made in a row. The Adaptive A ir Suspens ion
is once again available, afte r waiting a few minutes. •
Contro ls a nd e quip
m en t Vehicle
OP-eration
Applies to vehicles : w ith Adapt ive A ir Sus pens ion
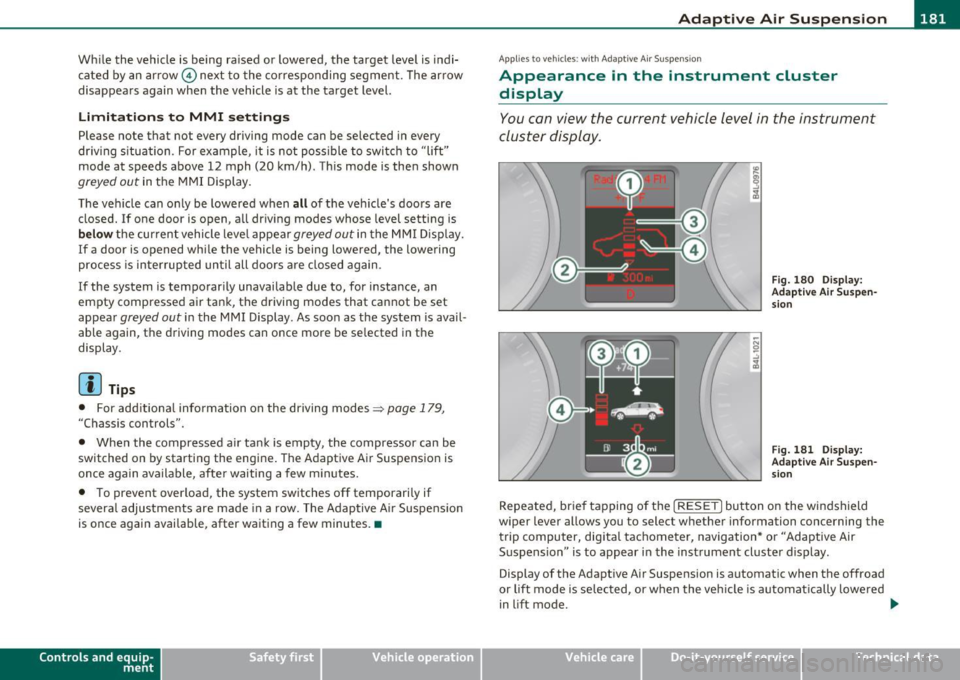
Appearance in the instrument cluster
display
You can view the current vehicle level in the instrument
cluster display.
Fig. 180 Display:
Adaptive Air Suspen sion
Fig. 181 Display:
Adaptive Air Suspen
s ion
Repeated, br ief tapping of the [ RESET] button on the windshield
wiper lever allows you to selec t whether information concerning the
trip computer, digita l tachometer, navigation* or "Adaptive Air
Suspension " is to appear in the instrument cluster display .
Display of the Adaptive Air Suspension is automatic when the offroad
or lift mode is se lected, or when the vehicle is automat ically lowered
in lift mode.
~
Vehicle care Do-it-yourselt service iTechnical data
Page 261 of 392

_________________________________________ I_ n_ t_ e_ ll_,igent technology ,__E~-
The ASR works in conjunction with the ABS. If a malfunction should
occur in the ABS, the ASR w ill also be out of action.
& WARNING
The increased safety afforded by ASR does not mean that you can
take safety risks. Always adapt your driving style to the road
conditions and traffic situation.
[ i] Tips
To ensure that the ASR works properly, all four whee ls must be fitted
with ident ical tires. Any differences in rolling radius of the tires can
cause the system to reduce engine power when th is is not desired.
See also=>
page 330, "New tires and replacing tires and whee ls" .•
Braking
General information
What affects braking efficiency?
Operating conditions and driving habits
The brakes on today's automobiles are still subject to wear,
depending large ly on operating conditions and driving habits=>& .
On vehicles that are either driven mostly in stop -and -go city traffic or
are driven hard, the brake pads should be checked by your authorized
Audi dealer more often than specified in the
Warranty & Mainte
nance booklet.
Failure to have your brake pads inspected can result
in reduced brake pe rformance .
On steep slopes, you should use the brak ing effect of the engine . This
way, you prevent unnecessary wear on the brake system. If you must
use your brakes, do not hold the brakes down continuously. Pump the
brakes at intervals.
Noises may occur when braking depending on the speed , braking
force and outside conditions such as temperature and humidity.
Safety first
Moisture or road salt
If you are driving faster than 31 mph (SO km/h) and the windshield
wipers are on, the brake pads wi ll briefly touch the brake discs in
regular interva ls so as to improve reaction time when braking on wet
surfaces . You, the driver, will not not ice anything.
Under certain cond itions, for example, when driving through wa ter or
very heavy rain, or even after washing yo ur vehicle , the braking effect
can be reduced due to moisture (or in free zing conditions ice) on the
brake pads. A few careful brake applications should dry off the brake
pads or remove any ice coatings .
The effect iveness of the brakes can be reduced when the vehicle is
dr iven on a sa lt-covered road and the brakes are not used. Here too,
you should clean off accumu lated salt coating from brake discs and
pads with a few careful applications of the brake=> & -
Corrosion
There may be a tendency for dirt to build up o n the brake pads and
corrosion to form on the dis cs if the car is no t driven regularly or only
for short trips with little use of the brakes.
If the brakes are not used frequently, or if corrosion has formed on
the discs, it is advisable to clean off the pads and discs by braking
firmly a few times from a moderately high speed=> &.
Faults in the brake system
If you should notice a sudden increase in brake pedal travel, then one
o f the two brake circuits may have failed==>& .
Low brake fluid level
Malfunctions can occur in the brake system if the brake fluid level is
too low. The brake fluid level is monitored e lectron ically .
Brake lining wear status
Brake lining wear may be checked by visual inspection of the condi
tion of the brake pads through the openings in the wheel. If neces
sary, the wheel may be removed for this inspection =>
page 343,
"Changing a wheel". ._.
Vehicle care Technical data
Page 281 of 392

____________________________________________ C_l_e _a_ n_ i n--= g=--- a_n_ d----' p,__ r_o _t_ e_ c_ t_ i _o_ n __ _
Under certain circumstances, weekly washing may be necessary .
Under o ther conditions, a mont hly w ashi ng and waxi ng may be
adequate.
After the winter, the underside of the vehicle s hou ld be tho roughly
washed, p refe rably in a profess ional car was h.
& WARNING
Always read and heed all WARNINGS and other information
~ page 278. •
Automatic car wash
The vehicle can be washed in almost any mod ern auto
matic car wash.
T he vehi cle p aint is so dura ble tha t the vehicle c an norm ally be
washed without problems in an automatic car wash . H owever, the
effect on t he pa int depends to a la rge ex ten t on t he desig n of the
facility, the filter ing of the was h water, t he type of wash and care
material, etc . If t he pa int has a dull appearance after going through
t he ca r wash or is sc ratched, bring this to the attention of the ope r
ator immediately . If necessary, use a different car wash .
Be fore goi ng th ro ugh a car wash, be s ure to take the usual precau
tions such as clos ing the windows and the Panoramic s lid in g su nroof.
Fa cto ry inst alled a ntennas must no t be removed .
If you have installed addit ional accessories on the vehicle -such as
spoilers, roof rack, etc . - it is best to ask the car wash ope rator if these
sho uld be removed.
& WARNING
Please take note of the following points before going through an
automatic car wa sh with your vehicle , so that you can avoid
damage to your veh icle.
Safety first
& WARNING (co ntinued )
• Compare the tra ck of your vehicle with the d istance between
the guide rails of the facility -there is a risk of damage to the
wheels and tires.
• Compare the height and width of your vehicle with the height
and width of the tunnel at the facility.
• Fold the exterior mirrors flat -there is a risk of damaging the
e xterior mirrors . Power folding e xterior mirrors* must not be
folded in or out by hand. Use the power function!
• Do not allow the wiper blade to fall onto the wind shield after
the vehicle is dr ied · there is a risk of damag ing the paint on the
hood .
• Always read and heed all WARNINGS and other information
~page 278. •
Washing the vehicle by hand
A lot of water is needed wh en washing a vehicl e by hand.
- Before you start washing , ma ke sure you have read and
u nders tood the WARNIN GS =>
& in "General informa
t io n" o n page
278.
- Fir s t soak all dried dir t until it is soft, the n rinse it off.
- As yo u clean yo ur vehic le, start w ith th e roof and work you r
way do wn to the bottom, us ing a sponge , a sponge g love
or a clean bru sh .
- Rin se the sp ong e or t he s po nge glo ve o ften, flushing it
cl ean each t im e.
- U se spe cia l car shampoo only for ve ry pe rsiste nt dirt .
- Rinse the car thoroug hly with wate r.
- U se a ch amo is leat her to gently w ipe t he ex ter ior d ry . •
Vehicle care Technical data
Page 285 of 392

____________________________________________ C_l_e _a_ n_ i n--= g=--- a_n_ d----' p,__ r_o _t_ e_ c_ t_ i _o_ n __ _
Windows
Clear vision to all sides.
Clean all windows regularly to remove road film and carwash
wax buildup.
- Remove snow from windows using a brush.
- Use a plastic ice scraper to remove ice from windows and
mirrors.
- Remove other residue on the w indows with a spray-on
glass cleaner .
- Wipe the windows dry with a clean piece of cloth or
kitchen paper towel.
T he best way to remove snow from w indows and mirrors is to use a
brush. Use a non-abrasive plastic ice s craper - be tter st ill, a spray
deicer -to remove ice from windows and mirrors.
Th e w indows must not be cleaned with insect remover or wax since
these can interfere with the function of the w indshield wiper blades
(chatte r) .
Oil, grease, or silicone residue can be removed with glass cleaner or
s ili cone remover. Howeve r, wax residue requires the use of a specially
formulated solvent . Please contact your author ized Aud i dealer for
advice on safe products for wax remova l.
W indows shou ld also be cleaned on the inside at regu lar i nte rvals.
Never dry windows w ith the same chamo is that you use to dry painted
surfaces. Wax res idue on the chamois ca n impa ir v is ion t hrough the
windows .
& WARNING
• Alw ays read and h eed all WARNINGS and other information
~ page 278 .
Safety first
& WARNING (continu ed)
• The windshield must not b e tre ated with w ater-repellent
m aterial s. They c an increa se g lare und er poor visibilit y condit ions
s uch as w etnes s, dar kne ss, or when the sun i s low on the ho rizon .
In addition, they can cau se the wind shi eld wip ers to chatter.
0 Note
• Never use warm o r hot wate r to remove snow and ice from
windows and mirrors . This could cause the glass to crack.
• To prevent damage to the w ires of the rear defogger, do not place
any adhesive stickers on the inside of the rear window over the wires.
• T o help prevent dirt from scratching the w indow, always scrape in
a forward direction - pushing the scraper away from you - never back
and forth .•
Weatherstrips
Complete car care includes the weatherstrips as well .
-Apply a suitable rubber conditioner to the weatherstrips
from time to t ime .
To be able sea l properly, the weatherstrips around the hood, doors,
rear l id, etc. must remain pliable . Spray the weatherstrips with sili
cone or coat t hem with talc um powder or g lycerine to retain the flex
ibility of the rubber and to p ro tect them agai nst free zing in the
winter .
& WARNING
Alway s read and heed all WARNINGS and other inform ation
~ page 278 .
Vehicle care Technical data
Page 292 of 392
-~_C_ le_ a_n_ i_ n_ g=- a_ n_d___. p_ ro_ t_e _c_ t_ i_o _n ___________________________________________ _
Engine compartment
Be especially careful when cleaning the engine compa rt
men t.
Always switch off the ignition before cleaning the engine=:>& .
Plenum panel
Remove leaves from the plenum panel in front of the win dshi eld
unde r th e eng ine hood . T hi s prevents the water d rain holes from
becoming b locked, and it prevents debris from entering the vehicle
inter io r th rough the heat ing and vent ilation ducts .
Corrosion protection
The eng ine compartment and transmission have been cor rosion
protected at the factory.
Good ant i-cor rosion treatment is very impo rtant , pa rtic ular ly in the
w inter . If the vehicle is frequently driven on sa lt treated roads, the
en tire eng ine compar tment and plenum p anel sho uld be thoroug hly
cleaned at the end of winter and retreated to prevent salt damage. At
t he same t ime, the underside of the vehi cle should be washed as well.
If the e ng ine compartment is clea ned at any t ime with grease
removing so lutions
2l , or i f you have the engine washed , the anti
co rros io n treatment is a lmost a lways removed as w ell.
It is t herefore
essential to have a long-last ing corrosion p rotect ion reapplied to all
surfa ces, seams, jo ints and compo nents in the engi ne co mpa rt ment .
& WARNING
Be aware: The engine compartment of any motor vehicle is a
potentially hazardous area .
• Before working in the engine compartment, be sur e to read the
information =:>
page 290.
2
l Use on ly th e co rr ect clean ing so lut ions. Never use gaso line or diese l fuel.
& WARNING (c on tinued )
• Before reaching into the front plenum panel , alway s remove
the ignition key. Otherwise, the windshield wiper system could unintentionally be switched on , possibly causing personal injury
from the moving wiper linkage.
• Never reach into the area around or touch the radiator fan. The
auxiliary fan is temperature controlled and can switch on suddenly
· ev en when the ignition is off.
• Do not wash, wax or dry the engine with th e engine running.
Moving or hot pa rts could injure you.
• Do not clean the underside of the chass is, fenders, wheel
covers, or other hard to reach part s without protecting your hands
and arm s. You may cut yourself on sharp-edged metal parts.
• Always read and heed all WARNINGS and other information
=:> page 2 78. •
Page 302 of 392

___ C_h_ e_c _k _i_n -=g :a,__ a_n_ d_ f_ i_ l _li _n _,g;._ __________________________________________ _
Checking and filling
Engine hood
Releasing the engine hood
The engine hood is released from inside the vehicle.
-Open the driver's door.
Fig. 231 Driver's side
footwell: engine hood
release lever
-Pull the release lever on the left under the instrument
panel => fig . 231 in the direction of the arrow .
The hood pops up slightly under spring pressure .•
Opening the engine hood
Fig. 232 Release lever
under the engine hood
Before opening the engine hood, make sure that the wind
shield wipers are flat against the windshield. Otherwise, they
could damage the paint on the hood.
- Lift the hood slightly =>& .
- Pull up on the release under the hood => fig. 232. This
releases the catch.
- Open the hood all the way.
& WARNING
Hot engine coolant can burn you.
• To reduce the risk of being burned, never open the hood if you
see or hear steam or coolant escaping from the engine compart
ment. Wait until no steam or coolant can be seen or heard before
carefully opening the hood. •