display AUDI Q7 2012 Owner´s Manual
[x] Cancel search | Manufacturer: AUDI, Model Year: 2012, Model line: Q7, Model: AUDI Q7 2012Pages: 342, PDF Size: 86.42 MB
Page 148 of 342
146 Parking system
Switching on and off
Applies to vehicles: with Audi parking system plus w ith
rea rview camera
The reorview camera switches on automati
cally together with the acoustic and visual
pork assist when you put the vehicle in re verse .
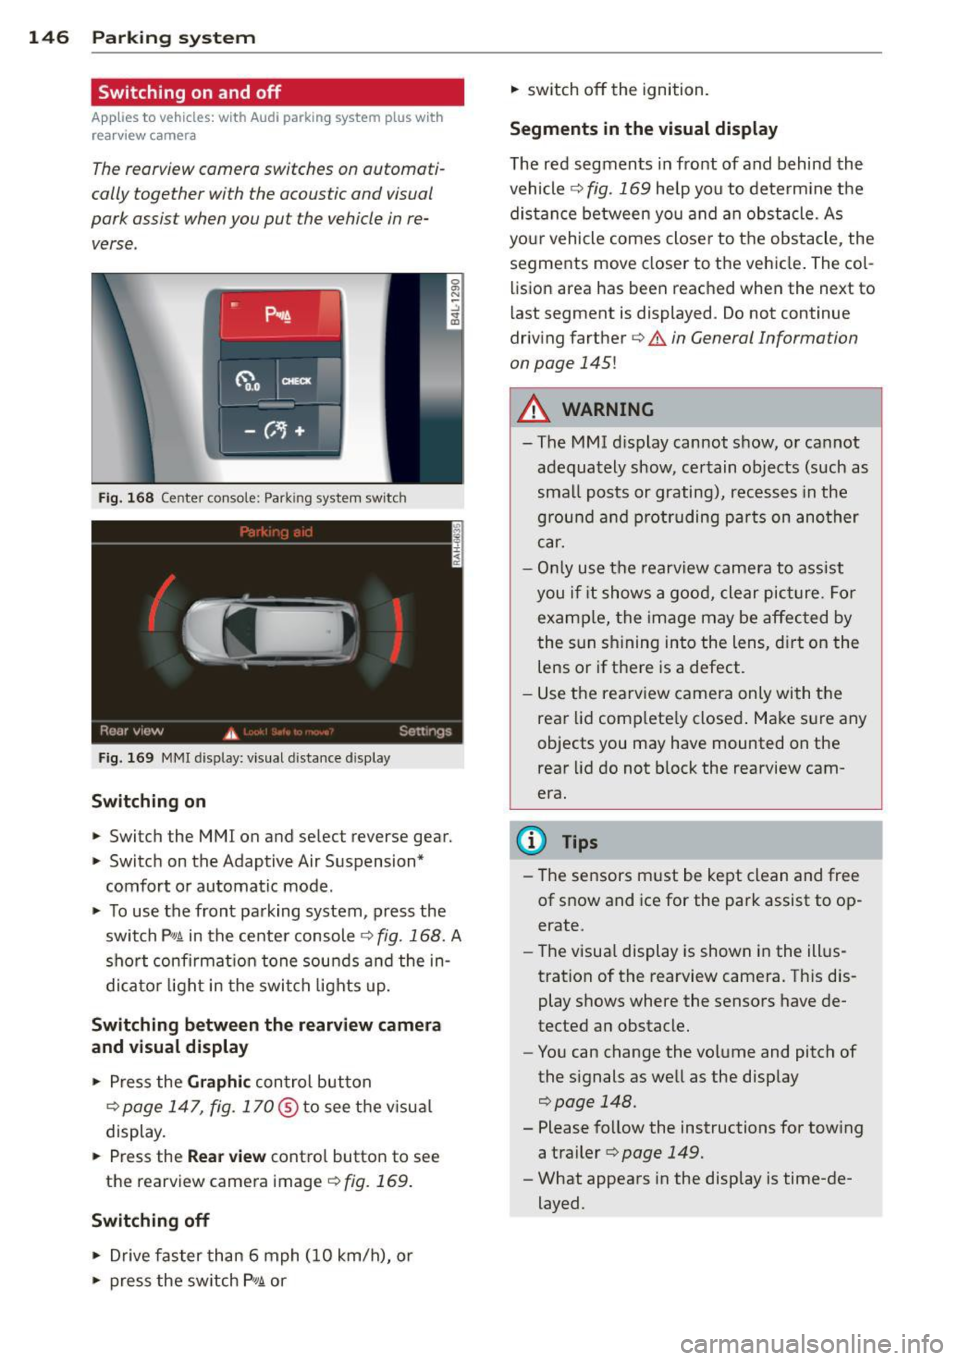
Fig. 168 Ce nter console: Park ing system switc h
Fig. 169 MMI display: visual d istance d isplay
Switching on
> Switch the MMI on and se lect reverse gear.
> Switc h on the Adaptive Air Suspension*
comfort or automatic mode.
> To use the front pa rking system , press the
switch P"1t in the center console
c:> fig. 168. A
short confirmat ion tone sou nds a nd the in
di ca to r li ght in the swi tch lights up.
Switching betwe en the r earview camera
and visual display
> Press the Graphi c control button
¢
page 147, fig. 170@to see the v isua l
display.
> Press the Rea r view contro l button to see
the rearview camera image
<=:> fig. 169.
Switching off
> Drive faster than 6 mph (10 km/h), or
> press the sw itch P 1t or
> switch off the ignition.
Segm ents in the visual display
The red segments in fro nt of and behind the
vehicle
<=:> fig. 169 help you to determ ine t he
distan ce between yo u and an obstacle. As
your vehicle comes close r to the obstacle, the
segments move closer to the vehicle . The co l
lision area has been reached when the next to
l ast segment is displayed . Do not continue
driving farther ¢
& in General Information
on page
145!
A WARNING
-
- The MMI d isplay cannot show, or ca nnot
adequately show, certain objects (such as
sma ll posts or grating), recesses in the
g rou nd a nd p rot ruding pa rts on ano ther
car.
- Onl y use t he rearview camera to ass ist
you i f it shows a good, clear pic ture. For
examp le, the image may be affec ted by
the sun s hining into the lens, d irt on the
lens or if there is a defect.
- Use the rearv iew came ra only wi th the
rear lid comp lete ly closed . Make s ure any
objects you may have mounted on the
rear lid do not b lock the rearview cam
era.
(D Tips
- The sensors m ust be kept clean and free
of snow and ice for the park assist to op
erate.
- The visua l display is shown in the ill us
tration of the rearview camera. Th is dis
play shows where the sensors have de
tected an obstacle.
- You can change the volume and pitch of
the s ignals as we ll as the disp lay
c:> page 148.
- Please follow the instructions for tow ing
a trailer
c:> page 149.
- What appears in the display is time-de
layed.
Page 149 of 342
Reverse Parking
Applies to vehicles: with Audi parking system plus w ith
rea rview camera
Parking mode 1 can be used when parking in
a garage or into a parking space.
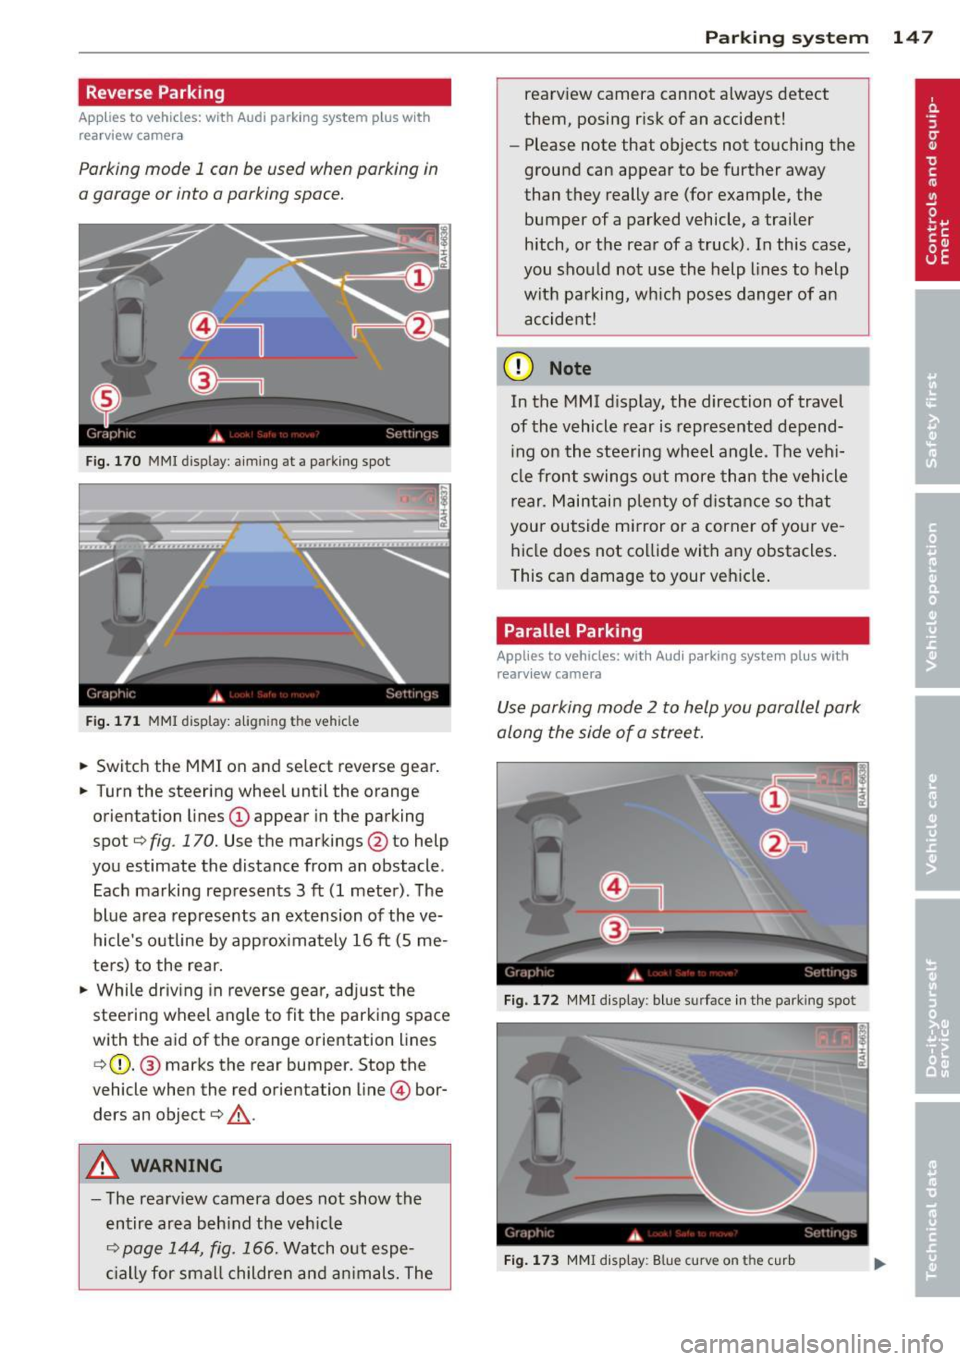
Fig. 170 MMI display: aiming at a park ing spot
Fig. 171 MMI display: aligning the vehicle
• Switch the MMI on and select reverse gear.
• Turn the steering wheel until the orange
orientation lines
(D appear in the parking
spot¢
fig. 170. Use the markings @to help
you estimate the distance from an obstacle .
Each marking represents 3
ft (1 meter). The
blue area represents an extension of the ve
hicle's outline by approximately 16
ft (5 me
ters) to the rear.
• While driving in reverse gear, adjust the
steering wheel angle to fit the parking space
with the aid of the orange orientation lines ¢ (D. @ marks the rear bumper. Stop the
vehicle when the red orientation line© bor
ders an object¢
,A.
A WARNING
-The rearv iew camera does not show the
entire area beh ind the veh icle
¢
page 144, fig. 166. Watch out espe
cially for smal l children and animals. The
Parking system 147
rearview camera cannot always detect
them, posing risk of an accident!
- Please note that objects not touching the
ground can appear to be further away
than they really are (for example, the bumper of a parked vehicle, a trailer
hitch, or the rear ofa truck). In this case,
you shou ld not use the help lines to help
with parking, which poses danger of an accident!
(D Note
In the MMI d isplay, the direction of travel
of the vehicle rear is represented depend
ing on the steering wheel angle. The vehi
cle front swings out more than the vehicle
r ear. Maintain plenty of distance so that
your outside mirror or a corner of your ve
hicle does not collide with any obstacles.
This can damage to your vehicle.
Parallel Parking
Applies to vehicles: wit h Aud i parking syste m plus with
rearv iew camera
Use parking mode 2 to help you parallel park
along the side of a street.
Fig. 172 MMI display: blue surface in the park ing spot
Fig. 173 MMI display: Blue curve on the curb
Page 150 of 342

148 Parking system
The following steps app ly only when there is
no obstacle such as a wall near the parking
spot. Otherwise, please read the informat ion
prov ided in the "Parking Next to Obstacles"
section.
.. Activate the turn signal.
.. Position your vehicle parallel to the edge of
the street, approximately 3 ft (1 meter)
from a parked vehicle.
.. Switch the MM I on and se lect reverse gear .
The parking aid turns o n and parking mode
1 appears on the disp lay .
.. Press the cont ro l butto n
(D c:> fig. 172 on
t h e M MI con trol conso le. Par kin g mode 2
appears .
.. Back up and align yo ur vehicle so the b lue
area @ borders on the rear end of the vehi
cle or on the parking spot line. The bl ue area
represents an extension of the veh icle's out
li ne by approximate ly 16 ft (5 meters) to the
rear . The long side of the blue area should
be o n the cu rb. The entire blue area must fit
into the parking spot .
.. Wi th the veh icle stopped, turn the s teer ing
wheel to the right as far as it w ill go.
.. Back into the park ing spot until the blue
c ur ve to uches the curb
i::> fig. 173. Stop the
vehicle.
.. With the veh icle stopped, turn the steer ing
wheel to the left as far as it will go.
.. Co nti nue to back in to the parking spot until
the veh icle is parked para llel to the curb .@
marks the rear bumper . Stop the vehicle
when the red orientation line@ borders an
obje ct
i::> & -Keep an eye on the front of
yo ur vehicle while doing this
i::> 0 .
Parking n ext to obstacles
When t here is an obstacle (such as a wall)
next to the pa rk ing spot, choose a spot w ith
mo re space on t he sides. Pos ition the long
side of the blue area so that there is sufficie nt
sp ace from the curb. The area m ust no t be on
the c urb. Yo u will also need to start turning
the steering wheel much earlier. There should
be a suffic ient amo unt of space between the
curb and the b lue curve, and the blue c urve
i:> fig. 173 mus t not touch the curb.
A WARNING
-The rearview camera does not show the
entire area behind the vehicle
i:> page 144, fig . 166 . Watch out espe
cially fo r small ch ild ren and anima ls . T he
rea rv iew came ra cannot a lways detec t
them, posing ris k of an acciden t!
- P lease note that objects not touching the
g round can appear to be further away
t han they really are (for examp le, the
bumper of a par ked vehicle, a trai ler
hitch, or the rea r of a truck) . In this case,
you shou ld not use the help lines to help
with parking, wh ic h poses danger of an
accident!
(D Note
In the MMI display, the direction of travel
of the vehicle rear is represented depend
i ng on the steering wheel angle . The vehi
cle front swings out more than the vehicle rear . Maintain plenty of dista nce so that
your outside mi rror or a corner of you r ve
hicle does not col lide with any obstacles.
This can damage to your ve hicle .
(D Tips
The left o r right orie ntation lines and su r
faces will be disp layed, depending on t he
tu rn s ignal being used .
Adjusting the display
and warning tones
Applies to vehicles: wi th rear park ass ist/A ud i parking sys
tem plus with rearview camera
The display* and warning tones can be ad
justed in the MMI.
.. Select: Function b utton I CAR !> Control but
t on
Sy stems * > Parking sy stem . Or
.. Sele ct: Func tion button
I CA R!> Con trol but
t on
Car sy stems * > Driver as sist > Parking
aid.
Display*
-Off -when the par king system is switched
off, only a udible s ignals a re g iven .
Page 151 of 342
-On -when the parking system is switched
on, either the visual display or the picture
from the rearview camera is disp layed .
Warning tones
- Front volume* -
front sensor vo lume
- Front frequency* -front sensor frequency
-Rear volume -rear sensor volume
-Rear frequency -rear sensor frequency
-In -ca r entertainment fader/Music volume
while parking -
when the parking system is
switched on, the volume of the active audio source is lowered.
The newly adjusted value is briefly heard from
the signal generator.
(D} Tips
- The warning tones can also be adjusted
direct ly by the v isual disp lay* or the pic
ture from the rearview camera*. Simply
press the
Settings* control button .
- Changed settings are activated when
parking system is switched on aga in.
- The settings are automatically stored
and ass igned to the remote control key.
Trailer hitch
Applies to vehicles: with rear park assist/Audi parking sys·
tem plus with rearview camera and trailer hitch
For vehicles with a factory installed trai ler
hitch, or a trai ler hitch installed according to
factory specifications, the parking system rear
sensors do not come on whenever you shift in
to reverse gear or when you press the P
11,
switch*. If you install a hitch yourself, th is
function may not work . In general the follow
limitations may come up:
Rear park assist*
There is no warning for distances to the rear.
Audi parking system plus with rearview
came ra*
There is no warning for distances to the rear .
The front sensors remain activated. The visual
display switches to the trailer towing mode.
The picture from the rearview camera will not
Parking system 149
show the orientation lines nor the blue surfa
ces.
Error messages
Applies to vehicles: with rear park assist/Audi parking sys
tem plus with rearview camera
There is an error in the system if the LED on
the
P" 1! switch* is blinking and you hear a con
tinuous alarm for a few seco nds after switch
ing on the park ing system or when the park
ing system is already activated. Have your au
thorized Audi dea ler correct the error .
(D Tips
If the error is not corrected before you
switch off the ignition, when you switch on
the parking system again, the LED in the
p,,1, switch* will blink .
Page 153 of 342
possible to raise the suspension to a high leve l
above certain speeds .
When a speed of about 75 mph (120 km/h) is
exceeded for more than 30 seconds, the vehi
cle is automatically lowe red to
low level when
in comfort and automatic mode. Ground
clearance is about 0.6 inch (15 mm) less,
compared to the
normal level.
When a speed of about 100 mph (160 km/h)
is exceeded for more than 20 seconds , the ve
h icle is automat ica lly lowered to
highway lev
el
when in automatic and dynamic mode.
Ground clearance is about 1.4 inches (35 mm)
less, compared to the
normal level. Road
holding is opt imized as a result of the lower
center of gravity, and fuel consumption is re
duced as a result of reduced wind resistance .
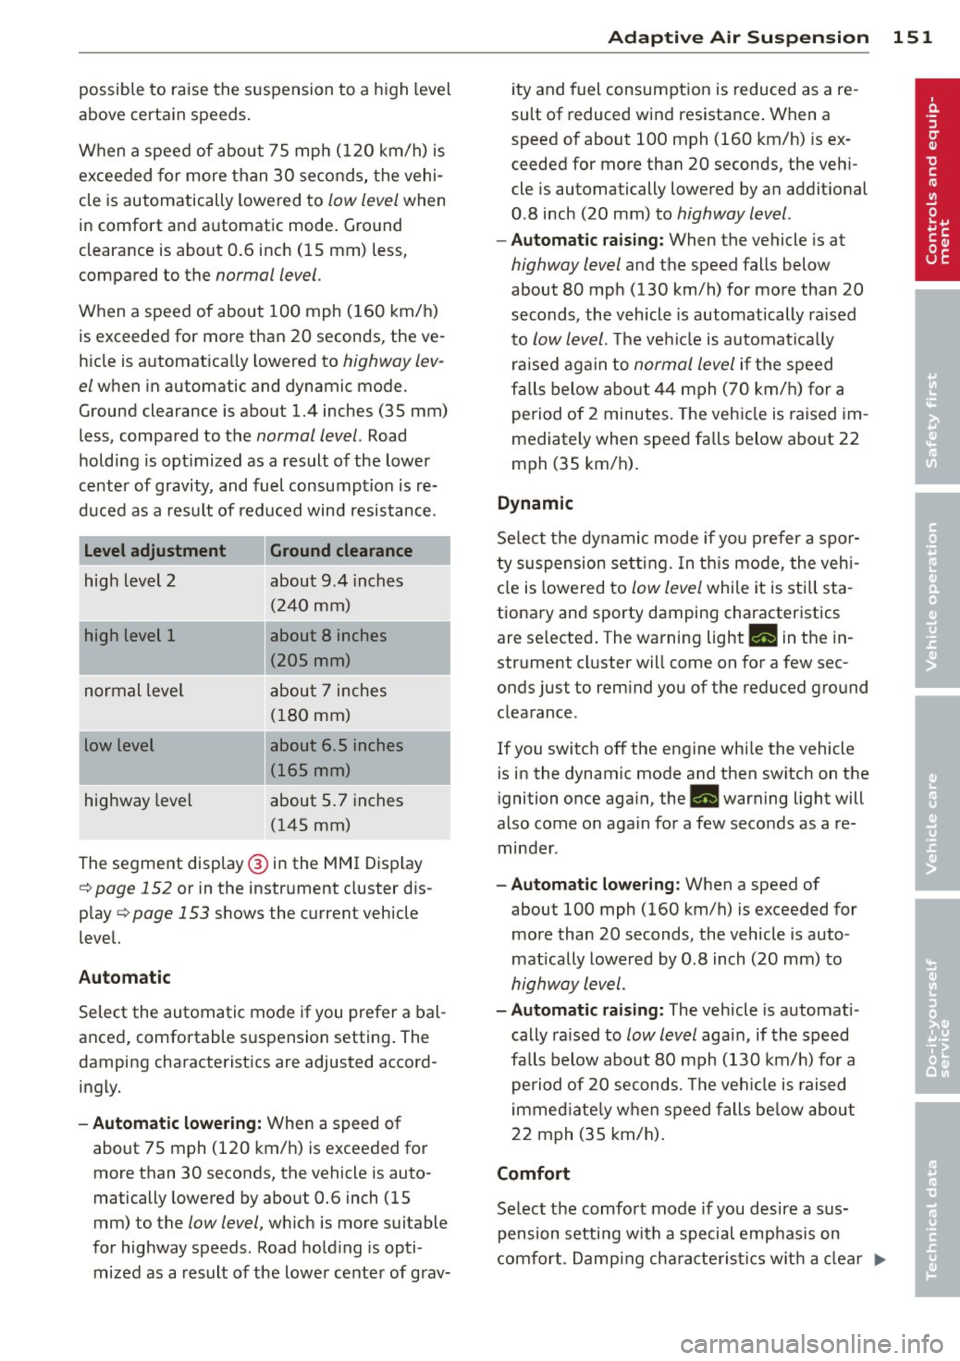
Level adjustment
high level 2
high level 1
normal leve l
low level
highway level
Ground clearance
about 9 .4 inches
(240 mm)
about
8 inches
(205 mm)
about 7 inches (180 mm)
about 6 .5 inches
(165 mm)
about 5.7 inches (145 mm)
The segment disp lay @ in the MMI Display
c:::> page 152 or in the instrument cluster dis
p lay
i:> page 153 shows the current vehicle
level.
Automatic
Select the automatic mode if you prefer a bal
anced, comfortable suspension setting . The
damping characteristics are adjusted accord
ingly.
- Automatic lowe ring: When a speed of
about 75 mph (120 km/h) is exceeded for
more than 30 seconds, the vehicle is auto
matically lowered by about 0.6 inch (15
mm) to the
low level, wh ich is more suitable
for highway speeds. Road hold ing is opti
mized as a result of the lower center of grav-
Ad aptive Air Su sp en sion 15 1
ity and fuel consumption is reduced as a re
sult of reduced wind resistance . When a
speed of about 100 mph (160 km/h) is ex
ceeded for more than 20 seconds, the veh i
cle is automatically lowered by an addit ional
0 .8 inch (20 mm) to
highway level.
- Automat ic raising: When the vehicle is at
highway level and the speed falls below
about 80 mph (130 km/h) for more than 20
seconds, the vehicle is automatically raised
to
low level. T he ve hicle is automat ica lly
ra ised aga in to
normal level if the speed
fa lls below abo ut 44 mph (70 km/h) for a
period of 2 minutes . The vehicle is raised im
mediately when speed fa lls below abo ut 22
mph (35 km/h).
Dynamic
Se lect the dynamic mode if you prefer a spo r
ty suspension setting. In t his mo de, the veh i
cle is lowered to
low level while it is still sta
tionary and sporty damping characteristics
are se lected . The warning light
Ill in the in
strument cl uster will come on for a few sec
onds just to rem ind you of the reduced ground
clearance .
If you switc h off the engine whi le the vehicle
is in the dynamic mode and then switch on the
ignition once aga in, the
Ill warning light will
also come on aga in for a few seconds as a re
minder .
-Automa tic lo weri ng : When a speed of
about 100 mph (160 km/h) is exceeded for
more than 20 seconds, the vehicle is auto
matically lowered by 0 .8 inch (20 mm) to
highway level .
-Automat ic ra is ing: The veh icle is automati
cally ra ised to
low level aga in, if the speed
fa lls below about 80 mph (130 km/h) fo r a
pe riod of 20 seconds. The veh icle is raised
immed iate ly w hen speed falls be low about
22 mph (35 km/h).
Comfort
Select the comfort mode if you desire a s us
pension setting with a special emp hasis on
comfort . Damp ing cha racte ristics w ith a clea r
Iii-
Page 154 of 342
152 Adaptive Air Suspension
emphasis on comfo rt are se lected in this
mode.
- Automatic lowering: When a speed of
about 75 mph (120 km/h) is exceeded for
more than 30 seconds, the vehicle is auto
matically lowered by 0.6 inch (15 mm) to
low level.
-Automatic raising: The vehicle is automati
ca lly raised to
normal level again, if the
speed falls below about 44 mph (70 km/h)
for a period of 2 minutes . The vehicle is
raised immediately when speed falls below
about 22 mph (35 km/h) .
Offroad
Select the offroad mode when you have to
travel over poor quality sections of road (e.g. trails). In th is mode, the vehicle is ra ised to
high level 1, and damping characteristics for
poor road stretches are selected . When
switch ing to offroad mode, the Adaptive Air
Suspension indicator appears automat ically in
the instrument cluster display ¢
page 153.
The offroad mode can only be activated at
speeds below 37 mph (60 km/h). Offroad mode ends automat ically and the automatic
mode is activated when a speed of approxi
mately SO mph (80 km/h) is exceeded.
Lift
Select the lift mode when except ionally high
ground clearance is needed at a reduced
speed. In thi s mode, the vehicle is ra ised to
high level 2. When switching to lift mode, the
Adaptive A ir Suspension indicator appears au
tomatically in the instrument cluster display
c!) page 153.
The lift mode can be activated only at speeds
below 12 mph (20 km/h) . When a speed of
about 25 mph (40 km/h) is exceeded , the sys
tem automatically leaves lift mode and the
offroad mode is activated. The instrument
cluster display automat ically switches the dis
p lay to Adaptive Air Suspension to indicate re
duced ground clearance.
MMI settings
Applies to vehicles: with Adaptive Air Suspension
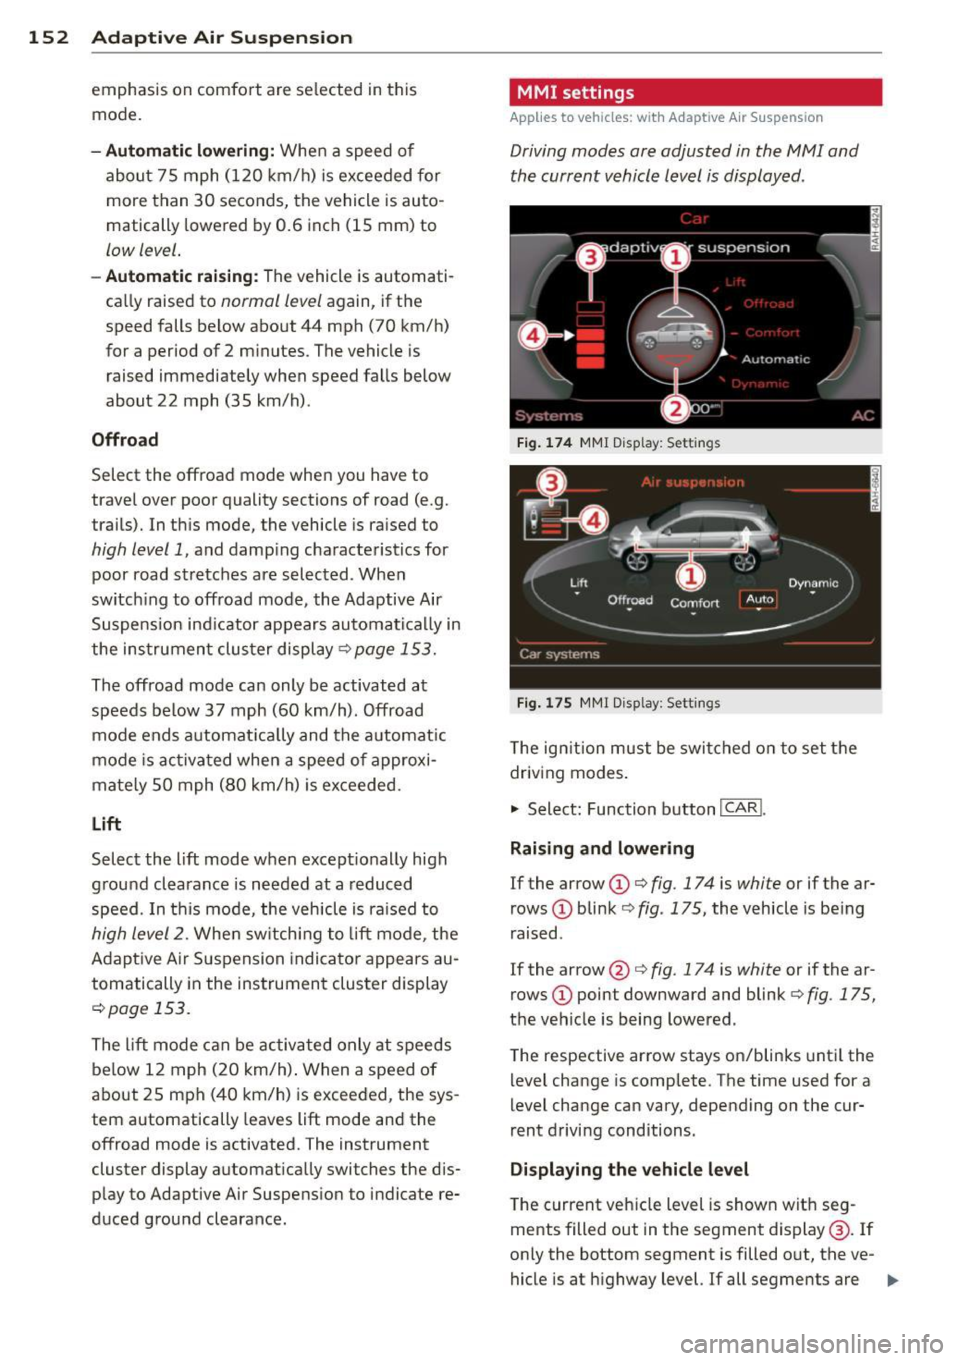
Driving modes are adjusted in the MMI and
the current vehicle level is displayed .
Fig. 174 MMI Display: Sett ings
Fig. 175 MMI Display: Settings
T he ign ition must be switched on to set the
driving modes .
.,. Select: Function button
I CAR!.
Raising and lowering
If the arrow (D Q fig. 174 is white or if the ar
rows
(D blink ¢ fig. 175, the vehicle is be ing
raised .
If the arrow @ Q fig. 17 4 is white or if the ar
rows
(D point downward and blink¢ fig. 175,
the vehicle is being lowered.
T he respective arrow stays on/blinks until the
level change is complete. The time used for a
level change can vary, depending on the cur
rent driving conditions.
Displaying the vehicle level
The current veh icle level is shown with seg
ments filled out in the segment display @. If
only the bottom segment is filled out, the ve-
hicle is at highway level.
If all segments are Ill>
Page 155 of 342
filled out, the vehicle is at high level 2 and has
the greatest amount of ground clearance pos
sib le.
Wh ile the vehicle is be ing raised or lowered,
the target level is indica ted by an arrow@
¢ fig. 174 or a white border @~ fig. 175 . The
arrow/border disappears aga in when the vehi
cle is at the target level.
Limitation s to MMI s ettin gs
Please note that not eve ry dr iving mode can
be selected in every driving situation . For ex
ample , it is not possible to switch to "lift"
mode at speeds above 12 mph (20 km/h) .
This mode is then shown
greyed out in the
MMI Display .
The vehicle can only be lowered when
a ll of
the vehicle's doors are closed. If one door is open, all driving modes whose level setting is
belo w the current vehicle level appear
greyed
out
in the MMI Display . If a door is opened
while the veh icle is being lowered , the lower
ing process is inte rrupted until all doors are
closed again.
If the system is temporarily unava ilable due
to, for instance, an empty compressed air
tank, the driving modes that cannot be set ap pear
greyed out in the MM I Disp lay. As soon
as the system is available again, the drivi ng
modes can once more be selected in the dis
p lay.
@ Tips
- For additional informat io n on the driving
modes ~
page 150, Chassis controls .
-When the compressed air tank is empty,
the comp ressor can be switched on by
starting the engine. The Adaptive Air
Suspension is once again available, after
waiting a few minutes.
- To prevent overload, the system switches off temporarily if several adjustments
are made in a row. The Adaptive Air Suspension is once again available, after
waiting a few m inutes.
Ad apti ve A ir Sus pension 15 3
Appearance in the instrument cluster
d isplay
Appl ies to vehicles: wi th Adaptive A ir Suspensio n
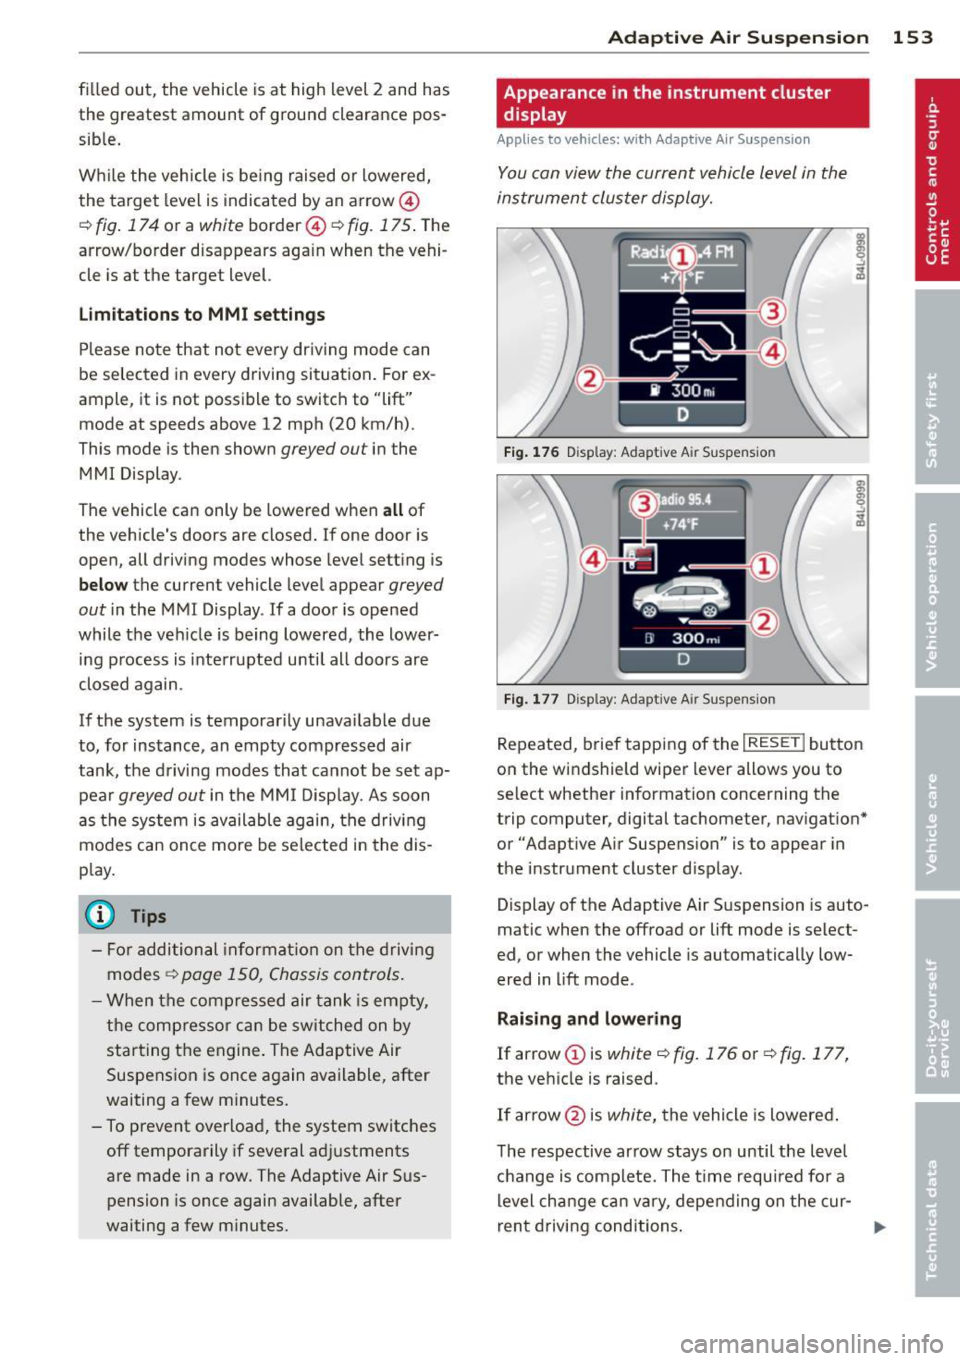
You can view the current vehicle level in the
instrument cluster display.
Fi g. 17 6 Disp lay: Adapt ive A ir Suspensio n
Fig. 177 Disp lay: Adapt ive A ir Suspension
Repeated, brief tapping of the I RESE T I button
on the windshield wiper lever allows you to
select whether information concerning the
trip computer, digital tachometer, navigat ion *
or "Adapt ive A ir Suspens ion" is to appear in
the instrument cluster d isp lay.
Display of the Adaptive Air S uspension is auto
matic when the offroad or lift mode is select
ed, or when the vehicle is automatically low
ered in lift mode.
Rai sing and lowe ring
If arrow (Dis
white¢ fig. 176 or~ fig. 177,
the vehicle is raised .
If arrow @is
white, the vehicle is lowered .
The respective arrow stays on until the level
c hange is complete. The time required for a
level cha nge can va ry, depending on the cur -
ren t driving conditions . .,..
Page 157 of 342
this mode. If the suspension is switched from
this mode to another mode, dynamic mode
cannot be re-se lected .
{D) Tips
-For vehicles with a factory installed tow
ing hitch or a trailer hitch that was in
stalled later accord ing to factory specifi
cations, the system recognizes "Trailer
tow ing mode" and activates this special
mode automatically, as soon as the elec
trical connection on the trailer socket is
connected . The mode ceases automat i
cally when the elect rical connection to
the trailer socket is d isconnected.
- If the tra iler towing mode has been act i
vated, the vehicle will not drop to the l ow or highway level.
Cargo mode
A pp lies to vehicles: wit h Adap tive Air S uspe nsio n
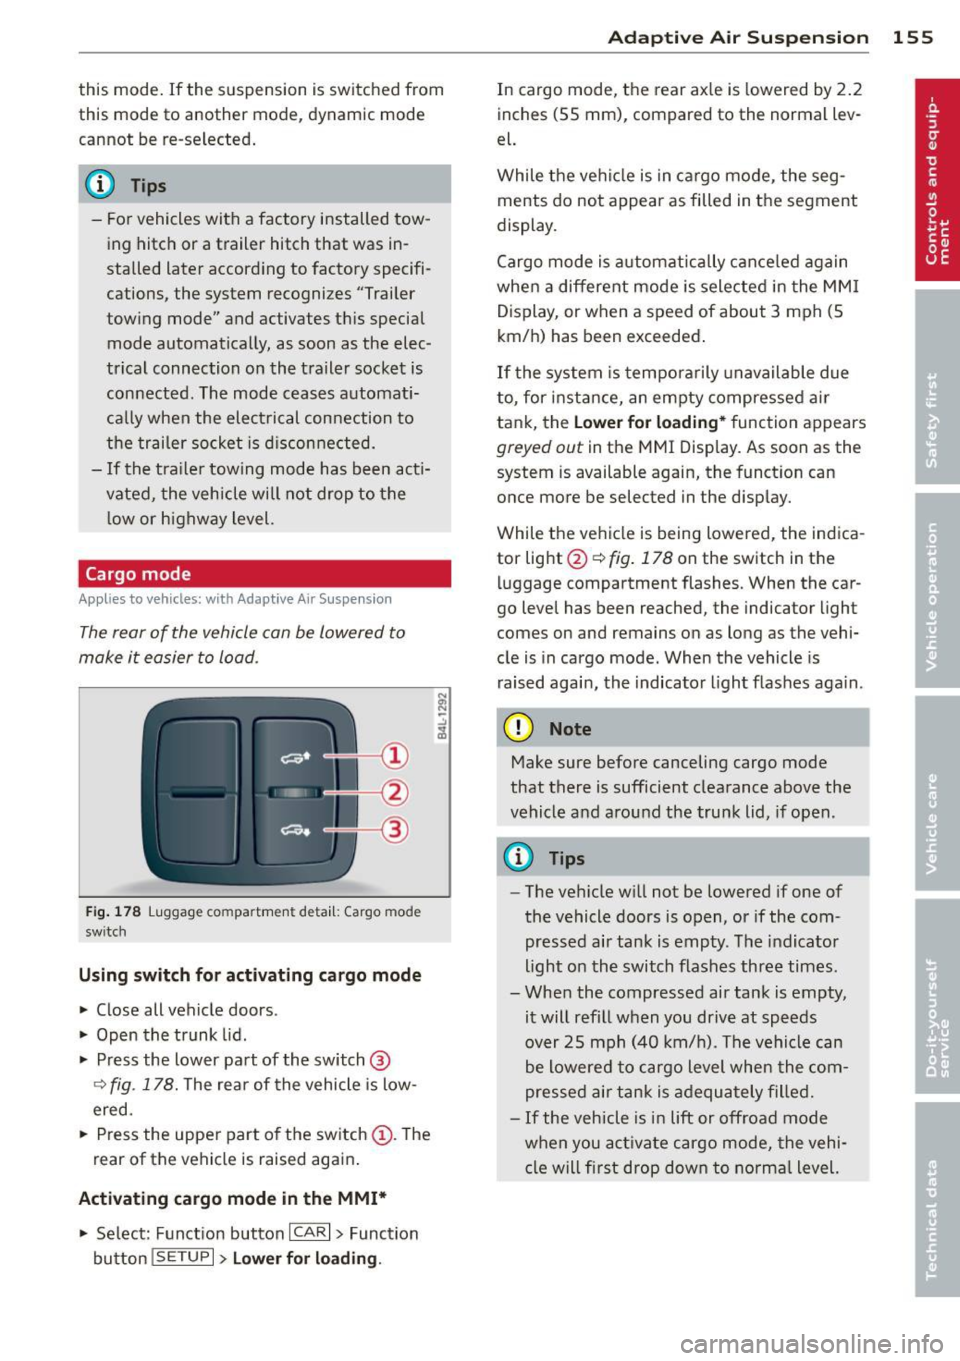
The rear of the vehicle con be lowered to
make it easier to load .
Fig. 178 Luggage compa rtment detail: Cargo mode
sw itc h
Using sw itch for activating cargo mode
~ Close all vehicle doors .
~ Open the trunk lid .
~ Press the lower pa rt of the switch@
Q fig. 178. The rear of the vehicle is low
ered.
~ Press the uppe r part of the sw itch (D . The
rear of the vehi cle is raised aga in .
Activating cargo mode in the MMI*
~ Se lect: Function button ICAR I > Function
button
! SE TUP I> Lower f or load in g. Ad
apti ve A ir Sus pension 155
In cargo mode, the rear ax le is lowered by 2 .2
inches (55 mm), compared to the normal lev
el.
While the ve hicl e is in ca rgo mode, the seg
ments do not appear as filled in the segment
display.
Cargo mode is a utomatically c ance led again
when a different mode is selected in the MM I
D isplay, or when a speed of about 3 mph (5
km/ h) has been exceeded.
If the system is tempora rily unavailable due
to, for instance, an empty compressed ai r
tank, the
Lower fo r loading* function appears
greyed out in the MMI Display. As soon as the
system is available again, the function can
once more be selected in the disp lay.
While the vehicle is being lowered, the indica
tor light @~
fig. 178 on the switch in the
luggage compartment flashes. When the car
go level has been reached, the indicator light
comes on and remains on as long as the vehi
cle is in cargo mode. When the vehicle is
raised agai n, the indicator l ight f las hes aga in.
(D Note
Make sure before canceling cargo mode
that there is sufficient clearance above the
vehicle and around the tru nk lid , if open .
(D Tips
-The ve hicle w ill not be lowered if one of
the vehicle doors is open, or if the com
pressed air tank is empty . T he indicator
light on the switch flashes three times.
- When the compressed air tank is empty,
it will refill when you drive at speeds
over 25 mph (40 km/ h). The vehicle can
be lowered to cargo level when the com
pressed air tank is adequately fille d.
- If the veh icle is i n lift or off road mode
when you act ivate cargo mode, the vehi
cl e w ill first drop dow n to norma l level.
Page 184 of 342
182 Airbag sys tem
as def ined in the electronic control unit
Q page 190, PASSENGER AIR BAG OFF light.
A lways remember, a ch ild safety seat or infant
carrier insta lled on the front sea t may be
struck and knocked o ut o f position by the rap
id ly inflating passeng er's airbag in a frontal
coll is ion . T he airbag cou ld greatly reduce the
effec tiveness of the child restraint and even
serious ly injure the child during inflat ion.
F or this reason, and because the back seat is
the safest p lace for children - when properly
restra ined acco rd ing to their age and si ze - we
s trongly recommend that children always sit
in the back seat
Q page 200, Child Safety .
A WARNING
A child in a rearward-facing child safety
s e at insta lled on the front passenger seat
w ill be seriously injured and can be k illed if
t he fr ont a irbag inflates - even with an Ad
vanced Airbag System.
- T he i nflating a irbag will hit the child
safety seat or infant carrier wit h great
f orce and w ill smash the ch ild safety sea t
and child against the backrest , center
armrest, door or roof.
- Always insta ll rear -facing child sa fety
seats on the rear seat.
- If you mus t install a rearward facing
child safety seat on the front passenger
seat because of exceptional circ umstan
ces and the
PASSENG ER AIR BAG OFF
light does not come on and stay on , im
med iately install the rea r-facing child
safety seat in a rear seating position and
hav e the a irbag system inspected by you r
authori zed Aud i dealer.
- Forward-fac ing ch ild safety seats instal
led on the front passenger's seat may i n
terfere wi th the deployment of the air
b ag and cau se serious person al injury to
the ch ild .
A WARNING
If, in exceptional c ircumstances, you must
install a forward-facing child restra int on
the front passenger's seat: -
Always make sure the forward-facing
seat has been designed and certified by
its manufacturer for use on a front seat
with a passenger front and s ide a irbag .
- Never put the forward-facing child re
straint up against or very near the instru ment panel.
- Always move the passenger seat into its
rearmost pos ition in the seat's fore a nd
aft ad justment range, as fa r away from
the airbag as possible b efore installing
the forwa rd-fa cing ch ild restra int. The
b ackrest mus t be a djusted to a n up right
position.
- Make s ure that the
PASSENGER AIR BAG
OFF
li ght comes on and stays o n all the
t ime wheneve r the ignition is switched
on.
A WARNING -ra----
To reduce the risk of serious injury, make
sure that the
PASSENGER AIR BAG OFF
light will be displayed whenever a child re
straint is installed on the front passenger
seat and the ignition is sw itched on.
- If the
PASSENGER AIR BAG OFF light
does not stay on, perform the checks de
scribed
Q page 190, Monitoring the Ad
vanced Airbag System .
-Take t he chi ld restraint off the front pas
senger seat and install it prope rly at one
of the rear seat positions if t he
PASSEN
GER AIR BAG OFF
li ght does not stay on.
- Have the airbag system inspected by
your author ized Audi deal er immed iate
ly .
- Always carefu lly follow instr uctions from
chi ld restraint manufacture rs when in
st all ing c hild restra ints .
A WARNING
If, in exce ptiona l circumstances, you m ust
i nsta ll a forward or rearw ard-fa cing child
r estra int on the front passenger's seat :
- Imp roper ins tallation o f child restra ints
can reduce their effec tiveness or even
Page 194 of 342
192 Airbag sys tem
-the safety be lt is being properly worn and
that there is not a lot of slack in the safety
belt webbing,
- accessory seat covers or cushions or other
t h ings that may cause an incorrect reading
or impression on the weight-sensing mat
under the upholstery of the seat have been
removed from the front passenger seat,
- a safety belt extender has not been left in
the safety belt latch for the front passenger
seat.
In addition to the
PASSENG ER AIR BA G OFF
light in the center of the instrument panel,
the message
PASSENGER AIR BAG OFF or
PA SS ENGER AIR BA G ON will briefly appear
in the instrument cluste r display . T his is to in
form the drive r of the current front passenger
a ir bag status.
Important safety instructions on
monitoring the Advanced Airbag System
A WARNING
An airbag system that is not funct ioning
prope rly cannot provide supplemental pro
tect ion in a frontal crash.
- If the airbag indicato r light comes on, it
means that the re may be someth ing
wrong with the Advanced A irbag System.
It is possible that the airbag will inflate
when it is not supposed to, or w ill not in
flate when it should.
- Have the airbag system inspected imme
diately by your author ized Audi dealer .
A WARNING
If the front airbag inflates, a ch ild witho ut
a child restra int, or in a rearward-facing
child safety seat, or in a forward -facing
child restraint that has not been properly
installed will be seriously injured and can
be killed.
- Even though your veh icle is equipped
with an Advanced Airbag System, make
certain that a ll children , especially 12
years and younge r, a lways ride on the back seat properly
restrained for their
age and size.
- Always install forward o r rear-facing
child safety seats on the rear seat -even
with an Advanced A irbag System.
- If you must install a rearward-facing
child safety seat on the front passenger
seat because of exceptiona l circumstan
ces and the
PASS ENG ER AIR BAG OFF
light does not appea r and stay on, imme
diate ly install the rear-facing child safety
seat in a rear seat ing pos ition and have
the airbag system inspe cted by your au
thori zed A udi dealer.
- A tight tether or other s trap on a rea r
ward-facing child restraint att ached to
the front passenger seat can p ut too
m uch p ressure on the weight-sensing
mat in the seat and registe r more weight
than is actually on the seat. The heavier
weight registered can make the system
work as though an adult were on the seat
and deploy the Advanced Airbag when it
must be suppressed causing ser ious or
even fata l injury to t he ch ild.
- If, i n exceptiona l circumstances, you
m ust ins tall a forward-fac ing ch ild re
straint o n the front passenger seat, al
ways move the sea t in to its rearmos t po
sition in the seat's fore and aft adjust
ment range, as fa r away from the airbag
as possible. The backrest must be adjust
ed to an upright pos ition. Make sure that
the
PASSENGER AIR BAG OFF light
comes on and stays on all the time when
ever the ignit ion is switched on.
A WARNING
--
- If the PASSENGER AIR BAG OFF light
does not go out when an ad ult is sitting
on the front passenger seat after taking
the steps descr ibed above, make su re the
ad ult is properly seated a nd restra ined at
one o f the rea r seat ing pos itions.
- Have the airbag system inspected by
your author ized Audi dealer befo re tr ans
port ing anyone on the front passenger
seat.
...