ECU AUDI Q7 2012 Owner´s Manual
[x] Cancel search | Manufacturer: AUDI, Model Year: 2012, Model line: Q7, Model: AUDI Q7 2012Pages: 342, PDF Size: 86.42 MB
Page 40 of 342
38 Opening and closing
Opening and closing
Keys
Key set
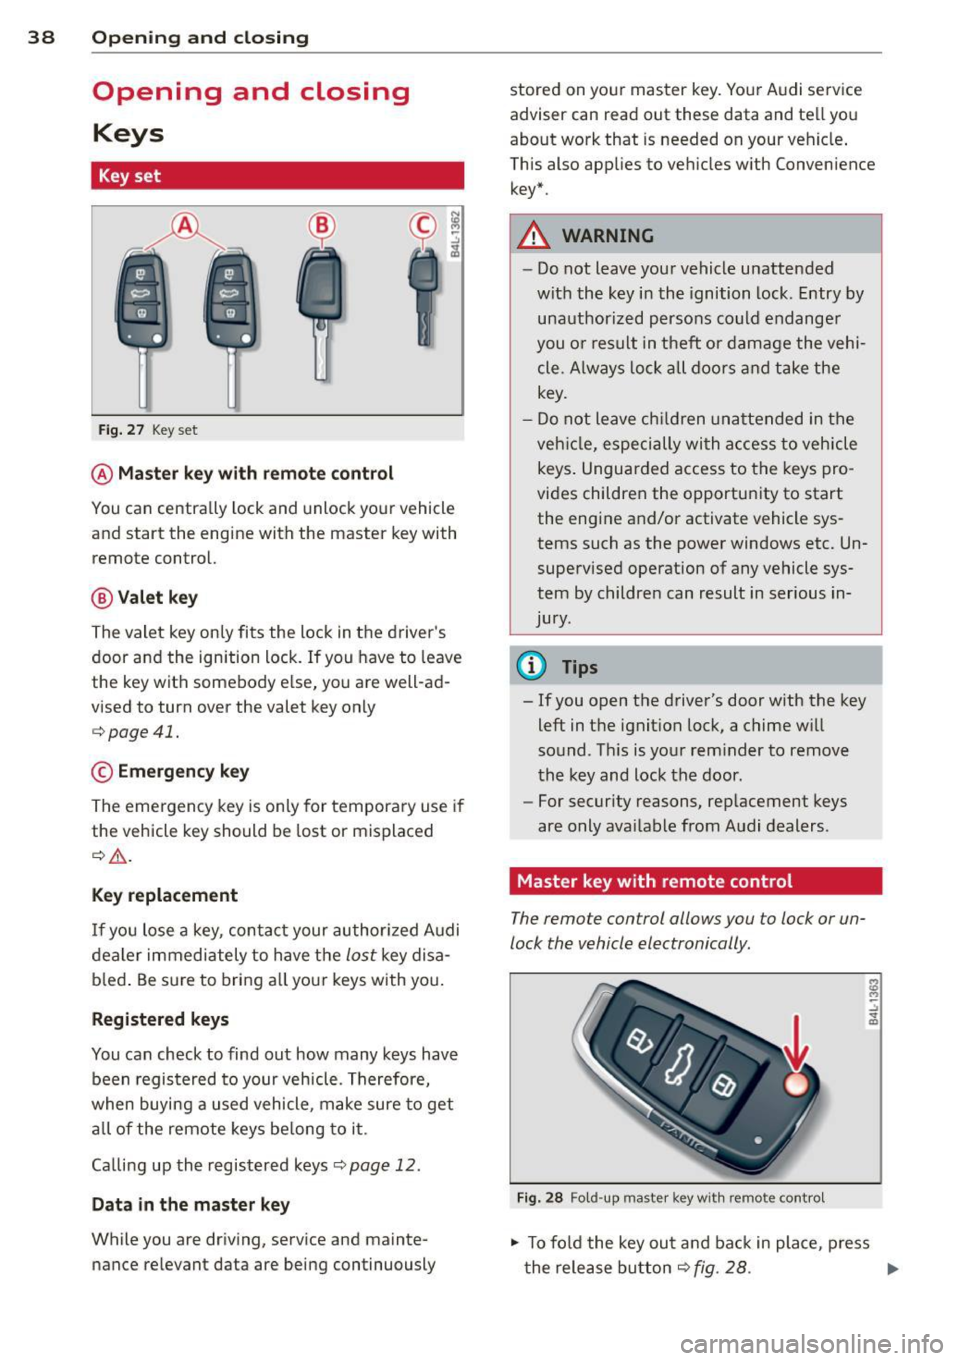
Fig. 27 Key set
@ Master key with remote control
You can centrally lock and unlock your vehicle
and start the engine with the master key with
remote control.
@ Valet key
The valet key only fits the lock in the driver's
door and the ignition lock . If you have to leave
the key with somebody else, you are well-ad
vised to turn over the valet key only
¢ page 41.
© Emergency key
The emergency key is only for temporary use if
the vehicle key should be lost or misplaced
¢ .&. .
Key replacement
If you lose a key, contact your authorized Audi
dealer immediately to have the
lost key disa
b led . Be sure to bring all your keys with you.
Registered keys
You can check to find out how many keys have
been registered to your vehicle. Therefore,
when buying a used vehicle, make sure to get
all of the remote keys be long to it .
Ca lling up the registered keys¢
page 12.
Data in the master key
While you are driving, serv ice and mainte
nance relevant data are being continuously stored on your master key. Your Audi service
adviser can read out these data and tel
l you
about work that is needed on your vehicle .
This also app lies to vehicles w ith Convenience
key*.
A WARNING
--
- Do not leave your vehicle unattended
with the key in the ignition lock. Entry by
unauthorized persons could endanger
you or result in theft or damage the vehi
cle. A lways lock all doors and take the
key.
- Do not leave children unattended in the
veh icle, especially with access to vehicle
keys . Unguarded access to the keys pro
vides children the opportun ity to start
the engine and/or activate vehicle sys
tems such as the power windows etc. Un
supervised operation of any vehicle sys
tem by children can result in serious in
Jury .
(D Tips
- If you open the driver's door with the key
left in the ignition lock, a chime w ill
sound. Th is is your reminder to remove
the key and lock the door.
- For security reasons, replacement keys
are only ava ilable from Audi dealers.
Master key with remote control
The remote control allows you to lock or un
lock the vehicle electronically .
Fig. 28 Fold-up maste r key with remo te control
., To fold the key out and back in place, press
t he release button ¢
fig. 28. .,.
Page 44 of 342
42 Openin g and clo sing
readiness light, located in the upper part of
the driver's door panel, will start to blink.
- T he vehicle interior lights turn off.
Unlocking and l ocking with Conven ience
k ey*
On vehicles which a re equipped w ith the C o n
ve nience k ey*
authorization system, the
doors are unlocked without a key by means of
a proximity sensor in the door handle. The
doors are simi larly locked without a key using
the locking button. Each door has a proximity
sensor and a locking button .
Automatic l ock ing
The automatic locking feature locks all the ve
hicle doors and the rear lid when you drive
faster than 9 mph (15 km/h). This function can be turned on and off in the MMI
C entr al
lo cking
Menu c:> page 44.
You can un lock the vehicle from the inside by :
- removing the key from the ign it ion sw itch
(the vehicle will automat ica lly unlock itself)
or
- pressing the unlock part of the power lock
switch @or
- pull ing the door handle (twice to open the
rear doors).
Unintent ionall y locking yourself out
In the following cases there safeguards to
prevent you locking your remote master key in
the vehicle :
- The veh icle does not lock with the power
locking sw itch
c:> page 44 if the driver's
door is open.
- On vehicles with Convenience key* , if the
most recently used master key is in the lug
gage compartment, the rear lid is automati
cal ly unloc ked aga in after it is closed.
Do not lock your vehicle with the
r e mot e m as
t e r k ey or Convenienc e key*
until all doors
and the rea r lid are closed. In t his way you
avoid locking yourse lf out accidenta lly.
A WARNING
- When you lock your vehicle from outside,
nobody- espec ially children -should re
main inside the vehicle . Remember,
when you lock the vehicle from the out
side the windows cannot be opened from
the inside.
- When you leave the veh icle, always re
move the ignition key and take it with
you . This will prevent passengers (chil
dren, for example) from accidentally be
ing locked in the vehicle should they acci
dentally press the power locking switch
in the front doors.
- Do not leave children inside the vehicle
unsupervised. In an emergency it would
be imposs ible to open the doors from
the outside without the key.
(D Tips
- In the event of a crash with airbag de
ployment all locked doors will be auto
matically unlocked to give access to the
vehicle occupants from the outside.
- If the power locking system sho uld mal
function, you can lock each door individ
ually using the vehicle key
c:> page 45 .
-If the power locking system shou ld fa il,
you can still open the fuel tank flap in an
emergency
c:> page 2 55 .
-You are well advised not to keep va lua
bles inside an unattended vehicle, v is ible
or not. Even a properly locked vehicle
cannot p rov ide the secur ity of a safe .
Page 81 of 342
Luggage compartment
Expanding luggage compartment
To expand the luggage compartment, the
seatbacks can be folded forward separately or together .
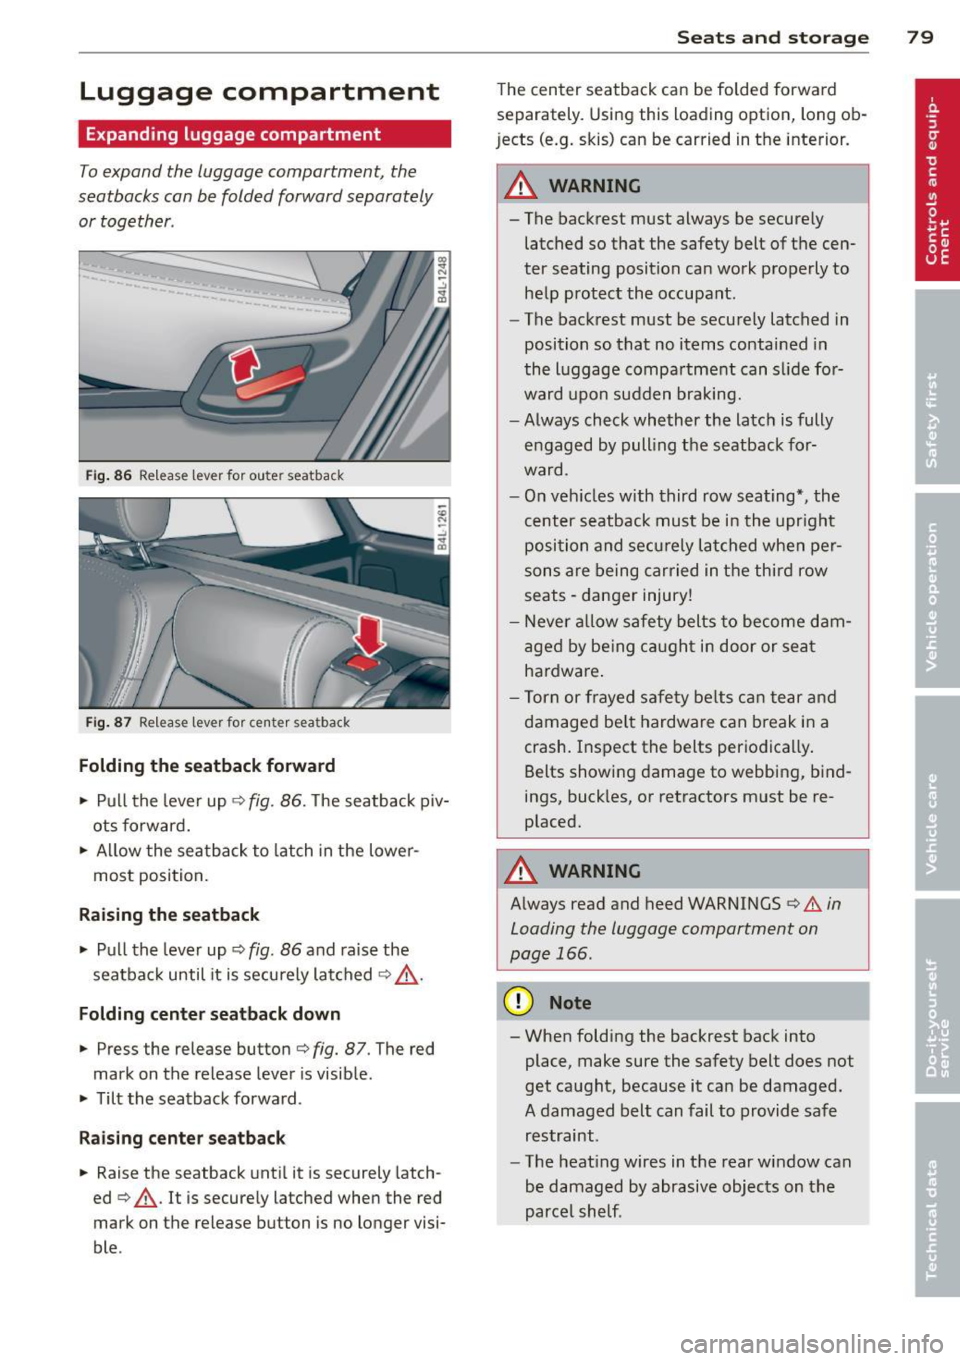
Fig. 86 Release lever for ou ter seatback
Fig. 87 Release leve r fo r cente r seatback
Folding the seatback forward
.. Pu ll the lever up ¢ fig. 86. The seatback piv
ots fo rward .
.. Allow the sea tba ck to latch in the lowe r
most posi tion.
Raising the seatback
.. Pull the lever up ¢ fig. 86 and ra ise the
seatba ck until it is secu rely latched ¢ _&. .
Folding center seatback down
.. Press the release button ¢ fig. 87. The red
mark on the release lever is visib le .
.. Tilt the seatback forward .
Raising c enter seatback
.. Raise the seatback unt il it is securely latch
ed ¢_&. . It is securely latched when the red
mark on the release button is no longer visi
ble .
Seats and storage 79
The cen ter seatback can be folded forwa rd
separately. Using this loading option, long ob
jects (e.g. skis) can be carried in t he interior.
_& WARNING
-
- The backrest must always be secure ly
latched so that the safety belt of t he cen
ter seating position ca n wo rk p roperly to
he lp p rot ect the occupant.
- The back rest must be securely latched in
position so that no items contai ned in
the l uggage compa rtment can s lide fo r
ward upon sudden braking.
- Always check whether the latc h is fully
e ngaged by pull ing t he seatback for
ward .
- On veh icles with third row seating*, the
cent er seatback must be i n the upr ight
posi tion and se curely la tched whe n pe r
sons are being carried in t he thir d ro w
seats -danger injury!
- Never a llow safety belts to become dam
age d by be ing c augh t in door or sea t
ha rdware .
- Tor n or frayed s afety be lts c an t ear and
damage d be lt hardware can break in a
crash. I nsp ect the belts per io d ica lly.
Belts showi ng damage to webbing, b ind
ings, buck les, or retractors m ust be re
placed.
_& WARNING
A lways read and heed WARNINGS ¢.&. in
Loading the luggage compartment on
page 166 .
(D Note
-When fold ing the backrest back into
place, make sure the safety belt does not
get ca ught, because it can be damaged .
A damaged belt can fail to provide sa fe
restraint .
- The heat ing wires in the rea r window can
be damaged by abrasive objects on the
parce l shelf .
Page 82 of 342
80 Seats and storage
Tie-down rings
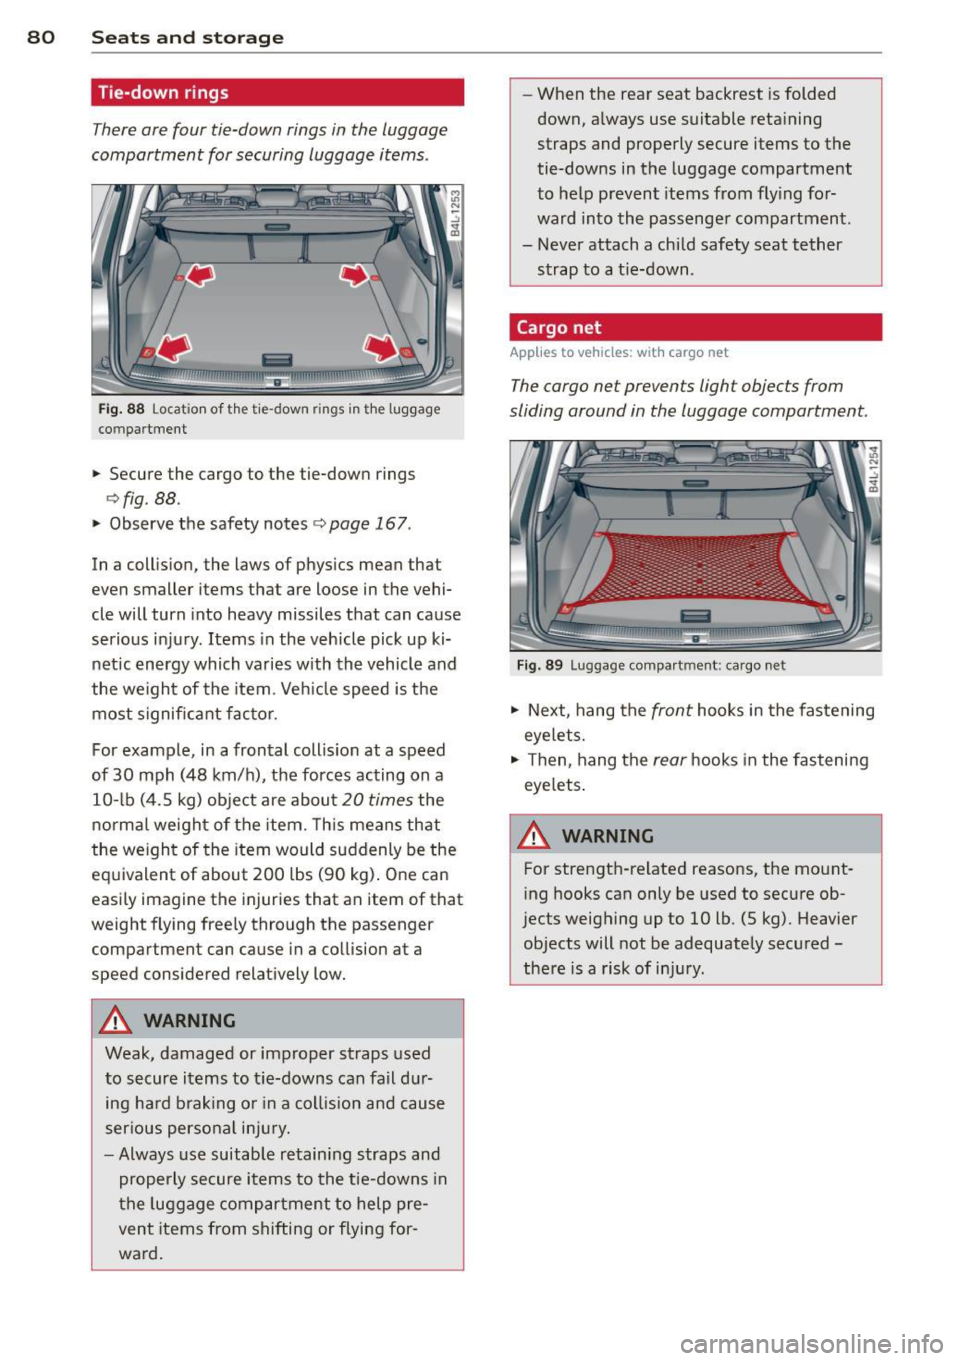
There are four tie-down rings in the luggage
compartment for securing luggage items .
liiiil
Fig. 88 Location of the tie-down rings in th e luggage
compartment
., Secure the cargo to the tie-down rings
¢fig. 88 .
., Observe the safety notes ¢ page 167 .
In a collis ion, the laws of physics mean that
even smaller items that are loose in the vehi
cle will turn into heavy missiles that can cause
serious injury. Items in the vehicle pick up ki
netic energy which varies with the vehicle and
the we ight of the item. Vehicle speed is the
most significant factor.
For example, in a frontal collis ion at a speed
of 30 mph (48 km/h), the forces acting on a 10- lb (4. 5 kg) object are about
20 times the
normal weight of the item. T his means that
the weight of the item would suddenly be the
equivalent of about 200 lbs (90 kg). One can
easily imagine the injuries that an item of that
weight flying freely through the passenger
compartment can cause in a collision at a
speed considered relatively low.
A WARNING
Weak, damaged or improper straps used
to secure items to tie-downs can fail dur
ing hard braking or in a collision and cause
serious personal injury.
- Always use suitable retaining straps and
properly secure items to the tie-downs in
the luggage compartment to help pre
vent items from shifting or flying for
ward.
.
- When the rear seat backrest is folded
down, always use suitable retaining
straps and properly secure items to the
tie-downs in the luggage compartment
to help prevent items from flying for
ward into the passenger compartment.
- Never attach a child safety seat tether strap to a tie-down.
Cargo net
Applies to vehicles: wit h cargo net
The cargo net prevents light objects from
sliding around in the luggage compartment.
Fig. 89 Luggage compartment: cargo net
., Next, hang the front hooks in the fastening
eyelets.
., Then, hang the
rear hooks in the fastening
eyelets .
A WARNING
--
For strength-related reasons, the mount·
ing hooks can only be used to secure ob
jects weighing up to 10 lb. (5 kg). Heavier
objects will not be adequately secured -
there is a risk of injury.
Page 84 of 342
82 Seats and st o rage
- So that stale a ir can escape from the ve
hicle be sure not to cover the ventilation
s lot between the rear lid and the lug
gage compartment cover.
Protective liner
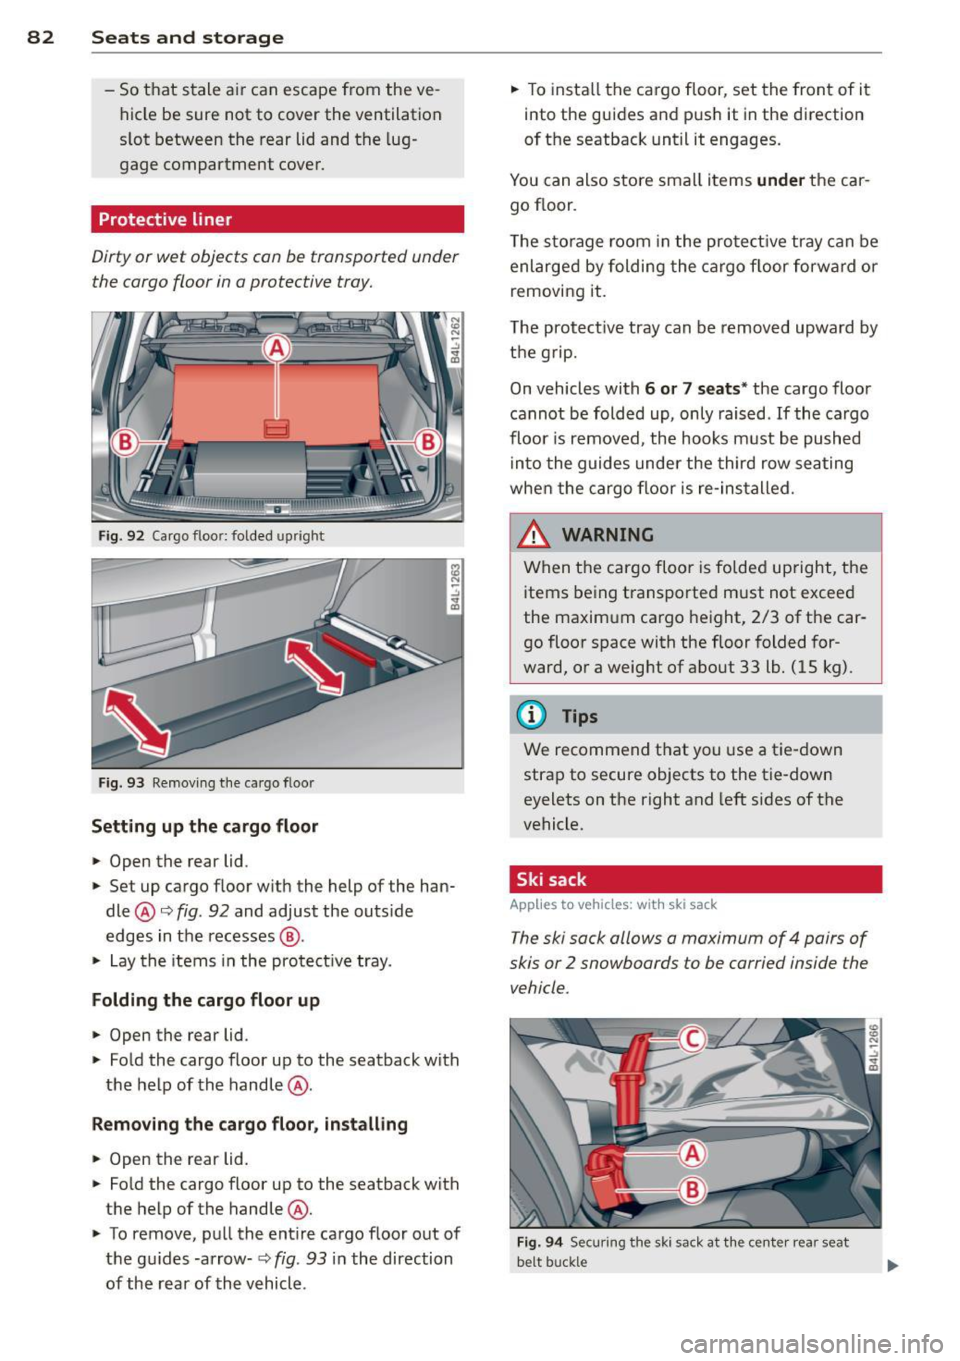
Dirty or wet objects con be tronsported under
the cargo floor in a protective tray.
Fig. 92 Cargo floor: folded upright
Fig. 93 Remov ing t he cargo floor
Setting up the ca rg o flo or
• Open the rear lid.
• Set up cargo floor with the help of the han
dle @¢
fig. 92 and adjust the outs ide
edges in the recesses @.
• Lay the items in the protect ive tray.
Folding the cargo floor up
• Open the rear lid.
• Fold the cargo floor up to the seatback with
the help of the handle @.
Rem oving the c arg o floor , in sta ll ing
• Open the rear lid.
• Fo ld the cargo floor up to the seatback with
the help of the handle @.
• To remove, pull the enti re cargo floor out of
the gu ides -arrow-
Q fig . 93 in the direction
of the rear of the vehicle. •
To insta ll the ca rgo floor, set the front of it
into the guides and pus h it in the direction
of the seatback until it engages.
You can also store sma ll items
und er the car
go floor.
T he sto rage room in the pro te ct ive tray can be
enlarged by folding the cargo floor forward or
removing it .
T he protect ive tray can be removed upward by
the grip.
On vehicles with
6 or 7 sea ts* the cargo floor
cannot be folded up, only raised. If the ca rgo
floor is removed, the hooks must be pushed
into the guides under the third row seating
whe n the cargo floor is re-installed.
& WARNING
When the cargo floor is folded upright, the
items being transported must not exceed
the maximum cargo height, 2/3 of the car
go floor space with the floor folded for
ward, or a weight of about 33 lb. (15 kg).
@ Tips
We recommend that you use a tie-down
strap to secure objects to the tie-down
eyelets on the right and left sides of the
vehicle.
· Ski sack
Applies to vehicles: with ski sack
The ski sack allows a maximum of 4 pairs of
skis or 2 snowboards to be carried inside the
vehicle.
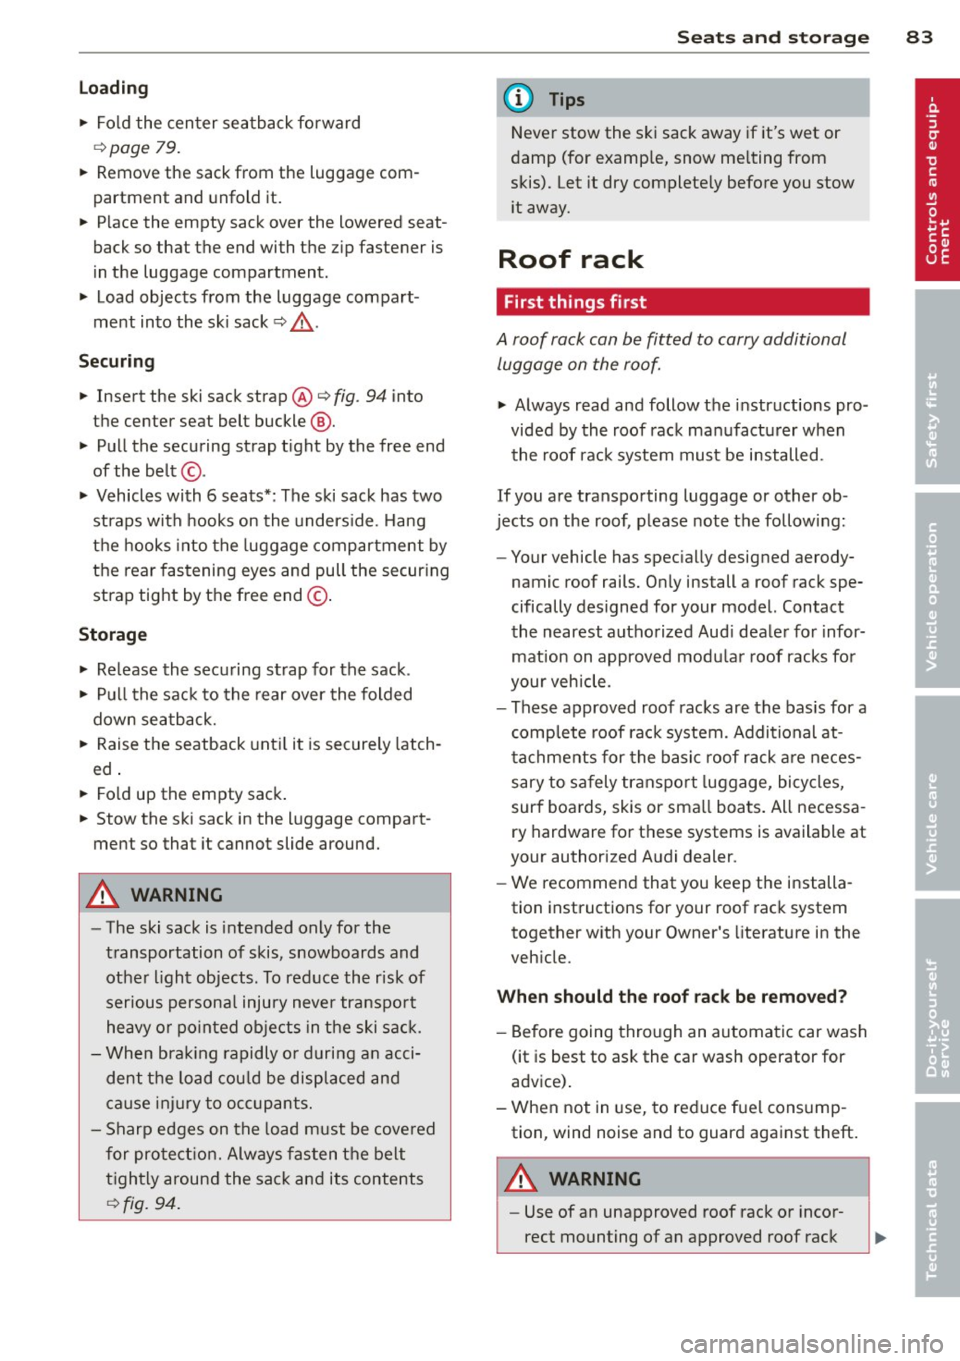
F ig. 9 4 Securing the ski sack at the center rear seat
be lt buckle
Page 85 of 342
Lo adin g
"' Fo ld the center seatback forward
r=> page 79.
"' Remove the sack from the luggage com
partment and unfold it.
"' Place the empty sack over the lowered seat
back so that the end wi th the z ip fastener is
i n the luggage compartment.
"' Load objects from the luggage compart
ment into the sk i sack
r=> &, .
Securin g
"' Insert the ski sack strap @ r=> fig. 94 into
the center seat belt buckle @.
"' Pull the securing strap t ight by the free end
of the belt @.
"' Vehicles with 6 seats* : The ski sack has two
straps with hooks on the unders ide . Hang
the hooks into the luggage compartment by
the rear fastening eyes and pull the secur ing
strap tight by the free end @.
Storage
"' Re lease the securing strap for the sack .
"' Pull the sack to the rear over the folded
down seatback.
"' Raise the seatback unti l it is securely latch
ed .
"' Fo ld up the empty sack.
"' Stow the ski sack in the luggage compart
ment so that it cannot slide around.
_&. WARNING
-
- The ski sack is intended only for the
transportation of skis, snowboards and
other light objects. To reduce the risk of
serious persona l injury never transport
heavy or po inted ob jects in the ski sack .
- When bra king rapidly o r during an acci
dent the load cou ld be displaced and
ca use inj ury to occupants.
- Sharp edges on the load must be cove red
for protect ion. Always fas ten the belt
t igh tly around the sack and its contents
r=> fig. 94. S
eat s an d sto rage 8 3
(D Tips
Never stow the ski sack away if it's wet or
damp (for examp le, snow me lting from
skis). Let it dry complete ly before you stow
i t away.
Roof rack
First things first
A roof rack can be fitted to carry additional
luggage on the roof.
"' Always read and follow the instructions pro
vided by the roof rack manufacturer when the roof rack system must be installed .
If you are transporting luggage or other ob
jects on the roof, p lease note the following:
- Your vehicle has spec ially designed aerody-
namic roof rails. Only install a roof rack spe
cifically designed for your model. Contact
the nearest authorized Aud i dealer fo r infor
mation on approved modu lar roof racks for
your vehicle.
- These approved roof racks are the bas is for a
complete roof rack system. Additional at
t achments for the basic roof rack a re neces
sary to safely transpo rt luggage, bicycles,
surf boards, skis or sma ll boats. All necessa
ry hardware for these systems is available at
your authorized Audi dealer.
- We recommend that you keep the installa
tion instructions for your roof rack system
together with your Owner's literature in the
veh icle.
When sh ould the roof rac k be remov ed?
- Before going through an automatic car wash
(it is best to ask the car wash operator for
advice) .
- When not in use, to reduce fuel cons ump
tion, wind noise and to guard against theft.
_&. WARNING
- Use of an unapproved roof rack or incor
rect mounting of an approved roof rack
Page 86 of 342
84 Seats and storage
can cause the roof rack or the items at
tached to it to fall off the roof onto the
road.
- Objects falling from the roof of a vehicle
can cause a crash and personal injury.
- Only mount the system between the
markings shown in~
page 84, fig. 95 .
-The roof rack system must be installed
exactly according to the instructions pro
vided.
(D Note
- Your vehicle warranty does not cover any damages to the vehicle caused by using roof racks or mounting structures not
approved by Audi for your vehicle . The
same applies to damage resulting from incorrect roof rack installation .
- Always check the roof rack mountings
and hardware before each trip and dur
ing a trip to make sure everything is se
curely tightened . If necessary, retighten
the mountings and check the entire sys
tem from time to time.
- After mounting a roof rack system, or
when you transport objects on the roof
of your vehicle, the height of the vehicle
is naturally increased. Be careful when
driving under low bridges or in parking
garages for example. This could cause
damage to the load and even the vehicle
itself.
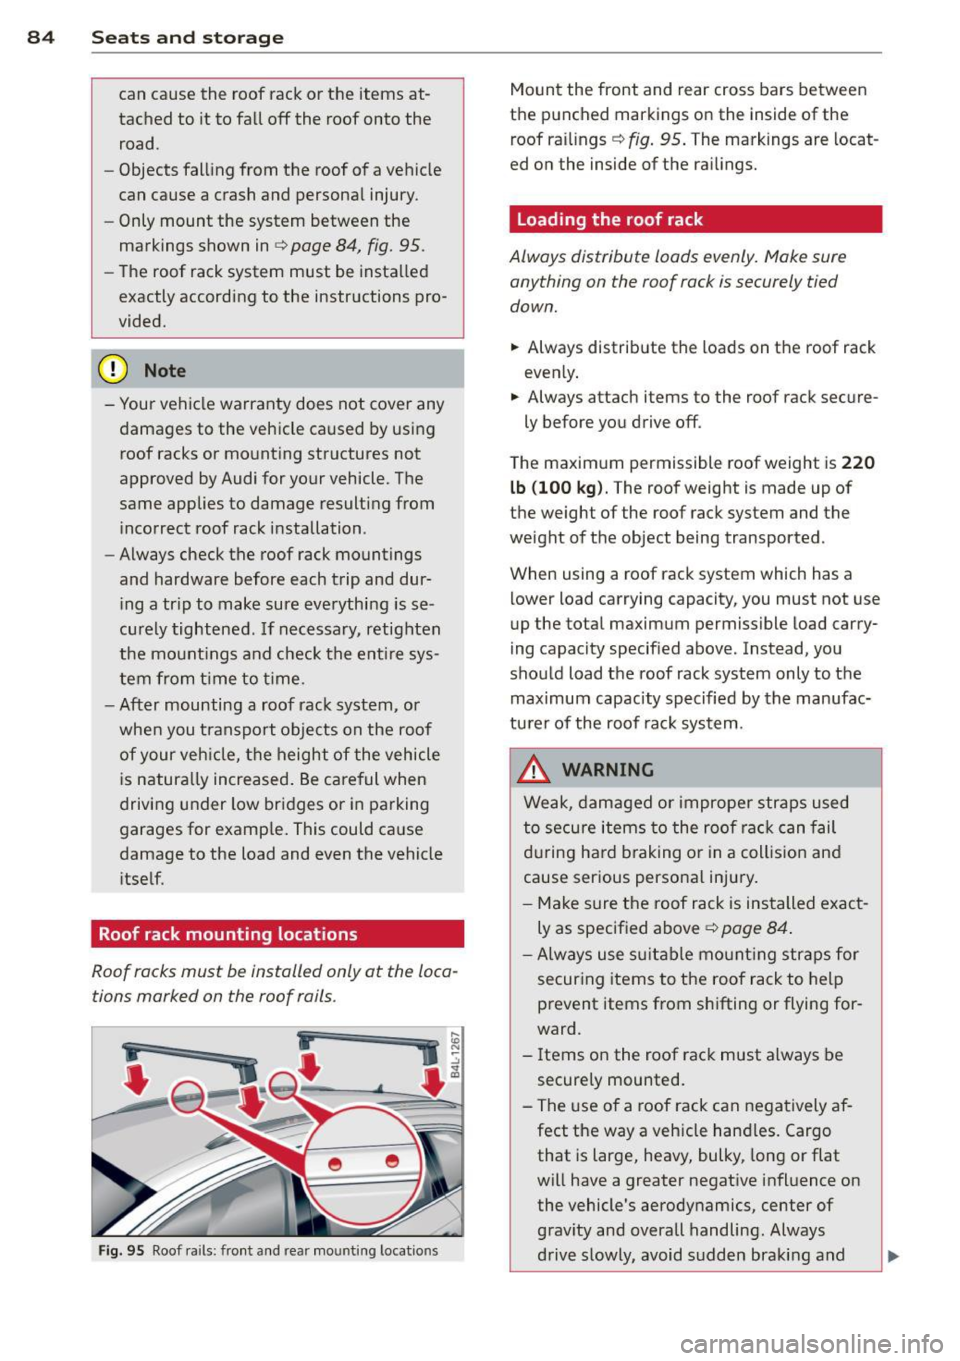
Roof rack mounting locations
Roof racks must be installed only at the loca
tions marked on the roof rails .
i
-
Fig. 95 Roof rails: front and rea r mo unting locatio ns
Mount the front and rear cross bars between
the punched markings on the inside of the
roof railings ~
fig. 95. The markings are locat
ed on the inside of the railings.
Loading the roof rack
Always distribute loads evenly. Make sure
anything on the roof rack is securely tied
down.
.,. Always distribute the loads on the roof rack
evenly .
.,. Always attach items to the roof rack secure -
ly before you drive off .
The max imum permissible roof weight is
220
lb (100 kg).
The roof weight is made up of
the weight of the roof rack system and the
weight of the object being transported .
When using a roof rack system wh ich has a
lower load carrying capacity, you must not use
up the total maximum permissible load carry
ing capacity specified above. Instead, you
should load the roof rack system only to the maximum capacity specified by the manufac
turer of the roof rack system .
.&_ WARNING
Weak, damaged or improper straps used
to secure items to the roof rack can fail
during hard braking or in a collision and
cause serious personal injury.
- Make sure the roof rack is installed exact
ly as specified above~
page 84.
-Always use suitable mounting straps for
securing items to the roof rack to help
prevent items from shifting or flying for
ward .
- Items on the roof rack must always be
securely mounted.
- The use of a roof rack can negatively af
fect the way a vehicle handles. Cargo that is large, heavy, bulky , long or flat
will have a greater negative influence on the vehicle's aerodynamics, center of
gravity and overall handling. Always
drive slowly, avoid sudden braking and .,,.
Page 90 of 342
88 Seats and storage
-Any articles of clothing that you have
hung up must not interfere with the driv
er's view. The coat hooks are designed
only for lightweight clothing. Never hang any clothing with hard, pointed or heavy
objects in the pockets on the coat hooks .
Dur ing sudden braking or in an a ccident -
especi ally if the airbag is deployed -
these objects could injure a ny passe n
gers inside the vehicle.
Glove compartment
F ig . 102 U nlocki ng button for glove compa rtment
To open glove compartment
• Press the button :::!l.....-¢ fig . 102 (arrow) -the
lid opens automatically .
To close glove compartment
• Push the glove compartment lid up until
the lock engages.
In the g love compartment lid you wi ll find a
p lace to store a pen and a pad of paper .
A WARNING
To reduce the risk of personal injury in an
accident or sudden stop, a lways keep the
glove compartment closed wh ile driving.
@ Tips
Should you not be ab le to open the glove
compartment as described, make sure the
valet key function is not activated
¢page 41.
Cooling box in glove compartment
The cooling box works only when the air-con
ditioning is in cooling mode.
F ig . 1 03 Glove box with coo ling box open and sw itched
on
• Open the glove compartment¢ page 88,
fig. 102.
• Turn the rotary switch @counter-clockwise
to sw itch the cooling on. The symbo ls on the
rotary switch must be displayed
¢ fig . 103
according ly.
• Tur n the rotary swi tch@ clockw ise to
switch the cooling off.
T he cooling box wor ks only in the coo ling
mode. If the cl imate control is in the hea ting
mode, we recommend switching the cooling
box off.
Emergency unlocking of glove
compartment
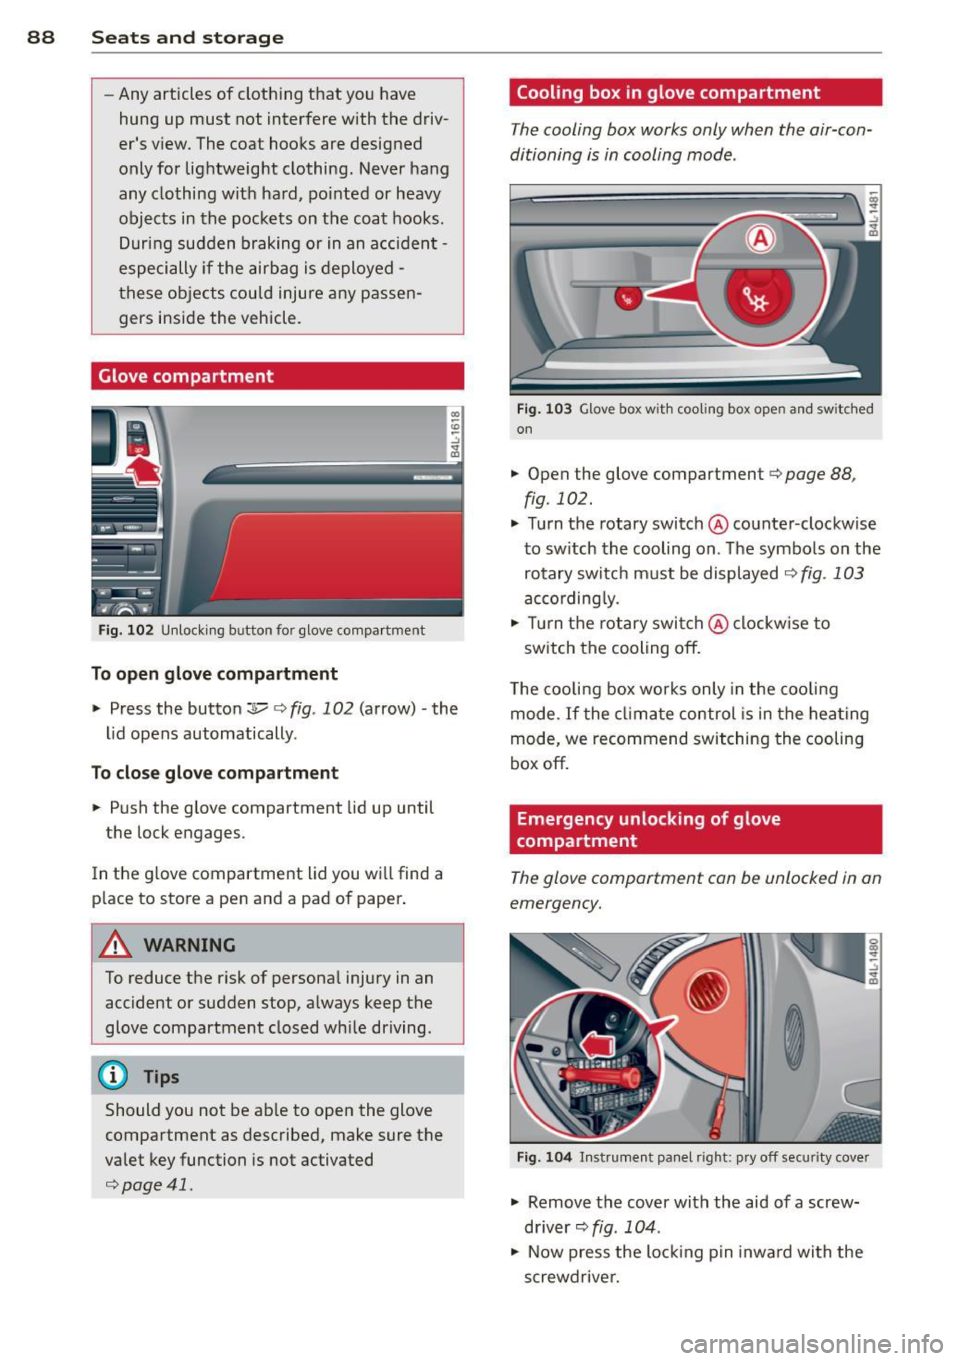
The glove compartment can be unlocked in an
emergency.
F ig. 10 4 In strument panel right: pry off secur it y cover
• Remove the cover with the aid of a screw
driver~
fig . 104 .
• Now press the lo cking p in inwa rd with the
screwdrive r.
Page 117 of 342

that must have a certain size. The system re
sponds only after the distance measurement has been made. If a measurement is not pos
sible, the system cannot respond and w ill not
react to a vehicle or someth ing else up ahead.
Open road
When the road is clear, the adaptive cruise
contro l works like cr uise control. It maintains
a constant target speed specified by the driv
er.
Driving in traff ic
If a slowe r vehicle driving ahead is detec ted,
the adaptive cruise contro l decelerates (within
the limits of the system)
¢ page 124, Driver
intervention prompt
and c:> page 125, System
limitations
to its speed and after adjust ing,
tr ies to maintain the set distance from the ve
h icle ahead. The vehicle may temporarily drive
slower than the set speed while adjust ing
¢ & in Description on page 113 .
If the vehicle in front accelerates, adaptive
cruise control also accelerates up to the speed
that you have set.
If the vehicle ahead slows to a stop, ACC will
slow your vehicle down and to a complete
stop if this is possible w ith in the system's lim
its and capabilities . ACC will not make an
emergency stop. The text message
ACC off :
manual c ontrol!
appears in the instr ument
cluster display . Once the veh icle stops, you
must depress the brake pedal to prevent the
vehicle from moving forward or "creeping". Depressing the brake pedal turns
off ACC.
When the veh icle ahead accelerates you can
reactivate ACC
¢ page 118, as soon as your
ve hicle has reached a speed of 1 mph (2 km/
h) .
Situ ation s re quiring dri ver int ervention
In some s ituations you w ill have to use the
footbrake to s low the vehicle down in order to
keep a safe distance from vehicle in front of
you or to avo id a rear-end coll is ion. In this sit
uation, a symbol appears and a warning tone
sounds
¢ page 124.
Ada pti ve crui se control 115
Passing another vehicle
If you move in to the passing lane and no ve hi
cle is detected ahead, the adaptive cr uise con
trol acce le rates to the speed you have set and
maintains it.
Overr iding ACC
You can in cr ease yo ur speed at a ny time by
stepping on the accelera tor ped al. A fter you
release the accelerator peda l, the system ad
justs back down to the speed you prev ious ly
set .
Reducing stopp ing distance
If the radar sensor detects that the d istance
to the vehicle a head is less than de fined m ini
mum distance, the brakes are automatically
prepared fo r emergency braking by the driver .
The brake pads are moved very close to the brake d iscs without actually braking the vehi
cle. This brake assistant feature reacts more
quick ly to the dr ive r's brak ing, and also works
when adapt ive cruise control is off . The stop
ping distance is reduced as a result of th is ad
vance brake p reparation . Th is fun ction does
not perform any emergency b rak ing mane u
vers by itse lf; the dr iver mus t always apply the
brakes.
A WARNING
If ACC initiates a braking maneuver, the brake pedal w ill be retracted. Inter ference
with the brake peda l can prevent ACC from
slowing the veh icle down and cause a
crash and serious personal injury.
- Never put anything in the driver's foot
well or let anyth ing fall into it. An object
in the driver's footwe ll can interfe re with
the peda ls and prevent the acce le rator
from being used to override ACC or pre
vent ACC from being switched off when
the brake pedal is depressed and also
prevent the vehicle from being slowed
down or stopped .
- On ly use floor mats that keep the area
around the peda ls free and that can be
securely fastened to the footwell .
-
Page 140 of 342
138 Automatic transmi ssion
co uld "creep" forward or backward.
When stopped, keep the brake pedal
fully depressed and use the parking brake if necessary to keep the vehicle
from ro lling .
- If the selector lever is unintentionally
moved into N wh ile you are driving, take
yo ur foot off the accele rato r pedal and
wa it for the engine to return to idle
speed befo re selecting a d rivi ng position .
- Never shift into "R" or "P" when the vehi
cle is in mot ion.
- Never get out of the dr iver 's seat when
the engine is runn ing .
- If you must get out of the vehicle, move
the se lector lever securely into the P po
sit io n and apply the par king brake f irm ly.
- If the eng ine must remain ru nning, never
hav e any driv ing pos ition engaged when
c hec king under the hood . M ake sure t he
sele ctor lever has securely eng aged and
is locke d in "P" with the par king brake
firmly set ¢
page 248, Engine compart
ment .
Otherw ise, any increase in eng ine
speed may set the vehicle in m otion,
even w ith the par kin g brake applied.
Selector lever positions
This section describes the selector lever posi
tions and driving ranges.
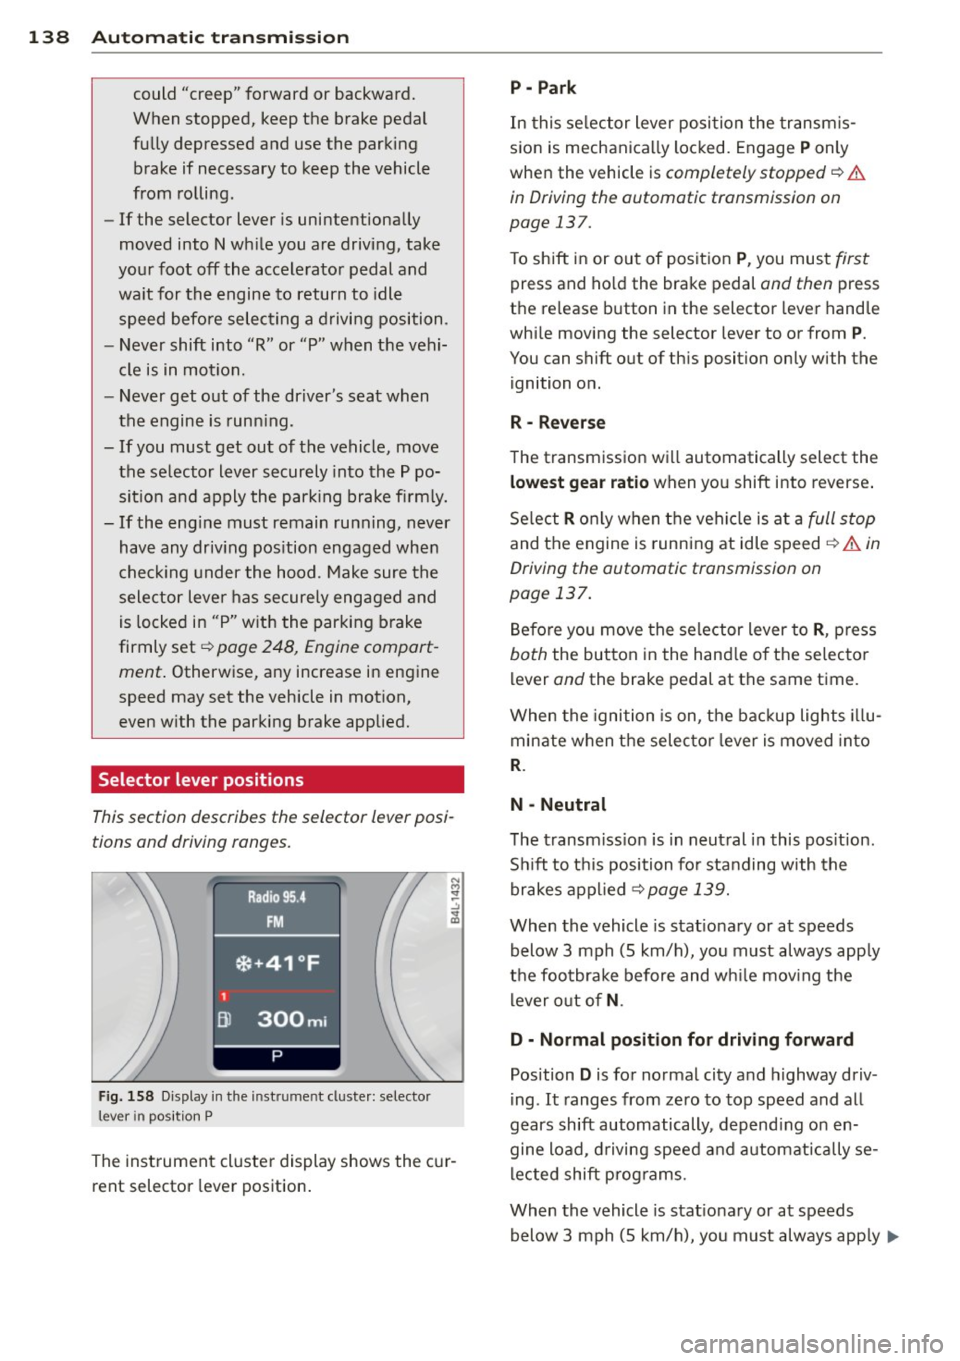
F ig. 158 Display in t he in st rum en t cluste r: selecto r
lev er in po sit ion P
The inst rumen t cluste r display shows the c ur
rent selector lever position .
P - Park
In this selector lever posi tion the transm is
s ion is mechanica lly locked. Engage
P only
whe n the vehicle is
completely stopped¢&.
in Driving the automatic transmission on
page 137.
T o shift in or out of posit ion P , you mus t first
press and ho ld the brake pedal and then press
the re lease button in the selector leve r hand le
whi le moving the selector lever to or from
P .
You can shift out of th is position only with the
ignition o n.
R • Reverse
The transm iss ion w ill automatically select the
lowest gear ratio when you shift into reverse .
Se lect
R o nly when t he vehi cle is at a full stop
and the engine is running at idle speed¢&. in
Driving the automatic transmission on
page 137.
B efore you move the se lector lever to R , press
both the button in the hand le o f the se lecto r
lever and the brake pedal at the same t ime.
W hen the ignition is on, the bac kup light s illu
minate w hen t he selec to r l ever is
moved in to
R .
N -Neutral
The transm iss io n is in neut ral in this pos it ion .
S hi ft to t his position fo r standing with the
brakes app lied
¢ page 139.
When the vehicle is stat iona ry or at speeds
below 3 mph (5 km/h) , you must always app ly
t h e foo tbrake before and wh ile mov ing the
l ever o ut o f
N.
D - Normal position for driving forward
Position D is for no rma l city and highway driv
ing . It ranges from zero to top speed and all
gears shift automatically , depend ing on en
gine load, d riving speed and a utomat ically se
l ected shift p rog rams.
When the vehicle is stat iona ry or at speeds
below 3 mph (5 km/h), you must always app ly
IJ,,