remote start AUDI Q7 2012 Owner´s Manual
[x] Cancel search | Manufacturer: AUDI, Model Year: 2012, Model line: Q7, Model: AUDI Q7 2012Pages: 342, PDF Size: 86.42 MB
Page 37 of 342
II
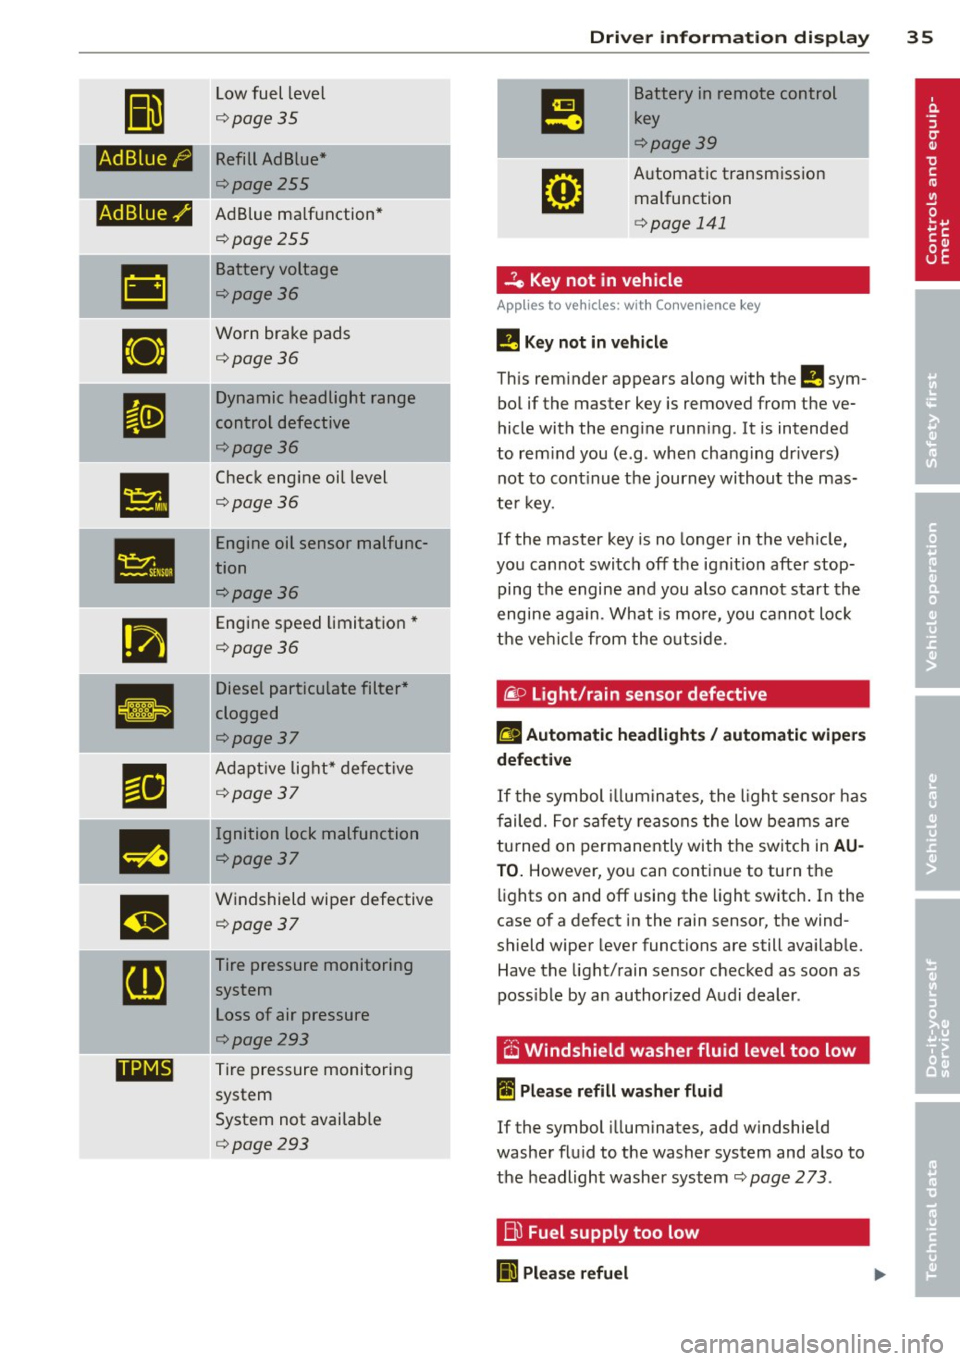
Low fuel level
¢page 35
fi.fl1::jfl1-j Kefill Ad Blue*
¢page255
-Ad Blue,/'
•
•
•
••NI@
AdBlue ma lfunction*
¢poge255
Battery voltage
¢poge36
Worn brake pads
¢poge36
Dy namic headlight range
control defective
¢poge36
Check eng ine oil level
¢poge36
Engine oil sensor malfunc
tion
¢poge36
Engine speed limitat ion*
¢poge36
Diesel particulate filter *
clogged
¢poge37
A dapt ive lig ht* defec tive
¢poge37
-Ignition lock malfunction
¢poge37
W indshield wiper defective
¢poge37
Tire pressure monitoring
sys tem
Loss of air pressure
¢poge293
T ire pressure monitoring
system
System not availab le
¢poge293
Dri ver information di spla y 35
Battery in remote control
key
¢poge39
A utomat ic transm iss ion
malfunction
¢ page 141
...?c, Key not in vehicle
Applies to vehicles: with Convenience key
!!I Key not in vehicle
This reminder appears along with the !!I sym
bol if the master key is removed from the
ve
hicle with the engine runn ing. It is intended
to rem ind you (e .g. whe n cha ng ing dr ive rs)
not to cont inue the journey without the mas
te r k ey.
If the master key is no longer in the ve hicle ,
you cannot swi tch off t he ig nit io n after stop
ping the engine an d you also cannot start the
engine aga in. What is mo re, you cannot lo ck
t he ve hicl e from the o utsi de.
@. D Light/rain sensor defective
fll Automatic headlights/ automatic wipers
defective
If t he symbol illumina tes, the l ight se nsor has
f ailed. For safe ty rea sons the low beams are
tu rned on permanently with t he switc h in
AU
TO. However , yo u can cont inue to tu rn the
li g hts on and off using the light switch . In the
case of a defect in the rain sensor, t he wind
shield wiper lever functions are still availab le.
Have the light/rain senso r ch ecked as soon as
poss ible by an author ized Audi dealer .
6 Windshield washer fluid level too low
~ Please refill washer fluid
If the symbol illuminates, add w indshie ld
washe r fl ui d to the washer system and also to
t h e headlight washer system
¢ page 2 73 .
Bl Fuel supply too low
II Please refuel
Page 40 of 342
38 Opening and closing
Opening and closing
Keys
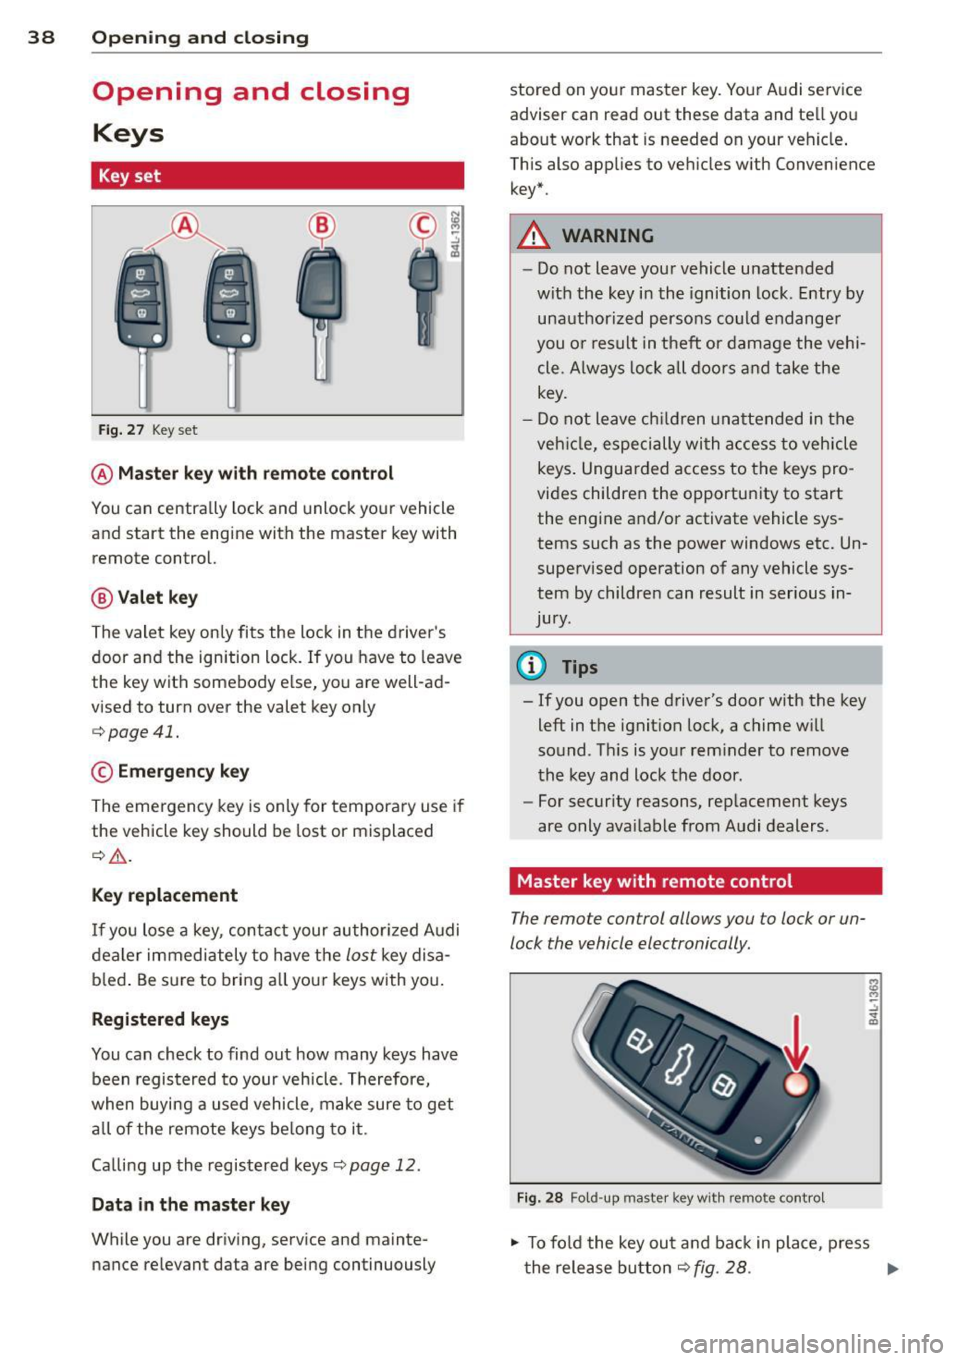
Key set
Fig. 27 Key set
@ Master key with remote control
You can centrally lock and unlock your vehicle
and start the engine with the master key with
remote control.
@ Valet key
The valet key only fits the lock in the driver's
door and the ignition lock . If you have to leave
the key with somebody else, you are well-ad
vised to turn over the valet key only
¢ page 41.
© Emergency key
The emergency key is only for temporary use if
the vehicle key should be lost or misplaced
¢ .&. .
Key replacement
If you lose a key, contact your authorized Audi
dealer immediately to have the
lost key disa
b led . Be sure to bring all your keys with you.
Registered keys
You can check to find out how many keys have
been registered to your vehicle. Therefore,
when buying a used vehicle, make sure to get
all of the remote keys be long to it .
Ca lling up the registered keys¢
page 12.
Data in the master key
While you are driving, serv ice and mainte
nance relevant data are being continuously stored on your master key. Your Audi service
adviser can read out these data and tel
l you
about work that is needed on your vehicle .
This also app lies to vehicles w ith Convenience
key*.
A WARNING
--
- Do not leave your vehicle unattended
with the key in the ignition lock. Entry by
unauthorized persons could endanger
you or result in theft or damage the vehi
cle. A lways lock all doors and take the
key.
- Do not leave children unattended in the
veh icle, especially with access to vehicle
keys . Unguarded access to the keys pro
vides children the opportun ity to start
the engine and/or activate vehicle sys
tems such as the power windows etc. Un
supervised operation of any vehicle sys
tem by children can result in serious in
Jury .
(D Tips
- If you open the driver's door with the key
left in the ignition lock, a chime w ill
sound. Th is is your reminder to remove
the key and lock the door.
- For security reasons, replacement keys
are only ava ilable from Audi dealers.
Master key with remote control
The remote control allows you to lock or un
lock the vehicle electronically .
Fig. 28 Fold-up maste r key with remo te control
., To fold the key out and back in place, press
t he release button ¢
fig. 28. .,.
Page 44 of 342
42 Openin g and clo sing
readiness light, located in the upper part of
the driver's door panel, will start to blink.
- T he vehicle interior lights turn off.
Unlocking and l ocking with Conven ience
k ey*
On vehicles which a re equipped w ith the C o n
ve nience k ey*
authorization system, the
doors are unlocked without a key by means of
a proximity sensor in the door handle. The
doors are simi larly locked without a key using
the locking button. Each door has a proximity
sensor and a locking button .
Automatic l ock ing
The automatic locking feature locks all the ve
hicle doors and the rear lid when you drive
faster than 9 mph (15 km/h). This function can be turned on and off in the MMI
C entr al
lo cking
Menu c:> page 44.
You can un lock the vehicle from the inside by :
- removing the key from the ign it ion sw itch
(the vehicle will automat ica lly unlock itself)
or
- pressing the unlock part of the power lock
switch @or
- pull ing the door handle (twice to open the
rear doors).
Unintent ionall y locking yourself out
In the following cases there safeguards to
prevent you locking your remote master key in
the vehicle :
- The veh icle does not lock with the power
locking sw itch
c:> page 44 if the driver's
door is open.
- On vehicles with Convenience key* , if the
most recently used master key is in the lug
gage compartment, the rear lid is automati
cal ly unloc ked aga in after it is closed.
Do not lock your vehicle with the
r e mot e m as
t e r k ey or Convenienc e key*
until all doors
and the rea r lid are closed. In t his way you
avoid locking yourse lf out accidenta lly.
A WARNING
- When you lock your vehicle from outside,
nobody- espec ially children -should re
main inside the vehicle . Remember,
when you lock the vehicle from the out
side the windows cannot be opened from
the inside.
- When you leave the veh icle, always re
move the ignition key and take it with
you . This will prevent passengers (chil
dren, for example) from accidentally be
ing locked in the vehicle should they acci
dentally press the power locking switch
in the front doors.
- Do not leave children inside the vehicle
unsupervised. In an emergency it would
be imposs ible to open the doors from
the outside without the key.
(D Tips
- In the event of a crash with airbag de
ployment all locked doors will be auto
matically unlocked to give access to the
vehicle occupants from the outside.
- If the power locking system sho uld mal
function, you can lock each door individ
ually using the vehicle key
c:> page 45 .
-If the power locking system shou ld fa il,
you can still open the fuel tank flap in an
emergency
c:> page 2 55 .
-You are well advised not to keep va lua
bles inside an unattended vehicle, v is ible
or not. Even a properly locked vehicle
cannot p rov ide the secur ity of a safe .
Page 45 of 342
Unlocking and locking the vehicle with
the remote control
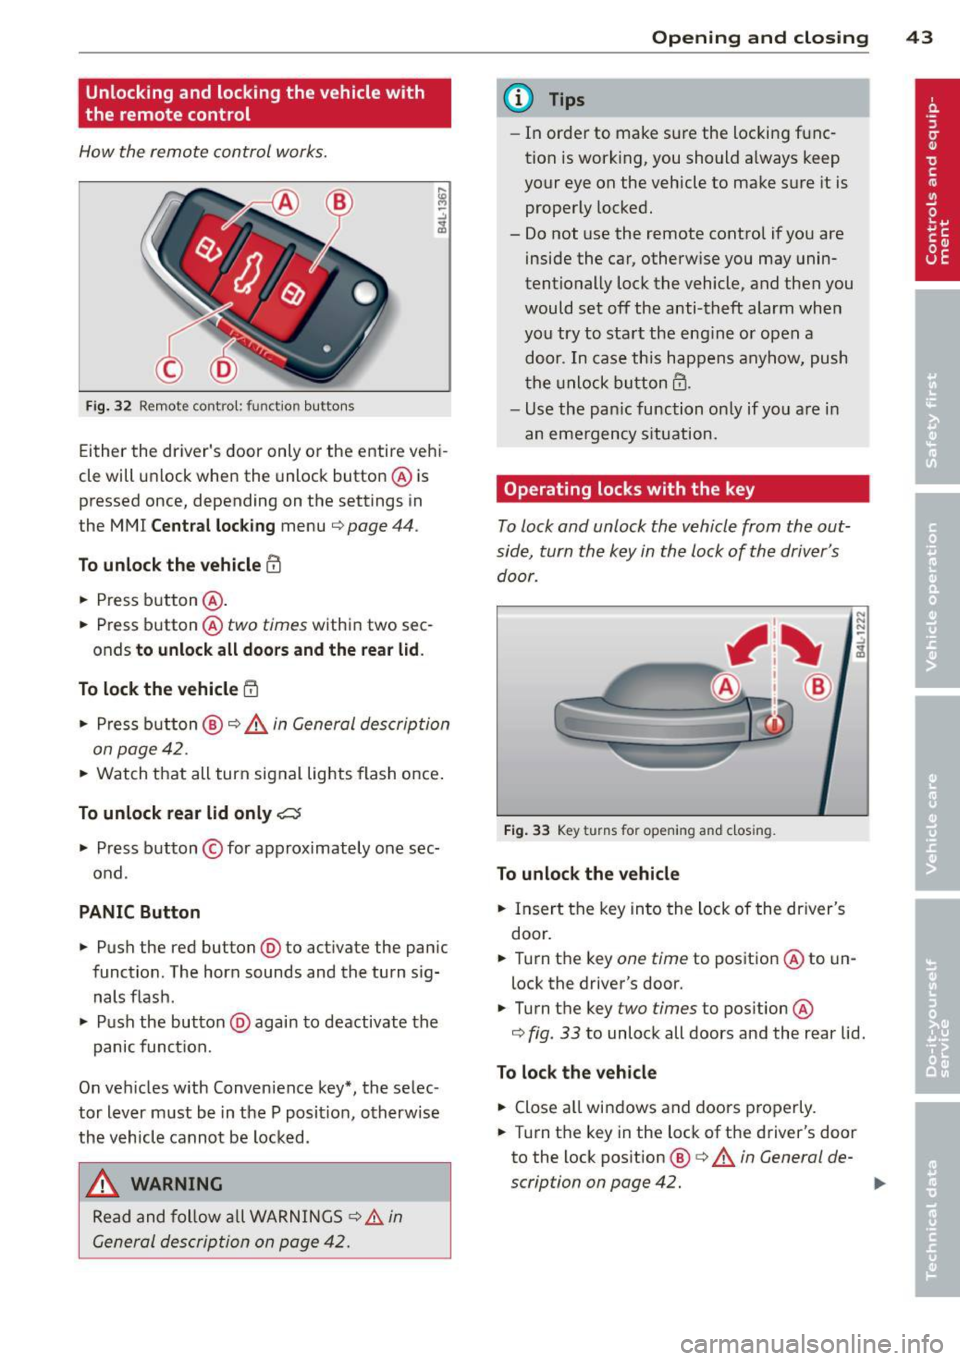
How the remote control works.
Fig. 32 Remot e contr ol: fun ctio n but ton s
Either the driver 's door only or the entire vehi
cle will unlock when the unlock button @ is
pressed once, depending on the settings in
the MMI
Central locking menu ¢ page 44 .
To unlock the vehicle ffi
.. Press button @.
.. Press button @two
times within two sec
onds
to unlock all doors and the rear lid .
To lock the vehicle 5'.l
.. Press button @¢.&. in General description
on page 42 .
.. Watch that all turn signal lights flash once.
To unlock rear lid only~
.. Press button © for app roximately one sec
ond .
PANIC Button
.. Push the red button@) to act ivate the panic
function. The horn sounds and the turn sig nals flash .
.. Push the button @again to deactivate the
panic function.
On vehicles w ith Convenience key*, the selec
tor lever must be in the P posit ion, otherwise
the vehicle cannot be locked.
_& WARNING
Read and follow all WARNINGS ¢&. in
General description on page 42.
-
Opening and closing 43
@ Tips
-In order to make sure the locking func
tion is working, you should a lways keep
your eye on the vehicle to make s ure it is
properly locked.
- Do not use the remote control if you are
inside the car, otherwise you may unin
tentionally lock the vehicle, and then you
would set off the anti-theft alarm when
you try to start the eng ine or open a
door . In case this happens anyhow, push
the unlock button@.
- Use the pan ic function on ly if you are in
an emergency s ituation.
Operating locks with the key
To lock and unlock the vehicle from the out
side, turn the key in the lock of the driver's door .
Fig. 33 Key turns fo r open in g and clos ing .
To unlock the vehicle
.. Insert the key into the lock of the driver's
door .
N N N :;
~
.. Turn the key one time to position @to un
lock the driver's door.
.. Turn the key
two times to position @
¢
fig . 33 to unlock all doors and the rear lid .
To lock the vehicle
.. Close all windows and doors properly.
.. Turn the key in the lock of the driver's door
to the lock pos ition @ ¢
A in General de-
scription on page 42. ..,.
Page 49 of 342
Clos ing re ar lid /trunk lid
"' Press the close button in the open rear lid
~ fig. 40. T he trunk lid moves to the closed
posit ion by itself and soft close locks it auto
matically ~&_ .
"' The closing process
is stopped immedi atel y
if the clo se button in the rear lid is pressed
again.
"' By pushing the button again, the rear lid is
opened again .
Saving the open ing a ngle of the rear lid
"' Bring the rear lid manua lly or automatic ally
to the desired opening posi tion and leave it
i n th is position .
"' Press the button in the rear lid
~ fig . 40 for
at least four seconds in order to save the de
s ired opening position. The position ca n only
be saved start ing at a certain level.
A WARNING
- Never close the rear lid inattentively or
without checking fi rst . Altho ugh the
closing force of the rear lid is lim ited,
yo u can st ill ser iously injure yourself or
others.
- Always ensure that no one is w ith in
range of the rear lid when it is moving, in
part icu lar close to the hinges and the up
per and lower edges -fingers or hands
can be p inched .
- To help prevent po isonous exhaust gas
from being d rawn into the vehicle, al
ways keep the rear lid closed while driv ing. Never transport objects larger than
those which fit completely into the lug
gage area, because then the rear lid can
not be fully closed.
- Never leave you r vehicle unattended es
pecially with the rea r lid left open . A
child could crawl into the car through the
l u ggage compa rtment and pull the lid
shut, becom ing trapped and unab le to
get out. To reduce the risk of persona l in
jury , never let children p lay in or around
your vehicle . A lways keep the rear lid as
-
Opening and clo sin g 47
well as the vehicle doors closed when not
in use .
- If there is a l uggage rack or bicycle rack
mounted on the rear lid, it may not be
ab le to open completely or an opened
rear lid may close by itself because of the
added weight . So the open rear lid must
be supported or the weight must be re
moved from the luggage rac k first.
@ Tips
- If the rear lid is open or not properly
locked when the ign ition is turned on,
the door and rear lid warning ~
page 22
appears in the instrument cluster dis-
play .
- T he automatic rear lid opening/clos ing
process can be stopped by ho ld in g the
re ar lid w ith your hand. The lid can then
be f urther opened/closed by h and.
- I f there is a mechan ica l problem wit h the
automatic rear lid
opening proces s or
there is an obstruction, the process is
stop ped immediately.
- I f there is a mechan ica l problem wit h au
tomatic closing for the rea r lid or there
is an obstr uction, it opens again slightly
r ight away . Chec k to see why the rear lid
cou ld not be closed before attempting to
close it again .
- If the rear lid on a locked vehicle is un
locked with the midd le button~ on the
remote key, the rear lid is automat ically
locked again immed iate ly after closing .
T his is indicated by the turn signals
blinking.
- The followi ng applies to vehicles equ ip
ped w ith the Convenience key* feature: if
the remote control key is left in the lug
gage compa rtment, l uggage compa rt
ment w ill autom atic ally unlo ck itsel f af
ter yo u lock the vehicle. This preven ts
you from unintentionally locking you r
key in the luggage compartment.
- If the vehicle battery charge drops be low
a certain level, yo u can sti ll open o r close
the rear lid manually, however, you w ill
need to apply more force to close it. ..,.
Page 53 of 342

How is the anti-theft alarm system
switched off?
The anti -theft a la rm system is switched off
on ly when you unlock yo ur vehicle. If yo u do
not open a door w ith in 60 seconds after you
have unlocked with the remote control , the
ve hicle w ill lock itse lf again automat ically .
When will the anti-theft alarm sy stem be
triggered?
W hen the ve hicle is locked, the alarm system
mon itors and protects the following parts of
the vehicle:
- engi ne compartment
- lu ggage compartment
- doo rs
- i gnition
When the system is activated, the alarm will be tr iggered if on e of the doo rs, the eng ine
h ood or t he rear lid a re opened, o r if the ig ni
tion is tur ned on. The anti-t heft alarm sys tem
will also go off when the battery is discon
nected .
You can a lso tr igge r the alarm by p re ssing t he
P ANIC button o n your remote con trol. T his
will alert other peop le in case of emergency.
Press the
PANIC b utton again to t urn off the
a larm.
How is the anti-theft alarm switched off
when triggered?
The a larm system is switc hed off when you
un lock the vehicle o r whe n the ignition is
sw itched on. The alarm will also switch itself
off when it comes to the end of its cycle.
Emergency flasher and horn
The emergency flas her wi ll blink brief ly and
the hor n sounds when the doors, engine hood
and rear lid are proper ly closed .
If th e emergen cy fl ashe rs do no t blink , or the
horn does no t sound, check the doors, engine
h ood an d rear lid to make sure they are p rop
erly closed.
If you close a door, t he hood o r
the rear lid w ith the anti-theft alarm sw itched
on, the emergency flashers will b link and the
Opening and clo sin g 51
horn wi ll sou nd on ly afte r you have closed the
door or li d.
(D Tips
For the anti-theft ala rm sys te m to fu n c
tion properly, make sure all ve hicle doors
and win dows are closed before leavi ng t he
vehicle .
Power windows
Controls
Fig. 4 6 Drive r's doo r: power w indow sw itches
Switches for front door windows
@ o p erates the w indow in the d river's door.
® opera tes the w indow in the front passe ng-
er's door .
Switches for rear windows
© operates the left rear window.
@ operates the r ight rear wi ndow.
Safety switch
® Safety switch for rear window operat ion.
A WARNING
- Do not lea ve c hildren unattended in t he
ve hicle, especially wi th access to veh icle
keys. Unsupervi sed us e of the keys can
resu lt in start ing of the engi ne and use
o f vehicle system s such as po wer w in
dows, etc. w hich co uld res ult in se riou s
in jur y.
- R eme mber -you can s till ope n or close
the powe r win dows for about ten mi
n utes after the ign ition is switc hed off.
O nl y w hen eit her of t he fro nt doors are
Page 57 of 342

Opening front r oof segment to comf ort
se ttin g
" Turn the rotary switch c::> fig. 49@ to posi
tion ©, you will feel the switch engage . The
roof segment is slid open only to a comfort
position w ith low wind noise. This is the rec
ommended standard sett ing for normal
driv ing cond itions .
Sliding front roof segment full y open
" Rotate and ho ld the switch @ in position @
unt il the roof segment has reached the de
s ired pos it ion. There may be increased wind
noise in this pos it ion.
(D Tips
- In posit ion @, the switch jumps back to
pos ition © again as soon as the switch is
released .
- When dr iv ing with the Panoramic slid ing
sunroof open, open the front roof seg
ment to the comfort setting to m inim ize
wind noise .
Closing Panoramic sliding sunroof
Applies to vehicles: with Panoram ic sliding sunroof
Clos ing tilted front roof segm ent
" Pull the switch c::> page 54, fig . 49 @ and
ho ld it until the roof segment has reached
the des ired pos ition.
" Pull the switch
bri efl y to close the roo f seg
ment automatica lly. By activating the switch
briefly again, the roof segment can be stop
ped in any position
c::, .,&_ .
Clos ing front r oof s egment wh en slid
o p en
" Rotate switch c::, page 54, fig. 49@ to posi
t ion @ to close the roof segment
c::> .,&_. To
move to an intermediate posit ion, rotate the
switch to the corresponding click-stop .
Clos ing tilt ed r ear roof segm ent
" Tap the rocker switch c::> page 54, fig . 49 ®
or c::> page 54, fig. 50 © in the front area Q
br iefl y to close the roof segment completely
c::> A.
Opening and clo sin g 55
" To set an intermediate position manually ,
press the rocker switch in the front area~
until the roof segment has reached the de
sired tilt posit ion
c::> .,&_ .
A WARNING
Improper use of the Panoram ic sliding
sunroof can cause serious personal injury.
- Be careful when closing the Panoramic
-
sliding sunroof . Not paying attention
could cause you or others to be trapped
and injured as the Panoram ic sliding sun
roof closes.
- Always take the key w ith you when you
leave the vehicle to prevent injur ies
caused by the Panoramic slid ing sunroof
clos ing
- Never leave children or persons requiring
assistance alone in the vehicle, especially
when they could access the vehicle keys .
Unsupervised use of the keys can result
in the engine being started or use of ve
hicle systems such as the power win
dows, etc. wh ich could result in serious
injury. The doors could be locked with
the remote key, de laying help in an
emergency.
- The Panoramic slid ing sunroof will con
tinue to operate until the ign ition key
has been removed and one of the front
doors has been opened.
Convenience closing feature
Applies to vehicles: wit h Pa noramic slid ing sunroof
The Panoramic sliding sunroof can be closed
from outside with the key in the driver's door lock .
" Insert the key into the dr iver's door lock .
" Tu rn and hold the key in the lock pos it ion @
c::> page 43, fig . 33 until the Panoramic slid
ing sunroof is complete ly closed
c::> .,&_ in
Closing Panoramic sliding sunroof on
page 55.
Th e power s un blind is a lso closed . .,..
Page 111 of 342

it. For example, the master key cannot be rec
ognized if it is covered by an object (e.g. alu
minum brief case) which
screens the radio s ig
nal. Electronic devices such as cell phones can
also interfere with the radio signal.
Press brake pedal to start engine
This message appears if you press the I START !
button to start the engine and do not depress
the brake pedal. The engine can only be start
ed if the brake pedal is depressed .
Engage Nor P to start engine
This message appears when the engine is
started if the selector lever for the automatic
transmission is not in the P or N position. The
engine can only be started with the selector in
these posit ions.
!I Key not in vehicle
This message appears along with the !! sym
bol if the master key is removed from the ve
hicle w ith the engine running .
It is intended
to remind you (e.g. when changing drivers) not to continue the journey without the mas
ter key .
If the master key is no longer in the vehicle,
you cannot switch off the ignition after stop ping the engine and you also cannot start the
engine again. Moreover, you cannot lock the
veh icle from the outside with the key.
Shift to P otherwise vehicle can roll away.
Doors do not lock if you are not in P.
This message appears for safety reasons
along w ith a warning buzzer if the selector
lever for the automatic transmission is not in
the P pos ition when the ignit ion is switched
off with the
ISTOPI button and the dr iver's
door is opened. Move the se lector lever to the
P position, otherwise the vehicle is not se
cured against rolling away. You a lso cannot
lock the vehicle using the lock ing button on
the door hand le or using the remote key.
On the road 109
To engage steering lock, press and hold
STOP button
This message appears for safety reasons if the
engine and the ignition have been switched
off by pressing the
I STOPI button once, and
then the driver's door is opened. In this in
stance, the steering is not locked . The steer
ing is locked:
- If you press the
IS TOPI button again for
more than 1 second.
- If you close the driver's door and lock your
veh icle from the outside.
Parking brake
Operation
The parking brake replaces the handbrake .
Fig. 123 Section of inst rument clust er: Pa rking brake
Applying parking brake
.,. Press the pedal down forcefully~ fig. 123
@ in the direction of the arrow.
Releasing parking brake
.,. Pull the hand le to the rear @ in the direc-
tion of the arrow
~ _&. .
If you should drive off with the parking brake
still set, a warning tone will sound and the
fo llow ing will appear in the instrument clus
te r to remind you to release the parking
brake:
Parking brake is applied
The park ing brake warning comes on only af
ter you have dr iven for longer than 3 seconds
and faster than 5 mph (5 km/h) . .,._
Page 158 of 342
156 Hom eli nk®
Homelink ®
Universal remote
control
General information
Applies to vehicles: with Home link® universal remote
control
The Homelink ® feature can learn up to three
radio frequency codes for most current trans
mitters used for operating garage doors, es tate gates, home or outdoor lighting sys
tems, and other devices.
You must first program the Homelink ® trans
mitter before you can use the system
~ page 157, Programming the Homelink ®
transmitter.
In order to program the Home link ® transmit
ter for devices utilizing rolling code, a second
person on a ladder who can safe ly reach the
garage door opener motor is recommended. I t is also necessary to locate the "learn" but
ton on your garage door opener motor . Refer
to the operating instructions for the opener,
as the location and color of this button may
vary by manufacturer.
You can still use the origina l remote control
for the device at any time .
.&_ WARNING
-
- Never use the Homelink ® transmitter
with any garage door opener that does
have not the safety stop and reverse fea
ture as requ ired by federa l safety stand
ards. Th is includes any garage door open
er model manufactured before April 1,
1982.
- A garage door opener which cannot de
tect an object, signa ling the door to stop
and reverse does not mee t current feder
al safety s tandards. Using a garage doo r
opener without these features increases
risk of serious inj ury or death.
- F or sa fety reasons never release the
parking brake or start the engine w hile
anyone is stand ing in front of the vehicle . -
A garage door or an estate gate may
sometimes be set in mot ion when the
Homelink ® remote control is being pro
grammed. If the device is repeatedly ac
tivated, this can overstrain motor and
damage its e lectr ical components -an
overheated moto r is a fire hazard!
- To avo id possible injuries or property
damage, please always make abso lutely
certain that no persons o r objects are lo
cated in the range of motion o f any
equ ipment being ope rated .
(D Tips
-If you would like more information on
Homel ink ®, where to purchase the
Homel ink ® compatib le produc ts, or
would like to purchase the Homelink ®
Home Lighting Package, please call to ll
free: 1-800-355-3515 .
- For Declaration of Compliance to United States FCC and Ind ustry Canada reg ula
tions~
page 322.
Page 159 of 342
Programming the Homelink®
transmitter
A pplies to vehicles: with Home link® universa l remote
co ntrol
The transmitter is programmed in two phas·
es. For rolling code transmitters, a third
phase is also necessary .
.- :-::::: . ... ........ -. ----· . ...... ........ .l
-·-·-· -·-· -·..: ··-· ---- -·- ·· ..._~ -- · ····
111111
-
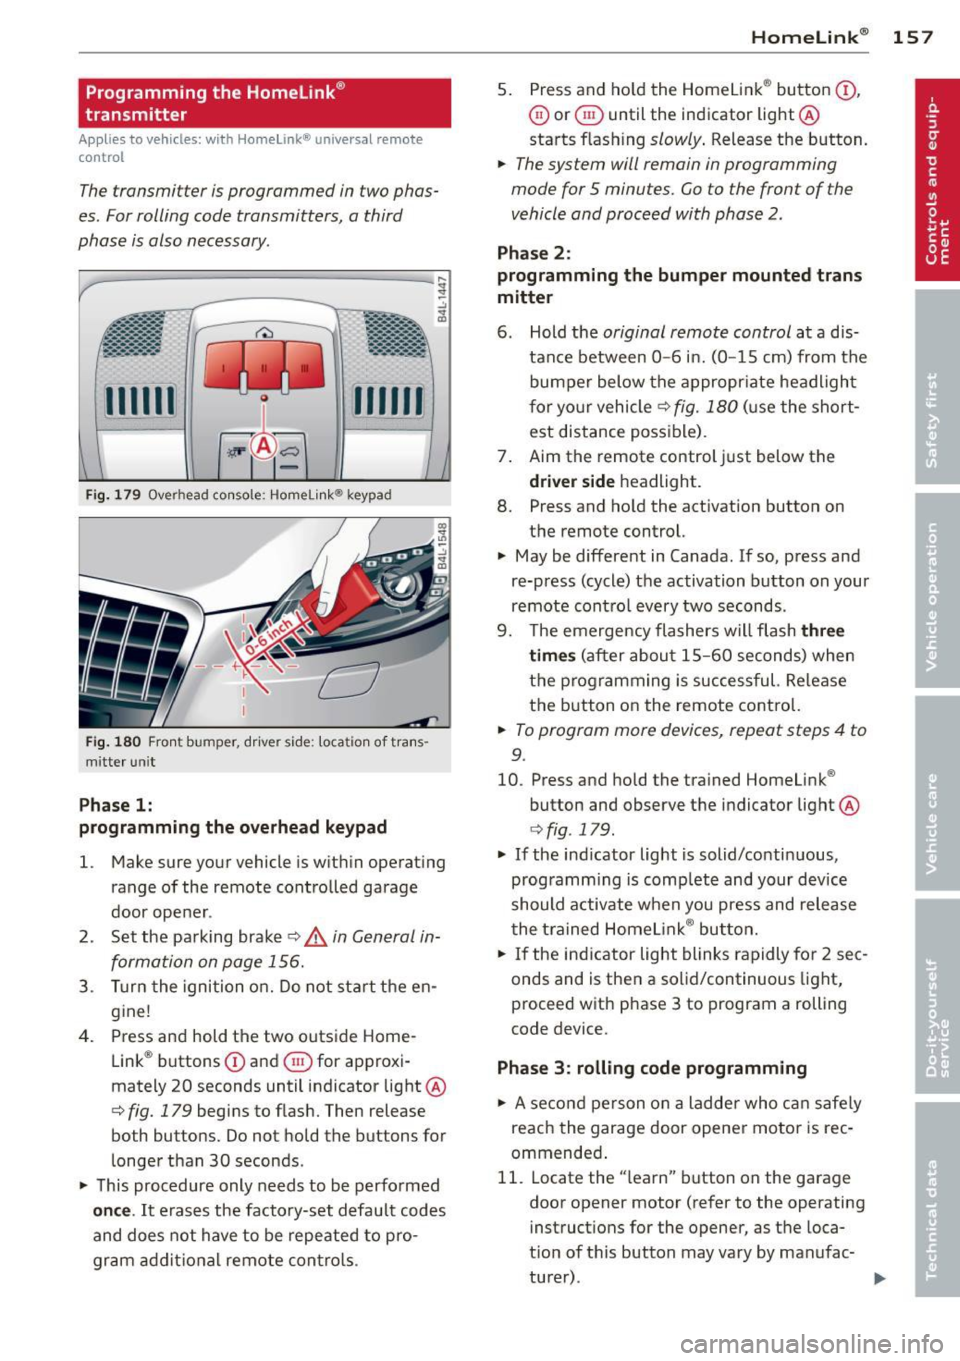
Fi g. 1 79 Overhead console: Homelink ® keypad
Fig. 1 80 Front bumper, d rive r side: loca tion of tra ns
mitter un it
Pha se 1:
programming the o verhead keypad
l. Make sure your vehicle is wit hin ope rating
range of the remote controlled garage
door ope ner .
2 . Set the pa rking brake
c:> .& in General in
formation on page 156.
3 . Turn the ignition o n. D o not sta rt the en
g ine!
4. Press and hold the two outs ide Home
Link ® buttons
(D and ® for approxi
mately 20 seconds until indicator light @
c:> fig. 179 begins to flash. Then release
both buttons. Do not hold the buttons for
l onger than 30 seconds .
~ This procedure only needs to be perfo rmed
on ce .
It erases the factory-set default codes
and does not have to be repeated to p ro
gram ad dit io na l remote contro ls .
Homelink ® 15 7
5. Press and ho ld the Homelink ® button (D ,
0 or ® until the indicator light@
starts flash ing
slowly . Release the button.
~ The system will remain in programming
mode for 5 minutes.
Go to the front of the
vehicle and proceed with phase 2 .
Phase 2 :
programming the bumper mounted trans
mitter
6 . Hold the
original remote control at a d is
tance between
0 -6 in. (0 -15 cm) from the
bumper below the appropr iate headligh t
f or yo ur vehicle
c:> fig. 180 (u se the short
est distance possible) .
7 . Aim the remote control just below the
driver s ide headlight.
8. Press and ho ld the activation button on
the remote control.
~ May be different in Canada. If so, press and
re-press (cycle) the activation button on your
remote cont ro l every two seconds .
9. The emergency flashers w ill flash
three
time s
(a fter about 15 -60 seconds) when
the programming is successful. Re lease
t h e button on the remote contro l.
~ To program more devices, repeat steps 4 to
9.
10. Press and hold the trained Homelink ®
button and observe the indicator light @
c:>fig . 179 .
~ If the indicator light is solid/contin uous,
programm ing is comp lete and your device
should a ctivate when you press and release
t he t rained Homelink ® bu tton.
~ If the ind icator light blinks rapidly for 2 sec
onds and is then a solid/continuous light,
proceed w ith phase 3 to program a rolling
code device.
Phase
3: rolling code programming
~ A se con d person o n a ladde r who c an safe ly
reach the garage door opener motor is rec
ommended .
11. Locate the "learn" button on the garage
door opener motor (refer to the operating
instruct ions for the opener, as the loca·
t ion of t his button may vary by manufac-
turer) . .,.