remote control AUDI Q7 2013 Owner´s Manual
[x] Cancel search | Manufacturer: AUDI, Model Year: 2013, Model line: Q7, Model: AUDI Q7 2013Pages: 348, PDF Size: 87.72 MB
Page 72 of 348
70 Clear vis ion
The digital compass only works with the igni
tion turned on. The directions are displayed as
in itia ls:
N (North), NE (Northeast), E (East),
S E (Southeast), S (South), SW (Southwest),
W (West), NW (Northwest).
(D Tips
To avo id inaccurate directions, do not al
low any remote controls, electrical sys
tems, or metal parts close to t he mirror.
Setting the magnetic deflection zone
App lies to vehicles: with digital compass
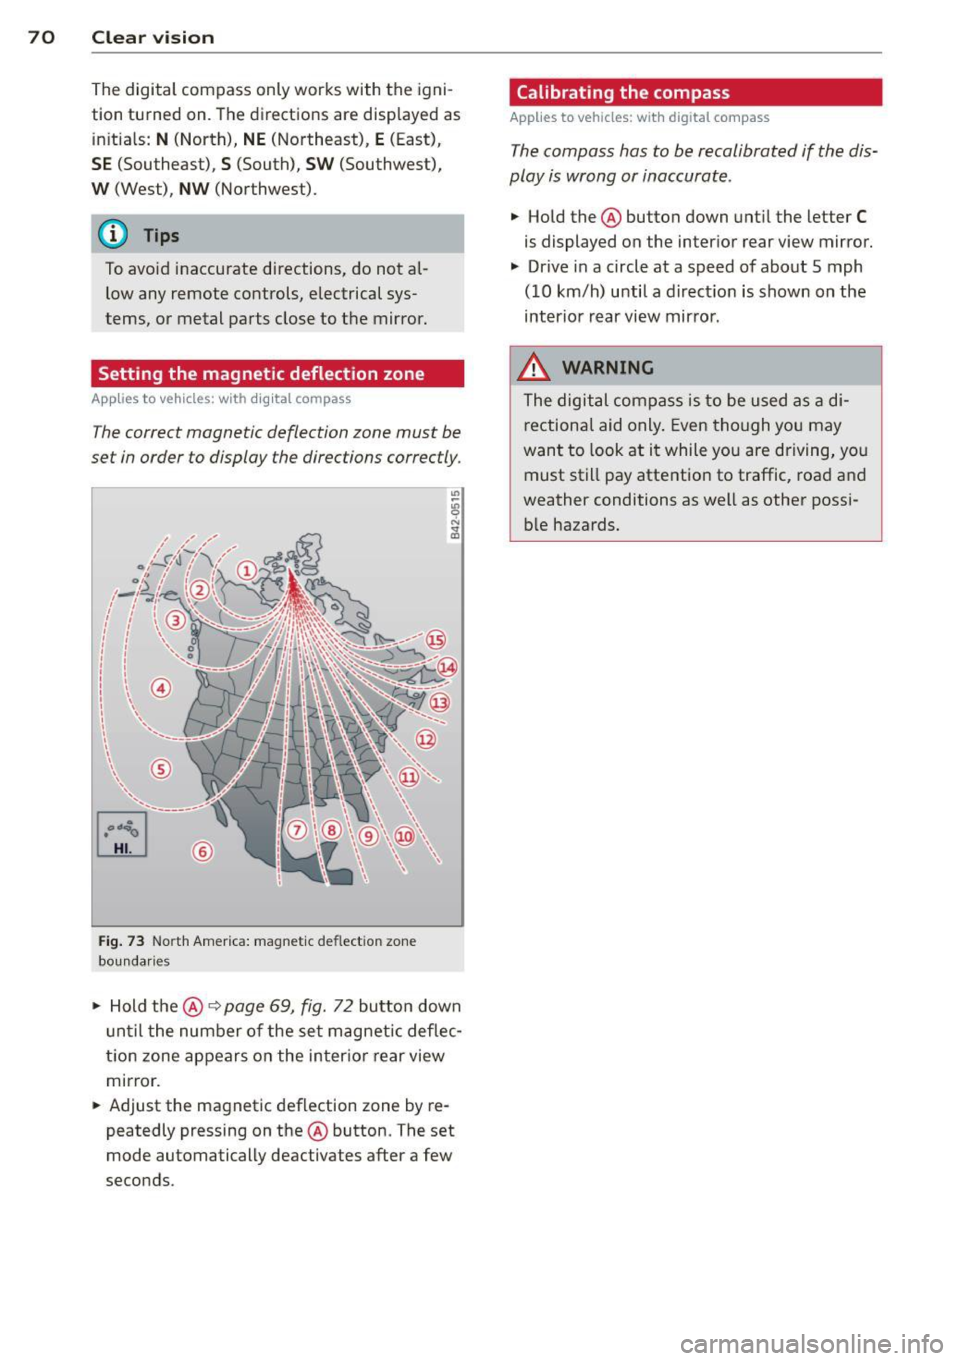
The correct magnetic deflection zone must be
set in order to display the directions correctly.
©
F ig . 73 Nort h Amer ica: magnet ic deflect ion zo ne
bou nda ries
.. Hold the®~ page 69, fig. 72 button down
u nti l the number of the set magnetic deflec
t ion zone appears on the inter io r r ear view
mirror .
.. Adjust the magnetic deflection zone by re
peatedly pressing on the ® button. The set
mode automatically deactivates after a few
seconds.
Calibrating the compass
App lies to vehicles : w it h dig ita l compass
The compass has to be recalibrated if the dis
play is wrong or inaccurate.
.. Hold the ® button down unt il the letter C
is displayed on the inter ior rear view mirror .
.. Drive in a circle at a speed of about 5 mph
(10 km/h) until a d irect ion is shown on the
interio r rear view mirro r.
8, WARNING
The digital compass is to be used as a di
r ectiona l aid only . Even though you may
want to look at i t while you are driving, you
must still pay atte ntion to traffic, road a nd
weather conditions as well as other possi b le hazards.
-
Page 75 of 348
unattended in the vehicle -they could be
injured!
- Exercise caution when adjusting the seat
height. Unsupervised or careless seat ad
justment can pinch fingers or hands
causing injur ies.
- While the vehicle is moving, the seat
backs of the front seats must not be in
clined too far to the rear because the ef
fectiveness of the safety belts and the
airbag system is severely compromised -
there is a risk of injury.
- To reduce the r isk of injury in the case of
sudden braking or accident, front pas
sengers must never ride in a moving ve
hicle wi th the seatback reclined. Safety
belts and the airbag system only offer
maximum protection when the seatback
is upright and the safety be lts are prop
erly positioned on the body. The more
the seatback is reclined, the greater the
risk of personal injury from an incorrect
seating pos ition and improperly posi
t ioned safety belts.
Seat memory
Driver's seat memory
Ap plies to vehicles: with seat memo ry
The seat adjustment settings for two drivers
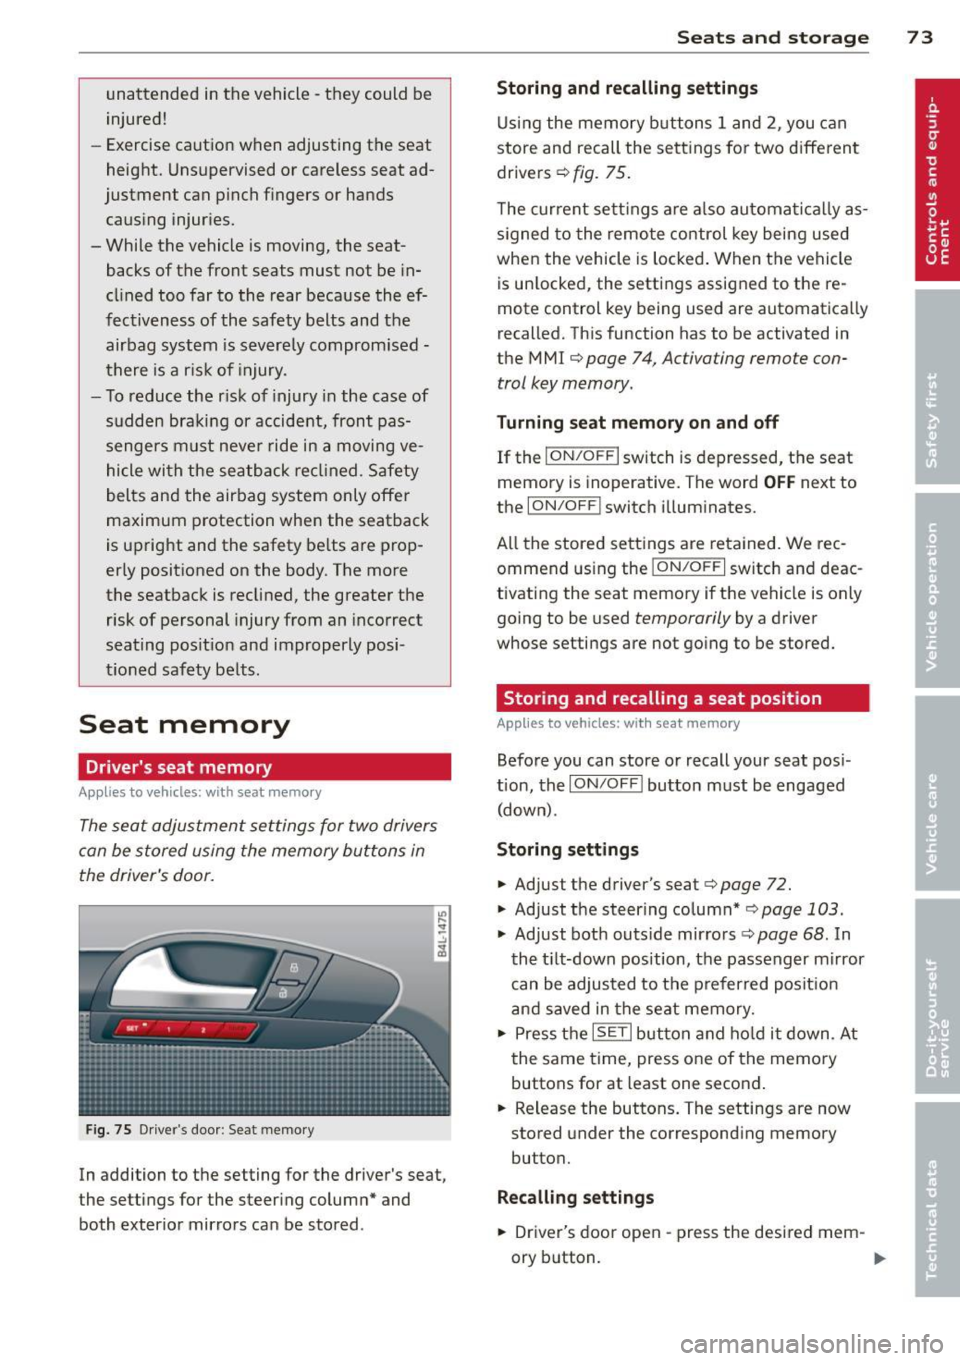
can be stored using the memory buttons in
the driver's door.
F ig. 75 Driver's door : Seat memory
In addition to the setting for the driver's seat,
the settings for the steering column* and
both exterior mirrors can be stored .
Seats and storage 73
Storing and recalling settings
Using the memory buttons 1 and 2, you can
store and recall the settings for two different drivers ¢
fig. 75.
The current settings are also automatical ly as
s ig ned to the remote control key being used
when the vehicle is locked. When the vehicle
is un locked, the settings assigned to the re
mote control key being used are automatically
recalled. This function has to be activated in
the M MI ¢
page 7 4, Activating remote con
trol key memory.
Turning seat memory on and off
If the I ON/O FF I switch is depressed, the seat
memory is inoperative. The word
OFF next to
the
ION/O FF I switch illuminates.
All the stored settings are retained. We rec
ommend using the
ION/OF F I switch and deac
tivating the seat memory if the vehicle is only
going to be used
temporarily by a driver
whose settings are not going to be stored.
Storing and recalling a seat position
App lies to vehicles: wit h seat memory
Before you can store or recall your seat pos i
tion, the
ION /OFF! button must be engaged
(down) .
Storing settings
.,. Adjust the driver's seat¢ page 72 .
.,. Adjust the steer ing column* ,=;, page 103 .
.,. Adjust both outs ide mirro rs ¢ page 68 . In
the tilt-down position, the passenger mirror
can be adjusted to the preferred posit ion
and saved in the seat memory .
.,. Press the
ISETI button and hold it down . At
the same time, press one of the memory
buttons for at least one second .
... Release the buttons. The settings are now
stored under the corresponding memory
button.
Recalling settings
.,. Driver's door open -press the desired mem-
ory b utton.
ll-
Page 76 of 348
7 4 Seats and stor age
• Driver's door closed -press the correspond
ing memory button unti l the stored position
is reached.
Successf ul s torage is conf irmed a ud ibly and
by the l ight i n the
!SET ! button illuminating .
When the ve hicle is
locked , the cur rent set
tings are stored and ass igned to the remo te
control key. Bu t th e set tings stored on memo
ry buttons 1 and 2 are not deleted. They can
be reca lled at any time . When the vehicle is
unlocked , the settings assigned to the remote
control key are restored.
If you r vehicle is driven by other persons using
your remote control key, you should save yo ur
individua l seat position on one of the memory
buttons. You can reca ll your settings aga in
simply and conve niently by pressing the corre
spond ing memory butto n. When the vehicle is
l oc ked, these setti ngs are automatically re-as
signed to t he remote control key and stored.
.&_ WARNING
- F or safe ty re ason s, the sea t sett in g can
only be rec alled w hen the veh icle is st a
t ionary -othe rwise you r isk having an ac
cident.
- In an emergency, the recall operation
can be stoppe d by pressin g the
!ON/OFF I
button or by br iefly p ress ing any given
memory button.
Activating remote control key memory
A ppl ies to veh icles: with seat memo ry
To assign the driver's seat settings to the re
mote contro l key when locking the vehicle, the
function must be activated in the MMI.
• Se lect:
I CARI f u nct ion button > Systems *
control button > Seat adjustment > Driver 's
seat > Key mem. p rofile > On .
Or
• Se lect:
ICARI funct io n button > Car sy s
tems *
control bu tton > Vehicle settings >
Seats > Driver's seat > Remote control key
> On .
(D Tips
If you do not want anothe r driver's set
tings to be assigned to the remote control key, switch off the memory function using
the MMI or the
I ON/OF F! button
c> page 73.
Rear seats
General information
Safe transportation of passengers on the rear
seats requires proper safety pre cautions.
All passengers on the rear seats mus t be seat
ed in comp lian ce with the safety guide lines
exp lained in
c> page 175 and c>page 184.
T he co rrec t seating pos ition is cr it ic al f or the
sa fe ty of front
and rear seat passenge rs a like
c>page 168 .
A WARNING
--Occupants in the f ront and rear seats
m ust always be proper ly restrained.
- Do not let anyone ride in the ve hicle
witho ut the head restraints prov ided.
Head restraints help to reduce injuries.
- Loose items inside the passenge r com
pa rtment, can fly forward in a crash or
sudden maneuve r and injure occupants.
Always store a rticles i n the luggage com
pa rtment an d use the fastening eyes, es
pecially w he n the rea r seatbac ks hav e
been fo lded down.
- Read and heed all WARNI NGS
c> pag e 168, Proper s eating positions
for passengers in rear sea ts.
Page 126 of 348
124 Adaptive cruise control
Stationary object ahead
The text message Stationary object ahead ap
pears, when you want to activate the system
and there is a stationary vehicle or an object
immediately in front of you .
Gradient too steep
The text message Gradient too steep appears
when the max imum gradient for proper ACC
operation has been exceeded. Adaptive cruise
contro l is turned
off . A warning tone also
sounds as a reminder.
Shift lever position!
The text message Shift lever position! ap
pears when the selector lever is moved to po
sition
N . In this position, adaptive cruise con
trol is not ava ilab le .
Driver intervention prompt
Applies to vehicles: with adaptive cruise co ntrol
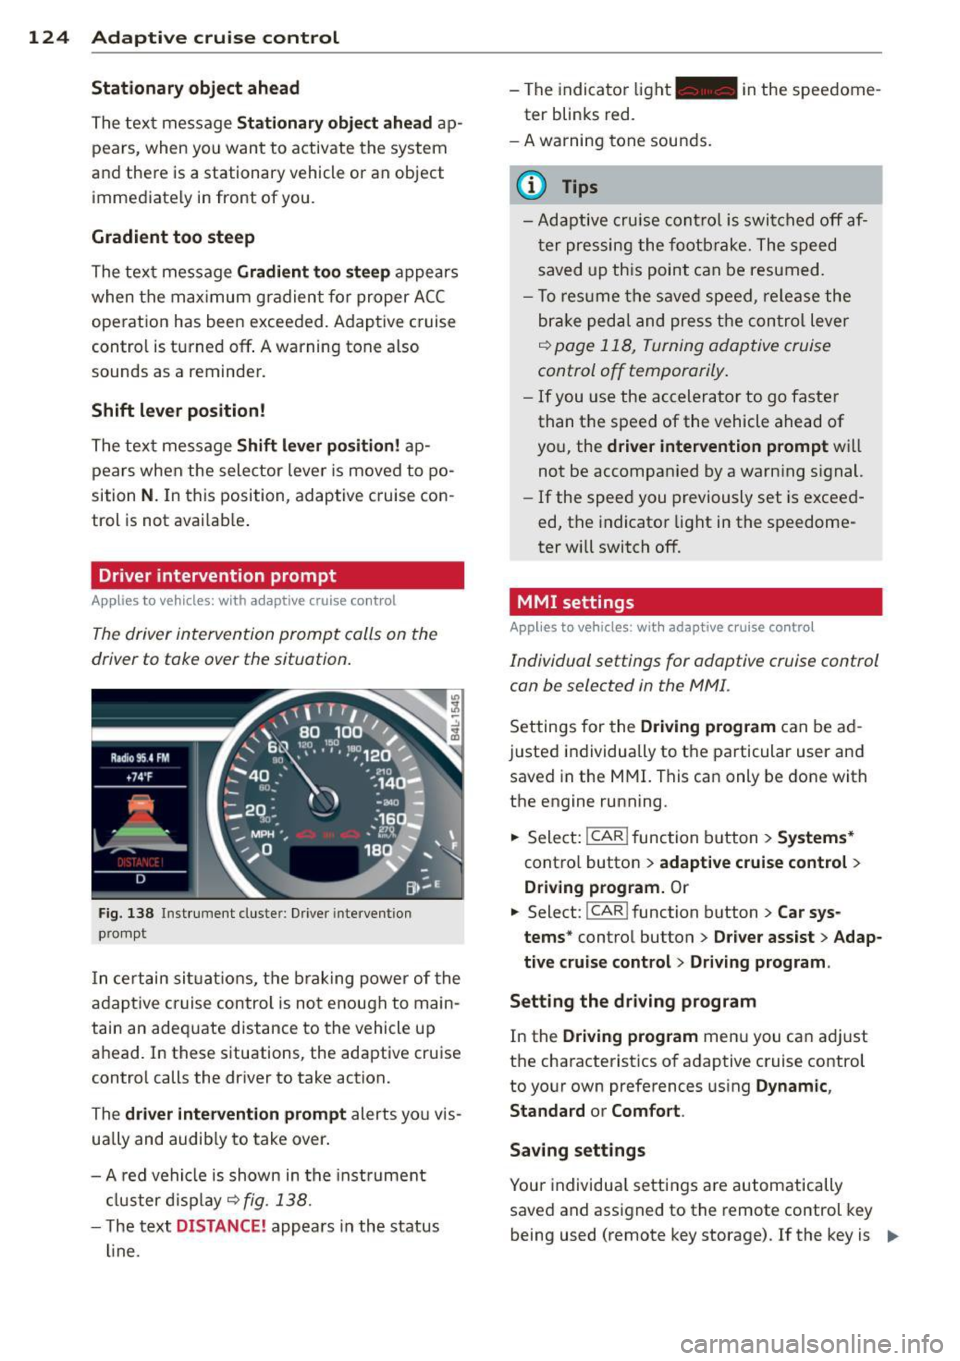
The driver intervention prompt calls on the
driver to toke over the situation.
Fig. 138 I n st rument cluste r: Drive r in terven tion
prompt
I n certain situat ions , the braking power of the
adapt ive cr uise control is not enough to main
tain an adequate distance to the vehicle up
ahead. In these situations, the adaptive cruise
control calls the driver to take action.
The
driver intervention prompt alerts you vis
ually and audib ly to take over.
- A red vehicle is shown in the instrument
cluster display ~
fig. 138.
- T he text DISTANCE! appears in the status
line. -
The indicator light- in the speedome
ter blinks red.
- A warning tone sounds.
0) Tips
-Adaptive cruise control is switched off af
ter pressing the footbrake. The speed
saved up this point can be resumed.
- To res um e the saved speed, release the
brake pedal and press the control lever
~ page 118, Turning adoptive cruise
control off temporarily.
-If you use the accelerator to go faster
than the speed of the vehicle ahead of
you, the
driver intervention prompt wi ll
not be accompanied by a warning s ignal.
- If the speed you previously set is exceed
ed, the indicator light in the speedome
ter will switch
off.
MMI settings
Applies to vehicles : with adaptive cruise contro l
Individual settings for adoptive cruise control
con be selected in the
MMI.
Settings for the Driving program can be ad
justed individually to the particular user and
saved in the MMI. This can only be done with
the engine running .
.,. Select:
!CAR ! function button> Systems*
cont ro l button > adaptive cruise control >
Driving program. Or
.,. Select: !CAR ! function button> Car sys·
tems *
control button > Driver assist > Adap
tive cruise control > Driving program .
Setting the driving program
In the Driving program menu you can ad just
the characteristics of adaptive cruise control
to your own preferences using
Dynamic,
Standard
or Comfort .
Saving settings
Your individual settings are automatically
saved and assigned to the remote control key
being used (remote key storage) . If the key is ..,_
Page 136 of 348
134 Audi side assist
but is not considered notable in the event of a
lane change, because it is dropping back so
quickly. The signal on the outside mirror does not light up¢.&.
in Safety tips on page 136.
@ Signal on outside mirror does not light
up
If you activate your turn signal in driving sit
uation @, the signal still does not light up on
the outside mirror¢.&.
in Safety tips on
page 136.
MMI settings
App lies to vehicles: with side assist
The basic brightness setting of the signal on
the outside mirror can be adjusted via the
MMI.
.. Select : ICARI function button> Systems*
control button > Audi side assist. Or
.. Select:
I CARI function button > Car sys
tems*
control button > Driver assist > Audi
side assist.
The brightness of the signal light for both the
informational and alert stages is automatical
ly adjusted to ambient light conditions. In ad
dition, you can adjust the
basic brightness
separately, via the brightness function.
While making the adjustment, the new brightness setting is displayed briefly . The
brightness displayed is that of the informa
tional stage signal. The alert stage signal
brightness is linked to the informational stage
signal brightness.
The informational stage signal brightness
should be adjusted so that you notice the sig
nal illumination when you look in the outside
mirror, but not when you look forward
through the windshield.
In very dark or light surroundings, the auto
matic brightness setting adjusts signal light
brightness to maximum or minimum intensi
ty, as needed. In circumstances such as these,
you may not notice any change in the bright
ness on the outside mirror when adjusting the
basic brightness.
You may not notice the change until lighting
conditions are normal again.
(D Tips
- Side assist is not active when the basic
brightness is adjusted. The signal light
comes on briefly to help you make the
adjustment.
- Your settings are automatically stored
and assigned to the remote control key
being used.
· General information '
App lies to vehicles : wit h side assist
Side assist has limits and cannot detect
vehicles under all road and weather condi
tions . Please remember system limitations
and never rely on the system, especially when:
- driving through curves¢
page 134,
-lanes are of different widths¢ page 135.
' When driving through curves
Applies to vehicles: wit h side assist
Side assist cannot detect vehicles in curves
with a turning radius of less than 328 feet
(100 m).
When driving through a curve, it is possible
that side assist may register a vehicle two
lanes over, and the signal on the outside mir
ror will light up.
Page 155 of 348
Manual -This view behind the vehicle (Rear
mode) is a lways disp layed when you turn on
the system.
Adjusting the display and warning tones
Applies to vehicles: with rear park assist/Audi parking sys
t em plus with rearview camera/front- and rearview cam·
e ra
The display* and warning tones can be ad
justed in the MMI.
""S elect: ICARlf unction button> Systems*
control button > Parking system. Or
"" Se lect: I CAR
I function button > Car sys
tems* control button > Driver assist
> Park
ing aid.
Display*
- Off -when the parking system is switched
off, only aud ible signals are given.
-On -when the parking system is switched
on, either the visual display or the picture
from the rearview camera is disp layed .
Warning tones
- Front volume* - front sensor vo lume
- Front frequency* -front sensor frequency
- Rear volume - rear sensor volume
- Rear frequency -rear sensor frequency
- In-car entertainment fader/Music volume
while parking - when the parking system is
switched on, the volume of the active audio
source is lowered.
The new ly adjusted value is briefly heard from
the signal generator.
@ Tips
- The warning tones can also be adjusted
direct ly by the visual disp lay* or the pic
ture from the camera*. S imply press the
Settings* control button.
- Changed settings are activated when
parking system is switched on again.
- The settings are automatically stored
and assigned to the remote control key
being used. Parking
systems 153
Error messages
Applies to
vehicles: with rear park assist/Audi parking sys
tem plus with rearview camera/front- and rearv iew ca m
era
There is an error in the system if the LED in
the~ button* is blinking and you hear a con
tinuo us alarm for a few seconds after switch
ing on the park ing system or when the park
ing system is already activated .
If the error is
not corrected before you switch off the igni
tion, when you switch on the parking system
again, the LED in the ~ button* will blink. If
you activate the parking system with the but
ton in this case, the continuous warning tone
will continue to sound.
Parking system plus with front and
rearview camera*
There is another system error if:
- the~·· symbol appears in the display and
the corresponding display area is shown in
blue. The camera is not working in this area.
- all segments around the vehicles are red or
if no segments are displayed.
Drive to your authorized A udi dealer or au
thorized repair fac ility immed iate ly to have
the mal function corrected .
Trailer hitch
Applies to vehicles: with rea r park assist/Audi parking sys
tem plus with rearview camera/front- and rearview cam
era and tra iler hitch
For vehicles using the trailer socket, the park
ing system rear sensors do not turn on when
you shift into reverse gear or when you press
the~ button*. This results in the follow ing
restrictions:
Rear park assist*
There is no warning for distances to the rear.
Audi parking system plus with rearview
camera/front and rearview camera*
There is no distance warning for the rear. The
front sensors remain act ivated. The visual dis
play sw itches to the trailer towing mode. The
rearview camera image will not show the ori-
entat ion lines and the blue surfaces . ..,.
Page 163 of 348
Homelink®
Universal remote
control
General information
Appl ies to vehicles: with Horne Link® universal rem ote
control
The Homelink ® feature can learn up to three
radio frequency codes for most current trans
mitters used for operating garage doors, es
tate gates, home or outdoor lighting sys·
tems, and other devices.
You must first program the Homelink ® trans·
mitter before you can use the system
¢ page 162, Programming the HomeLink®
transmitter.
In order to program the Homelink® transmit·
ter for devices utilizing rolling code , a second
person on a ladder who can safe ly reach the
garage door opener motor is recommended.
It is also necessary to locate the "learn" but
ton on your garage door opener motor . Refer
to the operat ing instruct ions for the opener,
as the location and color of this button may
vary by manufacturer.
You can still use the origina l remote control
for the device at any time.
A WARNING
-
- Never use the Homelink® transmitter
with any garage door opener that does
have not the safety stop and reverse fea
ture as requ ired by federal safety stand
ards . Th is includes any garage door open·
er model manufactured before April 1,
1982.
- A garage door opener which cannot de·
tect an object, signaling the door to stop
and reverse does not meet current feder
al safety standards. Using a garage door
opener without these features increases
risk of serious injury or death.
- For safety reasons never release the
parking brake or start the engine while
anyone is stand ing in front of the vehicle .
Homelink® 161
-A garage door or an estate gate may
sometimes be set in motion when the
Homelink ® remote control is being pro·
grammed . If the device is repeatedly ac·
tivated, th is can overstrain motor and
damage its electrical components -an
overheated motor is a fire hazard!
- To avoid possible injuries or property
damage, please always make abso lutely
certain that no persons or objects are lo·
cated in the range of motion of any
equ ipment being ope rated.
(D Tips
- If you would like more information on
Homelink ®, where to purchase the
Homel ink ® compatible products, or
would like to purchase the Homelink ®
Home Lighting Package, please call toll
free: 1-800-355-3515 .
- For Declaration of Compliance to United
States FCC and Industry Canada regu la
tions ¢
page 328 .
Page 164 of 348
162 Homelink®
Programming the Homelink ®
transmitter
Applies to vehicles: with Homelink® unive rsal remote
control
The transmitter is programmed in two phas
es. For rolling code transmitters, a third
phase is also necessary .
-
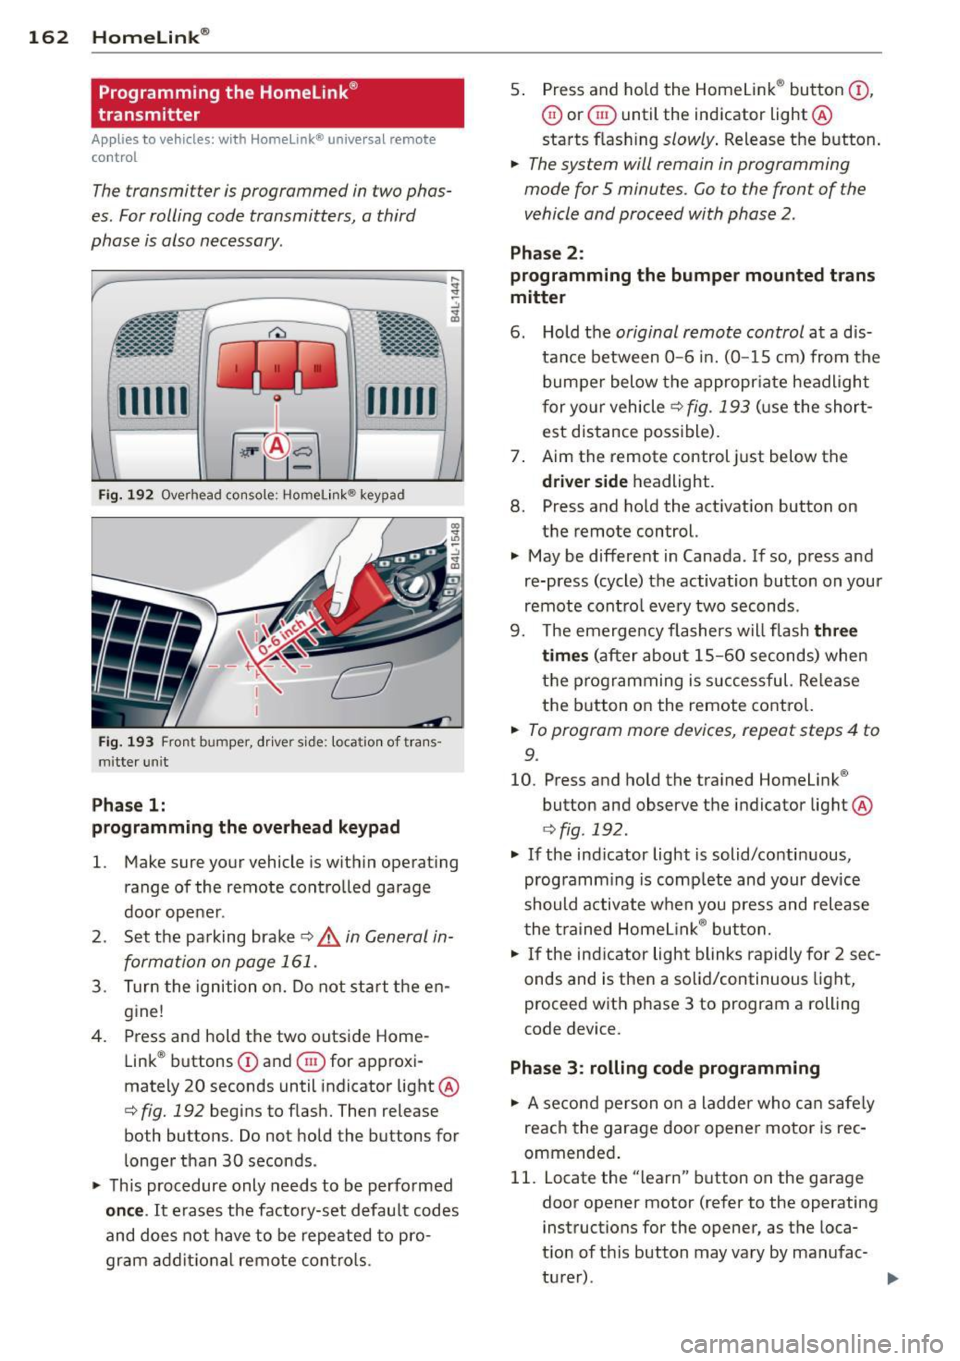
Fig. 192 Overhead co nsole ; Homelink ® keypad
Fig. 193 Front bumper, d rive r side: loca tion of trans ·
m itterun it
Pha se 1:
programming the o verhead k eypad
1. Make sure your vehicle is w ithin operat ing
range of the remote controlled garage
door ope ner .
2 . Set the parking brake~,&.
in General in
formation on page 161.
3 . Turn the ignition on. Do not start the en
g ine!
4 . Press and hold the two outside Home
Link ® buttons
CD and @for approxi
mately 20 seconds until indicator light ®
c::> fig. 192 begins to flash. Then release
both buttons . Do not hold the buttons for
l onger than 30 seconds .
.,. This procedure only needs to be performed
on ce . It erases the factory-set defau lt codes
and does not have to be repeated to pro
gram addit ional remote contro ls. 5
. Press and ho ld the Homelink ® button
(D ,
@ or @ until the indicator light®
starts flashing
slowly . Release the b utton.
.,. The system will remain in programming
mode for 5 minutes. Co to the front of the
vehicle and proceed with phase 2 .
Phase 2:
programming the bum per mounted trans
mitte r
6. Hold the original remote control at a dis
tance between
0 -6 in. (0 -15 cm) from the
bumper below the appropr iate headlight
f or yo ur vehicle
~ fig. 193 (u se the short
est distance possible) .
7 . Aim the remote control just below the
dri ver s ide headlight.
8. Press and hold the act ivat ion button on
the remote control.
.,. May be different in Canada . If so, press and
re-press (cycle) the activation button on your
remote cont ro l every two seconds .
9. The emerge ncy flashers will flash
thre e
tim es
(after about 15-60 seconds) when
t h e programming is successful. Re lease
the b utton o n the remote control.
.,. To program more devices, repeat steps 4 to
9.
10. Press and hold the trained Homelink ®
button and observe the indicator light ®
¢fig . 192 .
.,. If the ind icator light is solid/co nti nuous,
programm ing is comp lete and your device
should a ctivate w hen you press and release
t he t rained Homelink ® button.
.,. If the ind icator light blinks rapidly fo r 2 sec
onds and is then a solid/continuous light,
proceed w ith phase 3 to program a rolling
code device.
Phase 3 : rolling code programming
.,. A second person on a ladder who ca n safe ly
reach the garage door opener motor is rec
ommended .
11. Locate the "learn" button on the garage
door opener motor (refer to the operating instructions for the opener, as the loca
t ion of t his button may vary by manufac-
turer) .
~
Page 165 of 348
12. Press and release the learn button on the
garage door opener motor.
.. Note : once the button is pressed, there are
30 seconds in which to initiate the next
step .
13. On the Homel ink® keypad inside the vehi
cle, firmly press and hold the Homelink ®
button previously programmed in phases
1 and 2 for two seconds and release. Re
peat this sequence
twice .
.. Some vehicles may requ ire the press/hold/
release sequence up to three times to com
plete the training process .
.. Homelink ® should now activate your rolling
code equipped device.
If the 5 minute time limit is exceeded, the
emergency flashers will flash one time to in
d icate that the process has been terminated.
In this case, repeat steps 4 through 9 .
If the emergency flashers do not flash
three
times (after about 15-60 seconds), program
ming was not successful. In this case, repeat
steps 4 through 9.
Remote control units for garage door openers
in Canada are set to stop transmitting radio
frequency s ignals after two seconds. This time
may not be sufficient for the Homelink ® sys
tem to learn the radio frequency s ignal. Per
form all other steps as described above .
Operating the Homelink ® transmitter
Applies to vehicles: with Home link® universa l remote
control
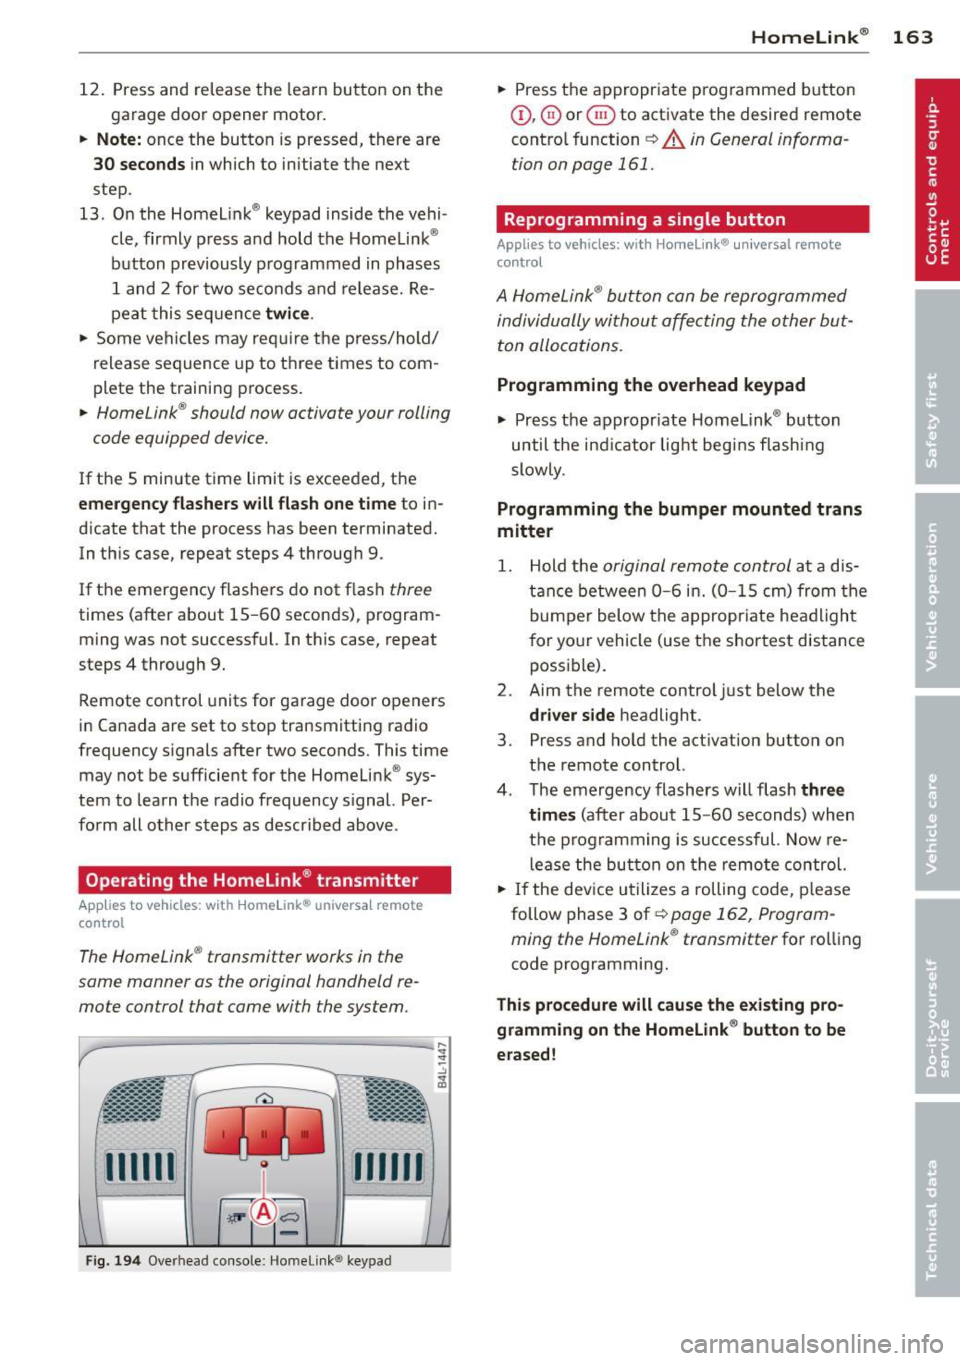
The Homelink ® transmitter works in the
some manner as the original hondheld re
mote control that come with the system.
mm
-
Fi g. 194 Overhead co nsole: Home link ® keypad
Homelink ® 163
.. Press the appropriate programmed button
Q), @) or @ to activate the desired remote
contro l function
~ A in General informa
tion on page 161 .
Reprogramming a single button
Applies to vehicles: with Homelink® universal remote
control
A HomeLink ® button can be reprogrammed
individually without affecting the other but
ton allocations.
Programming the overhead keypad
.. Press the appropr iate Homelink ® button
until the ind icator light begins flashing
slowly .
Programming the bumper mounted trans
mitter
1. Hold the original remote control at a dis
t anc e between
0-6 in. (0 -15 cm) from the
bumper below the appropriate headlight
for your vehicle (use the shortest distance
possible).
2. Aim the remote control just below the
driver side headlight.
3. Press and hold the act ivation button on
the remote control.
4. The emergency flashers will flash
three
times
(after about 15 -60 seconds) when
the programming is successful. Now re
lease the button on the remote control.
.. If the device utilizes a rolling code, please
follow phase 3 of¢
page 162, Program
ming the Homelink ® transmitter
for rolling
code programming.
This procedure will cause the existing pro
gramming on the Homelink ® button to be
erased!
Page 330 of 348
328 Consumer Information
Technical Modifications
Our guidelines must be complied with when technical modifications are made .
Always consult an authorized Audi dealer be
fore starting work on any modifications.
This will help ensure that vehicle function,
performance and safety are not impaired
¢ &. .
Attempting to work on electronic components
and the software used with them can cause
malfunctions. Because of the way electronic
components are interconnected with each
other, such malfunctions can also have an ad
verse affect on other systems that are not di
rectly involved. This means that you risk both
a substantial reduction in the operational
safety of your vehicle and an increased wear of
ve hicle parts ¢
A:,..
Author ized Audi dealers will perform th is
wo rk in a professiona l and competent manner
or, in special cases, refer you to a professional
company that specializes in such modifica
tions .
A WARNING
Improper repairs and modifications can
change the way vehicle systems work and
cause damage to the veh icle and serious
personal injury.
-
If emergency repairs must be performed
elsewhere, have the vehicle examined by
an authorized Audi dealer as soon as possi
ble.
Declaration of
Compliance, Telecom
munications and
Electronic Systems
Radio Frequency Devices and Radio Communi
cation Equipment User Manual Notice.
The manufacturer is not responsib le for any
radio or TV interference caused by unauthor
ized modifications to this equipment.
Devices
T he following devices each comply with FCC
Part 15.19, FCC Part 15.2 1 and RSS-Gen Iss ue
1:
- Adapt ive cru ise control
- Conven ience key
- Aud i side assist
- Cell phone package
- Electron ic immobilizer
- Homelink ® universal remote contro l
- Remote control key
FCC Part 15.19
This device complies with part 15 of the FCC
Rules . Operation is subject to the follo wing
two conditions:
(1) This device may not cause harmful inter
ference, and
(2) this device must accept any interference
received, including interference that may
cause undesired operation.
FCC Part 15 .21
CAUTION:
Changes or modifications not expressly ap
proved by the party responsible for compli
ance could void the user's authority to operate
the equipment .
RSS-Gen Issue 1
Operation is subject to the following two con
ditions:
(1) this device may not cause inte rfe rence,
and