AUDI Q7 2013 Owner´s Manual
Manufacturer: AUDI, Model Year: 2013, Model line: Q7, Model: AUDI Q7 2013Pages: 348, PDF Size: 87.72 MB
Page 221 of 348
-Always follow the instructions provided
by the manufacturer of the ch ild re
straint you intend to install in your veh i
cle .
- Never install a child restraint without a
properly attached top tether strap if the
child restraint manufacturer's instruc
t ions req uire the top tether strap to be
used.
- Improper use of ch ild restra int LATCH
lower anchorage points can lead to injury
in a collision. The LA TCH lower anchorage
points are designed to withstand only
those loads imposed by correctly fitted
child restraints.
- Never mount two child restraint systems
on one LATCH lower anchorage point.
- Never secure or attach any luggag e or
other item to the LATCH lower anchorag
es .
{i) Tips
-In Canada, the terms "top tether" with
"lowe r universal anchorages" (or "lower
universal anchorage bars") are used to
desc ribe the system .
- In other countries, the term "ISOFIX" is
us ed to describe the lower anchorages.
Location
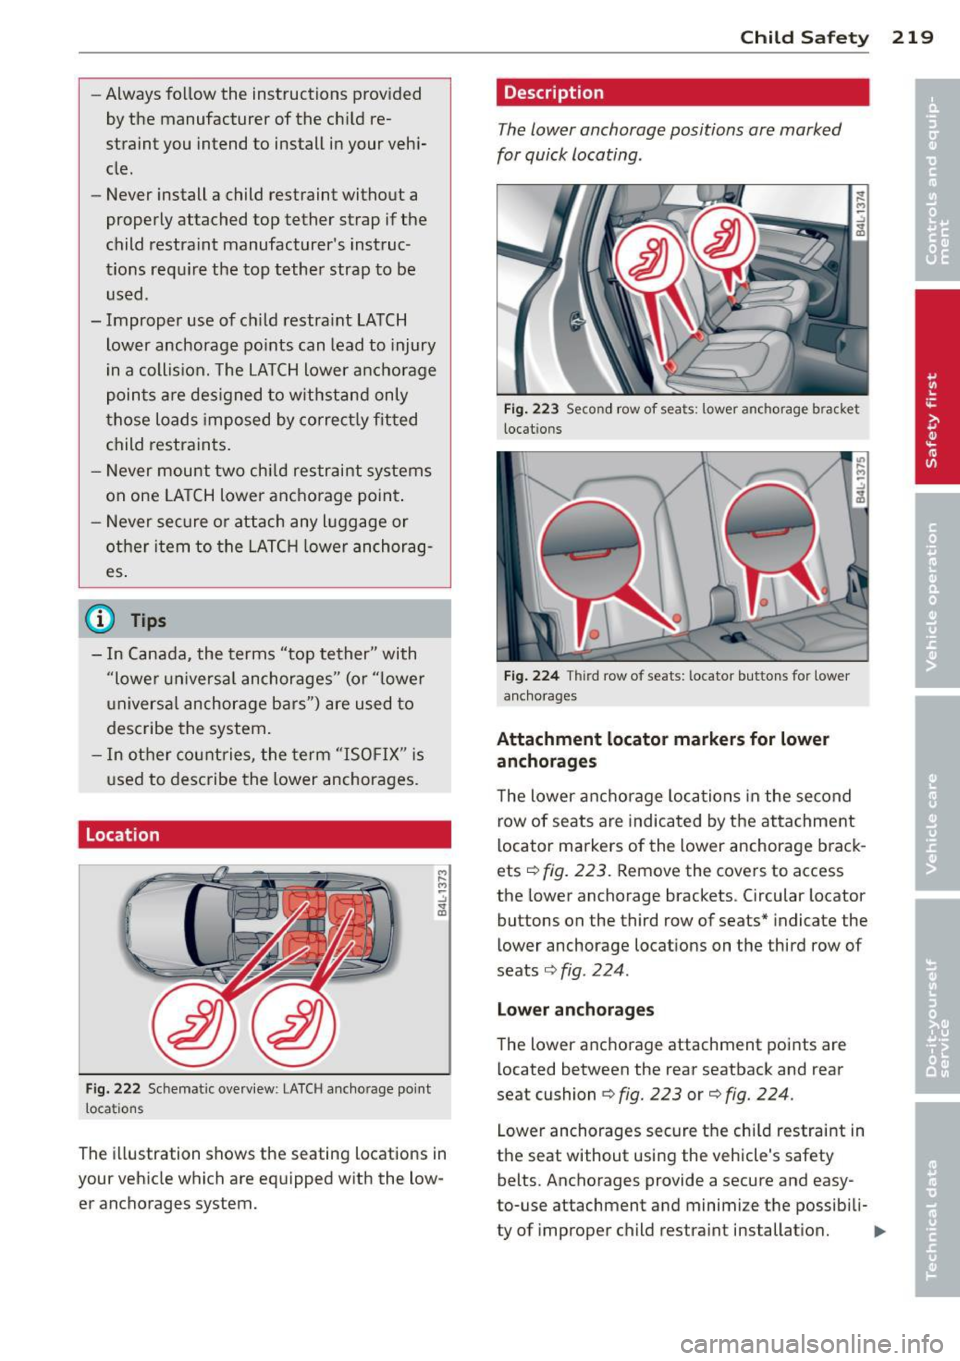
Fig . 222 Schematic overv iew : LATCH anc horage poi nt
locations
The illustration shows the seating locations in
your vehicle which are equipped with the low er anchorages system.
Child Safety 219
Description
The lower anchorage positions are marked
for quick locating .
Fig. 223 Second row of seats: lower anc horage b racket
locat io n s
Fig. 224 Thir d row of seats: locato r buttons for lower
a nch orages
Attachment locator markers for lower
anchorages
T he lower anchorage locations in the second
row of seats are indicated by the attachment
locator markers of the lower anchorage brack
ets <=>
fig. 223. Remove the covers to access
the lower anchorage brackets . Circular locator
buttons on the third row of seats" indicate the
lower anchorage locations on the third row of
seats <=>
fig. 224 .
Lower anchorages
The lower anc horage attachment points are
located between the rear seatback and rear
seat cushion <=>
fig. 223 or<=> fig. 224.
Lower anchorages secure the child restraint in
the seat without using the vehicle's safety
belts. Anchorages provide a secure and easy
to-use attachment and minimi ze the possibili-
ty of improper child restraint installation. .,..
Page 222 of 348
220 Child Safe ty
A ll child restraints man ufactured after Sep
tember 1, 2002, must have lower anchorage
attachments for the
LATCH system.
Remember that the lower anchorage points
are on ly intended for installation and attach
ment of child restraints specifically certified
for use w ith
LATCH l ower anchorages . Child
restra ints that are not equipped with the tow
er anchorage attachments can still be instal led in compliance with the ch ild restra int
manufacturer's instruct ions on using vehicle
safety belts.
A WARNING
Improper use of LATCH lower anchorages
can ca use serio us pe rsonal injury in an ac
cident.
- Always carefully follow the ch ild re
strain ts manufac turer's instruct io ns for
proper installation of the child restraint
and proper use of the lower anchorages
or safety belts in your vehicle .
- Never secure o r attach any l uggage or
ot her items to the
LATCH lower ancho
rages.
- Always read and heed the important in
formation about child restraints in this
chapter and WARNINGS
¢ page 205,
Child Safety.
Guidance fixtures for lower anchorages
Applies to vehicles: with third row seating
Special guidance fixtures increase the conven
ience of the lower anchorages and are availa
ble from your authorized Audi dealer.
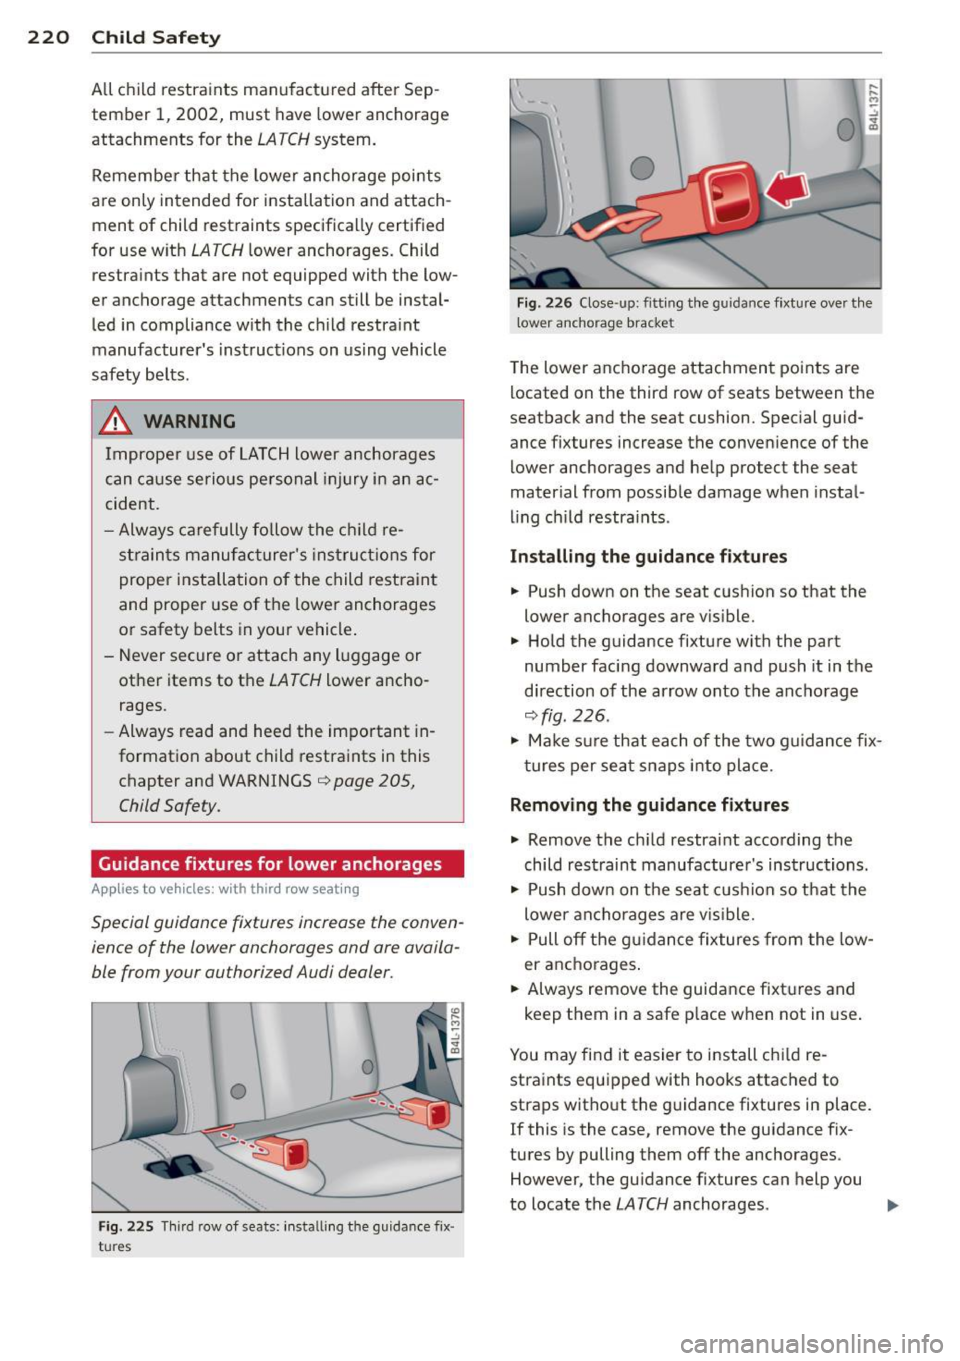
Fig . 225 Thir d row of seats: install ing the gu idance fix ·
tures
0
Fig. 226 Close-up: fitting the guidance fixture over t he
l ower anchorage bracket
T he lower ancho rage attachment poi nts are
located on the third row of seats between the
seatback and the seat cushion. Special guid
ance fixtures increase the conven ience of the
lower anchorages and help protect the seat
mater ial from possib le damage when instal
ling ch ild restra ints .
Installing the guid anc e fixture s
.,. Push down on the seat cushion so that the
tower anchorages are v is ible.
.,. Hold the guidance fixture with the part
number facing downward and push it in the
d irection of the arrow onto the anchorage
¢fig. 226 .
.,. Make s ure that ea ch of the two guidance fix
t ures per sea t snaps into place.
Removing the guidance fixtures
.,. Remove the ch ild restraint according the
child restraint manufacture r's instructions .
.,. Push down on the seat cus hion so that the
lowe r ancho rages are v is ible.
.,. Pull off the gu idance fixtures from the low
er ancho rages .
.,. Always remove the guidance fixtures and
keep them in a safe p lace when not in use .
You may find it easier to install c hild re
straints equ ipped with hooks attached to
straps witho ut the g uidance fixtures in place.
If this is the case, remove the guidance fix
tures by pulling them off the anchorages. However, the guidance fixtures can help you
to locate the
LATCH anchorages . ..,.
Page 223 of 348
_& WARNING
Improper use of tether anchorages or low
er anchorages can cause serious personal
injury in a crash.
- Always carefully follow the child re
straint manufacturer's instructions for
proper installation and use of child re
straint systems.
- Never use the
LATCH or tether anchorag
es to attach safety belts or other kinds of
occupant restraints.
- Child restraint tether attachments and
lower attachments are only designed to
secure a child restraint that has been
equipped to use these anchorages.
- Tether anchorages and lower anchorages
are designed to withstand only those
loads imposed by correctly fitted child
restraints. Under no circumstances can
they be used safely for adult or child
safety belts or harnesses.
- Never mount more than one child re
straint to a single tether or to a lower an
chorage point. Attaching two child re
straints to a single anchorage point can
cause the anchorage to fail and cause se
rious personal injury in a crash.
(D Note
-Remove the guidance fixtures before
folding the rear seatback to prevent
damaging the seat cushion.
- If you leave the guidance fixtures instal
led for several days, they could leave a
mark on the upholstery on the seat cush
ion and backrest in the area that the
guidance fixtures were installed. The up
holstery would also be permanently
stretched around the guidance fixtures.
This applies especially to leather seats.
Child Safety 221
Installing a child restra int with LATCH
lower anchorages
Whenever you install a child restraint always
follow the child restraint manufacturer's in
structions.
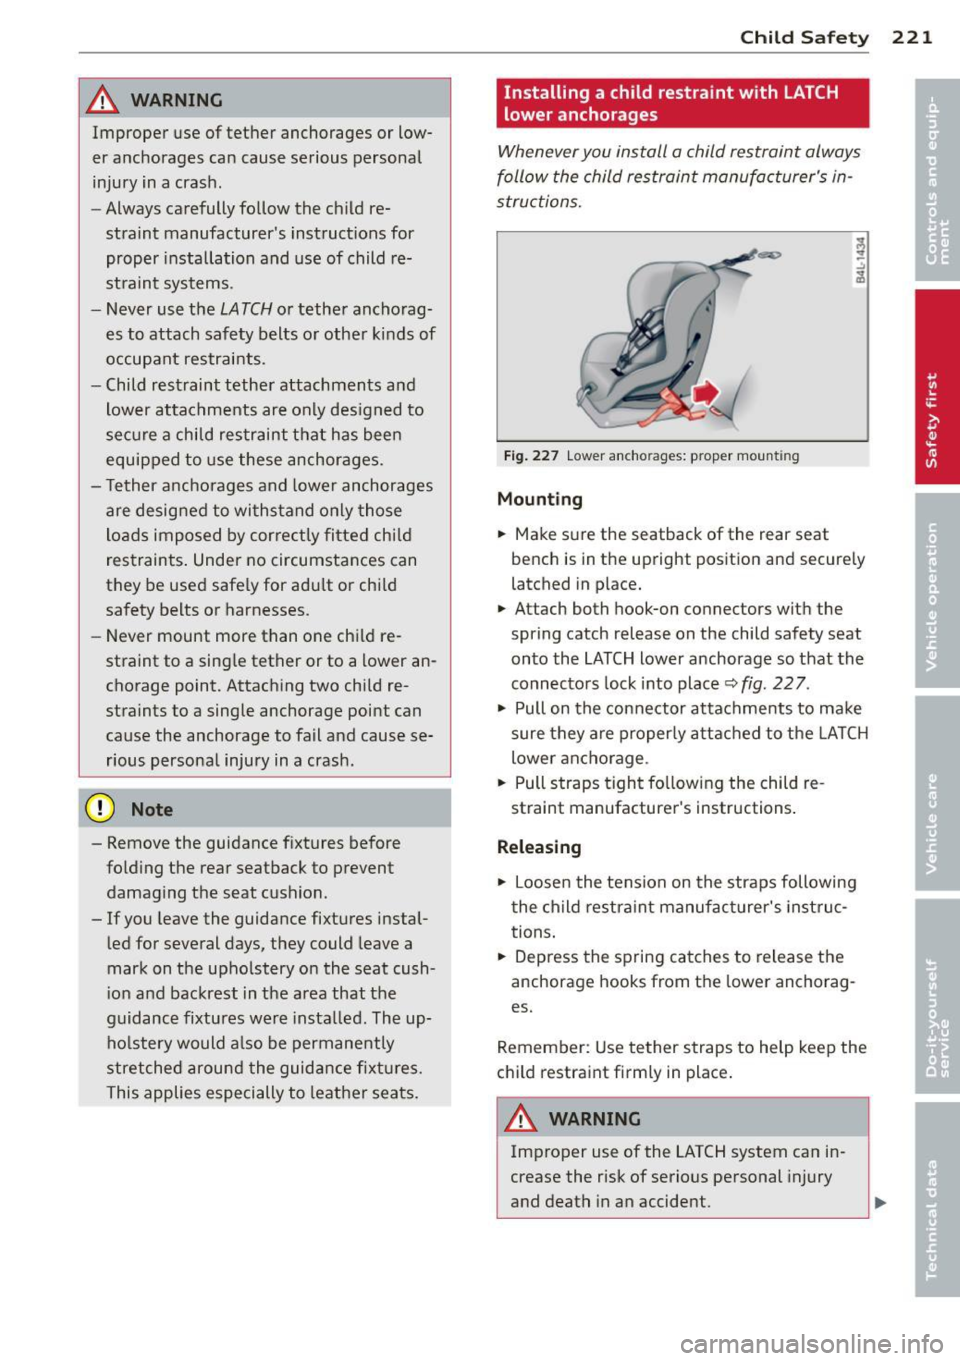
Fig. 227 Lower anchorages: proper mounting
Mounting
.. Make sure the seatback of the rear seat
bench is in the upright position and securely
latched in place.
.. Attach both hook-on connectors with the
spring catch release on the child safety seat
onto the LATCH lower anchorage so that the
connectors lock into place
¢fig. 227.
.. Pull on the connector attachments to make
sure they are properly attached to the LATCH
lower anchorage .
.. Pull straps tight following the child re
straint manufacturer's instructions.
Releasing
.. loosen the tension on the straps following
the child restraint manufacturer's instruc
tions.
.. Depress the spring catches to release the
anchorage hooks from the lower anchorag
es.
Remember: Use tether straps to help keep the
child restraint firmly in place.
A WARNING '-
Improper use of the LATCH system can in-
crease the risk of serious personal injury
and death in an accident.
Page 224 of 348
222 Child Safe ty
- These anchors were developed only for
child safety seats us ing the ''LATCH" sys
tem.
- Never attach other child safety seats,
belts or other objects to these anchors.
- Always make sure that you hear a click
when latching the seat in place. If you do
not hear a click the seat is not secure and
cou ld fly forward and hit the interior of
the vehicle, or be ejected from the vehi cle.
A WARNING
Improper insta llation of chi ld restraints
w ill increase the risk of injury in an acc i
dent.
- Always fo llow the child restraint system
ma nufacturer's instructions for proper
installation of the child restraint system
and proper use of tether straps as we ll as
the lower anchorages or safety belts in
yo ur vehicle.
- Always read and heed the important in
format ion and WARNINGS about child
safety and the installation of child re
straint systems ¢
page 205, Child Safe
ty.
Tether anchors and tether straps
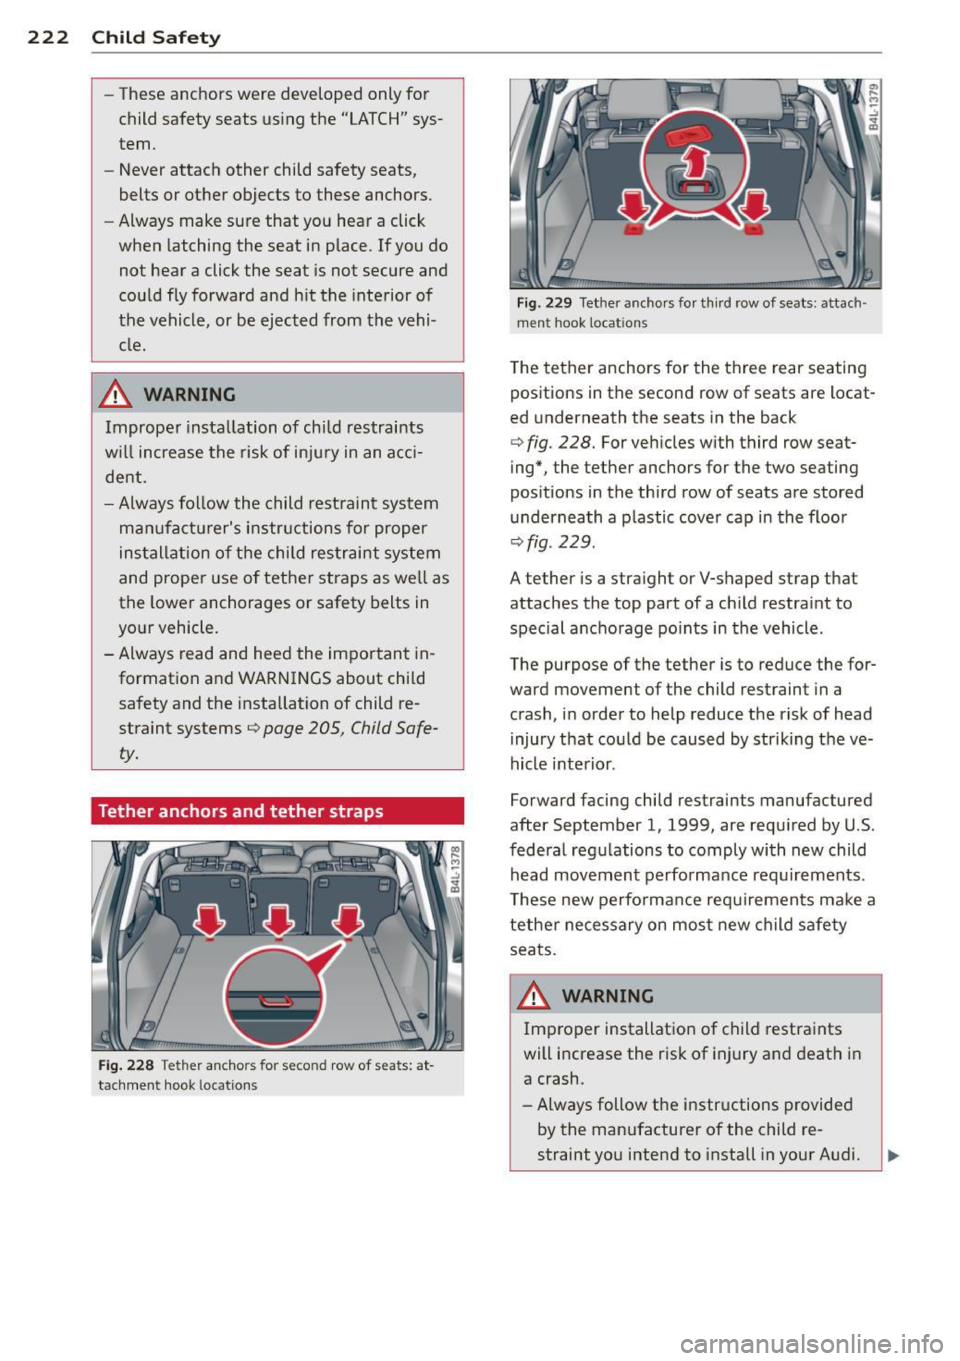
Fig. 228 Tether anchors for second row of seats: at
t ac hm ent hook locatio ns
-
Fig. 229 Tet her anchors fo r thir d row of seats: attach
men t hook loca tions
The tether anchors for the three rear seating
positions in the second row of seats are locat
ed underneath the seats in the back
c> fig. 228. For vehicles with third row seat
ing*, the tether anchors for the two seating
pos itions in the third row of seats are stored
u nderneath a p lastic cover cap in the floor
c> fig . 229 .
A tether is a stra ight or V-shaped strap that
attaches the top part of a ch ild restra int to
special anchorage po ints in the vehicle .
The purpose of the tether is to reduce the for
ward movement of the child restraint in a
crash, in order to help reduce the risk of head
injury that could be caused by striking t he ve
hicle inte rior .
Forward facing child restraints manufactured
after September 1, 1999, are required by U.S .
federa l regu lations to comply with new child
head movement perfo rmance requ irements .
T hese new perfo rma nce req uirements make a
tether nece ssary on most new child safety
seats .
,&_ WARNING
-= -Improper installation of child restraints
will increase the risk of injury and death i n
a crash.
- Always follow the instructions provided
by the manufacturer of the child re-
straint you intend to install in your Audi. ..,_
Page 225 of 348
-Improper use of child restra int anchors
(incl uding tether anchors) can lead to in
jury in a co llision. The anchors are de
signed to withstand only those loads im
posed by correctly fitted ch ild restraints .
- Never mount two child restraint systems
on one LATCH lower anchor po int.
- Never attach two child restraint systems
to one tether strap or tether anchorage.
- Never attach a tether strap to a tie-down
hook in the luggage compartment.
- Never use ch ild restra int tether ancho
rages to secure safety belts or other
kinds of occupant restra ints.
- Never secure or attach any luggage or
other items to t he LATCH lower ancho
rages or to the tether anchors.
- If a tether or other strap is used to at
tac h a child restraint to the fro nt passen
ger seat, make sure that it is not so
t ight, that it causes the we ight-sensing
mat to measu re mo re weight than is ac
t ual ly on the seat.
- T he heav ier we ight reg iste red can make
the Advanced Airbag System wo rk as
though an adult were on the seat and de ploy the Adva nced Ai rbag when it must
be s uppressed causing serious or even
fatal injury to the child.
- If you must install a rearward facing
child safety seat on the front passenger
seat because of exceptional circ umstan
ces and the
PASSENGER AIR BAG OFF
light does not come on and stay on, im
med iately install the rear-facing child
safety seat in a rear seating posi tion and
have the a irbag system inspected by you r
Audi dealer.
Child S afety 223
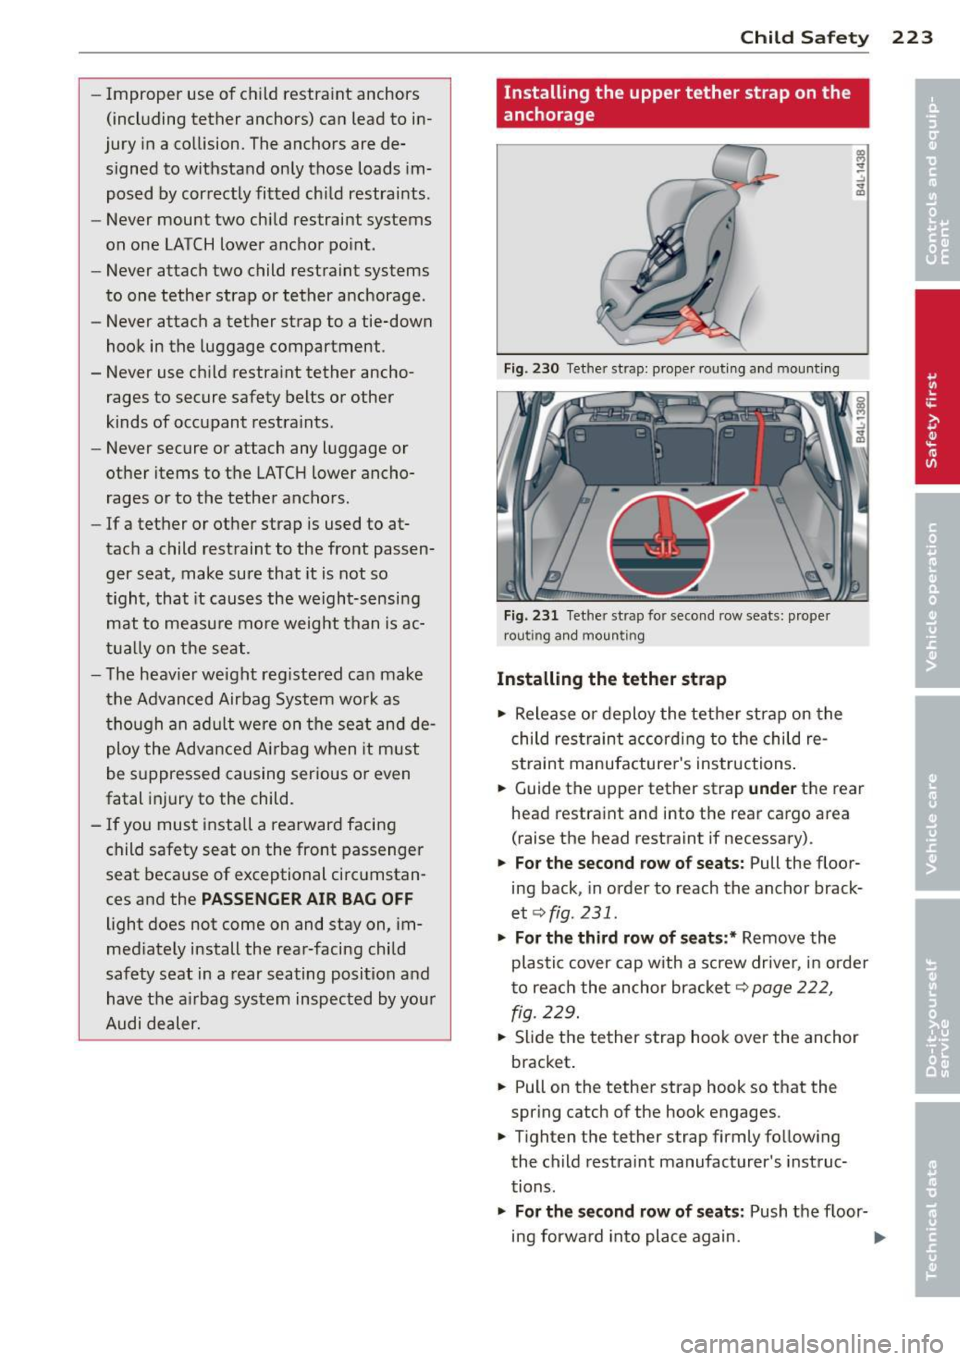
Installing the upper tether strap on the
anchorage
Fig . 230 Tet her st rap: prope r rout ing a nd mounti ng
Fi g. 23 1 Tet her st rap fo r seco nd row sea ts: prope r
rou ting and moun tin g
Installing the tether strap
... Release or deploy the tether strap on the
child res traint accord ing to the child re
st raint manufacture r's ins tructions .
... Guide the upper tether strap
und er the rear
head restraint and into the rear ca rgo area
(raise the head restraint if necessary).
... Fo r the second row o f seats: Pull the floor
ing back, in order to reach the anchor brack
et
c:::> fig. 231 .
... Fo r the third row of seat s:* Remove the
plastic cover cap with a screw drive r, in orde r
to reach the anchor bracket
c:::> page 222,
fig . 229.
.,. Slide the tether strap hoo k over the anchor
bracket .
... Pull on the tether strap hook so that the
spring catch of the hook engages .
.,. Tighten the tether strap firmly follow ing
the child restra int manufacturer's instruc
tions .
.,. For the second r ow of s eats : Push the floor-
ing forward into place again.
11-
Page 226 of 348
224 Child Saf ety
Re leas ing th e te th er str ap
.. Loosen the tension following the child re
stra int manufacturer's instructions.
.. Depress the spring catch on the hook and
release it from the anchorage .
.. Fo r t he seco nd ro w of se ats: Push the floor
ing forward into place again.
.. For the th ird r ow of seats :* Replace the
plast ic cover cap .
(D Note
If you leave the child restraint with the
tether strap firmly installed for several
days, this could leave a mark on the up
holstery on the seat cushion and backrest
in the area whe re the tether strap was in
stalled. The uphols tery would a lso be per
manently stretched around the tether
strap . This applies especially to leather
seats .
Using tether straps on rearward-facing
child restraints
Currently , few rear -facing child restraint sys
tems come with a tether . P lease read and
heed the child restraint system manufactur
e r's instructions caref ully to determine how to
p roperly insta ll the tethe r.
& WARNING
A child in a rearward -facing child safety
seat insta lled on the front passenger seat
w ill be seriously injured and can be ki lled if
the front a irbag inflates - even with an Ad
vanced Airbag System.
- The inflating airbag will hit the child safety seat or infant carrier with great
force and w ill smash the ch ild safety seat
and child against the backrest, center
armrest, or door .
- A tight tether or other strap on a rear
ward-facing child restra int attached to
the front passenger seat can put too much pressure on the weight-mat in the
seat and register a heavier weigh t in the
Advanced Airbag System. The heav ier weight registered can make the system
work as though an adult were on the seat
and deploy the Advanced Airbag when it must be suppressed causing ser ious or
even fatal injury to the ch ild.
- If you must install a rearward fac ing
child safety seat on the front passenger
seat because of exceptional c ircumstan
ces and the
PASSENGER AIR BAG OFF
light does not come on and stay on, im
mediately insta ll the rear-fac ing ch ild
safety seat in a rear seating position and have the airbag system inspected by your
Audi dea ler.
Additional Information
Sources of information about child
restraints and their use
T here are a number of sou rces of add itiona l
information about child restraint se lection, in
sta llation and use:
N HT SA advises that the best chi ld safety seat
is the one that fits your ch ild and fits in you r
vehicle, and that yo u will use correct ly and
consistently.
T ry before yo u buy!
U. S Nat ional Highw ay Traffi c Safety Admin
i s trat ion
Tel.: 1-888-327-4 236 (TIY: 1-800-424-9153)
http://www.nhtsa.gov
N ati onal SAFE KID S Camp aign
Tel.: (202) 662-0600
http://www.safekids .o rg
S af ety Belt Saf e U. S.A
T el.: (800) 7 45 -SAFE (Eng Lish)
Tel.: (800) 747-SANO (Span ish)
http://www.ca rseat.org
T ranspo rt Ca nad a Info rmation Centre
Tel.: 1-800 -333-0371 or call
1-613-998-8616 if you are in the Ottawa area
http://www.tc.gc.ca/eng/ roadsafety/
menu.htm
Aud i Cu stom er R elation s
Tel.: (800) 822-2834
Page 227 of 348
Intelligent technology Notice about data
recorded by vehicle
control modules
Your vehicle is not equipped with an Event Da
ta Recorder (EDR), installed by some manu
facturers for the express purpose of capturing
data for retrieval after an accident or crash
event. EDRs are sometimes called "crash re
corders".
Some state laws restrict the retr ieval or down
loading of data stored by EDRs that were in
stalled in a vehicle for the express purpose of
retrieving data after an accident or crash
event without the owner's consent.
Although your vehicle is not equipped with an
EDR, it is equipped with a number of electron
ic control modules for various vehicle systems
such as, for example, engine function, emis
sion control, as well as for the airbags and
safety belts.
These electronic control modules also record
vehicle-related data during norma l vehicle op
eration for diagnostic and repair purposes.
The recording capacity of the electronic con
trol modules is limited to data (no sound is re
corded) and only a small amount of data is ac
tually recorded over a very limited period of
time and stored when a system fault or other
condition is sensed by a control unit. Some of
the data then stored may relate to vehicle
speed, direction, braking as we ll as restraint
system use and performance in the event of a
crash or other condition. Stored data can only be read and downloaded with special equip
ment.
Intelligent technology 225
Electronic Stabilization
Control (ESC)
General information
The ESC improves the vehicle stability.
. ..---------..
------- -
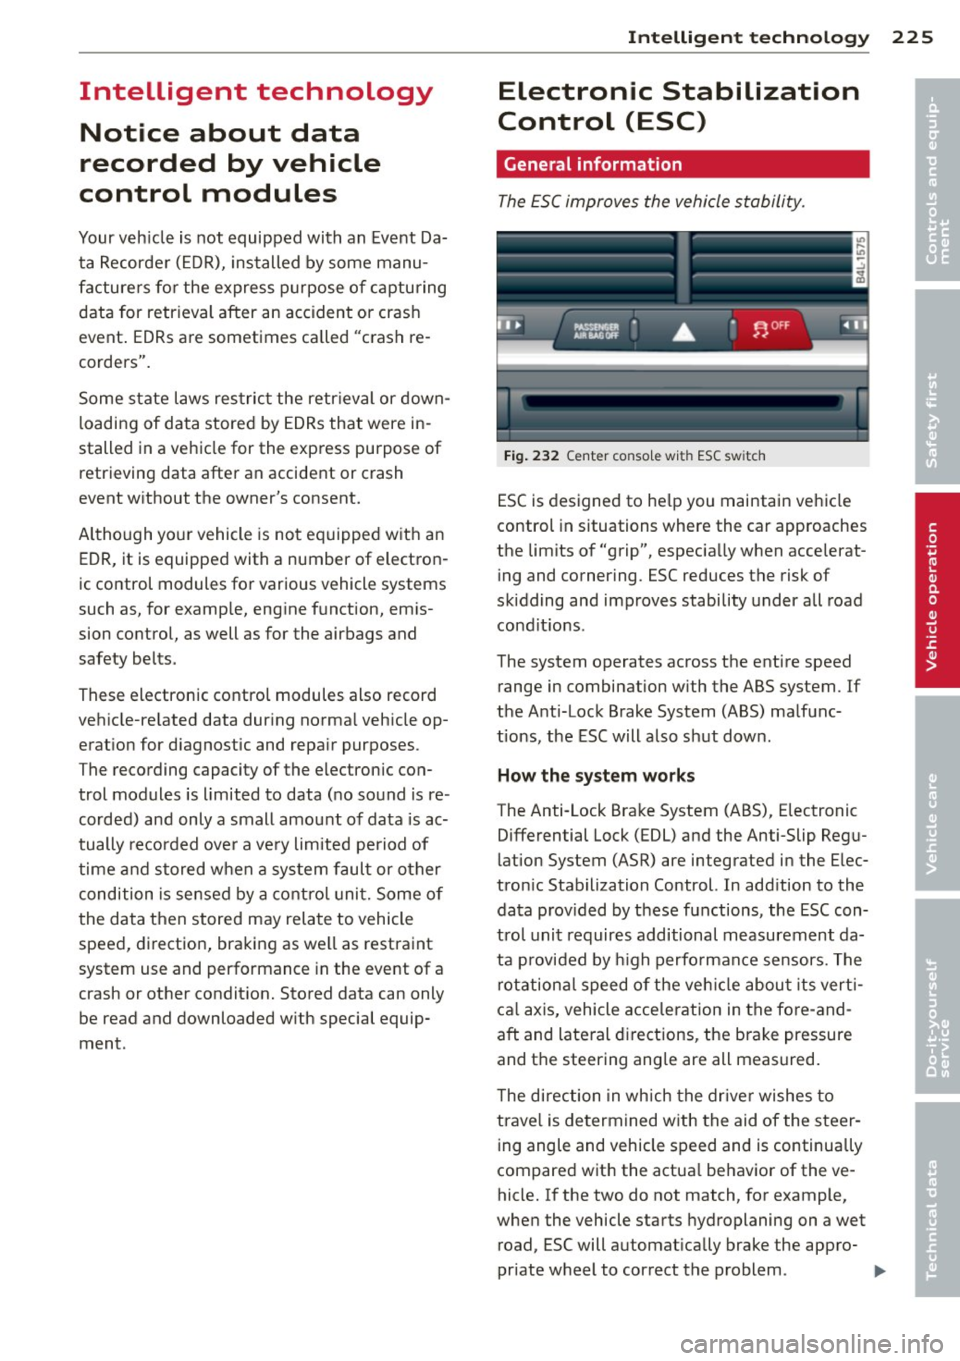
Fig. 232 Center console with ESC sw itch
ESC is designed to help you maintain vehicle
control in situations where the car approaches
the limits of "grip", especially when accelerat
ing and cornering. ESC reduces the risk of
skidding and improves stability under all road
condit ions .
The system operates across the entire speed range in combination with the ABS system. If
the Anti-Lock Brake System (ABS) malfunc
tions, the ESC will also shut down.
How the system works
The Anti-Lock Brake System (ABS), Electronic
Differential Lock (EDL) and the Anti-Slip Regu
lation System (ASR) are integrated in the Elec
tronic Stabilization Control. In addition to the
data prov ided by these functions, the ESC con
trol unit requires additional measurement da
ta provided by high performance sensors. The
rotational speed of the vehicle about its verti
cal axis, vehicle acceleration in the fore-and
aft and lateral directions, the brake pressure and the steering angle are all measured.
T he direction in wh ich the driver wishes to
travel is determined with the aid of the steer
ing angle and vehicle speed and is continually
compared with the actual behavior of the ve
hicle. If the two do not match, for example,
when the vehicle starts hydroplaning on a wet
road, ESC will automatically brake the appro-
priate wheel to correct the problem. ..,_
•
•
Page 228 of 348
226 Intellig ent technol ogy
The vehicle is then stabilized by the forces act
ing on the whee l during braking. If the vehicle
is
oversteering (rear tends to sk id out of the
turn), the brakes are ma inly applied on the
wheel that is on the outside of the curve. In
the case of a vehicle that is
understeering
(tendency to slide out of the curve), the
brakes are applied as needed on the whee l
that is on the ins ide of the curve or addit ional
l y on the o ther wheels. An acoustic s ignal indi
cates when ESC b rake app lication cuts in
¢ A .
The system operates across the entire speed
range in combination with the ABS system
¢ page 229. If the Anti-Lock Brake System
(ABS) malfunctions, the ESC wi ll be out of ac
tion as well .
Activating
When you turn on the engine, ESC w ill auto
mat ica lly be act ivated and will perform a se lf
test. As soon as the test is comp leted, the sys
tem is in normal operating mode.
Offroad mod e
ESC should normally be ope rated in normal
mode because this ensures maximum vehicle
stability. If necessary, you can act ivate the
ESC offroad mode by pressing the but to n
¢ fig . 232 to obtain maximum traction and
braking ability when driving
off paved roads at
l ow speeds. In ESC offroad mode, the indica
tor light
Ii) ill uminates and the message Sta
b ilization control (E S C): Offr oad . Wa rning !
R estric te d stabilit y
appears br iefly in the dis
p lay .
The ESC offroad mode can be useful in the fo l
low ing except ional situations when slip or a
h ighly effective differential locking function is
des irable . Examp les:
- when driving with tire chains,
- when driving in deep snow or on loose
ground,
- when driving on uneven surfaces with the
whee ls severe ly unloaded (articulation), and
- when rocking the vehicle loose after it has
become stuck . When the
unusual situation is past, you
sho uld shift back to the norma l ESC operating
mode by pushing the button again . The mes
sage
S ta b ilizat ion cont rol (ES C): O n then ap
pears briefly in the display.
H ill desc ent control
The hill descent control is switched on in ESC
offroad mode . When slowly descending steep
gradients on loose ground or when the axles
are articulated, hill descent control provides ass istance by automatically apply ing the
brakes to keep vehicle speed constant. The ve
hicle is also rendered easier to steer by selec
t ive d istr ibut ion of braking force. Hill descent
control intervenes when:
- the acce lerator pedal is not pressed,
- the vehicle is travelling less than 12 mph
(20 km/h),
- a steep gradient is detected,
- wheel behavior indicates loose ground or
conditions with poor adhesion (e .g. also axle
art iculation).
Hill descent contro l operates both d riving for
ward and in reverse. Active hill descent con
tro l is deactivated by pressing the accelerator
pedal until the condit ions for activation al
ready listed are met again .
A WARNING
--
- The Electronic Stabilization Contro l is
neverthe less s ubject to the laws of phys
ics. It is part icularly important to pay at
tention to this fact on wet and slippe ry
roads . It i s therefore important that you
always adapt your dr iving to the cond i
tion of the road and traffic conditions . Do
not a llow the increased safety provided
by the E lectronic Stabilization Contro l
system to lull you into accepting addi
tional safety risks .
- Please be aware that in ESC offroad
mode, particularly on a smooth and s lip
pe ry road, the wheels may have an in
creased tendency to sp in and the vehicle
may b reak away - dange r of skidding!
~
Page 229 of 348
-Stability is limited in the ESC offroad
mode.
Electronic differential lock (EDL)
The electronic differential lock monitors the
rotational speed of the drive wheels .
General notes
The electronic differentia l lock (EDL) helps the
car to start movi ng, accelerate and climb a
gradient on surfaces providing poor or almost
no grip. Without EDL, this would be difficult,
if not impossible.
H ow the system works
The ED L opera tes automatically. It monitors
the rotat iona l speed of wheels w ith the help
of the ABS sensors¢
page 229. If a noticea
b le
slip is detected at the wheels (e .g. on slip
pery ground
on one side), the spinning whee ls
are braked and power is transferred to the
other wheels. This is done up to a speed of
about
60 mph (100 km/h) . Noises from the
brake system s ignal that wheel sp in is being
controlled.
Dri ving off
When driving off, always be sure to keep road
conditions in mind as you accelerate. If one
drive wheel spins because it is on a surface
w ith less gr ip, apply
plenty of throttle until
the car starts to move.
O verheating of br akes
To prevent the disc brake of the braked wheel
from overheating if subjected to excessive
loads on this wheel, the EDL cuts out tempo
rarily . T he vehicle remains operational and be
haves in the same way as a veh icle w ithout
E DL.
As soon as the brake has cooled down, EDL
switches on again automatically .
A WARNING
-When accelerating on slippery surfaces,
such as on ice or snow, always be carefu l
when depressing the acce le rator pedal.
Int ellig ent technolog y 22 7
Even with the EDL working, the drive
wheels can spin and red uce your ab ility
to control your car. Risk of crash!
- The increased safety afforded by EDL
does not mean that you can take safety
risks. Always adapt your driving style to
the road condit ions and traffic situation .
(D Tips
If a fault occurs in the ABS, the EDL is also
not functioning. This is ind icated by the
ABS warning light¢
page 18.
Anti-Slip Regulation System (ASR )
The Anti-Slip Regulation System prevents the
driven wheels from spinning when the car is
accelerating .
General note s
The Anti-Slip Regu lation System (ASR) is inte
grated in the Electronic Stabilization Control
(ESC). When the vehicle starts up and acceler
ates, the wheels are prevented from spinning
by adjust ing the engine power to match the
amount of grip available from the road sur
face .
How the sy stem works
ASR performs automat ically, i.e. without the
driver's intervention. With the aid of the ABS
sensors ¢
page 229, ASR monito rs the speed
of the dr iven wheels .
If the wheels start to
spin, engine torque is red uced automat ically
unt il the t ires find enough grip to lock onto
the ro ad surface. The system is active across
the entire speed range.
T he ASR works in conjunction with the ABS. If
a malfunc tion s hou ld occu r in the ABS, the
ASR wi ll also be out of act io n.
A WARNING ~
The increased safety affo rded by ASR does
not mean that you can take safety risks.
A lways adapt your driving sty le to the road
conditions and traffic situation.
Ill--
•
•
Page 230 of 348
228 Intelligent technology
To ensure that the ASR works properly, all
four wheels must be fitted with identical
tires. Any differences in rolling rad ius of
the t ires can cause the system to reduce
engine power when this is not desired. See
also¢
page 291, New tires and replacing
tires and wheels.
Braking
General information
What affects braking efficiency?
Operating conditions and driving habits
The brakes on today's automob iles are st ill
subject to wea r, depending la rgely on operat
ing cond itions and dr iv ing habits
Q ,& . On
vehicles that are either driven mostly in stop
and -go city traffic or are driven hard, the
brake pads should be checked by your author
ized Audi dealer more often than specified in
the
Warranty & Maintenance booklet . Failure
to have your brake pads inspected can result
in reduced brake performance .
On steep slopes, you shou ld use the braking
effect of the engine. This way, you prevent un
necessary wear on the brake system. If you
must use your brakes, do not hold the brakes
down continuously . Pump the brakes at inter
va ls.
Noises may occur when braking depending on
the speed, braking force and outside condi
tions such as temperature and humidity.
Moisture or road salt
Under certain conditions, for examp le, when
driving through water or very heavy rain, or
even after washing your vehicle, the braking
effect can be reduced due to moisture (or in
freezing conditions ice) on the brake pads. A
few careful brake applications should dry off
the brake pads o r remove any ice coatings.
When you are driving at higher speeds with
the w indshield wipers on, the brake pads will
brief ly touch the brake discs in regular inter- vals so as
to improve reaction time when brak
ing on wet surfaces . You, the driver, will not
notice anything.
T he effect iveness of the brakes can be reduced
when the vehicle is driven on a sa lt-covered
road and the brakes are not used . Here too,
you should clean off accumulated sa lt coating
from brake discs and pads w ith a few careful
applications of the brake¢,&.
Corrosion
There may be a tendency for dirt to build up
on the brake pads and corrosion to form on
the discs if the car is not driven regu larly or
only for short trips with litt le use of the
brakes.
If the brakes are not used frequently, or if cor
rosion has formed on the discs, it is advisable
to clean off the pads and discs by braking
firmly a few times from a moderately high
speed
c> ,& .
Faults in the brake system
If you shou ld notice a sudden increase in
brake pedal trave l, then one of the two brake
c ir cuits may have fa iled
c> ,& .
Low brake fluid level
Malfunctions can occur in the brake system if
the brake fluid level is too low. The brake fluid
l evel is monitored electronically .
Brake lining wear status
Brake lining wear may be checked by visual in
spect ion of the condition of the brake pads
through the openings in the wheel. If neces
sary, the wheel may be removed for this in
spect ion
c> page 304, Changing a wheel.
A WARNING
-- You shou ld perform braking maneuvers
for the purpose of cleaning the brake
system only if road conditions permit.
Othe r road users must not be put at risk -
you may cause an accident!