height adjustment AUDI Q7 2014 Owner´s Manual
[x] Cancel search | Manufacturer: AUDI, Model Year: 2014, Model line: Q7, Model: AUDI Q7 2014Pages: 340, PDF Size: 85.02 MB
Page 74 of 340
72 Seats and stor age
Seats and storage
General recommen
dations
Why is your seat adjustment so
important?
The safety belts and the airbag system can
only provide maximum protection if the front
seats are correctly adjusted.
There are various ways of adjusting the front
seats to provide safe and comfortable support
for the driver and the front passenger. Adjust
you r seat prope rly so that :
- you can easily and quickly reach all the
switches and controls in the instrument
panel
-your body is properly supported thus reduc
ing physical stress and fatigue
- the safety be lts and airbag system can offer
maximum protection
¢ page 183 .
In the following sections, you will see exactly
how you can best adjust your seats .
There are special regulations and instructions
for installing a child safety seat on the front
passenger's seat. Always follow the informa
tion regarding child safety provided in
¢ page 204, Child Safety.
A WARNING
Incorrect seating position of the driver and
all other passengers can result in serious
personal injury.
- Always keep your feet on the floor when
the vehicle is in motion -never put your
feet on top of the instrument panel, out
of the window or on top of the seat cush
ion . This applies especially to the passen
gers .
If your seating position is incorrect,
you increase the risk of injury in the case
of sudden braking or an accident.
If the
airbag inflates and the seating position
is incorrect, this could result in personal
injury or even death.
- It is important for both the driver and
front passenger to keep a distance of at least 10
inches (25 cm) between them
selves and the steering wheel and/or in
strument panel. If you're sitting any
closer than this, the airbag system can not protect you properly . In addition, the
front seats and head restraints must be
adjusted to your body height so that they
can give you maximum protection.
- Always try to keep as much distance as
possible between yourself and the steer
ing wheel or instrument panel.
- Do not adjust the driver's or front pas
senger's seat while the vehicle is moving.
Your seat may move unexpectedly, caus
ing sudden loss of vehicle control and
personal injury. If you adjust your seat
while the vehicle is moving, you are out
of position.
Driver's seat '
The correct seat position is important for safe
and relaxed driving.
We recommend that you adjust the driver's
seat in the following manner :
.,. Adjust the seat in fore and aft direction so
that you can easily push the peda ls to the
floor wh ile keeping your knees slightly bent
i::::> A in Why is your seat adjustment so im
portant? on page 72.
.. Adjust the seatback so that when you sit
with your back against the seatback, you can
still grasp the top of the steering wheel.
.. Adjust the head restraint so the upper edge
is as even as possible with the top of your
head . If that is not poss ible , try to adjust
the head restraint so that it is as close to
this position as possible
c:::> page 77.
A WARNING
Never place any objects in the driver's foot
well. An object could get into the pedal
area and interfere with pedal function. In
case of sudden braking or an accident, you
would not be able to brake or accelerate .
Page 75 of 340
Front passenger's seat
Always move the front passenger seat into the rearmost position .
To avoid contact with the airbag while it is de
ploying, do not sit any closer to the instru
ment panel than necessary and always wear
the three-point safety belt provided adjusted
correctly . We recommend that you adjust the
passenger's seat in the following manner:
.. Move the front passenger seat into the rear
most position of the fore and aft adjustment
range
~ .&. in Why is your seat adjustment
so important? on page
72.
• Bring the backrest up to an (almost) upright
position.
Do not ride with the seat reclined.
.. Adjust the head restraint so the upper edge
is as even as possible with the top of your
head . If that is not possible, try to adjust
the head restraint so that it is as close to
this position as possible ¢
page 77 .
.. Place your feet on the floor in front of the
passenger's seat .
Power front seat
adjustment
Seat adjustment controls
The operating logic for the switches corre
sponds to the cons truction and function of
the seat.
ui
"' ~ -" __.___,., 1,--~--,-,:,
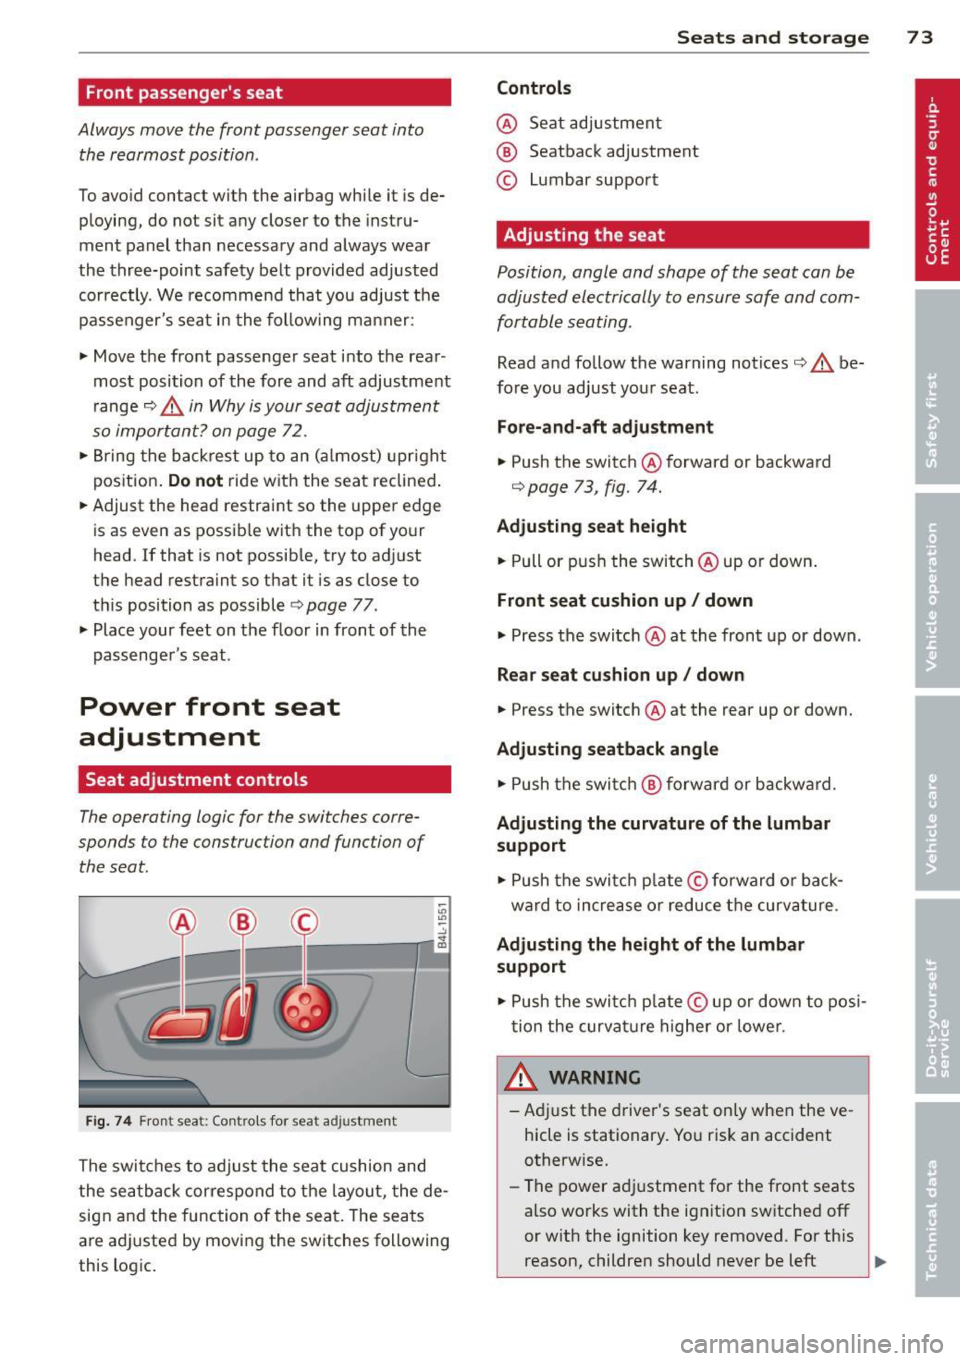
Fig. 74 Front seat: Co ntr ols for seat a djustment
The switches to adjust the seat cushion and
the seatback correspond to the layout, the de
sign and the function of the seat. The seats
are adjusted by moving the switches following
this logic.
Seats and storage 73
Controls
@ Seat adjustment
® Seatback adjustment
© Lumbar support
Adjusting the seat
Position, angle and shape of the seat can be
adjusted electrically to ensure safe and com
fortable seating .
Read and follow the warning notices¢.&. be
fore you adjust your seat .
Fore-and-aft adjustment
.. Push the switch @forward or backward
¢ page 73, fig. 74 .
Adjusting seat height
.. Pull or push the switch @up or down.
Front seat cushion up/ down
.. Press the switch @at the front up or down .
Rear seat cushion up/ down
.. Press the switch @at the rear up or down.
Adjusting seatback angle
.. Push the switch @ forward or backward.
Adjusting the curvature of the lumbar
support
.. Push the switch plate© forward or back
ward to increase or reduce the curvature.
Adjusting the height of the lumbar
support
.. Push the switch plat e© up or down to posi
tion the curvature higher or lower .
A WARNING
-Adjust the driver's seat only when the ve
hicle is stationary. You risk an accident
otherwise.
- The power adjustment for the front seats
also works with the ignition sw itched off
or with the ignition key removed. For this
reason, children should never be left
IJIJ>
Page 76 of 340
7 4 Seats and storage
unattended in the vehicle -they could be
injured!
- Exercise caution when adjusting the seat
height. Unsupervised or careless seat ad
justment can pinch fingers or hands causing injuries.
- While the vehicle is moving, the seat
backs of the front seats must not be in
clined too far to the rear because the ef
fectiveness of the safety belts and the
airbag system is severely compromised -
there is a risk of injury.
- To reduce the risk of injury in the case of
sudden braking or accident, front pas
sengers must never ride in a moving ve
hicle with the seatback reclined . Safety
belts and the airbag system only offer
maximum protection when the seatback
is upright and the safety belts are prop
erly positioned on the body. The more
the seatback is reclined, the greater the
risk of personal injury from an incorrect
seating position and improperly posi
tioned safety belts .
Seat memory
Driver's seat memory
Applies to vehicles: with seat memory
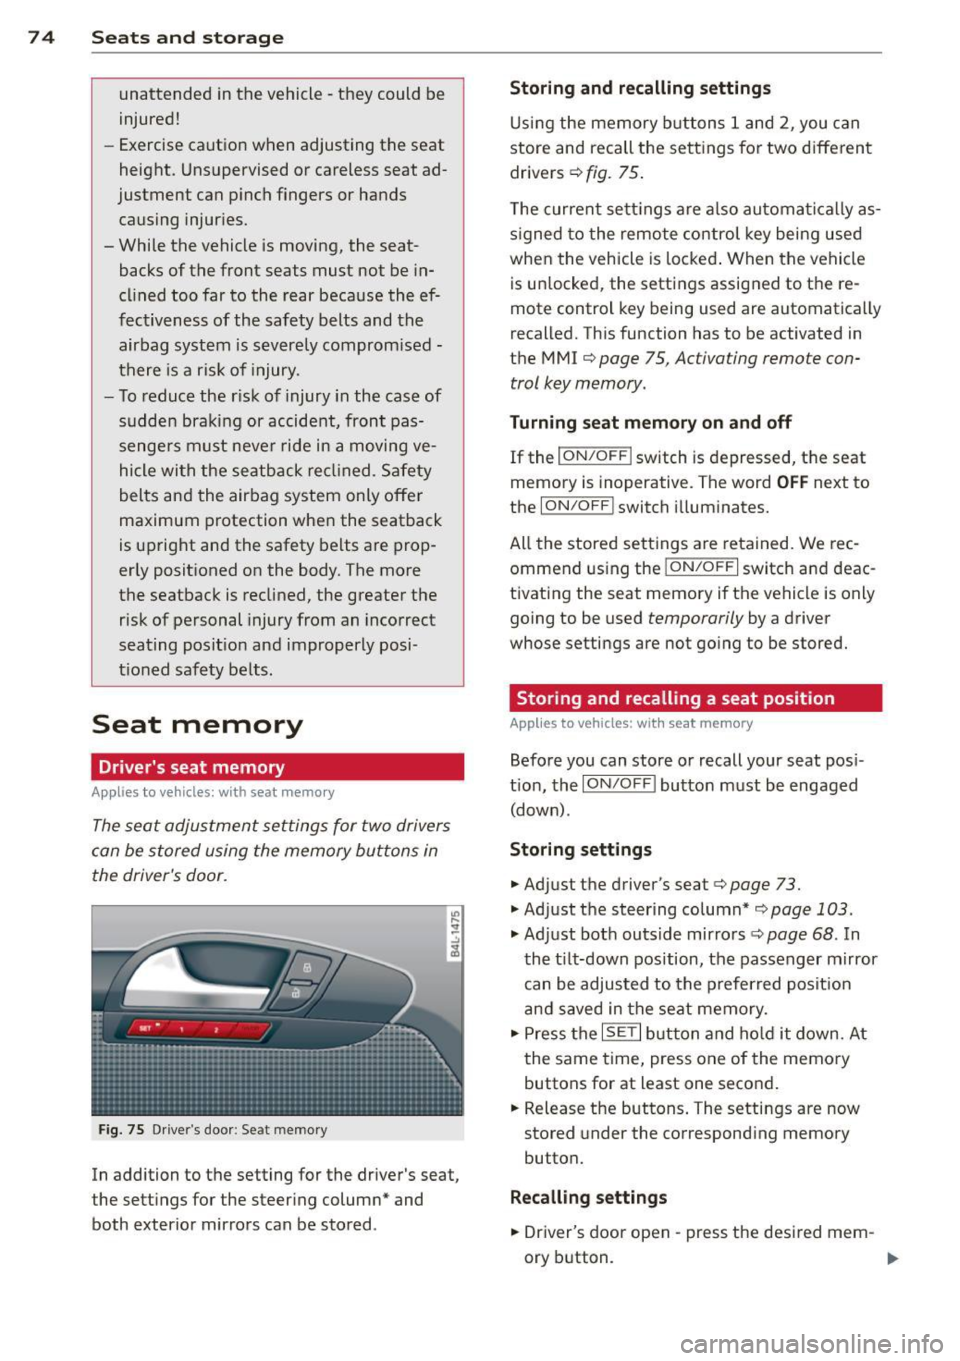
The seat adjustment settings for two drivers
can be stored using the memory buttons in
the driver's door.
Fig. 75 Drive r's door : Se at me mory
In addition to the setting for the driver 's seat,
the settings for the steering column* and both exterior mirrors can be stored .
Storing and recalling settings
Using the memory buttons 1 and 2, you can
store and recall the settings for two different
drivers ¢
fig. 75.
The current settings are also automatically as
s igned to the remote control key being used
when the vehicle is locked. When the vehicle
is unlocked, the settings assigned to the re
mote control k ey b eing used are automatically
recalled. This function has to be activated in
the MMI ¢
page 75 , Ac tiva ting remo te con
trol key memory.
Turning seat m emory on and off
If the I ON/OFF I switch is depressed, the seat
memory is inoperative. The word
OFF next to
the
ION/O FF! switch illuminates.
All the stored settings are retained. We rec
ommend using the
I ON/O FF I switch and deac
tivating the seat memory if the vehicle is only
going to be used
temporarily by a driver
whose se tting s are not going to be stored.
Storing and recalling a seat position
Applies to vehicles: with seat memory
Before you can store or recall your seat posi
tion, the
ION/OFF I button must be engaged
(down) .
Storing settings
.,. Adjust the driver 's seat ¢ page 73 .
.,. Adjust the steering column*¢ page 103 .
.,. Adjust both outside mirrors¢ page 68. In
the tilt-down position, the passenger mirror
can be adjusted to the preferred position
and saved in the seat memory .
.,. Press the
ISETI button and hold it down. At
the same time, press one of the memory
buttons for at least one second .
.,. Release the buttons. The settings are now
stored under the corresponding memory
button.
Recalling settings
.,. Driver's door open -press the desired mem-
ory button . _..
Page 79 of 340
Folding seatback up and down (third
row seating)
Applies to vehicles: with third row seatin g
The third row seating is suitable for persons
up to 1.6 meters (5 ft 3 in) in height .
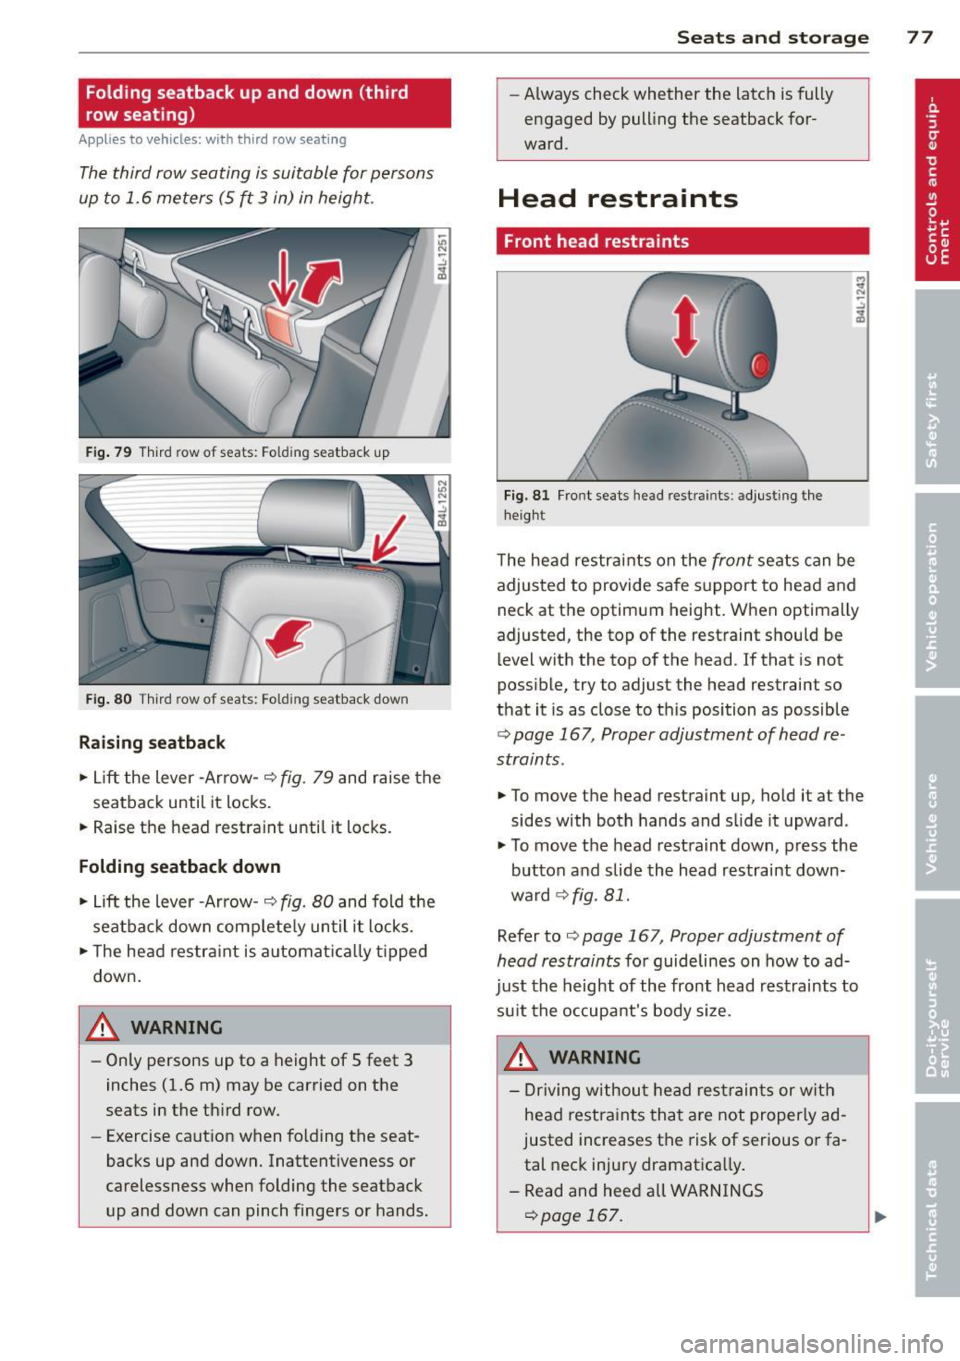
Fig. 79 Third row o f seats : Fo ld ing seatback up
Fig. 80 Third row o f seats: Fo ld in g seatback dow n
Raising seatback
~ Lift the lever -Arrow- ¢ fig. 79 and raise the
seatback until it locks.
~ Raise the head restraint until it locks.
Folding seatback down
~ Lift the lever -Arrow- ¢ fig. 80 and fold the
seatback down complete ly until it locks.
~ The head restraint is automat ically t ipped
down.
A WARNING
- Only persons up to a height of 5 feet 3
inches (1.6 m) may be carried on the
seats in the third row.
- Exercise caution when folding the seat
backs up and down. Inattentiveness or
carelessness when folding the seatback
up and down can pinch fingers or hands.
-
Seats and storage 77
-Always check whether the latch is fully
engaged by pull ing the seatback for
ward.
Head restraints
Front head restraints
Fig. 81 Fro nt seats head rest ra in ts: adjust ing the
height
The head restraints on the front seats can be
adjusted to provide safe support to head and
neck at the optimum height. When optimally
adjusted, the top of the restraint should be level with the top of the head . If that is not
possible, try to adjust the head restraint so
that it is as close to this position as possible
¢ page 167 , Proper adjustment of head re
straints .
~ To move the head restraint up, hold it at the
sides with both hands and slide it upward.
~ To move the head restraint down, press the
button and slide the head restraint down
ward ¢
fig. 81.
Refer to¢ page 167, Proper adjustment of
head restraints
for guidelines on how to ad
just the height of the front head restraints to
su it the occupant's body size.
A WARNING
- Driving without head restraints or with
head restraints that are not properly ad
justed increases the risk of serious or fa
tal neck injury dramatica lly.
- Read and heed all WARNINGS
c::>page 167.
Page 105 of 340
On the road
Steering
Manually adjustable steering wheel
Applies to vehicles: with manu ally adjustable steering
w hee l
The height and reach of the steering wheel
can be adjusted.
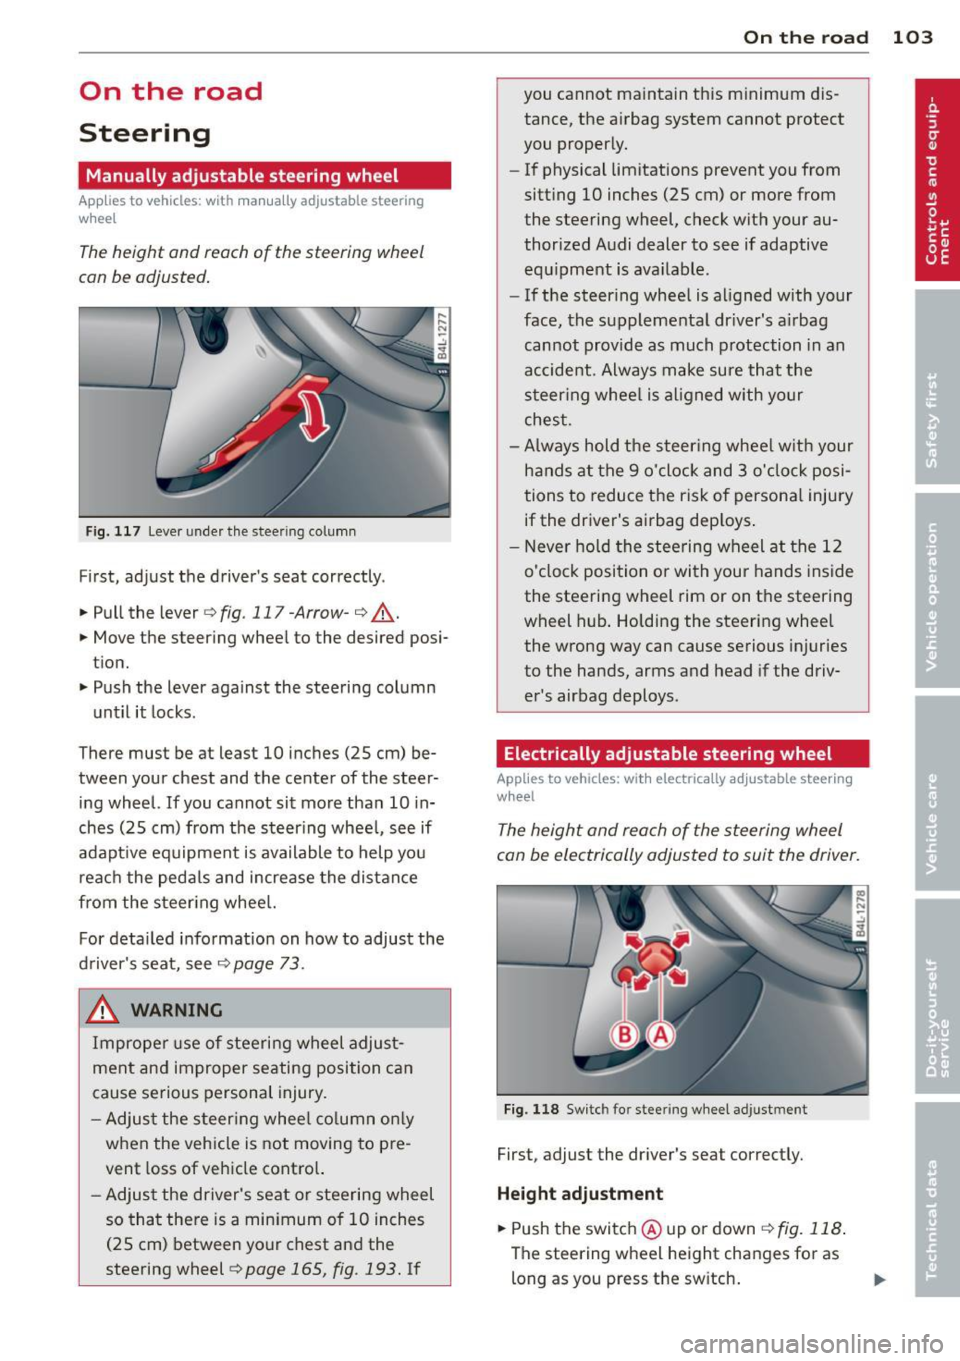
Fig. 117 Lever under the steer ing column
First, adjust the driver's seat correctly .
.. Pull the lever
q fig. 117 -Arrow-q ,A.
.. Move the steering wheel to the desired posi
tion.
.. Push the lever against the steering column
until it locks.
There must be at least 10 inches (25 cm) be
tween your chest and the center of the steer
ing wheel.
If you cannot sit more than 10 in
ches (25 cm) from the steering wheel, see if
adapt ive equipment is available to help you
reach the pedals and increase the distance
from the steering wheel.
For detailed information on how to adjust the
driver's seat, see
¢page 73.
& WARNING
Improper use of steering wheel adjust
ment and improper seating position can
cause serious personal injury.
- Adjust the steering wheel column only
when the veh icle is not moving to pre
vent loss of vehicle control.
-
-Adjust the driver's seat or steering wheel
so that there is a minimum of 10 inches
(25 cm) between your chest and the
steering wheel
¢ page 165, fig. 193. If
On the road 103
you cannot maintain this minimum dis
tance, the airbag system cannot protect
you properly.
- If physical limitations prevent you from
sitting 10 inches (25 cm) or more from
the steering wheel, check with your au
thorized Audi dealer to see if adaptive
equipment is available.
- If the steering wheel is aligned with your
face, the supplemental dr iver's a irbag
cannot provide as much protection in an
accident. Always make sure that the
steering wheel is aligned with your
chest.
- Always hold the steer ing wheel w ith your
hands at the 9 o'clock and 3 o'clock posi
tions to reduce the risk of personal injury
if the driver's airbag dep loys .
- Never hold the steering wheel at the 12
o'clock position or with your hands inside
the steering wheel rim or on the steering
wheel hub. Holding the steering wheel
the wrong way can cause serious injuries
to the hands, arms and head if the driv
er's airbag deploys.
Electrically adjustable steering wheel
App lies to vehicles: with electrically adjustable steering
w heel
The height and reach of the steering wheel
can be electrically adjusted to suit the driver.
Fig. 118 Switch for stee ring wheel adjustment
First, adjust the driver's seat correctly.
Height adjustment
.. Push the switch @up or down <=> fig. 118.
The steering wheel height changes for as
long as you press the sw itch.
Page 166 of 340
164 Driving Safel y
Driving Safely
General notes
Safe driving habits
Please remember -safety first!
This chapter contains important information,
tips, instructions and warnings that you need
to read and observe for your own safety, the
safety of your passengers and others . We have
summarized here what you need to know
about safety belts, a irbags, ch ild restra ints as
well as child safety. Your safety is for us
priori
ty number 1.
Always observe the info rmat ion
and warn ings in th is sect ion -fo r yo ur own
safety as well as that of your passengers .
The information in this se ction app lies to all
model ve rsions of your veh icle . Some of the
feat ures desc ribed in this sec tions may be
standard equipment on some models, or may
be optional equipment on others . If you are
not sure, ask your authorized Aud i dealer.
A WARNING
- Always make sure that you follow the in
struct ions and heed the WARNINGS in
this manual. It is in your interest and in
the inte rest of you r passengers.
- Always keep all of the Owner's Literature
man uals in your Audi when you lend or
sell your veh icle so that this impo rtant
information will a lways be availab le to
the drive r and pas sengers.
- Always keep the Owner's Literature han
dy so tha t you can find it easily if yo u
have ques tions.
Safety equipment
The safety features are part of the occupant
restraint system and work together to help
redu ce the risk of injury in a wide variety of
accident situations.
Your safety and the safety of you r passenge rs
should not be left to chance. Advances in
technology have made a varie ty o f fea tures
avai la bl e to he lp re duce the risk of inj ury in an accident
. The following is a list of just a few of
the safety features in your Audi:
- sophis tic ated s afety be lts for d rive r and a ll
passenger sea ting pos it ions,
- be lt te nsione rs fo r th e fro nt sea ts a nd the
ou ter sea ting posit ions in the second row
seating,
- be lt h eight adjustment fo r th e front sea ts
an d the o ute r seat ing pos itions in the sec
ond row seating,
- he ad restra ints for e ach sea ting pos ition,
- fro nt airbags,
- side airbags in the fro nt seats and the outer
seating positions in the second row seat ing*,
- side curta in ai rbags,
- specia l LATCH anchorages for child re-
st raints,
- ad justab le steering colum n.
These individual safety features, can work to gether as a system to he lp protect you and
your passengers in a wide range of accidents .
These features cannot work as a system if
they are not always correctly adjusted and cor rectly used .
Safety is everybody's responsibil ity!
Important things to do before driving
Safety is everybody 's job! Vehicle and occu
pant safety always depends on the informed
and careful driver.
Fo r yo ur safety and the safety of your passen
gers,
before driving always:
.. Ma ke s ure t hat all lights and sign als are op
erati ng correctly .
.. Make s ure t hat the tire pressure is correct.
.. Make s ure that all windows are clean and af
ford good vis ibility to the outs ide.
.. Secure all luggage and other items carefu lly
¢ page 88.
.. Make s ure that nothing can inte rfere with
the peda ls.
.. Adj ust fron t seat, head restraint and m irrors
correc tly fo r you r height . .,.
Page 181 of 340
the wrong buckle will reduce safety belt
effectiveness and can cause serious per
sonal injury.
- A passenger who is not properly restrain
ed can be seriously injured by the safety
belt i tself when it moves from the stron
ger parts of the body into critical areas
like the abdomen .
- Always lock the convertible locking re
tractor when you are secur ing a child
safety seat in the vehicle~
page 216.
Safety belt position
Correc t bel t posi tion is the key to ge tting
maximum protection from safety belts .
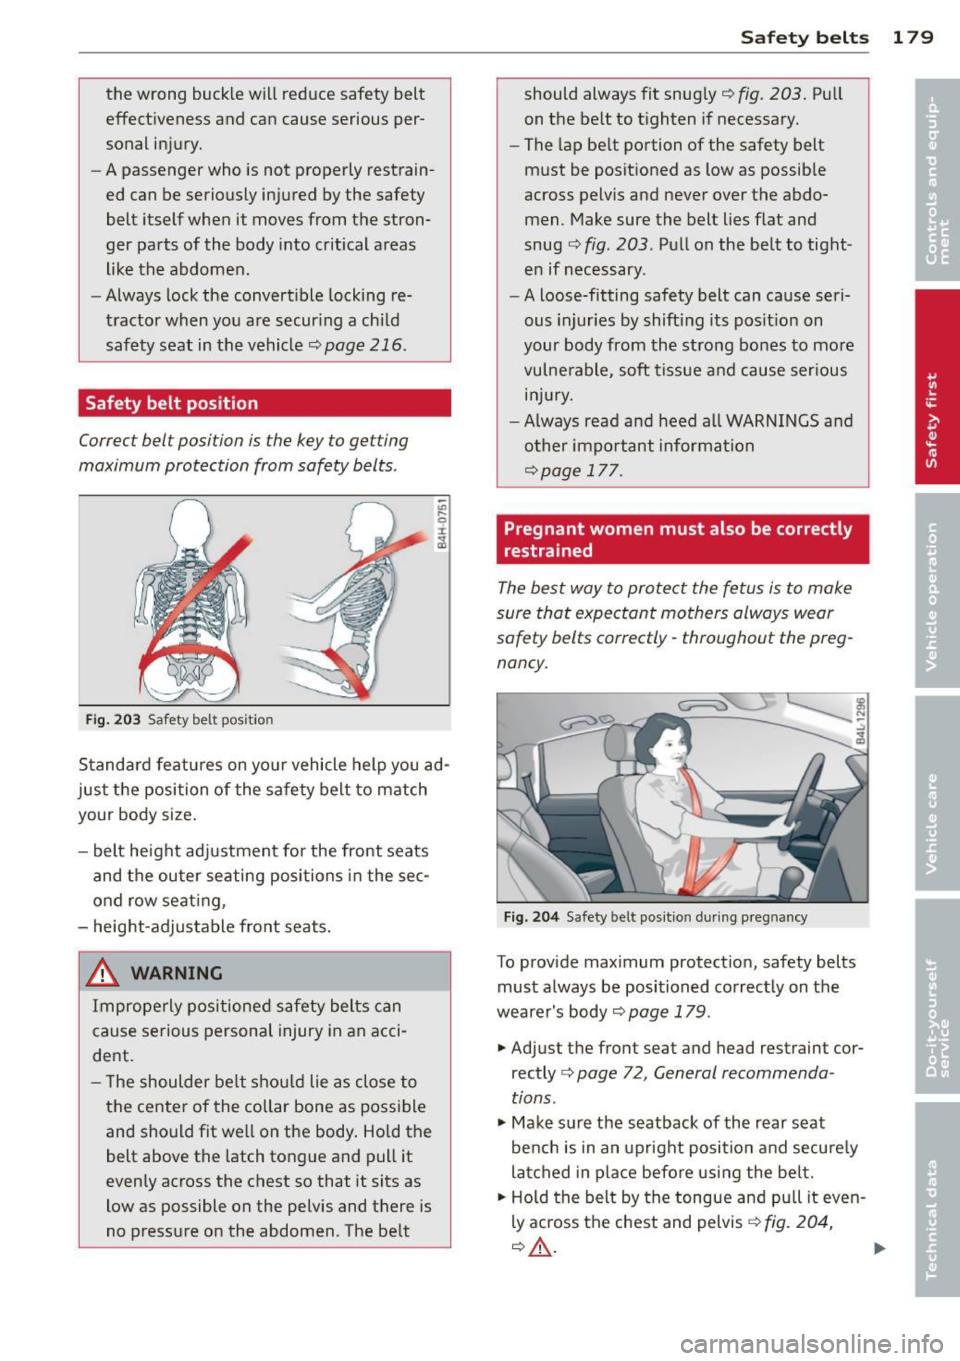
Fig. 203 Safety belt pos it io n
Standard features on your vehicle help you ad
just the position of the safety belt to match
your body size.
- belt height adjustment for the front seats
and the outer seating positions in the sec
ond row seating,
- height-adjustable front seats.
A WARNING
Improperly positioned safety belts can
cause serious personal injury in an acci
dent.
-
- The shoulder belt should lie as close to
the center of the collar bone as possible
and should fit well on the body. Ho ld the
belt above the latch tongue and pull it
evenly across the chest so that it sits as
low as possible on the pelvis and there is
no pressure on the abdomen . The belt
Safety belts 179
should always fit snugly= fig. 203. Pull
on the belt to tighten if necessary.
- The lap belt portion of the safety belt
must be positioned as low as possible
across pelvis and never over the abdo
men . Make sure the belt lies flat and
snug ¢
fig. 203 . Pull on the belt to tight
en if necessary .
- A loose-fitting safety belt can cause seri
ous injuries by shifting its pos ition on
your body from the strong bones to more
vulnerable , soft tissue and cause serious
injury.
- Always read and heed all WARNINGS and
other important information
¢ page 177 .
Pregnant women must also be correctly
restrained
The best way to protect the fetus is to make
sure that expectant mothers always wear
saf ety belts correctly -throughout the preg
nancy.
Fig. 204 Safety belt pos ition du ring pregnan cy
To provide max imum protection, safety belts
must always be positioned correctly on the
wearer's body
¢ page 179 .
... Adjus t the fron t seat and head restra in t cor
rectly ¢
page 72, General recommenda
tions .
.,. Make sure the seatback of the rear seat
bench is in an upright position and securely
latched in place before using the belt.
... Hold the belt by the tongue and pu ll it even
ly across the chest and pelvis¢
fig. 204,
=A . ~
Page 214 of 340
212 Child Safety
to the backrest on the vehicle seat. Ad
just or remove the rear seat head restraint if it is difficult to install the
child seat with the head restraint in place
<=> page 78 . Install the head restraint
again immediately once the child seat is
removed. Driving without head restraints
or with head restraints that are not prop erly adjusted increases the risk of serious
or fatal neck injury dramatically.
- Always read and heed all WARNINGS
whenever using a child restrained in ave
hicle is being used<=>
page 174, Safety
belts,
<=> page 183, Airbag system and
i=> page 204, Important things to know.
A WARNING
If exceptional circumstances require the
use of a forward-facing child restraint on
the front passenger's seat, the child's safe
ty and well-being require that the follow ing special precautions be taken:
- Make sure the forward-facing seat has
been designed and certified by its manu
facturer for use on a front seat with a passenger front and side airbag.
-A lways follow the manufacturer's in
structions provided with the child safety
seat or infant carrier.
- Always move the front passenger seat in
to the rearmost position of the passen
ger seat's fore and aft adjustment range, and as far away from the airbag as possi
ble before installing the child restraint.
- Always make sure that nothing prevents
the front passenger's seat from being
moved to the rearmost position in its
fore and aft adjustment range.
- Always make sure the backrest is in an
upright position.
- Make sure that the
PASSENGER AIR BAG
OFF
light comes on and stays on all the
time whenever the ignition is switched
on.
- If the light does not stay on, perform the
checks
<=> page 194, Monitoring the Ad
vanced Airbag System.
-
- Take the child restraint off the front pas
senger seat and install it properly at one
of the rear seat positions if the
PASSEN
GER AIR BAG OFF
light does not stay on
whenever the ignition is switched on.
Booster seats and safety belts
Properly used booster seats can help protect
children weighing between about 40 lbs. and
80 lbs. (18 kg and 36 kg) who are less than 4
ft.
9 in . (57 inches/1 .45 meters) tall.
"' ....
"' 0 ±
o5
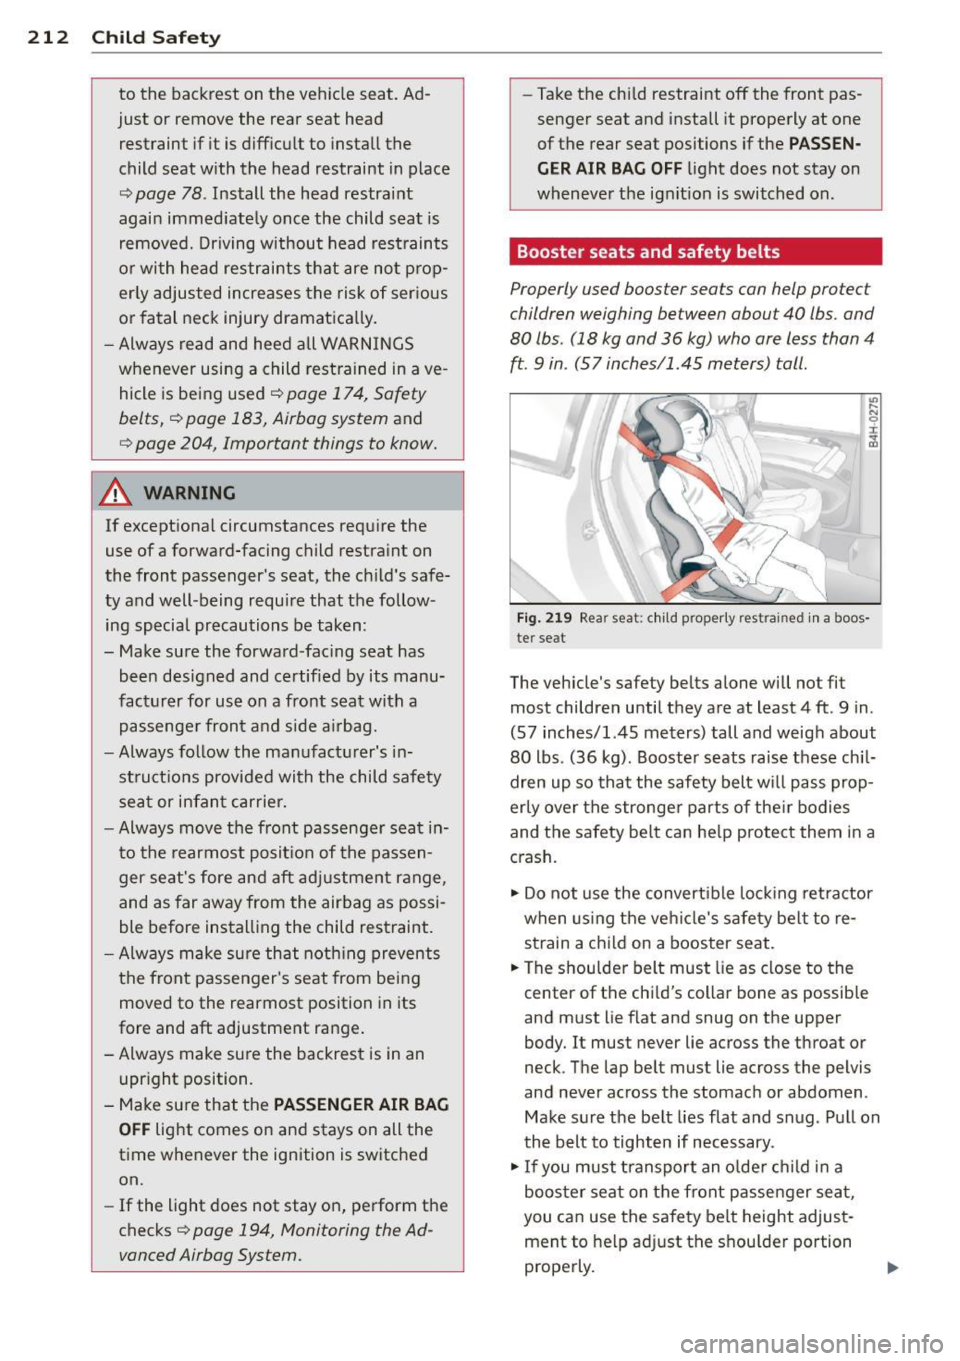
Fig. 219 Rear seat: c hild properly restrained in a boos
te r seat
The vehicle 's safety belts alone will not fit
most children until they are at least 4 ft. 9 in .
(57 inches/1.45 meters) tall and weigh about
80 lbs. (36 kg). Booster seats raise these chil
dren up so that the safety belt will pass prop
erly over the stronger parts of their bodies
and the safety belt can help protect them in a
crash.
.,. Do not use the convertible locking retractor
when using the vehicle's safety belt to re
strain a child on a booster seat.
.. The shoulder belt must lie as close to the
center of the child's collar bone as possible
and must lie flat and snug on the upper
body. It must never lie across the throat or
neck . The lap be lt must lie across the pelvis
and never across the stomach or abdomen .
Make sure the belt lies flat and snug. Pull on
the belt to tighten if necessary .
.,. If you must transport an older child in a
booster seat on the front passenger seat,
you can use the safety belt height adjust
ment to help adjust the shoulder portion
properly.
Page 306 of 340
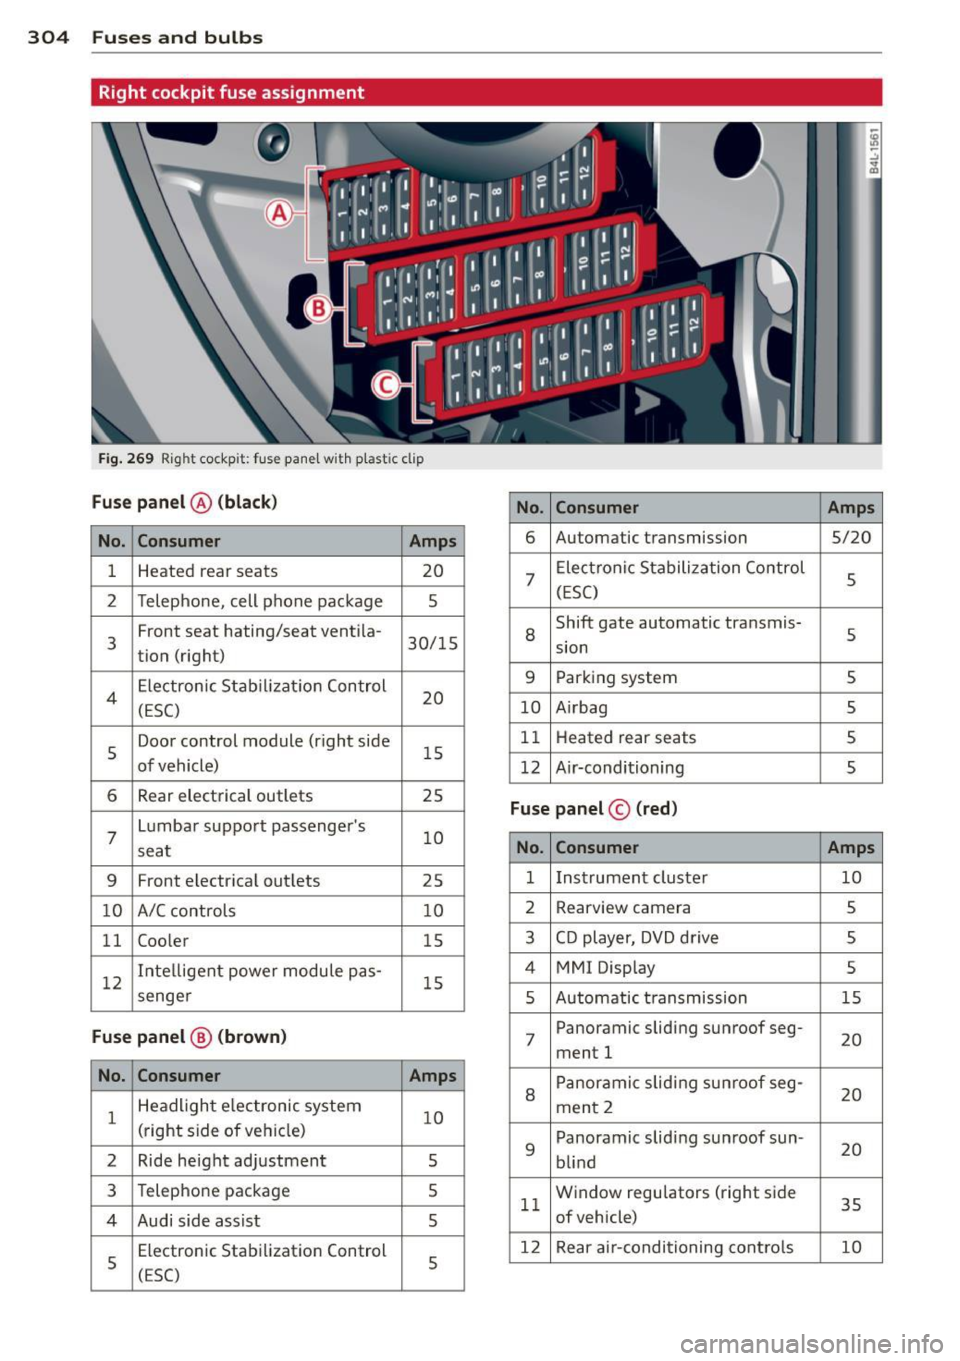
304 Fuses and bulbs
Right cockpit fuse assignment
Fig. 269 Right cockpit: fuse pane l w ith plastic clip
Fuse panel @ (black)
No. Consumer Amps
No. Consumer Amps 6
Automatic transmission
5/20
1 Heated rear seats
20
2 Telephone, cell phone package 5
7
Electronic Stabilization Control
5
(ESC)
3 Front seat
hating/seat ventila-
30/15
tion (right) 8
Shift gate automatic transmis-
s sion
4 Electronic
Stabil iz at ion Control
20
(ESC) 9 Parking system s
10 A
irbag 5
5 Door control module (right side
15
of vehicle) 11
Heat ed rear seats 5
12 A ir-conditioning
5
6 Rear electrical outlets 25
7
Lumbar support passenger's
10
seat
Fuse panel © (red)
No. Consumer Amps
9
Front electrica l outlets
25 1
Instrument cluster 10
10 A/C controls 10 2
Rearvi ew camera 5
11 Coo
ler
15 3 CD player, DVD drive
5
12 Inte
lligent powe r module pas-
15
4 MMI Display 5
senge r 5 Automatic t ransmission 15
Fuse panel@ (brown ) 7 Panoramic
sliding sunroof seg-
ment 1 20
No.
Consumer Amps
1 Headlight e
lectronic system
10
(right side of veh icle)
2 Ride height adjustment 5
8
Panoramic sliding sunroof seg-
20
ment 2
9 Panoramic
sliding sunroof sun-
20
blind
3 Telephone package 5
4 Audi side assist
5 11
W
indow regulators (right side
35
of vehicle)
s
Electronic Stabilization Control
(ESC) 5 12
Rear air-conditioning controls 10
Page 307 of 340
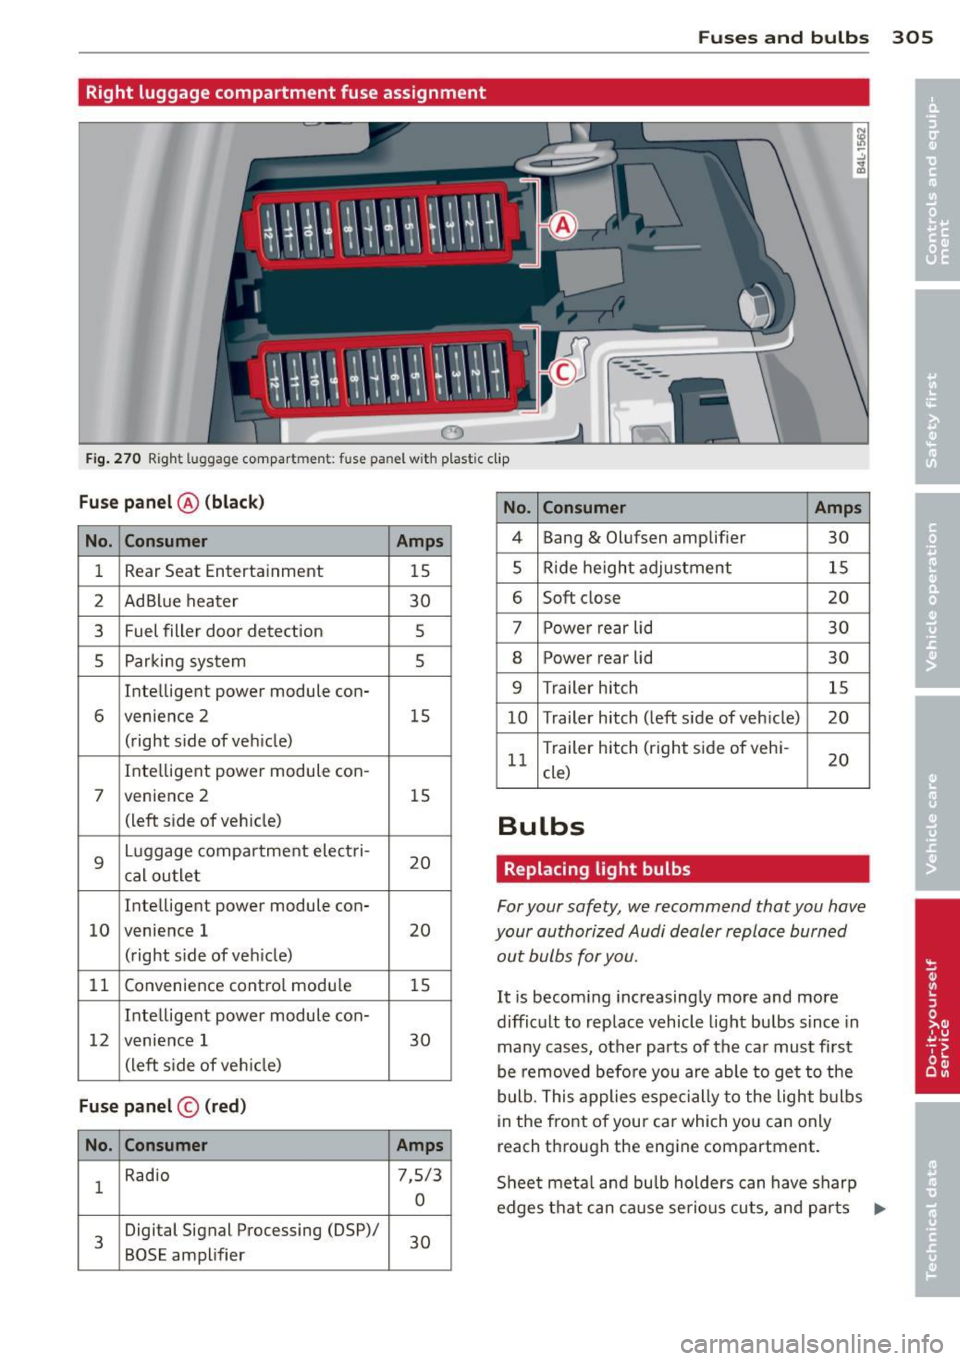
Fuse s and bulb s 305
Right luggage compartment fuse assignment
0
Fig . 270 Right luggage compartment: fuse panel with plastic clip
Fuse pan el@ (black )
No. Con sumer Amps
1 Rear Seat
Entertainment
15
2 AdBlue heater 30
3 Fuel filler door detection 5
5 Parking system 5
Inte lligent power module con-
6 venience 2
15
(right side of vehicle)
Inte lligent power module con-
7 venience 2 15
(left side of vehicle)
9
Luggage compar tment electri-
20
cal outlet
Intelligent power module con-
10 venience
1
20
(right side of veh icle)
11 Convenience contro
l modu le
15
Intelligent power module con-
12 venience 1 30
(left s ide of ve hicle)
Fus e pa nel © (red )
No. Con
sumer
Amps
1 Radio
7,5/3
0
3 Digital
Signal Processing (DSP)/
30
BOSE amplifier
No. Consumer Amps
4 Bang & Olufsen amplifier
30
5 Ride height adjustment 15
6 Soft close 20
7 Power rear lid 30
8 Power rear lid
30
9 Trailer hitch 15
10 Trailer
hitch (left side of vehicle) 20
11 Trailer hitch (right
side of vehi-
20
cle)
Bulbs
Replacing light bulbs
For your safety, we recommend that you have
your authorized Audi dealer replace burned
out bulbs for you.
It is becoming increasingly more and more
difficult to replace vehicle light bulbs since in
many cases, other parts of the car must first
be removed before you are able to get to the
bulb. This applies espe cially to the light bulbs
in the front of your car which you can only
reach through the engine compartment.
Sheet metal and bu lb holders can have sharp
edges that can cause se rio us cu ts, and par ts
IJ>