AUDI Q7 2015 Owner´s Manual
Manufacturer: AUDI, Model Year: 2015, Model line: Q7, Model: AUDI Q7 2015Pages: 350, PDF Size: 86 MB
Page 301 of 350
M N
0 ...J
'SI: ,...., \!) ..,.,
,...., ..,., ,....,
loss of control, crashes and serious per
sonal inj uries. Have worn or damaged tires
rep laced immediate ly.
- Winter tires have maximum speed rating
that may be lower than your veh icle's
maximum speed.
- Never drive faster than the speed for wh ich the winter or other tires installed
on your vehicle are rated.
A WARNING
Always adjust your driving to the road and traffic conditions . Never let the good ac
celeration of the winte r tires and all-whee l
drive temp t you into taking extra r is k s. Al
ways remembe r:
- When braking, an a ll-w heel driv e vehicle
hand les in the same way as a front dr ive
vehicle.
- Drive carefu lly and reduce your speed on
icy and slippery roads, even winter tires
c annot he lp un der blac k ice cond it ions.
@) For the sake of the environment
Use summe r tires when weathe r cond i
tions perm it. They are quieter, do not wea r
as quickly and red uce fue l consumption.
Snow chains
Snow chains may be fitted on ly to the rear
wheels, and only to certain tire sizes . Ask yo ur
authorized Audi dealer on whic h tire sizes
snow chains can be used.
The snow chains must have low -profile links
a nd must not be thicker than 0 .S3 inch
(13 .5 mm), including the lock.
Remove wheel cente r covers and tr im discs
before p utting snow chains on you r vehicle
~ 0 . For safety reasons cover caps must the n
be fitted over the whee l bolts. These are avail
ab le from authorized Audi dea lers.
A WARNING
Using the wrong snow chains for your vehi
cle or installing them incorrectly can in-
Tire s an d wheel s 2 99
crease the risk of loss of contro l leading to
serious personal injury.
- Snow chains are available in different
sizes. Always make sure to follow the in
structions prov ided by the snow chain
manufacturer.
- When driving with snow cha ins neve r
drive faster than the speed permitted for
your specific snow chains.
- Always observe local regulations.
([) Note
-Remove snow c hains be fore driving on
roads not covered with snow to avoid
damaging tires and wearing the snow
chains down unnecessarily.
- Snow chains, which come into direct con
tact with the whee l rim, can scratch or
damage it. Therefore, make sure that the
snow chains are s uitably covered. Check
t he pos itio n of the snow chains afte r
dr iving a few yards and co rrect if neces
sary. Fo llow the inst ruct io ns from the
s now chain ma nufa ct urer when do ing so.
- If the Adaptive Ai r Suspens io n* s hou ld
ma lfun ction, do not mount o r use snow
c h ains be cause the ve hicl e w il l be ex
t reme ly low. If you do d rive with snow
chains on while t he ve hicle is at this lev
el, the snow chains m ight seve rely dam
age the whee lhouse and other parts of
the vehicle.
(D Tips
Where snow chains are mandatory oncer
tain roads, th is normally a lso applies to
vehicles with all-wheel drive.
Wheel bolts
Wheel bolts must always be tightened to the
correct torque.
T he design of w heel bolts is matched to the
factory installed rims. If different rims a re fit
ted, the correct wheel bolts with the right length and correct ly shaped bolt heads must
be used. Th is ensures that wheels are fitted .,..
•
•
Page 302 of 350

300 Tires and wheels
securely and that the brake system functions
correctly .
I n certain circumstances, you may not use
wheel bolts from a different vehicle -even if it
is the same model
¢ page 328.
A WARNING
Improperly tightened or maintained wheel
bolts can become loose causing loss of
control, a collision and serious personal in
jury.
- Always keep the wheel bolts and the
threads in the wheel hubs clean so the
wheel bolts can turn easily and be prop
erly tightened.
- Never grease or oil the wheel bolts and
the threads in the wheel hubs. They can
become loose while driving if greased or
oiled, even if tightened to the specified
torque.
- Only use wheel bolts that belong to the
rim being installed.
- Never use different wheels bolts on your
vehicle .
-Always maintain the correct tighten ing
torque for the wheel bolts to reduce the
risk of a wheel loss.
If the tightening tor
que of the wheel bolts is too low, they
can loos en and come out when the vehi
cle is moving .
If the tightening torque is
too high, the whee l bolts and threads
can be damaged and the wheel can be
come loose.
{[) Note
The specified torq ue for the wheel bolts is
120 ft lb (160 Nm) with a tolerance of
± 7,4 ft lb(± 10 Nm). Torque whee l bolts
diagonally. After changing a whee l, the
torque must be checked as soon as possi
ble with a torque wrench -preferably by an
author ized Audi dealer or qualified work
shop.
Low aspect ratio tires
Your Audi is factory-equipped w ith low aspect
ratio tires. These tires have been thoroughly
tested and been se lected specifically for your
model for their superb performance, road feel
and handling under a variety of driving condi
t ions . Ask your authorized Audi dealer for
more details.
The low aspect ratio of these tires is indicated
by a numera l of
55 or less in the tire's size
designation. The numera l represents the ratio
of the tire's sidewall height in relation to its
tread width expressed in percentage. Conven
t iona l tires have a he ight/w idth ratio of 60 or
more .
The performance of low-aspect-ratio tires is
particularly sensitive to improper inflation
pressure. It is therefore important that low
aspect ratio tires are inflated to the specified
pressure and that the inflation pressure is
regularly checked and maintained. Tire pres
sures should be checked at least once a
month and always before a long trip
¢ page 282, Checking tire pressure .
What you can do to avoid tire and rim
damage
Low aspect ratio tires can be damaged more
easily by impact with potholes, curbs, gullies
or ridges on the road, particularly if the tire is
underinflated .
In order to minimize the occurrence of impact
damage to the tires of your vehicle, we recom
mend that you observe the following precau
tions:
- Always maintain recommended inflation
pressures. Check your tire pressure every
2,000 miles (3,000 km) and add air if neces
sary .
- Drive carefully on roads with potholes, deep
gullies or ridges. The impact from dr iving
through or over such obstacles can damage
your tires. Impact with a curb may also cause damage to your tires .
- After any impact, immed iately inspect your
tires or have them inspected by the nearest
II>
Page 303 of 350
M N
0 ...J
'SI: ,...., \!) 1.1'1 ,...., 1.1'1 ,....,
authorized Audi dealer. Replace a damaged
tire as soon as possible.
- Inspect your tires every 2 ,000 miles (3,000
km) for damage and wear. Damage is not a l
ways easy to see . Damage can lead to loss of
air and underinflation, which could eventu
ally cause tire failure. If you be lieve that a
t ire may have been damaged, replace the
t ire as soon as possible .
- These tires may wear more quick ly than oth
ers .
- Please also remember that, while these tires
deliver respons ive handling, they may ride
less comfortably and make more noise than
other cho ices .
Reduced perform ance in winte r/cold
s eason conditions
All tires are des igned for certai n purposes.
The low aspect ratio, ultra high pe rformance
tires orig inally installed on your veh icle are in
tended fo r max imum dry and wet road per
formance and handling . They are not s uitable
for cold, snowy or icy weather conditions. If
you drive under those circumstances, you should equip your vehicle with all-season or
winter tires, which offer better traction under those cond itions . We suggest you use the rec
ommended snow or all-season tires specified
for your vehicle, or their equ ivalent .
Refer to
c> page 298 for more detailed infor
mat ion regarding winter t ires.
Tire pressure
monitoring system
(D General notes
Each t ire, includ ing the spare (if provided),
should be checked monthly when cold and in
flated to the inflation pressure recommended
by the vehicle manufacturer on the vehicle
p lacard or tire inflation pressure label. (If your
ve hicl e has t ires of a different size than the
si ze ind icated on the vehicle p lacard or tire in
flation pressure label, yo u should determine
the proper tire inflation pressure for those
tires).
Tire s an d wheel s 301
As an added safety featu re, your veh icle has
been equipped with a tire pressure monitoring
system (TPMS) that illum inates a low tire
pressure telltale when one or more of your
tires is significantly under-inflated. According
ly, when the low tire pressure telltale illumi
nates, you should stop and check your tires as
soon as possib le, and inflate them to the
proper pressu re. Driving on a sign ifi cantly un
der- infla ted ti re causes the tire to overhea t
and can lead to tire fa ilure . Unde r-inflation al
so reduces fuel efficiency and tire tread life,
and may affect the vehicle's handling and
stopp ing ability.
Please note that the TPMS is not a substitute
for proper tire maintenance, and it is the driv
er's responsibility to maintain correct tire
pressure, even if under-inflation has not
reached the level to tr igger illuminat ion of the
TPMS low tire pressure tellta le.
Your vehicle has also been equipped with a
T PMS malfunction ind icator to ind icate when
the system is not operating properly . The
TPMS malfunction indicator is combined with
the low tire pressure telltale . Whe n the sys
tem detects a malfunction , the telltale will
flash for approximate ly one m inute and then
rema in continuously illum inated . Thi s se
quence will continue upon s ubseque nt vehicle
start-ups as long as the malfunct ion exists.
When the malfunction indicato r is illum inat
ed, the sys tem may not be ab le to detect or
s ignal low tire pressure as intended. TPMS
malfunctions may occur for a var iety of rea
sons, including the insta llation of rep lace
ment or a lternate tires or wheels on the vehi
cle that prevent the TPMS from functioning
properly. Always check the TPMS malfunction
telltale after rep lacing one or more tires or
whee ls on your vehicle to ensure that the re
placeme nt or alternate ti res and wheels allow
the TPMS to cont inue to funct ion p rope rly . •
•
Page 304 of 350

302 Tire s and whee ls
Tire pressure indicator appears
The tire pressure indicator in the instrument
cluster informs you if the tire pressure is too
low or if there is a system malfunction.
F ig . 255 D isp lay: underinflation warn ing
Using the ABS sensors, the tire pressure moni
toring system compares the tire tread circum
ference and vibration characteristics of the in
d iv idual tires. If the pressure decreases in one
or more tires, this is indicated in the instru ment cluster with a
RE warning symbol and a
message ¢
fig. 255 . The dr iver message in the
d isplay goes out after 5 seconds . The dr iver
message can be displayed again by pressing
the
! CHECK I button. If only one tire is affect
ed, the display will indica te its pos ition.
The tire pressure monitoring must be reset via MMI each time the pressures are adjusted (e.
g. when switch ing between partial and full
l oad pressure) or after changing or replac ing a
tire on your vehicle¢
page 303. The TPMS in
dicator only monitors the tire pressure that
you have previously stored. You can find the
recommended tire pressures for your vehicle
on the label on dr iver's side 8-pillar
¢page 278.
Tire tread circumference and vibration charac
teristics can change and cause a tire pressure
warn ing if:
- the tire pressure in one or more tires is too
l ow,
- the tire has st ructural damage,
- the tire pressure was changed, whee ls rotat-
ed o r replaced but the TPMS was not reset
¢ page 303,
-the sp are tire* is mounted.
Warn ing symbo ls
RE Loss of pressure in at least one tire¢,&..
Check the tire or tires and rep lace or repa ir if
necessary . The
RE indicator light in the instru
ment cluster also illuminates
¢ page 14.
Check/correct the pressures of all four tires
and reset TPMS via MMI.
[m'El (T ire Pressure Monitoring System) Tire
pre ssure: System m alfunction!. If [m'El ap
pears after switching the ignition on or while
driving and the
RE i ndicator light in the in
strument cluster bli nks for approx imately one
minute and then stays on, there is a system
malfunction . Attempt to store the correct tire
pressure
¢ page 303. If the indicator light
does not tu rn off or if it t urn s on sho rtly
thereafte r, immediately d rive yo ur vehicle to
an a uthorized Audi dea ler or a uthorized repair
facility to have the malfunction corrected.
A WARNING ......_
- If the tire pressure ind icator appears in
the instrument cluster display, one or
more of your t ires is sign ificant ly under
inflated . Reduce your speed immediately
and avoid any hard steer ing or b raking
maneuvers. Stop as soon as possib le and
check the tires and their pressu res. In
flate the ti re p ressu re to the proper pres
sure as indicated on the vehicle's tire
pressure labe l
r=:>page 278. Driving on a
sign ificantly under-inflated tire causes
the t ire to overheat and can lead to tire
fa ilure. Under-inflation also is likely to
impair the vehicle's handl ing and stop
p ing ability .
- The driver is responsible for maintaining
the correct tire pressures. You must
check the tire pressures regu larly.
- Under certain conditions (such as a spor
ty driv ing style, winter conditions or un
paved roads), the pressure monitor indi
cator may be delayed .
-Ask you r aut horized Aud i dea ler if run
flat t ires may be used on you r vehicle.
Page 305 of 350
M N
0 ..J
'SI: ,...., \!) ..,.,
,...., ..,., ,....,
@ Tips
-The tire pressure m onitoring system may
stop working when there is an ESC mal
funct ion.
- Using snow chains may result in a system
malfunction.
- The tire pressure monitoring system on
your A udi was developed using t ires with
the "AO" or "RO" identification on the
tire sidewall
c:> page 291. We recom
mend using these t ires.
Reset tire pressure monitoring system
If the tire pressure is adjusted, wheels are ro
tated or changed, the TPMS must be reset via
MMI.
.. Before stor ing the new tire pressures, check
t h at the current pressures on all four t ires
correspond to the specified values and
adapt the p ress ures to the current load
c:> page 278 .
.. Swi tch on the igni tion .
.. Se lect:
ICARI f u nct ion but to n > Sy stem s*
control b utton > Tire pre ssure monitoring >
Store now. Or
.. Se lect:
ICARI f u nction button> Car sy stems*
control button > Se rvicing & checks > Tire
pressure monito ring > Store tire pressures
> Yes , store now .
(D Tips
Do not store the t ire p ress ure i f there a re
snow chains on the tire. Otherwise, a sys
tem ma lf u nction may occu r.
Tire s an d wheel s 303
•
•
Page 306 of 350
304 What do I do now?
What do I do now?
Jack, tools and
inflatable spare tire
Tools
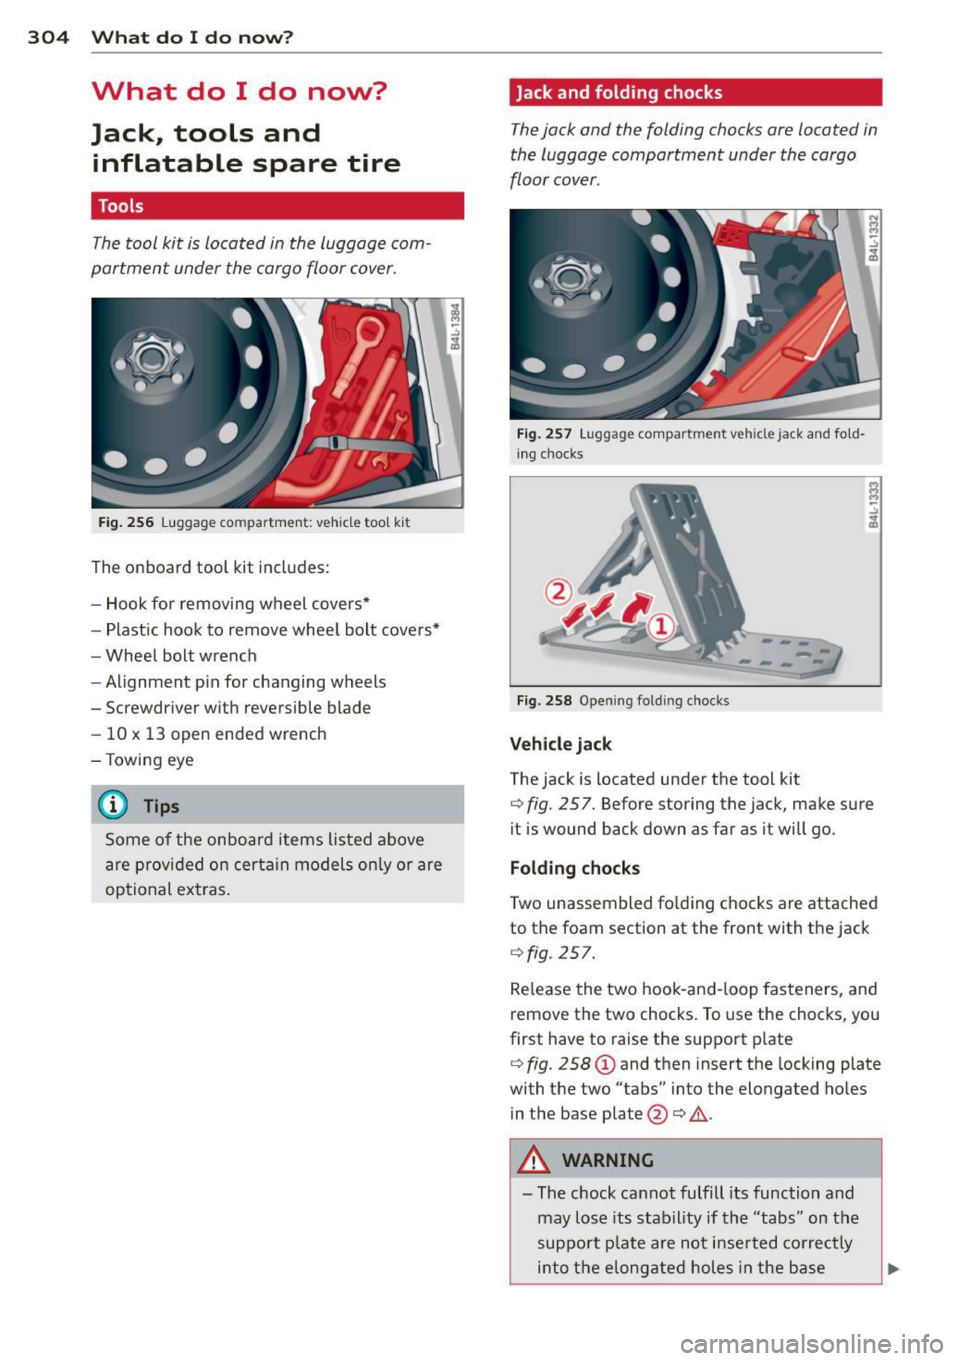
The tool kit is located in the luggage com
partment under the cargo floor cover.
Fig . 256 Luggage compartmen t: vehicle too l kit
The onboard tool kit includes:
- Hook for removing wheel covers*
- Plastic hook to remove wheel bolt covers*
- Wheel bolt wrench
- Alignment p in for changing wheels
- Screwdriver with reversible blade
- 10 x 13 open ended wrench
-Towing eye
(D Tips
Some of the onboard items listed above
are provided on certa in models only or are
optional extras .
Jack and folding chocks
The jack and the folding chocks are located in
the luggage compartment under the cargo
floor cover.
Fig. 257 Luggage compartment veh icle jack and fo ld
ing chocks
-----........ -
Fig. 258 Opening fold ing chocks
Vehicle jack
The jack is located under the tool kit
<=>fig . 257. Before storing the jack, make sure
it is wound back down as far as it will go.
Folding chocks
Two unassembled fo lding chocks are attached
to the foam section at the front with the jack
<=> fig. 257.
Release the two hook-and-loop fasteners, and
remove the two chocks. To use the chocks, you
first have to raise the support plate
<=> fig. 258 (!) and then insert the locking plate
with the two "tabs" into the elongated holes
in the base plate@<=>&. .
A WARNING
-- The chock cannot fulfill its function and
may lose its stability if the "tabs" on the
support plate are not inserted correctly
into the elongated holes in the base
Page 307 of 350
M
"' 0 _,
"". rl I.O
"' rl
"' rl
plate. If this hap pens , the vehicle may
start to m ove whi le a whee l is being
changed.
- Never use the folding chocks if they are
damaged or i f they have not been assem
bled correct ly.
A WARNING
Improper use of the vehicle jack can cause
ser ious personal injuries.
- Never use the jack supplied with your
Audi on another vehicle, particularly on a heavier one. The jack is only suitable for
use on the vehicle it came w ith .
- Us ing a bumper jack to raise the vehicle
will damage the bumper system. The
jack may slip, causing i njury.
- Never support your vehicle on cinder bloc ks, b ricks or other objects. Th ese
may not be able to support the load and
cou ld cause injury when they fail.
- Never start or run t he engine while the
vehicle is suppor ted by the jack.
- If you must wo rk under the vehicle, al
ways use safety stand s spe cifically de
signed for this purpose.
- Always make sure the inflatable spare
tir e a nd even a f lat t ire are se cured in
place and not loose, ot herwise they
cou ld fly forward, causing personal inj ury
to passengers in the veh icle in an acc i
dent or sudden mane uver.
Removing bass box
Applies to vehicles: with bass box
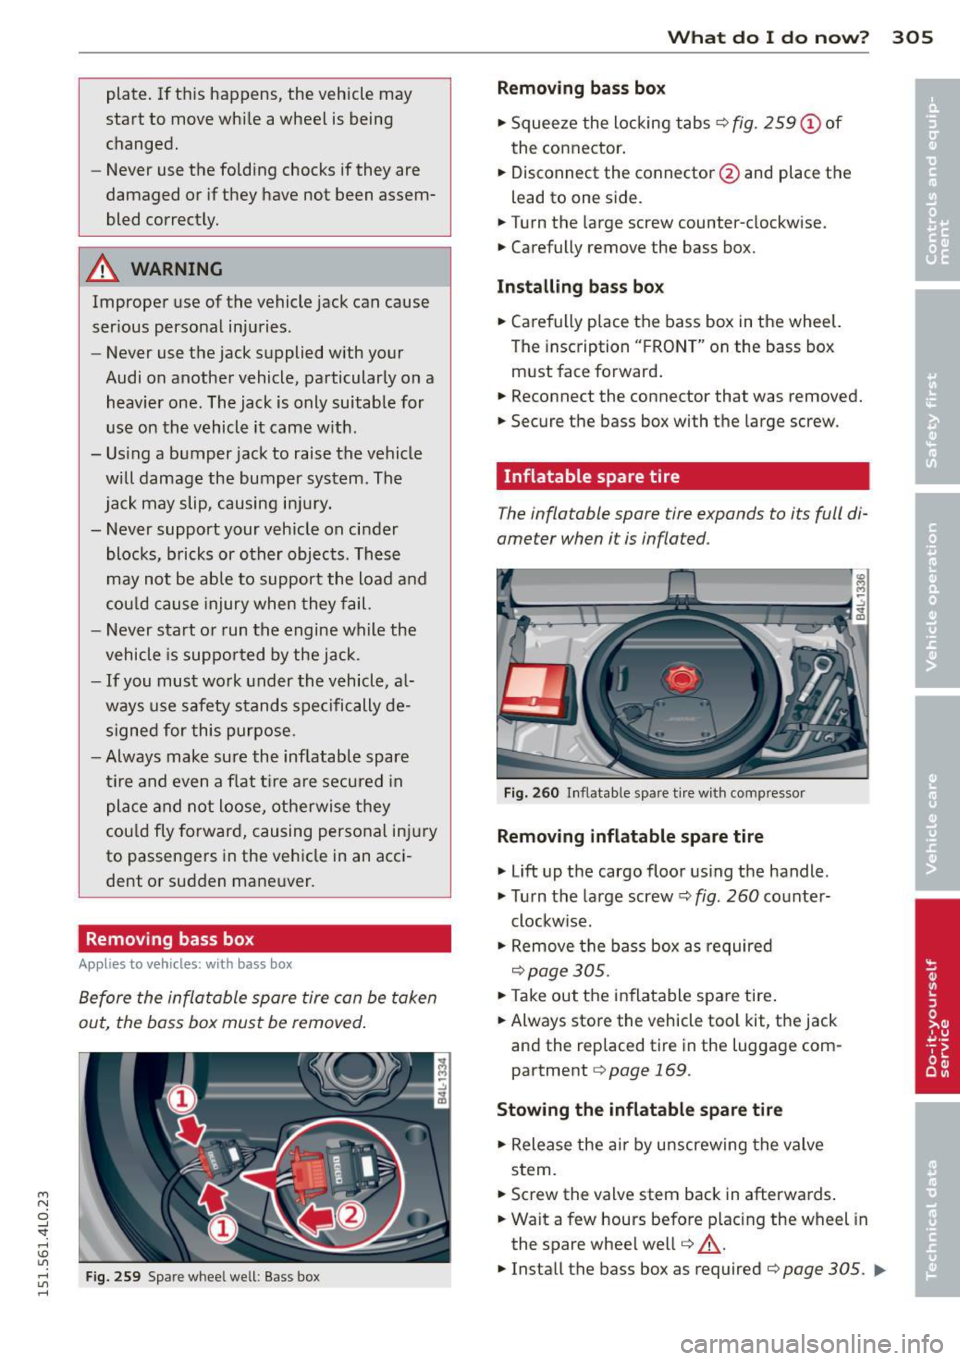
Before the inflatable spare tire can be taken
out, the bass box must be removed .
Fig . 259 Spare wheel well: Bass box
What do I do now ? 305
Removing bass box
.,. Squee ze the locking tabs ~ fig . 259 (D of
the conne ctor .
.,. Disconnect the connector @and place the
lead to one side.
.,. Turn the large screw counter-clockwise .
.,. Carefully remove the bass box.
Installing bass bo x
.,. Carefully p lace the bass box in the wheel.
The inscription "F RO NT" on the bass box
must face forward .
.,. Reconnect the connector that was removed.
.,. Secure the bass box with the large screw .
Inflatable spare tire
The inflatable spare tire expands to its full di
ameter when it is inflated.
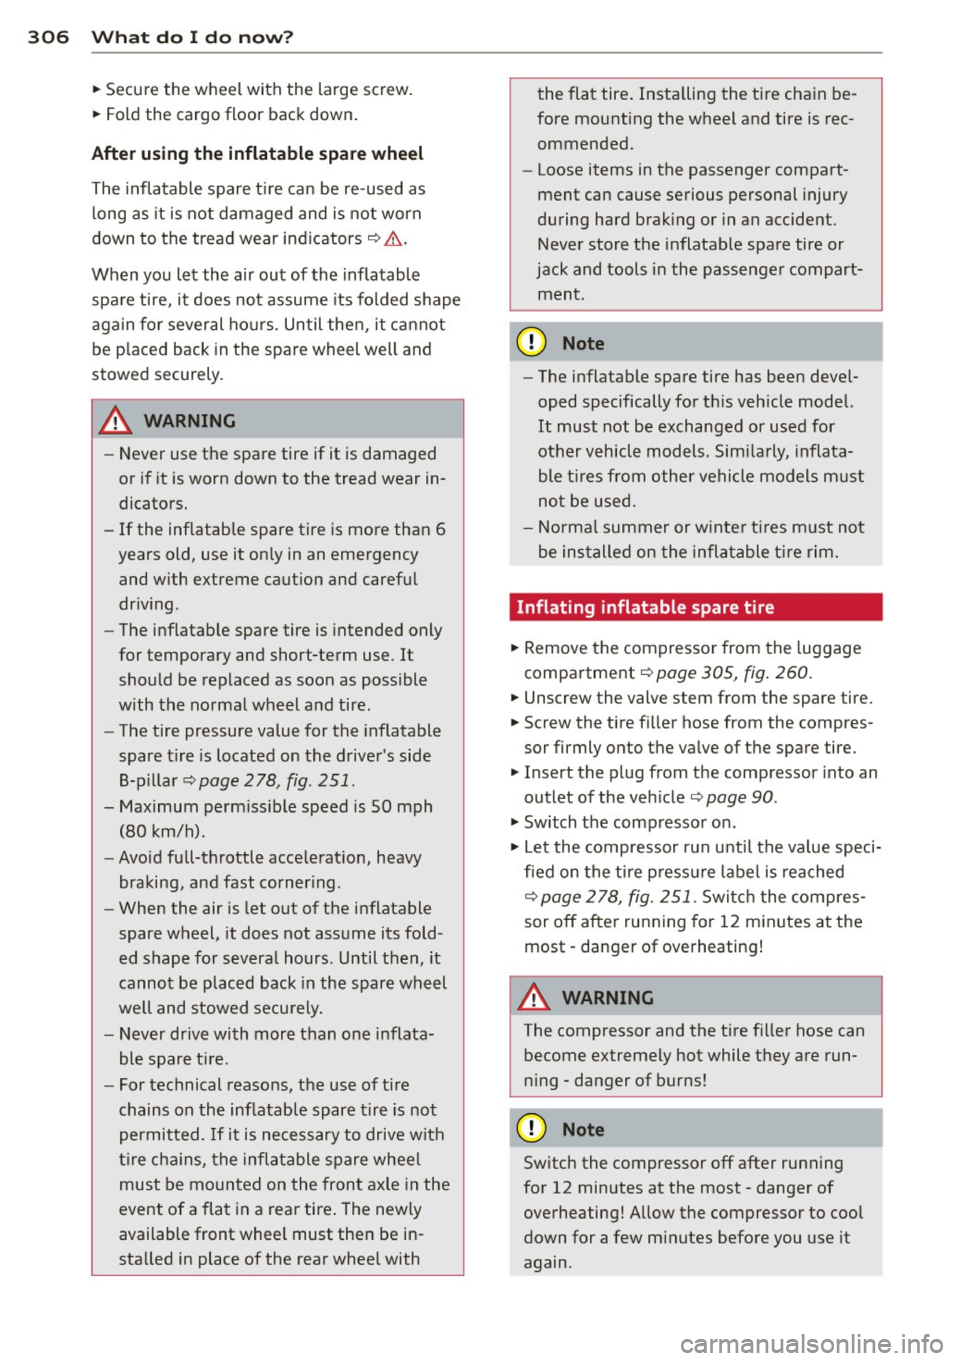
Fig. 2 60 In flatable spare tir e w ith compressor
Removing inflatable spare tire
.,. Lift up the cargo floo r us ing the handle .
"' Turn the large screw
9 fig . 260 counte r-
clockw ise.
"' Remove the bass box as required
¢ page 305 .
.,. Take out the in flatable spare tire .
.,. Always store the vehicle tool kit, the jack
and the replaced tire in the luggage com
partment
9 page 169.
Stowing the inflatable spare t ire
"' Release the ai r by u nscrewing the valve
stem .
.,. Screw the valve stem back in afterwards .
.,. Wait a few hours before p lac ing the wheel in
the spare wheel we ll¢ ,& .
"' Install the bass box as required ¢
page 305 . ..,_
Page 308 of 350
306 What do I do now?
• Secure the wheel with the large screw.
• Fold the cargo floor back down .
After using th e inflat able spare wheel
The inflatable spare t ire can be re-used as
l ong as it is not damaged and is not worn
down to the tread wear ind icators
c::> A .
When you let the air out of the inflatable
spa re tire, it does not assume its folded shape
again for several ho urs. Until then, it cannot
be p laced back in the spare wheel well and
stowed securely.
A WARNING
- Never use the spare tire if it is damaged
or if it is worn down to the tread wear in
dicators.
- If the inflatable spare tire is more than 6
years old, use it on ly in an emergency
and w ith extreme caut ion and careful
dr iv ing .
- The inflatable spare tire is intended only
for temporary and short-term use .
It
should be replaced as soon as possible
with the no rmal wheel and tire .
- The tire pressure value for the inflatable
spare t ire is located on the driver's side
B-p illar
c::> page 278, fig . 251 .
-Maximum perm iss ible speed is SO mph
(80 km/h).
- Avoid full-throttle acce le rat ion, heavy
braking, and fast corner ing .
- When the air is let out of the inflatable
spare wheel, it does not assume its fold
ed shape for several hours . Until then, it
cannot be placed back in the spare wheel
we ll and stowed secu rely.
- Never drive with more than one inflata
ble spare ti re.
- For technical reasons, the use of ti re
chains on the inf latable spare tire is not
permitted.
If i t is necessary to drive w ith
t ir e cha ins, the infla table spare whee l
must be moun ted on the front axle in the
event of a flat in a rear tire . The newly
available front whee l must the n be in
sta lled in place of the rear wheel with the flat tire
. Insta lling the t ire cha in be
fore mounting the wheel and tire is rec
ommended.
- Loose items in the passenger compart
ment can cause serious personal injury
during hard brak ing or in a n accident.
Never store the inflatable spare tire or
jack and tools in the passenge r compart
ment.
(D Note
- The inflatable spare tire has been deve l
oped specifically for t his veh icle mode l.
It must not be exchanged or used for
other vehicle models. Sim ila rly, inflata
ble t ires from other vehi cle models m ust
no t be used.
- Norma l summer or w inte r ti res m ust not
be ins talled on the infla table t ire rim.
Inflating inflatable spare tire
• Remove the compressor from the luggage
compa rtment
c::> page 305 , fig. 260.
• Unscrew the valve stem from the spare tire.
• Screw the tire f iller hose from the compres
sor firmly onto the
va lve of the spare tire.
• Insert the plug from the compressor into an
outlet of the ve hicle
c::> page 90 .
• Switch the comp resso r on .
• Let the compressor run unti l the va lue speci
fied on the ti re p ressu re label is reached
c::> page 278, fig. 251 . Switc h the compres
sor off after running for 12 m inutes at the
most -danger of overheating!
A WARNING
-The compressor and the tire f iller hose can
become extremely hot while t hey are run
n ing -danger of burns!
([) Note
Switch the compressor off after ru nning
for 12 min utes at the most -danger of
overheating! Allow the compressor to cool
down for a few m inutes before you use it
again .
Page 309 of 350
M N
0 ..J
'SI: ,...., \!) ..,.,
,...., ..,., ,....,
Changing a wheel
Before changing a wheel
Observe the following precautions for your
own and your passenger's safety when chang
ing a wheel .
.,. After you experience a tire fa ilure, pull the
car well away from moving traffic and try to
reach
level gro und before you stop¢.&_ .
.. All passengers should
leav e the car and
move to a safe location (fo r instan ce, be hind
the guardra il)¢ .&_.
.,. Engage the
parkin g brake to prevent your
vehicle from ro lling unintentionally¢ .&_.
.. Move
selecto r le ver to p osition P ¢ .&_ .
1> Ifyou are towing a trai ler: unhitch the trail
er from your veh icle.
.,. Block the diagonally opposite wheel with
the folding chocks or other objects.
.. Take the
jack and the inflatab le spare tire
out of the luggage compartment
¢page 304.
& WARNING
You or your passengers cou ld be injured
while changing a whee l if yo u do not fol
low these safety precautions:
- If you have a flat t ire, move a safe dis
tance off the road . Turn off the eng ine,
t ur n the emergency flashers o n and use
other warning devices to alert other mo
torists.
- Make sure that passengers wait in a safe
place away from the vehicle and well
away from the road and traffic.
- To he lp prevent the veh icle from mov ing
sudden ly and possibly slipping off the
jack, always fully set the parking b rake
and block the whee l diagonally opposite
the wheel being cha nged with the fo ld
ing chocks or othe r objects. When one
front whee l is lifted off the g ro und, plac
ing the A utomat ic Transm iss ion in P
(Park) wi ll
not prevent the vehicle from
moving .
-
What do I do now? 307
-Before you change a whee l, be sure the
ground is level and firm. If necessary,
use a sturdy board under the jack.
- Always store the vehicle tool kit, the jack
and the replaced tire in the luggage com
partment
<=:>page 169 .
Changing a wheel
When you change a wheel, follow these
quence described below step-by-step and in
exactly that order.
1. Activate the vehicle jack mode (only
vehicles with Adaptive Air S uspension)
¢ page 161 .
2. Remove the decorati ve wheel co ver* . For
more details see also <=:>
page 308, Deco
rative wheel covers
or <=:> page 308,
Wheels with wheel bolt caps.
3. Loosen the wh eel bolt s¢ page 308 .
4. Loca te the p roper mounting point for the
jack and align the jack be low that point
¢ page 309.
5. Lift the car with the jack Q page 309 .
6. Remove the wheel with the flat ti re and
then install the
inflatable spare tire
¢ page 310.
7. Tig hte n all wheel bolts lightly.
8.
L owe r the vehicle with the jack .
9. Use the wheel bolt w rench and
firmly
t ighten all wheel bolts¢ page 308.
10. Replace the decora tive whe el co ver* .
11. Deactivate the vehicle jack mode (on ly
vehicles with Adaptive Air S uspension)
¢ page 161 .
A WARNING
Always read and follow all WARNINGS and
informat ion<=:>
& in Raising the vehicle on
page 310
and <=:> page 311.
•
•
Page 310 of 350

308 What do I do now?
After changing a wheel
A wheel change is no t complete without do
ing the following .
"'Always store the vehicle tool kit, the jack
and the replaced tire in the luggage com
partment
¢ page 169.
"'As soon as possible, have the tightening
torques
on all wheel bolts checked with a
torque wrench. The correct tightening tor
que is 120
ft lb (160 Nm) .
"' Have the flat tire
replaced as soon as possi
ble.
@ Tips
- If you notice that the wheel bolts are
corroded and difficult to turn while
changing a tire, they should be replaced
before you check the tighten ing torque.
- Drive at reduced speed until you have the
tightening torques checked.
Decorative wheel covers
App lies to vehicles: with decorative wheel covers
The decorative wheel covers must be removed
first to access the wheel bolts.
Fig . 261 C han ging a w hee l: Removing the whee l cove r
Removing
"'Insert the hook provided with the vehicle
tool kit in the hole in the hub.
"' Pull off the
decorative wheel cover
<=> fig . 261 .
' Wheels with wheel bolt caps
Applies to vehicles: with wheel bolts with caps
The caps must be removed first from the
wheel bolts before the bolts can be un
screwed .
Fig. 262 Changing a wh eel: re mo vin g th e wh eel b o lt
caps
Removing
"' Push the plastic clip provided with the vehi
cle tool kit over the wheel bolt cap until it
engages .
"' Pull on the
plastic clip to remove the cap
<=)fig. 262 .
Refitting
"' Place the caps over the wheel bolts and
push them back on.
The caps are to protect and keep the wh eel
bolts clean.
Loosening and tightening the wheel
bolts
The wheel bolts mus t be loosened before rais
ing the vehicle .
Fig. 263 Cha ng ing a w heel : loosening th e w hee l bo lts II--