radio AUDI Q7 2017 Owner´s Manual
[x] Cancel search | Manufacturer: AUDI, Model Year: 2017, Model line: Q7, Model: AUDI Q7 2017Pages: 402, PDF Size: 100.39 MB
Page 5 of 402
Error messages . . . . . . . . . . . . . . . . . . . . . 146
Trai ler hitch . . . . . . . . . . . . . . . . . . . . . . . . 147
Intelligent Technology . . . . . . . . . . 148
Elect ronic stabilization control (ESC) . . . . 14 8
Brakes ... .. .. ... .. ..... ... .. .. .... . 150
Electromechanica l steer ing, a ll-wheel
steering . . . . . . . . . . . . . . . . . . . . . . . . . . . 152
All-wheel drive (quattro) . . . . . . . . . . . . . . 152
Energy ma nagement . . . . . . . . . . . . . . . . . 153
Not ice about data reco rded by the Event
D ata Reco rde r and vehicle control
mod ules . . . . . . . . . . . . . . . . . . . . . . . . . . . 154
Infotainment system . . . . . . . . . . . . 156
Multi Media Interface . . . . . . . . . . . . 156
Traffic safety information . . . . . . . . . . . . . 156
I n troduction . . . . . . . . . . . . . . . . . . . . . . . . 15 6
M MI On/Off knob with joystic k function . . 156
Infotainment system display . . . . . . . . . . 157
M MI operat ion . . . . . . . . . . . . . . . . . . . . . . 158
MMI touc h . . . . . . . . . . . . . . . . . . . . . . . . . 160
Contro l knob with joystick f unction . . . . . 162
Shortcut keys . . . . . . . . . . . . . . . . . . . . . . . 163
L etter/numbe r speller . . . . . . . . . . . . . . . . 164
Fr ee tex t sea rch . . . . . . . . . . . . . . . . . . . . . 165
M enus and Symbols . . . . . . . . . . . . . . . . . . 166
Voice recognition system . . . . . . . . 169
Operating . . . . . . . . . . . . . . . . . . . . . . . . . . 168
Command overview inform ation . . . . . . . . 169
Commands . . . . . . . . . . . . . . . . . . . . . . . . . 170
External vo ice operat ion 174
Telephone . . . . . . . . . . . . . . . . . . . . . . . . 176
I ntroduction . . . . . . . . . . . . . . . . . . . . . . . . 176
Setup . . . . . . . . . . . . . . . . . . . . . . . . . . . . . 176
Using the te lephone . . . . . . . . . . . . . . . . . 178
Favorites . . . . . . . . . . . . . . . . . . . . . . . . . . . 181
Messages . . . . . . . . . . . . . . . . . . . . . . . . . . 181
Listening to voicema il . . . . . . . . . . . . . . . . 184
D irectory . . . . . . . . . . . . . . . . . . . . . . . . . . . 184
Addit ional settings . . . . . . . . . . . . . . . . . . 186
Tr oubleshoo ting . . . . . . . . . . . . . . . . . . . . . 188
~ Audi connect (Infotainment) . . . . 189 ......
~ Introduction . . . . . . . . . . . . . . . . . . . . . . . . 189 N
8 Setup . . . . . . . . . . . . . . . . . . . . . . . . . . . . . 189 0 :E: '
Configuration thro ugh myAudi . . . . . . . . . 189
Opening A udi connect (Infotainment) . . . 190
A udi connect Infotainment services . . . . . 190
Wi-Fi hotspot . . . . . . . . . . . . . . . . . . . . . . . 195
Configuring the data connection . . . . . . . . 196
Audi connect (Infotainment) general
i nformation . . . . . . . . . . . . . . . . . . . . . . . . 196
T roub leshooting . . . . . . . . . . . . . . . . . . . . . 198
Audi connect vehicle control . . . . 199
I n trod uction . . . . . . . . . . . . . . . . . . . . . . . . 199
Setup . . . . . . . . . . . . . . . . . . . . . . . . . . . . . 199
Additional o ptions . . . . . . . . . . . . . . . . . . . 200
Remote locking and un lo cki ng . . . . . . . . . 20 0
Vehicle sta tus report . . . . . . . . . . . . . . . . . 200
Parking location . . . . . . . . . . . . . . . . . . . . . 200
Geofencing Alert . . . . . . . . . . . . . . . . . . . . 201
Speed Alert . . . . . . . . . . . . . . . . . . . . . . . . . 201
Valet Alert . . . . . . . . . . . . . . . . . . . . . . . . . 201
Stolen Vehicle Locator . . . . . . . . . . . . . . . . 201
Online Aud i serv ice reques t . . . . . . . . . . . . 201
Eme rgency call . . . . . . . . . . . . . . . . . . . 203
I n trod uction . . . . . . . . . . . . . . . . . . . . . . . . 203
E mergency call . . . . . . . . . . . . . . . . . . . . . . 203
Online roads ide ass ista nce . . . . . . . . . . . . 204
N avigation . . . . . . . . . . . . . . . . . . . . . . . . 205
Open ing navigation . . . . . . . . . . . . . . . . . . 205
E nte ring a des tina tion . . . . . . . . . . . . . . . . 206
Persona l rou te ass ist ance . . . . . . . . . . . . . 211
Alte rnative rou tes . . . . . . . . . . . . . . . . . . . 2 12
Additional settings . . . . . . . . . . . . . . . . . . 213
Map. ... .. .. .. .. .. .... . ..... ... .. .. 215
Online map d isp lay ................ .. 217
Map update . . . . . . . . . . . . . . . . . . . . . . . . 218
Traffic information . . . . . . . . . . . . . . . . . . 220
T roubleshooting . . . . . . . . . . . . . . . . . . . . . 222
Radio ............................. 223
Open ing the radio . . . . . . . . . . . . . . . . . . . 223
Radio funct ions . . . . . . . . . . . . . . . . . . . . . 224
Radio menu . . . . . . . . . . . . . . . . . . . . . . . . 226
Presets . . . . . . . . . . . . . . . . . . . . . . . . . . . . 226
Addition al settings . . . . . . . . . . . . . . . . . . 226
T roub leshooting . . . . . . . . . . . . . . . . . . . . . 227
3
Page 6 of 402
Table of contents Media ... . ... ... .. .......... .. .. ...
228
Introduction . . . . . . . . . . . . . . . . . . . . . . . . 228
Notes ... .. .. .. ... .......... .. .. .. . 228
Media drives . . . . . . . . . . . . . . . . . . . . . . . . 229
Bluetooth audio player . . . . . . . . . . . . . . . 231
Wi -F i aud io player . . . . . . . . . . . . . . . . . . . 232
Online media and Internet radio . . . . . . . . 233
Multimedia connections . . . . . . . . . . . . . . 234
Pla ying media. .. ............. .... .. . 237
Additional settings . . . . . . . . . . . . . . . . . . 240
Supported media and file formats . . . . . . 243
Troubleshooting . . . . . . . . . . . . . . . . . . . . . 244
Audi smartphone interface . . . . . . 247
Setup ... .. .... ... .......... .. .. ... 247
Operating . . . . . . . . . . . . . . . . . . . . . . . . . . 247
Troubleshoot ing. . . . . . . . . . . . . . . . . . . . . 248
System settings . . . . . . . . . . . . . . . . . . 249
Setting the date and time . . . . . . . . . . . . . 249
MMI settings . . . . . . . . . . . . . . . . . . . . . . . 249
Connection manager . . . . . . . . . . . . . . . . . 250
System update . . . . . . . . . . . . . . . . . . . . . . 252
Sound settings . . . . . . . . . . . . . . . . . . . . . . 253
Volume settings . . . . . . . . . . . . . . . . . . . . . 253
Restarting the MMI . . . . . . . . . . . . . . . . . . 254
Software license i nformat ion 254
Safety first . . . . . . . . . . . . . . . . . . . . . . . 256
Driving safety . . . . . . . . . . . . . . . . . . . . 256
Bas ics . . . . . . . . . . . . . . . . . . . . . . . . . . . . . 256
Correct passenger seating positions . . . . . 257
D river's and front passenger's footwell . . 260
Pedal area . . . . . . . . . . . . . . . . . . . . . . . . . . 261
Storing cargo correctly . . . . . . . . . . . . . . . 261
Reporting Safety Defects . . . . . . . . . . . . . . 263
Safety belts . . . . . . . . . . . . . . . . . . . . . . 265
Gene ral information . . . . . . . . . . . . . . . . . 265
Why use safety belts? . . . . . . . . . . . . . . . . 266
Safety belts . . . . . . . . . . . . . . . . . . . . . . . . 268
Belt tensioners . . . . . . . . . . . . . . . . . . . . . . 271
Airbag system . . . . . . . . . . . . . . . . . . . . 273
Important information . . . . . . . . . . . . . . . 273
Front airbags . . . . . . . . . . . . . . . . . . . . . . . 277
Mo nito ring the Advanced Airbag System . 285
4
Side airbags . . . . . . . . . . . . . . . . . . . . . . . . 289
Side curtain airbags . . . . . . . . . . . . . . . . . . 292
Child safety . . . . . . . . . . . . . . . . . . . . . . 295
Important information . . . . . . . . . . . . . . . 295
Child safety seats . . . . . . . . . . . . . . . . . . . . 301
Securing child safety seats . . . . . . . . . . . . 306
LATCH system (lower anchorages and
tethers for c hildren) . . . . . . . . . . . . . . . . . 309
Additional information . . . . . . . . . . . . . . . 313
Maintenance and Care ........... 314
Checking and Filling . . . . . . . . . . . . . 314
Gasoline . . . . . . . . . . . . . . . . . . . . . . . . . . . 314
Diesel fuel . . . . . . . . . . . . . . . . . . . . . . . . . 315
Refueling ..... .. .. .. .. ........... .. 316
Selective catalytic reduction (AdBlue/
DEF) . . . . . . . . . . . . . . . . . . . . . . . . . . . . . . 318
Emissions control systems . . . . . . . . . . . . 321
Engine compartment . . . . . . . . . . . . . . . . . 322
Engine o il . . . . . . . . . . . . . . . . . . . . . . . . . . 324
Cooling system . . . . . . . . . . . . . . . . . . . . . . 328
Brake fluid . . . . . . . . . . . . . . . . . . . . . . . . . 329
Battery . . . . . . . . . . . . . . . . . . . . . . . . . . . . 330
Windshield washer system . . . . . . . . . . . . 331
Service interva l display 332
Wheels ........ ... ...... ....... ... 333
Wheels and Tires . . . . . . . . . . . . . . . . . . . . 333
T ire pressure monitoring system . . . . . . . 351
Run-flat tires . . . . . . . . . . . . . . . . . . . . . . . 352
Care and cleaning .... .......... .. 354
General informat ion . . . . . . . . . . . . . . . . . 354
Car washes . . . . . . . . . . . . . . . . . . . . . . . . . 354
Cleaning and care information . . . . . . . . . 355
P lac ing your vehicle out of service . . . . . . 359
Troubleshooting . . . . . . . . . . . . . . . . . 360
Emergency assistance . . . . . . . . . . . 360
Genera l information . . . . . . . . . . . . . . . . . 360
Eq uip ment . . . . . . . . . . . . . . . . . . . . . . . . . 360
Tire mobility kit . . . . . . . . . . . . . . . . . . . . . 360
Replacing a whee l . . . . . . . . . . . . . . . . . . . 362
Page 15 of 402
u (0
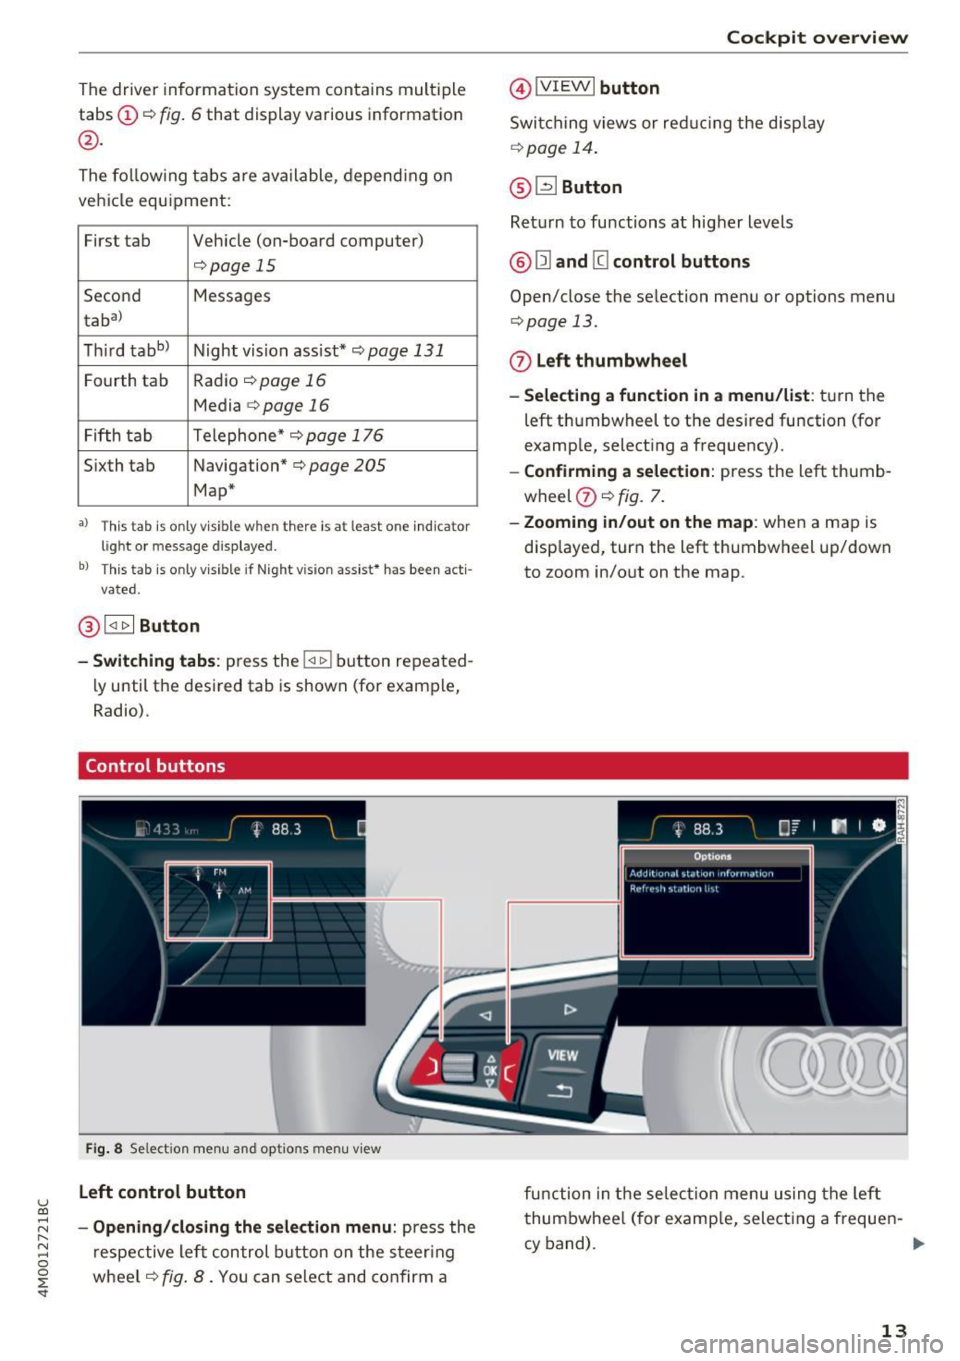
The driver informa tion system contains mult iple
tabs ©
c:;, fig. 6 that display various information
@.
The fo llow ing tab s are ava ilable, depend ing o n
ve hicl e equ ipment:
First tab Veh icle (on-board computer)
<=>page 15
Se co nd Messages
tabal
Thir d tabb)
Night vis ion ass ist*
c:;, page 131
F o urth tab Radio <=>page 16
Media c:;, page 16
Fifth tab Telephone
* c:;, page 1 76
S ixth tab Navigation" c:;, page 205
Map*
•> Thi s tab is only visible when there is at least one indicato r
light or m essage displayed.
bl T hi s tab is only v isible if Night vision ass ist * h as been acti
vated.
@ l<11> I Button
-Switching tabs: press the !<1 t> I bu tton re pea ted
l y until t he des ired tab is shown (for example,
Radio).
Control buttons
Fi g. 8 Se lect ion menu and opt ions menu view
Left control button
;::j -Opening/closing the selection menu : press the r--.
~ respe ctive le ft control button on the s teer ing 0
~ wheel c:;, fig . 8. You can sele ct and co nfi rm a
@IV IEWI button
Swi tc h ing views or red ucing the disp lay
¢ page 14 .
@ ~Button
Ret urn to fu nctions a t higher levels
@ Ill and @ control buttons
Open/close the se lecti on men u or options menu
<=> page 13.
0 Left thumbwheel
-Selecting a function in a menu/list : tur n the
left thumbwheel to the des ired function (fo r
examp le, select ing a frequency).
- Confirming a selection : press the left thumb
wheel
(J) c:;, fig. 7.
- Zooming in/out on the map : when a map is
disp layed, turn the left thumbw heel up/down
to zoom in/out on the map .
fu nction in t he se lec tion m enu us ing t he left
t hum bwhee l (for examp le, select ing a freque n-
cy band). ..,.
13
Page 18 of 402
Cockpit over view
Fuel consumption
The current fue l cons umption can be shown us
ing a bar graph¢
fig. 12. The ave rage cons ump
tion stored in the short-term memory is also dis
p layed . If the ba r is green, your vehicle is saving
fue l through the following function:
- Recuperati on: electrica l energy can be stored in
the ve hicle battery when t he vehicle is coasting
or driving downhi ll. The bar will move toward
0 .
@ Tips
The date, time of day and t ime and date for
mat can be set in the Infotainment system
¢page 249 .
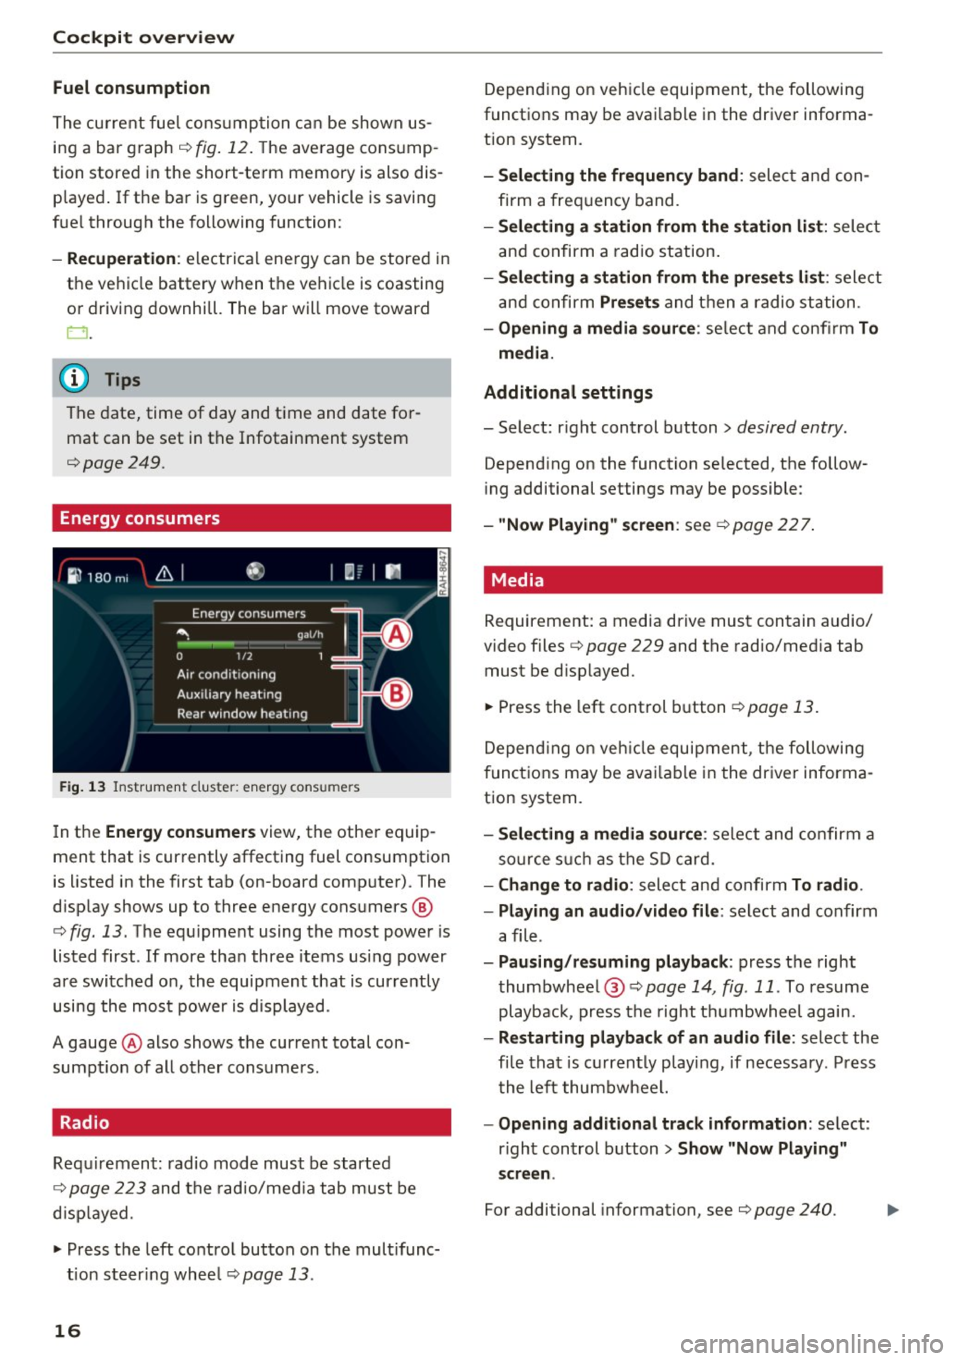
Energy consumers
Fig . 1 3 Instrument cluste r: energy cons umers
I n the Energ y consume rs view, the othe r equip
ment that is currently affecting fuel consumption
is listed in the first tab (on-board computer) . The
d isplay shows up to three energy consumers @
¢
fig. 13 . The equ ipment using the most power is
listed first . If more tha n three items us ing power
are switched on, the equipment that is currently
using the most power is d isplayed.
A gauge @also shows the current total con
sumpt io n of all other consumers.
Radio
Requ irement: radio mode must be started
¢
page 223 and the radio/med ia tab must be
d isp layed .
.. Press the left control button on the mult ifunc
tion steer ing whee l
¢page 13.
16
Depend ing on veh icle equipment, the following
functions may be avai lable in the driver informa
t ion system.
- Selecting the frequen cy band : select and con
firm a freq uency band .
-Selecting a station fr om the station li st: select
and confirm a rad io station.
- Selecting a station from the pre set s list: select
and confirm
Pre set s and then a radio station .
-Opening a media sour ce : se lect and confi rm To
media .
Addition al sett ings
- Select: r ight control button> desired entry.
Depend ing on the function selected, the follow
i ng additional settings may be possible :
-"Now Pla ying" screen : see ¢page 227.
' Media
Requirement: a media drive must contain audio/
video files¢
page 229 and the radio/med ia tab
must be d isp layed .
.. Press the left control button
r=;, page 13.
Depend ing on veh icle equipment, t he following
f unct ions may be ava ilable in the dr iver informa
tion system.
- Selecting a media sour ce : select and confirm a
so urce s uch a s the S D card.
- Change to radio : select and confirm To radio.
- Playing an audio /video file :
select and confirm
a file .
-Paus ing /resuming playback : press the right
thumbwhee l@ ¢page
14 , fig .11. To resume
playback, press the right t humbwheel again.
-Restarting p la y back of an audio fi le: select the
fi le that is currently playing , if necessary . Pr ess
t he left thumbwheel.
- Opening additional tra ck information : select:
r ight control button >
Show "Now Pl aying"
s creen .
For additional information , see ¢ page 240.
Page 29 of 402
u co ...... N r-... N ...... 0
0
:E: '
burns. Wait until you no longer see or hear
steam or coolant escaping .
- The engine compartment in any vehicle can
be a dangerous area. Stop the eng ine and
allow it to cool before working in the engine
compartment. A lways follow the informa
t io n found in
¢ page 322, Working in the
engine compartment.
(I) Note
Do not continue driving if the. indicator
light turns on as this increases the risk of en
gine damage.
~ Safety belt
The . indicator light stays on unt il the drive r's
and front passenger's safety be lts are fastened.
Above a certain speed, there will also be a wa rn
ing tone .
@ Tips
For addit iona l information on safety be lts ,
see
¢ page 265.
t3 Generator/vehicle battery
I f the . or(•) indicator light turns on, there is a
malfunct ion in the generato r o r the veh icle elec
tr ica l system .
• Electrical system: malfunction! Safel y stop
v ehicle
Do no t cont inue d riving and switc h the eng ine
off. See an a utho rized Aud i de aler or aut hor ized
Aud i Service Facility for assistance .
(•) Electrical system: malfunction! R estart not
po ssible . Plea se conta ct Service
The vehicle battery was disconnected from the
ve hicle electrical system and will no longer
charge . Drive to an author ized A udi dealer or au
thor ized Audi Se rvice Fa cility immed iate ly.
Do not stop the engine, or you will not be able to
start it aga in . If you can no longer sta rt the en
g ine , see an authori zed Audi dealer or authorized
Aud i Service Fac ility for assistance.
Coc kpit o ve rv iew
(•) F.lectrical sy stem: malfunction! Please con
tact Se rvice
Drive to an authori zed A udi dealer or autho riz ed
A udi Service Facility immed iate ly. Because the ve
hicle battery is discharging, turn o ff all unneces
sary el ectrical equipment such as the radio . S ee
an a utho rized Aud i dea ler or authorized Audi
Service Facility if the battery charge level is too low.
(•) Electrical sy stem: low battery charge. Bat
tery will be charged while d riv ing
T he s tarting ability may be impa ired.
If this message tu rns off after a little whi le, the
vehicle battery cha rged e nough while driving.
If the message does not turn off and stay off
whe n driving, have an author ized Audi dealer or
autho rized Aud i Serv ice Facility repa ir the mal
funct ion.
't:::?: Engine oil pressure
• Turn off engine . Oil pres sure t oo low
Stop the engine and do not cont in u e d rivi ng.
Check the eng ine oi l level
¢ page 326.
-If the eng ine o il level is too low, add engine oil
¢ page 326 . Only continue driving once the in
d icator light turns off .
- If the engine o il level is correct and the indica
tor light still turns on, turn t he e ngine off and
do not cont inue driving . See an authorized Aud i
deale r or a uthorized Aud i Service Facility fo r as
sis tance .
(D Tips
The oil pressure warni ng is not an oil level in
dicator. Always check the oil level regularly .
~ Engine oil level (MIN)
• Pleas e add oil immediatel y.
Add engine oil immediately ¢ page 326.
El Please add max. x qt (l) oil. You can contin·
ue d riv ing
Ill-
27
Page 38 of 402
Opening and clo sin g
remain in the vehicle. Otherw ise the children
cou ld start the engine or operate electrical
equipment such as power windows.
@ Tips
- The operation of the remote contro l key can
be temporarily disrupted by interfe rence
from transmitters near the vehicle working i n the same frequency range (such as a cell
phone or radio equipment) . A lways check i f
your vehicle is locked!
- For an explanation on conformity with the
FCC regulations in the United States and the
Industry Canada regulations, see
¢ page 384 .
Removing the mechanical key
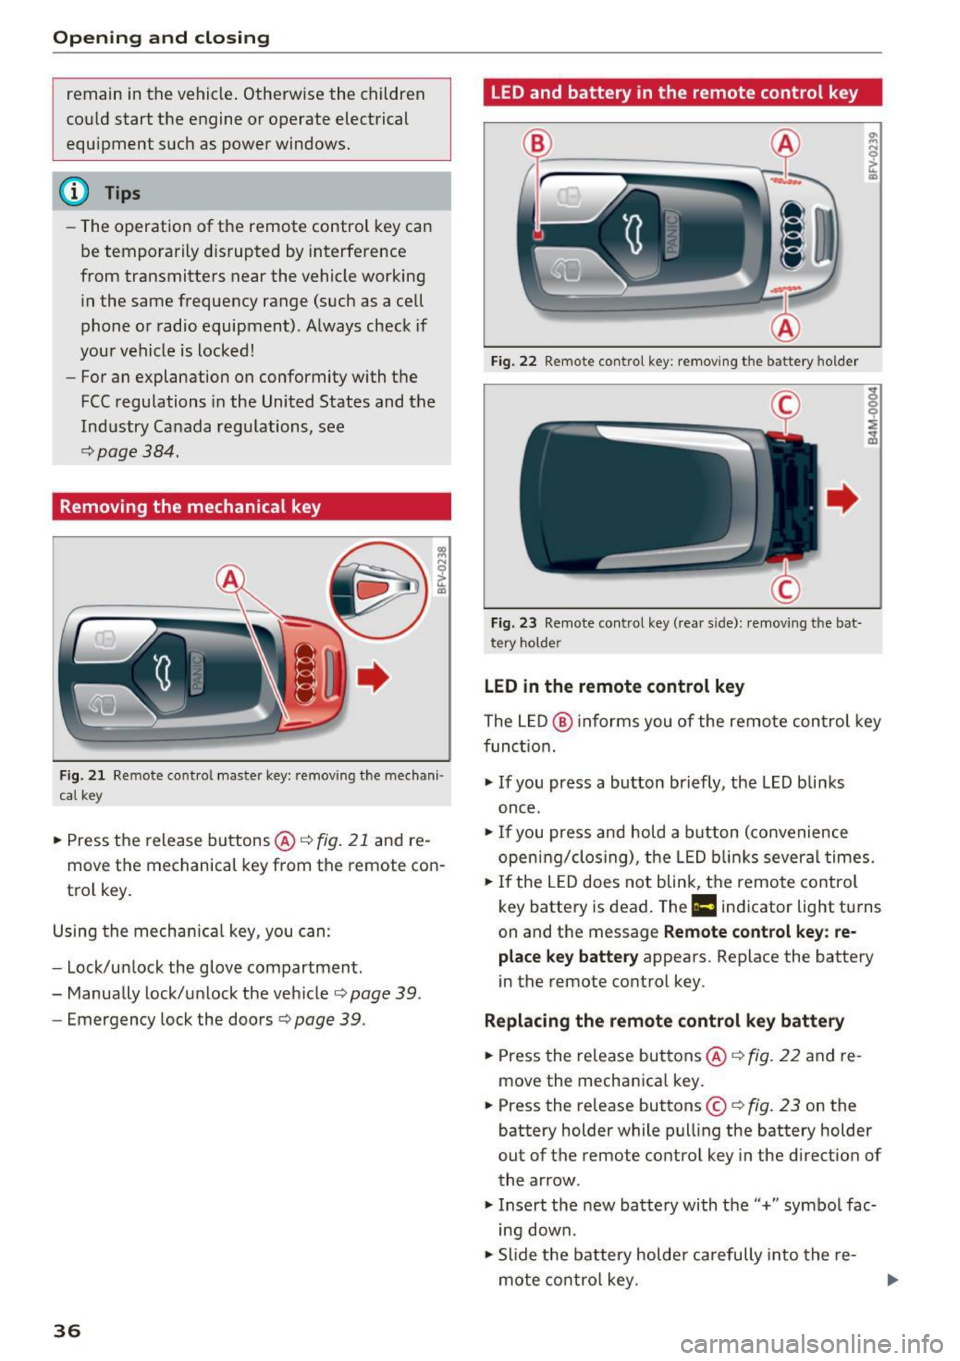
Fig. 2 1 Remote cont ro l ma ster key: remov ing t he mec han i·
cal ke y
.. Press the release buttons@¢ fig. 21 and re
move the mechanical key from the remote con
trol key .
Using the mecha nica l key , you can:
- Lock/un lock the glove compartment.
- Manually lock/u nlock the veh icle
c::;, page 39.
- Emergency lock the doors c::;, page 39 .
36
LED and battery in the remote control key
Fig. 22 Remote con tro l key : remo ving t he ba tte ry h olde r
Fig. 23 Remo te control key (rea r sid e): remov ing t he b at·
t ery ho lde r
LED in the remote control key
The L ED @ informs you of the remote con trol key
func tion.
"' If you press a bu tton briefly, the LED blinks
once .
"'If you press and hold a b utton (co nvenience
open ing/clos ing), the LED b links several times.
"' If the LED does not blink, the remote contro l
key battery is dead. The
Ill indicator light tu rns
on and the message
Remote control key : re
place key battery
appears. Replace the battery
i n the remote control key.
Replacing the remote control k ey batte ry
"'Press the release buttons @¢ fig. 22 and re
move the mechan ica l key.
"' Press the release buttons ©
c::;, fig. 23 on the
battery holder while pull ing the battery holder
out of the remote control key in the direction of
the arrow .
"' Insert the new battery with the'' +" symbo l fac·
ing down.
"' Slide the battery holde r carefully into the re·
mote co ntro l key .
Page 44 of 402
Opening and closing
this. Move the lid slowly to reduce the
amount of force needed .
- When the trailer socket is being used (for
example, for a bicycle rack), the luggage
compartment lid can be opened and closed
using the handle or the foot motion activa
tion (vehicles with convenience key*) .
Opening/closing the luggage compartment
lid with foot motion activation (kicking
movement)
Applies to: vehicles with convenience key and sensor-control
led luggage compartment lid
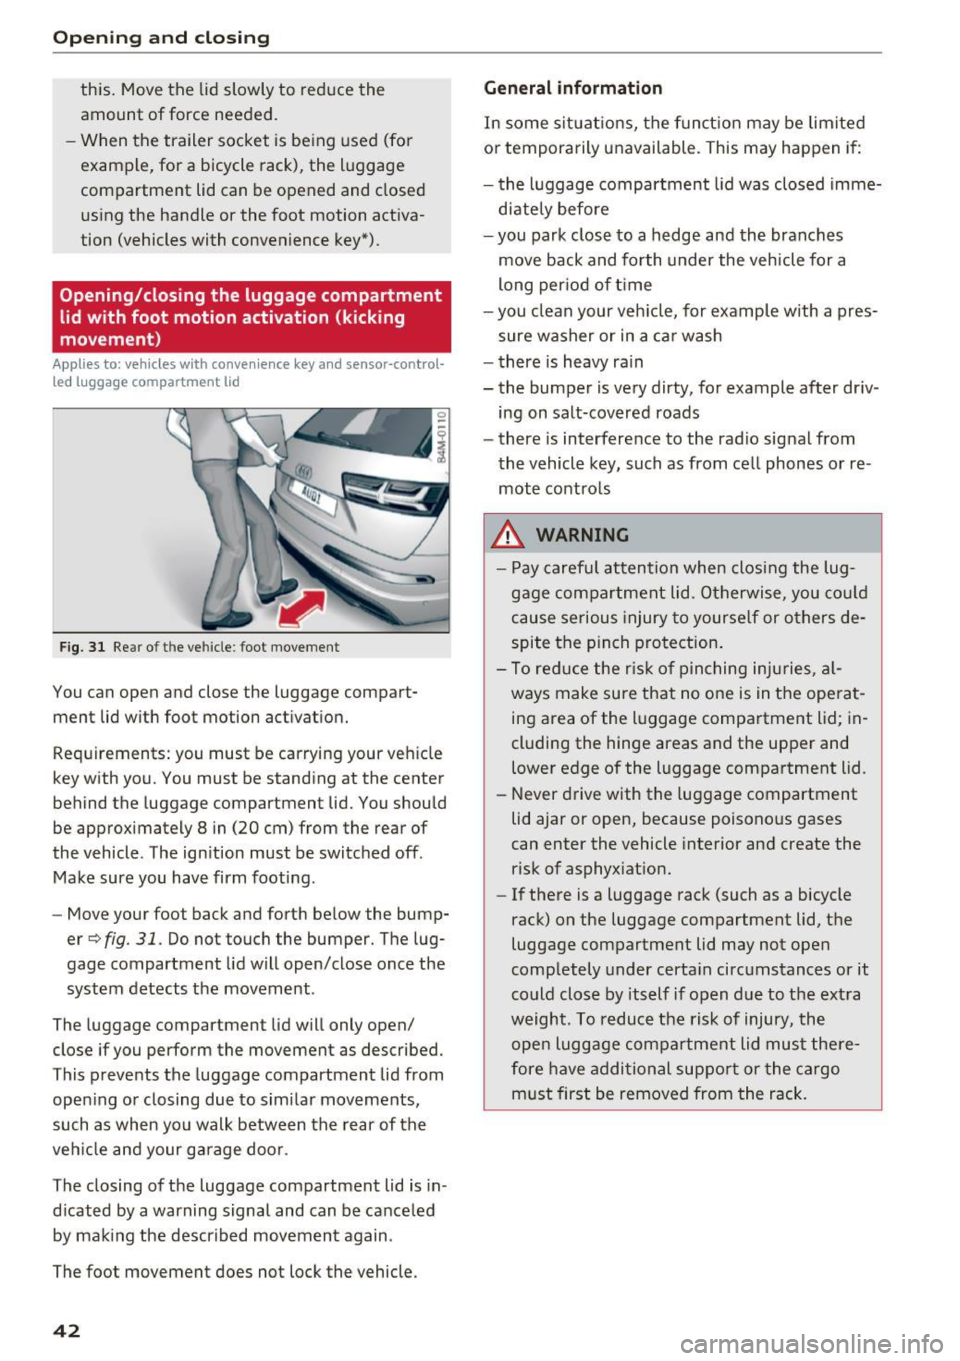
Fig. 31 Rear of th e ve hicle: fo ot move ment
You can open and close the luggage compar t
ment lid wi th foot mo tion activation.
Requirements: you must be carrying your vehicle
key with you. You must be standing at the center
behind the lugg age compartment lid. You should
be approximately 8 in (20 cm) from the rear of
the vehicle . T he ignition must be switched off .
Make sure you have firm footing .
- Move your foot back and forth below the bump
er
Q fig . 31. Do not touch the bumper. The lug
gage compartment lid will open/close once the system detects the movement .
The luggage compartmen t lid will only open/
close if you perform the movement as described.
This prevents the luggage compartment lid from opening or closing due to similar movements,
such as when you walk between the rear of the
vehicle and your garage door .
The closing of the luggage compartment lid is in
dicated by a warning signal and can be canceled by making the described movement again .
The foot movement does not lock the vehicle .
42
General information
In some situations, the function may be limited
or temporarily unavailable . This may happen if:
- the luggage compartment lid was closed imme
diately before
- you park close to a hedge and the branches
move back and forth under the vehicle for a
long period of time
-you clean your vehicle, for example with a pres
sure washer or in a car wash
- there is heavy rain
- the bumper is very dirty, for example after driv -
ing on salt-covered roads
- there is interference to the radio signal from
the vehicle key, such as from cell phones or re
mote controls
.&,. WARNING
- Pay careful attention when closing the lug
gage compartment lid. Otherwise, you could
cause serious injury to yourself or others de
spite the pinch protection.
- To reduce the risk of pinching injuries, al
ways make sure that no one is in the operat
ing area of the luggage compartment lid ; in
cluding the hinge areas and the upper and
lower edge of the luggage compartment lid .
- Never drive with the luggage compartment
lid ajar or open, because poisonous gases
can enter the vehicle interior and create the
risk of asphyxiation.
- If there is a luggage rack (such as a bicycle
rack) on the luggage compartment lid, the
luggage compartment lid may not open
completely under certain circumstances or it
could close by itself if open due to the extra
weight. To reduce the risk of injury, the open luggage compartment lid must there
fore have additional support or the cargo
must first be removed from the rack.
Page 160 of 402
Multi Media Interface
MMI operation
Selecting and confirming a function
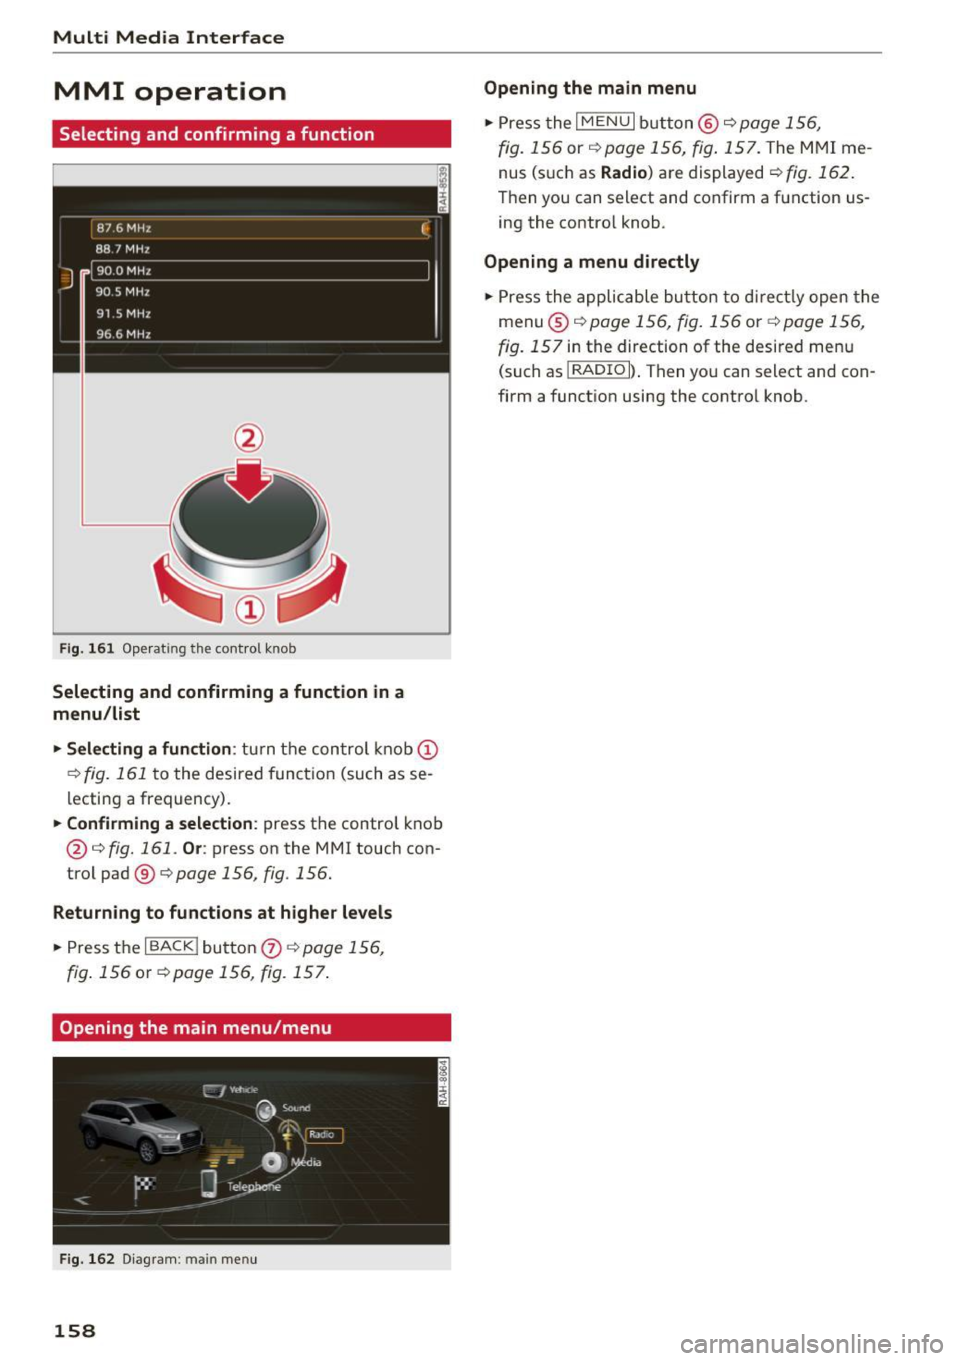
F ig . 16 1 Ope rat ing the cont ro l knob
Selecting and confirming a function in a
menu /list
.,. Selecting
a fun ction : turn t he con trol knob (D
¢ fig. 161 to the desired functio n (such as se
lecting a frequency) .
.,. Confi rming a selection : press the control knob
@¢ fig . 161 . Or: press on the MMI touch con
trol pad ®¢
page 156, fig. 156.
Returning to functions at higher levels
.., Press the I BACK ! button 0 ¢ page 156,
fig. 156 or ¢ page 156 , fig. 157 .
Opening the main menu/menu
Fig . 162 D iag ram : main menu
158
Opening the main menu
.,. Press the IMENUI bu tton @ qpage 156,
fig. 156 or qpage 156, fig . 157. The MMI me
nus (s uch as
Radio ) are displayed q fig. 162 .
Then you can select and confirm a function us
ing the control knob .
Opening a menu directly
.,. Press the applicable bu tton to di rec tly open the
menu ®
qpage 156, fig. 156 or q page 156,
fig. 157 in the direction of the desired menu
(such as I
RADIO ll. Then you can select and con
firm a function using the control knob .
Page 161 of 402
u (0 ...... N r--. N ...... 0
0
:E
with the control buttons
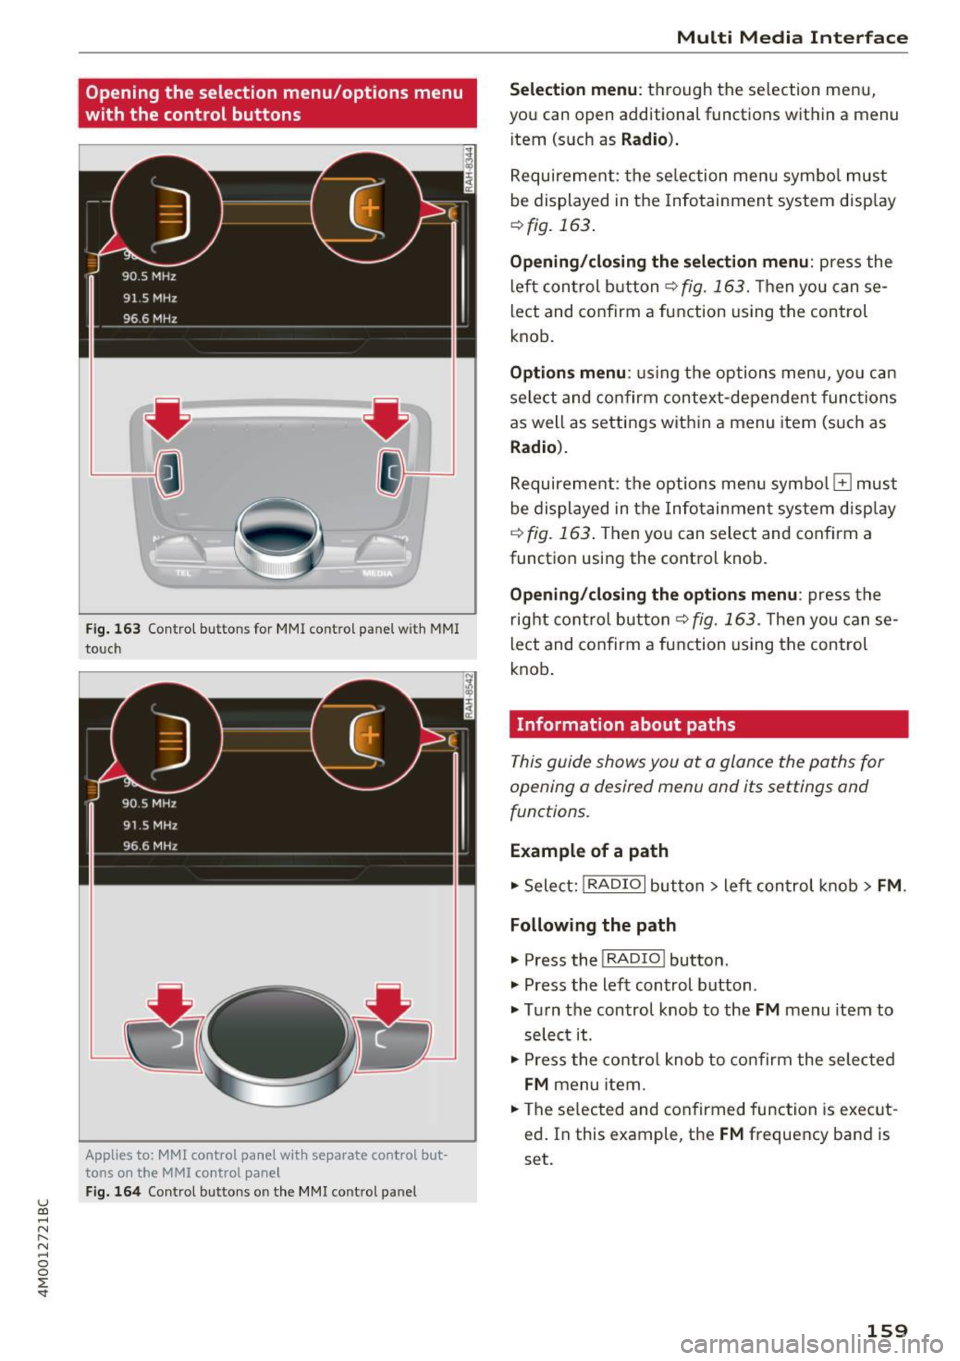
F ig . 163 Contro l bu ttons for MMI contro l panel w ith MMI
to uch
Applies to: MMl control panel with separate control but
tons on the
MMI control panel
Fig. 164 Control buttons o n the MMI control pa nel
Multi M edia I nterfac e
S ele ction menu :
th rough the se lection menu,
you can open additional functions within a menu
item (such as
R adio ).
Requirement: the se lection menu symbo l must
be displayed in the Infotainment system disp lay
¢ fig. 163 .
Opening /closing the selec tion menu : press the
left control button ¢
fig. 163. Then you can se
lect and confirm a function using the control
knob.
Opt ions menu : using the options menu, yo u can
select and confirm context-dependent func tions
as well as settings within a menu item (such as
Radio ).
Requirement: the options menu symbo l El must
be displayed in the Info tainmen t system disp lay
r=> fig. 163 . Then you can select and confirm a
function using the control knob .
Opening/closing the option s menu : press the
right cont rol but ton ¢
fig. 163 . Then you can se
lect and confirm a function using the control
knob .
Information about paths
This guide shows you at a glance the paths for
opening a desired menu and its settings and
functions.
Example of a path
.. Select: !RADIO I button> lef t control k nob> FM .
Following the path
.. Press the I RADIO I button .
.. Press the left control button .
.. Tu rn the control knob to the
FM menu item to
select it .
.. Press the contro l knob to co nfirm the selected
FM menu item .
.. The se lected and confirmed function is exec ut
ed . In this example, the
FM frequency band is
set.
159
Page 165 of 402
u (0 ...... N r--. N ...... 0
0
:E
the control knob
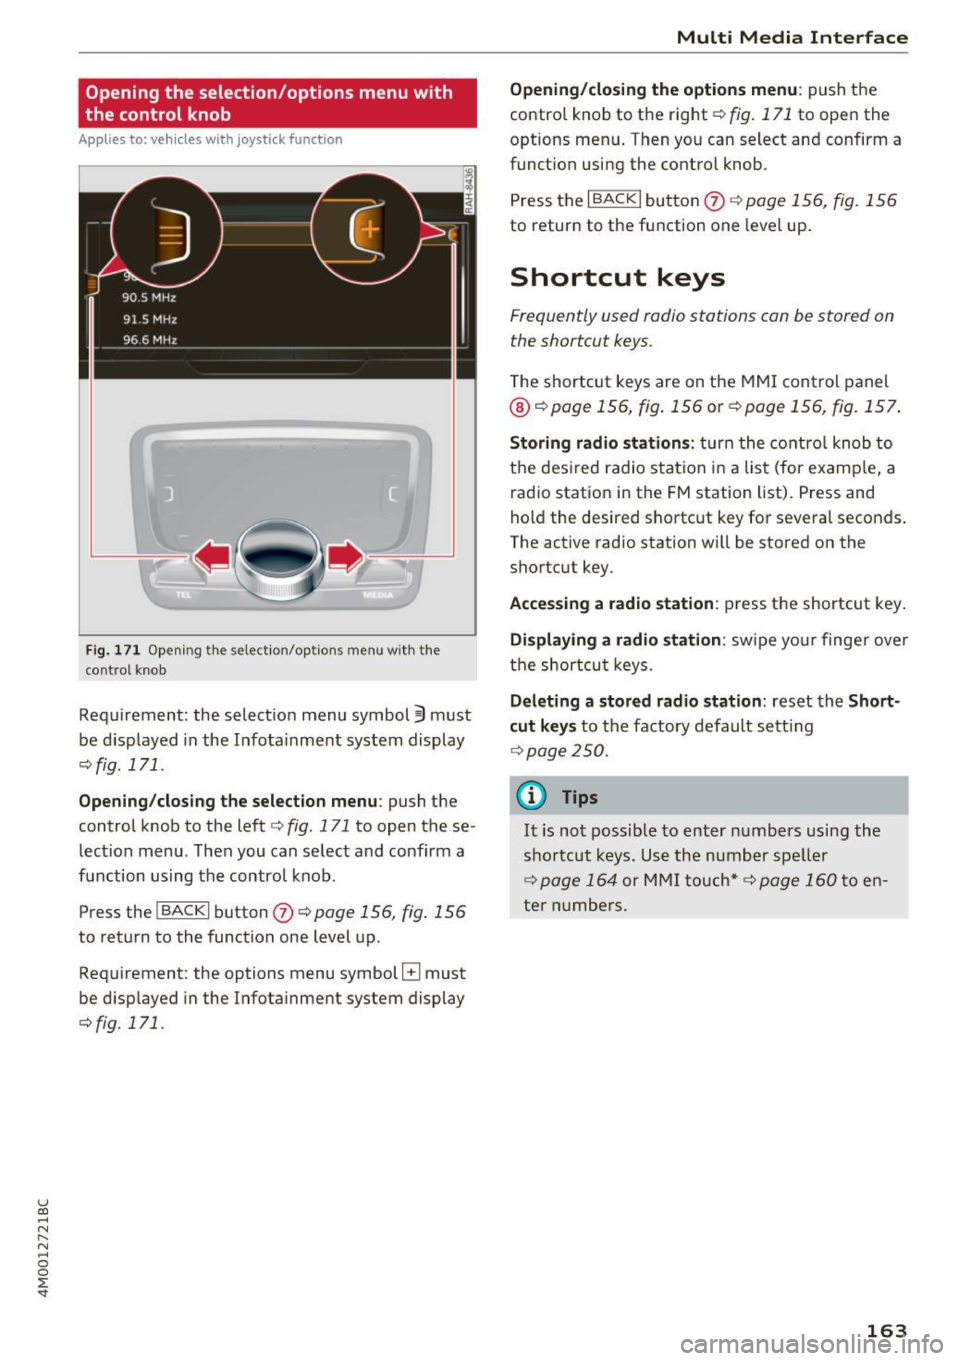
A pp lies to: ve hicles with joystick function
Fig . 171 Opening the select ion/options menu with the
control knob
Requirement: the selection menu symbol 3 must
be disp layed in the Infota inment system display
<=:>fig. 171.
Opening /closing the selection menu : push the
control knob to the left
c::> fig. 171 to open the se
lection menu. T hen you can se lect and confirm a
f u nction using the contro l knob.
Press the
I BACKI button (J) c::> page 156, fig. 156
to return to the function one level up.
Requirement: the options menu symbol
El must
be disp layed in the Infotainment system display
<=:>fig. 171.
Multi Media Interface
Opening/closing the options menu: push the
contro l knob to the right
c::> fig. 171 to open the
options menu . Then you can select and confirm a
funct ion using the control knob .
Press the
I BACK I button (J) c::> page 156, fig. 156
to return to the function one level up.
Shortcut keys
Frequently used radio stations can be stored on
the shortcut keys.
T he shortcut keys are on the MMI control panel
@ c::> page 156, fig . 156 or c::> page 156, fig. 157 .
Storing radio stations: turn the control knob to
the desired radio station in a list (for examp le, a
radio station in the FM station list). Press and
hold the desired shortcut key for several seconds .
The active radio station will be stored on the
shortcut key.
Accessing a radio station : press the shortcut key.
Displaying a radio station: swipe you r finger over
the shortcut keys.
Deleting a stored radio station: reset the Short
cut keys
to the factory default setting
<=:>p age 250.
(0 Tips
It is not possible to enter numbers using the
shortcut keys. Use the number speller
<=:>page 164 or MMI touch* <=>page 160to en
ter numbers.
163