ESP AUDI R8 2007 Service Manual
[x] Cancel search | Manufacturer: AUDI, Model Year: 2007, Model line: R8, Model: AUDI R8 2007Pages: 210, PDF Size: 8.1 MB
Page 151 of 210
Care of vehicle and cleaning149
Controls
Safety
Driving tips
General maintenance
Self-help
Technical data a typical and distinctive patina. This is characteristic for real leather
upholstery, and is a sign of genuine quality.
To maintain the value of natural leather you should note the
following points:
Caution
•
Avoid exposing leather to direct sunlight for long periods, other-
wise it may tend to lose some of its colour. If the car is left for a
prolonged period in the bright sun, it is best to cover the leather.
•
Sharp-edged objects on clothing, such as belts, zip fasteners,
rivets or similar, can also leave permanent scratches and rough
marks on the surface of the leather.Note
•
Use a suitable impregnating cream with ultra-violet protection at
regular intervals and after cleaning. This cream will nourish and
moisturise the leather, keep it supple and able to breathe. In addi-
tion, it will also help to protect the surface of the leather.
•
Clean the leather every 2 to 3 months and remove fresh dirt as
necessary.
•
Remove stains from fresh ball-pen and other inks, lipstick, shoe
cream and similar stains as soon as possible.
•
Preserve the colour of the leather. A special coloured cream will
renew the colour of the leather when required and will eliminate
differences in colour.
Applies to vehicles: with leather upholsteryCleaning and care of leather upholstery
Natural leather requires an extra degree of attention and
care.Normal cleaning
– Moisten a cotton or woollen cloth with water and wipe
over the leather surfaces.
More stubborn dirt
– More stubborn dirt can be removed using a mild soap
solution (pure liquid soap: two tablespoons dissolved in
one litre of water).
– It is very important not to let the water soak through the
leather or penetrate into the seams.
– Then wipe off with a soft, dry cloth.
Removal of stains
– Remove fresh water-based stains such as coffee, tea,
juices, blood etc. with an absorbent cloth or kitchen roll,
dried-on stains with the cleaning agent from the care set.
– Remove fresh fat-based stains on the surface such as
butter, mayonnaise, chocolate, etc. with an absorbent
cloth or kitchen roll or with the cleaning agent from the
care set.
–Treat fat-based, dried-in stains with grease-dissolving
spray.
–Treat less common stains such as ball-pen and other
inks, felt-tip pens, nail polish, dispersion paint, shoe
cream etc. with a special leather stain remover.
document_0900452a816e6cc9.book Seite 149 Mittwoch, 21. Februar 2007 1:32 13
Page 157 of 210
Checking and topping up fluids155
Controls
Safety
Driving tips
General maintenance
Self-help
Technical data
Checking and topping up fluidsEngine lidOpening the engine lid
The engine lid is released from inside the vehicle.– Open the driver's door.
– Make sure that the rear spoiler is retracted ⇒page 134.
– To release the engine lid, pull the lever under the dash-
board ⇒fig. 115.
– Open the engine lid ⇒.The engine lid is held open by two gas-filled struts.
WARNING
To avoid the risk of being scalded, never open the engine lid if you
see steam or coolant escaping from the engine compartment.
Wait until no steam or coolant can be seen before opening the
engine lid.
Working on components in the engine compartment
Extra caution is necessary when working on components
in the engine compartment.Always be aware of the danger of injury and scalding as well as the
risk of accident or fire when working in the engine compartment
(e.g. when checking and refilling fluids). Always observe the warn-
ings listed below and follow all normal safety precautions. The
engine compartment of any motor vehicle is a potentially hazardous
area ⇒.
WARNING
•
Switch off the engine.
•
Apply the handbrake firmly.
•
Put the gear lever in neutral or the R tronic selector lever in N.
•
Remove the ignition key.
•
Wait for the engine to cool down.
•
Keep children away from engine compartment.
•
Never spill fluids on hot engine components. These fluids can
cause a fire (e.g. radiator anti-freeze).
•
Take care not to cause short circuits in the electrical system,
especially when working on the battery.
•
Do not unscrew the cap on the expansion tank when the engine
is hot. The cooling system is under pressure.
•
Protect face, hands and arms by covering the cap with a large,
thick rag to protect against escaping coolant and steam.
•
If any tests have to be performed with the engine running,
there is an extra safety risk from the rotating parts, such as the
Fig. 115 Detail of foot-
well on driver's side:
Release lever
document_0900452a816e6cc9.book Seite 155 Mittwoch, 21. Februar 2007 1:32 13
Page 168 of 210
Wheels and tyres 166Wheels and tyresWheelsGeneral notes–When driving with new tyres, be especially careful during
the first 500 km.
– If you have to drive over a kerb or similar obstacle, drive
very slowly and as near as possible at a right angle to the
kerb.
– Inspect the tyres regularly for damage (cuts, cracks or
blisters, etc.). Remove any foreign bodies embedded in
the treads.
– Damaged wheels and tyres must be replaced immedi-
ately.
– Keep grease, oil and fuel off the tyres.
– Replace any missing valve caps as soon as possible.
– Mark the wheels before taking them off so that they
rotate in the same direction when put back.
– When removed, the wheels or tyres should be stored in a
cool, dry and preferably dark place.New tyres
New tyres do not give maximum grip straight away and should
therefore be “run in” by driving carefully and at moderate speeds for
about the first 500 km. This will also help to make the tyres last
longer.
The tread depth of new tyres may vary, according to the type and
make of tyre and the tread pattern.Concealed damage
Damage to tyres and rims is often not readily visible. If you notice
unusual vibration or the car pulling to one side, this may indicate
that one of the tyres is damaged. Reduce speed immediately if there
is any reason to suspect that damage may have occurred. Inspect
the tyres for damage. If no external damage is visible, drive slowly
and carefully to the nearest qualified workshop and have the car
inspected.
Tyres with directional tread pattern
An arrow on the tyre sidewall indicates the direction of rotation on
tyres with directional tread. Always note the direction of rotation
indicated when mounting the wheel. This guarantees optimum grip
and helps to avoid aquaplaning, excessive noise and wear.
Wheels with bolted rim flange*
Light-alloy wheels with a bolted rim flange consist of several
components. A special technique is applied to bolt these compo-
nents together. Apart from safety and true running this also ensures
that the wheel functions correctly and that there is no leakage.
Damaged rims must therefore be replaced; you must never attempt
to repair or dismantle them ⇒.
Wheels with bolted trim parts*
Light-alloy wheels can be fitted with interchangeable trim parts
which are attached to the rim using self-locking bolts. Should you
wish to replace damaged trim parts please contact a qualified work-
shop.
WARNING
Never remove the bolts on a wheel with bolted rim flange* (acci-
dent risk).
document_0900452a816e6cc9.book Seite 166 Mittwoch, 21. Februar 2007 1:32 13
Page 169 of 210
Wheels and tyres167
Controls
Safety
Driving tips
General maintenance
Self-help
Technical data
Tyre service life
Correct inflation pressures and sensible driving habits
will increase the service life of your tyres.– Check the tyre pressures at least once a month.
– The tyre pressures should only be checked when the
tyres are cold. The slightly raised pressures of warm tyres
must not be reduced.
– The pressures must be altered to suit major changes in
the load being carried.
– Avoid fast cornering and hard acceleration.
– Inspect the tyres for irregular wear from time to time.The service life of your tyres depends on the following factors:
Tyre pressure
Under-inflation or over-inflation will reduce the life of the tyres
considerably and also impair the car's handling. The inflation pres-
sures are listed on a sticker on the driver's door pillar.
Correct inflation pressures are very important, especially at high
speeds. The pressures should therefore be checked at least once a
month and before starting a journey.
Driving habits
Fast cornering, heavy acceleration and hard braking (squealing
tyres) all increase tyre wear.
Wheel balancing
The wheels on new vehicles are balanced. However, various factors
encountered in normal driving can cause them to become unbal-
anced, which results in steering vibration.Unbalanced wheels should be rebalanced, as they otherwise cause
excessive wear on steering, suspension and tyres. A wheel must
also be rebalanced when a new tyre is fitted or if a tyre is repaired.
Incorrect wheel alignment
Incorrect wheel alignment causes excessive tyre wear, impairing the
safety of the vehicle. If you notice excessive tyre wear, contact your
Audi R8 dealer.
WARNING
•
Always adapt the tyre pressure accordingly when the vehicle
load changes.
•
Under-inflated tyres flex more and can overheat at continuous
high speeds. This can cause tread separation and tyre blow-out,
which could result in an accident. Always observe the recom-
mended tyre pressures.For the sake of the environment
Under-inflated tyres will increase the fuel consumption.
document_0900452a816e6cc9.book Seite 167 Mittwoch, 21. Februar 2007 1:32 13
Page 170 of 210
Wheels and tyres 168Tread wear indicators
The tread wear indicators show the condition of the tyre
treads.The original tyres on your vehicle have 1.6 mm high “tread wear
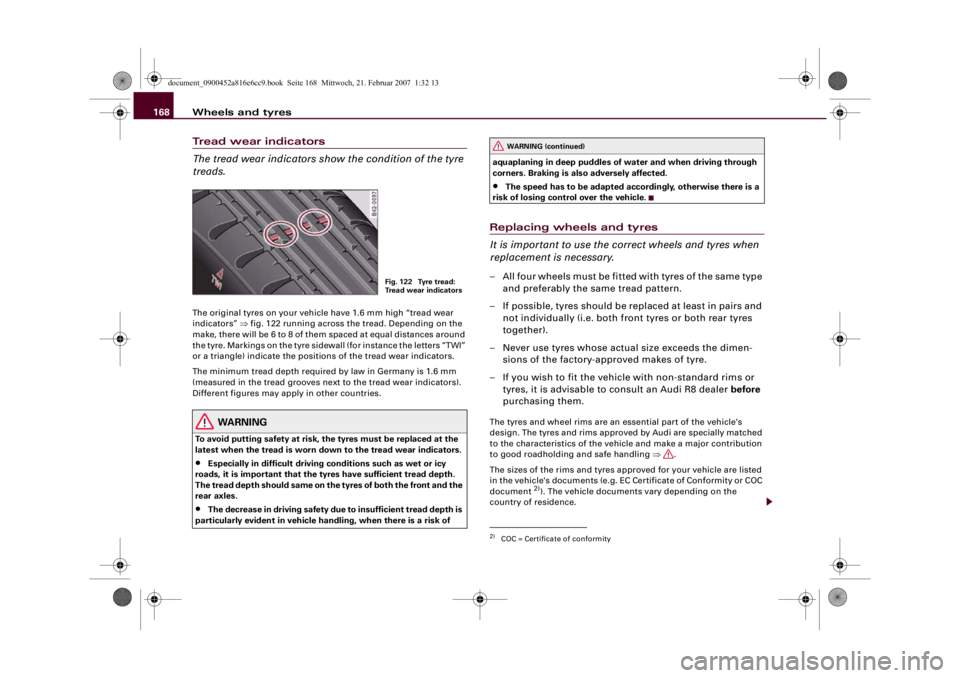
indicators” ⇒fig. 122 running across the tread. Depending on the
make, there will be 6 to 8 of them spaced at equal distances around
the tyre. Markings on the tyre sidewall (for instance the letters “TWI”
or a triangle) indicate the positions of the tread wear indicators.
The minimum tread depth required by law in Germany is 1.6 mm
(measured in the tread grooves next to the tread wear indicators).
Different figures may apply in other countries.
WARNING
To avoid putting safety at risk, the tyres must be replaced at the
latest when the tread is worn down to the tread wear indicators.•
Especially in difficult driving conditions such as wet or icy
roads, it is important that the tyres have sufficient tread depth.
The tread depth should same on the tyres of both the front and the
rear axles.
•
The decrease in driving safety due to insufficient tread depth is
particularly evident in vehicle handling, when there is a risk of aquaplaning in deep puddles of water and when driving through
corners. Braking is also adversely affected.
•
The speed has to be adapted accordingly, otherwise there is a
risk of losing control over the vehicle.
Replacing wheels and tyres
It is important to use the correct wheels and tyres when
replacement is necessary.– All four wheels must be fitted with tyres of the same type
and preferably the same tread pattern.
– If possible, tyres should be replaced at least in pairs and
not individually (i.e. both front tyres or both rear tyres
together).
– Never use tyres whose actual size exceeds the dimen-
sions of the factory-approved makes of tyre.
– If you wish to fit the vehicle with non-standard rims or
tyres, it is advisable to consult an Audi R8 dealer before
purchasing them.The tyres and wheel rims are an essential part of the vehicle's
design. The tyres and rims approved by Audi are specially matched
to the characteristics of the vehicle and make a major contribution
to good roadholding and safe handling ⇒.
The sizes of the rims and tyres approved for your vehicle are listed
in the vehicle's documents (e.g. EC Certificate of Conformity or COC
document
2)). The vehicle documents vary depending on the
country of residence.
Fig. 122 Tyre tread:
Tr e a d w e a r i n d i c a t o r s
2)COC = Certificate of conformityWARNING (continued)
document_0900452a816e6cc9.book Seite 168 Mittwoch, 21. Februar 2007 1:32 13
Page 174 of 210
Wheels and tyres 172Remove wheel covers (if fitted) and trim rings before attaching
snow chains. For safety reasons cover caps must then be fitted over
the wheel bolts. These are available from Audi R8 dealers.
Remove the chains when roads are free of snow. Otherwise they will
impair handling, damage the tyres and wear out very quickly.
Four-wheel drive: Where snow chains are compulsory on certain
roads, this normally also applies to cars with four-wheel drive. Snow
chains may only be fitted to the rear wheels (also on vehicles with
four-wheel drive).Tyre pressure monitoring systemApplies to vehicles: with tyre pressure monitoring systemIntroduction
The tyre pressure monitoring system keeps a check on the
inflation pressures of the four road wheels while you are
driving.The system warns the driver in the event of a loss of pressure by
means of symbols and messages in the instrument cluster display.
The system employs sensors on the wheels. The radio signals from
these sensors are transmitted to the tyre pressure monitoring
system.
Please bear in mind that the tyre inflation pressure is also influ-
enced by the temperature of the tyre. For every 10°C increase in the
tyre temperature the pressure will normally increase by about
0.1 bar. The tyre heats up while the vehicle is being driven and the
tyre pressure will rise accordingly. For this reason, you should only
adjust the tyre pressures when they are cold (i.e. approximately at
ambient temperature).
To ensure that the tyre pressure monitoring system works reliably,
you should check and, if necessary, adjust the tyre pressures at
regular intervals.The tyre pressures recommended for your vehicle are given on the
sticker attached to the driver's door pillar.
Initialising the tyre pressure monitoring system
The inflation pressures for two sets of wheels (e.g. with winter and
summer tyres) are stored on your vehicle. You can change between
these two sets of wheels any number of times without re-initialising
the system.
The tyre pressure monitoring system must be re-initialised by your
Audi R8 dealer if a new set of wheels is used or the electronic
sensors are renewed.
Warning lamp
lit
If the tyre pressure is more than 0.5 bar below the reference value,
the display will show the tyre symbol
with a corresponding
message, such as Tyre pressures too low ⇒.
WARNING
•
If the warning lamp
lights up you must slow down immedi-
ately and avoid any severe braking or steering manoeuvres. As
soon as you can do so safely, stop and check the tyres and the tyre
pressures.
•
Never re-adjust the tyre inflation pressure when the tyre is hot.
This can cause serious damage to the tyre or even a blow-out,
which could result in an accident.
•
Under-inflated tyres flex more and can overheat at continuous
high speeds. This can cause tread separation and tyre blow-out,
which could result in an accident.For the sake of the environment
Under-inflated tyres lead to increased fuel consumption and tyre
wear.
document_0900452a816e6cc9.book Seite 172 Mittwoch, 21. Februar 2007 1:32 13
Page 175 of 210
Wheels and tyres173
Controls
Safety
Driving tips
General maintenance
Self-help
Technical data
Note
•
Responsibility for ensuring that the tyres are correctly inflated
remains with the driver; the system can only provide assistance.
•
Only adjust the inflation pressure of the tyres when they are at
approximately ambient temperature.
•
The sensors and valves do not have to be detached or changed
round when fitting new tyres. Only the valve core needs to be
replaced, and if necessary the valve and the electronic components
in the wheel.
•
After using the Tyre Mobility System* the tyre pressure moni-
toring system may malfunction. The sensor for the tyre pressure
monitoring system must therefore be renewed by a qualified
workshop.
Applies to vehicles: with tyre pressure monitoring systemMalfunctionsIf the tyre pressure monitoring system is inoperative, the tyre
symbol or “TPMS” will appear on the display. This can have various
causes:•
One of the wheel sensors or other related components may not
be working.
•
Snow chains can interfere with the signals emitted by the
sensors so that the system cannot function properly.
•
The tyre pressure monitoring system may be inoperative due to
radio interference.
•
Radio systems operating on the same frequency, such as radio
headphones or two-way radios inside the vehicle, produce strong
electromagnetic fields which can cause temporary interference.
•
If the fault persists, take the vehicle to a qualified workshop.
document_0900452a816e6cc9.book Seite 173 Mittwoch, 21. Februar 2007 1:32 13
Page 176 of 210

Accessories and modifications to the vehicle 174Accessories and modifications to the vehicleAccessories, replacement parts and repairsIt is best to consult an authorised Audi R8 dealer before
purchasing accessories and replacement parts or having
any repairs carried out.Your car is designed to offer a high standard of active and passive
safety. For this reason, we recommend that you ask an Audi R8
dealer for advice before fitting accessories or replacement parts.
This is also very important if body repairs are required. Audi R8
dealers have full information on the manufacturer-approved repair
methods and can recommend suitable accessories and spare parts.
They can also give advice regarding official requirements for the
vehicle.
We recommend you to use only Audi accessories and Audi Genuine
parts®. Audi has tested these parts and accessories for suitability,
reliability and safety. Audi R8 dealers have the necessary experience
and facilities to ensure that the parts are installed properly.
Although the market is constantly scrutinised, Audi cannot judge or
assume responsibility for the reliability, safety and suitability of
non-genuine products - even though in some instances, these parts
may have been approved by an officially recognised technical
testing authority or accompanied by an official approval certificate.
Any retro-fitted equipment which has a direct effect on the vehicle
and/or the way it is driven (e.g. cruise control system or electroni-
cally-controlled suspension) must be approved for use in your
vehicle and bear the e mark (the European Union's approval
symbol).
If any additional electrical components are fitted which do not serve
to control the vehicle itself (for instance a refrigerator box, laptop or
ventilator fan, etc.), these must bear the CE mark (manufacturer
conformity declaration in the European Union).
WARNING
Never attach accessories (such as cup holders or telephone
brackets) to the surfaces covering the airbag units or the areas
around the airbags: this could cause injury if the airbag is trig-
gered.
Note
•
Since the Audi R8 has an aluminium body, all servicing, repairs
or other work on the car body must be carried out by an Audi R8
workshop or a qualified workshop working to the specifications of
the Audi factory. This ensures that the necessary repairs or servicing
are performed properly and that only Audi Genuine parts® are
installed on your vehicle. Use of non-genuine replacement parts,
equipment or accessories on your Audi R8, or repair of the vehicle
by unqualified persons, may result in serious damage to your car
(possibly including corrosion).
•
The manufacturer cannot be held liable for damage which occurs
as a result of failure to comply with these stipulations, and such
damage is not covered under warranty.
ModificationsModifications must always be carried out according to
our specifications.Unauthorised modifications to the electronic components or soft-
ware in the vehicle may cause malfunctioning. Due to the way the
electronic components are linked together in networks, other
systems may be affected by the faults. This can seriously impair
safety, lead to excessive wear of components, and also invalidate
the type approval for your vehicle.
document_0900452a816e6cc9.book Seite 174 Mittwoch, 21. Februar 2007 1:32 13
Page 188 of 210
Self-help 186•
Switch off the car telephone if necessary. Details will be given in
the manufacturer's instructions for the car telephone.
Starting the engine
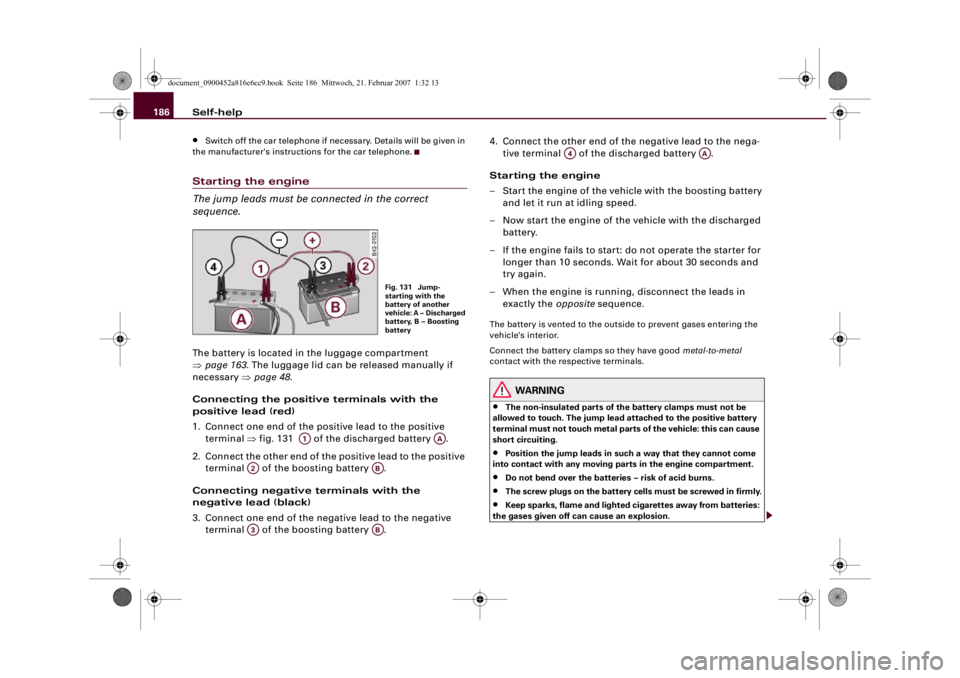
The jump leads must be connected in the correct
sequence.The battery is located in the luggage compartment
⇒page 163. The luggage lid can be released manually if
necessary ⇒page 48.
Connecting the positive terminals with the
positive lead (red)
1. Connect one end of the positive lead to the positive
terminal ⇒fig. 131 of the discharged battery .
2. Connect the other end of the positive lead to the positive
terminal of the boosting battery .
Connecting negative terminals with the
negative lead (black)
3. Connect one end of the negative lead to the negative
terminal of the boosting battery .4. Connect the other end of the negative lead to the nega-
tive terminal of the discharged battery .
Starting the engine
– Start the engine of the vehicle with the boosting battery
and let it run at idling speed.
– Now start the engine of the vehicle with the discharged
battery.
– If the engine fails to start: do not operate the starter for
longer than 10 seconds. Wait for about 30 seconds and
try again.
– When the engine is running, disconnect the leads in
exactly the opposite sequence.
The battery is vented to the outside to prevent gases entering the
vehicle's interior.
Connect the battery clamps so they have good metal-to-metal
contact with the respective terminals.
WARNING
•
The non-insulated parts of the battery clamps must not be
allowed to touch. The jump lead attached to the positive battery
terminal must not touch metal parts of the vehicle: this can cause
short circuiting.
•
Position the jump leads in such a way that they cannot come
into contact with any moving parts in the engine compartment.
•
Do not bend over the batteries – risk of acid burns.
•
The screw plugs on the battery cells must be screwed in firmly.
•
Keep sparks, flame and lighted cigarettes away from batteries:
the gases given off can cause an explosion.
Fig. 131 Jump-
starting with the
battery of another
vehicle: A – Discharged
battery, B – Boosting
battery
A1
AA
A2
AB
A3
AB
A4
AA
document_0900452a816e6cc9.book Seite 186 Mittwoch, 21. Februar 2007 1:32 13
Page 189 of 210
Self-help187
Controls
Safety
Driving tips
General maintenance
Self-help
Technical data
Caution
Please note that the described method of connecting the leads is
meant for jump-starting your vehicle. If jump-starting another
vehicle, you should not connect the negative lead (–) to the negative
terminal of the discharged battery ⇒page 186, fig. 131 , but
directly to the engine block or a solid metal part bolted to the engine
block. If the battery of the other vehicle does not have a gas vent,
there is a risk that a mixture of oxygen and hydrogen gas can accu-
mulate and cause an explosion.Tow-starting and towing awayGeneral notes
Points to observe when tow-starting or towing awayIf you use a towrope:
Notes for the driver of the towing vehicle
– The towrope must be taut before driving off.
– Engage the clutch very gently when starting to move
(press the accelerator slowly if you have R tronic).
Notes for the driver of the towed vehicle
– The ignition should be switched on so that the turn
signals, horn, windscreen wipers and washers can be
used. Please ensure that the steering wheel is unlocked
when you switch on the ignition and that it moves freely.
– Put the gear lever in neutral or move the selector lever to
position N.– The brake servo and power steering only work when the
engine is running. Considerably more effort is required
on the brake pedal and steering wheel when the engine
is switched off.
– Ensure that the towrope remains taut at all times when
towing.
Towrope or towbar
It is easier and safer to tow a vehicle with a towbar. You should only
use a towrope if you do not have a towbar.
A towrope should be slightly elastic to reduce the loading on both
vehicles. It is advisable to use a towrope made of synthetic fibre or
similar material.
Attach the towrope or the towbar only to the towing anchorages
provided for this purpose ⇒page 188.
Driving technique
Towing requires some experience – especially when using a
towrope. Both drivers should be familiar with the technique required
for towing. Inexperienced drivers should not attempt to tow-start or
tow away another vehicle.
Do not pull too hard with the towing vehicle and take care to avoid
jerking the towrope. When towing on a loose surface there is always
a risk of overloading and damaging the anchorage points.
Caution
If there is no oil in the gearbox or no lubricant in the automatic
transmission the car may only be towed with the driven wheels
lifted clear of the road, or transported on a special car transporter
or trailer.
Note
•
Note the regulations concerning towing.
A4
document_0900452a816e6cc9.book Seite 187 Mittwoch, 21. Februar 2007 1:32 13