alarm AUDI R8 2007 Owners Manual
[x] Cancel search | Manufacturer: AUDI, Model Year: 2007, Model line: R8, Model: AUDI R8 2007Pages: 210, PDF Size: 8.1 MB
Page 4 of 210
Contents 2ContentsNotes on this Owner's
Manual
. . . . . . . . . . . . . . . . . . . . . .
Controls
. . . . . . . . . . . . . . . . . . . . .
Controls and displays
. . . . . . . . . .
Overview . . . . . . . . . . . . . . . . . . . . . .
Instruments and
warning/indicator lamps
. . . . . . .
Instruments . . . . . . . . . . . . . . . . . . . .
Warning and indicator lamps . . . . .
Driver information system
. . . . . .
Introduction . . . . . . . . . . . . . . . . . . . .
Service interval display . . . . . . . . . .
On-board computer . . . . . . . . . . . . .
Menus . . . . . . . . . . . . . . . . . . . . . . . . .
Lap timer . . . . . . . . . . . . . . . . . . . . . .
Speed warning function . . . . . . . . .
Notes and symbols . . . . . . . . . . . . .
Doors and windows
. . . . . . . . . . . .
Remote control keys . . . . . . . . . . . .
Central locking system . . . . . . . . . .
Luggage lid . . . . . . . . . . . . . . . . . . . .
Anti-theft alarm system . . . . . . . . . .
Electric windows . . . . . . . . . . . . . . .
Lights and vision
. . . . . . . . . . . . . .
Lights . . . . . . . . . . . . . . . . . . . . . . . . .
Interior lights . . . . . . . . . . . . . . . . . .
Clear vision . . . . . . . . . . . . . . . . . . . .
Windscreen wipers . . . . . . . . . . . . .
Rear-view mirrors . . . . . . . . . . . . . .
Digital compass . . . . . . . . . . . . . . . .
Seats and storage
. . . . . . . . . . . . .
Manually adjustable front seats . .
Electrically adjustable front seats
Bucket seats . . . . . . . . . . . . . . . . . . .
Head restraints . . . . . . . . . . . . . . . .
Cup holders . . . . . . . . . . . . . . . . . . .
Ashtray . . . . . . . . . . . . . . . . . . . . . . .
Cigarette lighter and electrical
socket . . . . . . . . . . . . . . . . . . . . . . . .
Storage compartments . . . . . . . . .
Heating and cooling
. . . . . . . . . . .
Air conditioner . . . . . . . . . . . . . . . . .
Rear window heating . . . . . . . . .
Seat heating . . . . . . . . . . . . . . . . . . .
Driving
. . . . . . . . . . . . . . . . . . . . . . . . .
Steering . . . . . . . . . . . . . . . . . . . . . . .
Ignition lock . . . . . . . . . . . . . . . . . . .
Starting the engine . . . . . . . . . . . . .
Switching off the engine . . . . . . . .
Handbrake . . . . . . . . . . . . . . . . . . . .
Parking aid . . . . . . . . . . . . . . . . . . . .
Cruise control system . . . . . . . . . .
Audi magnetic ride . . . . . . . . . . . . .
Automatic gearbox
. . . . . . . . . . . .
Description . . . . . . . . . . . . . . . . . . . .
Manual mode . . . . . . . . . . . . . . . . . .
Automatic mode . . . . . . . . . . . . . . .
Kick-down feature . . . . . . . . . . . . . . Launch control programme . . . . . .
Steering wheel with paddle levers
Backup programme . . . . . . . . . . . . .
HomeLink
. . . . . . . . . . . . . . . . . . . . . .
Universal transmitter . . . . . . . . . . . .
Safety
. . . . . . . . . . . . . . . . . . . . . . .
Safe driving
. . . . . . . . . . . . . . . . . . . .
General notes . . . . . . . . . . . . . . . . . .
Correct sitting positions . . . . . . . . .
Pedal area . . . . . . . . . . . . . . . . . . . . .
Stowing luggage safely . . . . . . . . .
Seat belts
. . . . . . . . . . . . . . . . . . . . . .
Why is it so important to use seat
belts? . . . . . . . . . . . . . . . . . . . . . . . . .
Forces acting in a collision . . . . . .
How to wear seat belts properly .
Belt tensioners . . . . . . . . . . . . . . . . .
Airbag system
. . . . . . . . . . . . . . . . . .
Description of airbag system . . . .
Front airbags . . . . . . . . . . . . . . . . . .
Side airbags . . . . . . . . . . . . . . . . . . .
Deactivating the airbags . . . . . . . . 5
7
9
9
10
10
15
20
20
21
22
24
27
31
33
40
40
42
47
48
5052
52
57
58
59
63
65
67
67
68
70
71
72
72
72
73
75
75
79
80
81
81
81
82
83
83
85
86
88
90
90
91
92
9293
93
94
95
95
101
102
102
104
107
108
109
109
110
112
114
115
115
116
118
120
document_0900452a816e6cc9.book Seite 2 Mittwoch, 21. Februar 2007 1:32 13
Page 44 of 210

Doors and windows 42
– Take the used battery out of the cover.
– Insert the new battery. Make sure that the “+” symbol on
the battery is facing downwards. The correct polarity is
indicated on the cover.
– After inserting the battery, align the cover and key and
press the two parts together.
For the sake of the environmentUsed batteries must be disposed of appropriately and must not be
discarded with ordinary household waste.
Note
The new battery must be of the same type as the original one.Electronic immobiliser
The immobiliser is designed to prevent unauthorised
persons from driving the vehicle.An electronic chip inside the key automatically deactivates the
immobiliser when the ignition is switched on. When the ignition is
switched off after coming to a stop the electronic immobiliser is
activated automatically.
If an uncoded key is used, SAFE will appear continuously in the
mileage recorder display.
Note
•
The engine can only be started using an original Audi key with
the correct code.
•
It may not be possible to start the engine with the key if there is
another ignition key from a different make of vehicle on the same
key ring.
Central locking systemDescription
The central locking system allows both doors to be locked
and unlocked simultaneously.The central locking system on your vehicle locks and unlocks both
doors simultaneously.
The remote control key locks and unlocks the vehicle by means of a
radio signal ⇒page 43.
Locking and unlocking the vehicle using the key
In addition to the other functions, you can lock and unlock the
vehicle in the normal way by turning the key in the driver's door lock.
However, please note that when you unlock the vehicle with the key,
this only unlocks the mechanical lock on the doors set in the menu
display ⇒page 24. In order to switch off the anti-theft alarm, you
must insert the key in the ignition lock and switch on the ignition
within 15 seconds after opening the driver's door. The alarm will be
set off if the ignition is not switched on within 15 seconds.
When you lock the vehicle, this automatically locks both of the doors
and activates the anti-theft alarm.
Windows
The windows can be opened or closed together via the central
locking system ⇒page 43.
Deadlock mechanism
The central locking system is combined with a deadlock mecha-
nism. Once the vehicle has been locked from the outside, the door
handles on the inside are deactivated. This makes it more difficult
to break into the vehicle.
However, it is also possible to lock the vehicle without activating the
deadlock mechanism.
document_0900452a816e6cc9.book Seite 42 Mittwoch, 21. Februar 2007 1:32 13
Page 45 of 210
Doors and windows43
Controls
Safety
Driving tips
General maintenance
Self-help
Technical data Driver's door lock: Turn the key in the driver's door to the “lock” posi-
tion twice within 2 seconds.
Automatic locking function (Auto Lock)
The Auto Lock function locks all the doors and the luggage lid when
the vehicle exceeds a speed of about 15 km/h.
The vehicle is unlocked again automatically when the ignition key is
removed. Alternatively, the vehicle can also be unlocked via the
central locking switch
or by pulling one of the inside door
handles. If desired, you can deactivate the Auto Lock feature in the
menu display ⇒page 24 or have it deactivated by a qualified work-
shop.
Turn signals
All the turn signals will flash as confirmation when the vehicle is
locked or unlocked. The turn signals flash twice when the vehicle is
unlocked and once when the vehicle is locked, provided that the
luggage lid and all the doors are closed. In addition, the interior
lights will automatically light up when the vehicle is unlocked and
go out when the vehicle is locked, provided that the switches are in
the courtesy light position.
WARNING
Do not leave anyone (especially children) in the car if it is locked
from the outside and the deadlock mechanism is activated: the
doors and windows cannot then be opened from the inside.
Locked doors could delay assistance in an emergency, potentially
putting lives at risk.
Note
•
If the central locking system should fail to work, you can still lock
and unlock the driver's door with the key. The passenger's door can
be locked manually ⇒page 46.
•
The deadlock mechanism and the anti-theft alarm cannot be acti-
vated if the central locking is not functioning.
•
Never leave any valuable items in the vehicle unattended. Even a
locked vehicle is not a safe.
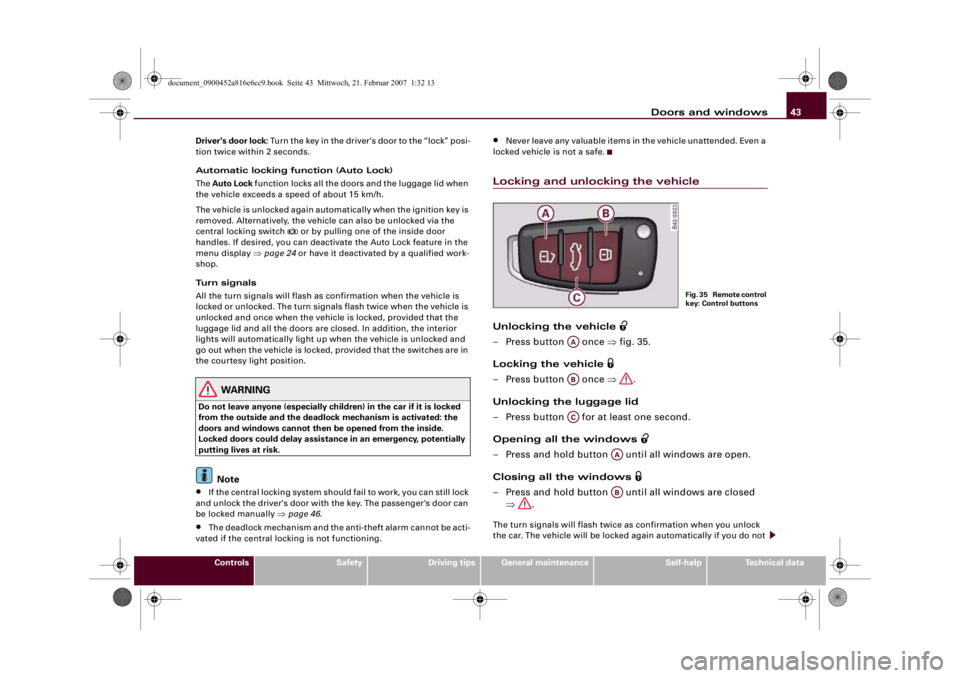
Locking and unlocking the vehicleUnlocking the vehicle
– Press button once ⇒fig. 35.
Locking the vehicle
– Press button once ⇒.
Unlocking the luggage lid
– Press button for at least one second.
Opening all the windows
– Press and hold button until all windows are open.
Closing all the windows
– Press and hold button until all windows are closed
⇒.The turn signals will flash twice as confirmation when you unlock
the car. The vehicle will be locked again automatically if you do not
F i g . 3 5 R e m o t e c o n t r o l
key: Control buttons
AAABAC
AAAB
document_0900452a816e6cc9.book Seite 43 Mittwoch, 21. Februar 2007 1:32 13
Page 46 of 210
Doors and windows 44open one of the doors or the luggage lid within 30 seconds after
unlocking the car. This function prevents the vehicle from remaining
unlocked if the unlocking button is pressed by mistake.
On vehicles with the security central locking feature, you can unlock
just the driver's door by pressing button once, or the whole
vehicle by pressing the button twice.
The turn signals flash once when the vehicle is locked to confirm
that the doors and luggage lid are properly locked.
WARNING
•
Do not leave anyone (especially childr e n ) i n t h e c a r i f i t i s l o c k e d
from the outside and the deadlock mechanism is activated: the
doors and windows cannot then be opened from the inside.
Locked doors could delay assistance in an emergency, potentially
putting lives at risk.
•
Take care when closing the windows. Careless use of the
windows can cause injuries.
•
For safety reasons, you should only use the remote control
open and close functions within about 2 metres of the vehicle. To
avoid injuries, always keep an eye on the windows when pressing
the button to close them. The windows stop moving as soon as
the button is released.Note
•
The remote control should only be used when the doors and the
front lid are closed.
•
The remote control should not be used when the vehicle is out of
sight.
•
The anti-theft alarm can be accidentally activated and the vehicle
locked if you press the locking button
on the remote control inside
the vehicle before inserting the key in the ignition. If this should
happen by mistake, press the unlocking button
.
•
The convenience open/close function for the windows only
works when the “Convenience open” function is activated in the
menu display ⇒page 24.
Locking and unlocking the vehicle using the key
If the central locking system should fail to operate, the
vehicle can still be locked and unlocked by turning the key
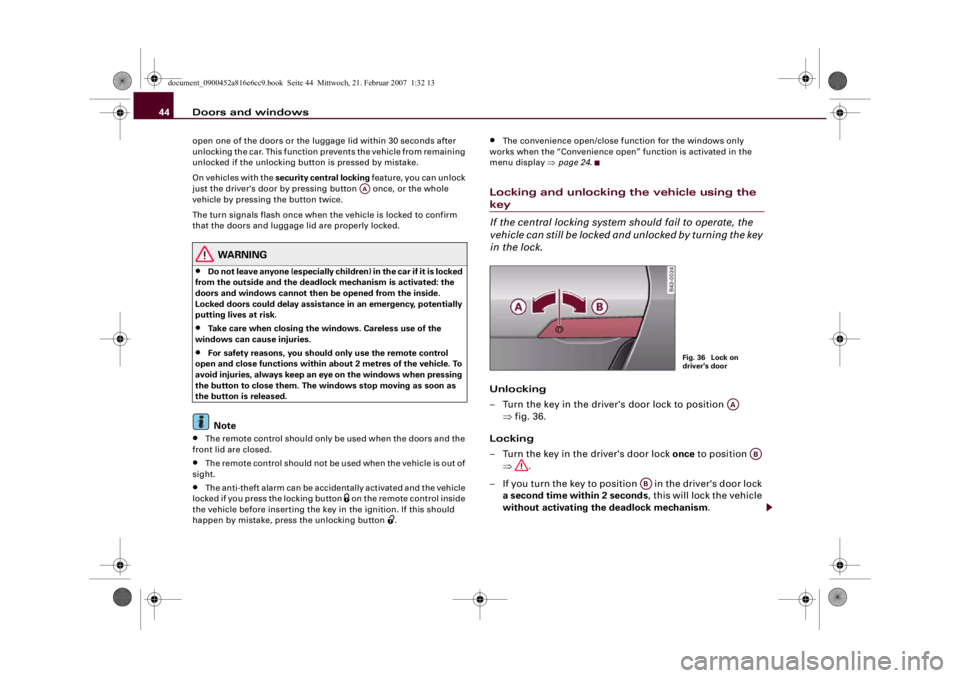
in the lock.Unlocking
– Turn the key in the driver's door lock to position
⇒fig. 36.
Locking
– Turn the key in the driver's door lock once to position
⇒.
– If you turn the key to position in the driver's door lock
a second time within 2 seconds, this will lock the vehicle
without activating the deadlock mechanism.
AA
Fig. 36 Lock on
driver's door
AA
AB
AB
document_0900452a816e6cc9.book Seite 44 Mittwoch, 21. Februar 2007 1:32 13
Page 47 of 210
Doors and windows45
Controls
Safety
Driving tips
General maintenance
Self-help
Technical data
WARNING
Do not leave anyone (especially children) in the car if it is locked
from the outside and the deadlock mechanism is activated: the
doors and windows cannot then be opened from the inside.
Locked doors could delay assistance in an emergency, potentially
putting lives at risk.
Note
•
The deadlock mechanism and the anti-theft alarm cannot be acti-
vated if the central locking is not functioning.
•
However, please note that when you unlock the vehicle with the
key, this only unlocks the mechanical lock on the doors set in the
menu display ⇒page 24.
•
Both doors are automatically locked when you lock the vehicle.
Central locking switch
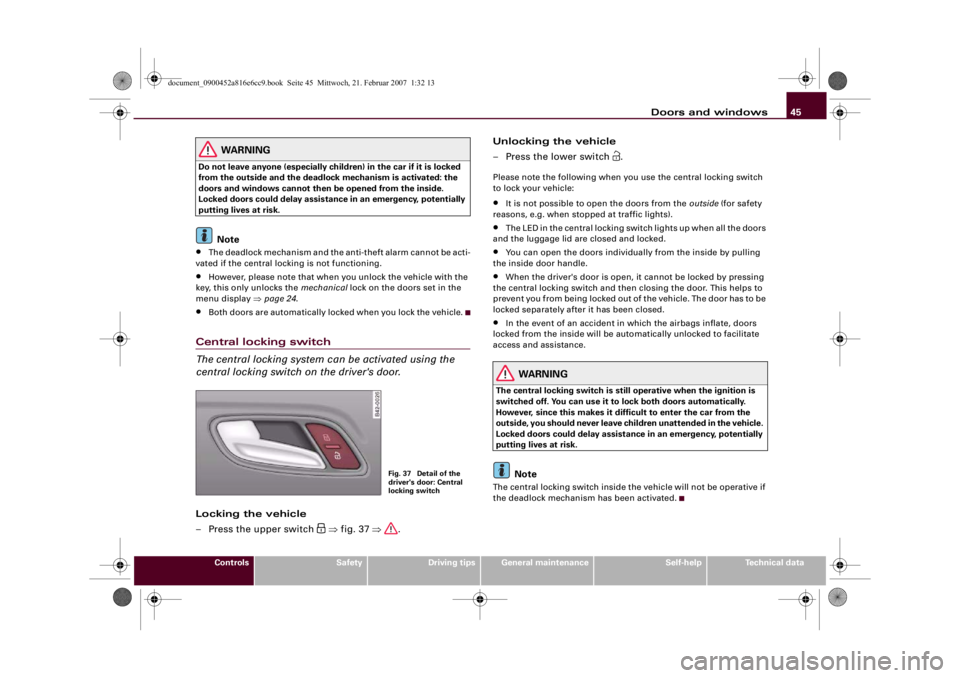
The central locking system can be activated using the
central locking switch on the driver's door.Locking the vehicle
– Press the upper switch
⇒fig. 37 ⇒.Unlocking the vehicle
– Press the lower switch
.
Please note the following when you use the central locking switch
to lock your vehicle:•
It is not possible to open the doors from the outside (for safety
reasons, e.g. when stopped at traffic lights).
•
The LED in the central locking switch lights up when all the doors
and the luggage lid are closed and locked.
•
You can open the doors individually from the inside by pulling
the inside door handle.
•
When the driver's door is open, it cannot be locked by pressing
the central locking switch and then closing the door. This helps to
prevent you from being locked out of the vehicle. The door has to be
locked separately after it has been closed.
•
In the event of an accident in which the airbags inflate, doors
locked from the inside will be automatically unlocked to facilitate
access and assistance.
WARNING
The central locking switch is still operative when the ignition is
switched off. You can use it to lock both doors automatically.
However, since this makes it difficult to enter the car from the
outside, you should never leave children unattended in the vehicle.
Locked doors could delay assistance in an emergency, potentially
putting lives at risk.
Note
The central locking switch inside the vehicle will not be operative if
the deadlock mechanism has been activated.
Fig. 37 Detail of the
driver's door: Central
locking switch
document_0900452a816e6cc9.book Seite 45 Mittwoch, 21. Februar 2007 1:32 13
Page 50 of 210
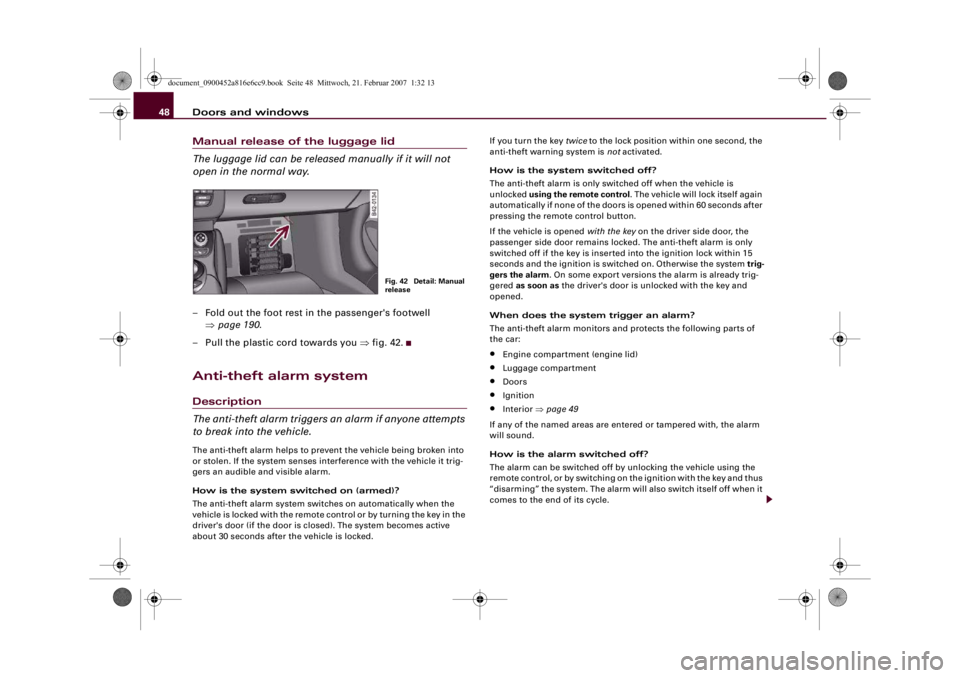
Doors and windows 48Manual release of the luggage lid
The luggage lid can be released manually if it will not
open in the normal way.– Fold out the foot rest in the passenger's footwell
⇒page 190.
– Pull the plastic cord towards you ⇒fig. 42.Anti-theft alarm systemDescription
The anti-theft alarm triggers an alarm if anyone attempts
to break into the vehicle.The anti-theft alarm helps to prevent the vehicle being broken into
or stolen. If the system senses interference with the vehicle it trig-
gers an audible and visible alarm.
How is the system switched on (armed)?
The anti-theft alarm system switches on automatically when the
vehicle is locked with the remote control or by turning the key in the
driver's door (if the door is closed). The system becomes active
about 30 seconds after the vehicle is locked.If you turn the key twice to the lock position within one second, the
anti-theft warning system is not activated.
How is the system switched off?
The anti-theft alarm is only switched off when the vehicle is
unlocked using the remote control. The vehicle will lock itself again
automatically if none of the doors is opened within 60 seconds after
pressing the remote control button.
If the vehicle is opened with the key on the driver side door, the
passenger side door remains locked. The anti-theft alarm is only
switched off if the key is inserted into the ignition lock within 15
seconds and the ignition is switched on. Otherwise the system trig-
gers the alarm. On some export versions the alarm is already trig-
gered as soon as the driver's door is unlocked with the key and
opened.
When does the system trigger an alarm?
The anti-theft alarm monitors and protects the following parts of
the car:
•
Engine compartment (engine lid)
•
Luggage compartment
•
Doors
•
Ignition
•
Interior ⇒page 49
If any of the named areas are entered or tampered with, the alarm
will sound.
How is the alarm switched off?
The alarm can be switched off by unlocking the vehicle using the
remote control, or by switching on the ignition with the key and thus
“disarming” the system. The alarm will also switch itself off when it
comes to the end of its cycle.
Fig. 42 Detail: Manual
release
document_0900452a816e6cc9.book Seite 48 Mittwoch, 21. Februar 2007 1:32 13
Page 51 of 210
Doors and windows49
Controls
Safety
Driving tips
General maintenance
Self-help
Technical data Turn signals
The turn signals flash briefly when the vehicle is locked to confirm
that the doors, the engine lid and the luggage lid are properly
closed and locked.
If the turn signals do not flash, check the doors, engine lid and
luggage lid to make sure they are properly closed. The turn signals
will flash briefly if one of the doors, the luggage lid or the engine lid
is closed after the system has been switched on.
Note
•
To make sure that the alarm is fully operative when leaving the
vehicle, briefly check that all the doors and windows are closed.
•
If the vehicle is unlocked at the driver's door using the key, the
central locking switch only becomes fully functional after the igni-
tion is switched on.
•
The alarm is triggered immediately if one of the battery cables is
disconnected while the alarm system is active.
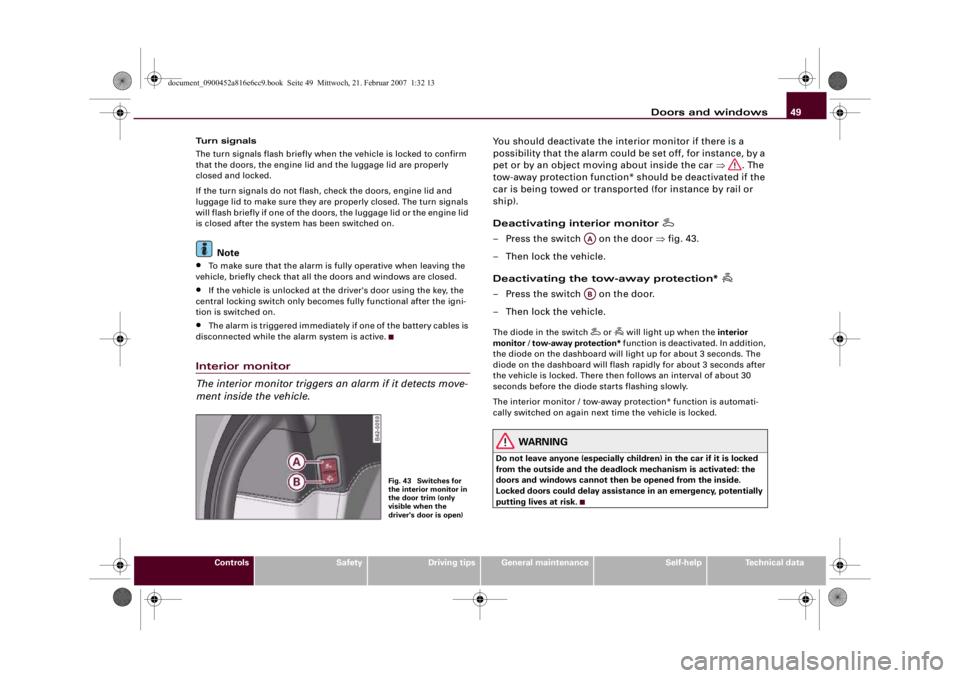
Interior monitor
The interior monitor triggers an alarm if it detects move-
ment inside the vehicle.
You should deactivate the interior monitor if there is a
possibility that the alarm could be set off, for instance, by a
pet or by an object moving about inside the car ⇒. The
tow-away protection function* should be deactivated if the
car is being towed or transported (for instance by rail or
ship).
Deactivating interior monitor
– Press the switch on the door ⇒fig. 43.
– Then lock the vehicle.
Deactivating the tow-away protection*
– Press the switch on the door.
– Then lock the vehicle.The diode in the switch
or
will light up when the interior
monitor / tow-away protection* function is deactivated. In addition,
the diode on the dashboard will light up for about 3 seconds. The
diode on the dashboard will flash rapidly for about 3 seconds after
the vehicle is locked. There then follows an interval of about 30
seconds before the diode starts flashing slowly.
The interior monitor / tow-away protection* function is automati-
cally switched on again next time the vehicle is locked.
WARNING
Do not leave anyone (especially children) in the car if it is locked
from the outside and the deadlock mechanism is activated: the
doors and windows cannot then be opened from the inside.
Locked doors could delay assistance in an emergency, potentially
putting lives at risk.
Fig. 43 Switches for
the interior monitor in
the door trim (only
visible when the
driver's door is open)
AAAB
document_0900452a816e6cc9.book Seite 49 Mittwoch, 21. Februar 2007 1:32 13
Page 194 of 210
Fuses and bulbs 192
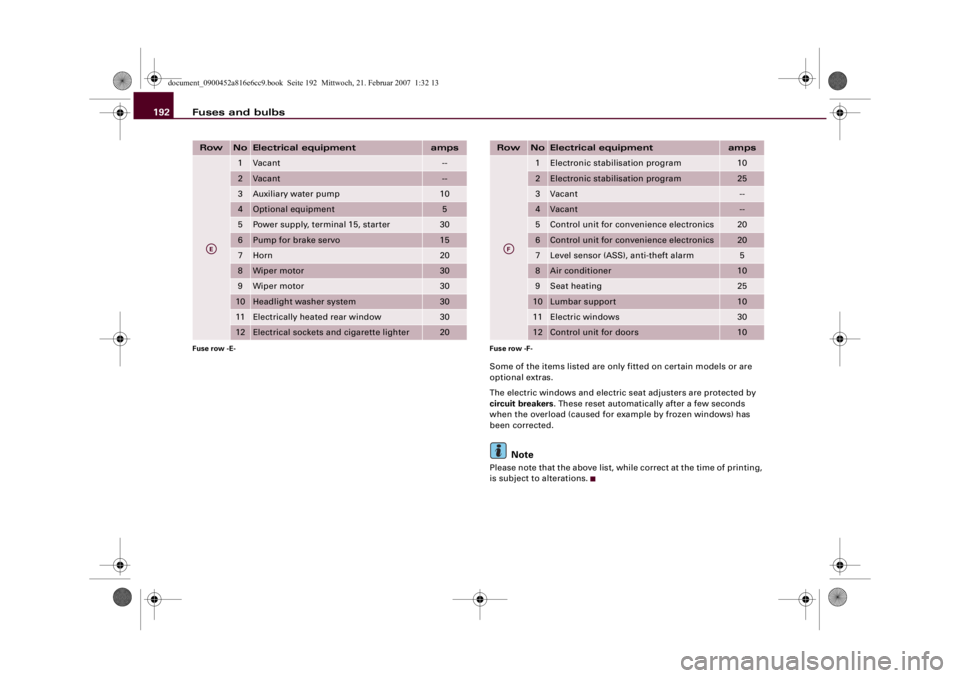
Some of the items listed are only fitted on certain models or are
optional extras.
The electric windows and electric seat adjusters are protected by
circuit breakers. These reset automatically after a few seconds
when the overload (caused for example by frozen windows) has
been corrected.
Note
Please note that the above list, while correct at the time of printing,
is subject to alterations.
Row
No
Electrical equipment
amps
1
Vacant
--
2
Vacant
--
3
Auxiliary water pump
10
4
Optional equipment
5
5
Power supply, terminal 15, starter
30
6
Pump for brake servo
15
7
Horn
20
8
Wiper motor
30
9
Wiper motor
30
10
Headlight washer system
30
11
Electrically heated rear window
30
12
Electrical sockets and cigarette lighter
20
Fuse row -E-
AE
Row
No
Electrical equipment
amps
1
Electronic stabilisation program
10
2
Electronic stabilisation program
25
3
Vacant
--
4
Vacant
--
5
Control unit for convenience electronics
20
6
Control unit for convenience electronics
20
7
Level sensor (ASS), anti-theft alarm
5
8
Air conditioner
10
9
Seat heating
25
10
Lumbar support
10
11
Electric windows
30
12
Control unit for doors
10
Fuse row -F-
AF
document_0900452a816e6cc9.book Seite 192 Mittwoch, 21. Februar 2007 1:32 13
Page 204 of 210
Index 202AABS
SeeAnti-lock brake system . . . . . . . . 132
AC mode
Air conditioner . . . . . . . . . . . . . . . . . . . 79
Acceleration figures
SeePerformance, weights and
dimensions . . . . . . . . . . . . . . . . . . . . 198
Accessories . . . . . . . . . . . . . . . . . . . . . . . . 174
acoustic parking system
SeeParking aid . . . . . . . . . . . . . . . . . . . 85
Air conditioner . . . . . . . . . . . . . . . . . . . . . . 75
AC mode . . . . . . . . . . . . . . . . . . . . . . . . . 79
Air distribution . . . . . . . . . . . . . . . . . . . 77
Air recirculation mode . . . . . . . . . . . . . 78
Automatic mode . . . . . . . . . . . . . . . . . . 78
Blower . . . . . . . . . . . . . . . . . . . . . . . . . . 77
Controls . . . . . . . . . . . . . . . . . . . . . . . . . 75
Defrosting . . . . . . . . . . . . . . . . . . . . . . . 78
Dust filter . . . . . . . . . . . . . . . . . . . . . . . . 75
Heating . . . . . . . . . . . . . . . . . . . . . . . . . . 75
Pollen filter . . . . . . . . . . . . . . . . . . . . . . 75
Rear window heating . . . . . . . . . . . . . . 79
Seat heating . . . . . . . . . . . . . . . . . . . . . 80
Switching on/off . . . . . . . . . . . . . . . . . . 77
Temperature . . . . . . . . . . . . . . . . . . . . . 76
Ventilation . . . . . . . . . . . . . . . . . . . . . . . 75
Air distribution
Air conditioner . . . . . . . . . . . . . . . . . . . 77
Air recirculation mode
Vehicles with air conditioner . . . . . . . . 78Airbag . . . . . . . . . . . . . . . . . . . . . . . . . . . . 115
Deactivating . . . . . . . . . . . . . . . . . . . . . 120
Front airbags . . . . . . . . . . . . . . . . . . . . 116
Key-operated switch for front passenger's
airbag . . . . . . . . . . . . . . . . . . . . . . . . . 120
Side airbags . . . . . . . . . . . . . . . . . . . . . 118
Triggering . . . . . . . . . . . . . . . . . . . . . . 116
Warning lamp . . . . . . . . . . . . . . . . . . . . 17
Alterations to the vehicle . . . . . . . . . . . . . 174
Alternator . . . . . . . . . . . . . . . . . . . . . . . . . . 18
Warning lamp . . . . . . . . . . . . . . . . . . . . 18
Anti-dazzle interior mirror . . . . . . . . . . . . . 63
Anti-freeze additive . . . . . . . . . . . . . . . . . 159
Anti-knock properties of petrol . . . . . . . . 152
Anti-lock brake system . . . . . . . . . . . . . . . 132
Warning lamp . . . . . . . . . . . . . . . . . . . . 19
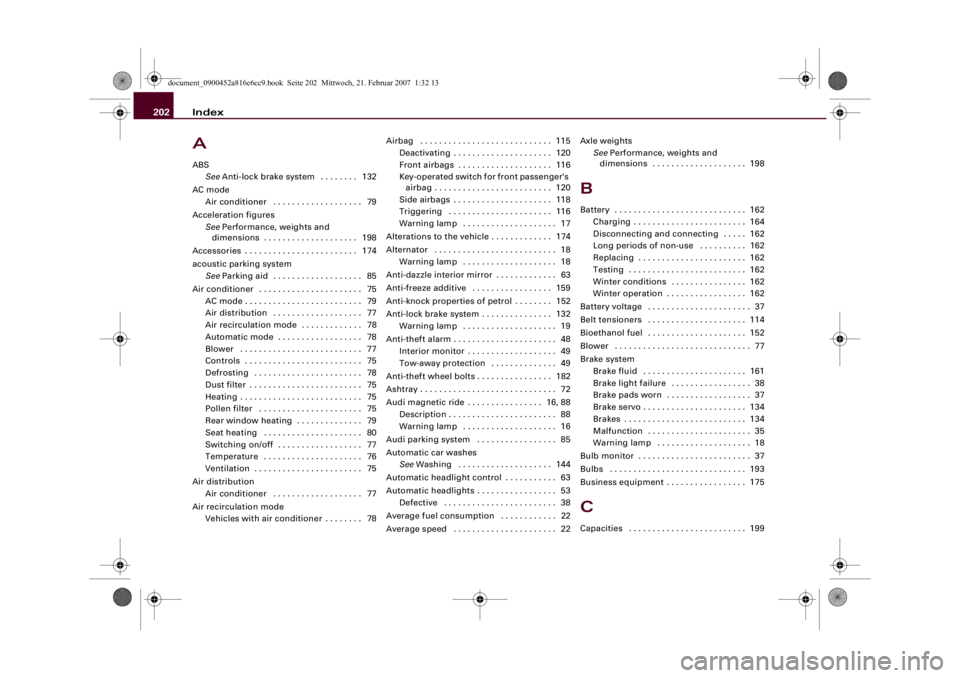
Anti-theft alarm . . . . . . . . . . . . . . . . . . . . . . 48
Interior monitor . . . . . . . . . . . . . . . . . . . 49
Tow-away protection . . . . . . . . . . . . . . 49
Anti-theft wheel bolts . . . . . . . . . . . . . . . . 182
Ashtray . . . . . . . . . . . . . . . . . . . . . . . . . . . . . 72
Audi magnetic ride . . . . . . . . . . . . . . . . 16, 88
Description . . . . . . . . . . . . . . . . . . . . . . . 88
Warning lamp . . . . . . . . . . . . . . . . . . . . 16
Audi parking system . . . . . . . . . . . . . . . . . 85
Automatic car washes
SeeWashing . . . . . . . . . . . . . . . . . . . . 144
Automatic headlight control . . . . . . . . . . . 63
Automatic headlights . . . . . . . . . . . . . . . . . 53
Defective . . . . . . . . . . . . . . . . . . . . . . . . 38
Average fuel consumption . . . . . . . . . . . . 22
Average speed . . . . . . . . . . . . . . . . . . . . . . 22Axle weights
SeePerformance, weights and
dimensions . . . . . . . . . . . . . . . . . . . . 198
BBattery . . . . . . . . . . . . . . . . . . . . . . . . . . . . 162
Charging . . . . . . . . . . . . . . . . . . . . . . . . 164
Disconnecting and connecting . . . . . 162
Long periods of non-use . . . . . . . . . . 162
Replacing . . . . . . . . . . . . . . . . . . . . . . . 162
Testing . . . . . . . . . . . . . . . . . . . . . . . . . 162
Winter conditions . . . . . . . . . . . . . . . . 162
Winter operation . . . . . . . . . . . . . . . . . 162
Battery voltage . . . . . . . . . . . . . . . . . . . . . . 37
Belt tensioners . . . . . . . . . . . . . . . . . . . . . 114
Bioethanol fuel . . . . . . . . . . . . . . . . . . . . . 152
Blower . . . . . . . . . . . . . . . . . . . . . . . . . . . . . 77
Brake system
Brake fluid . . . . . . . . . . . . . . . . . . . . . . 161
Brake light failure . . . . . . . . . . . . . . . . . 38
Brake pads worn . . . . . . . . . . . . . . . . . . 37
Brake servo . . . . . . . . . . . . . . . . . . . . . . 134
Brakes . . . . . . . . . . . . . . . . . . . . . . . . . . 134
Malfunction . . . . . . . . . . . . . . . . . . . . . . 35
Warning lamp . . . . . . . . . . . . . . . . . . . . 18
Bulb monitor . . . . . . . . . . . . . . . . . . . . . . . . 37
Bulbs . . . . . . . . . . . . . . . . . . . . . . . . . . . . . 193
Business equipment . . . . . . . . . . . . . . . . . 175CCapacities . . . . . . . . . . . . . . . . . . . . . . . . . 199
document_0900452a816e6cc9.book Seite 202 Mittwoch, 21. Februar 2007 1:32 13