AUDI R8 SPYDER 2012 Owners Manual
Manufacturer: AUDI, Model Year: 2012, Model line: R8 SPYDER, Model: AUDI R8 SPYDER 2012Pages: 236, PDF Size: 59.24 MB
Page 161 of 236
Plastic parts and imitation leather
You can clean plastic parts and imitation
leather with a damp cloth . If this does not re
move the dirt, you can treat these parts only
with specia l
solvent-free plastic cleaning and
care products.
A WARNING
So lvents can change the properties of
some plast ics and make it harder for the
airbag to dep loy.
-
- Never clean the instrument panel or the
surface of Airbag modules with cleaning
products that contain solvents.
- Products containing solvents w ill make
the surface of this part porous.
- Serious injur ies can result if plastic parts
come loose when the airbag is deployed.
- Always read and heed all WARNINGS and
the informat ion
c::;,page 153.
(D Note
Clean ing agents containing solvents will
attack the material and can change the
way it behaves.
Carbon-fiber parts
Applies to vehicles: with carbo n-fiber parts
The carbon-fiber parts of your vehicle have a
pa inted surface. They do not require any spe
cial care and are cleaned like plast ic parts
¢pag e 159.
Fabrics and fabric coverings
Fabrics and fabr ic coverings (e.g. seats, door
trim panels, etc.) should be cleaned at regular
intervals with a vacu um cleaner. This removes
surface dirt particles which could become em
bedded in the fabric through use. Steam
cleaners shou ld not be used, because the
steam tends to push the dirt deeper into the
fabric and lock it there.
Cleaning and protection 159
Normal cleaning
Generally, we recommend using a soft sponge
or a lint-free microfiber cloth to the clean fab
ric. Brushes shou ld only be used for carpets
and floor mats, since other fabric surfaces could be harmed by brushes.
Normal surface stains can be cleaned using a
commercially available foam cleaner . Spread
the foam on the s urface of the fabric with a
soft sponge and work it in gently. Do not satu
rate the fabric. Then pat the foam dry using
absorbent, dry cloths (e.g. m icrofiber cloth)
and vacuum it after it has dried completely.
Cleaning stains
Stains caused by beverages (e.g. coffee, fruit
juice , etc.) can be treated with a mild deter
gent solution. Apply the detergent solution
with a sponge . In the case of stubborn stains,
a detergent paste can be applied directly to
the stain and worked into the fabric. After
wards, use copious amounts of clean water to
remove the remaining deterge nt. Apply the
water with a damp doth or sponge and pat
the fabric dry with an absorbent, dry cloth .
Stains from chocolate or makeup should have
detergent paste (e.g. ox-gall soap) rubbed in
to them. Afterwards, remove the soap with
water (damp sponge) .
Alcohol can be used to treat stains from
grease, oil, lipstick or a ballpoint pen. Melted
grease or dye must be patted off using ab
sorbent materia l.
It may be necessary to re
treat the areas with detergent paste and wa
ter.
In the case of general soiling of the upho ls
tery and cover material, we recommend hiring
a specia list t hat has the equipment to clean
the seat covers and other fabr ic surfaces by
shampooing and spray extraction.
A WARNING
Always read and heed all WARNINGS and
the information
c::;, page 153.
•
•
Page 162 of 236
160 Cleaning and protection
Open Velcro fasteners on your clothing can
damage the seat cover. Please make sure
that Velcro fasteners are closed.
Natural leather
App lies to vehicles: with natura l leather
Audi makes great efforts to maintain the
properties, natural look and feel of interior leather.
General
We offer many different types of leather on
our vehicles. Most are different types of nappa
leather, which has a smooth surface and
comes in various colors.
The intensity of the color determines the visu
al characteristics and appearance . If the sur
face of the leather has a typical natural look,
then the leather is a nappa leather that has
been left in a relatively natural condition. This
leather offers particularly good comfort and
breathes well. Fine veins, closed grains, insect
bites, skin folds, and subtle variations in color
remain visible. These characteristics demon
strate that the material is natural.
Natural nappa leather is not covered by a col
or finish.
It is therefore more sensitive to soil
ing and wear, which is something you need to
consider if children, animals or other factors
might prove to be particularly hard on the
l eather.
By contrast, leather types that are covered by
a colored finish layer are more durable. This
has a positive effect on the leather's resist
ance to wear and soiling in daily use. On the
other hand, the typical characteristics of natu
ral leather are barely or not apparent. Howev
er, this does not mean that the leather itself is of inferior quality.
Care and handling
Because of the exclusive nature of the types of
leather that Audi uses and their unique prop
erties (such as sensitivity to oils, grease, soil ing, etc.), you will need to be somewhat care- ful
with these leathers, and a certain type of
care is required . For example, dark clothing
materials can discolor leather seats (especial
ly if such clothing is damp and was not dyed
correctly). Dust and dirt particles in pores,
folds, and seams can have an abrasive effect and can damage the leather surface as well as
weaken seams .
The leather should be cleaned regularly as needed. After having been used for a relatively
long time, your leather seats will acquire a
rich aged finish. This is a characteristic of nat
ural leather and a sign of true quality.
In order to maintain the value of this natural
product over the life of your vehicle, you
should follow the recommendat ions below:
(D Note
- To keep your leather from bleaching out,
do not allow it to be exposed to bright
sunlight for long periods of time. If you
have to leave the vehicle parked outside
for long periods, cover the leather to protect it from direct exposure to sun
light.
- Sharp objects on clothing, such as zip
pers, rivets or sharp pieces on belts can
leave permanent scratches or scrape
marks on the surface of the leather .
(D Tips
-After each time you clean the leather and
at regular intervals, use a leather preser
vative creme that contains UV-blockers
and that works into the leather. This
creme will nourish and moisturize the
leather, helping it to breathe and stay
supple .
It also helps to build up a protec
tive coating on the surface.
- Clean the leather every 2 -3 months,
and clean any areas that get soiled .
- Remove fresh marks made by ballpoint
pens, ink, lipstick, shoe polish, etc. as
soon as possible.
- Preserve the color of the leather as need
ed by using a spec ial colored leather care
creme to touch up areas of uneven color .
Page 163 of 236
Cleaning and caring for leather
upholstery and trim
Applies to vehicles: with natu ral leather
Natural leather requires special care and at
tention.
Norm al cleaning
.,. Cle an soiled areas w it h a slightly mo istened
cotton or woolen cloth .
More stubb orn d irt
.,. More stubborn dirt can b e re moved using a
cloth saturated with a m ild soap so lution (2
tablespoons m ild liquid soap).
.,. Never allow the soap solution to saturate
the leather, and make certa in that no water
soaks into the seams .
.,. Wipe off the soap solut ion with a soft, dry
clo th .
Cl eaning spots
.,. Remove fresh wa ter-b ased spots (such as
coffee, tea, ju ices, blood) w ith an absorbent
cloth or paper towel.
.,. Remove fresh
gr ease or o il-based spot s
(such as b utter, mayonnaise , chocolate) wi th
an absorbent cloth or paper towe l, or use
the cleaner from the leather care kit if the
spot has not yet p enetrated into the surface
of the leathe r.
.,. Use an oil/grease dissolv ing spray, if
oil /
gr ease spot s hav e dr ied on.
.,. Remove spec ific kinds of spots (ballpo int
pen, felt marker, fingernail polish , water
based paint, shoe polish, etc.) with a spot
remove r spec ifi cally formulated for leather .
Leather care
.,. Every half year use an approved leather care
product (ava ilable from your authorized Au
di dealer) to care for the leather .
.,. Apply the p roduct very spa ring ly.
.,. Wipe it off wi th a damp cloth .
If you have any questions about cleaning and
car ing for the leather in your vehicle, it is best
to contact your author ized Audi dealer, who
will be glad to help you and tell you about our
fu ll range of leather care products, s uch as:
Cleaning and protec tion 16 1
-Leather cleaning and care kit
- Cremes to care for colored leather
- Spot removers for ballpoint pens, shoe pol-
ish, etc.
- Oi l/grease d issolving spray
- New and upcom ing products .
A WARNING
Always read and heed all WARNINGS and
the information
r:!vpage 153.
@ Note
- Never use chemical so lvents (e .g . lighter
fluid, tu rpentine), waxes, shoe polish or
sim ilar products on the leather surfaces
in your Audi.
- To avoid damage, have stubbo rn sta ins
removed by a comme rcial clean ing spe
c ialist.
Cleaning Alcantara ® (synthetic suede)
App lies to vehicles: wit h Alcantara upholstery
Removing dust and dirt
.,. Mois ten a cloth , squeeze out excess water
and wipe down the seat surfaces.
Removing stains
.,. Moisten a cloth with lukewarm wate r or
w ith d iluted
e th yl (rubbing ) alcohol.
.,. Dab at the stain . Start at the outs ide and
work i nwards .
.,. Once the sta in is no longer v is ible , use a
soft dry cloth or tissue to soak up the mo is
ture.
Do no t use leather cleaning prod ucts on A l
cantara .
You may use a suitab le shampoo for remov ing
dust and di rt.
Dust and gr it in the pores and seams can
scratch and damage the surface .
If the car is
left stand ing in the sun for long per iods, the
Alcanta ra covers should be protected aga inst
direc t sun light to prevent it from fad ing.
Slight co lor va riations will develop in normal .,.. •
•
Page 164 of 236
162 Cleaning and protection
use and are not an indication of material
deterioration.
(U;) Note
- Never use chemical solvents (e.g. lighter
fluid , turpentine), waxes, shoe polish or
similar products on Alcantara ® surfaces.
- To avoid damage, have stubborn stains
removed by a commercial cleaning spe
cialist.
- Do not use brushes, stiff sponges or sim ilarly abrasive cleaning aids.
Safety belts
Heavily soiled safety belts may not retract
properly.
• Keep belts clean.
• For cleaning, use a mild soap and water sol
ution. Let belts dry thoroughly and away
from direct sunlight.
• Do not allow inertia reel safety bel ts to re
tract before they are completely dry.
• Check the condition of your safety belts
reg
ularly .
_& WARNING
Damaged safety belts can break in a crash.
- Anything that might damage your safety
belts could mean that you and your pas
sengers would not be adequately pro
tected in an accident.
- Safety belt performance depends on cor
rect installation. Never remove belts
from the vehicle to clean them.
- Do not use chemical cleaning agents,
bleach or dyes. They have corrosive prop
erties which weaken the webbing.
- When cleaning your safety belts, inspect
them for damage. If you discover dam
age, see your authorized Audi dealer.
- Always read and heed all WARNINGS and
the information
¢page 153.
1) Use o nly the co rrect cle anin g so lu ti on s. Never use gas
o lin e or die se l fuel.
Engine compartment
Be especially careful when cleaning the en
gine compartment.
Corrosion protection
The engine compartment and transmission
have been corrosion-protected at the factory.
Good anti-corrosion treatment is very impor
tant, particularly in the winter.
If the vehicle
is frequently driven on salt treated roads, the
entire engine compartment and plenum panel
should be thoroughly cleaned at the end of
winter and retreated to prevent salt damage .
At the same time, the underside of the vehicle should be washed as well.
If the engine compartment is cleaned at any
time with grease removing solutions
1> , or if
you have the engine washed, the anti-corro sion treatment is almost always removed as
well.
It is therefore essential to have a long
lasting corrosion protection reapplied to all
surfaces, seams, joints and components in the
engine compartment.
A WARNING
Be aware: The engine compartment of any
motor vehicle is a potentially hazardous
area.
- Before working in the engine compart
ment, be sure to read the information
¢page 169.
-Before reaching into the front plenum
panel, always remove the ignition key .
Otherwise, the windshield wiper system
could unintentionally be switched on,
possibly causing personal injury from the
moving wiper linkage.
- Never reach into the area around or
touch the radiator fan. The auxiliary fan
is temperature controlled and can switch
on suddenly- even when the ignition is
off.
Page 165 of 236
-Do not wash, wax or dry the engine with
the engine running. Moving or hot parts
could injure you.
- Do not clean the underside of the chas
sis, fenders, wheel covers, or other hard
to reach parts w ithout protecting your
hands and arms. You may cut yourself on
sharp-edged metal parts .
- Always read and heed all WARNINGS and
other information
~ page 153 .
Cleaning and protec tion 163
•
•
Page 166 of 236
164 Fuel supply and filling your fuel tank
Fuel supply and filling
your fuel tank
Gasoline
Fuel supply
Using the right fuel helps keep the environ
ment clean and prevents engine damage .
Fuel recommendation
The fuel recommended for your vehicle is un
lead ed premium
grade gasoline . See also
¢ page 217, Data. Audi recommends using
TOP TIER Detergent Gasoline with a minimum
octane rating of 91 AK I (95 RON). For more
information on TOP TI ER Detergent Gasoline,
p lease go to the officia l website (www.toptier
gas.com).
The recommended gasoline octane rating for
your engine can also be found on a label locat
ed on the inside of the fuel filler flap. This rat
ing may be specified as AKI or RON.
Your veh icle may also be operated using un
l eaded regular gasoline with a minimum oc
tane rating of 87 AKI/91 RON. However, using
87 AKI/91 RON octane fuel wi ll slightly re
duce engine performance.
Use unleaded gasoline only. Unleaded gaso
line is available throughout the USA, Canada ,
and in most European countries . We recom
mend that you do not take your vehicle to
areas or countries where unleaded gasoline
may not be available.
F or more information on refueling your vehi
cle, see
¢ page 165.
Octane rating
Octane rating ind icates a gasoline's ability to
resist engine damaging "knock" caused by
premature ign ition and detonation. Therefore,
buying the correct grade of gasoline is very
important to help prevent possible engine
damage and a loss of engine performance.
Gasoline most commonly used in the United
States and Canada has the following octane r
atings that can usually be found on the fi ller
pump:
- Premium Grade: 91 -96 AKI
- Regular Grade: 87 -90 AKI
Explanation of the abbreviations:
AKI = Anti Knock Index= (R+M)/2 = (RON
+MON )/2
RON= Research Octane Number
MON = Motor Octane Number .
(D Note
-Do not use any fuel w ith octane ratings
lower than 87 AKI or 91 RON otherwise
expensive engine damage will occur.
- Do
not use leaded gasoline! The use of
leaded gasoline w ill severely damage
your vehicle's catalytic converter and its
ability to control exhaust emissions.
Blended gasoline
Use of gasoline containing alcohol or
MTBE (methyl tertiary butyl ether)
You may use unleaded gasoline blended with
alcohol or MTBE (commonly referred to as
oxygenates) if the blended mixture meets the
following criteria:
Blend of gasoline methanol (wood alcohol or
methyl alcohol)
-Anti -knoc k index must be 87 A KI or higher.
- Blend must contain no more than 3% meth-
anol.
- Blend must contain more than 2% co-sol-
vents .
Blend of gasoline and ethanol (grain alcohol
or ethyl alcohol)
-Anti -knock index must be 87 AKI or higher.
- Blend must not contain more than 10%
ethanol.
Blend of gasoline and MTBE
-Anti-knock index must be 87 AKI or higher. ll-
Page 167 of 236

-Blend must contain not more than 15%
MTBE.
Seasonally adjusted gasoline
Many gasoline grades are blended to perform
espec ially we ll for winter or summer driving.
During seasonal change-over, we suggest that
you fill up at busy gas stat ions where the sea
sonal adjustment is more likely to be made in
time .
(D Note
-Methanol fuels which do not meet these
requirements may cause corrosion and
damage to plastic and rubber compo
nents in the fuel system .
- Do not use fue ls that fail to meet the
specified criter ia in this chapter.
- If you are unable to determine whether
or not a particular fue l blend meets the
specifications, ask your service station or
its fuel supp lier.
- Do not use fuel for which the contents
cannot be identified.
- Fuel system damage and performance
problems resulting from the use of fuels
different from those specified are not
the responsibility of Audi and are not
covered under the New Vehicle or the Emission Control System Warranties.
- If you experience a loss of fuel economy
or driveability and performance prob l ems due to the use of one of these fuel
blends, we recommend that you switch
to unblended fuel.
Gasoline additives
A major concern among many auto manufac
turers is carbon deposit build- up caused by
the type of gasoline you use.
Although gasoline grades differ from one manufacturer to another , they have certain
things in common. All gasoline grades contain
substances that can cause deposits to collect
on vital engine parts, such as fuel injectors
and intake valves. Although most gasoline brands include additives to keep engine and
Fuel supply and filling your fuel tank 165
fuel systems clean, they are not equally effec
tive .
A udi recommends using TOP TIER Detergent
Gasoline. For more info rmation on TOP TIER
Detergent Gasoline, please go to the official
website (www.toptiergas.com).
After an extended period of using inadeq uate
fuels, built-up carbon deposits can rob yo ur
engine of peak performance.
Q) Note
Damage or malf unct ion due to poor fue l
quality is not covered by the Aud i New Ve
hicle Limited Warranty.
Fuel tank
Fuel filler neck
The fuel filler neck is located on the right rear
side panel behind the fuel fille r flap.
If the unlocking system should fail, you can
still open the flap manually -for detailed in
structions see
¢ page 167.
You can find the fuel tank capacity of your ve hicle in
Technical Data ¢ page 217.
The label on the inside of the fuel fi ller flap
tells you the correct fue l for your vehicle. For
more information about fuel specifications,
see
¢ page 164.
Your vehicle fue l tank has an on -board refue l
ing vapor recovery system. This feature helps
to prevent fuel vapors from escaping from the
tank and polluting the environment while you refuel your vehicle . In order to fill the tank
properly while protecting the environment,
please fo llow this refueling procedure careful
ly.
_&. WARNING
Under normal operating conditions, never
carry additional fuel containers in your car.
Gas canisters and other containers used to
transport f uel can be dangero us. Such con
tainers, full or empty, may leak and could
cause a fire in a collision. If you must
•
•
Page 168 of 236
166 Fuel suppl y and filli ng your fuel t ank
transport fue l to use for your lawn mower,
snow blower, etc., be very careful and al
ways observe local and state laws regard
ing the use, transportat ion and storage of
such fuel containers. Make certain the con
tainer meets industry standards (ANSI/
AS TM F852 -86).
(D Note
Never drive your vehicle until the fuel tank
is completely dry. The irregular supply of
fuel can cause misfir ing. Gasoline cou ld
e nte r into the exhaust system and damage
the cata lytic conve rter.
Refueling
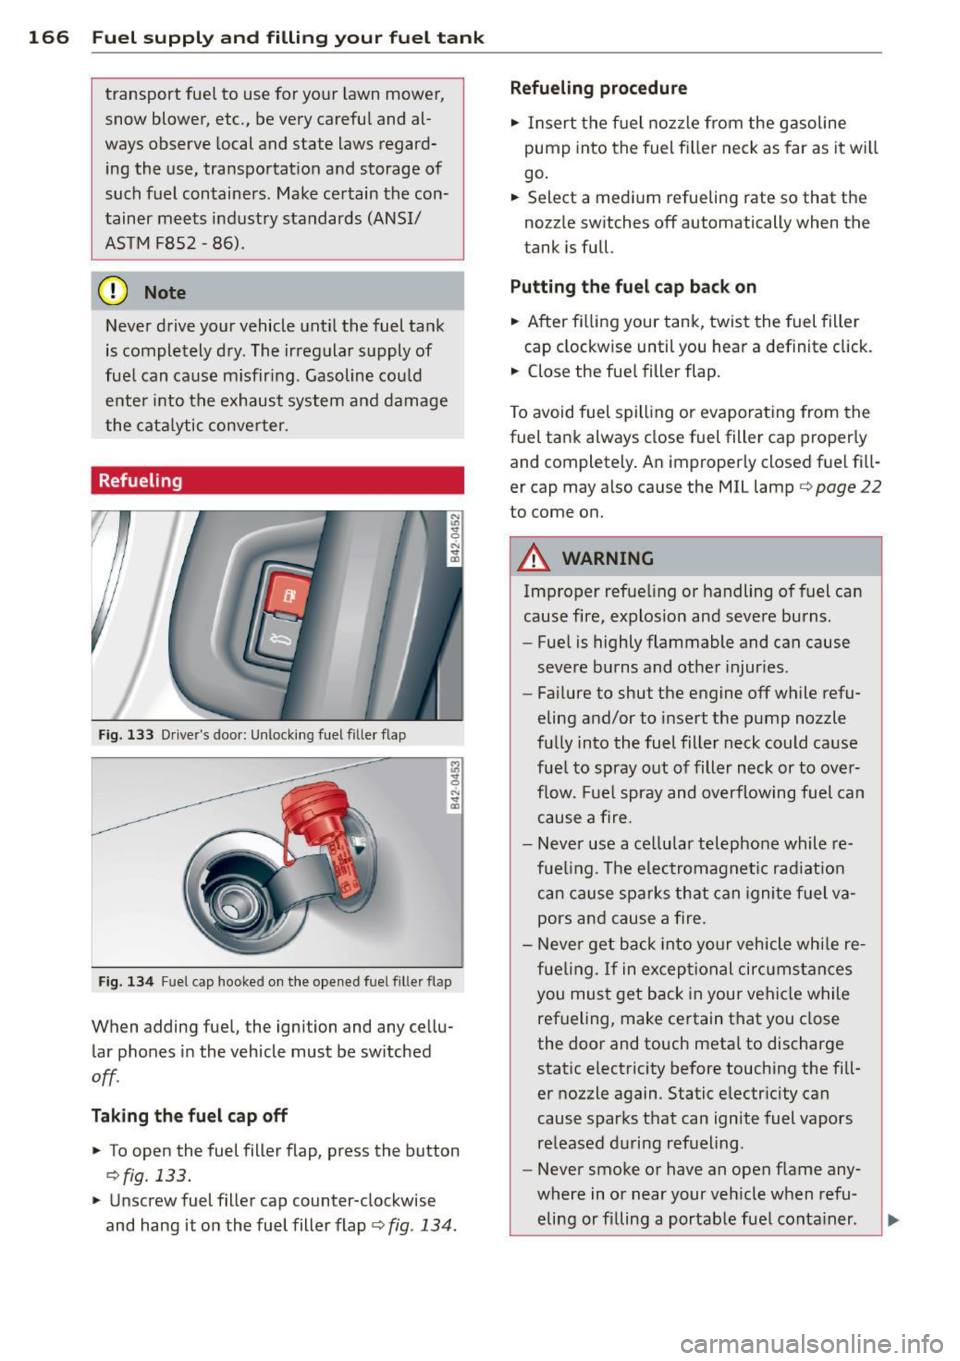
Fig. 133 D river 's doo r: Unlocki ng fuel filler flap
Fig. 134 Fuel cap hooked on the opened fuel filler flap
When adding fuel, the ignition and any cellu
lar phones in the vehicle must be sw itched
off .
Tak ing th e fuel cap off
• To open the fuel filler flap, press the button
9fig. 133.
• Unscrew fuel filler cap counter-clockwise
and hang it on the fuel filler flap ¢
fig. 134 .
Refueling procedure
• Insert the f uel nozzle from the gasoline
pump into the fuel fi ller neck as far as it wi ll
go .
• Select a med ium refueling rate so that the
nozzle switches off automatically when the
tank is full.
Putting th e fu el cap bac k on
• After fi lling your tank, twist the fuel filler
cap clockwise until you hear a definite click.
• Close the fue l filler flap.
T o avoid fuel spilling or evaporating from the
fuel tank always close fuel filler cap properly and completely. An improperly closed fuel fi ll
er cap may also cause the MIL lamp¢
page 22
to come on.
A WARNING
Improper refue ling or handling of fuel can
cause fire, explosion and severe burns.
- Fuel is highly flammable and can cause
severe burns and other injuries.
- Fai lure to shut the engine off while refu
eling and/or to insert the pump nozzle
fully into the fuel filler neck could cause
fuel to spray out of filler neck or to ove r
flow. F ue l spray and overflowing fuel can
cause a fire.
- Never use a ce llular telephone while re
fue ling. The electromagnet ic rad iat io n
can cause spa rks that can igni te fuel va
pors and cause a fire.
- Never get back into your vehicle whi le re
fue ling.
If in exceptio nal circumstances
you must get back in your vehicle while
ref ueling, make certain that you close
the door and touch metal to discharge
static electricity before touching the fill
er nozzle again. Static electricity can
cause sparks that can ignite fuel vapors
re leased d uring refueling .
- Never smoke or have an open f lame any
where in o r near your veh icle when refu
eling or filling a portable fue l conta iner.
Page 169 of 236
-For your safety, we strongly recommend
that you do not travel with a portable
fuel container in your vehicle. The con
tainer, full or empty may leak and could
cause a fire , especially in a crash .
-If, under exceptional circumstances, you
must transport a portable fuel container,
please observe the following:
- Never fill a portable fuel container
while it is anywhere in or on the vehicle (for example, in the luggage compart
ment, or on the trunk) . Static electrici
t y can build up while filling and can ig
nite fuel vapors causing a fire .
- Always place a portable fuel container
on the ground before filling .
- Always keep the filler nozzle complete
ly inside the portable container before
and during filling.
- If filling a portable container made of
metal, the filler nozzle must always be
in contact with the container . This will
help prevent static electricity from dis
charging and cause a fire.
- Never spill fuel inside the vehicle or
luggage compartment. Fuel vapors are
highly flammable.
- Always observe local and state/provin
cial laws regarding the use, storage
and transportation of fuel containers
- Make certain the fuel container meets
industry standards (ANSI/ ASTM
F852-86).
(D Note
I f any fuel has spilled onto the car, it
should be removed immediately to prevent
damage to the paint.
@ For the sake of the environment
As soon as the correctly operated nozzle switches off automatically for the first
time, the tank is full. Do not try to add
more fuel because fuel may spill out. In
addition, the expansion space in the fuel
tank will be filled -causing the fuel to
Fuel supply and filling your fuel tank 167
overflow when it becomes warm and pol
lute the environment.
a) Tips
- Running your engine while refueling may
cause vapors to escape or even fuel to
spill out of the tank. This would then
shut off the fuel nozzle before the tank
is full.
- Do not refuel your vehicle with the igni
tion switched on. The fuel gauge may
otherwise not indicate the correct fuel
level after refueling .
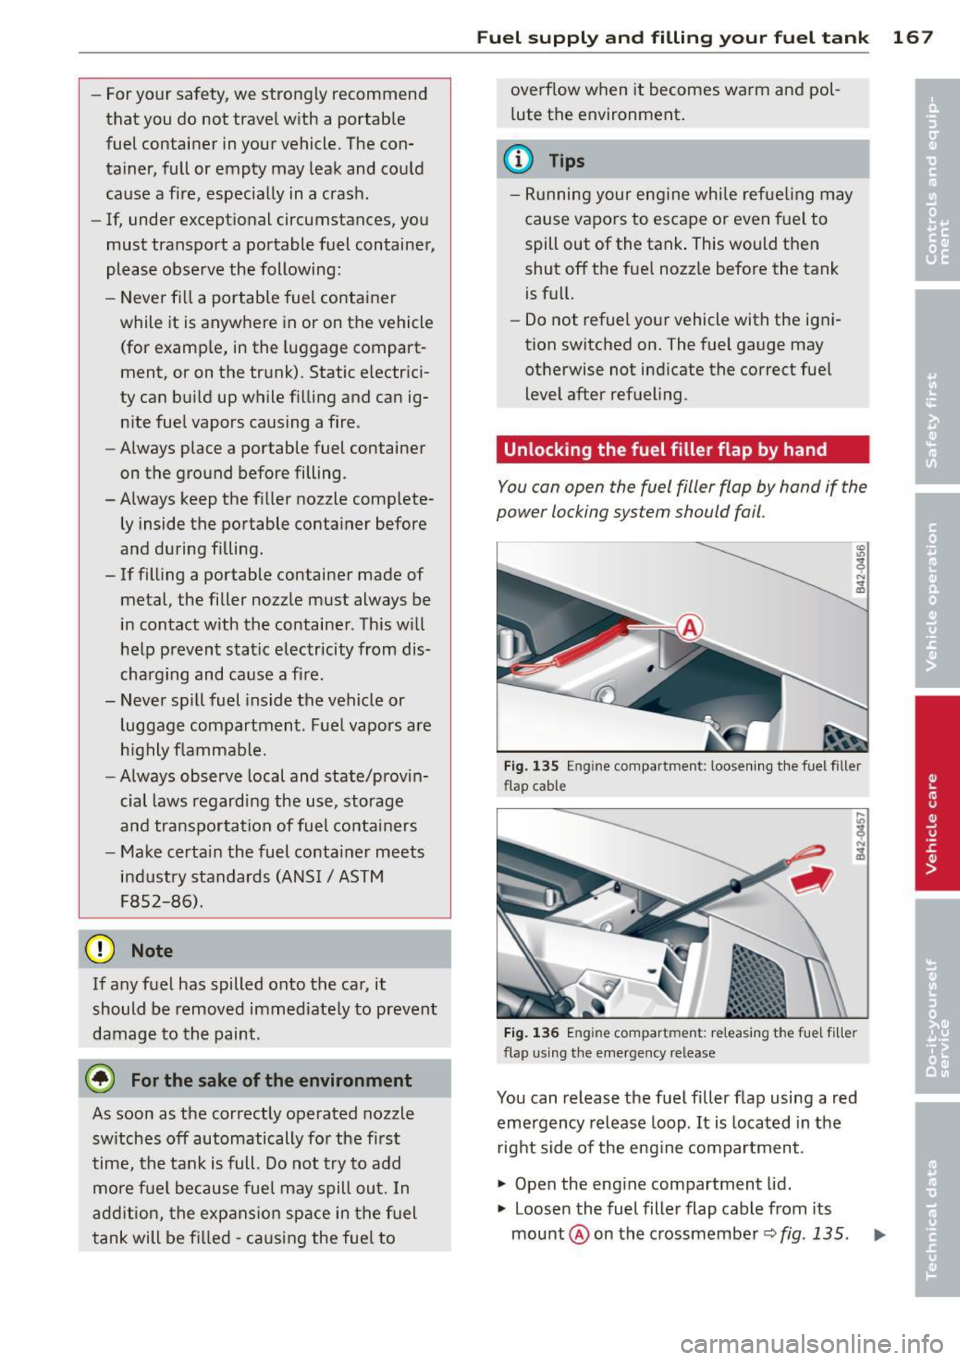
Unlocking the fuel filler flap
by hand
You can open the fuel filler flap by hand if the
power locking sy stem should fail .
Fig. 135 En gin e compar tment: loo sening the fue l fill er
fl ap cab le
Fig. 136 Engine compar tment: re lea sing the fuel fille r
flap using the emer gen cy re le ase
You can release the fuel filler flap using a red
emergency release loop .
It is located in the
right side of the engine compartment.
.. Open the engine compartment lid.
.. Loosen the fuel filler flap cable from its
mount @ on the crossmember
~ fig. 135 . liJJ,,
Page 170 of 236
168 Fuel supply and filling your fuel tank
• Pull the red loop in the direction of the ar
row until the fuel filler flap opens
¢fig. 136 .
• Once the fue l filler f lap is open, secure the
cable on the crossmember again.
• Close the engine compa rtment lid
¢ page 170 .