check engine AUDI R8 SPYDER 2012 Owner's Guide
[x] Cancel search | Manufacturer: AUDI, Model Year: 2012, Model line: R8 SPYDER, Model: AUDI R8 SPYDER 2012Pages: 236, PDF Size: 59.24 MB
Page 181 of 236
Winter operation
The cold time of year places a special strain on
the battery, resulting in reduced starting pow
er. So before the cold weather starts, have the battery inspected and charged as necessary.
A WARNING
-All work on the battery requires technical knowledge. Please contact an authorized
Audi dealer or another authorized facility
for questions about the battery -danger
of acid burns and explosion hazard!
- The battery must not be opened! Do not try to change the battery's liquid level,
otherwise detonating gas will escape
from the battery- explosion hazard!
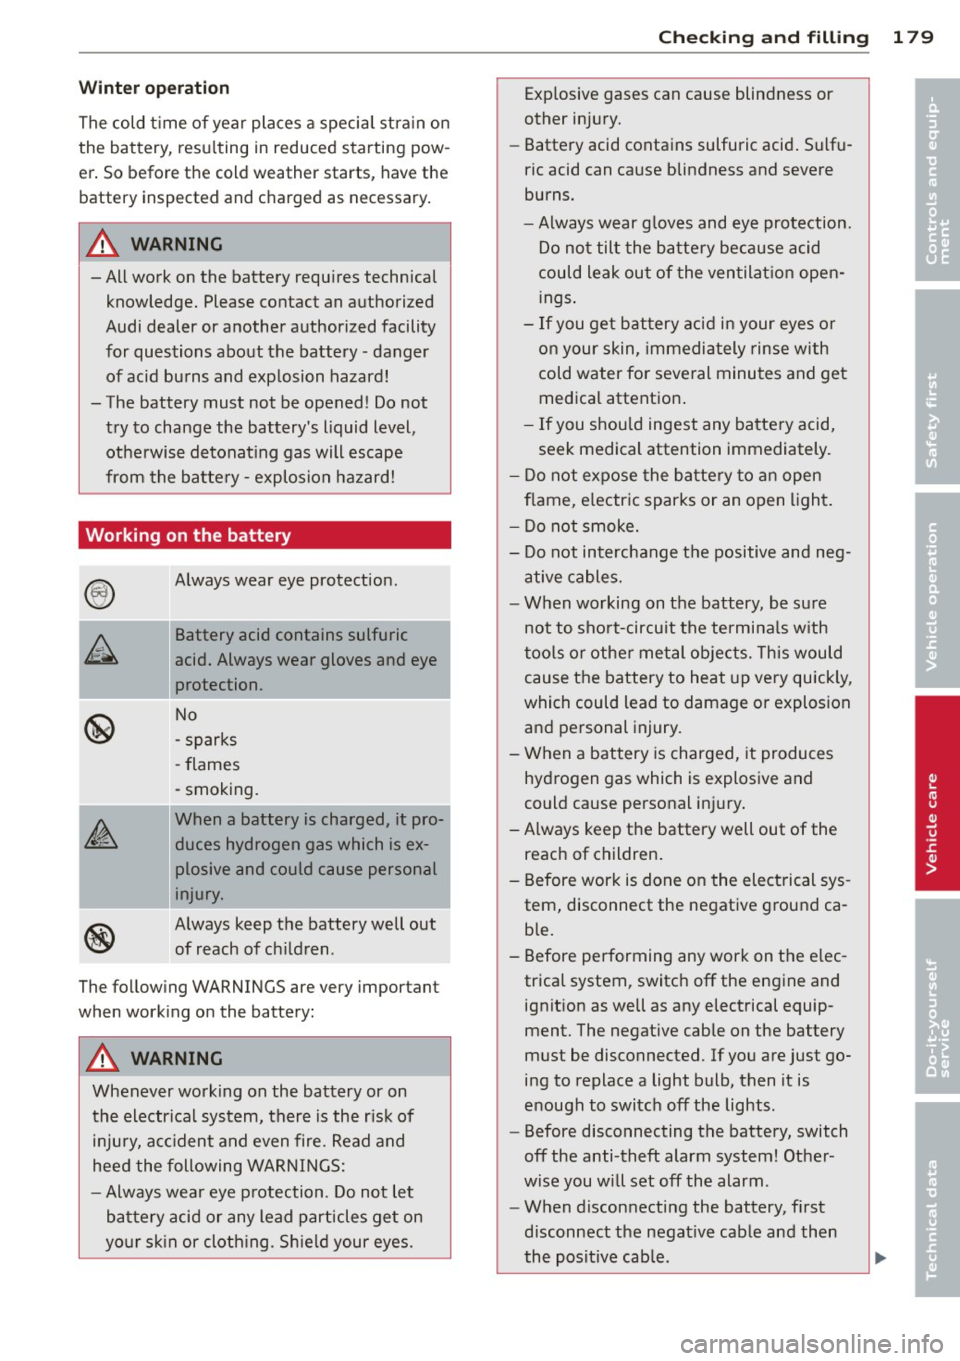
Working on the battery
®
~
I
@
®
Always wear eye protection.
Battery acid contains sulfuric
acid. Always wear gloves and eye
protection.
No
- sparks
- flames
- smoking.
When a battery is charged, it pro
duces hydrogen gas which is ex plosive and could cause personal
injury.
Always keep the battery well out
of reach of children.
The following WARNINGS are very important
when working on the battery:
A WARNING
Whenever working on the battery or on
the electrical system, there is the risk of injury, accident and even fire. Read and
heed the following WARNINGS:
- Always wear eye protection . Do not let
battery acid or any lead particles get on
your skin or clothing. Shield your eyes.
Checking and filling 179
Explosive gases can cause blindness or
other injury.
- Battery acid contains sulfuric acid. Sulfu
ric acid can cause blindness and severe
burns.
- Always wear gloves and eye protection.
Do not tilt the battery because acid
could leak out of the ventilation open
ings.
- If you get battery acid in your eyes or
on your skin, immediately rinse with
cold water for several minutes and get medical attention.
- If you should ingest any battery acid,
seek medical attention immediately.
- Do not expose the battery to an open
flame, electric sparks or an open light.
- Do not smoke.
- Do not interchange the positive and neg-
ative cables.
- When working on the battery, be sure
not to short-circuit the terminals with
tools or other metal objects. This would
cause the battery to heat up very quickly,
which could lead to damage or explosion
and personal injury.
- When a battery is charged, it produces
hydrogen gas which is explosive and
could cause personal injury.
- Always keep the battery well out of the
reach of children.
- Before work is done on the electrical sys
tem, disconnect the negative ground ca
ble.
- Before performing any work on the elec trical system, switch off the engine and ignition as well as any electrical equip
ment. The negative cable on the battery
must be disconnected. If you are just go
ing to replace a light bulb, then it is
enough to switch off the lights.
- Before disconnecting the battery, switch
off the anti-theft alarm system! Other
wise you will set off the alarm.
- When disconnecting the battery, first
disconnect the negative cable and then
the positive cable.
•
•
Page 182 of 236
180 Checking and filling
- Before reconnecting the battery, make
sure all electrical consumers are switch ed off. Reconnect the positive cable first
and then the negative cable. Never inter
change the cables -th is could start a fire!
- Never charge a frozen or a thawed-out
battery . It could explode! If a battery has
frozen, then it must be rep laced. A dis
charged battery can freeze over at 32 °F
(0 °C).
- Make su re the vent hose is always attach
ed to the opening on the side of the bat
t ery.
- Never use batteries which are damaged.
Dange r of explos ion! A lways rep lace a
damaged batte ry.
& WARNING
C alifornia Propos ition
65 Warning:
- Battery posts, te rm inals and related ac
c essories cont ain le ad and lead com
pounds, chemicals known to the State of
California to ca use cancer and re produc
t ive p roblems . Wash hands after han
dling.
(D Note
- Do no t disconnect the vehi cle bat tery
when the ignition is switched on or when
t h e engine is running, otherwise, you will
damage e lectronic components in the
electrical system.
- If your vehicle is go ing to stand for a
l ong period of time witho ut being driven,
protect the battery from "free zing", ot h
erwise it w ill be damaged and w ill then
have to be replaced . Charging the battery
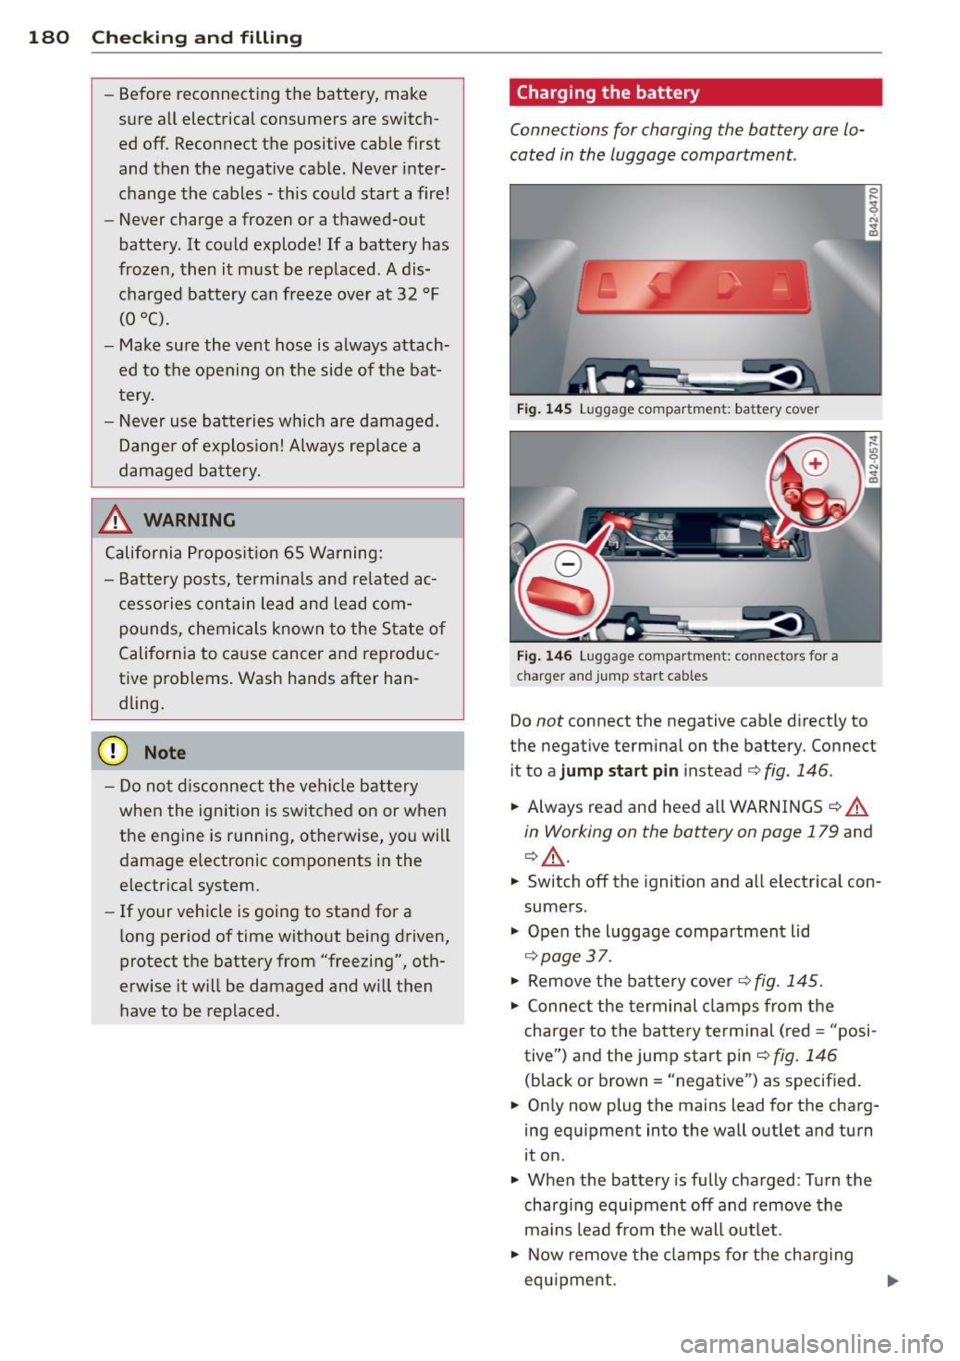
Connec
tions for charging the battery are lo
cated in the luggage compartment.
F ig . 14 5 Lugg age co mpar tment : ba ttery cove r
Fig. 146 Lu ggage co mpa rtm en t: c onn ecto rs fo r a
c h arger a nd ju mp start c ables
Do not connect the negative c able direct ly to
the negative terminal on the battery . Connect
it to a
jump sta rt p in instead c:, fig . 146 .
.,. Always read and heed a ll WARNINGS c;, .&.
in Working on the battery on page 179 and
¢ .&_ .
.,. Switch off the ignition and all electrical con
sumers .
.,. Open the luggage compa rtment lid
c:> page37 .
.,. Remove the batte ry cove r c:, fig. 145.
.,. Connec t the terminal clamps from t he
charger to the batte ry te rminal (red = "posi
tive") and the jump start pin
c:, fig . 146
(black or brown= "negative") as specified .
.,. On ly now plug the mains lead for the charg
ing equ ipment into the wa ll outlet and turn
it on .
.,. When the battery is fully cha rged : Turn the
charg ing equipment off and remove the
ma ins lead from the wall out let .
.,. Now remove the cla mps fo r the ch arg ing
equ ipment.
Page 183 of 236

~ Install the battery cover.
~ Close the luggage compartment lid
¢page 37.
When charging at low voltages (e.g . with a
trickle charger ), the battery cables do not
have to be disconnected first. Before charging
at
high voltages, i.e. "fast charging", you
must disconnect both cables. In either case,
follow the instructions from the manufacturer
of the charger .
Fastcharging a battery is
dangerous ¢ & in
Working on the battery on page 179 .
It re
quires special charging equipment and the knowledge to go with it. We recommend hav
ing your battery fast charged only by a quali
fied workshop.
A discharged battery can
freeze at tempera
tures of only 32 °F (0 °C) . Allow a frozen bat
tery to thaw completely before attempting to
charge it¢ & . However, we recommend not
using a thawed battery again because the bat
tery casing can be cracked due to ice forma
tion and can leak battery acid .
Do not open the battery caps when charging
the battery.
_& WARNING
-
Charging a battery can be dangerous.
- Never charge a frozen battery .
It may ex
plode because of gas trapped in the ice.
Allow a frozen battery to thaw out first.
- Do not reuse batteries which were fro
zen. The battery housing may have
cracked and weakened when the battery
froze.
- Charge the battery in a well ventilated
area. Keep away from open flame or elec
trical spark. Do not smoke. Hydrogen gas
generated by the battery is explosive.
- To reduce the danger of explosion , never
connect or disconnect charger cables
while the charger is operating.
- Fast charging a battery is dangerous and
should only be attempted by a compe
tent technician with the proper equip ment.
Checking and filling 181
- Battery acid that may spill during charg
ing should be washed off with a solution
of warm water and baking soda to neu
tralize the acid .
@ Note
Never use a fast charger as a booster to
start the engine. This will seriously dam
age sensitive electronic components, such
as control units, relays, radio, etc ., as well
as the battery charger .
(D Tips
-The vehicle battery must not be charged
with a standard small charger that plugs
into the cigarette lighter or outlet .
- Only charge the battery through the con
nections in the luggage compartment.
Replacing the battery
The new battery mus t have the same specifi
cations as the old one.
Your vehicle is equipped with an intelligent
energy management system for distributing
electricity¢
page 147 . The battery charges
better in vehicles with the energy manage
ment system than in vehicles without the sys
tem . To ensure that the additional power is
available after replacing the battery , replacing
with the same type of battery from the same manufacturer (like the battery that was deliv
ered with the vehicle) is recommended. An au
thorized dealer must code the battery in the
energy management control module.
The new battery must have the same capacity,
voltage (12 volts), current and design and it
must be sealed with plugs. The battery must
conform to the standards TL 825 06 (from
April 2008) and VW 7 SO 73 (from April 2010).
Since the vehicle battery is difficu lt to reach,
we recommend having the battery replaced by
an authori zed Audi RB dealer or other quali-
fied workshop . ..,. •
•
Page 184 of 236
182 Checking and filling
(D Note
- Your vehicle is equipped with a specia l
battery. Installing a different type of
battery can cause prob lems in the vehi
cle electrical system. When replacing the
vehicle battery, always install one with
the same spec ificat ions as the original
battery .
- Make sure that the gas venting hose is
always connected to the o riginal open ing
on the battery side. Otherw ise gasses or
ba tte ry acid could leak out .
- Battery holder and term inals a lways
have to be secured cor rectly.
- Read and follow the warnings under
9 page 179, Working on the battery be
fore performing any work on the batte ry.
@) For the sake of the environment
Because of the problem of proper disposal
of a battery, we recommend your author
ized Audi dealer change the battery for
you . Batteries contain sulfur ic ac id and
lead and must always be disposed of prop
erly in compliance with a ll environmenta l
reg ulations. D isposing of vehicle batteries
improperly is very dangerous to the envi
ronment. Make sure that the removed bat
tery ca nnot overbalance, otherwise sulfu
r ic acid might escape!
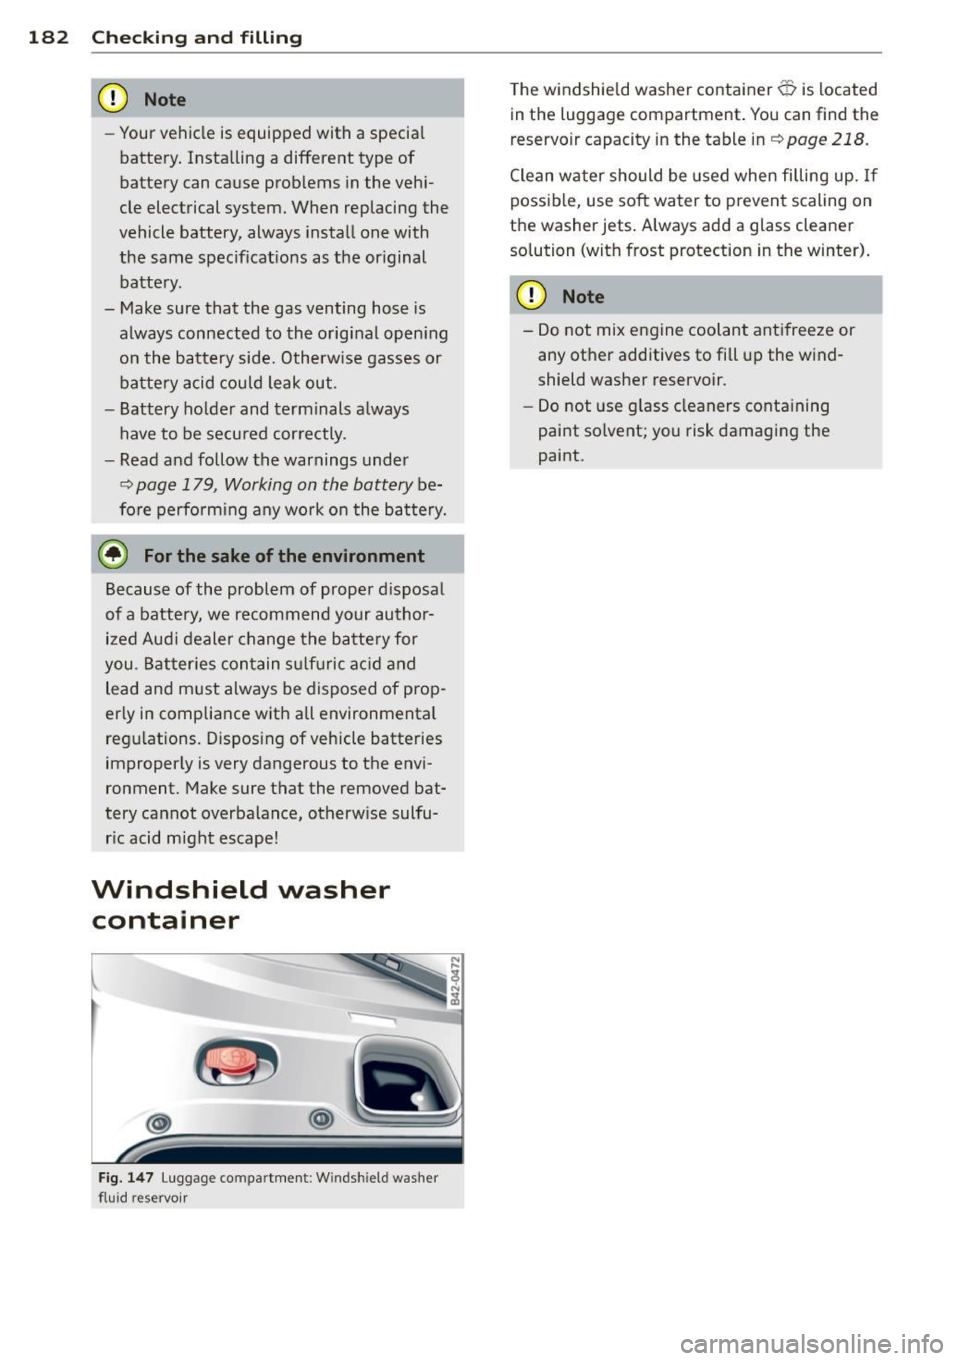
Windshield washer
container
Fig. 147 Luggage compa rtment : W inds hield washer
fl uid reservo ir
The windshield washer container O is located
in the luggage compartment. You can find the
reservo ir capacity in the table in
¢page 218.
Clean water should be used when filling up. If
possible, use soft water to prevent scaling on
the washer jets . Always add a glass cleaner
solution (with frost protection in the winter) .
(D Note
- Do not mix engine coolant antifreeze or
any other additives to fill up the wind
shield washer reservoir.
- Do not use glass cleaners containing
pai nt so lvent; you risk damaging the
paint.
Page 211 of 236
Tightening wheel bolts
~ Fit the wheel bolt wren ch over the wheel
bolt and push it down as far as it will go
1l.
~ Close your gr ip around the end of the
wrenc h handle fo r maximum torque and
turn each whee l bolt
clockwi se u nti l it sits
t ight.
H ave the
tightening torque of the whee l bolts
checked as soon as possible with a torque
wrench. It shou ld be 120 Nm.
Chec k the
tir e pre ssure as soon as possible .
Return the vehicle tool kit to its proper place .
A WARNING
Loosening the wheel bo lts is prohib ited;
da nger of an accident!
@ Tips
- Never try and use the hexagona l socke t
i n the handle of the screwdr iver to loos
en or tighten the w heel bolts.
- If yo u have dete rm ined t hat wheel bolts
a re cor roded and difficult to t urn, the
bo lts must be rep laced befo re checking
the to rque.
- Unti l the tig hte ning torque is checked,
d rive at redu ced speeds as a precaution .
Notes on wheel change
Please read the information ¢ page 193, New
tires and replacing tires and wheels ,
if you are
going to use a spare t ire which is different
from the tires on you r veh icle.
Afte r you change a tire :
- Check the tire pressure on the spare imme
diately after mounting.
- Have the wheel bolt t ightening torque
chec ked w ith a torq ue wrench as soon as
poss ib le by your author ized A udi dealer or a
qualified service sta tion .
1) You need t he appro pria te adapte r to t ig hte n th e an ti
t h eft whee l bolt s
c:> page 206 .
What do I do now? 209
- With stee l and alloy wheel rims, the whee l
bolts are correctly tightened at a torque of
90 ft lb (120 Nm) .
- If you notice while changing a tire that the
wheel bo lts are corroded and difficu lt to
turn, then they shou ld be rep laced before
you check the tightening torque.
- Replace the flat tire with a new one and
have it installed on your vehicle as soon as
possible . Remount the wheel cover.
Until then , d riv e with e xtra care and at re
duced speeds.
A WARNING
- If you are going to equ ip your vehicle
with tires or rims which differ from those
which were facto ry installed, then be
sure to read the information ¢
page 193,
New tires and replacing tir es and
wheels.
- Always sto re the tools secu rely in lug
gage compartment. Othe rwise, in a n ac
cident o r su dden maneuver they cou ld fly
forwdrd, CciU5ing injury to pd55enger5 in
the vehicle.
(D Note
Do not use comme rcially avai lab le tire
sea lants . Otherwise, the e le ctr ic al compo
nen ts of t he tire p ressu re monitoring sys
tem * wi ll no longe r work proper ly and the
sensor fo r the tire pressure mon itor ing
system will have to be rep laced by a quali
fied workshop.
Jump-starting
General
If necessary, the engine can be started by
connecting it to the battery of another vehi
cle.
If the engi ne should fail to start because of a
discharged or weak battery, the battery can be
II>
•
•
Page 212 of 236

210 What do I do now?
connected to the battery of another veh icle,
using a pair of jump er cable s to start the en
g ine.
Both batter ies must be rated at 12 vo lts. The
ca pacity (Ah) of the booster battery must not
be substantially less than the capacity of the
d ischarged battery .
J umper cables
Use
only jumper cables of sufficiently large
cr oss sec tion to safely carry the starter cur
rent . Re fer to the manu facturer's specifica
tions .
Use only jumper cables which have
insulated
termina l clamps and are properly marked for
distinction :
plu s(+) ca ble: in most cases co lored red
minu s(-) ca ble: in most cases colored black
A WARNING
Batteries contain electricity, ac id, and gas .
Any of these can cause ve ry serious or fatal
injury. Follow the instructions below fo r
safe handl ing of your veh icle's battery.
- Always shield you r eyes and avoid lean
ing over the batte ry whenever possible.
- A discharged battery can already freeze
a t temperatures just be low 32 ° F (0 °C).
Before connecting a jumper cable, the
frozen battery must be thawed com
pletely, otherwise it could exp lode .
- Do not a llow battery ac id to contact eyes
or s kin. Fl ush any contacted area w ith
water immediately .
- Improper use o f a booster battery to
start a ve hicle may cause an explosion.
- Vehicle batteries gene rate explos ive gas
es . Keep sparks, flame and lighted ciga
rettes away from batteries .
- Do not try to jump s tar t any veh icle with
a low acid level in the battery.
- Th e volt age of the booster battery must
also have a 12-Volt rating . The capacity
(Ah) of the booster battery shou ld not be
lower than that of the discharged bat
tery. Use of batter ies of different voltage or substantially d
iffe rent "Ah" rating
may cause an exp losion and persona l in
jury.
- Never charge a frozen battery. Gas trap
ped in the ice may cause an explosion.
- Never charge or use a battery that has
been frozen . The battery case may have
be weakened .
- Use of batter ies of different voltage or
substantially d ifferent capacity (Ah) rat
ing may cause an exp losion and injury.
The capac ity (Ah) of the booster battery
should not be lower than that of the dis
charged battery.
- Before you check anything in the engine compa rtment, always read and heed a ll
WARNINGS
,=;, page 169, Working in the
engine comportment.
(!) Note
- App lying a higher voltage booster bat
tery will cause expens ive damage to sen
sitive e lectronic components, such as
cont ro l uni ts, relays, rad io, etc.
- There must be no electrical contact be
tween the vehicles as otherwise cur rent
c o ul d already start to f low as soon as the
positive( +) terminals are connected.
(D Tips
- T he d ischa rged ba ttery m ust be properly
c onnected to the veh icle's e lectr ica l sys
t em.
- Switch off any car phone, o r follow the
car phone instructions for th is si tuat ion.
Page 213 of 236
Use of jumper cables
Make sure to connect the jumper cable
clamps in exactly the order described below'
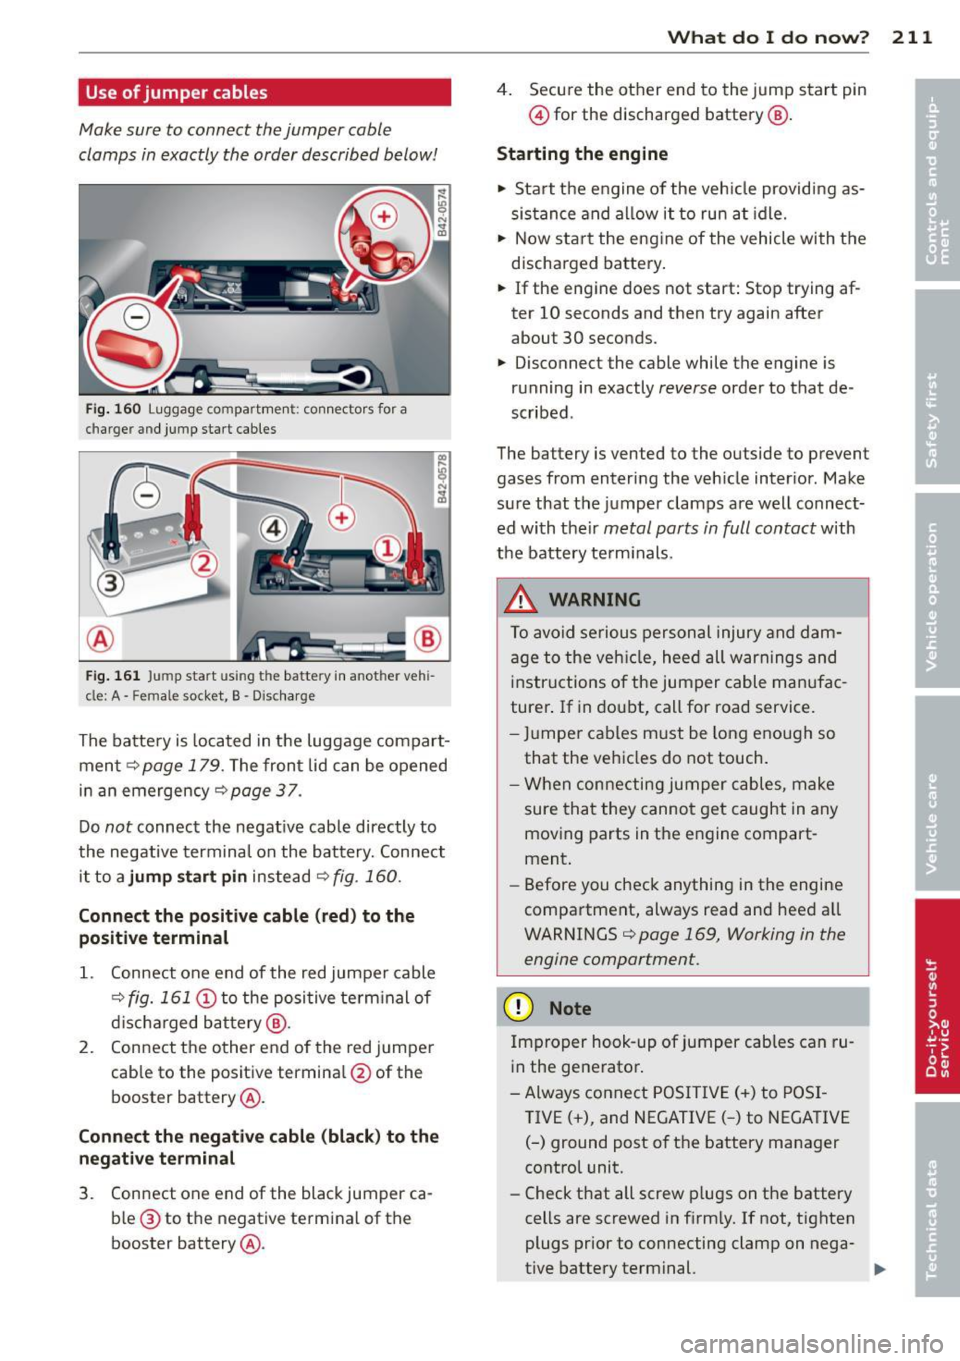
Fig . 160 Luggage co m pa rtme nt: connec tor s for a
ch arge r and jump start cab les
F ig . 161 Ju m p sta rt usin g t he batte ry in a not her ve hi
cl e:
A -Fem ale so cket , B · Di scharge
The batte ry is located in the luggage compart
ment
¢ page 179. The front lid can be opened
in an emergency
~page 37.
Do not connect the negat ive cable directly to
the negative termina l on the battery. Connect
it to a
j u mp start pin instead ¢ fig. 160.
Connect the posi tive cable (red) to the
positive t ermin al
1. Connect one end of the red jumper cable
¢ fig. 161 (D to the positive te rm inal of
d isc harged battery @.
2. Connect the other end of the red jumper
cable to the positive termina l@ of the
booster battery @.
Conn ect the negat ive cable (black ) to the
negati ve t erminal
3. Connect one end of the black jumper ca
b le @ to the negative terminal of the
booster battery @.
What do I d o now ? 211
4. Secu re the other end to the jump start pin
@ for the discharged battery @.
Starting the engine
~ Sta rt the engine of the veh icle providing as
sistance and al low it to run at idle.
~ Now sta rt the eng ine of the vehicle with the
discharged battery .
~ If the engine does not start: Stop trying af
ter 10 seconds and then try again after
about 30 seconds.
~ Disconnect the cable while the engine is
running in exactly
reverse order to that de
scribed .
The ba ttery is vented to the ou tside to prevent
gases from entering the veh icle inter ior . Make
sure that the jumper clamps are well connect
ed with their
metal parts in full contact with
the battery term inals .
.&, WARNING
To avoid serious person al injury and dam
age to the veh icle, heed all warnings and
instructions o f the jumper cable manufac
turer . If in doubt , call for road service.
- Ju mper cables m ust be long enough so
that the vehicles do not touch.
- When connecting jumper cables, make
sure that they canno t get caught in any
mov ing parts in the engine compart
ment.
- Before you check anything in the engine
compartment, always read and heed a ll
WARNINGS
¢ page 169, Working in the
engine compartment.
(D Note
Improper hook-up of jumper cables can ru
in the generator .
- Always co nnect POSITIVE(+) to POSI
TIVE(+), and NEGATIVE( -) to NEGATIVE
( - ) ground post of the battery manager
control unit.
- Check that all screw p lugs on the battery
cells are screwed in firm ly. If not, tighten
plugs prior to connecting clamp on nega-
-
tive battery term inal. .,..
Page 214 of 236
212 What do I do now ?
-Please note that the procedure for con
necting a jumper cable as described
above applies spec ifically to the case of
your vehicle be ing jump started. When
you are giving a jump start to another ve
hicle, do
not connect the negative( -) ca
ble to the negat ive( -) terminal on the
discharged bat tery ©-Instead, securely
con nect the negative( -) cable to either a
solid meta l comp onent that i s firmly
bo lted to the engine b lock or to the en
gine block itself . If the battery that is be
ing charged does not vent to the outside,
escaping battery gas cou ld ign ite and ex
plode!
Emergency towing
with commercial tow
truck
General hints
Your Audi requires special handling for tow
ing.
The following information is to be used by
commercia l tow truck operators who know
how to operate their equipment safe ly.
- Never tow your A udi, towing will cause dam
age to the engine and transmission .
- Never wrap the safety chains or winch cables
around the brake lines.
- To preven t unnecessary damage, your Audi
must be transported with a ca r carr ie r (flat
bed truck).
- To load the vehicle on to the flat bed, use
the towing loop fo und in the veh icle tools
and attach to the front anchorage
~ page 212.
A WARNING
A vehicle being towed is not safe for pas
senge rs. Never allow anyone to r ide in a
veh icle being towed, for any reason.
(D Note
The vehicle has very low gro und clea rance.
Make sure that no damage is caused to the
-
u nderside of the vehicle when it is being
l oaded onto a f lat bed t ruck .
Front towing loop
Do not install the front towing loop until it is
needed.
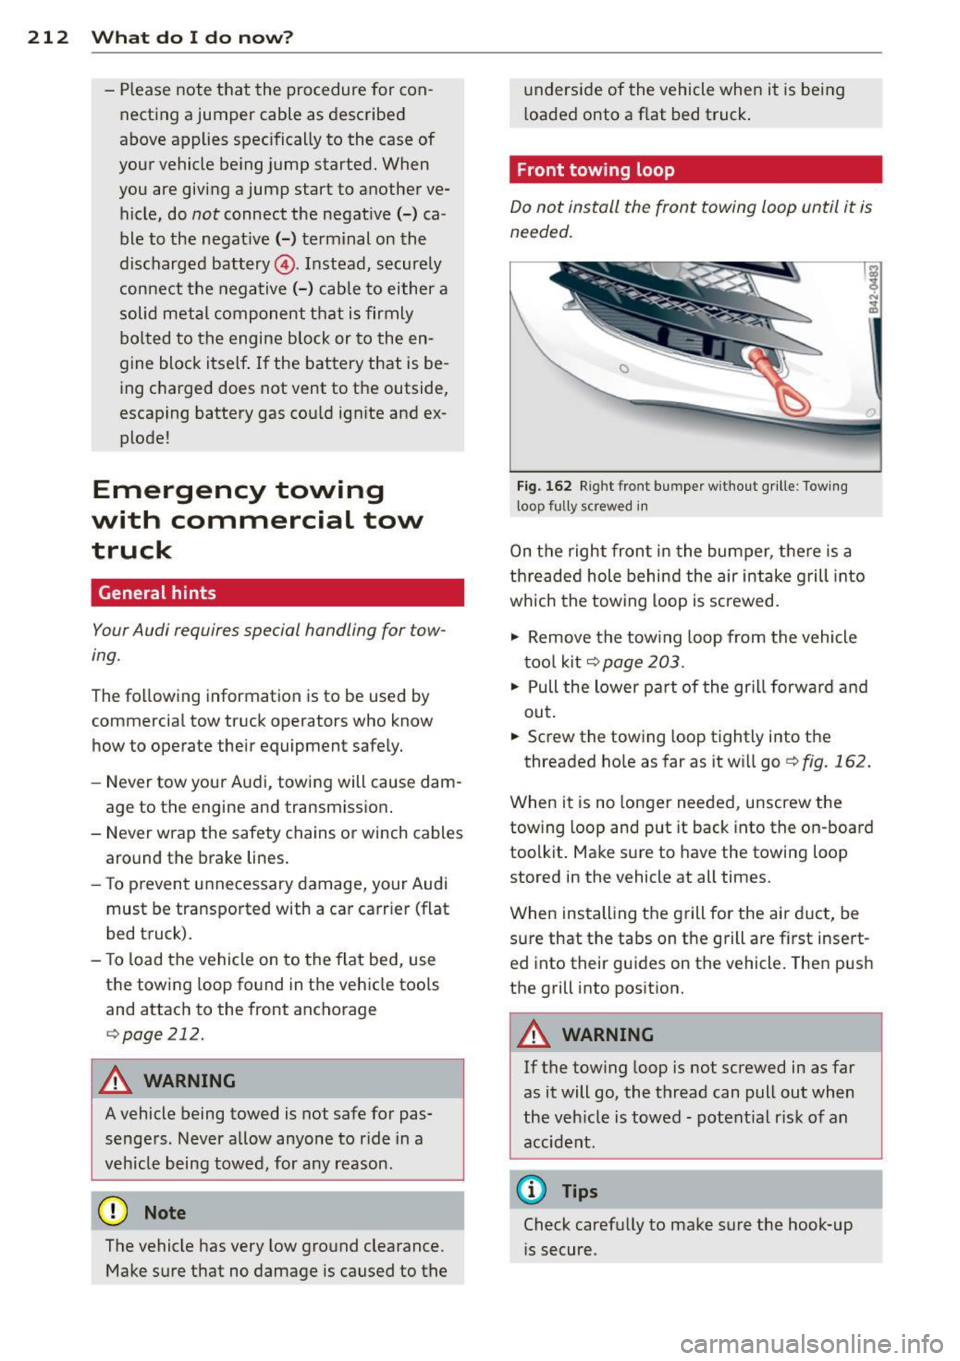
Fi g. 162 Righ t front bumper witho ut g rille : Tow ing
l oop
fully screwed in
On t he right fron t in the bumper, there is a
th readed hole behind the air in take grill into
which the towing loop is screwed.
"' Remove the tow ing loop from the vehicle
t oo l kit
~page 203.
"' Pull the lower part of the gr ill forward and
out .
"' Sc rew the towing loop tightly into the
threaded ho le as far as it wi ll go ¢
fig. 162.
When it is no longer needed, unscrew the
towing loop and put it back into the on -board
toolkit . Make su re to have the towing loop
stored in the vehicle at all times.
When installing t he grill for the air d uct, be
s u re that the tabs on the grill are f irst inse rt
ed into their guides on the vehicle . Then push
the grill into pos ition.
A WARNING
= If the tow ing loop is not screwed in as far
as it will go, the thread can pull out when
the veh icle is towed -potent ial r is k of an
a ccident.
@ Tips
Check caref ully to make sure the hook-up
i s secure.
Page 215 of 236
Fuses and bulbs
Electrical fuses
Replacing fuses
Fuses that have blown will have metal strips
that have burned through.
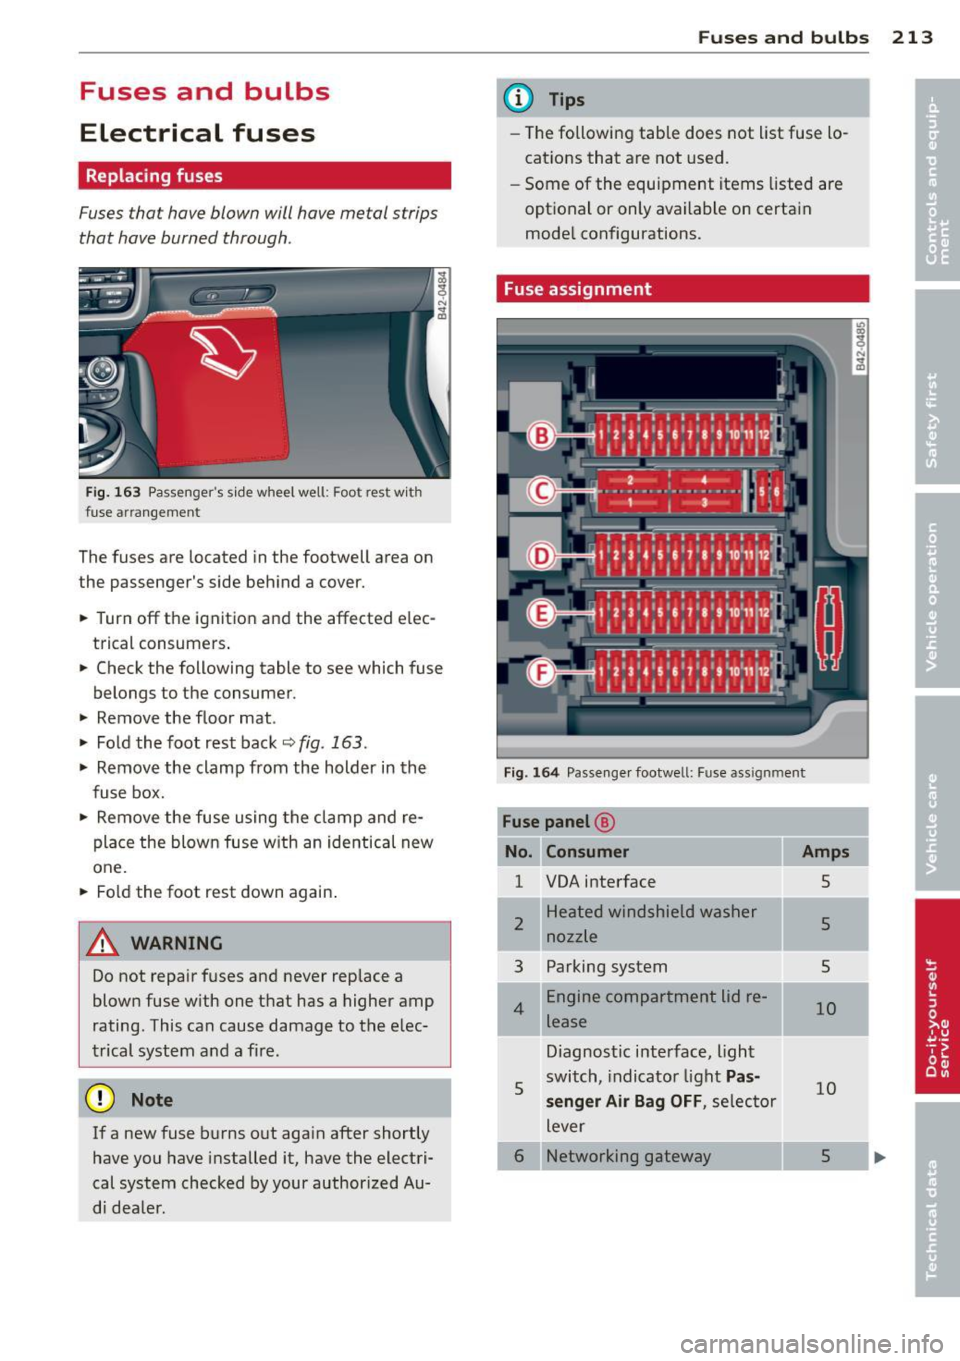
Fig. 163 Passenger's s ide wheel well: Foot rest w ith
fuse arrangement
The fuses are located in the footwell area on
the passenger's side behind a cover.
• Turn off the ignition and the affected e lec
trical consumers .
• Check the following table to see which fuse
belongs to the consumer.
• Remove the floor mat .
• Fold the foot rest back
¢ fig. 163.
• Remove the clamp from the holder in the
fuse box.
• Remove the fuse using the clamp and re
place the blown fuse w ith an identical new
one.
• Fo ld the foot rest down again .
A WARNING
Do not repair fuses and never replace a
blown fuse with one that has a higher amp
rating. This can cause damage to the elec
trical system and a fire.
(D Note
If a new fuse burns out again after shortly
have you have installed it, have the electri
cal system checked by your authorized Au
d i dealer.
Fu se s and bulb s 213
@ Tips
-The following table does not list fuse lo
cations that are not used.
- Some of the equipment items listed are
optional or only available on certain
mode l configurations.
Fuse assignment
Fig. 164 Passenge r footwell: Fuse assignment
Fuse panel @
Con sumer
1 VOA interface
2
3
4
5
Heated windshield washer
nozzle
Parking system
Engine compartment lid re
lease
Diagnostic interface, light
switch, indicator light
Pa s
se nger Air Ba g OF F,
selector
lever
6 Networking gateway
Amp s
5
5
5
10
10
5
Page 222 of 236
220 Consumer Inf ormation
steadi ly reduced the scope of maintenance
and repairs which can be carried out by vehicle
owners.
Als o, sa fe ty a nd en vir onm ent al con
cerns place very strict limits on the nature of
repairs and adjustments to engine and trans
miss ion parts which an owner can perform .
Maintenance, adjustments and repa irs usua lly
require special tools, testing devices and oth
er equipment available to specially trained
workshop personnel in order to assure proper pe rformance, reliab ility and safety of the vehi
cle and its many systems.
Improper maintenance, adjustments and re
pa irs can impair the operation and reliab ility
of your vehicle and even void your vehicle war
ranty. Therefore, proof of servic ing in accord
ance w ith the ma intenance schedule may be a
condition for upholding a poss ible warranty
claim made within the warranty period.
Above all, operational safety can be adversely
affected, c reating unnecessary risks for you
and your passengers.
If in doubt about any se rv icing, have it done
by your author ized Audi dealer or any other
p roperly equipped and qualified workshop.
We strong ly urge you to give yo ur autho rized
Audi dealer the opportunity to perfo rm all
schedu led maintenance and necessary repairs.
Your dea ler has the facilities, original parts
and trained specialists to keep your vehicle
running properly.
Performing limit ed m aint enance yours elf
The following pages describe a limited num
ber of proced ures which can be performed on
your vehicle with ordinary too ls, shou ld the
need arise and trained personnel be unavaila
ble. Before performing any of these proce
dures, always thoroughly read all of the app li
cable text and carefully follow the instruc
tions given . Always rigorously obse rve the
WARNINGS p rovided.
Before you ch eck anything in th e eng ine
co mpartm ent , alway s re ad and h eed all
WA RNINGS
c::> .&. and c::> ..&. in Working in the
engine compartment on page 169.
A WARNING
- Serious personal injury may occur as a re
sult of improperly performed mainte
nance, adjustments or repa irs.
- Always be extremely careful when work
ing on the vehicle. Always follow com
monly accepted safety pract ices and gen
eral common sense. Never r is k personal
injury.
- Do not attempt any of the maintenance,
checks or repairs descr ibed on the fol
lowing pages if you are not fu lly fam iliar
with these or other procedures with re
spect to the vehicle, or are uncertain how
to proceed .
- Do not do any work without the proper
too ls and equipment. Have the necessa ry
work done by your author ized A udi deal
er or another proper ly equipped and
qualified workshop.
- Always remove the ignition key before
anyone gets under the vehicle.
- Always support your veh icle with safety
stands if it is necessary to work under
neath the vehicle. The jack* is not ade
quate for this purpose and cou ld collapse
causing ser ious personal inju ry.
- If you must work underneath the vehicle
with the wheels on the ground, a lways
make sure the vehicle is on level ground,
that the wheels a re a lways secure ly
b locked and that t he engine cannot be
s tarted.
- Always make sure the transmission se
lec to r l ever is in
"N" (Neut ral) (R t ron ic)
or Neutral (manual transmission) and
the hand bra ke is f irmly app lied.
@ For the sake of the environment
- Changing the engine sett ings will ad
verse ly affect emission leve ls. Th is is det
r imental to the environment and increas
es fuel consumpt ion .
- Always observe environmenta l regu la
tions when disposing of old eng ine oil,
used brake flu id, dirty engine coo lant,
spent batteries or worn out tires.