ESP AUDI R8 SPYDER 2015 User Guide
[x] Cancel search | Manufacturer: AUDI, Model Year: 2015, Model line: R8 SPYDER, Model: AUDI R8 SPYDER 2015Pages: 232, PDF Size: 58.36 MB
Page 34 of 232
Opening and closing
Emergency locking
If the power locking system fails (power failure),
you will need to lock the passenger door sepa
rately.
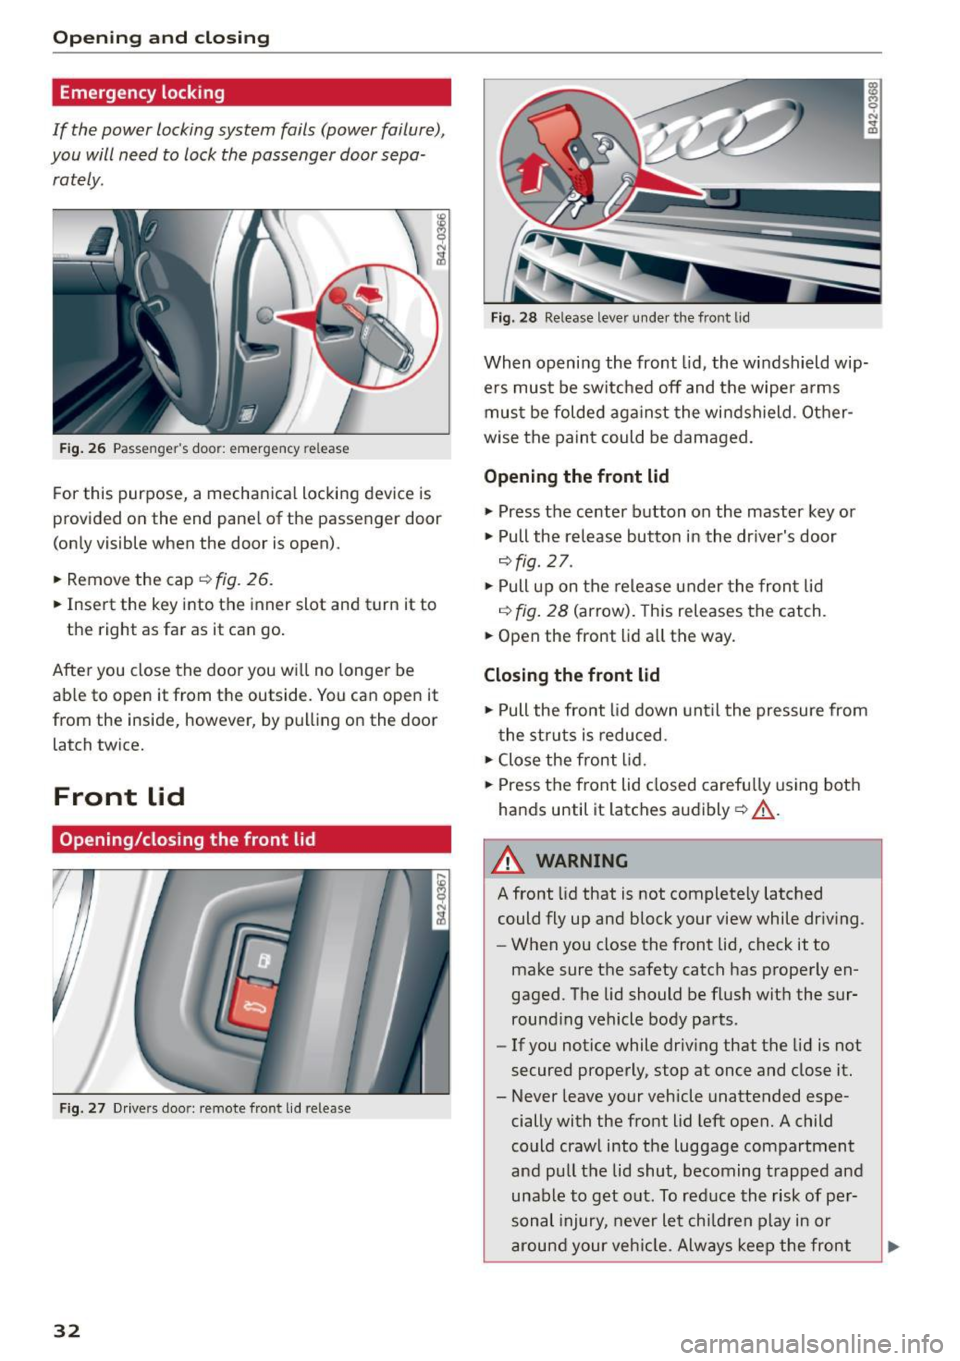
F ig. 26 Passen ger's door: emergency release
For this purpose, a mechanical locking device is
provided on the end panel of the passenger door
(only visible when the door is open).
.. Remove the cap
q fig . 26.
.. Insert the key into the inner slot and turn it to
the right as far as it can go.
After you close the door you wil l no longer be
ab le to open it from the outside. You can open it
from the inside, however, by pulling on the door
latch twice.
Front lid
Opening/closing the front lid
Fig . 27 D rive rs doo r: remote front lid re lease
32
Fig. 28 Release leve r under the fro nt lid
When opening the front lid , the w indshield wip
ers must be switched off and the wiper arms
must be folded aga inst the windshield . Other
wise the paint could be damaged.
Opening the front lid
.,. Press the center button on the master key or
.,. Pull the release button in the driver's door
~fig. 27 .
.,. Pull up on the release under the front lid
~ fig. 28 (arrow). This releases the catch .
.. Open the front lid all the way.
Closing the front lid
.,. Pull the front lid down until the pressure from
the struts is reduced .
.. Close the front lid .
.. Press the front lid closed carefu lly using both
hands until it latches audibly ~
,A.
A WARNING
-
A front lid that is not completely latched
could fly up and block your view while driving.
- When you close the front lid, check it to
make sure the safety catch has properly en
gaged. The lid should be flush with the sur
rounding vehicle body parts.
- If you notice while driv ing that the lid is not
secured properly , stop at once and close it.
- Never leave your vehicle unattended espe
cially with the front lid left open. A child
could crawl into the luggage compartment
and pull the lid shut, becoming trapped and
unable to get out . To reduce the risk of per
sonal injury, never let children play in or
around your veh icle. Always keep the front
Page 36 of 232
Opening and closing
W hen the system is activated, the ala rm w ill be
triggered if one of the doors, the engine com
partment lid or the front lid are opened.
The ant i-theft a larm system will a lso go off when
the battery is disconnected.
You ca n also tr igger the alarm by p ressing the
PAN IC b utton o n your remote-c on trol key . Thi s
will alert o ther people in case of emergency.
Press the
PANIC button again to t urn off the
alarm.
How is the anti-theft alarm switched off
when trigg ered?
The ala rm sys tem is switc hed off when you un
lock the vehicle using the remote-contro l key or
when the ignit ion is switched on. The a larm w ill
a lso switch itself off when it comes to the end of
its cycle .
Emergency flasher
The emergency f las her will blink briefly w hen the
doors, engine compartment lid and front lid are
properly closed.
If the emergency flashers do no t blink , check the
doors, engine compartment lid and front lid to
make sure they are properly closed . If you close a
door, the engine compartment lid or the front lid
with the an ti-theft alarm switc hed on, the emer
gency flashers will bli nk only after you have
closed the door or lid .
(D Tips
For the anti-theft alarm system to function
properly, make sure all vehicle do ors and w in
dows are closed befo re leavi ng the veh icle .
34
Power windows
Controls
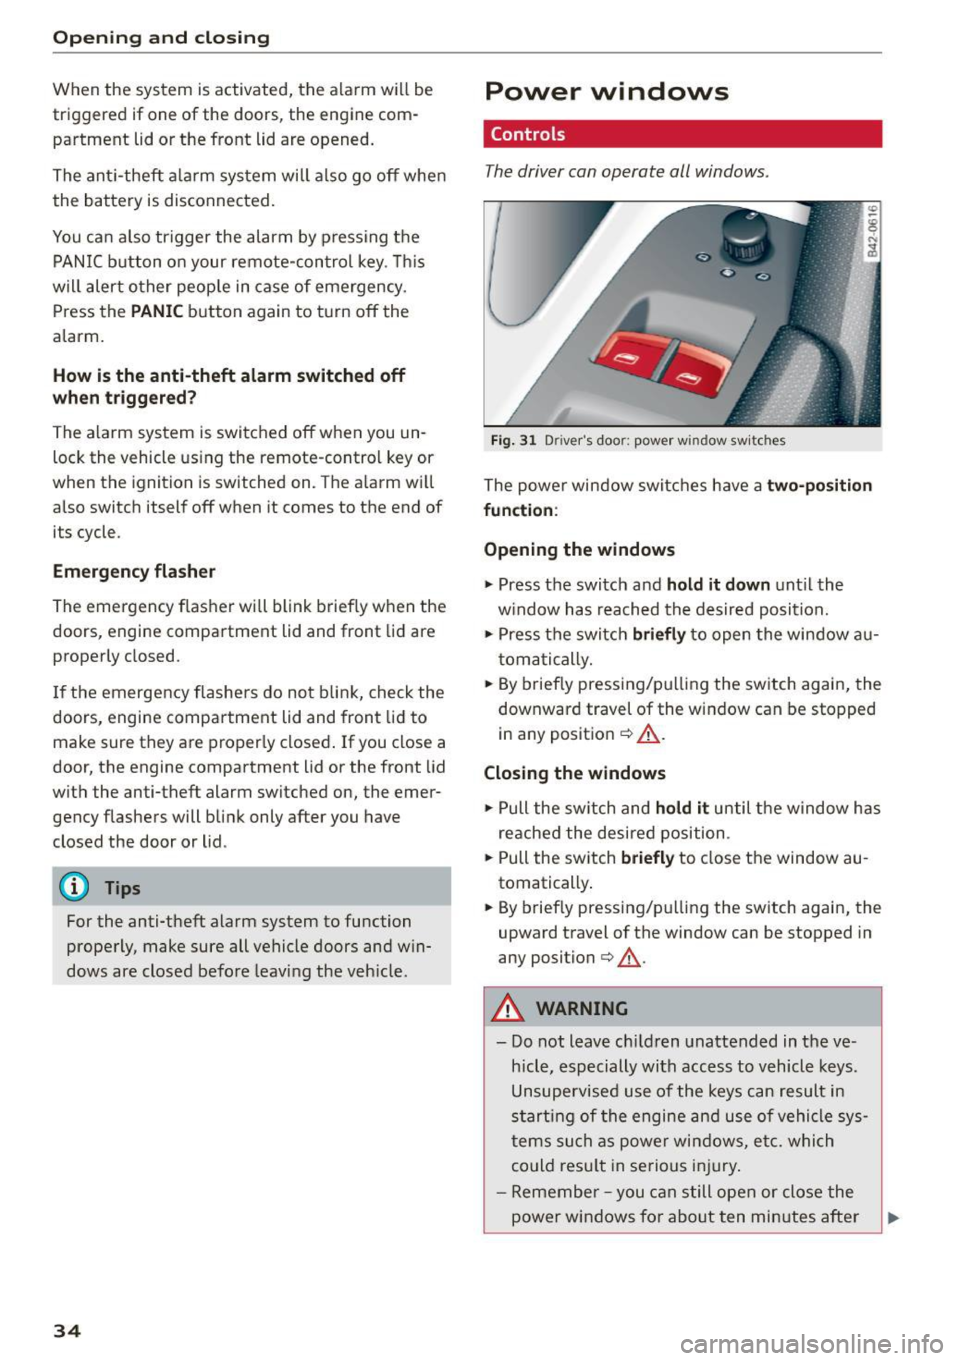
The driver can operate all windows .
Fig. 3 1 Driver 's doo r: powe r w in dow swi tches
The power window swi tc h es h ave a two-positi on
fun ction :
Opening the windows
.,. Press the switch and hold it down unt il the
w indow has reached the desired posi tion.
.,. Press the switch
briefly to open the window a u
t om atic ally .
.,. By brief ly pressing/p ulling the sw itch again, the
downward travel of the window can be stopped
in any positio n
¢ .&,.
Closing the windows
.,. Pull the sw itch and hold it until t he w indow h as
re ached the desire d position .
.,. Pull the sw itch
briefly to close the window au
tomatically .
.,. By briefly pressing/p ulli ng the switch again, the
upward travel of the window can be stopped in
any position
¢ ,& .
A WARNING
-Do not leave ch ild ren unattended in the ve
hicle, especially with access to vehicle keys .
Unsupervised use of the keys can re sult in
s tarti ng of the engine and use of vehi cle sy s
t ems su ch as power wi ndow s, e tc. whic h
co uld res ult in se rious i njury.
- Remembe r -you ca n still ope n or close the
power windows fo r abo ut ten minutes after
Page 37 of 232
.... N
l'
N "1: .... I.O
"' N
"' ....
the ignition is switched off. Only when ei
ther of the front doors are opened are the power windows switched off.
- Be careful when closing the windows. Check
to see that no one is in the way, or serious injury could result!
- Always remove the ignition key whenever
you leave your vehicle .
- If you lock your vehicle from the outside, no
one, especially children, should remain in
the vehicle.
- Do not stick anything on the windows or the windshield that may interfere with the driv
er's field of vision.
(D Tips
- When the doors are opened, the windows
are automatically lowered 0.4 in (10 mm).
Reactivating the system after battery
disconnection
If the vehicle bat tery is disconnected and then
reconnected, the automati c closing and opening
function will not work until it is reactivated .
... Pull and hold the power window switch until
the window is completely closed .
.,. Release the switch and pull it again for one sec
ond .
Garage door opener
(Homelink)
Description
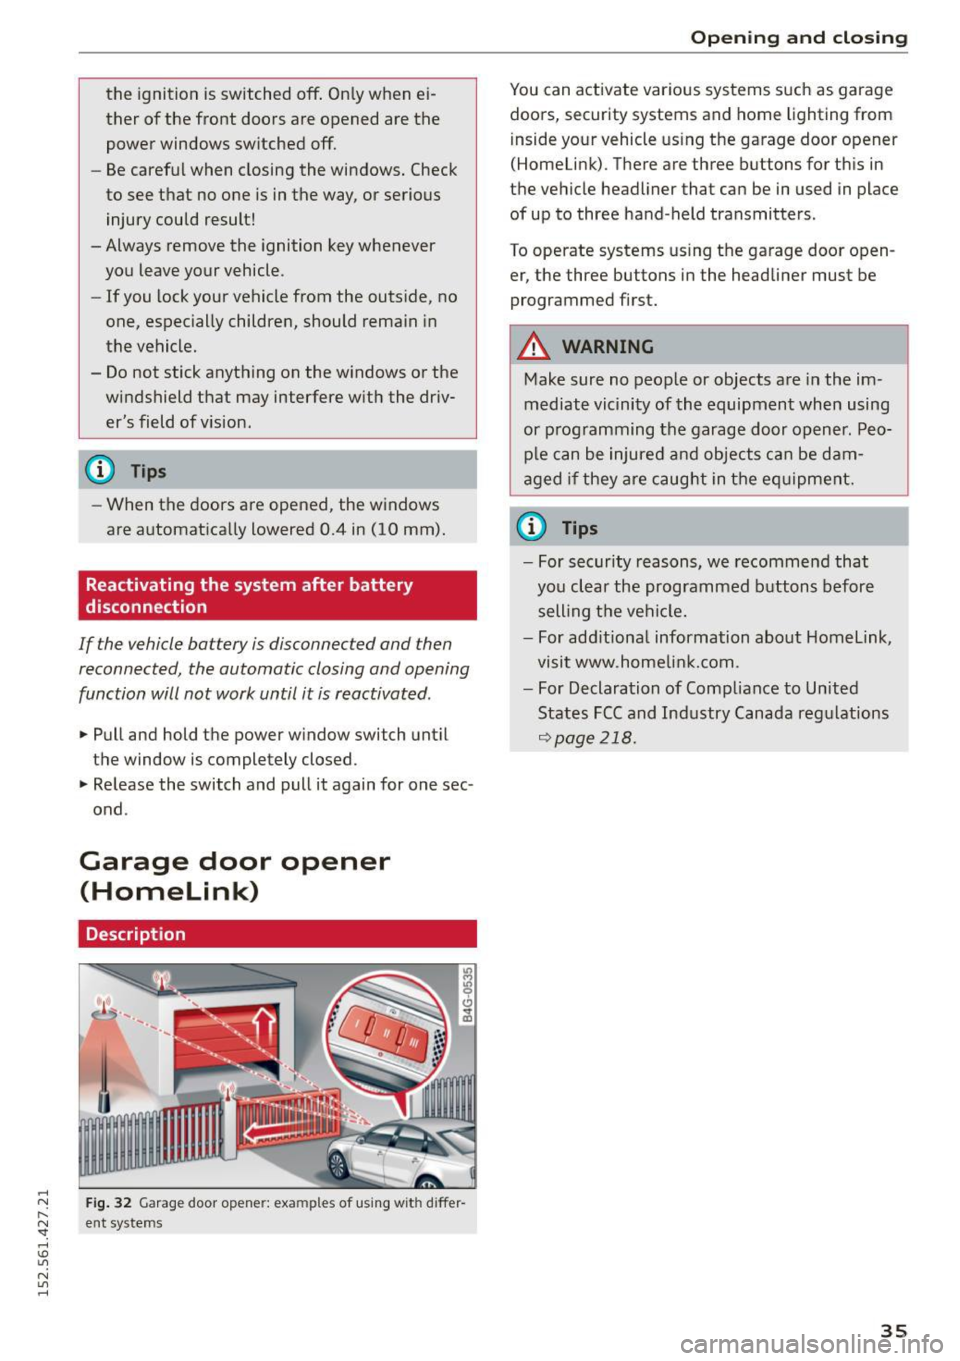
Fig. 32 Garage door opene r: exa mples of using wit h diffe r
ent sy stems
Opening and closing
You can activate various systems such as garage
doors, security systems and home lighting from
inside your vehicle using the garage door opener
(Homelink) . There are three buttons for this in
the vehicle headliner that can be in used in place of up to three hand -held transmitters .
To operate systems using the garage door open er, the th ree buttons in the headliner must be
programmed first.
A WARNING
=
Make sure no people or objects are in the im-
mediate vicinity of the equipment when using
or programming the garage door opener. Peo
ple can be injured and objects can be dam
aged if they are caught in the equipment.
@ Tips
-For security reasons, we recommend that
you clear the programmed buttons before
selling the vehicle.
- For additional information about Homelink ,
visit www .homelink.com.
- For Declaration of Compliance to United
States FCC and Industry Canada regulations
Qpage 218.
35
Page 40 of 232
Convertible top
Convertible top
Convertible top
General information
The fabr ic conv ert ible top opens and closes auto
matica lly. W hen it is open, it is sto red in t he con
ver tible top storage bay. The convert ible top may
be opened or closed at speeds up to 31 mph
(SO km/h).
T he conve rtible top is wind- and wate rproof un
de r n orma l conditions. Some mois ture may co l
lec t in the vehicle interior, but on ly unde r ex
tremely adverse weathe r co ndit ions such as tor
rentia l rain . That is normal and no cause for con
cern.
F ollow t he clean ing and maintenance instr uc
tions ~
page 145 to ensu re the convertib le to p
remains wind- an d waterproof. A lso note the fol
lowing points:
- Only stow the convertib le top when i t is clean
and dry. Gra ins of sand or coa rse dirt particles
can cause abrasions on the convertible top
when stowed that can lead to damage to the
fabric over time. Stowing the convertible top
whe n it is damp can cause marks or pe rmanent
mildew spots to form .
- Do not leave the convertible top open for sever
al weeks or the c reases in it may become discol
ored . Th i s is especially tr ue if the top was stow
ed when damp .
- Remove ice and snow befo re ope ning the con
vertib le top . Do not use any sharp edged ob
jects to remove ice and snow or t he conve rtible
t op co ul d be scra tch ed o r dam aged . T he rear
window may be cleare d wi th a stand ard i ce
scra per.
- T he fab ric in the co nver tib le top lose s elasticity
in su b-zero tem pera tures . We recommend not
opening or closi ng the convertib le top when the
temperature is below 32 °F (0 QC). T he conver
tible top will not open when the temperature is
S °F (-15 QC) or below.
38
Opening /closing the convertible top
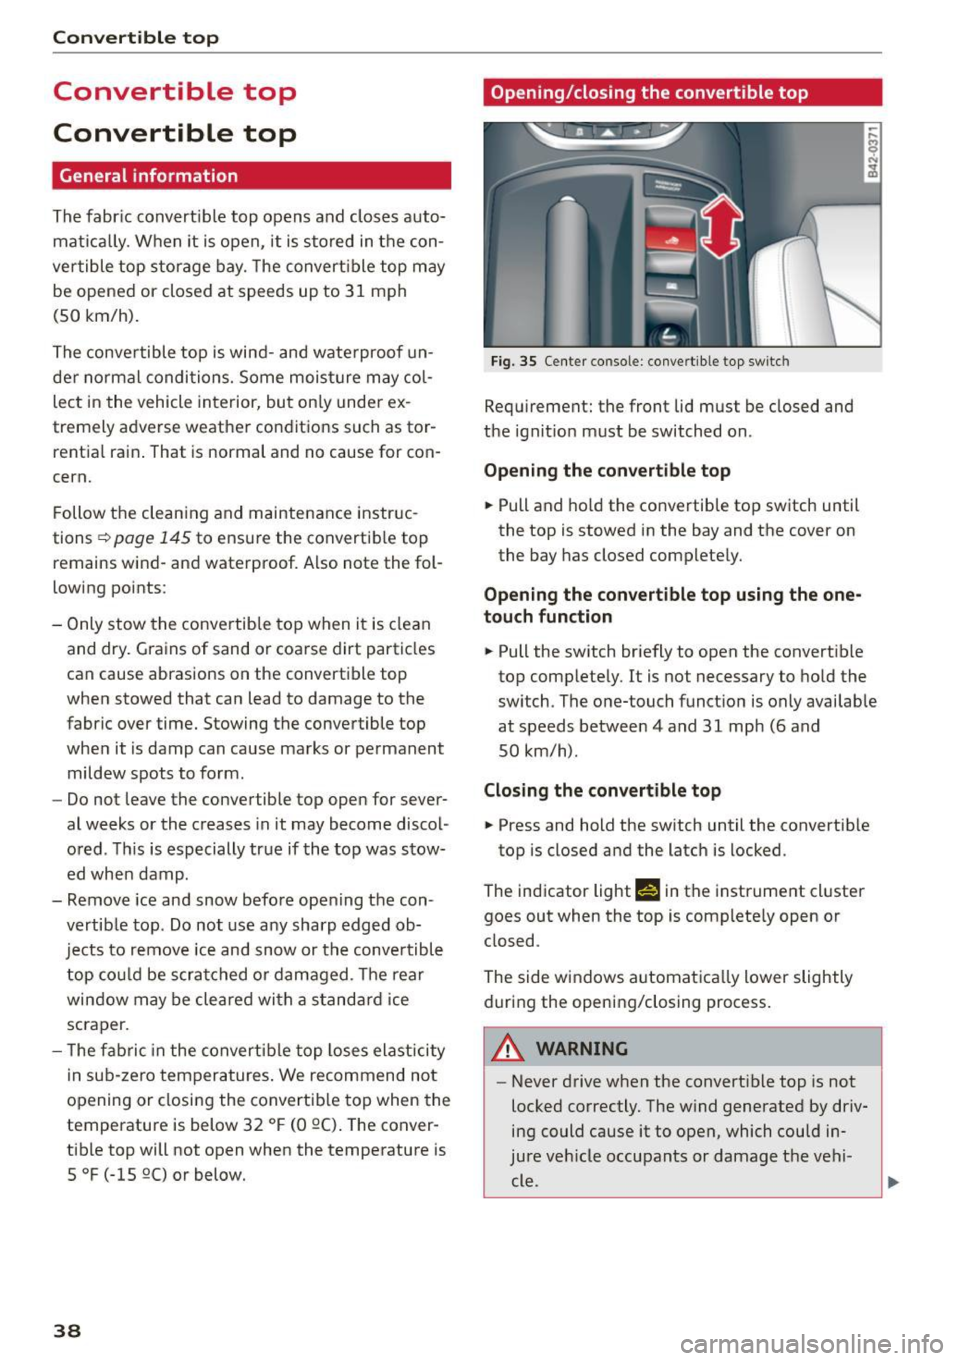
Fi g. 35 Cente r console : co nve rtible top sw itc h
Req uirement: the front lid must be closed and
t h e ign it io n m ust be switched on.
Opening the convertible top
.,. Pull and ho ld the co nvertib le top switch until
the top is stowed in the bay and the cover on
the bay has closed complete ly.
Opening the convertible top using the one
touch function
.,. Pull the sw itch br iefly to open the convertib le
top comp lete ly. It is not necessary to ho ld the
sw itch . The one-touch funct ion is only avai lab le
at speeds between 4 and 31 mph (6 and
SO km/h) .
Closing the convertible top
.,. Press and hold the sw itch until the convertib le
top is closed a nd the latch is locked.
The ind icator lighr
fi in the instrument cl uster
goes out when the top is comp lete ly open or
closed .
The side windows a utomatica lly lower slightly
during the opening/closing process.
A WARNING
- Never drive when the convert ible top is not
locked correctly. The w ind generated by driv
ing could cause it to open, which could in
jure v ehicle occupants or damage t he ve hi-
c~ . ~
Page 49 of 232
.... N
l'
N "1: .... I.O
"' N
"' ....
The leavin g home function i lluminates the area
around the vehicle when un locking it .
A WARNING
-Never use daytime running lights to see
where you are going. They are not bright enough and w ill not let you see far enough
ahead for safety, especially at dusk or when it is dark . Be aware of changes in outside
light cond itions when you are dr iv ing and re·
spond by switching on your low beams.
- Automatic head· and taillight control is only
intended to assist the d river. This feature
does not relieve the driver of his responsibi l
ity to check t he headlights a nd to turn t hem
on manually according to the cur rent lig ht
and visibility conditions. For example, fog
and rain cannot be detected by the light
sensors. Consequent ly, always switch the
headlights on under these weather cond i·
tions and when dr iv ing in the da rk.
- Crashes can happen when yo u cannot see
the road ahead and when you cannot be
seen by other motorists.
- Always turn on the headlights so that you
can see ahead and so that others can see
your car from the back.
- Please observe lega l regulations when using
the light ing systems described .
@ Tips
-Always observe the specific local regulations
for your area when to use your lights.
- Turn on low beams as evening app roaches
or in conditions of poor visib ility.
- Do not attach stickers to the windshie ld in
front of the sensors as this can disab le the
automat ic head- and taill ight control and
the automatic glare-dimming of the rear·
v iew mirror(s) *.
- If you remove the ignit ion from the ign it ion
lock while the headlights are still on, a buz
zer w ill sound as long as the dr iver's door is
open to remind you to t urn off the lights .
- In the AUTO mode, the low beams are
turned off when the ignition is t urned off.
The remaining lights ar e turned off when
t h e key is taken ou t of the ignition.
Cle ar vi sion
-In cool or damp weather conditions the
head lights may fog
over temporarily on the
inside .
- The c ritical factor is the temperature dif
ference between the inter io r and the exte·
rior of the hea dlight lens .
- W ith the mai n beams switched on, the
lig ht-em itting area w ill be free of conden
sation after a short time, however the
e d ges of the glass may still be fogged.
- This physical phenomeno n has no effect
on the life of your veh icle's lighti ng sys
tem .
Turn signals and high beam lever
The lever on the left side of the steering column
is used to operate the turn signals and the high
beam as well as the headlight flasher.
t
t
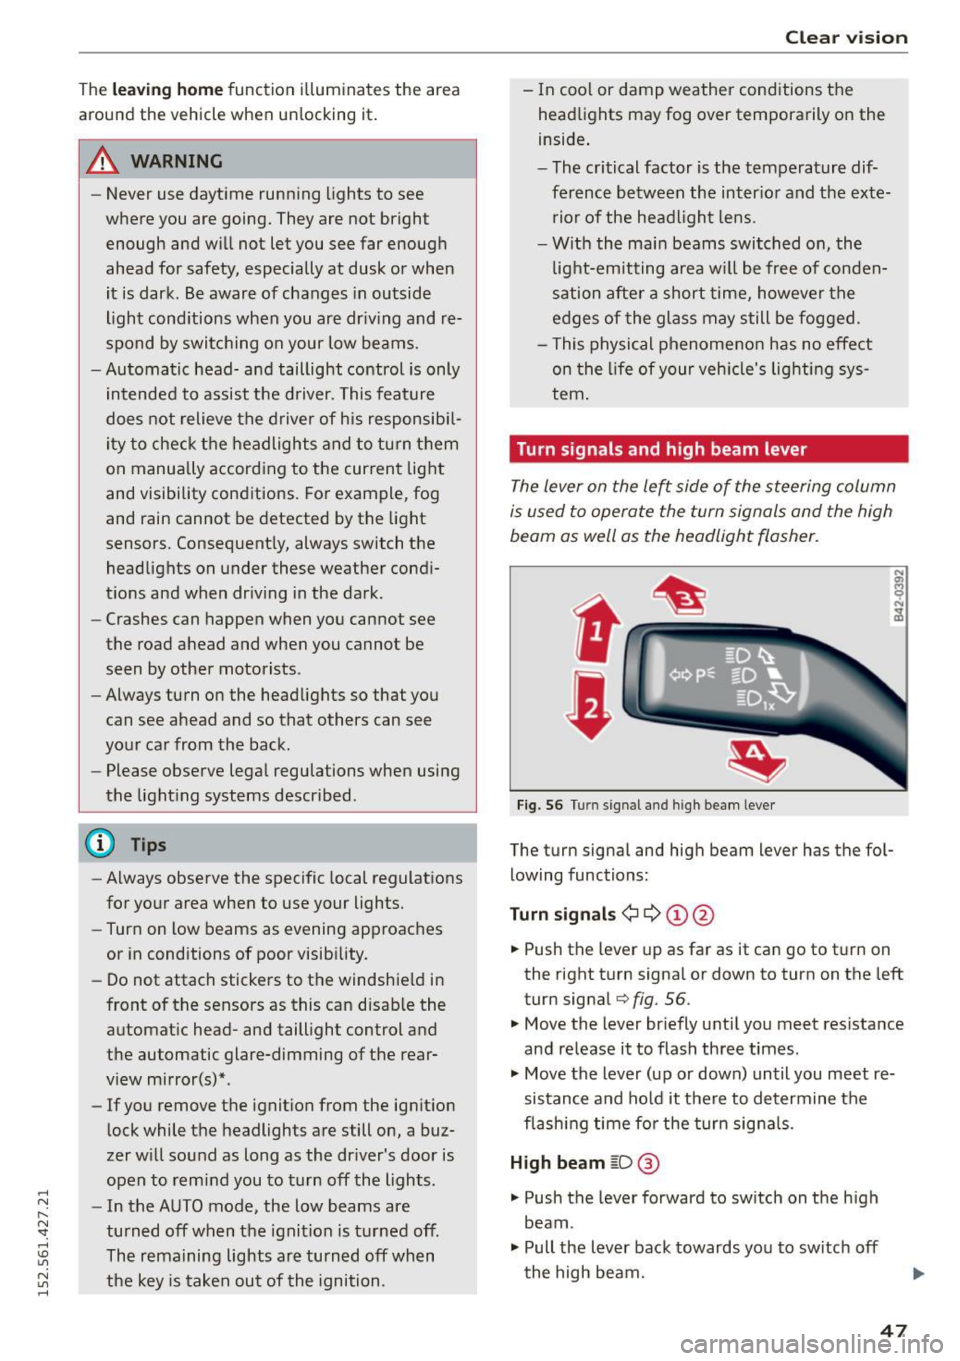
Fig . 56 Turn signal and high bea m leve r
The turn signa l and high beam lever has the fo l
lowing functions :
Turn signal s¢¢ ©@
.,. Push the lever up as far as it can go to t urn on
the right turn signa l or down to turn on the left
turn signal
q fig. 56.
.,. Move the lever br iefly u ntil you meet res istance
and re lease it to flash three times.
.,. Move the lever (up or down) until you meet re
sistance and hold it there to determine the
flash ing time fo r the turn signa ls .
High beam ~D @
.,. Push the lever forward to sw itch on the h igh
beam.
.,. Pull the lever back towards yo u to switch off
the high beam.
47
Page 51 of 232
.... N
l'
N "1: .... I.O
"' N
"' ....
With the door contact circuit, the interior lights
turn on as soon as you unlock the veh icl e or open
the doors . The interior lights are also turned on
when the ignition key is removed . The lights turn
off about 30 seconds afte r the doors are closed .
When the veh icle is locked or when the ignition is
turned o n, the inter ior lights are turned off .
When a door is open , the interior lights are
turned off after about 10 m inutes to preven t bat
tery draining .
T he brightness of the lights is controlled a uto
mat ica lly by a d immer when they a re sw itched
on/off.
Instrument panel illumination
T he illumination of the instruments, displays
and the center console can be adjusted .
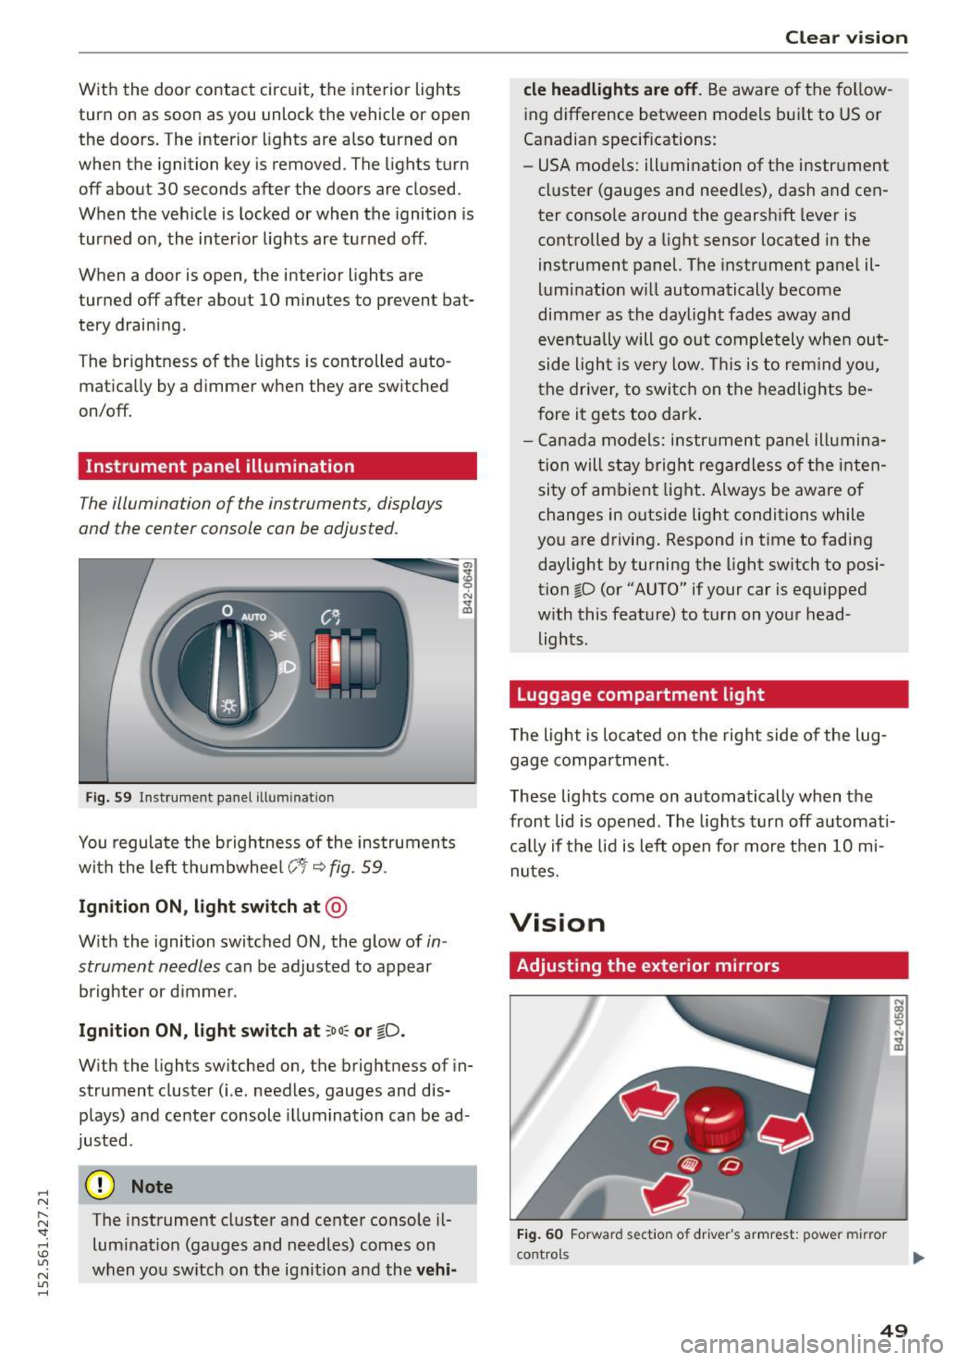
Fig . 59 In strument pa nel ill uminatio n
You regulate the brightnes s of the ins truments
with the left th umbwhee l
C:1 i::;,fig. 59.
Ign ition ON , light switch at @
With the ignition switched ON, the glow of in
strument needles
can be adjusted to appear
brighter or d immer .
Ignition ON , light switch at :oo~ or tD .
With the lights sw itched on, the brightness of in
strument cluster (i.e. needles, gauges and dis
plays) a nd center console il lum ination ca n be ad
justed .
(D Note
The instrument cluster and center console il
lum inat io n (gauges and needles) comes on
when you sw itch on the ig nitio n and the
ve hi-
Cle ar vi sion
cle headlight s are off . Be aware of the fo llow
ing difference between models b uilt to US or
Canadian specif ications:
- USA models: ill umination of the i nstr ument
cl uster (gauges and need les) , dash and cen
ter console around the gearsh ift lever is
controlled by a light sensor located in the
instrument panel. The instrume nt pane l il
lum ination w ill automatically become
dimme r as the daylight fades away and
eventua lly will go out comp letely when out
side light is very low . Thi s is to rem ind you,
t he driver, to switch on t he headlights be
fore it gets too dark .
- Cana da model s: instrument panel illumina
t ion will s tay bright regar dless o f the inten
si ty of ambien t light . Always be aware o f
changes in outside lig ht conditions while
you are driving. Respond in t ime to fading
daylight by turning the light sw itch to posi
tion ~D (or "AUTO" if your car is equipped
w ith this feat ure) to turn on your head
lights .
Luggage compartment light
The light is located on the right side of the lug
gage compa rtment .
These lights come on automatically when the
front lid is opened . The lights turn off automati
c a lly if the lid is left o pen fo r more then 10 mi
nutes .
Vision
Adjusting the exterior mirrors
Fig. 60 Forward sect io n of driver 's armrest: pow er mirr or
con trol s ...
49
Page 52 of 232
Clear vision
Turn the knob to the desired position :
Q/P -In this position, you can adjust the driv
er's and front passenger 's exterior mirrors by
turning the knob in the desired direction .
(@ -The mirrors are heated depending on the
outside temperature.
8 - The exterior mirrors fold in*
You are well-advised to fold the exterior mirrors in when maneuvering in tight spaces or when
leaving the car parked close to other vehicles.
A WARNING
-
- Curved (i .e. convex) mirror surfaces in
crease your field of view . Remember that
vehicles or other objects will appear smaller
and farther away than when seen in a flat
mirror. If you use this mirror to est ima te
distances of following vehicles when chang
ing lanes, you could estimate incorrectly
and cause an accident.
- If th e mirror housing is moved unintent ion
a lly (for example, wh ile parking your vehi
cle), then you must first fold the mirror
electrically. Do not readjust the mirror hous
ing manually. You could damage the motor
which controls the mirror.
- If you wash the vehicle in an automatic car
wash, you must fold the exterior mirrors in
to reduce the risk of damage to the mirrors.
Never fold power folding exterior mirrors*
by hand . Only fold them in and out using
the power controls.
(D Tips
If there should be a malfunction in the elec
trical system, you can still adjust the exter ior
m irrors by pressing the edge of the mirror .
50
Dimming the mirrors
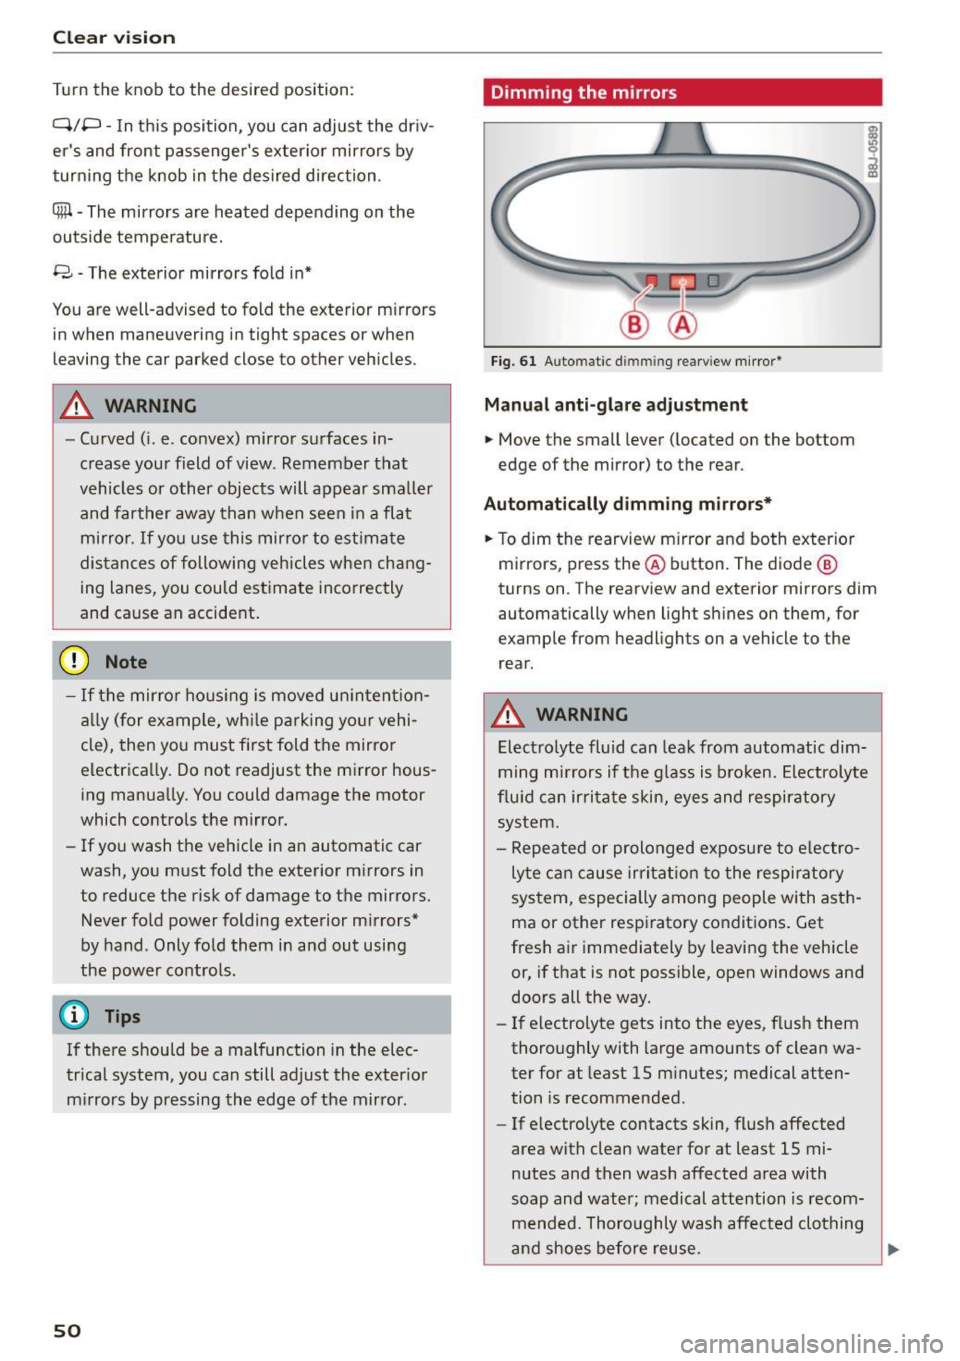
Fig. 61 Auto matic d immin g rearv iew mirror*
Manual anti-glare adjustment
.. Move the small lever (located on the bottom
edge of the mirror) to the rear .
Automatically dimming mirrors*
.. To dim the rearview m irror and both exterior
mirrors, press the@ button. The diode @
turns on . The rearview and exterior mirrors dim
automatically when light shines on them, for
example from headlights on a vehicle to the
rear.
A WARNING
Electrolyte fluid can leak from automatic dim
ming mirrors if the glass is broken. Electrolyte
fluid can irritate skin, eyes and respiratory
system.
- Repeated or prolonged exposure to electro
lyte can cause irritat ion to the respiratory
system, especially among people with asth
ma or other respiratory conditions. Get
fresh air immediately by leaving the vehicle
or, if that is not possible, open windows and
doors all the way.
- If electrolyte gets into the eyes, flush them
thoroughly with large amounts of clean wa
ter for at least 15 minutes; medical atten
tion is recommended .
- If electrolyte contacts skin, flush affected
area with clean water for at least 15 mi
nutes and then wash affected area with
soap and water; medical attention is recom
mended. Thoroughly wash affected clothing
and shoes before reuse.
Page 54 of 232
Clear vision
in the interval wipe position and then come back
a while later and drive off, the rain sensor will re
activate itself after the vehicle speed has exceed
ed 4 mph (6 km/h).
The rain sensor* is only activated with the wiper
lever set to position(!). When it starts to rain,
the rain sensor will automatically activate the in
termittent wiping mode.
To reduce the sensitivity of the sensor, move
switch @ down. To increase the sensitivity, move
the switch up. The higher you adjust the sensitivi
ty, the faster the sensor will react when it senses moisture on the windshield. The pauses between
wiper turns depend not only on the sensitivity setting, but on the vehicle speed as well.
During brief stops, e.g . at a red light, wiper mo
tion will automatically be reduced to the next
lower speed . Wipers already turning at low speed
change to intermittent wiping.
When the ignition is turned on, the washer jets
are heated.
A WARNING
- Wiper blades are crucial for safe driving! On
ly when they are in good condition are they
able to clear the windows properly to pro
vide uncompromising visibility. Worn or
damaged wiper blades are a safety hazard
¢ page 53, Replacing windshield wiper
blades!
- The light/rain sensor* is only designed to as
sist and support the driver. It remains en
tirely the driver's responsibility to monitor outside weather conditions and to manually
activate the wipers as soon as rain or drizzle
reduces visibility through the windshield .
- The windshield must not be treated with
water-repellent materials. They can increase
glare under poor visibility conditions such as
wetness, darkness, or when the sun is low
on the horizon . In addition, they can cause
the windshield wipers to chatter.
(D Note
In freezing or near freezing conditions:
52
- Always check that the wiper blades are not
frozen to the glass before you turn the wip
ers on. Loosen a wiper blade which is frozen
in place before operating the wipers to pre
vent damage to the wiper blade or the wiper
motor .
- Do not use the wipers to clear a frosted win
dow. Using the wipers as a convenient ice
scraper will destroy the wiper blades .
- Before you take your vehicle to an automatic
car wash, make sure you have the wind
shield wiper system switched off (lever in position
0), otherwise the windshield wiper
system could get damaged in the car wash if
it should suddenly come on.
(D Tips
- The windshield wipers are switched off
when the ignition is turned off. Activate the
windshield wipers after the ignition is
switched back on by moving the windshield
wiper lever to any position.
- Worn or dirty windshield wiper blades cause
smearing, which can affect the operation of
the light/rain sensor*. Check the condition
of your windshield wiper blades regularly.
- The rain sensor is part of the interval wiping
system. Turning off the ignition will also de
activate the rain sensor . To reactivate the
sensor, switch off the interval wiping func
tion, then switch it back on again.
- Applies to vehicles with light/rain sensor:
When the wipers are switched on manually
and in rain conditions, the automatic head
lights* turn on <=>
page 46, Lights or off dur
ing the day when the wipers are no longer
operating. The automatic headlights* func
tion is available in this case only when the
light switch is in the "AUTO" position
<=>
page 46, fig. 55.
- Make sure the washer fluid reservoir in the
engine compartment is topped off before
going on a long trip. Look up<=>
page 168
for checking and filling the washer contain
er.
- The wipers only operate with the hood com
pletely closed.
Page 59 of 232
Front passenger's seat
Always move the front passenger seat into the rearmost position.
To avoid contact wit h the airbag while it is de
p loying, do not sit any closer to the instrume nt
panel than necessary and always wear the three
point safety belt provided adjusted correctly . We
recommend that you adjust the passenger's seat
i n the following manner:
"' Bring the backrest up to an (almost) upr ight
pos it ion.
Do not ride w ith the seat reclined .
"'T he idea l position fo r the head restra int is with
the upper edge of the rest ra int level with the
top o f you r head¢
page 58. Yo u should not
lower the top o f the restraint be low the level of
your eyes .
"' Place your feet on the f loor in front of the pas
senger's seat.
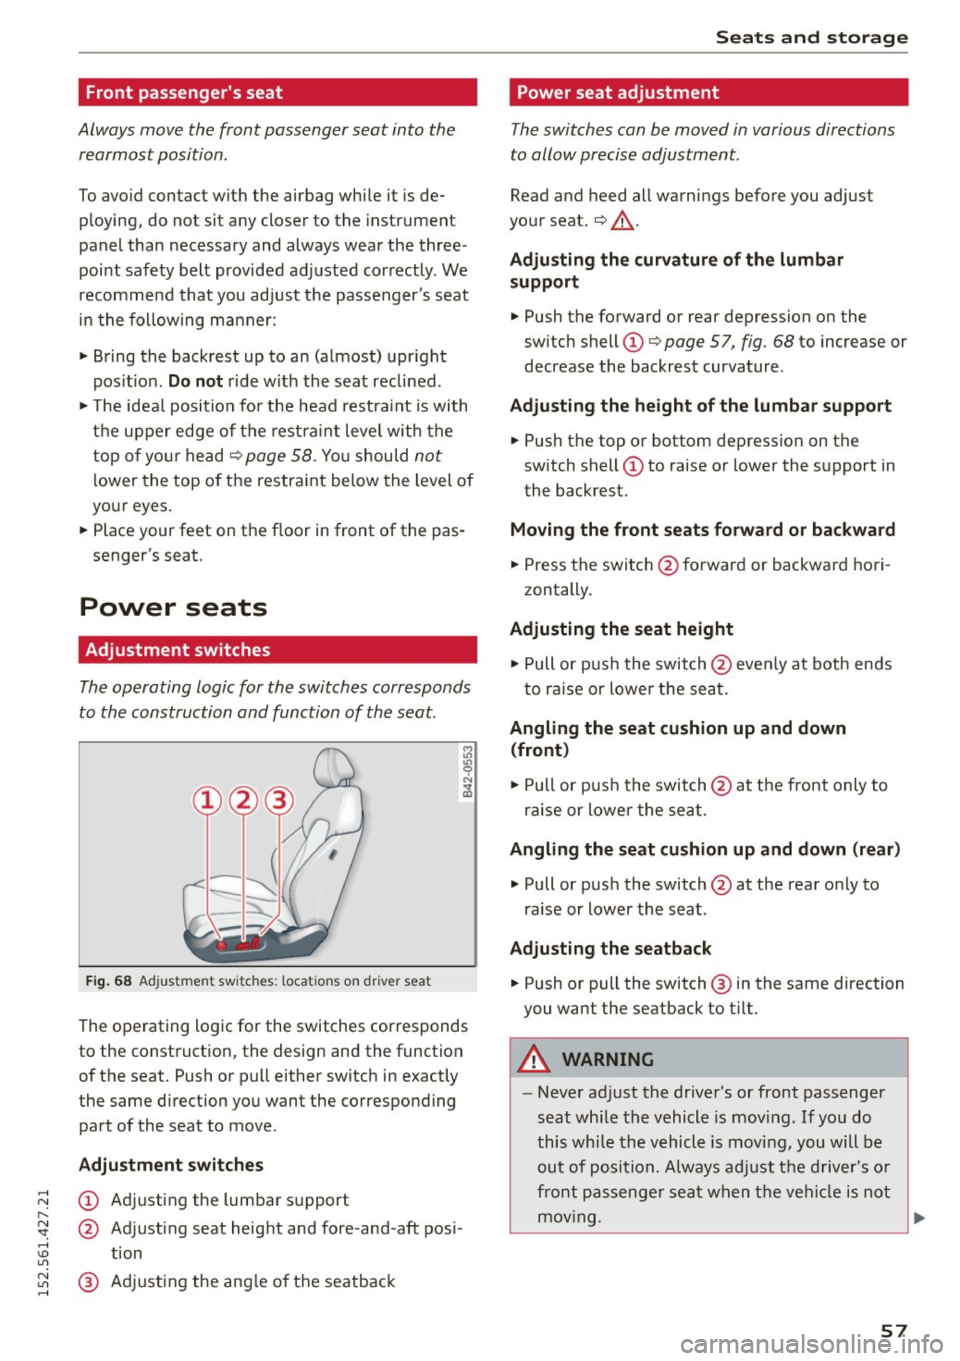
Power seats
Adjustment switches
The operating logic for the switches corresponds
to the construction and function of the seat.
F ig . 68 Ad just men t sw it ches: locat ions on driver seat
The operating logic for the switches corresponds
to the const ruction, the design and the function
of the seat. Push or pull either switch in exactly
the same direction you want the corresponding pa rt of the seat to move .
Adjustment switches
~ (I) Adjusting the lumbar s upport
r--
~ @ Adjusting seat height and fore-and -aft posi-,....,
S eat s and stor age
Power seat adjustment
The switches can be moved in various directions
to allow precise adjustment.
Read and heed all warnings before you adjust
your seat.¢ ,&..
Adju sting the cur vatur e of the lumbar
support
"' Push the forward or rear depression on the
sw itch shell (I)¢
page 5 7, fig. 68 to increase or
decrease the backrest curvature .
Adjusting the height of the lumbar support
"' Push the top or bottom depression on the
sw itch shell (I) to raise or lower the s upport in
the backrest.
Moving the front seat s forward or backward
"' Press the switch @forward or backwa rd hori
zontally.
Ad justing the seat height
"' Pull or pus h the switch @eve nly at both ends
t o ra ise or lowe r the sea t.
Angling the seat cushion up and down
(front )
"' Pull or pus h the switch @at t he front only to
ra ise or lower the sea t.
Angling the seat cushion up and down (rear)
"' Pull or push the switch @at the rear o nly to
ra ise or lower the seat .
Adjusting the seatback
"' Push or pull the switch @ in the same direction
you want the seatback to t ilt.
A WARNING
--- Never adjust the driver's or front passenger
seat whi le the vehicle is moving. If you do
this whi le the vehicle is moving, you will be
ou t of position. Always ad just the d river 's o r
fr ont p assenge r seat w hen t he vehi cle is not
mov ing.
~
57
Page 62 of 232
Seats and storag e
braking or in an accident -especially if the
airbag is dep loyed -these objects could in
jure any passengers ins ide the vehicle.
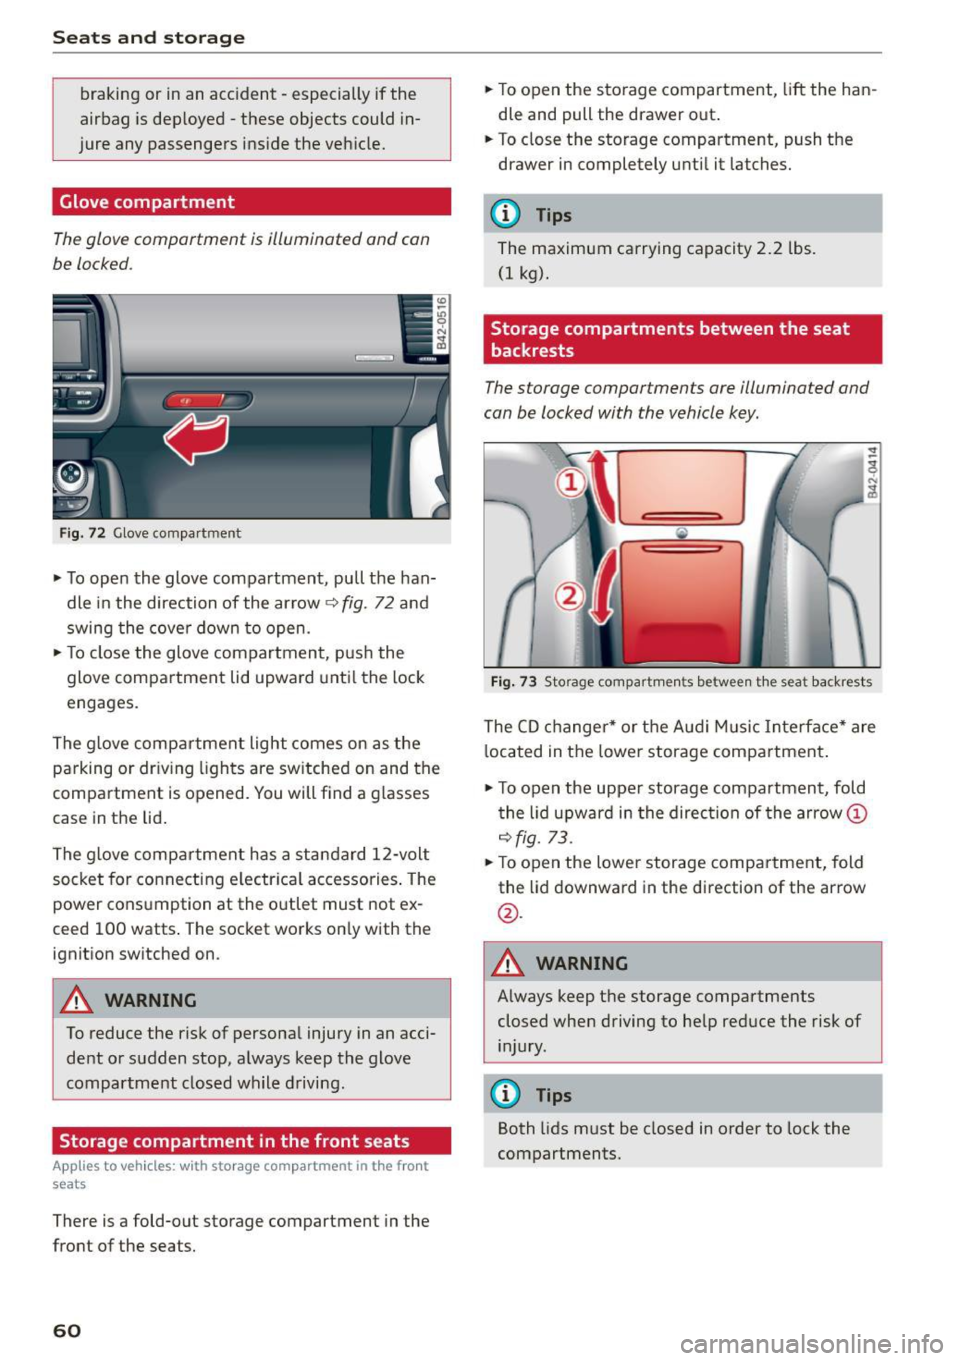
Glove compartment
The glove comportment is illuminated and con
be locked.
F ig. 72 Glove compartment
.,. To open the glove compartment, pull the han
dle in the direction of the arrow
9 fig. 72 and
swing the cove r down to open .
.,. To close the glove compartment, p us h the
glove compartment lid upward unti l the lock
engages.
The glove compartment light comes on as the parking or dr iving lights are switched on and the
compartment is opened. You will find a g lasses
case in the lid.
The glove compartment has a standard 12-volt socket for co nnecting e lectrica l accessories . The
power cons umption at the outlet must not ex
ceed 100 watts . The socket works on ly with the
ignition switched on.
A WARNING
To reduce the risk of personal injury in an acci
dent o r sudden stop, a lways keep the glove
compartment closed wh ile driving .
Storage compartment in the front seats
Applies to veh icles: w ith storage compartment in the front
seats
There is a fold-out storage compartment in the
front of the seats.
60
.,. To open the storage compartment, lift the han
dle and pull the drawer out .
.,. To close the storage compartment, push the
drawer in completely until it latches.
(D Tips
The maximum carrying capacity 2.2 lbs.
(1 kg).
Storage compartments between the seat
backrests
The storage comportments ore illuminated and
con be locked with the vehicle key.
Fi g. 73 Storage compart men ts betwee n th e seat backrests
The CD changer * or t he A ud i M usic Interface* are
l ocated in the lowe r storage compartment .
.,. To open the upper storage compartment, fold
t he lid upward in the direc tion of the arrow@
9fig. 73 .
.,. To open the lower storage compartment, fold
the lid downward in the direction of the arrow
@ .
A WARNING -
Always keep t he storage compartments
closed when driving to help reduce the risk of i n jury.
(D Tips
Both lids m ust be closed in order to lock the
compartments.