ESP AUDI R8 SPYDER 2015 Workshop Manual
[x] Cancel search | Manufacturer: AUDI, Model Year: 2015, Model line: R8 SPYDER, Model: AUDI R8 SPYDER 2015Pages: 232, PDF Size: 58.36 MB
Page 143 of 232
..... N
r-N "': ..... \!) 1.1'1
N 1.1'1 .....
What you should know
The highest priority is given to maintaining start
ing capability .
The battery is severely taxed in short-distance
driving, in city traffic and during the cold time of
year . Abundant electrical energy is required, but
only a little is generated . It is also critical if the
engine is not running and electrical components
are turned on. In this instance energy is being
consumed but none is being generated.
It is in precisely these situations that you w ill no
tice energy management actively regulating the
d istribution of ene rgy.
Vehicle stands for an extended period
If you do not drive your vehicle over a period of
several days or weeks , electr ical components are
gradually cut back or switched off . This reduces
energy consumption and maintains starting ca
pability over a longer pe riod .
Take into consideration that when you unlock
your veh icle, some convenience functions, such
as the remote key or power seat adjustment, may
not be available. The convenience functions will
be available again when you turn on the ignition
and start the engine .
With the engine turned off
If you listen to the radio, for example, with the
engine turned off, the battery is being dis
charged .
If starting capability is jeopardized due to energy
consumption, a message appears in the driver in
formation display .
You have to start the engine to charge the bat
tery .
With the engine running
Although electrical energy is generated when the
vehicle is being driven, the battery can become
discharged. This happens mostly when little en
ergy is be ing generated and a great deal con
sumed and the battery's state of charge is not
optimal.
Intelligent technology
To bring the energy balance back into equilibri
um, consumers which require especially large
amounts of energy are temporar ily cut back or
switched off. Heating systems in part icu lar re
quire a great deal of energy. If you notice, for ex
ample, that the heated seats* or the heated rear
window are not heating, they have been tempo
rarily cut back or switched off . These systems w ill
be available again as soon as the energy balance
has been restored.
You w ill also not ice that engine idle speed has
been increased slightly . This is normal and not a
cause for concern. By incr easing eng ine idle
speed the additional energy required is generated
and the battery is charged.
Driver notification in the instrument
cluster display
If battery power drops in to the range where it
can limit the ability of the engine to start, this is
shown in the instrument cluster display w ith the
following driver message :
[•] low battery charge: battery will be charged
while driving
This notification reminds you that the starting
capability of the engine may be limited. As soon
as you start driving again, the battery will be re
charged and the notificat ion will go out .
Driver notification appears and goes out
again
If this driver notification appears after the igni
tion is turned on or while driv ing and it goes out
again after a while, the battery has been ade
quately recharged .
Driver notification appears and does not go
out again
If this driver notif ication appears after the ign i
t ion is turned on or while dr iv ing and does not go
out again, the battery's state of charge is not in
t h e optimal range. Starting ability is restricted .
Have the battery checked as soon as possible by
an authorized Audi dea le r or qualified workshop.
141
Page 144 of 232
Driving and en vironment
Driving and environment
Break-in period
A new vehicle must be broken in, and the break-in
period shou ld be 1 ,500 miles (2,500 km) . Do not
use full acceleration for the first 600 miles
(1 ,000 km) and do not exceed the maximum en
gine speed of 6,000 rpm You must also not use
full accelerat ion between 600 and 1,200 miles
(1,000 to 2,000 km) . From 1,200 to 1,500 miles
(2 ,000 to 2,500 km), you can gradually increase
maximum eng ine speed to 8,250 rpm for brief
pe riods.
During the first hours of operation, there is
greater fr iction in the eng ine and the transmis
sion than later when all the moving pa rts have
b roken in .
The way you drive during the first 1,500 miles
(2 ,500 km) affects engine quality . If you drive at
modera te engine speeds thereafter, part icu larly
when the engine is cold, yo u red uce eng ine wea r
and increase the potential mileage o f the engine.
Do not dr ive at RPMs that a re too
low. Shift down
when the engine is no longe r runni ng "smooth
ly". Extremely high RPMs are gover ned automati
cally.
Avoid damaging the
vehicle
W hen you are driving on poor roads, or over
curbs, steep ramps, etc ., make certain that low
lying parts such as spoilers and exhaust system
parts do not bottom out and get damaged .
This is especially true for vehicles with low-slung
chassis (sports chassis) and fully loaded vehicles.
Driving through water on
roads
Note the following to avoid vehicle damage when
d riving through water, for examp le on flooded
roads:
- The water must no t be any h igher than the bot
tom of the vehicle body.
142
- Do not drive faster than walk ing speed .
A WARNING
After driv ing through water, mud, s lush, etc .,
the brakes may be s low to take effect because
of wet brake rotors and pads. Dry the brakes
first by brak ing carefully to restore the full
braking effect.
(D Note
Vehicle components such as the eng ine,
transmission , suspension or e lectrical system
can be severe ly damaged by dr iv ing t hrough
water .
(D Tips
- Check the dept h of the water before driving
through it.
- Do not stop the vehicle, drive in reverse or switch the engine off when driv ing through
water.
- Keep in mind that oncoming veh icles may
create waves that raise the water level and
make it too deep for your vehicle to d rive
through safely .
- Avoid driving through salt water because it
can cause corrosion.
Catalytic converter
It is very important that your emission control
system (catalytic converter) is functioning prop
erly to ensure that your vehicle is running in an
environmen tally sound manner.
.,. Always use lead-free gasoline ~ page 151,
Fuel supply.
.,. Never r un the tank down all the way to empty.
.,. Never put too much mo tor o il in yo ur engi ne
~ page 160, Adding engine oil 'l::r..
.,. Never try to push- or tow-sta rt your vehicle .
The cata lytic converter is an effi cien t "clean -up"
device built in to the exhaust system of the vehi
cle. The cata lytic conve rter burns many of the
po llutants in the exhaust gas before they are re
l eased into the atmosphere.
-
Page 147 of 232
.....
Vehicle care and cleaning General information
Regular, proper care helps to maintain your vehi
cle's value.
It can a lso be a req uirement when
submitting warranty claims for corrosion damage
and paint defects on the body.
The required cleaning and care products can be
obtained from your authorized Audi dea ler or a
qualified workshop. Read and follow the instruc
tions for use on the packaging.
A WARNING
-Us ing clean ing and care products incorrectly
can be dangerous to your health.
- Always store cleaning and care products out
of reach of children to reduce the r isk of poi
soning.
@ For the sake of the environment
- Preferably use environmentally-friendly products when buying cleaning agents.
- Do not dispose of leftover cleaning and care
products with household trash.
Car washes
The longer deposits remain on the vehicle, the
more the surface can be damaged. High tempera
tures such as those caused by sunlight increase
the damaging effect .
Before washing, wet heavy deposits with plenty
of water.
Stubborn depos its such as bird droppings or tree
sap are best removed with plenty of water and a
microfiber cloth .
A lso, was h the underside of your vehicle once
road salt stops being used for the season.
Pressure washers
When washing your veh icles w ith a pressure
washer, always follow the operating instructions
"' provided with the pressure washer. This is espe-
r--
~ cially important in regard to the pressure and
; spraying distance . Do not aim the spray directly
~ at seals on side windows, doors, the engine com -,.... Vehicle care and cleaning
partment lid, the front lid
or the convertible top
or at tires, rubber hoses, insulating material
orsensors* or camera lenses *. Keep a distance of
at least 16 inches (40 cm).
Do not remove snow and ice with a pressure
washer .
Never use rotary nozzles or high pressure noz
zles.
The water temperature must not be above 140 °F
(60 °().
Automatic car washes
Spray off the veh icle before washing.
Make sure that the windows are closed and the
windshield wipers are off. Follow instructions
from the car wash operator, especially if there are
accessor ies attached to your vehicle .
If possible, use car washes that do not have
brushes .
Only use car washes where the vehicle remains
stationary and the washing equipment moves
around t he vehic le when washing and drying. Car
washes that move the vehicle through the car
wash using a chain are not recommended.
Washing by hand
Clean the vehicle starting from the top and work
ing down using a soft sponge or cleaning brush.
Use solvent-free cleaning prod ucts .
Washing vehicles with matte finish paint by
hand
To avoid damaging the paint when washing, first
remove dust and large particles from your vehi
cle. Insects, grease spots and fingerprints are
best removed with a spec ia l cleaner for matte
finish paint.
Apply the prod uct using a microfiber cloth . To
avo id damaging the paint surface, do not use too
much pressure.
Rinse the vehicle thoroughly with water. Then
c lean using a neutral shampoo and a soft micro
fiber cloth.
Rinse the vehi cle thoroughly again and let it air
dry. Remove any water residue using a sham my . .,.
145
Page 149 of 232
..... N
r-N "": ..... \!) 1.1"1
N 1.1"1 .....
Vehicle care and cleaning
Component S ituation Solution
Ex haust t ail
Road sa lt Water, cleaning
solution suitable for stainless steel, if nee-
pip es essary
Power to p Dirty Clean water, power top clean ing product, if necessary .
C lean with the gra in of the fabr ic using a soft brush and al-
l ow to air d ry .
W ind d efle ct o r Dirty Water, mild soap solutiona), if necessary
Decorati ve p arts/ Dirty Mild soap solution al, a cleaning so lution suitable for stain-
trim less stee l, if necessary
P ai nt Paint damage Refer to the pa int number on the vehicle data label, repair
with touch up paint ~
page 212
Spilled fuel Rinse with water immediately
Rust fi lm Rust film remover, then protect with hard wax; for ques-
tions, refer to an authorized A udi dealer or a q ualified
workshop
Corrosion Have it removed by an authorized Audi dealer or a qualified
workshop
Water no longer Protect with hard wax (at least twice per year)
beads on the surface
of clean paint
No shine even though Treat with suitab le polish; then apply paint p rotectant if
paint has been pro- the polish that was used does not contain any protectant
tected/paint looks
poor
Deposits such as in- Dampen w ith water immediatedly and remove w ith a mi-
sects, bird dropp ings, crofibe r cloth
tree sap and road sa lt
Grease-based con-Remove immediatedly w ith a mild soap solutional and a
taminants such as soft cloth
cosmetics or sunblock
C ar bon p art s Dirty Clean the same way as painted parts~ page 145, Car
washes
D ecorativ e decal s Dirty Soft
sponge with a mild soap solutiona)
aJ Mild soap solution: max imu m two tablespo ons n eutral soap in 1 quart (I lite r) of water
Cle anin g int erior
Compon ent Situation Solution
Windo ws
Dirty
Glass cleaner, then wipe dry
Deco rative Dirty Mild soap solutional
parts/
trim
Pl as tic par ts
Dirty Damp cloth
Heavily soiled Mild soap solutional, solvent-free plastic clea ning so l-
u tion, if necessary
147
Page 150 of 232
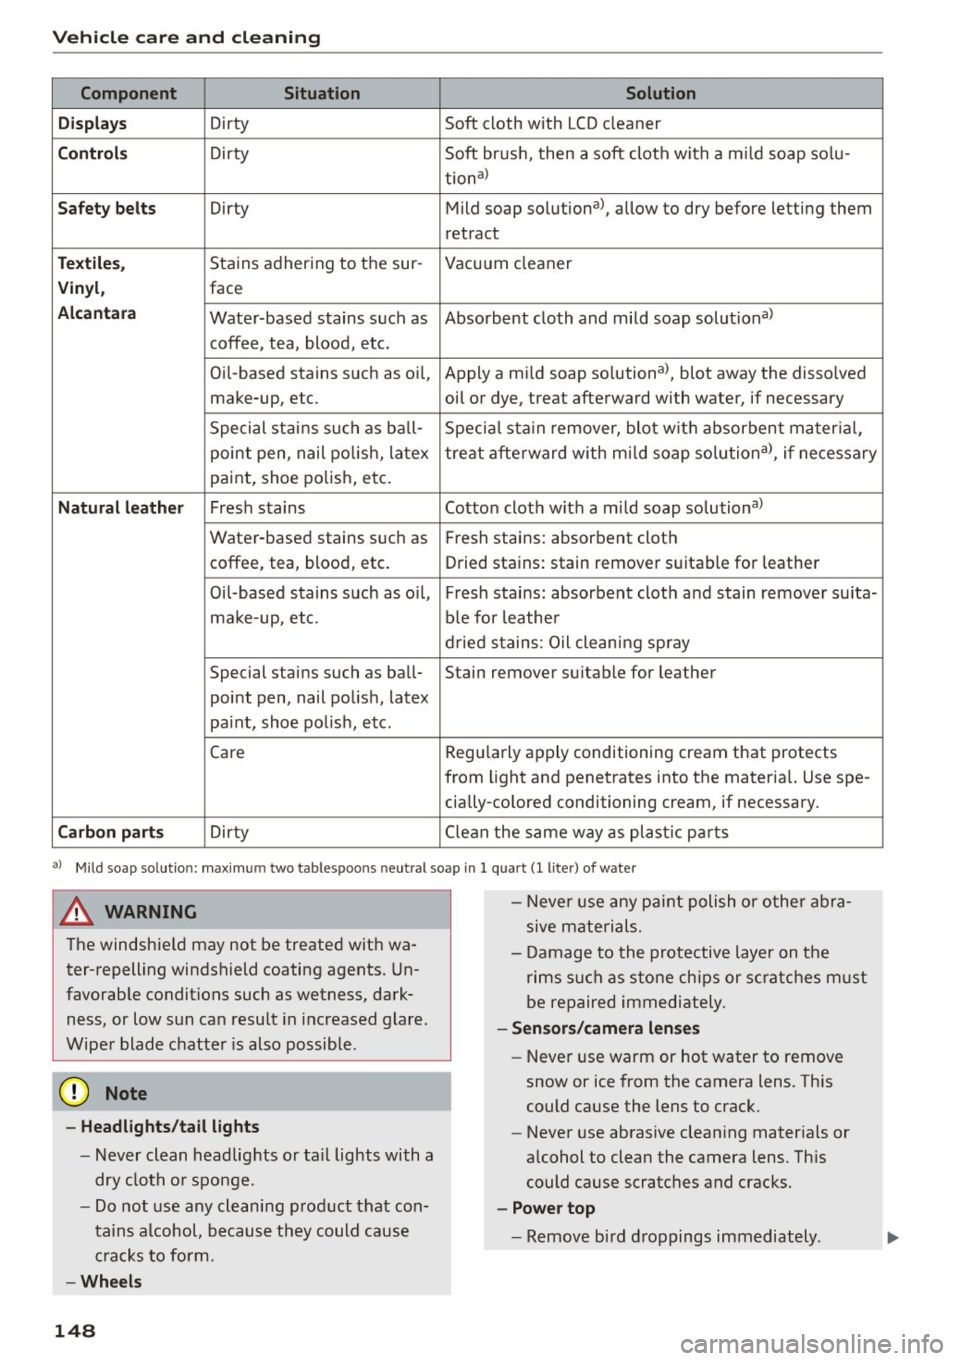
Vehicle care and cleaning
Component Situation Solution
Displays
Dirty Soft cloth with LCD cleaner
Controls Dirty Soft brush, then a soft cloth with a mild soap solu-
tional
Safety belts Dirty Mild soap solution a>, allow to dry before letting them
retr act
Textiles, Stains adhering to the sur- Vacuum cleaner
Vinyl, face
Alcantara Water-based stains such as Absorbent cloth and mild soap solutional
coffee, tea, blood, etc.
Oil-based stains such as o il, Apply a mi ld soap solutiona>, blot away the disso lved
make-up, etc. oil ori dye, treat afterward with water, if necessary
Special stains such as ball- Special stain remover, blot with absorbent material,
point pen, nail polish, latex treat afterward with mild soap solutional, if necessary
paint, shoe polish, etc.
Natural leather Fresh stains Cotton cloth with a mild soap solutional
Water-based stains such as
Fresh stains: absorbent cloth
coffee, tea, blood, etc. Dried stains: stain remover suitable for leather
Oil-based stains such as oil, Fresh stains: absorbent cloth and stain remover suita-
make-up, etc. ble for leather
dried stains: Oil cleaning spray
Special stains such as ball- Stain remover suitable for leather
point pen, nail polish, latex
paint, shoe polish, etc.
Care Reg
ula rly apply conditioning cream that protects
from light and penetrates into the materia l. Use spe-
cially-co lored conditioning cream, if necessary.
Carbon parts Dirty Clealil the same way as plastic parts
aJ Mild soap so lution: max im um two ta blespoo ns neut ral so ap in 1 quart (l lite r) of w ate r
A WARNING
Th e windshie ld may not be treated with wa
ter-repelling windshield coating agents. Un
favorable conditions such as wetness, dark
ness, or low sun ca n resu lt in increased glare.
Wiper blade chatter is also possible .
(D Note
-Headlights/tail lights
- Never clean headlights or tail lights with a
dry cloth or sponge.
- Do not use any cleaning product that con
tains alcohol, because they could cause
cracks to form.
-Wheels
148
-
- Never use any paint polish or other abra
sive materials.
- Damage to the protective layer on the
r ims such as stone chips or scratches must
be repaired immed iately.
-Sensors/camera lenses
- Never use warm or hot water to remove
snow or ice from the camera lens. This
could cause the lens to crack.
- Never use abrasive clean ing materials or
a lcohol to clean the camera lens. This
could cause scratches and cracks.
- Power top
- Remove bird droppings immediately .
Page 154 of 232
Fuel supply and filling your fuel tank
fill up at busy gas stations where the seasonal
adjustment is more like ly to be made in time.
0 Note
- Methanol fuels which do not meet these re
quirements may cause corrosion and dam
age to plastic and rubber components in the
fuel system.
- Do not use fuels that fail to meet the spec i
fied criteria in this chapter.
- If you are unable to determine whether or
not a particular fuel blend meets the speci
fications, ask your service station or its fuel
supplier.
- Do not use fuel for which the contents can
not be identified.
- Fuel system damage and performance prob
l ems resulting from the use of fuels differ
ent from those specified are not the respon
sibility of Audi and are not covered under
the New Vehicle or the Emission Control
System Warranties.
- If you experience a loss of fuel economy or
driveability and performance problems due
to the use of one of these fuel blends, we
recommend that you switch to unb lended
fuel.
Gasoline additives
A major concern among many auto manufactur
ers is carbon deposit build-up caused by the type
of gasoline you use.
A lthough gasol ine grades differ from one manu
facturer to another, they have certain things in
common. All gaso line grades contain substances
that can cause deposits to collect on vita l engine
parts, such as fuel injectors and intake valves. A l
though most gasoline brands include additives to
keep engine and fuel systems clean, they are not
equally effect ive .
Audi recommends using TOP TIER Detergent Gas
oline. For more information on TOP TIER Deter
gent Gasoline, please go to the official website (www.toptiergas .com).
152
After an extended period of using inadequate
fuels, built-up carbon deposits can rob your en gine of peak performance .
([) Note
Damage or malfunction due to poor fuel qual
ity is not covered by the Audi New Vehicle
Limited Warranty.
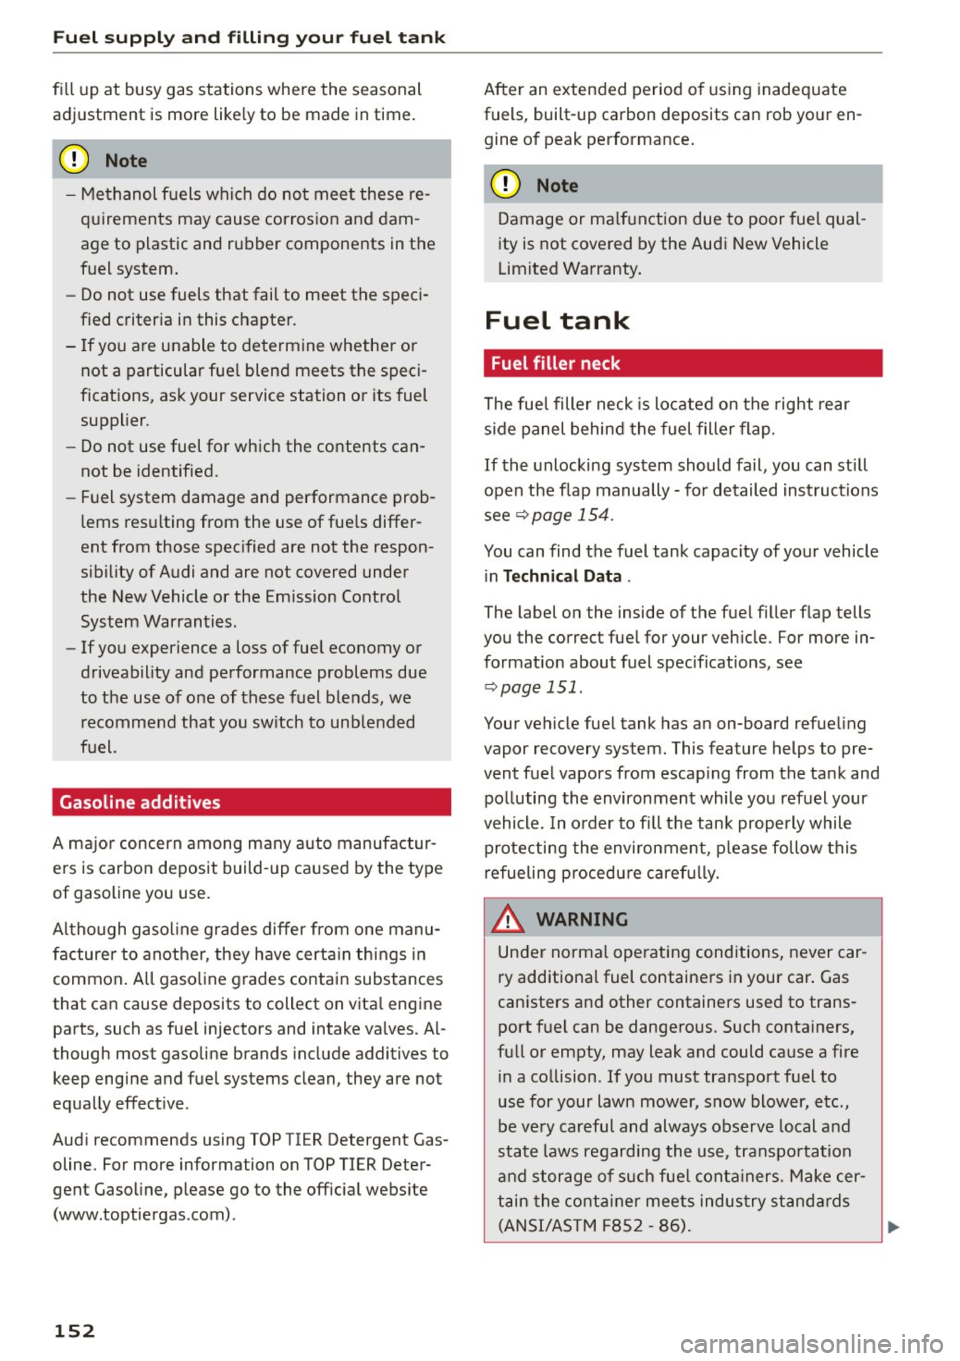
Fuel tank
· Fuel filler neck
The fuel filler neck is located on the right rear
s id e panel behind the fuel filler flap.
If the unlocking system should fail, you can still
open the flap manually -for detailed instructions
see
~page 154.
You can find the fuel tank capacity of your vehicle
i n
Technical Data .
The label on the inside of the fuel filler flap tells
you the correct fuel for your vehicle. For more in
formation about fuel specifications, see
~ page 151 .
Your vehicle fue l tank has an on-board refueling
vapor recovery system. This feature helps to pre
vent fuel vapors from escap ing from the tank and
polluting the environment while you refuel your
vehicle. In order to fill the tank properly while
protecting the environment, please follow this
refueling procedure carefully.
& WARNING
-Under normal operating conditions, never car
ry additional fuel containe rs in your car . Gas
canisters and other containers used to trans port f uel can be dangerous. Such containers,
full or empty, may leak and could cause a fire
in a collision. If you must transport fuel to
use for your lawn mower, snow blower, etc., be very careful and always observe local and
state laws regarding the use, transpo rtation
and storage of such fuel containers. Make cer
tain the container meets indus try s tandar ds
(ANSI/ASTM F8S2 -86).
Page 155 of 232
.... N
l'
N "1: .... I.O
"' N
"' ....
(D Note
Never drive yo ur vehicle unti l the fuel tank is
completely dry . The irregular supp ly of fuel
can cause misfir ing. Gasoline co uld enter into
the exhaust system and damage the catalyt ic
converter .
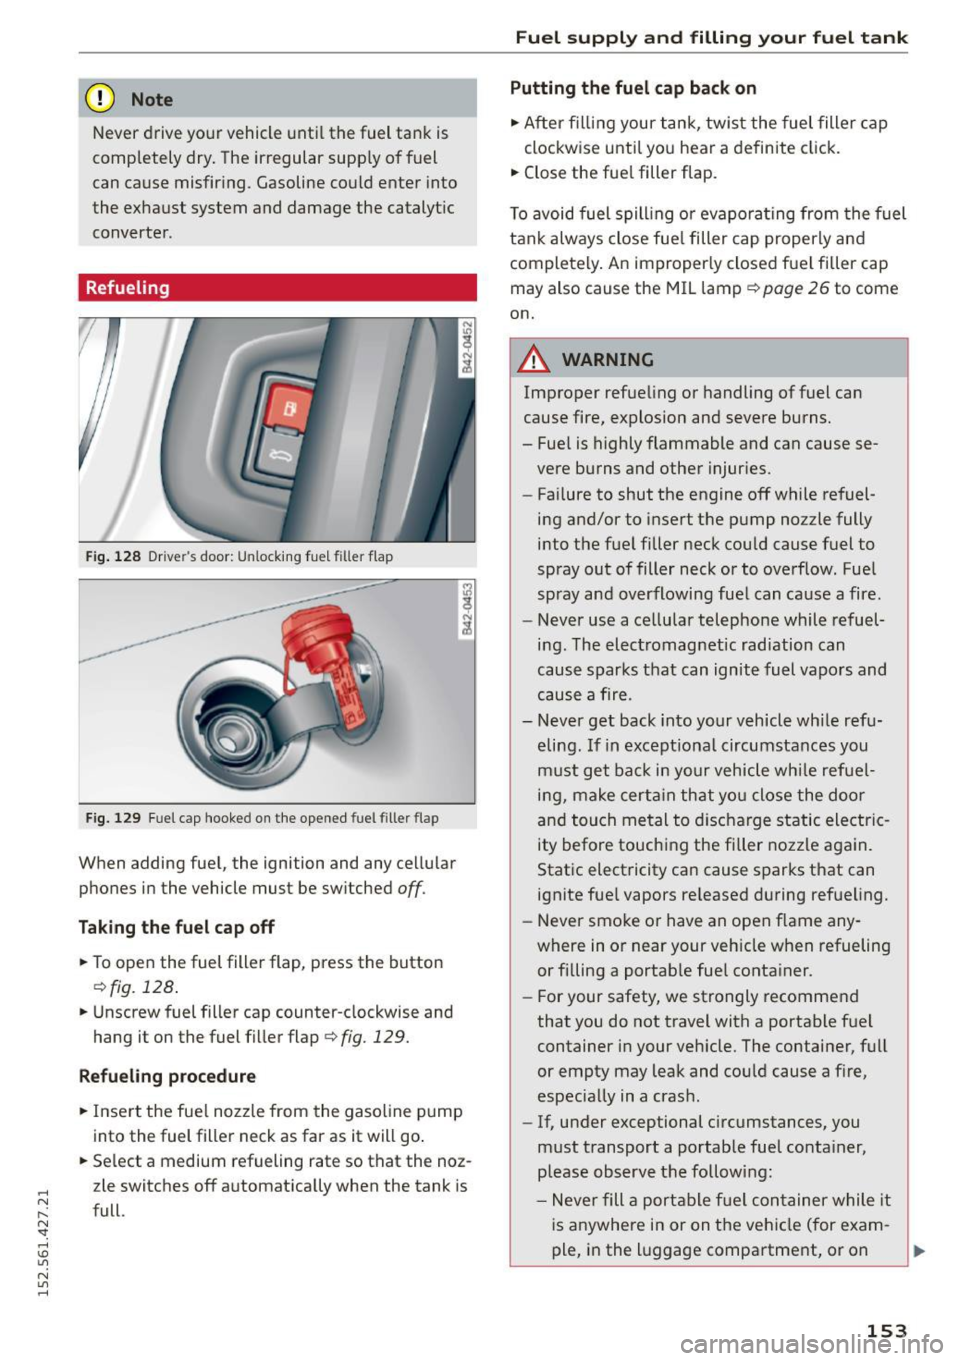
Refueling
F ig. 12 8 Drive r's door: Unlocking f uel filler f lap
F ig . 129 Fu el cap hooke d on th e opene d fu el fil ler fla p
When adding fuel, the ignition and any cellular
phones in the vehicle must be sw itched
off .
Taking the fuel cap off
.. To open the fuel filler flap, press the button
¢ fig. 128 .
.. Unscrew fuel filler cap counte r-clockwise and
hang it on the fuel filler flap
¢ fig. 129.
Refueling procedure
.. Inse rt the fue l nozz le from the gasoline pump
into the fuel filler neck as far as it will go .
.. Se lect a medium refueling rate so that the noz
z le switches off automat ica lly when the tank is
full.
Fuel supply and filling your fuel tank
Putting the fuel cap back on
.,. After f illing your tank, twis t the fuel filler cap
clockw ise unti l yo u hear a definite cl ick .
.. Close the fue l filler flap.
T o avoid fuel spill ing o r evapora ting from the fuel
tank always close fue l filler cap properly and
complete ly . An improper ly closed f uel filler cap
may also cause the MIL lamp ¢
page 26 to come
on.
A WARNING
--Improper refue ling or handling of fuel can
cause fire, explosion and severe burns.
- Fue l is highly flammable and can cause se
vere burns and other injur ies.
- Fa ilure to shut the engine off while re fuel
ing and/or to insert the pump nozzle fully
into the fue l filler neck cou ld cause fuel to
spray out of filler neck or to overflow. Fue l
sp ray an d overflowing fue l can ca use a fire.
- Never use a ce llular telepho ne while refuel
ing . T he elec tromagnetic radiation can
cause sparks that can ignite fuel vapo rs and
cau se a fire .
- Never get back into yo ur vehicle wh ile refu
e ling . If in except iona l circumst ances you
m ust get ba ck in yo ur vehicle whi le refuel
i n g, make cert ain that yo u close the doo r
a nd tou ch me tal to disch arge st atic electric
ity before touch ing the filler nozzle aga in.
Static elect ricity ca n cause s parks that can
ignite fue l vapors re leased d uring refueling.
- Never smoke o r have an open f lame any
where in or near your veh icle w hen refueling
or fi lling a portab le fue l conta iner.
- For your safety, we strongly recomme nd
that you do not travel with a portable f uel
container in your veh icle. The container, f ull
or empty may leak and cou ld cause a f ire,
especia lly in a cras h .
- If, under exceptional c ircumstances, you
must t ransport a po rtab le fuel conta iner,
p lease observe t he follow ing :
- Never fill a por table fuel co ntainer while it
is anywhere in or on the veh icle (for exam -
p le, in the l uggage compa rtme nt, or on ..,.
153
Page 157 of 232
.... N
l'
N "1: .... I.O
"' N
"' ....
Checking and filling Engine compartment lid
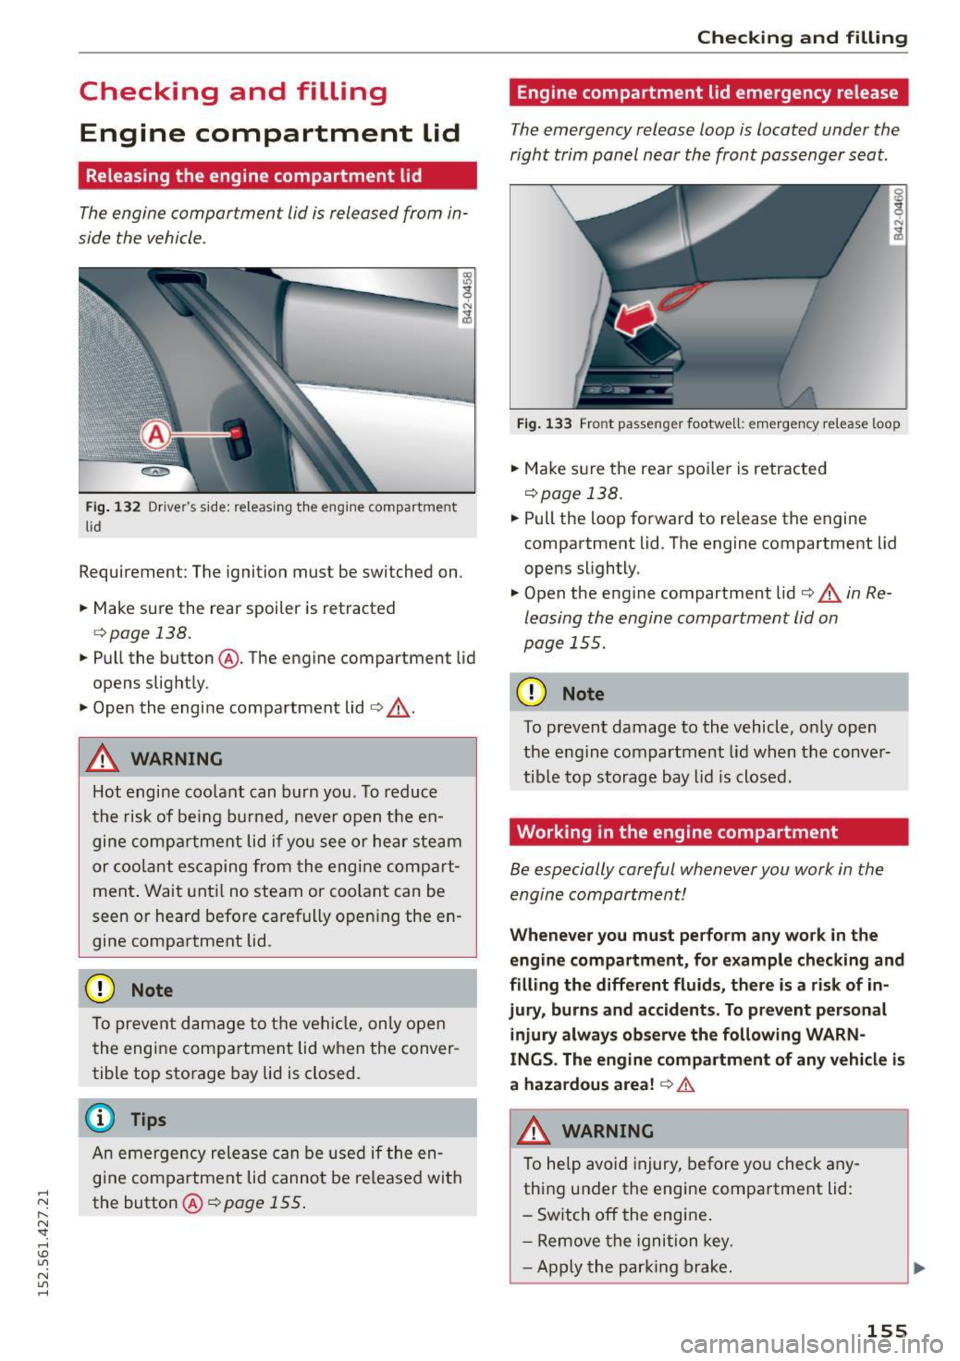
Releasing the engine compartment lid
The engine compartment lid is released from in
side the vehicle.
~
-------- .J;
Fig. 132 Driver's side: releasing t he engine compartment
lid
Requirement: The ignition must be switched on .
" Make sure the rear spoiler is retracted
¢page 138.
"Pull the button @. The engine compartment lid
opens slight ly.
" Open the engi ne compartment lid¢_&, .
& WARNING
Hot engine coo lant can burn you. To reduce
t he risk of be ing burned, never open the en
gi ne comp artment lid i f yo u s ee or he ar s team
or cool an t es caping from the engine compart
ment . Wait unt il no steam or coo lant can be
seen or heard befo re carefully open ing the e n
gine compartment lid.
CD Note
To preve nt d amage to t he veh icle, only open
t he engine compartment lid when the conver
tible top storage bay lid is closed.
@ Tips
An emergency release can be use d if the en
gi ne compa rtment lid canno t be re leased with
the button @¢
page 155 .
-
Checking and filling
Engine compartment lid emergency release
The emergency release loop is located under the
right trim panel near the front passenger seat.
F ig . 1 33 Front passenger footwell: emerge ncy release loop
"Ma ke su re the rea r spoile r is retracted
¢page 138.
" Pull the loop forward to release the engine
compartment lid. The engine compartment lid
opens slightly.
" Open the engine compartment lid¢ &,
in Re
leasing the engine compartment lid on
page 155.
CD Note
To prevent damage to the vehicle, o nly open
the engine compartment lid when the conve r
tib le to p storage bay lid is closed.
Working in the engine compartment
Be especially careful whenever you work in the
engin e compartment!
Whenever you must perform any work in the
eng ine compartm ent, for example checking and
filling the differ ent fluid s, there is a ri sk of in
jury, burns and accident s. To prevent personal
injury alway s ob serve the following WARN
INGS . The engine compartment of any vehicle is
a hazardou s area !
c:> &.
,&. WARNING
To help avoid injury, be fore yo u check any
thing u nder the engine compartment lid:
- Sw itch off the engi ne .
- Remove the ignition key .
- Apply the par king brake.
-
155
Page 164 of 232
Checking and filling
Do not reduce the concentration of the coo lant in
the summer by adding p lain water.
The propor·
tion of coolant additive must be at least 50%
but not more than 60%
to maintain antifreeze
protection and cooling efficiency .
If the coolant
frost protection is too low, the coolant could
freeze and damage the ve hicle heating and en
g ine cooling system .
For year-round driving, antifreeze is added at the
factory for temperatures down to:
- - 31 ° F ( -3 5 °C) USA
- - 40 °F ( - 40 °C) Canada .
If you must add coolant, use a mixture of water
and coolant additive. Mixing the coolant additive
with distilled water is recommended .
& WARNING
Before you check anything in the engine com
partment, always read and heed all WARN
INGS
<=> .&. in Working in the engine compart
ment on page 155.
(D Note
- Before winter sets in, have the coolant
checked to see if the coolant additive in your
vehicle is sufficient to meet the climate con
dit ions . This is especially important if you
live in a region where the winter is extreme
l y cold. If necessary, increase the proportion
of coolant add itive to 60%.
- When adding coolant addit ive to your cool
in g system, remember:
- We recommend using only coolant addi
tive G12++ or G13 for your vehicle. This
coolant additive is available at authorized
Audi dealers. Other types of antifreeze can
signif icant ly reduce corrosion protection.
The resulting corrosion can cause a loss of
coolant and serious engine damage.
- Do not add any type of radiator leak sealant
to your vehicle's engine coolant. Add ing ra
diator repair fluid may adversely affect the
funct ion and pe rformance of your cooling
system and could result in damage not cov
ered by you r New Vehicle Lim ited Warranty.
162
Checking the engine coolant level
Proceed carefully when checking the coolant .
Fig. 142 Conve rtible top : serv ice pos it ion
Fig. 143 Co nve rtible top storage bay : coolant expa nsion
tank
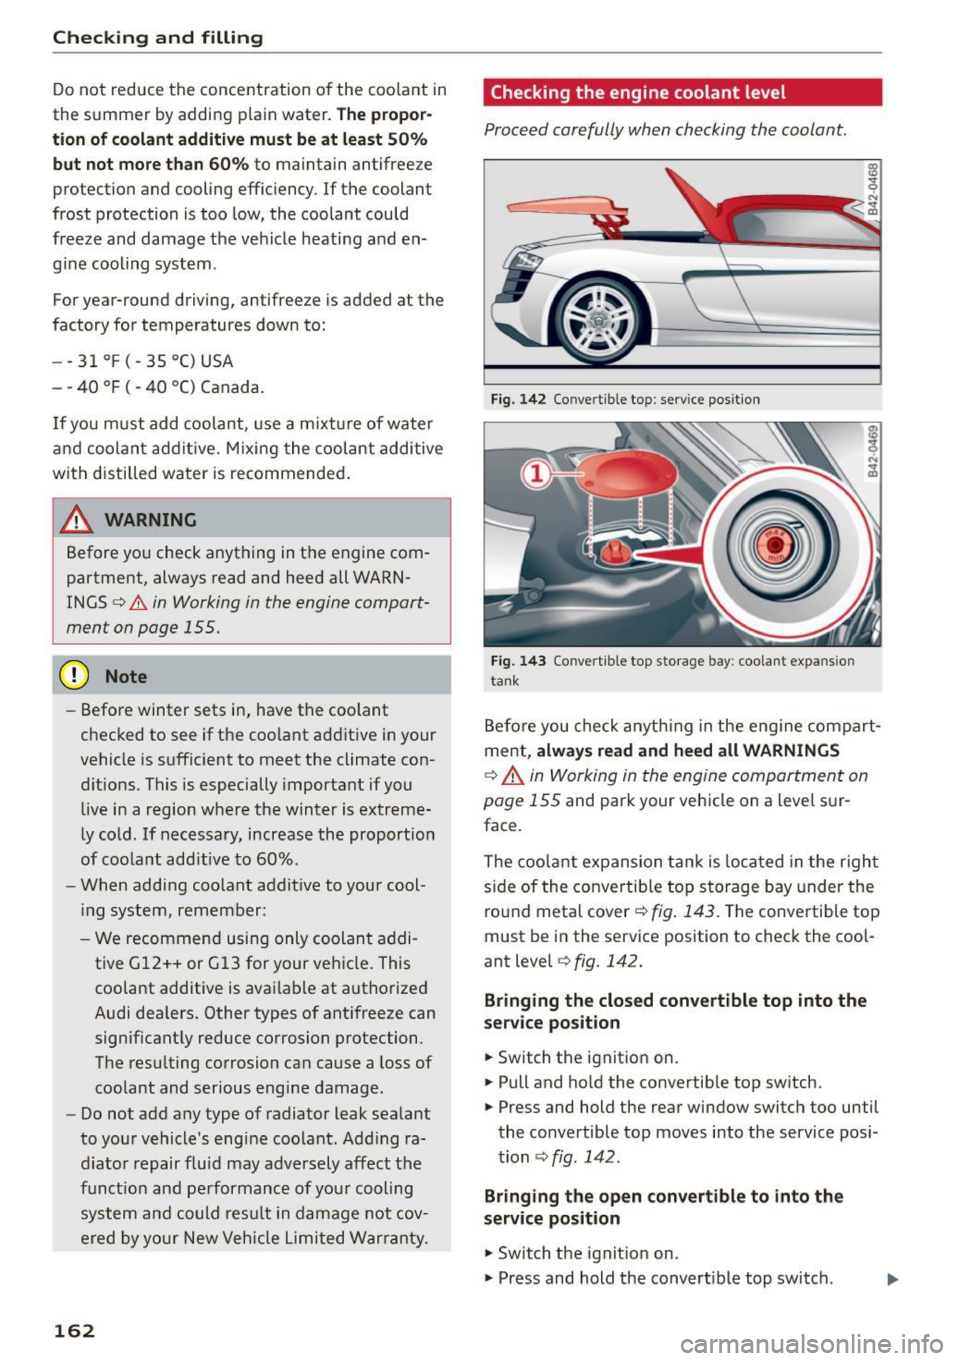
Before you check anything in the eng ine compart
ment,
always read and heed all WARNINGS
c:> .&. in Working in the engine compartment on
page 155
and park your vehicle on a leve l su r
face.
The coolant expansion tank is loca ted in the right
s ide of the convertib le top storage bay under the
round metal cover
cf;, fig. 143. The convertible top
must be in the service position to check the cool
ant level
i=;, fig . 142.
Bringing the closed convertible top into the
service position
.,. Switch the ignition on.
.,. Pull and ho ld the convertib le top switch.
.,. Press and hold the rear window switch too until
the convertible top moves into the service posi
tion <=>
fig. 142.
Bringing the open convertible to into the
service position
.,. Switch the ignition on .
.,. Press and hold the convert ible top switch .
Page 168 of 232
Checking and filling
(D Tips
If your vehicle is left standing for several
weeks at extremely low temperatures, the
ve
hicle battery should be removed and stored
where it will not freeze. This will prevent it
from being damaged and having to be re placed .
Working on the battery
Be especially careful when working on or near
the battery!
The battery is located in the luggage compart
ment behind a
cover. Before you work on or near
the battery ,
read and heed all WARNINGS c> &_.
Always heed the safety warnings, when working
on the vehicle battery or the vehicle electrical
system to prevent injury.
The following WARNINGS are very important
when working on the battery:
Always heed the following WARNING SYM-
BOLS and safety precautions when working on
the battery.
®
Always wear eye protection.
&
Battery acid contains sulfuric acid. Al·
ways wear gloves and eye protection.
@
No
- sparks
- flames
- smoking.
~
When a battery is charged, it produces
hydrogen gas which is explosive and
could cause personal injury.
®
Always keep the battery well out of reach
of children.
.&_ WARNING
Whenever working on the battery or on the
electrical system, there is the risk of injury,
accident and even fire. Read and heed the fol
lowing WARNINGS:
- Always wear eye protection. Do not let bat
tery acid or any lead particles get on your
166
skin or clothing. Shield your eyes. Explosive
gases can cause blindness or other injury.
- Battery acid contains sulfuric acid. Sulfuric
acid can cause blindness and severe burns.
-Always wear gloves and eye protection . Do
not tilt the battery because acid could leak
out of the ventilation openings.
- If you get battery acid in your eyes or on
your skin, immediately rinse with cold wa
ter for several minutes and get medical at
tention.
- If you should ingest any battery acid, seek
medical attention immediately.
- Do not expose the battery to an open flame,
electric sparks or an open light.
- Do not smoke.
- Do not interchange the positive and nega- tive cables.
- When working on the battery, be sure not to
short-circuit the terminals with tools or oth
er metal objects. This would cause the bat
tery to heat up very quickly, which could
lead to damage or explosion and personal
injury.
- When a battery is charged, it produces hy
drogen gas which is explosive and could
cause personal injury.
- Always keep the battery well out of the
reach of children.
- Before work is done on the electrical sys
tem, disconnect the negative ground cable.
- Before performing any work on the electri
cal system, switch off the engine and igni
tion as well as any electrical equipment. The
negative cable on the battery must be dis
connected. If you are just going to replace a
light bulb, then it is enough to switch off
the lights.
- Before disconnecting the battery, switch off
the anti-theft alarm system! Otherwise you
will set off the alarm.
- When disconnecting the battery, first dis
connect the negative cable and then the
positive cable.
- Before reconnecting the battery, make sure all electrical consumers are switched off. Re
connect the positive cable first and then the
~