AUDI R8 SPYDER 2015 Workshop Manual
Manufacturer: AUDI, Model Year: 2015, Model line: R8 SPYDER, Model: AUDI R8 SPYDER 2015Pages: 232, PDF Size: 58.36 MB
Page 51 of 232
.... N
l'
N "1: .... I.O
"' N
"' ....
With the door contact circuit, the interior lights
turn on as soon as you unlock the veh icl e or open
the doors . The interior lights are also turned on
when the ignition key is removed . The lights turn
off about 30 seconds afte r the doors are closed .
When the veh icle is locked or when the ignition is
turned o n, the inter ior lights are turned off .
When a door is open , the interior lights are
turned off after about 10 m inutes to preven t bat
tery draining .
T he brightness of the lights is controlled a uto
mat ica lly by a d immer when they a re sw itched
on/off.
Instrument panel illumination
T he illumination of the instruments, displays
and the center console can be adjusted .
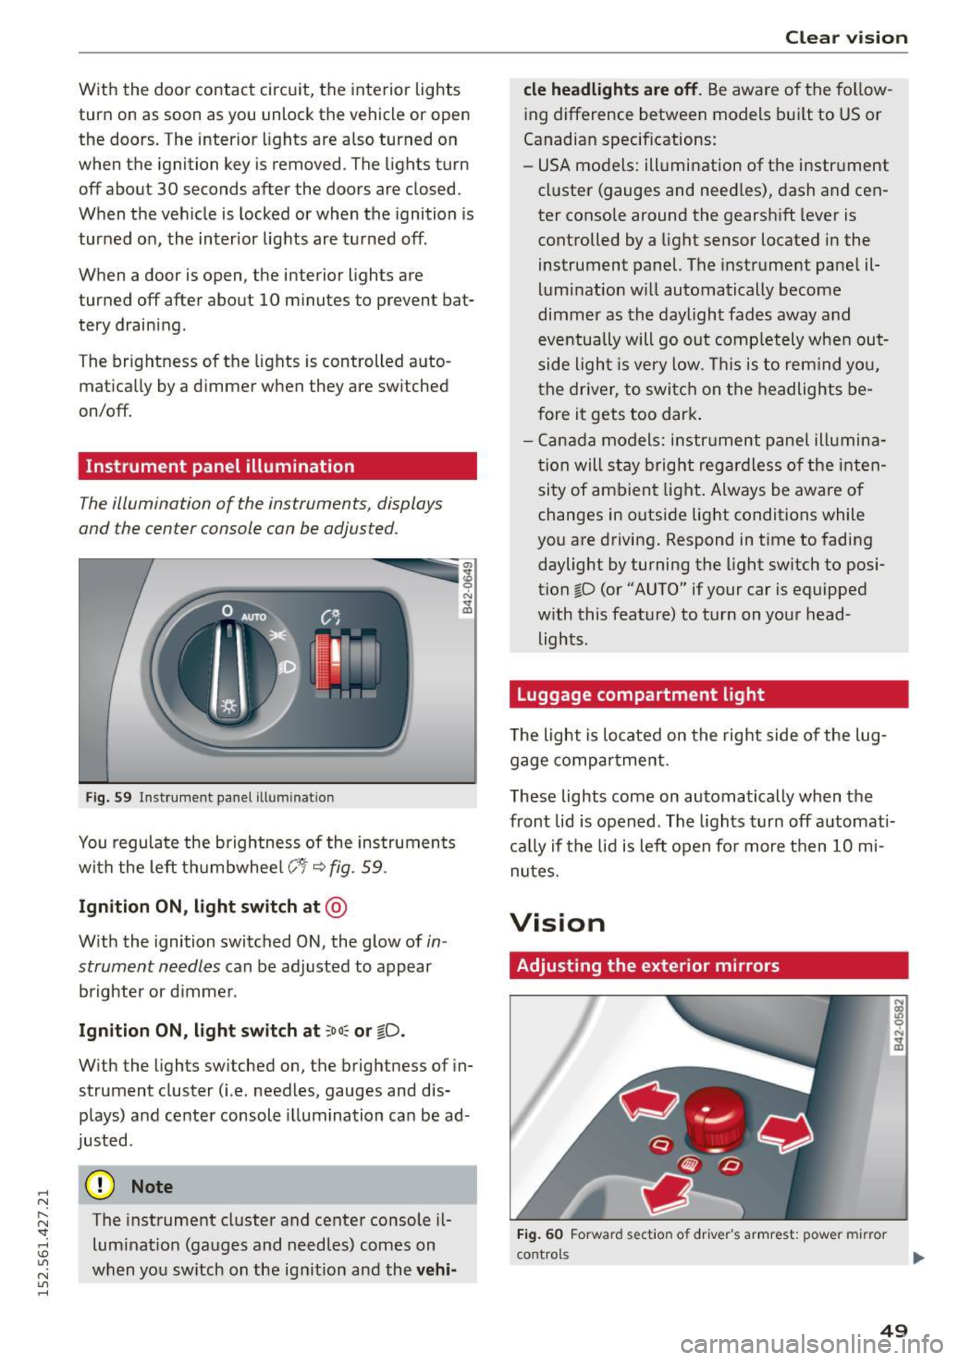
Fig . 59 In strument pa nel ill uminatio n
You regulate the brightnes s of the ins truments
with the left th umbwhee l
C:1 i::;,fig. 59.
Ign ition ON , light switch at @
With the ignition switched ON, the glow of in
strument needles
can be adjusted to appear
brighter or d immer .
Ignition ON , light switch at :oo~ or tD .
With the lights sw itched on, the brightness of in
strument cluster (i.e. needles, gauges and dis
plays) a nd center console il lum ination ca n be ad
justed .
(D Note
The instrument cluster and center console il
lum inat io n (gauges and needles) comes on
when you sw itch on the ig nitio n and the
ve hi-
Cle ar vi sion
cle headlight s are off . Be aware of the fo llow
ing difference between models b uilt to US or
Canadian specif ications:
- USA models: ill umination of the i nstr ument
cl uster (gauges and need les) , dash and cen
ter console around the gearsh ift lever is
controlled by a light sensor located in the
instrument panel. The instrume nt pane l il
lum ination w ill automatically become
dimme r as the daylight fades away and
eventua lly will go out comp letely when out
side light is very low . Thi s is to rem ind you,
t he driver, to switch on t he headlights be
fore it gets too dark .
- Cana da model s: instrument panel illumina
t ion will s tay bright regar dless o f the inten
si ty of ambien t light . Always be aware o f
changes in outside lig ht conditions while
you are driving. Respond in t ime to fading
daylight by turning the light sw itch to posi
tion ~D (or "AUTO" if your car is equipped
w ith this feat ure) to turn on your head
lights .
Luggage compartment light
The light is located on the right side of the lug
gage compa rtment .
These lights come on automatically when the
front lid is opened . The lights turn off automati
c a lly if the lid is left o pen fo r more then 10 mi
nutes .
Vision
Adjusting the exterior mirrors
Fig. 60 Forward sect io n of driver 's armrest: pow er mirr or
con trol s ...
49
Page 52 of 232
Clear vision
Turn the knob to the desired position :
Q/P -In this position, you can adjust the driv
er's and front passenger 's exterior mirrors by
turning the knob in the desired direction .
(@ -The mirrors are heated depending on the
outside temperature.
8 - The exterior mirrors fold in*
You are well-advised to fold the exterior mirrors in when maneuvering in tight spaces or when
leaving the car parked close to other vehicles.
A WARNING
-
- Curved (i .e. convex) mirror surfaces in
crease your field of view . Remember that
vehicles or other objects will appear smaller
and farther away than when seen in a flat
mirror. If you use this mirror to est ima te
distances of following vehicles when chang
ing lanes, you could estimate incorrectly
and cause an accident.
- If th e mirror housing is moved unintent ion
a lly (for example, wh ile parking your vehi
cle), then you must first fold the mirror
electrically. Do not readjust the mirror hous
ing manually. You could damage the motor
which controls the mirror.
- If you wash the vehicle in an automatic car
wash, you must fold the exterior mirrors in
to reduce the risk of damage to the mirrors.
Never fold power folding exterior mirrors*
by hand . Only fold them in and out using
the power controls.
(D Tips
If there should be a malfunction in the elec
trical system, you can still adjust the exter ior
m irrors by pressing the edge of the mirror .
50
Dimming the mirrors
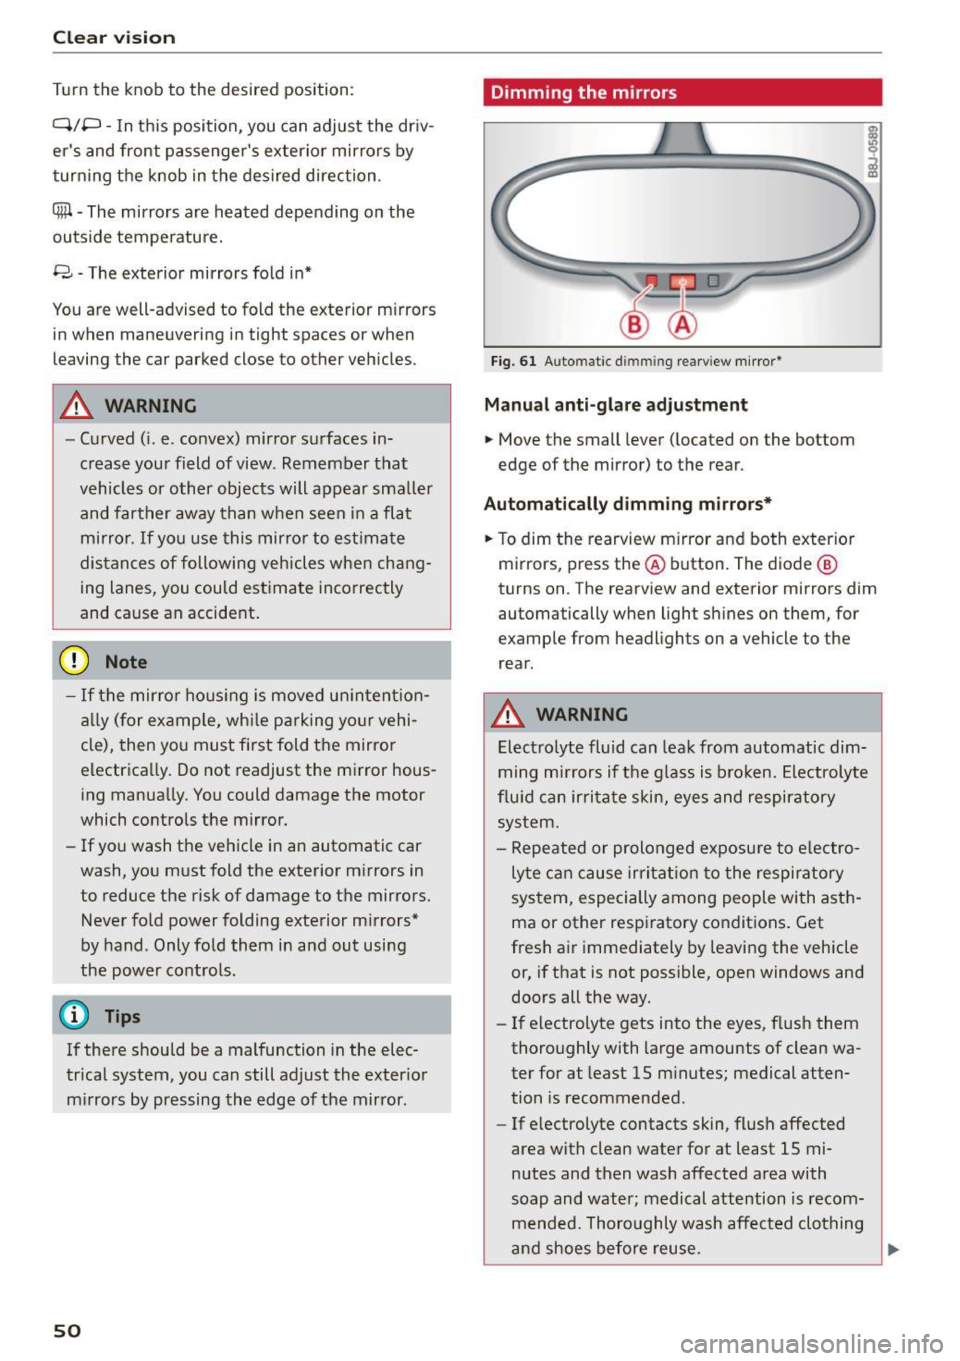
Fig. 61 Auto matic d immin g rearv iew mirror*
Manual anti-glare adjustment
.. Move the small lever (located on the bottom
edge of the mirror) to the rear .
Automatically dimming mirrors*
.. To dim the rearview m irror and both exterior
mirrors, press the@ button. The diode @
turns on . The rearview and exterior mirrors dim
automatically when light shines on them, for
example from headlights on a vehicle to the
rear.
A WARNING
Electrolyte fluid can leak from automatic dim
ming mirrors if the glass is broken. Electrolyte
fluid can irritate skin, eyes and respiratory
system.
- Repeated or prolonged exposure to electro
lyte can cause irritat ion to the respiratory
system, especially among people with asth
ma or other respiratory conditions. Get
fresh air immediately by leaving the vehicle
or, if that is not possible, open windows and
doors all the way.
- If electrolyte gets into the eyes, flush them
thoroughly with large amounts of clean wa
ter for at least 15 minutes; medical atten
tion is recommended .
- If electrolyte contacts skin, flush affected
area with clean water for at least 15 mi
nutes and then wash affected area with
soap and water; medical attention is recom
mended. Thoroughly wash affected clothing
and shoes before reuse.
Page 53 of 232
.... N
l'
N "1: .... I.O
"' N
"' ....
-If swallowed and person is conscious, rinse
mouth with water for at least 15 m inutes.
Do not induce vomit ing unless instructed to
do so by medical professional. Get medical
attent ion immed iate ly .
(D Note
Liquid electro lyte leaking from broken mirror
glass will damage any plastic surfaces it
comes in contact with. C lean up spilled elec
trolyte immed iately w ith clean water and a
sponge.
@ Tips
- Switch ing off the dimming function of the
i nside rear view mir ror also deactivates the
a utomat ic dimming f unction of the exte rior
mir ro rs .
- The au tomatic d imm ing mir ro rs do not d im
when the interior lig hting is turned on or
t h e reverse gear is selecte d.
- Automat ic dimming for the m irror only op
e rates p rope rly if t he lig ht st riking the in
s id e mir ro r i s no t hindere d in any way.
Sun visors
A_.... ,_""''""' 1-----
"~ I~If:._-:::~ ...._ __ ...,....;;;;:;;..,..........., -
~~==.i.=J:Z=t ----------·---
___ , ...... __ ....,.....,_ii,iiiiiiiiioioii=------------i
Fi g. 62 Su n viso r
The vanity mir rors in the sun visors a re eq uipped
with covers .
Clear vi sion
Wiper and washer
system
Windshield wiper
The windshield wiper lever controls bo th the
windshield wipers and the washer system.
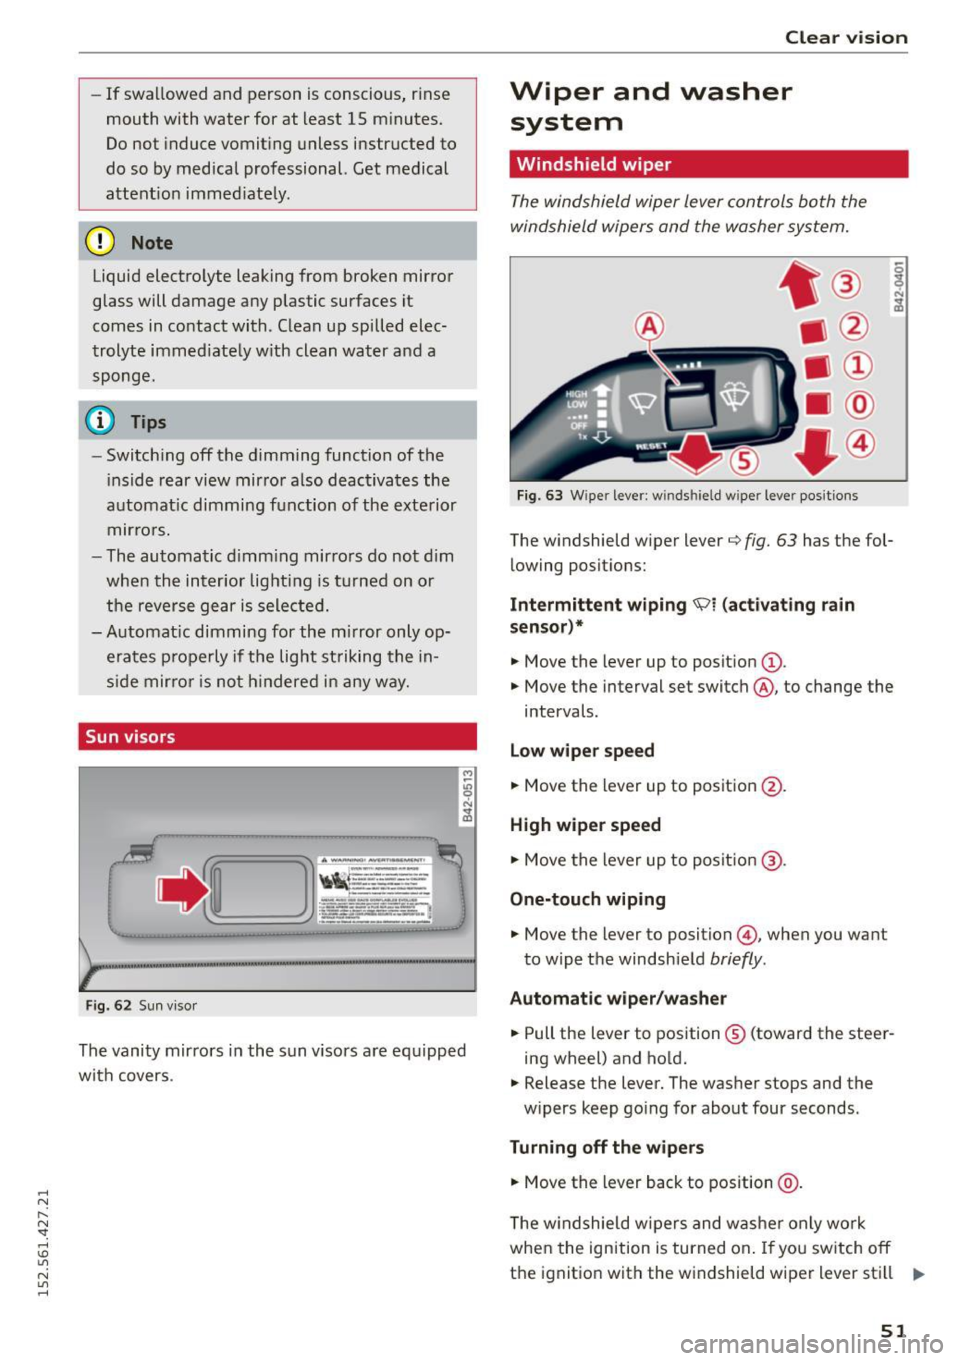
Fi g. 63 W iper lever: w indshield w iper leve r posit ions
The w indshield wiper lever q fig . 63 has the fol
lowing posit ions:
Intermittent wiping ~1 {act ivating rain
sensor)*
• Move the lever up to posit ion (D .
.,. Move the interval set switch@, to change the
intervals.
Low wipe r speed
.,. Move the lever up to posit ion @.
High wiper speed
.,. Move the lever up to posit ion @.
One-touch wiping
.,. Move the lever to position @, when you want
to w ipe the windshie ld
briefly .
Automatic wiper /washer
.,. Pull the lever to position ® (toward the steer
ing wheel) and hold.
.. Release the lever. The washer stops and the
w ipers keep go ing fo r about four seconds.
Turning off the w iper s
.,. Move the lever back to position @ .
The w indshield w ipers and w ashe r only work
whe n the ign ition is turned on . If you sw itch off
t h e ignit ion with the windshield wiper lever sti ll .,..
51
Page 54 of 232
Clear vision
in the interval wipe position and then come back
a while later and drive off, the rain sensor will re
activate itself after the vehicle speed has exceed
ed 4 mph (6 km/h).
The rain sensor* is only activated with the wiper
lever set to position(!). When it starts to rain,
the rain sensor will automatically activate the in
termittent wiping mode.
To reduce the sensitivity of the sensor, move
switch @ down. To increase the sensitivity, move
the switch up. The higher you adjust the sensitivi
ty, the faster the sensor will react when it senses moisture on the windshield. The pauses between
wiper turns depend not only on the sensitivity setting, but on the vehicle speed as well.
During brief stops, e.g . at a red light, wiper mo
tion will automatically be reduced to the next
lower speed . Wipers already turning at low speed
change to intermittent wiping.
When the ignition is turned on, the washer jets
are heated.
A WARNING
- Wiper blades are crucial for safe driving! On
ly when they are in good condition are they
able to clear the windows properly to pro
vide uncompromising visibility. Worn or
damaged wiper blades are a safety hazard
¢ page 53, Replacing windshield wiper
blades!
- The light/rain sensor* is only designed to as
sist and support the driver. It remains en
tirely the driver's responsibility to monitor outside weather conditions and to manually
activate the wipers as soon as rain or drizzle
reduces visibility through the windshield .
- The windshield must not be treated with
water-repellent materials. They can increase
glare under poor visibility conditions such as
wetness, darkness, or when the sun is low
on the horizon . In addition, they can cause
the windshield wipers to chatter.
(D Note
In freezing or near freezing conditions:
52
- Always check that the wiper blades are not
frozen to the glass before you turn the wip
ers on. Loosen a wiper blade which is frozen
in place before operating the wipers to pre
vent damage to the wiper blade or the wiper
motor .
- Do not use the wipers to clear a frosted win
dow. Using the wipers as a convenient ice
scraper will destroy the wiper blades .
- Before you take your vehicle to an automatic
car wash, make sure you have the wind
shield wiper system switched off (lever in position
0), otherwise the windshield wiper
system could get damaged in the car wash if
it should suddenly come on.
(D Tips
- The windshield wipers are switched off
when the ignition is turned off. Activate the
windshield wipers after the ignition is
switched back on by moving the windshield
wiper lever to any position.
- Worn or dirty windshield wiper blades cause
smearing, which can affect the operation of
the light/rain sensor*. Check the condition
of your windshield wiper blades regularly.
- The rain sensor is part of the interval wiping
system. Turning off the ignition will also de
activate the rain sensor . To reactivate the
sensor, switch off the interval wiping func
tion, then switch it back on again.
- Applies to vehicles with light/rain sensor:
When the wipers are switched on manually
and in rain conditions, the automatic head
lights* turn on <=>
page 46, Lights or off dur
ing the day when the wipers are no longer
operating. The automatic headlights* func
tion is available in this case only when the
light switch is in the "AUTO" position
<=>
page 46, fig. 55.
- Make sure the washer fluid reservoir in the
engine compartment is topped off before
going on a long trip. Look up<=>
page 168
for checking and filling the washer contain
er.
- The wipers only operate with the hood com
pletely closed.
Page 55 of 232
.... N
l'
N "1: .... I.O
"' N
"' ....
Service position
It is only possible to change wiper blades if you move the wiper arms to the service position .
In order to use the windshield wipers, the front
lid must be completely closed.
Moving wiper bla de s to th e serv ice positi on
• When there is a risk of frost, make sure that the
wiper blades are not frozen to the windshield.
• Switch the ignition on.
• Move the wiper lever to position
O i:> page 51,
fig. 63.
• Press the
!RESE T I button unt il the Di spla y ty pe
menu appears in the Driver Information System
display .
• Usi ng the rocke r switch a nd the
!RESET I b utton,
select the
Se t> Wip ers > Fr ont > S ervi ce pos i
ti on on
function. The windshie ld wiper arms
move to the service position.
Moving wi per blades to park position
• Make ce rtain that the wiper arms are lying
against the w indshie ld.
• Switch the ignition on and move the w iper lever
from position Oto
4 i:> page 51, fig. 63 . The
wiper arms will move back to the park position.
(D Note
Never drive yo ur vehicle when the windshield
wiper arms are in the service position and
pulled away from the windshield. When you
drive faster than 4 mph (6 km/h), the wiper
arms automatically return to the park posi
tion and could cause paint damage to the
front lid!
(D Tips
- You can also turn on the service pos ition, for
example, if you want to protect the wind
sh ield from ic ing by using a cover .
- The service position moves to
off automati
cally when you operate the windshield w iper
lever, or speed exceeds 4 mph (6 km/h) .
Clear vi sion
Cleaning windshield wiper blades
Clean the windshie ld w iper b lades when they be
gin to leave strea ks. Use a soft cloth and g lass
cleaner to clean t he windshie ld w iper blades.
• Place the windshie ld w iper arms in the service
position. Refe r to
c> page 53.
• Lift the wiper a rm away from the front window .
& WARNING
-
Dirty windsh ield wiper b lades can impair your
view. This can lead to accidents.
Replacing windshield wiper blades
Wiper blades in good condition help keep the
windshield clear.
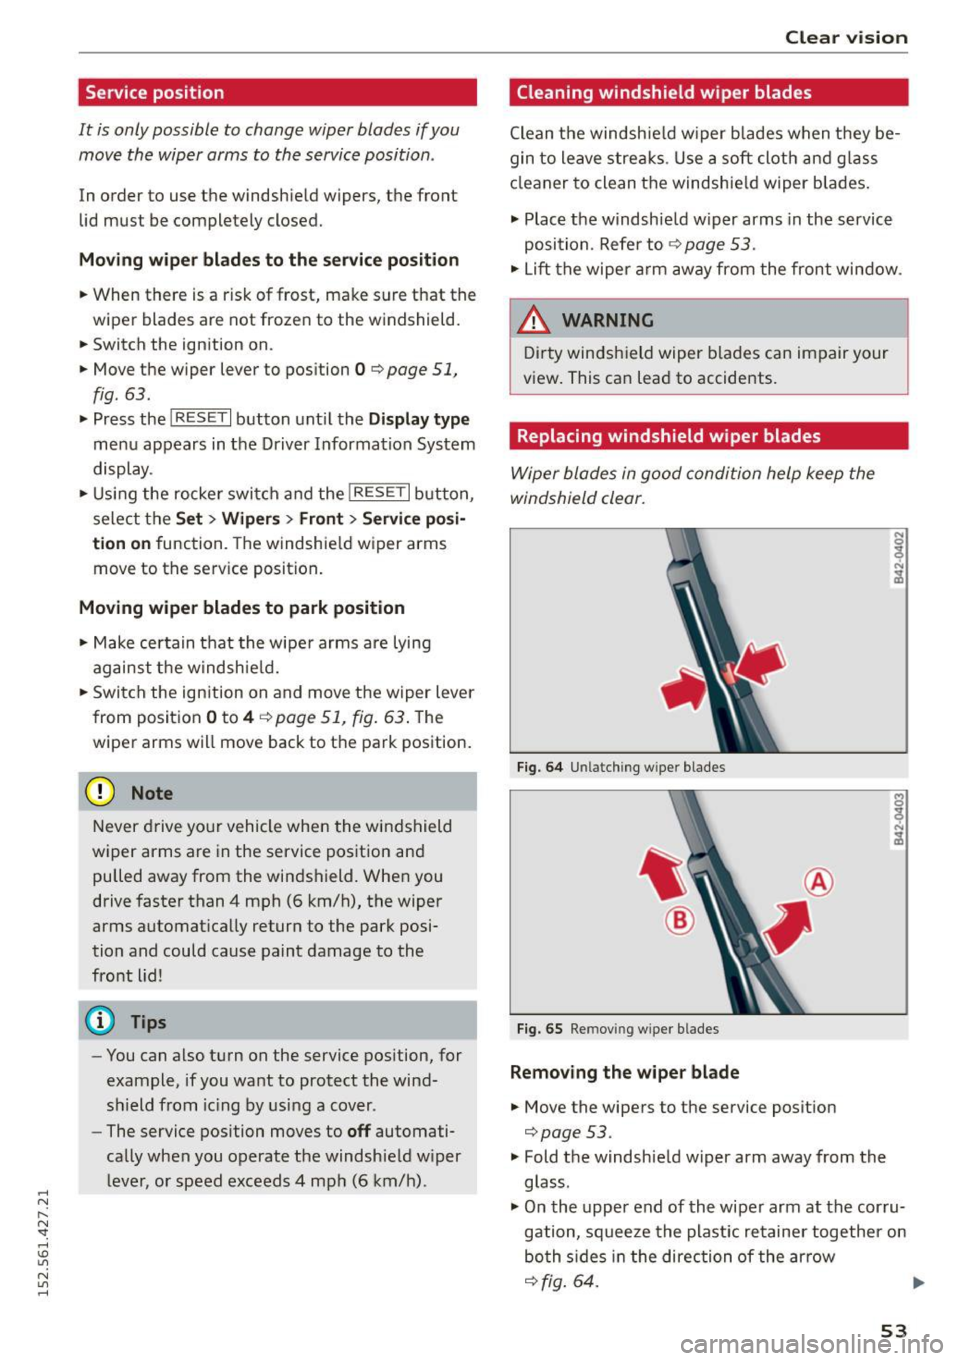
F ig. 6 4 Unlatching wiper blades
Fig. 65 Removing wiper blades
Remo ving the wiper bl ade
• Move the wipers to the service position
i=>page53.
.,. Fold the windshield wiper arm away from the
glass .
• On the upper end of the wiper arm at the corru
gation, squeeze the plastic retainer together on
bo th s ides in the direction of the arrow
i=>fig . 64. ..,_
53
Page 56 of 232
Clear vision
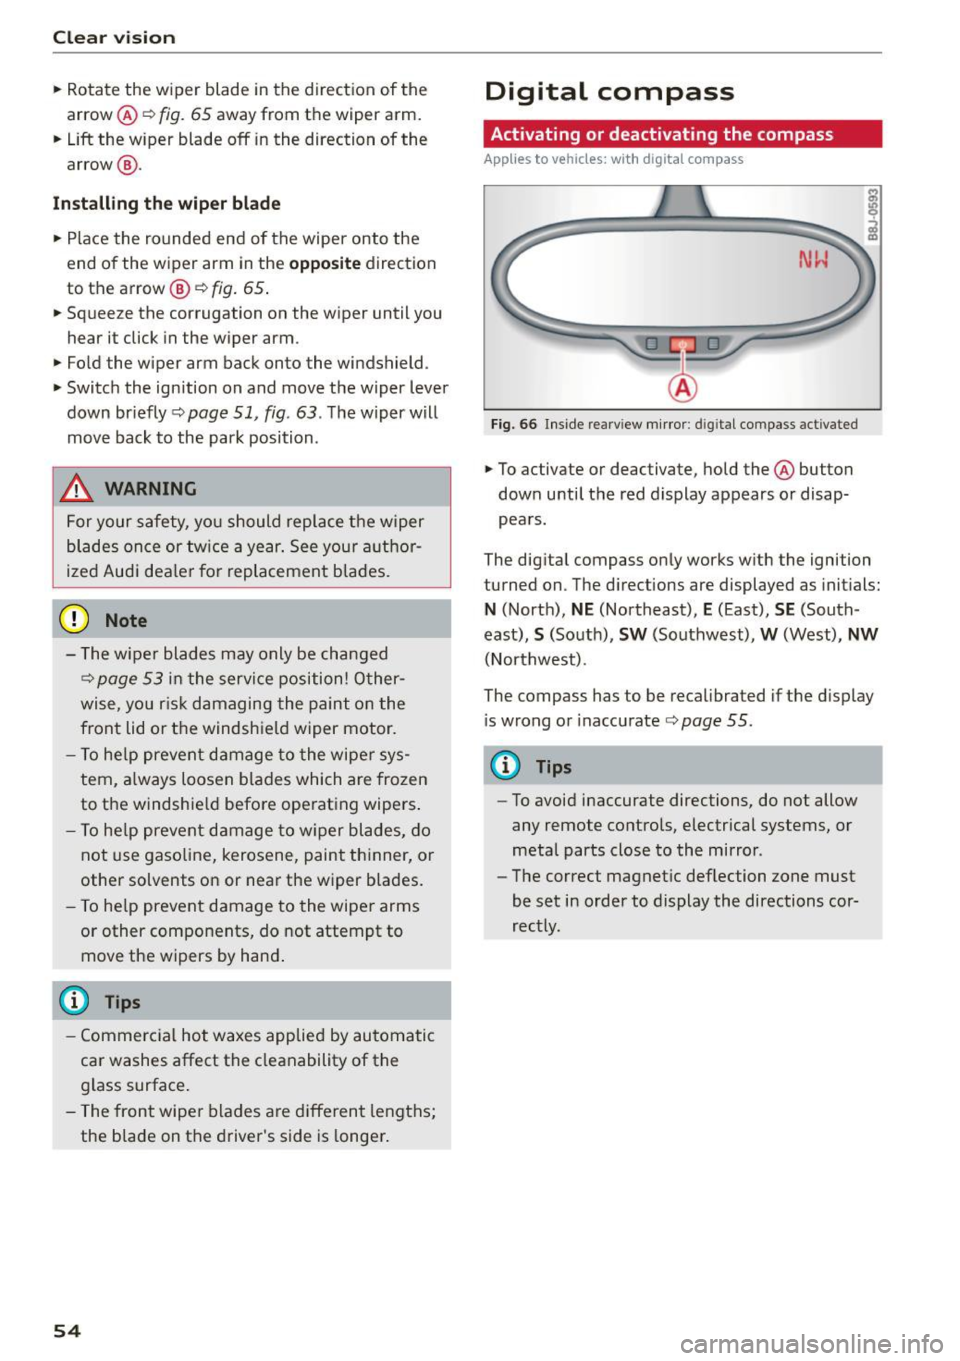
... Rotate the w iper blade in the direction of the
arrow @c:>
fig. 65 away from the wiper arm.
... Lift the wiper blade
off in the direction of the
arrow @.
Install ing the wiper blade
" Place the rounded end of the wiper onto the
end of the wiper arm in the
oppo site direction
to the arrow @c:>
fig. 65.
"Squee ze the corrugation on the wiper until you
hear it click in the wiper arm .
" Fo ld the w iper arm back onto the windshield .
... Switc h the ignition on and move the wiper lever
down br iefly
c:> page 51, fig. 63 . The wiper w ill
move back to the park position .
_& WARNING
For your safety, you should replace the wiper
blades once or tw ice a year . See your a utho r
ized Audi dea le r f or replacement b lades.
(D Note
- The wipe r blades may only be changed
c:> page 53 in the serv ice position! O ther
wise, you r is k damaging the paint on the
front lid or t he windshie ld wiper motor.
- To he lp preven t damage to the wipe r sys
tem, a lways loosen blades which are frozen
to the windshie ld before ope rating wipers .
- To he lp prevent d amage to w iper blades, do
not use gaso line, kerosene, paint th inner, or
other solvents o n or near the wiper b lades.
- To he lp prevent damage to the wipe r arms
or other components, do not attempt to move the wipers by hand .
- Commerc ial hot waxes applie d by au tom atic
ca r washes affect the cleanability of the
glass surface .
- T he front wipe r blades a re d ifferent le ng ths;
the blade on the driver 's side is longer .
54
Digital compass
Activating or deactivating the compass
Applies to ve hicles: w ith d igital compass
Fig. 66 Insi de rea rv iew m irror: d ig ital co mpass activated
... To activate or deactivate, hold the @button
down until the red display appears o r disap
pears .
The dig ital compass only works with the ignition
turned on . T he d irect ions are displayed as init ials:
N (North), NE (Northeast), E (East), SE (South
east),
S (South), SW (Southwest), W (West), NW
(Northwest).
The compass has to be recalibrated if the d isplay
i s wrong or inaccurate c:>
page 55.
@ Tips
-To avoid inaccurate directions, do not allow
any remote co ntro ls, electrical systems , or
meta l parts close to the mirror .
- Th e correct magnet ic deflection zone must
be set in order to display the directi ons cor
rectly.
Page 57 of 232
.... N
l'
N "1: .... I.O
"' N
"' ....
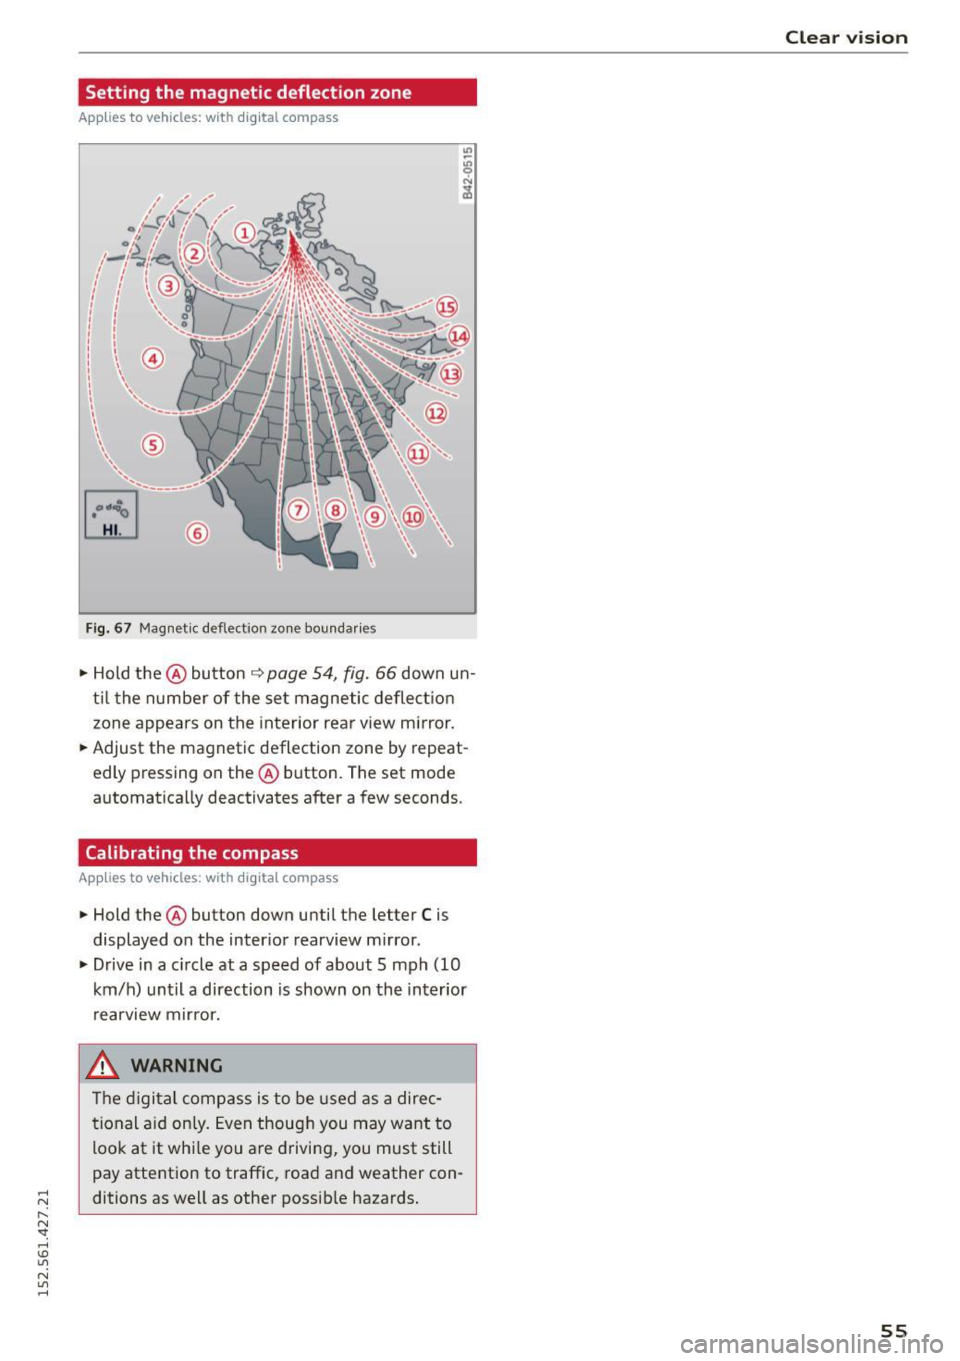
Setting the magnetic deflection zone
Applies to vehicles: with dig ital compass
®
F ig. 67 Magnetic deflect io n zon e bou ndaries
• Hold the@ button ~ page 54, fig. 66 down un
til the number of the set magnetic deflection
zone appears on the interior rear view mirror .
• Adjust the magnetic deflection zone by repeat
edly pressing on the @ button . The set mode
automatically deactivates after a few seconds .
Calibrating the compass
Applies to vehicles: with dig ital compass
• Hold the@ button down until the letter C is
displayed on the interior rearview mirror.
• Drive in a c ircle at a speed of about 5 mph
(10
km/h) until a direction is shown on the interior
. . rearv1ew mirror.
_& WARNING
-
The digital compass is to be used as a direc
tional aid only. Even though you may want to
loo k at it while you are driving, you must still
pay atte ntion to traffic, road and weather con
ditions as well as other possible hazards.
Clear vision
55
Page 58 of 232
Seat s and storage
Seats and storage
General recommen
dations
Why is your seat adjustment so important?
The safety belts and the airbag system can only
provide maximum protection if the front seats are correctly adjusted.
There are var ious ways of adjust ing the front
seats to provide safe and comfortable suppo rt
for the driver and the front passenger. Adjust
your seat properly so that :
- you can easily and quick ly reach all the switches
and controls in the instrument panel
- your body is prope rly supported thus reduc ing
physical stress and fatigue
- the safety belts and a irbag system can offer
maximum p rotection
<> page 102.
In the following sections, you will see exactly
how you can best ad just your seats .
There are special regulat ions and inst ructions for
installing a c hild safety seat on the front pas
senger 's seat . Always heed the informat ion re
garding child safety prov ided in<>
page 122 ,
Child Safety.
_& WARNING
Incorrect seating position of the drive r and all
other passenge rs can resu lt in serious pe rson
al injury.
- Always keep your feet on the floor when the
vehicle is in m otion -neve r put your feet on
top of the instrument pane l, out of the win
dow or on top of the sea t cushion! This ap
plies es pecially to the passenge rs . If you r
seat ing pos ition is incorrect you increase the
risk of injury in the case of sudden bra king
or an accident. If the airbag inflates and the
seat ing pos ition is incorrect this cou ld result
in persona l injury o r even dea th .
- It is important for both the driver and front
passenge r to keep a distance of at least
10 inches (25 cm) between themselves and
t h e steering wheel and/or instrument panel.
If you're sitting any closer than th is, t he a ir-
56
bag system cannot p rotect you properly. In
addit ion to this, the front seats and head re
straints must be adjusted to your body he ight so that they can g ive you maximum
protection.
- Always try to keep as much distance as pos
sible between yourself and the steer ing
wheel or instrument pane l.
- Do not adjust the driver's or front passeng
er's seat while the veh icle is moving . Your
seat may move unexpected ly, causing sud
den loss of vehicle control and persona l in
jury.
If you adju st your seat while the vehicle
is moving, you are out of position .
Driver's seat
The correct seat position is important for safe
and rela xed driving .
We recommend that you adjust the dr iver's seat
i n the following manner:
.,. Adjust the seat in fore and aft direction so t hat
you ca n eas ily push the pedals to the floor
wh ile keep ing your knee slightly bent¢.&.
in
Why is your seat adjustment so important? on
page 56.
.,. Adjust the se atb ack so tha t when yo u sit wi th
your back agains t the sea tback, you ca n still
grasp the top of the steering whee l.
.,. Posit ion the head restraint according to the oc
cupant's he ight ¢
page 58. For maximum
protect ion, the top of the head restraint should
be at least at eye level, preferably higher and
idea lly level with the top of the head
¢ page 89, fig . 101 .
_& WARNING
Neve r place any objects in the dr iver's foo t
well. An object could ge t into t he pedal are a
a nd in te rfere wi th pedal fun ct ion . In case o f
sud den braking or an acc ident, you wou ld not
be ab le to b rake or accele rate!
-
Page 59 of 232
Front passenger's seat
Always move the front passenger seat into the rearmost position.
To avoid contact wit h the airbag while it is de
p loying, do not sit any closer to the instrume nt
panel than necessary and always wear the three
point safety belt provided adjusted correctly . We
recommend that you adjust the passenger's seat
i n the following manner:
"' Bring the backrest up to an (almost) upr ight
pos it ion.
Do not ride w ith the seat reclined .
"'T he idea l position fo r the head restra int is with
the upper edge of the rest ra int level with the
top o f you r head¢
page 58. Yo u should not
lower the top o f the restraint be low the level of
your eyes .
"' Place your feet on the f loor in front of the pas
senger's seat.
Power seats
Adjustment switches
The operating logic for the switches corresponds
to the construction and function of the seat.
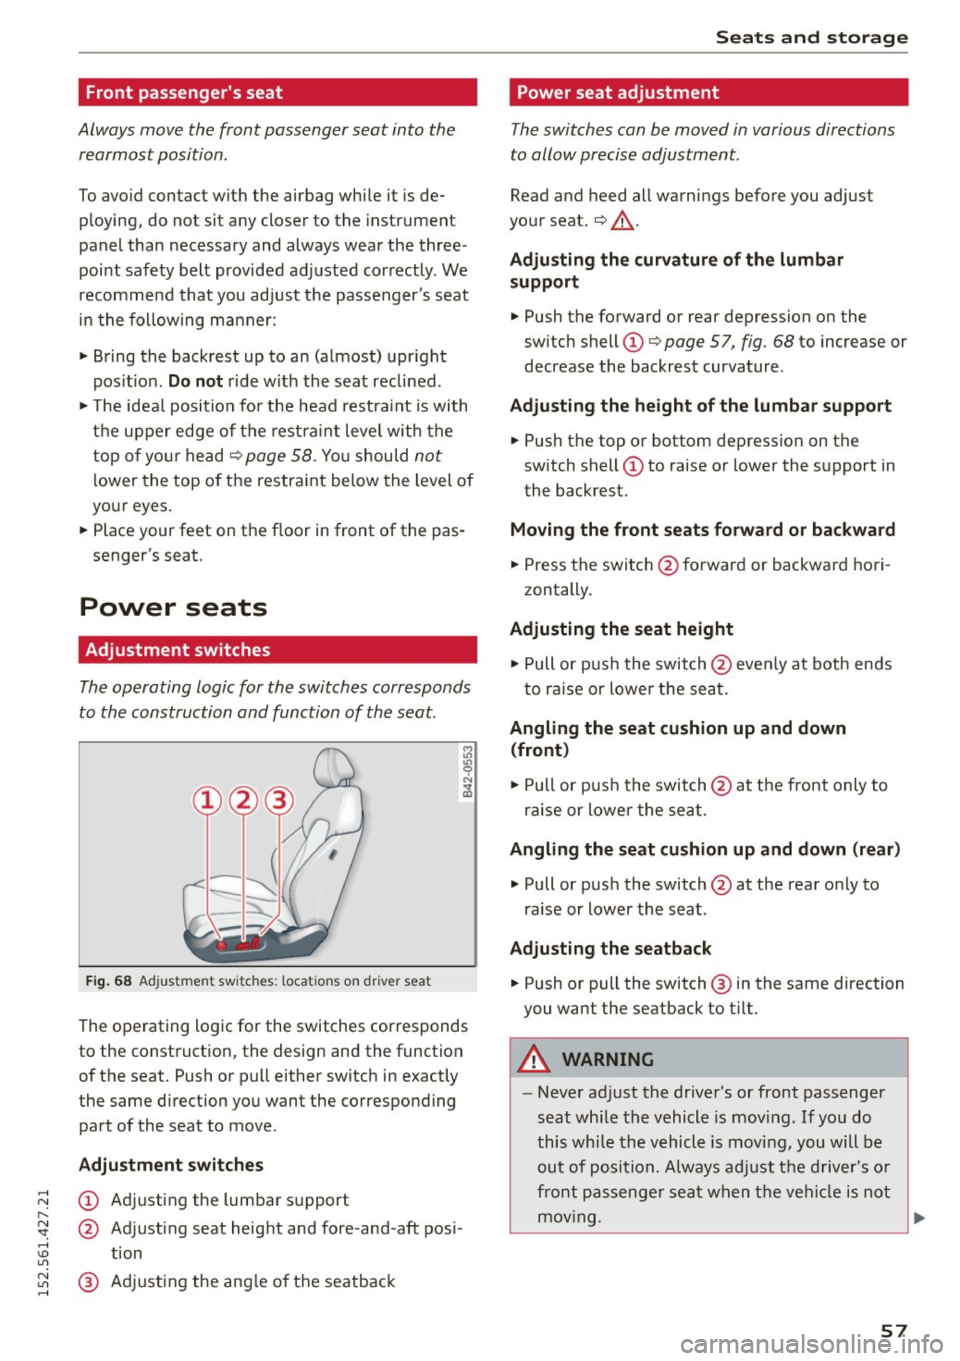
F ig . 68 Ad just men t sw it ches: locat ions on driver seat
The operating logic for the switches corresponds
to the const ruction, the design and the function
of the seat. Push or pull either switch in exactly
the same direction you want the corresponding pa rt of the seat to move .
Adjustment switches
~ (I) Adjusting the lumbar s upport
r--
~ @ Adjusting seat height and fore-and -aft posi-,....,
S eat s and stor age
Power seat adjustment
The switches can be moved in various directions
to allow precise adjustment.
Read and heed all warnings before you adjust
your seat.¢ ,&..
Adju sting the cur vatur e of the lumbar
support
"' Push the forward or rear depression on the
sw itch shell (I)¢
page 5 7, fig. 68 to increase or
decrease the backrest curvature .
Adjusting the height of the lumbar support
"' Push the top or bottom depression on the
sw itch shell (I) to raise or lower the s upport in
the backrest.
Moving the front seat s forward or backward
"' Press the switch @forward or backwa rd hori
zontally.
Ad justing the seat height
"' Pull or pus h the switch @eve nly at both ends
t o ra ise or lowe r the sea t.
Angling the seat cushion up and down
(front )
"' Pull or pus h the switch @at t he front only to
ra ise or lower the sea t.
Angling the seat cushion up and down (rear)
"' Pull or push the switch @at the rear o nly to
ra ise or lower the seat .
Adjusting the seatback
"' Push or pull the switch @ in the same direction
you want the seatback to t ilt.
A WARNING
--- Never adjust the driver's or front passenger
seat whi le the vehicle is moving. If you do
this whi le the vehicle is moving, you will be
ou t of position. Always ad just the d river 's o r
fr ont p assenge r seat w hen t he vehi cle is not
mov ing.
~
57
Page 60 of 232
Seats and storag e
-Be careful when adjusting the seat height.
Check to see that no one is in the way, or
serious injury could result!
- Because the seats can be electrically adjust
ed with the ignition key removed, never
leave children unattended in the vehicle. Un
supervised use of the electric seat adjust
ments may cause serious inj ury.
- To reduce the r isk of injury i n the case of
sudden braking or accident, front passen gers must never ride in a mov ing vehicle
with the seatback reclined. Safety belts and
t h e a irbag sys tem offer maximum protec
t ion only when the seatback is upr ight and
the safety be lts are properly positioned on
the body . The more the seatback is reclined,
the greater the risk of personal in ju ry from
an incorrect seating position and improperly
positioned safety be lts!
- Always make sure the front seatbacks are in
th e upright posit io n and securely locked in
place when driving.
Head restraints
Adjusting head restraints
The head restraints must be adjusted properly to
provide protection.
F ig. 69 Drive r"s seat head restraint : adjusting the height
The head restraints on the front seats can be ad
justed to provide safe support to head and neck
at the optimum height . When optimally adjust
ed, the top of the restra int should be leve l w ith
the top of the head
¢ page 89 .
• Grasp the sides of the head restraint with both
hands and slide it upward/downward until you
feel it click into place
¢ fig . 69.
58
A WARNING
-Dr iving without head restraints or with head
restraints that are not properly adjusted in
creases the risk of ser ious or fatal neck in
jury dramat ically.
- Read and heed all WARNINGS
<=> page 89,
Proper adjustment of head restraints.
@ Tips
Correct ly adjusted head restraints and safety
belts are an extremely effective combination
of safety features.
Cup holder
Fi g. 70 Cup ho lder
A WARNING
Spilled hot liquid can cause an accident and
personal injury.
- Never carry any beverage co nta iners with
hot liqu ids, such as hot coffee or hot tea, in
the vehicle while it is moving. In case of an
accident, s udden braking or other veh icle
movement, hot liquid cou ld spill, caus ing
scalding burns. Spilled hot liquid can also
cause an acciden t and personal injury.
- Use on ly soft cu ps in the cupholder. Hard
cups and glasses can cause injury in an acci
dent .
- Never use the cup holder or ad apter as an
ashtray -risk o f fire.
(D Note
Only d rink contai ne rs with lids should be car
r ied in the cupho lde r. Liqu id could sp ill out
-