AUDI R8 SPYDER 2015 Repair Manual
Manufacturer: AUDI, Model Year: 2015, Model line: R8 SPYDER, Model: AUDI R8 SPYDER 2015Pages: 232, PDF Size: 58.36 MB
Page 61 of 232
.... N
l'
N "1: rl I.O
"' N
"' ....
and damage your vehicle's electronic
equipment or stain the upholstery, etc.
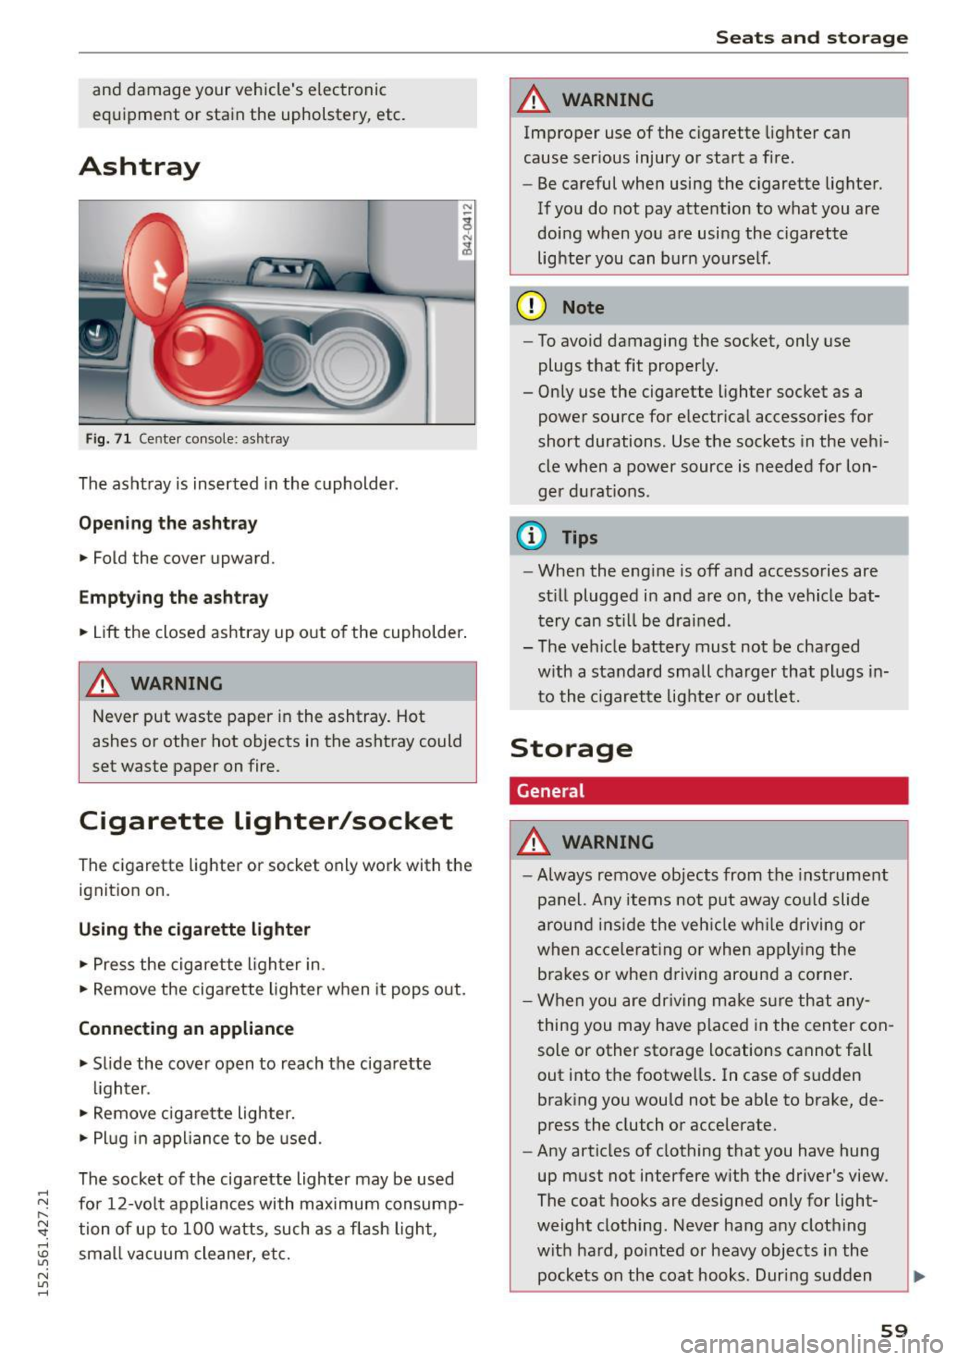
Ashtray
F ig . 71 Cen te r co nsole: ash tray
The ashtray is inserted in the cupholder.
Opening the a shtra y
• Fold the cover upward.
Emptying the ashtray
• Lift the closed ashtray up out of the cupholder .
A WARNING
-
Never put waste paper in the ashtray. Hot
ashes or other hot objects in the ashtray could
set waste paper on fire.
Cigarette lighter/socket
The cigarett e lighter o r socket only work with the
ignit ion on.
Using the cigar ett e lig hter
• Press the cigarette lighter in .
• Remove the cigarette ligh ter when it pops out.
Conn ecting an appliance
• Slide the cover open to reach the cigarette
lighter .
• Remove cigare tte lighte r.
• Pl ug in appliance to be used.
The socket of the cigarette lighter may be used
for 12-volt appliances with maximum consump· tion of up to 100 watts , such as a flash light,
small vacuum cleaner, etc.
Seats and storage
A WARNING
-Improper use of the cigarette lighter can
cause ser ious injury o r start a f ire.
- Be careful when using the c igarette Lighter.
If you do not pay attention to what you are
doing when you are using the cigarette
lighter you can bur n yourse lf .
(D Note
- To avoid damaging the socket, only use
plugs that fit proper ly.
- Only use the cigarette lighter socket as a power source for e lectr ical accessories for
short durations. Use the sockets in the veh i
cle when a power source is needed for lon·
ger d urat ions .
(i} Tips
-When the eng ine is off and accessories are
st ill plugged in and are on, the vehicle bat·
tery can st il l be drained .
- The vehicle battery must not be charged
with a standard small charger that plugs in
to the c igarette lighte r or outlet.
Storage
General
A WARNING
=
- Always remove objects from the instrument
panel. Any items not put away co uld slide
around ins ide the veh icle w hile driving or
when accele rating o r when app ly ing the
brakes or when driving around a corner .
- When you are dr iv ing make s ure that any
thing you may have placed in the center con
sole or other storage locations cannot fa ll
out into the footwe lls. I n case of sudden
braking you would not be ab le to brake, de
press the clutch or accelerate.
- Any articles of clothing that you have hung
up must not interfere with the driver's view .
The coat hooks are designed only for light·
weight clothing . Never hang any clothing
with ha rd, po inted or heavy objects i n the
pockets on the coat hooks. Dur ing sudden ..,.
59
Page 62 of 232
Seats and storag e
braking or in an accident -especially if the
airbag is dep loyed -these objects could in
jure any passengers ins ide the vehicle.
Glove compartment
The glove comportment is illuminated and con
be locked.
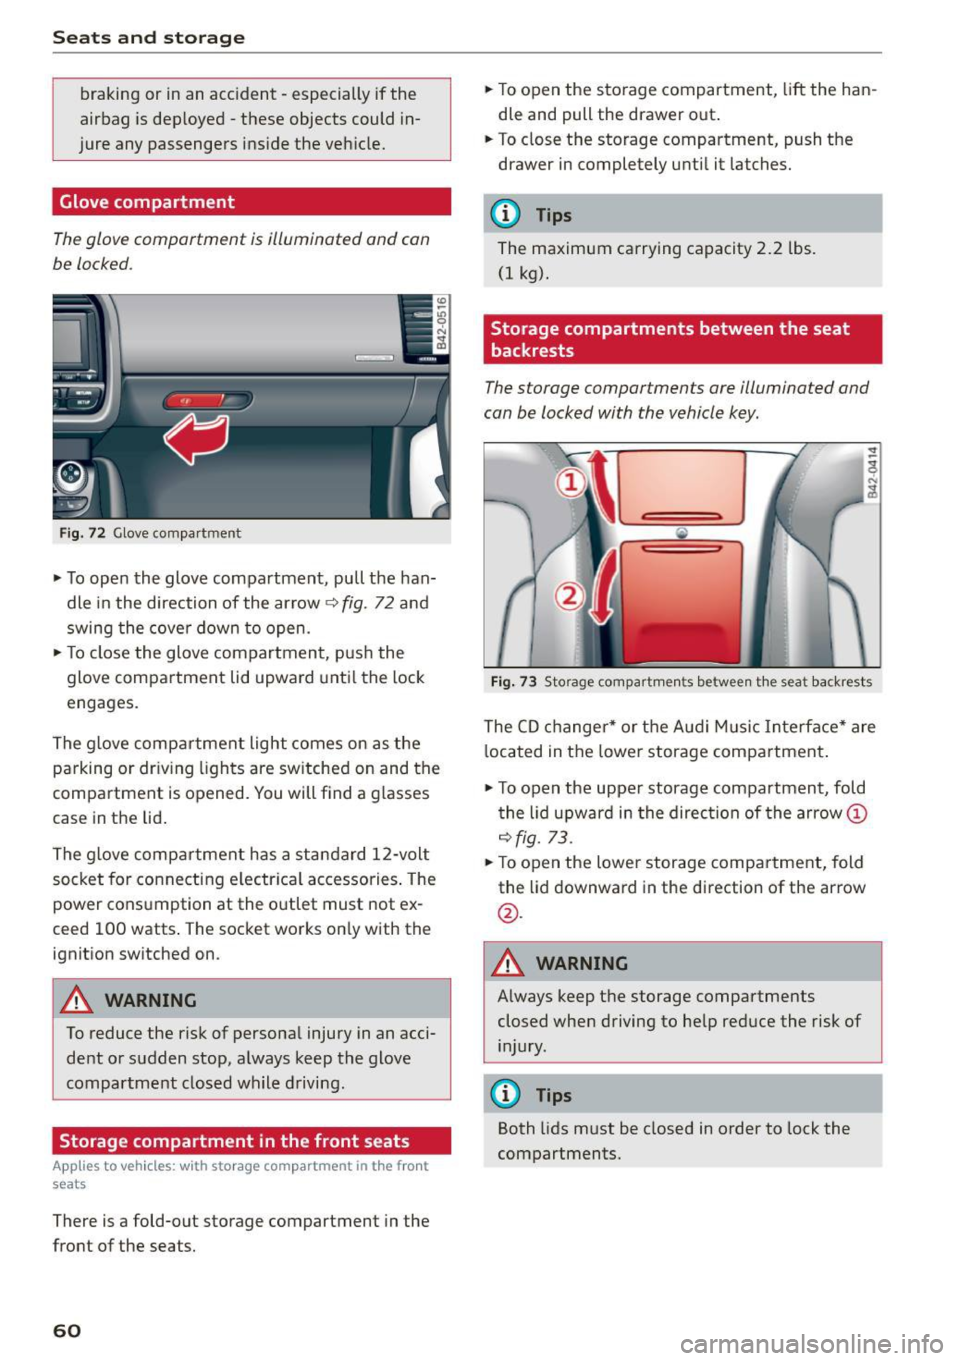
F ig. 72 Glove compartment
.,. To open the glove compartment, pull the han
dle in the direction of the arrow
9 fig. 72 and
swing the cove r down to open .
.,. To close the glove compartment, p us h the
glove compartment lid upward unti l the lock
engages.
The glove compartment light comes on as the parking or dr iving lights are switched on and the
compartment is opened. You will find a g lasses
case in the lid.
The glove compartment has a standard 12-volt socket for co nnecting e lectrica l accessories . The
power cons umption at the outlet must not ex
ceed 100 watts . The socket works on ly with the
ignition switched on.
A WARNING
To reduce the risk of personal injury in an acci
dent o r sudden stop, a lways keep the glove
compartment closed wh ile driving .
Storage compartment in the front seats
Applies to veh icles: w ith storage compartment in the front
seats
There is a fold-out storage compartment in the
front of the seats.
60
.,. To open the storage compartment, lift the han
dle and pull the drawer out .
.,. To close the storage compartment, push the
drawer in completely until it latches.
(D Tips
The maximum carrying capacity 2.2 lbs.
(1 kg).
Storage compartments between the seat
backrests
The storage comportments ore illuminated and
con be locked with the vehicle key.
Fi g. 73 Storage compart men ts betwee n th e seat backrests
The CD changer * or t he A ud i M usic Interface* are
l ocated in the lowe r storage compartment .
.,. To open the upper storage compartment, fold
t he lid upward in the direc tion of the arrow@
9fig. 73 .
.,. To open the lower storage compartment, fold
the lid downward in the direction of the arrow
@ .
A WARNING -
Always keep t he storage compartments
closed when driving to help reduce the risk of i n jury.
(D Tips
Both lids m ust be closed in order to lock the
compartments.
Page 63 of 232
.... N
l'
N "1: rl I.O
"' N
"' ....
Warm and cold Climate controls
Controls
Warm and cold
The climate controls automatically maintain the selected temperature in the vehicle interior through
out each season .
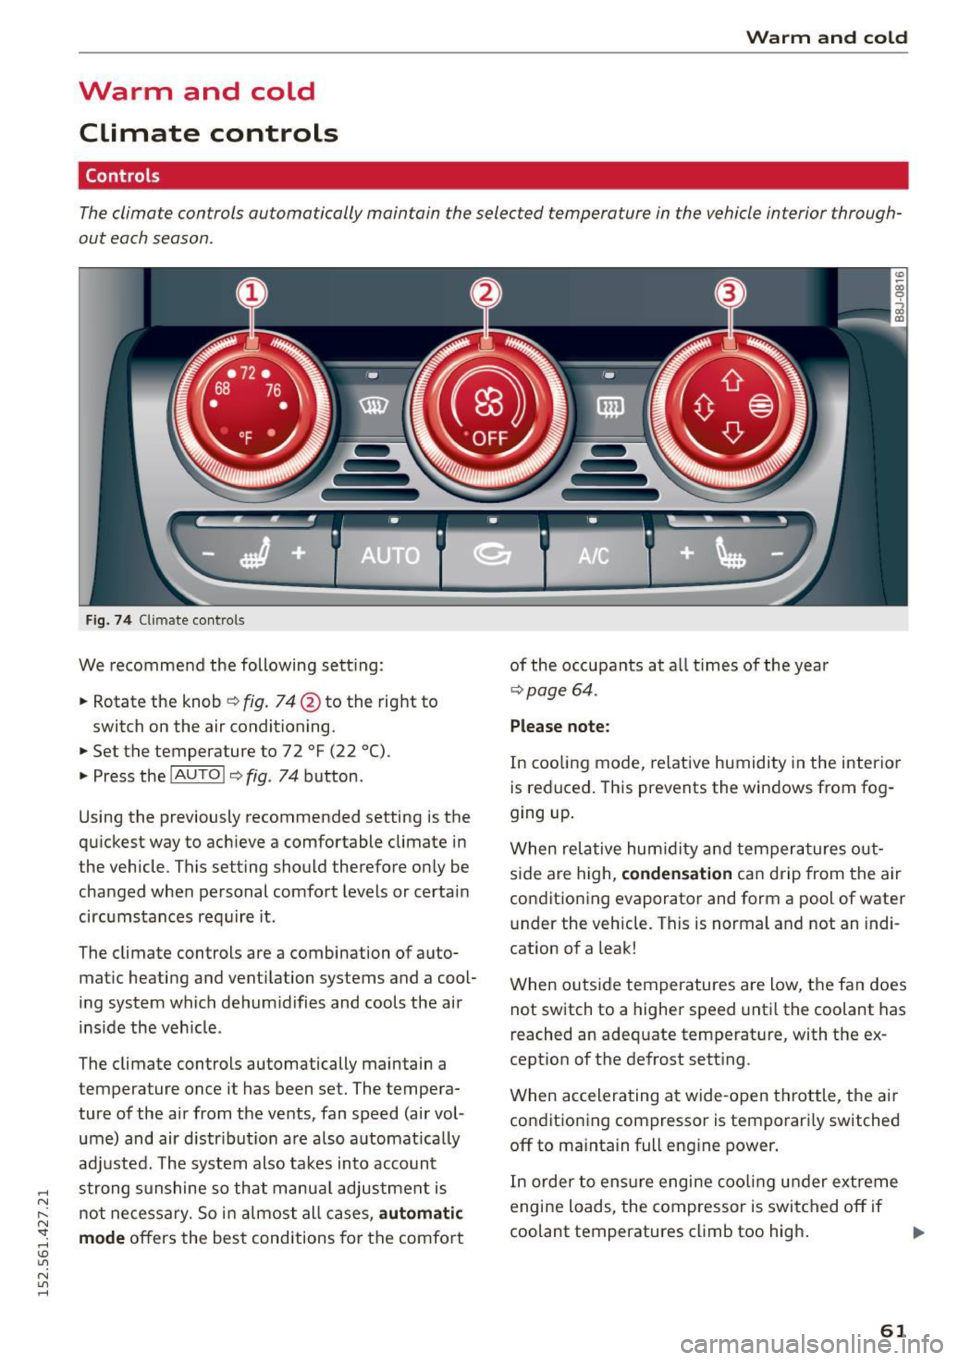
Fig . 74 Cl imate co ntrols
We recommend the following sett ing :
.. Rotate the knob
Q fig. 74 @ to the right to
switch on the air conditioning .
.,. Set the temperature to 72
°F (22 °() .
.. Press the !AU TO ! Q fig . 74 button .
Using the previously recommended setting is the
qu ickest way to ach ieve a comfortable climate in
the vehicle . This setting should therefore on ly be
changed when personal comfort levels or certain
circumstances req uire it .
The climate controls are a combination of a uto
mat ic heating and vent ilation systems and a cool
ing system which dehum idifies and cools the air
ins ide the veh icle .
The climate controls automatically maintain a
temperature once it has been set. The tempera ture of the air from the ve nts, fan speed (air vol
ume) and air d istr ibut ion are also a utomat ically
adj usted. The system also takes into account
strong sunshine so that manua l adjustment is
n o t necessary. So in almost all ca ses,
automatic
mode
offers the best conditions for the comfo rt of the occupants at a
ll times of the year
Q page 64 .
Please note :
In cooling mode , relative humidity in the interior
is reduced. This prevents the windows from fog
ging up .
When relative hum idity a nd temperatures o ut
s ide are high,
condensation can drip from the air
condit ioning evaporator and form a pool of water
under the vehicle . This is normal and not an indi
cation of a leak!
When outs ide temperatures are low, the fan does
not switch to a higher speed unti l the coolant has
reached an adequate temperat ure, with the ex
cept ion of the defrost setting .
When accelerating a t wide-open throttle, the ai r
condit ioning compressor is temporari ly switched
off to ma intain full eng ine power .
In order to ensure engine coo ling under ext reme
engine loads, the compressor is switched off if
coolant temperatures climb too high .
IJl>
61
Page 64 of 232
Warm and cold
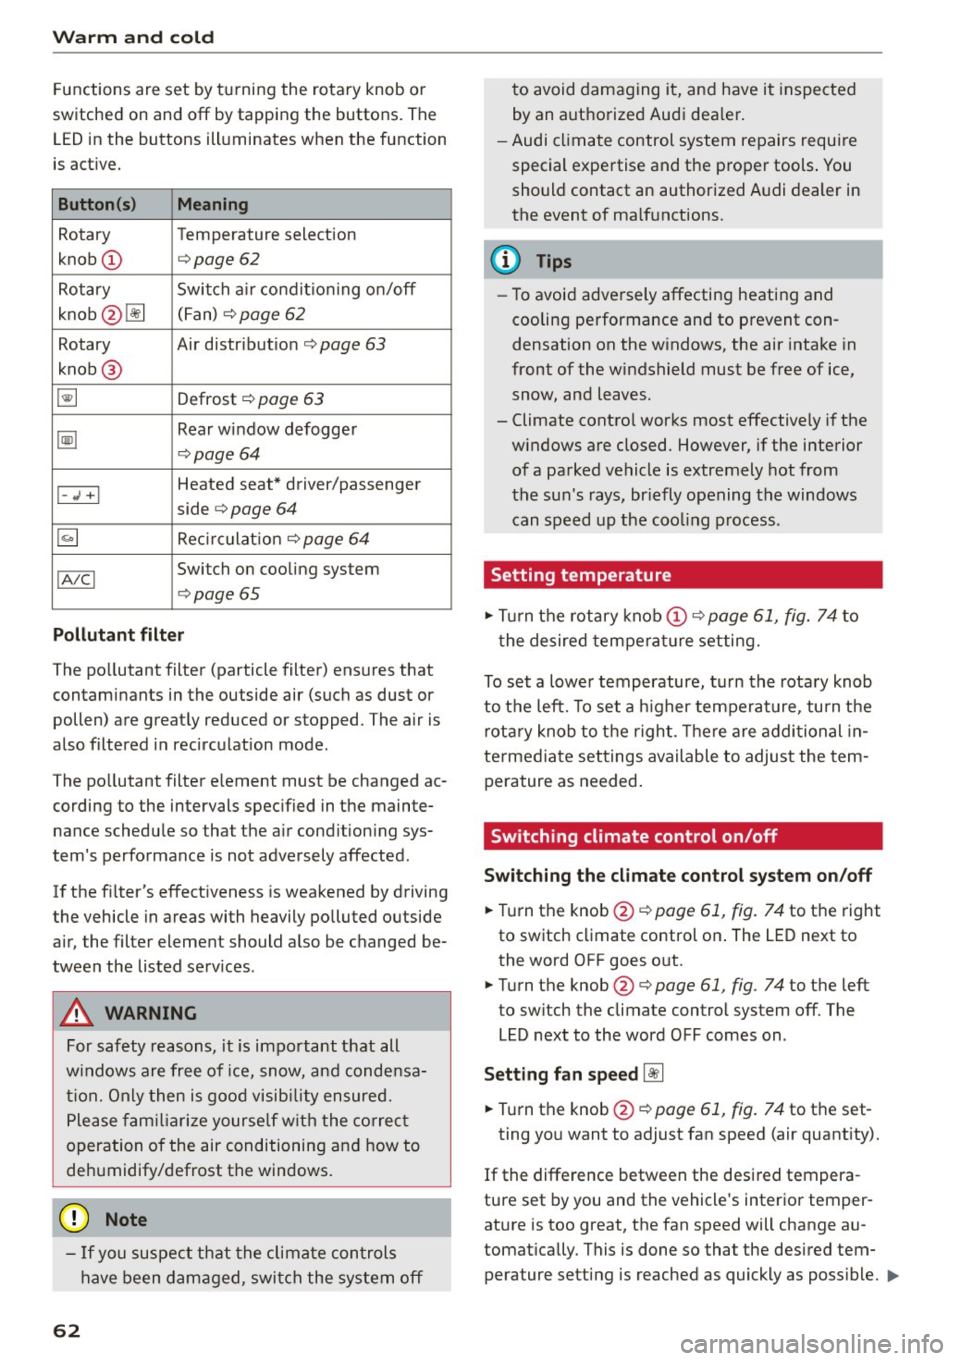
Functions are set by turning the ro tary knob or
switched on and
off by tappin g the buttons. The
L ED in the buttons illuminates w hen the function
is act ive.
Button(s)
Meaning
Rotary Temperature selection
knob
(D ¢ page 62
Rotary Switch a ir condit io ni ng on/off
knob @~ (Fan)
¢
page 62
Rotary Air distribut ion¢ page 63
knob @
~ Defrost ¢ page 63
~
Rear window defogger
¢page 64
Heated seat* driver/passenger I-.; +I
side ¢ page 64
~ Recirculat ion¢ page 64
IA!CI Switch on cooling system
¢ page 65
Pollutant filter
The pollutant filter (particle filter) ensures that
contaminants in the outside air (such as dust or
pollen) are great ly reduced or stopped. The air is
also filtered i n recirculation mode.
The pollutant filter e lement must be changed ac
cording to the intervals spec ified in the mainte
nance schedu le so that the a ir cond ition ing sys
tem's performance is not adversely affected.
If the f ilter's effect iveness is weakened by driving
the vehicle in areas with heavily polluted outside
air, the filter eleme nt should also be changed be
tween the listed serv ices .
A WARNING
For safety reasons, it is impo rtant that all
w indows are free o f ice, snow, and conde nsa
ti on. Only then is good visib ility ensured.
P lease fam iliarize yourse lf with the co rrec t
operation of the air conditioning an d how to
dehumidify/defrost the windows.
([) Note
-If yo u suspect that the climate controls
have been dam aged, swi tch the system
off
62
-
to avoid damaging it, and have it inspected
by an aut ho rize d Audi dea le r.
- Audi cl imate control system repairs requ ire
special expe rtise and the p roper tools . You
should contact an authorized A udi dealer in
the event of ma lf u nctions.
(D Tips
- To avoid adve rsely affecting heati ng and
cooling pe rformance and to prevent con
densation on the w indows , the air intake in
front of the windshield must be free of ice,
snow , and leaves.
- Climate contro l works most effectively if the
windows are closed. However, if the interior
of a parked vehicle is extremely hot from
t h e su n's rays, br iefly opening the windows
can speed up the coo ling p rocess.
Setting temperature
.,. Tu rn the rotary knob (D ¢ page 61, fig. 74 to
t he desired tempera ture setting.
To set a lowe r temperature, tu rn the rotary knob
to t he left. To set a h igher tempera ture, tu rn t he
rota ry knob to t he righ t. Th ere are addi tional in
te rme diate set tings available to adjust the tem
pera ture as needed .
' Switching climate control on/off
Switching the climate control sy stem on/off
.,. Tu rn the knob@¢ page 61, fig. 74 to th e right
to switch climate control on . The LED next to
the word OFF goes out.
.,. Turn the knob @¢
page 61, fig. 74 to the left
to sw itch the climate control system
off. The
LED next to the word OFF comes on .
Setting fan speed~
.,. Turn the knob @¢ page 61, fig. 74 to th e set-
ting yo u want to adjust fan speed (air quantity).
If the difference between the desi red tempera -
ture set by you and the vehicle's inter ior temper
ature is too great, the fan speed will change au
tomat ically. This is done so that the desired tem
perature setting is reached as quickly as poss ible . .,,.
Page 65 of 232
.... N
l'
N "1: .... I.O
"' N
"' ....
@ Tips
If the difference between the desired temper
ature you have set and the vehicle's interior
Air distribution
Fig. 75 Instrument panel: Location of air vents
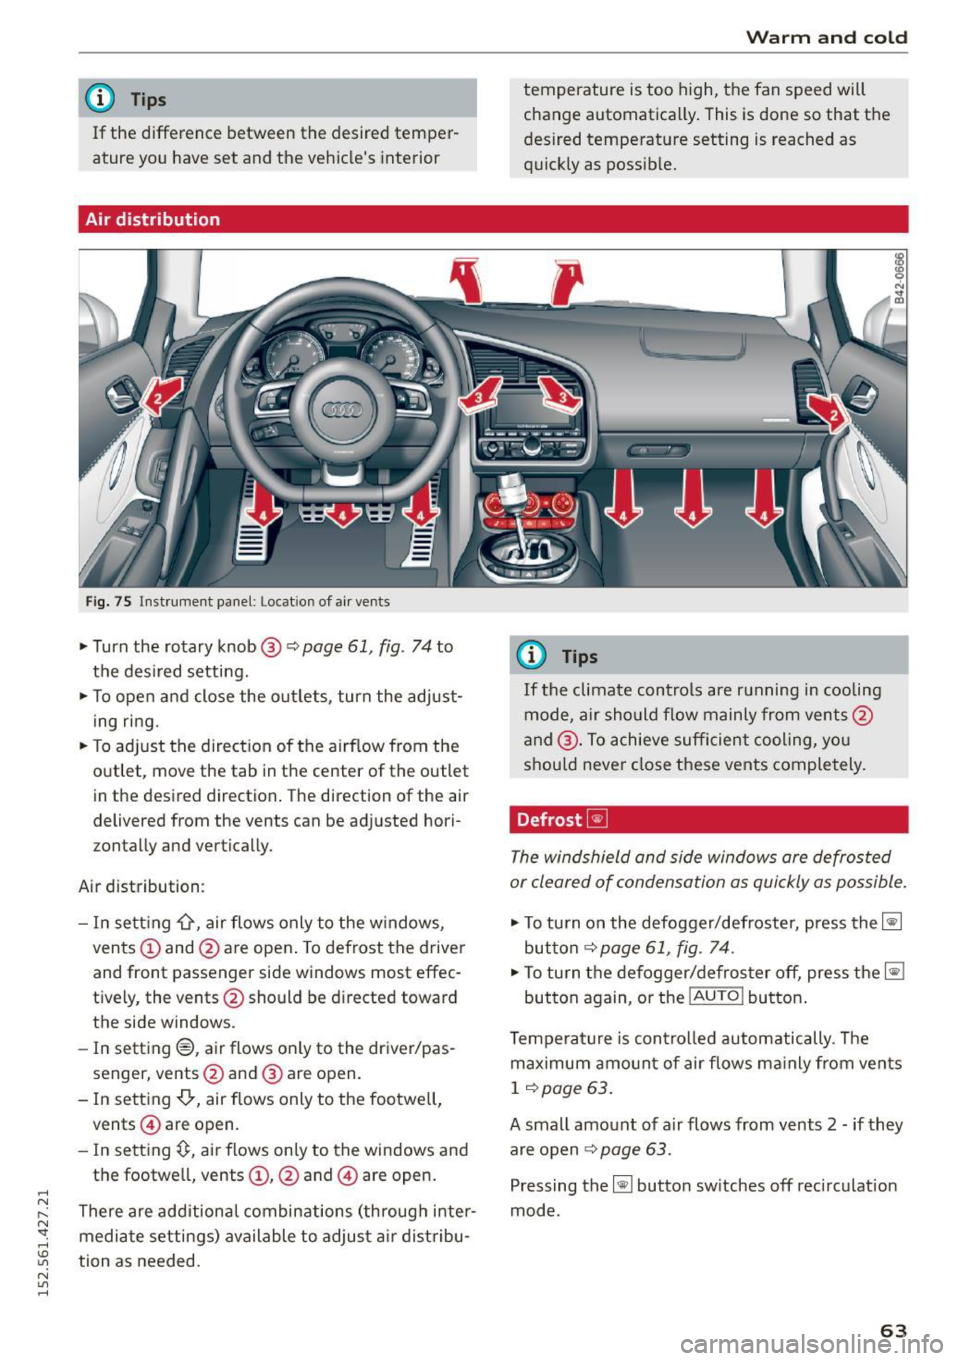
,.. Turn the rotary knob @ q page 61, fig. 74 to
the desired setting.
,.. To open and close the outlets, turn the adjust
ing ring.
,.. To adjust the direction of the airflow from the
outlet, move the tab in the center of the outlet
in the desired direction. The direction of the air
delivered from the vents can be adjusted hori
zontally and vertically.
Air distribution:
- In setting
-0, air flows only to the windows,
vents
(D and @are open. To defrost the driver
and front passenger side windows most effec
t iv ely, the vents @should be directed toward
the side windows .
- In setting®, air flows only to the driver/pas
senger, vents@and @ are open.
- In setting
-0-, air flows only to the footwell,
vents @ are open.
- In setting~. air flows only to the windows and
the footwe ll, vents
(D , @ and @ are open.
There are additional combinations (through inter mediate settings) available to adjust air distribu
tion as needed.
Warm and cold
temperature is too high, the fan speed will
change automatically. This is done so that the
desired temperature setting is reached as
quickly as possible.
(0 Tips
If
the climate controls are running in cooling
mode, air should flow mainly from vents@
and @. To achieve sufficient cooling, you
should never close these vents completely.
Defrost ~
The windshield and side windows are defrosted
or cleared of condensation as quickly as possible.
,.. To turn on the defogger/defroster, press the~
button
~page 61, fig. 74.
,.. To turn the defogger/defroster off, press the~
button again, or the
! AUTO ! button.
Temperature is controlled automatically. The
maximum amount of air flows mainly from vents
1 ~page 63.
A small amount of air flows from vents 2 -if they
are open
~ page 63.
Pressing the~ button switches off recircul ation
mode.
63
Page 66 of 232
Warm and cold
Rear window defogger
The r ear window d efogger clears th e re ar win
dow of cond ensation .
.,. Press the~ button c:;, page 61, fig . 74 to turn
the rear window defogger on and off.
The rear w indow defogger works only when the
engine is running. The indicator light in the but
ton illuminates when the rear window defogger
is turned on .
The window between the cockpit and engine
compartment is also cleared with the rear w in
dow.
The rear window defogger is switched off auto
mat ica lly after approx. 10 minutes.
@ For the sake of the environment
As soon as the rea r window is clear, yo u
should switch the rear window defogger off .
The reduced power consumpt ion has a benef i
cial effect on f uel consumption.
Heated seats
A pp lies to veh icles: w ith heated seats
The seat cushion and the seatback of the front
seats can be heated electrically.
.,. Press the heated sea ts b utton I-J + I c:;, page 61,
fig . 74
to set the level of heat ing des ired.
T he range o f control s goes from 1 to 3. The he at
set ting selected is shown by LEDs above the but
ton.
_& WARNING
Individua ls with reduced sensitivity to pain o r
tempe rat ure could develop burns when us ing
the seat heating function. To reduce the risk
o f i njury, these ind iv iduals s hould n ot use seat
heating.
@ Note
To avo id damage to the heating elements in
the seats, do not kneel on the seats o r place
heavy loads on a small a rea of the seat.
64
Automatic operation ~
Standard operating mode at all times of the
year .
Turning on automat ic oper ation
.,. Set the temperat ure you want .
.,. Press the
IAUTO I button c:;, page 61, fig. 74.
Automat ic operation ensures constant tempera
tures in the interior and dehumidifies the air in
s ide the veh icle. Air temperature, vo lume, and
distribution are controlled automatically to reach
or maintain the desired interio r temperature as
quic kly as possible. Fluc tuat io ns in exterio r tem
perature and the effects of temperature from the
pos it ion of t he sun are compe nsated for auto
matically.
Manual air recirculation mode~
The recirculation mode prevents polluted outside
air from entering the vehicle in te rior.
Switching on air recirculation
.,. Press the button~ c:;, page 61, fig. 74, c:;, _&.
Switching off air recirculation
.,. Press the button ~ again, or
.,. Press the
IAUTO I button, or
.,. Press the~ button .
I n recircu lation mode, air is drawn from the ve hi
cle inter io r, fil tered, an d recirc ulated . We recom
mend that you select recirculation mode
briefly
c:;, .&. under the following conditions:
When driving thro ugh a tunne l or in a traffic jam
so that exhaust f umes and odo rs ca nnot enter
the ve hicle interio r.
A WARNING
You sho uld not use the recirculation mode for
a n extended period si nce no fresh air is drawn
i n , and with th e air conditioning sw itched off
the w indows c an fo g up - th is increases the
risk of an ac cident!
Page 67 of 232
..... N
r-N "': ..... \!) 1.1"1
N 1.1"1 .....
A/C operation ~
Switching on A /C
~ Press the !AIC ! button~ page 61, fig . 74.
Switching A /C off
~ Press the !AIC ! button again.
The cooling system is switched on during A/Cop
eration - the heating and venti lation system is
contro lled automatically.
(D Tips
If the LED in the switch stays on after A/Cop
eration has been switched off(= switching the
A/C off), there is a fault in an air conditioning
component. Please consult an author ized
Aud i dea ler when there is an operating prob
lem.
Using the climate controls economically
Economical use of the climate controls helps to
save fuel.
When climate control is working in coo ling mode,
engine performance is red uced and fuel con
sumpt ion is affected. To keep the time the air
conditioning is on as short as possible, you
should do the following:
~ If you would like to save f uel, switch the air
condit ion ing
off.
~ If you open the w indows wh ile driving, switch
the a ir cond it ion ing
off .
~ If the vehicle is ext remely hot due to the heat
of the sun, briefly open doors and w indows.
@ For the sake of the environment
When you save fuel, you reduce em iss ions
from the vehicle .
Warm and cold
65
Page 68 of 232
On the road
On the road
Steering
Adjusting the steering wheel column
The steering wheel position can be continuously
adjusted in height and distance .
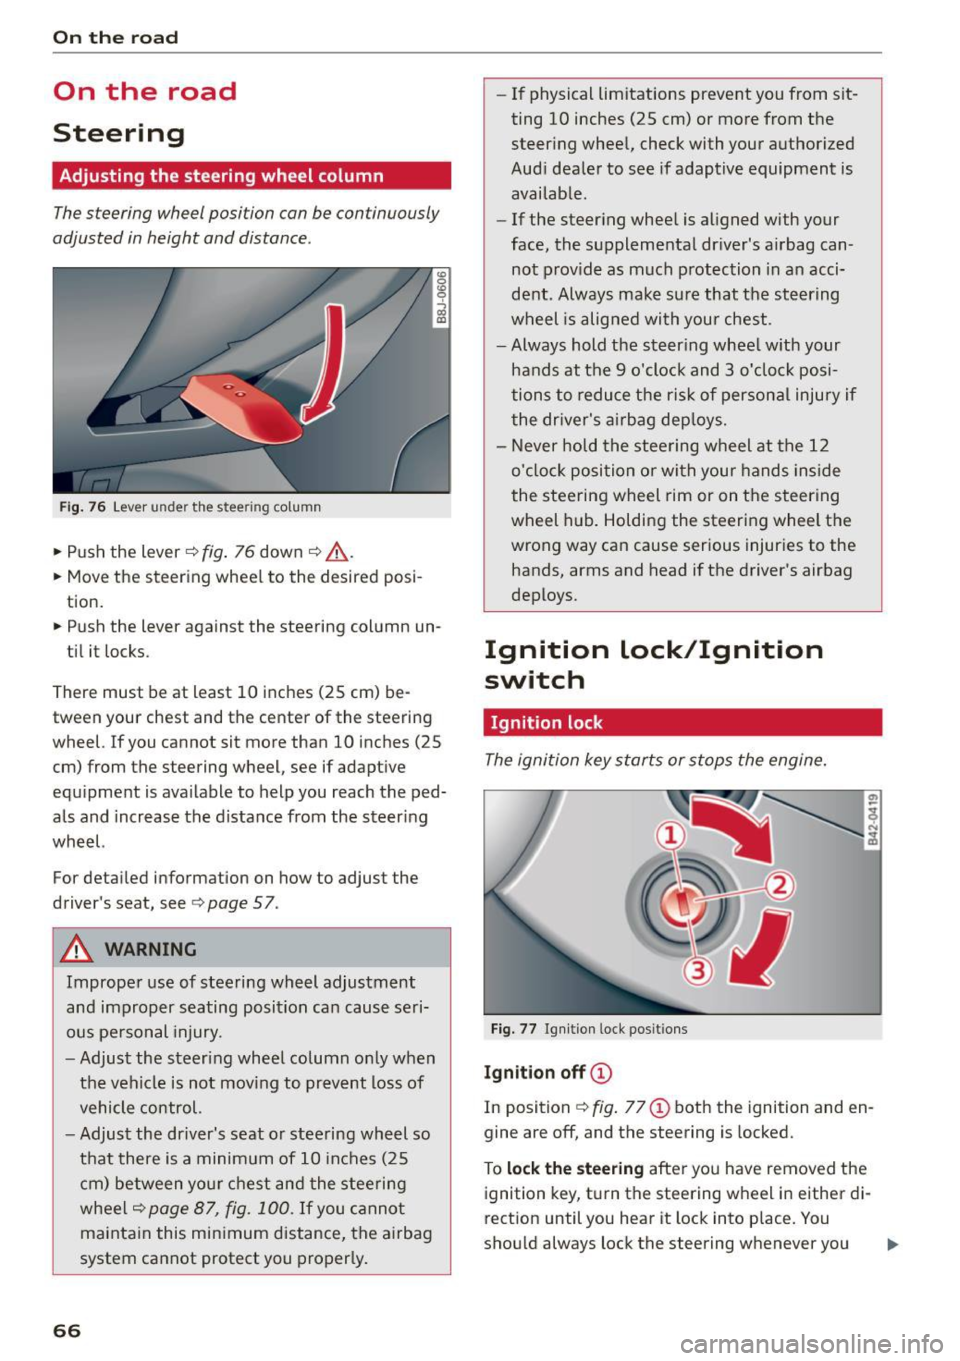
Fig. 76 Lever u nde r the stee rin g co lumn
... Push the lever ¢ fig. 76 down ¢ _&.. .
... Move the steering wheel to the desired posi
tion .
... Push the lever against the steering column un-
til it locks .
There must be at least 10 inches (25 cm) be
tween your chest and the center of the steering
wheel. If you cannot sit more than 10 inches (25
cm) from the steering wheel, see if adaptive
equipment is ava ilable to help you reach the ped
als and increase the distance from the steering
wheel.
For detailed information on how to adjust the
driver's seat, see
¢ page 57.
A WARNING
Improper use of steering wheel adjustment
and improper seating position can cause seri
ous pe rsonal injury.
- Adjust the steering wheel column only when
the vehicle is not moving to prevent loss of
vehicle control.
- Adjust the driver's seat or stee ring wheel so
that there is a minimum of 10 inches (25
cm) between your chest and the steering
wheel¢
page 87, fig. 100. If you cannot
maintain this min imum distance, the airbag
system cannot protect you proper ly.
66
- If physical limitations prevent you from sit
ting 10 inches (25 cm) or more from the steering wheel, check with your authorized
Audi dealer to see if adaptive equipment is
available.
- If the steering wheel is aligned with your
face, the supplemental dr iver's airbag can
not p rov ide as much protection in an acci
dent. Always make sure that the steering
wheel is aligned with your chest.
- Always hold the steering wheel w ith your
hands at the 9 o'clock and 3 o'clock posi
tions to reduce the risk of persona l injury if
the dr iver's airbag dep loys.
- Never hold the steering wheel at the 12 o'clock position or with your hands inside
the steering wheel rim or on the steering
wheel h ub. Holding the steering wheel the
wrong way can cause serious injuries to the hands, arms and head if the driver's airbag
deploys.
Ignition Lock/Ignition
switch
Ignition lock
The ignition key starts or stops the engine.
Fig. 77 Ign it ion lock posit ions
Ignit ion off CD
In position ¢ fig. 77 (D both the ignition and en
gine are off, and the steering is locked.
To
l ock the steering after you have removed the
ignition key, t urn the steering wheel in either di
rection until you hear it lock into place. You
should always lock the steering whenever you .,.
Page 69 of 232

..... N
r-N "': ..... \!) 1.1"1
N 1.1"1 .....
leave your vehicle . This makes vehicle theft even
more difficu lt
c::> & .
Ign ition on @
After switching the ignition on, the needles move
all the way up and then down.
If it is difficult to turn the key after you have in
serted it into the ign ition lock, turn the steering
wheel back and forth. This w ill take the load off
the steering lock mechanism and you will be able
to turn the key freely and start the engine.
Starting the engine @
In this position the engine starts . Wh ile the en
g ine is starting, the power supply to the head
l ights and other elect rical consume rs is tempo ra
ri ly inte rrupted to conserve battery power . After
the engine has started, re lease the key and it will
return to position @.
Before the sta rter can be opera ted again the key
m ust be t urned back to position (!). The
n on-re
pe at lo ck
prevents you from damaging the start
er when the engine is running .
A WARNING
-Never remove the key from the ignition lock
wh ile the vehicle is mov ing. The steer ing
wheel will lock causing loss of control.
- If you have to leave your vehicle - even for
just a min ute - a lways remove the ignit ion
key and take it with you. This is espec ially
important if you are going to leave ch ildren
behind in the veh icle . The ch ildren could
start the engine o r use other veh icle con
t ro ls. Unsuperv ised use of vehicle controls
( f or example, power windows) can c ause se
rious persona l injuries .
@ Tips
If the veh icle battery has been d isconnected
and then reconnected, then yo u m ust leave
t he key in posit ion @ for abou t 5 seconds be
fore you can start the engine .
On the road
Starting and stopping
the engine
Starting the engine
The engine can only be started with your original
Audi key.
On vehicles with S tronic*, the engine can be
sta rted in the neutra l position N and in each gear
(1 - 7 and R).
.,. Set the park ing brake
c::> .&_ .
.,. On veh icles with manual transmiss ion*, fully
dep ress the clutch peda l.
.,. Press and hold the bra ke peda l.
.,. Tu rn the ignition key to posit ion @
c::> page 66,
fig. 77 -do not depress the gas pedal when
starting the engine.
.,. Let go of the key as soon as the engine starts -
the starter m ust not cont inue to run. On
veh ides with S tronic, se lect gear position N .
A cold engine may at first be loud afte r it has
been started. This is due to the hydraulic valves
building up the oil pressure. This is normal and
no need for concern .
If the engine does not start immediately, stop
trying after 10 seconds and then try to restart
the engine about 30 seconds later .
A WARNING
--
-Never start or let the eng ine run in a con
f ined or enclosed area. Exhaust fumes from
the eng ine contain carbon mo noxide, a co l
o rl ess and odo rless gas. Carbon monoxide
can be fatal if i nhaled .
- Never leave the engine id ling unattended .
A n unattended ve hicl e w ith a running en
g in e poses a dange r of pe rsonal inj ury or
theft .
- W ith the engine r unning and a gear engag
ed, you have to ho ld the vehicle wi th the
foot b rake .
(D Note
-Avo id h igh engine speeds, fast acceleration
o r heavy engi ne loads whi le the engine is
st il l c old . T his could d amage t he engine.
67
Page 70 of 232
On the road
- The engine cannot be started by pushing or
towing the vehicle .
@I For the sake of the environment
To avoid unnecessary eng ine wear and to re
duce exhaust emissions , do not let your vehi
cle stand and warm up. Be ready to drive
off
immediately after starting your vehicle.
Stopping the engine
On vehicle s wi th S tron ic*, the engine can be
turned
off in the neutral position N and in each
gear (1 -7 and R) .
.. Tu rn the ignition key to posit ion (!) co
page 66,
fig. 77 .
A WARNING
- Never turn off the engine until the vehicle
has come to a complete stop .
- The brake booster and servotronic only work
when the eng ine is running . W ith the igni
t ion turned
off , you have to apply more force
when steering or braking. Since you cannot
steer and stop normally , this can lead to ac
c idents and serious injuries .
(D Note
-If the engine has been under heavy load for
an extended period of time, heat builds up
i n the eng ine compartment after the engine
i s switched
off -there is a r isk of damag ing
the engine . A llow the engine to continue to
run at id le for a short time or drive until it
has coo led down before you turn it off
q page 73.
-If the engine has been under heavy load for
an extended period of time, it can become
extremely hot . You should not park your ve
hicle over easily combustible objects or
areas (e .g . grass or leaves) . There is a risk of
starting a fire .
{!) Tips
After the engine has been switched off, the ra
diator fan can continue to run for up to 10 m i
nutes - even w ith the ignition switched
off . It
68
can also switch on again after some time if
the coo lant temperature rises as the result of
heat bu ildup or if the engine compartment is
heated by the sun's rays and the engine is hot .
Parking brake
Parking brake
When the parking brake is set, it prevents the ve
hicle from rolling away unintentionally.
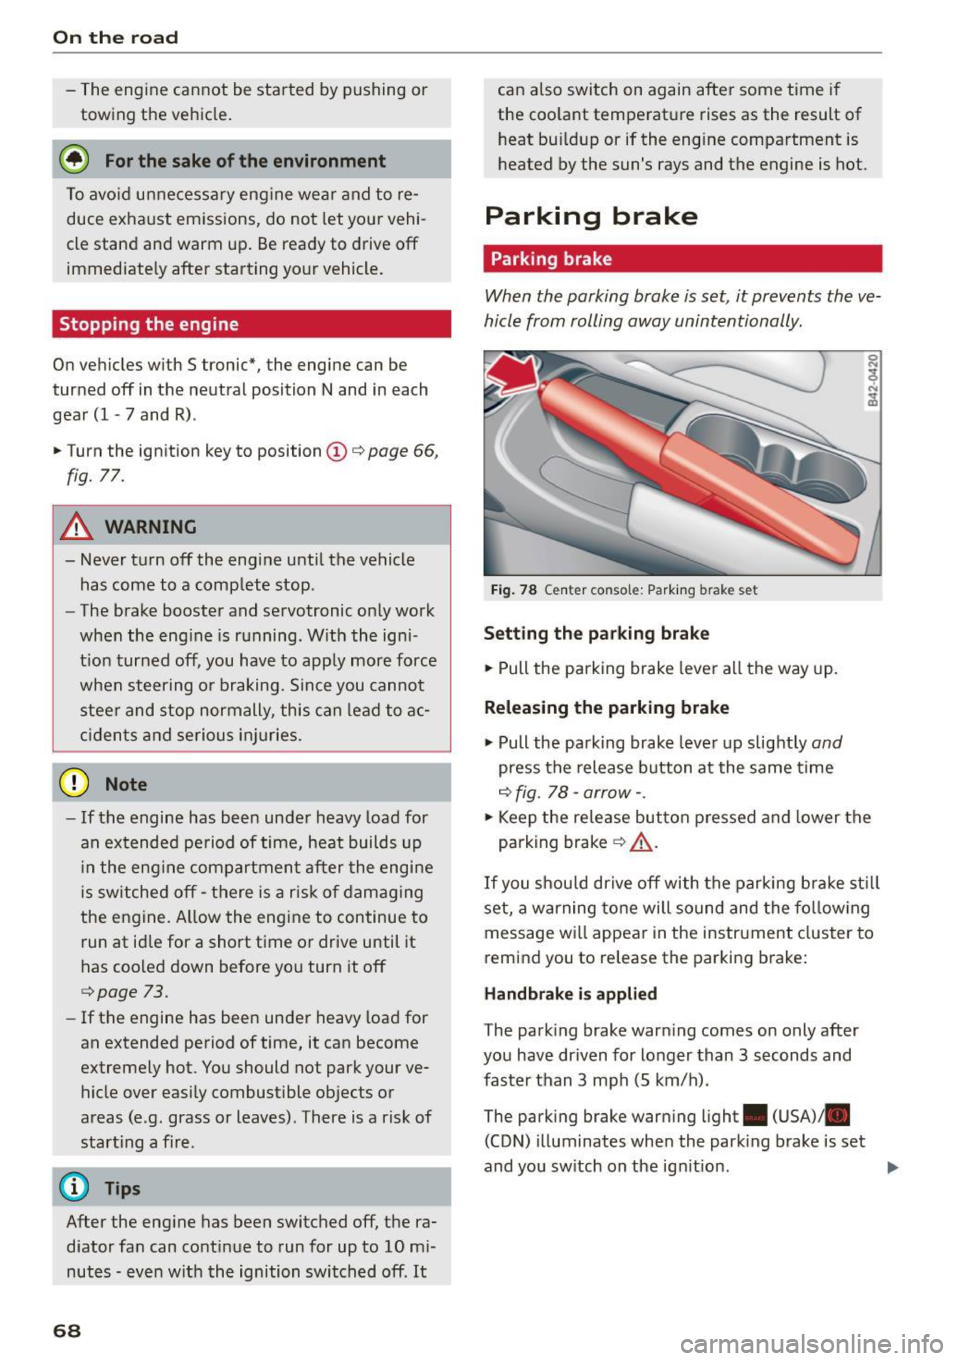
Fig . 78 C ente r co nsol e: Park ing bra ke set
S etting th e pa rking brak e
.. Pull th e parking brake lever all the way up.
Releasing the p arkin g brake
.. Pull the parking brake lever up slightly and
press the release button at the same time
c::> fig . 78 -arrow- .
.. Keep the release button pressed and lower the
parking brak e
q &_.
If you shou ld drive off with the parking bra ke st ill
set, a warning tone will sound and the fo llow ing
message wi ll appear in the instrument cluster to
r e mind you to release the parking brake:
H and brake i s appli ed
T he park ing brake warn ing comes on only after
you have driven for longer than 3 seconds and
faster than 3 mph (5 km/h) .
The parking brake warning ligh t. (USA)/ .
(CON) illuminates whe n the park ing brake is set
and you sw itch on the ign it ion .