AUDI RS5 COUPE 2015 Workshop Manual
Manufacturer: AUDI, Model Year: 2015, Model line: RS5 COUPE, Model: AUDI RS5 COUPE 2015Pages: 254, PDF Size: 64.12 MB
Page 51 of 254
"' N
0:: loo
rl I.O
"' N
"' rl
You can adjust the settings for the rear sun shade
so the shade retracts automatically when you select the reverse gear. To do this, select the
I CAR !
function button
>W indows > Rear blind > auto
matic > on
or! CAR I function button > Car sys
tems *
control button > Vehicle settings > Auto
matic rear blind
> On . The current setting is au
tomatically stored and assigned to the remote
key . Th e sun shade is extended again as soon as
the vehicle is traveling forward at a speed greater
than
9 mph (15 km/h) if the ignition has not
been switched off in the meantime .
WARNING
When lowering or raising the sunshade, make
sure there is nothing in its way and that it has
a free path to travel. This could cause person
al injury.
@ Tips
- Pressing the button rn several times con
secutive ly can trigger the overload protec·
tion. The sun shade can only be extended/
retracted again after a brief waiting period.
- The rear window sun shade only funct ions
when the vehicle interior is warmer than
14°F (-10°C).
Windshield wipers
Switching the windshield wipers on
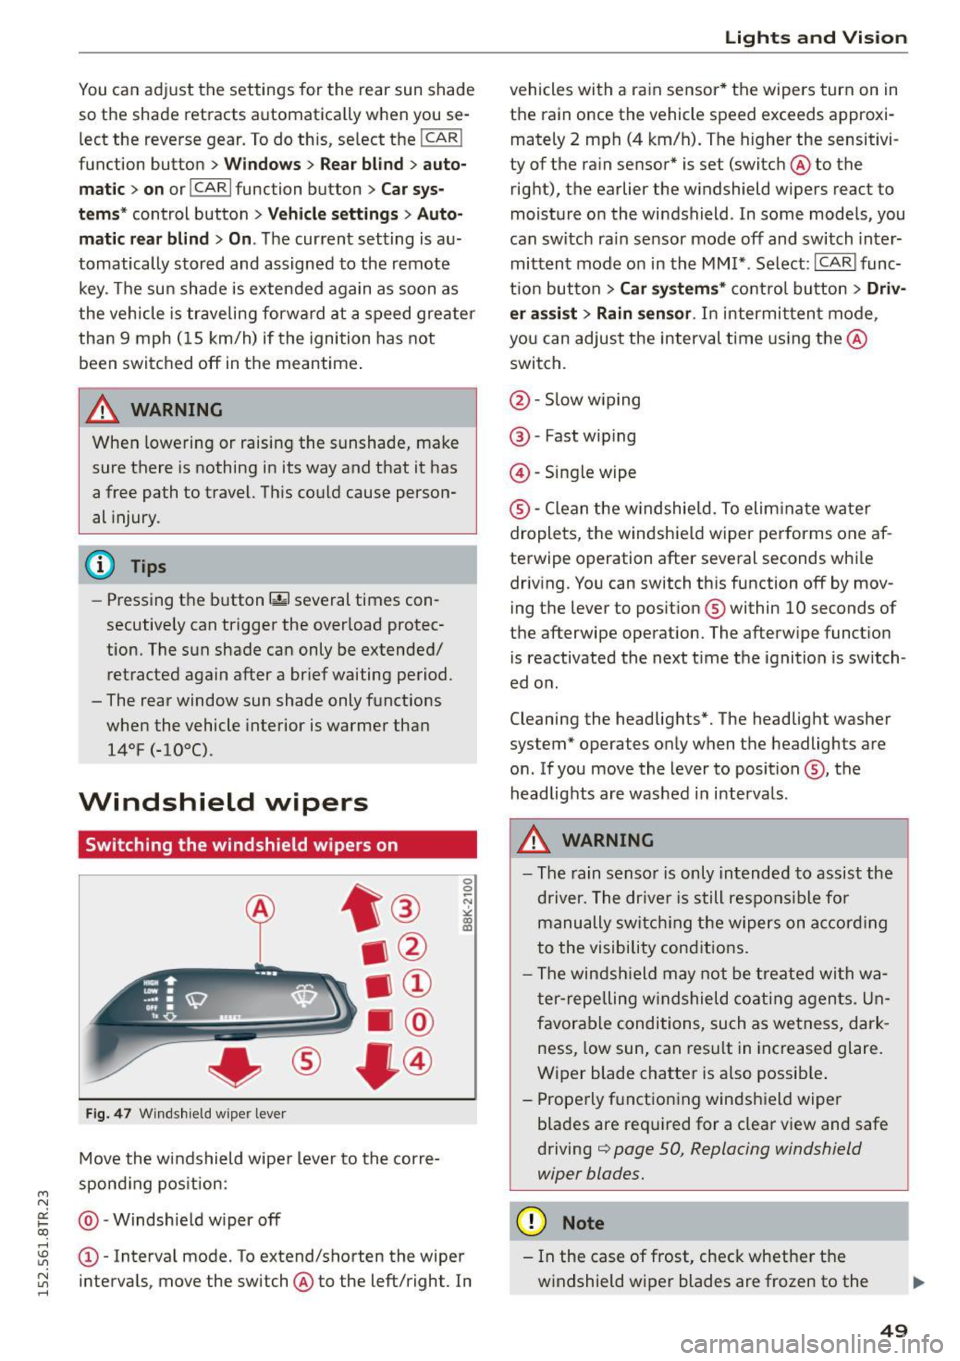
Fig. 47 Windshie ld wiper lever
Move the windshield wiper lever to the corre
sponding position:
@ -Windshield w iper off
0 0 -N
"' IX) a:,
(D -Interval mode. To extend/shorten the wiper
intervals , move the switch @to the left/right. In
Lights and Vision
vehicles with a ra in sensor* the wipers turn on in
the rain once the vehicle speed exceeds approxi
mately 2 mph (4 km/h). The higher the sensitivi
ty of the rain sensor* is set (switch @to the
right), the earlier the windshield wipers react to
moisture on the windshield . In some models, you
can switch ra in sensor mode off and switch inter
mittent mode on in the MMI* . Select : !CAR I func
tion button
> Car systems* control button > Driv
er assist> Rain sensor.
In intermittent mode ,
you can adjust the interval time using the@
switch.
@ -Slow wiping
@ -Fast wiping
@-Single wipe
® -Clean the w indshie ld. To eliminate water
droplets, the windshield wiper performs one af
terwipe operation after several seconds whi le
driv ing. You can switch this function off by mov
ing the lever to position ® within
10 seconds of
the afterwipe operation. The afterwipe function is reactivated the next time the ignition is switch
ed on .
Cleaning the headlights*. The headlight washer
system* operates only when the headlights are
on . If you move the lever to position @, the
headlights are washed in intervals.
A WARNING
--The rain sensor is only intended to assist the
driver. The driver is still respons ible for
manually switch ing the wipers on according
to the visibility conditions.
- The windshield may not be treated with wa
ter-repelling windshield coating agents. Un
favorable conditions, such as wetness, dark
ness, low sun, can result in increased glare.
Wiper blade chatter is also possib le .
- Properly functioning windshield wiper
blades are required for a clear view and safe
driving
c::> page 50, Replacing windshield
wiper blades.
(D Note
- In the case of frost, check whether the
windshield wiper blades are frozen to the
49
Page 52 of 254
Ligh ts a nd Vi sion
windshield . Switching on the windsh ield
wipers can damage the wiper b lades!
- Prior to using a car wash, the windshield
wiper system m ust be switched
off (lever in
position @). This helps to prevent uninten
tiona l switching on and damage to the
windsh ield wiper system.
@ Tips
- The windshield wipers are switched off
when the ignition is turned off . Activate the
windsh ield wipers after the ignition is
switched back on by moving the windsh ield
wiper lever to any pos it ion.
- Worn or dirty windshield w iper blades result
i n streaking. This can affect the rain sensor*
funct ion. Check your windshield wiper
blades regularly.
- The washer fluid nozzles of the windshield washer system are heated at low tempera
tures when the ignit ion is on.
- When stopp ing temporarily, (e.g . at a traffic
li ght) the set speed of the windsh ield wipers
i s automatically reduced by one speed.
Cleaning windshield wiper blades
Clea n the w indshield wiper blades whe n they be
g in to leave streaks . Use a soft cloth and glass
cleaner to clean the windshield wiper blades .
.,. Place the windshield wipe r a rms in the serv ice
pos ition. Re fer to ~
page 50.
.,. Lift the w iper arm away from the front w indow .
A WARNING
Dirty windshield wiper blades can impair your
view. Th is can lead to acc idents.
so
· Replacing windshield wiper blades
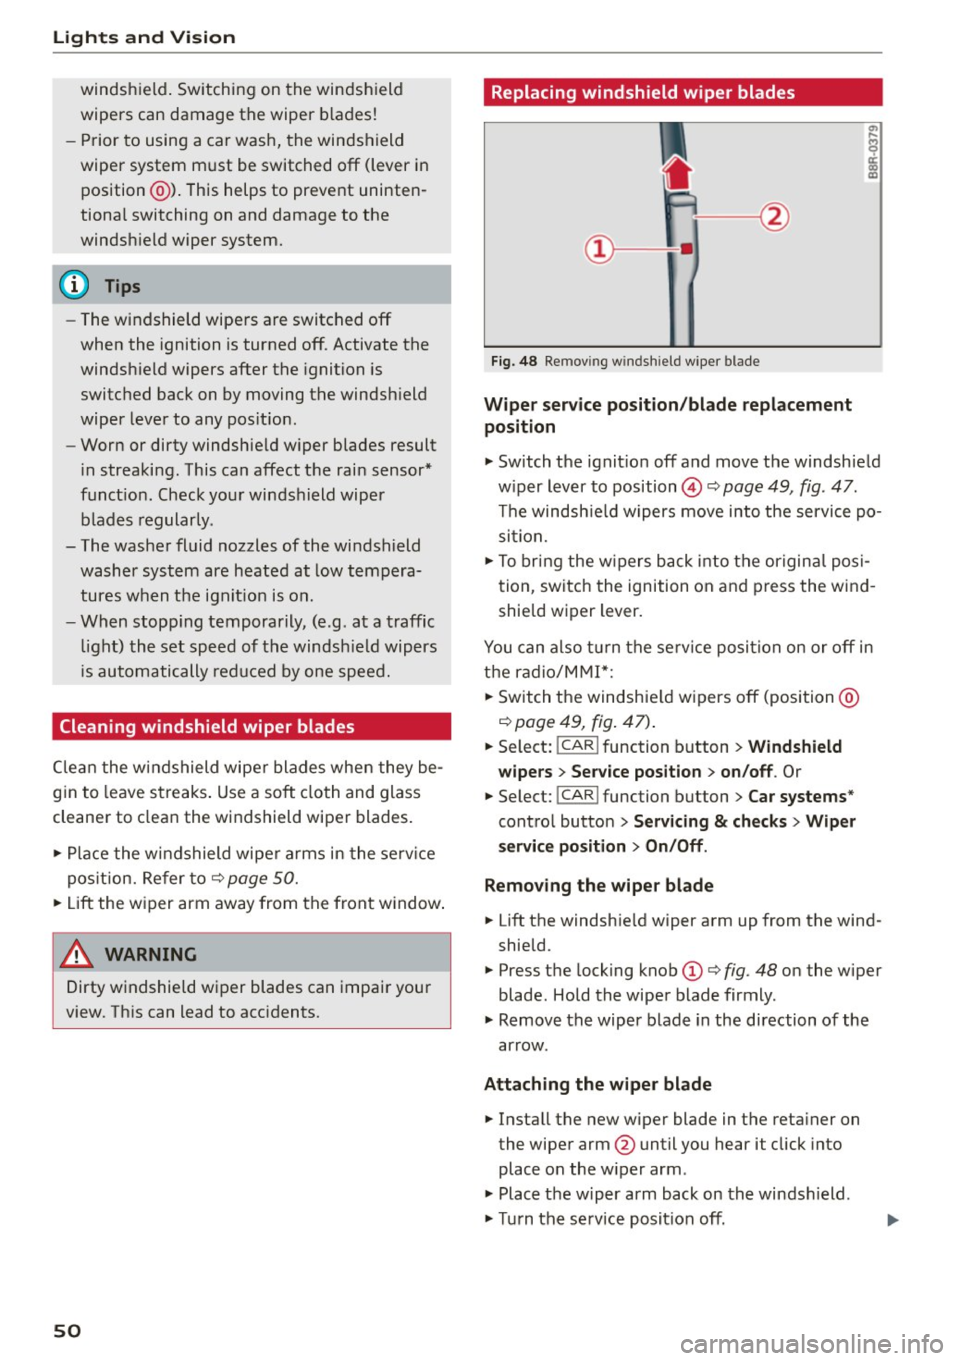
Fig. 48 Re mov ing w in d shi eld w ipe r b lade
Wipe r serv ice po sition /blade replacement
position
.,. Switch the ignit ion off and move the windsh ield
w iper lever to position©~
page 49, fig . 47.
T he windsh ie ld wipers move into the service po
sition.
.,. To bring the w ipers back i nto the origina l posi
tion, switch the ignition on and p ress the w ind
shie ld wiper lever.
You can also turn the se rv ice position on or
off in
the radio/M MI*;
.,. Sw itch the windshie ld w ipers
off (position @
Qpage49, fig. 47) .
.,. Select: !CAR I function button > Windshi eld
wipers
> S er vice position > on /off . Or
.,. Select: !CAR I function button> Car systems "
control button > S ervi cing & checks > Wiper
s ervice po sition
> On/Off .
Removing the wiper bla de
.,. Lift the windshie ld wiper arm up from the wind
shie ld.
.,. Press the locking knob
(D Q fig . 48 on the wiper
blade . Hold the wiper blade firmly .
.,. Remove the wiper blade in the direction of the
ar row.
Attaching the wipe r blade
.,. Install the new wiper blade in the reta iner on
the wiper arm @until you hear it click into
place on the w iper arm .
.,. Place the w iper arm back on the winds hield .
.,. Turn the service posit ion
off.
Page 53 of 254

"' N
0:: loo
rl I.O
"' N
"' rl
A WARNING
For your safety, you should replace the wiper
blades once or tw ice a year . See your author
ized Audi dealer for replacement blades .
(D Note
-The windshield wiper blades must only be
replaced when in the service position! Oth
erwise, you risk damaging the paint on the hood or the windshield wiper motor.
- You should not move your vehicle or press
the windshield wiper lever when the wiper
arms are folded away from the windshield .
The windshield wipers would move back in
to their orig inal position and could damage
the hood and windshield .
- To he lp prevent damage to the wiper sys
tem , always loosen blades which are frozen
to the windshie ld before operat ing wipers .
- To he lp prevent damage to w iper blades, do
not use gaso line , kerosene, paint th inner, or
other solvents on or near the wiper blades.
- To he lp prevent damage to the wiper arms
or other componen ts, do not attempt to
move the wipers by hand .
@ Tips
-Commerc ial hot waxes applied by au tomatic
car washes affe ct the how easily the glass
surface can be cleaned.
- You can also use the service pos it ion, for ex
amp le, if you want to protect the w indshield
from icing by using a cover.
Li ghts a nd Visio n
Digital compass
Switching the compass on and off
Applies to veh icles: w ith dig ital compass
The compass dire ction is shown in the rearview
mirror.
Fig . 49 Re arv ie w mirr or: Digi ta l compa ss ac tivated
.,. To swi tch the compass on or off , press and hold
the button @unti l the compass d isplay in the
mirror ¢
fig. 49 appears or d isappears .
T he dig ita l compass on ly wo rks when the ignit ion
is on. The directions are indicated with abbrev ia
t ions:
N (north), NE (northeast) , E (east), SE
(southeast) , S (south) , SW (so uthw est), W
(west), NW (northwest) .
(D Tips
To prevent inaccurate compass readings, do
not br ing any remote controls, electrical devi
ces or metallic objects near the mirror .
51
Page 54 of 254

Lights and Vi sion
Adjusting the magnetic zone
Applies to vehicles: with digital compass
The magnetic zone must be adjusted correctly
for the compass to read accurately .
~
LIU ®
Fig . SO No rth A meri ca: magne tic deflection zo ne bo unda
ri es
"' Press a nd ho ld the button @~ fig. 50 until the
number of the magne tic zone ap pears in the
rearview mirror .
"' Press the butto n @ repeated ly to select the
correct magnetic zone . The selection mode
turns off after a few seconds.
Calibrating the compass
Applies to vehicles: w ith d ig ital compass
You must recalibrate the compass if it does not
display the correct direction.
"'Press and ho ld the bu tton @unt il a C appea rs
in the rearview mirror.
"' Drive in a circle at about 6 mph (10 km/h) until
a direct ion is displayed in the rearv iew m irror .
A WARNING
-To avoid endanger ing yo urself and othe r
dr ivers, calibrate the compass i n an area
whe re the re is no traffic.
52
- The digital compass is to be used as a direc
tional a id on ly. Even though you may want
to look at it wh ile you are dr iv ing, you must
still pay attent io n to traffic, road a nd weath
er cond itions as well as other poss ible haz
ar ds.
Page 55 of 254
M N
0:: loo ,...., \!) 1.1'1
N 1.1'1 ,....,
Seats and storage
General information
Why is your seat adjustment so important?
The safety belts and the airbag system can only
provide maximum protection if the front seats are correctly adjusted.
There are various ways of adjusting the front
seats to provide safe and comfortable support
for the driver and the front passenger. Adjust
your seat properly so that:
- you can easily and quickly reach all the switches
and controls in the instrument panel
- your body is properly supported thus reducing
physical stress and fatigue
- the safety belts and a irbag system can offer
maximum protection ¢
page 128.
In the following sections, you will see exactly
how you can best adjust your seats.
There are special regulations and instructions for installing a child safety seat on the front pas
senger's seat. Always follow the information re
garding child safety provided in¢
page 150,
Child safety.
A WARNING -
Refer to¢ page 111, Driving safety for im
portant information, t ips, suggestions and
warnings that you should read and follow for
your own safety and the safety of your pas senge rs.
A WARNING
Incorrect seating position of the dr iver and all
other passengers can resu lt in serious person
al injury.
- Always keep your feet on the floor when the
vehicle is in motion -never put your feet on
top of the instrument pane l, out of the win
dow or on top of the seat cushion. This ap
plies especially to the passengers . If your
seating pos it ion is incorrect, you increase
the risk of injury in the case of sudden brak
ing or an accident. If the airbag inflates and
Seat s and stor age
the seating position is incorrect, this cou ld
result in personal injury or even death.
- It is important for both the driver and front
passenger to keep a distance of at least
10 inches (25 cm) between themselves and
the steering wheel and/or instrument panel.
If you're sitting any closer than this, the air
bag system cannot protect you properly. In
addition, the front seats and head restraints must be adjusted to your body height so
that they can give you max imum protect ion.
- Always try to keep as much distance as pos
sible between yourself and the steer ing
wheel or instrument pane l.
- Do not adjust the driver's o r front passeng
er 's seat while the veh icle is moving. Your
seat may move unexpectedly, causing sud
den loss of vehicle control and persona l in
jury.
If you adjust your seat whi le the vehicle
is moving, you are out of position.
Driver's seat
The correct seat position is important for safe
and relaxed driving.
We recommend that you adjust the dr iver's seat
in the following manner:
"' Adjust the seat in fore and aft direction so that
you can eas ily push the pedals to the floor
while keeping your knees slightly bent¢.&,
in
Why is your seat adjustment so important? on
page 53.
"' Adjust the seatback so that when you sit with
your back against the seatback, you can still
grasp the top of the steering wheel.
"' App lies to veh icles w ith adjustable head re
straints: Adjust the head restraint so the upper
edge is as even as possible with the top of your
head.
If that is not possible, try to adjust the
head restra int so that it is as close to th is posi
t ion as possible ¢
page 56.
A WARNING
Never place any objects in the driver's foot
well. An object could get into the pedal area
and interfere with pedal funct ion. In case of
-
53
Page 56 of 254
Seats and storag e
sudden braking or an accident, yo u wo uld not
be able to brake or accelerate.
Front passenger's seat
Always move the front passenger seat into the rearmost position.
To avo id contact w it h the airbag wh ile i t is de
p loying, do not sit any closer to the inst rument
panel than necessary and always wear the three
point safety belt provided adjusted correctly. We
recommend that you adjust the passenger's seat in the following manner:
.,. Bring the backrest up to an (a lmost) upright
position .
Do not ride with the seat reclined .
.,. Applies to vehicles with adjustable head re
straints: Adjust the head restra int so the upper
edge is as even as poss ible with the top of your
head. If that is not possib le, try to adjust the
head restraint so that it is as close to this posi
tion as possible ¢
page 56.
.,. Place your feet on the floor in fron t of the pas
senger 's seat.
Front seats
Power seat adjustment
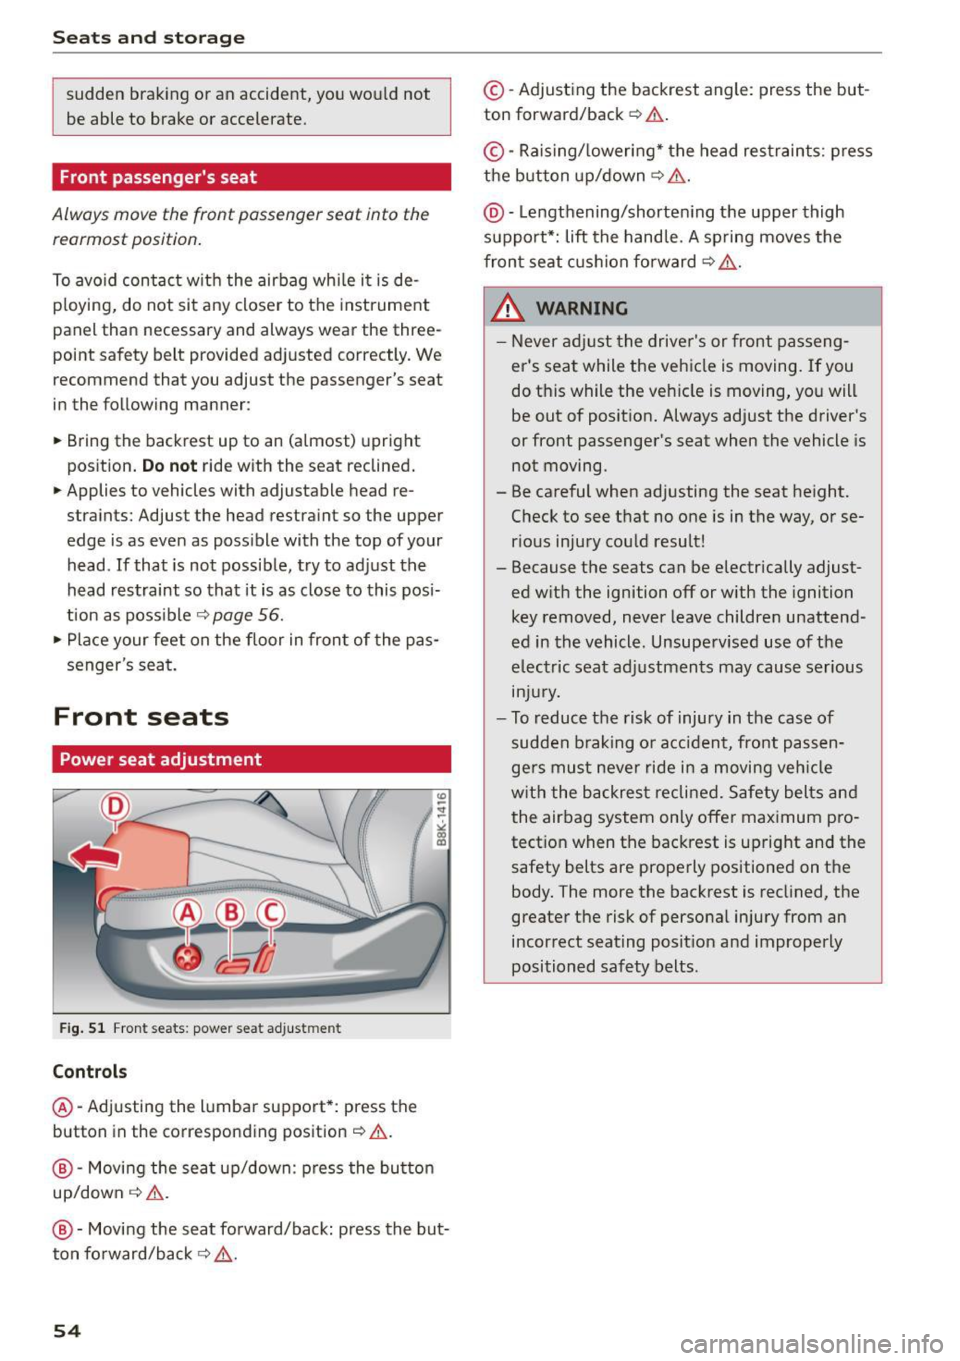
F ig . 5 1 Front seats : power seat ad justm ent
Controls
@ -Adjusting the l umbar support*: press the
button in the corresponding position~.& .
@-Movi ng the sea t up/down : press the bu tton
up/down
~ & .
@ -Movi ng the seat fo rward/back: press the but
ton fo rward/back
~ ,1,. .
54
©-Adjusting the backrest angle: press the but
ton forward/back ¢.& .
©-Raising/ lowering* the head res traints: p ress
the button up/down~ &.
@ -Lengthening/shorte ning the upper thigh
support*: lift the hand le. A sp ring moves the
fron t seat c ushion fo rward ¢
,&..
& WARNING -
-Never ad just the driver's or front passeng
er's seat while the vehicle is moving. If you
do this while the veh icle is moving, yo u will
be out of posit ion. Always adjust the driver 's
or front passenger's seat when the vehicle is
not moving .
- Be careful when adjusting the seat height. Check to see that no one is in the way, or se
r ious injury cou ld result!
- Because the seats can be electrically adjust ed w ith the ignition off or with the ignition
key removed, never leave children unattend
ed in the vehicle. Unsuperv ise d use of the
electric seat adj ustments may cause serious
m Ju ry.
- To reduce the risk of injury in the case of
sudden b raking or accident, fro nt passen
ge rs must neve r ride in a moving veh icle
w ith the backres t reclined. Safety belts and
the air bag system on ly offer ma ximum pro
tect ion when the bac krest is upright and the
safety belts are properly positioned on t he
body. The more the backrest is recl ined, the
greater the risk of persona l injury from an
incorrect seating posit ion and improperly
positioned safety belts.
Page 57 of 254
"' N
0:: loo
rl I.O
"' N
"' rl
Power easy entry function
The easy entry function makes it easier for the
rear passengers to enter and leave the vehicle .
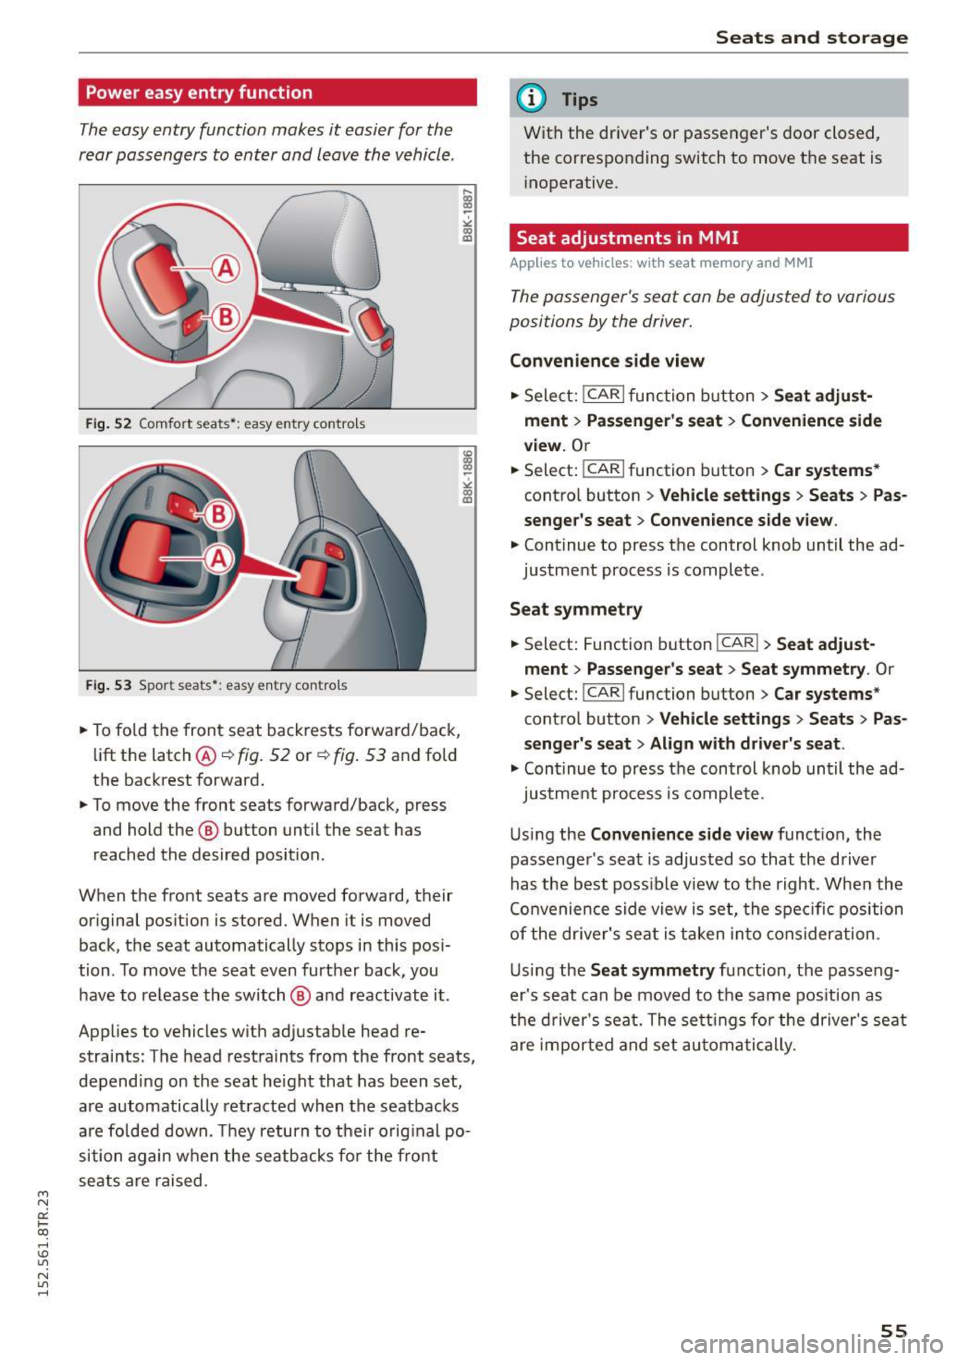
Fig. 52 Comfort seats•: easy ent ry contro ls
Fi g. 53 Sport seats*: easy entry controls
.. To fold the front seat back rests forward/back,
lift the latch @¢ fig. 52 or¢ fig. 53 and fold
the backrest forward.
.. To move the front seats forward/back, press
and hold the@ button until the seat has
reached the desired position .
When the front seats are moved forward, their
or iginal pos ition is stored. When it is moved
back, the seat automatically stops in this pos i
tion . To move the seat even further back, you
have to release the switch @ and reactivate it .
Applies to vehicles w ith adjustab le head re
straints: The head restraints from the front seats,
depending on the seat he ight that has been set,
are automatically retracted when the seatbacks
are folded down. They return to their orig inal po
sition again when the seatbacks fo r the front
seats are raised. Seats and storage
(D Tips
With the dr
iver's or passenger's door closed,
the corresponding switch to move t he seat is
i noperative.
Seat adjustments in MMI
Appl ies to vehicles: wit h seat memory and MMI
The passenger's seat can be adjusted to various
positions by the driver.
Conven ience side view
.. Select: jCAR I function b utton > Seat adju st
ment
> Pas senger' s seat > Convenience side
view.
Or
.. Select: I CAR I function button > Car systems *
control button > Vehicle settings > Seats > Pa s
senger 's seat > Con venie nce side view .
.,. Continue to press the control knob until the ad
justment process is complete .
Seat symmetry
.. Select: Function button !CAR !> Seat adjust
ment > Passenger's seat > Seat symmetry .
Or
.. Select: jcARI function button> Car systems *
control button > Vehicle settings > Seats > Pas
s eng er' s s eat > Align with driv er' s s eat.
.,. Cont inue to press the control knob until the ad-
justme nt process is complete .
Using the
Conveni ence s ide view function, the
passenger's sea t is adjusted so that the driver
has the best poss ible view to the right . When the
Co nvenience side view is set, the spe cific position
of the dr iver's se at is taken in to consideration.
U sing the
Seat symmetry function, the passeng
er's seat can be moved to the same pos ition as
the d river's seat. The se tti ngs for the driver's seat
are imported and set au toma tic ally.
55
Page 58 of 254
Seats and storag e
Center armrest
The center armrest can be adjusted to several
levels.
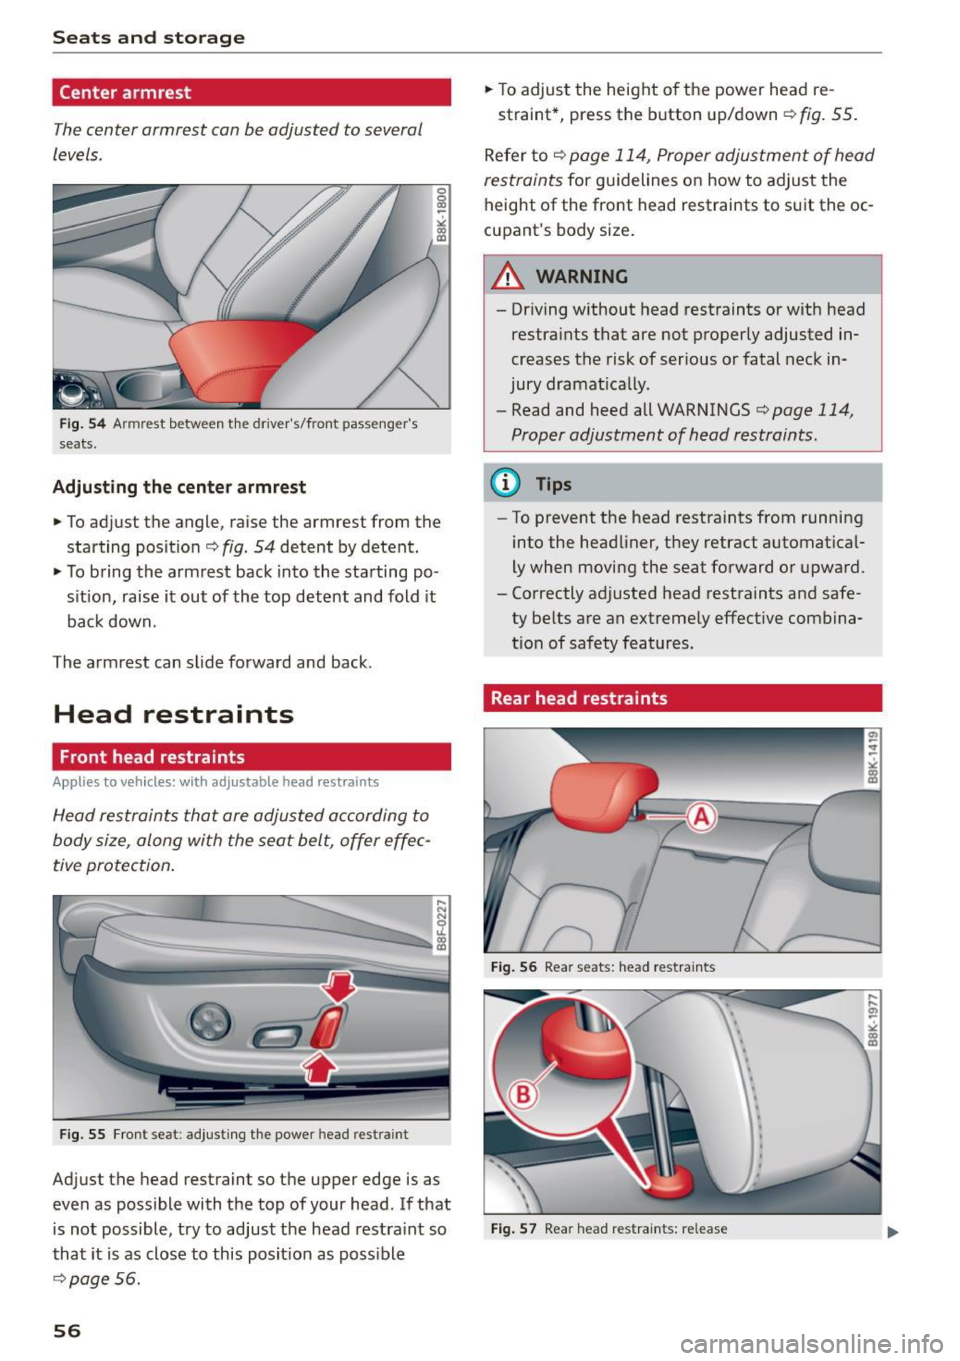
F ig . 54 Armrest between t he driver's/front passenger's
seats.
Adjust ing the cente r armre st
.. To adj ust the angle, raise the armrest from the
starting posit ion ¢
fig. 54 detent by detent.
.. To bring the armrest back into the starting po
s ition, raise it out of the top detent and fold it
back down.
The armrest can slide forward and back .
Head restraints
Front head restraints
Applies to veh icles: with ad justable head restraints
Head restraints that are adjusted according to
body size, along with the seat belt, offer effec
tive protection .
,...
---======-=====~:::::::~:
Fig. 55 Front seat: adjusting the power head restraint
Adjust the head restraint so the upper edge is as
even as possible with the top of your head. If that
is not possible, try to adjust the head restraint so
that it is as close to this posit ion as poss ible
¢ page 56.
56
.. To adjust the height o f the power head re-
straint*, press the b utton up/down ¢
fig. 55.
Refer to ¢ page 114, Proper adjustment of head
restraints
for guidelines on how to adjust the
height of the front head restraints to s uit the oc
cupant's body size .
A WARNING
-Dr iving without head restraints or with head
restraints that are not properly adjusted in
creases the risk of ser ious or fatal neck in
jury dramat ically.
- Read and heed all WARNINGS
c>page 114,
Proper adjustment of head restraints.
(D Tips
- To prevent the head restraints from running
into the headliner, they retract automat ica l
ly when moving the seat forward or upward .
- Correctly adjusted head restraints and safe
ty be lts are an extremely effect ive combina
t ion of safety features.
Rear head restraints
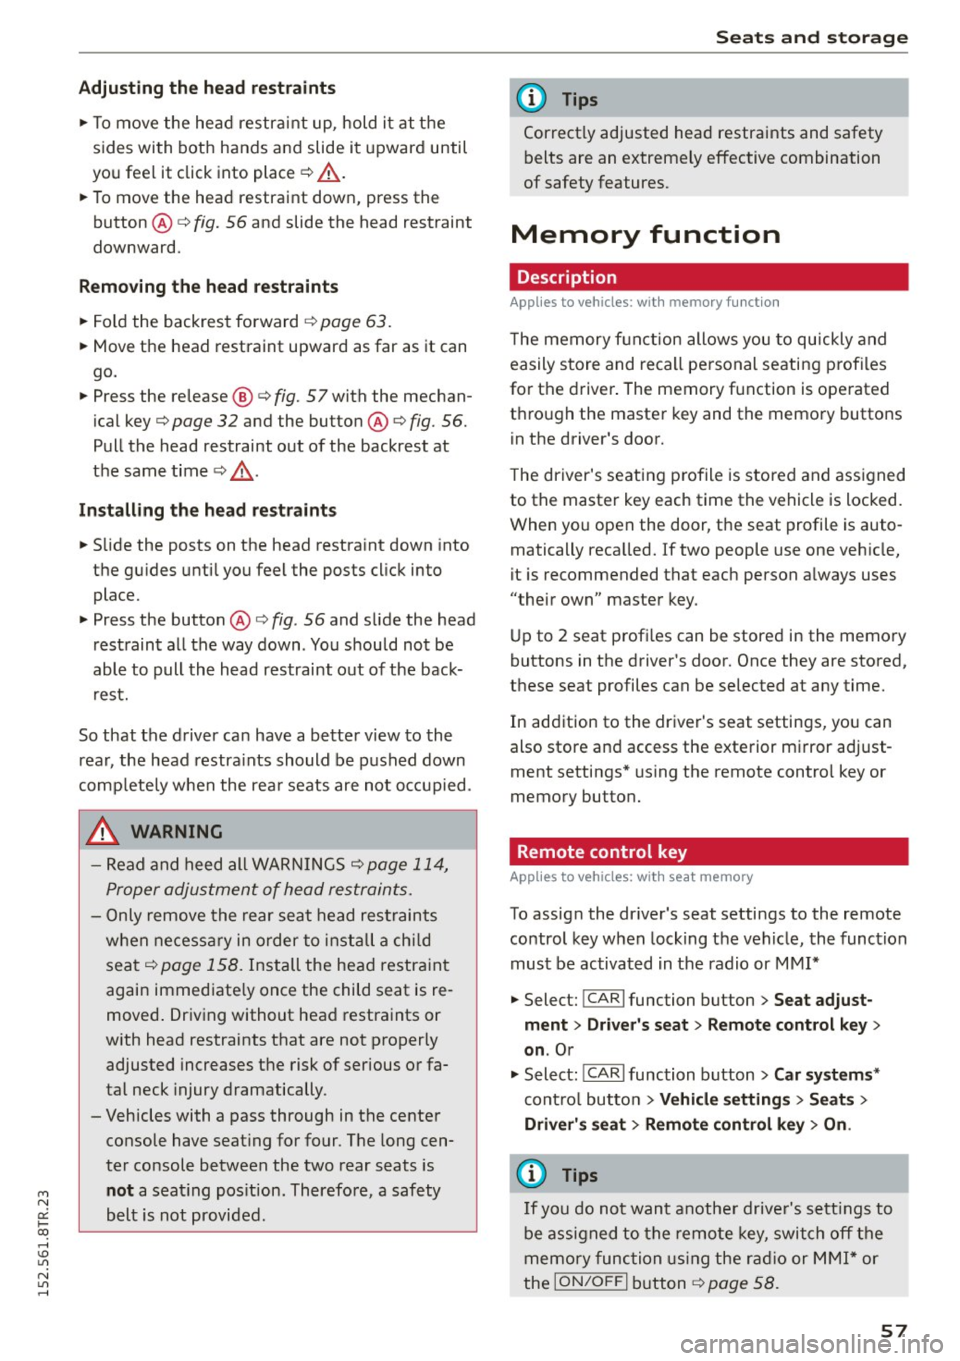
Fig . 56 Rea r seats: head restraints
Fig . 57 Rear head restraints: release
Page 59 of 254
M N
0:: loo ,...., \!) 1.1'1
N 1.1'1 ,....,
Adjusting the head restr aint s
"'To move the head restraint up, hold it at the
sides with bot h hands and slide it upward until
yo u feel it click into place¢
A.
"'To move the head restraint down, press the
button ®¢
fig. 56 and slide the head restraint
downward.
R emoving th e head re straint s
"' Fold the backrest forward ¢ page 63.
"'Move the head restraint upward as far as it can
go.
"' Press the release @¢
fig. 57 with the mechan
ical key¢
page 32 and the button ® ¢ fig. 56.
Pull the head restraint out of the backrest at
the same time¢,& .
Install ing the head rest raint s
"'Slide the posts on the head restraint down into
the gu ides until you feel the posts click into
place.
"' Press the button®¢
fig. 56 and slide the head
restraint all the way down . You should not be
able to pull the head restraint out of the back
rest.
So that the driver can have a better v iew to the
rear, the head restra ints should be pushed down
completely when the rea r seats are not occupied .
_& WARNING
-Read and heed all WARNINGS¢ page 114,
Proper adjustment of head restraints.
- Only remove the rear seat head restraints
when necessa ry in order to install a chi ld
seat
¢ page 158. Install the head restra int
again immediate ly once the child seat is re
moved . Driving without head restraints or
with head restraints that are not properly adjusted increases the risk of serious or fa
tal neck injury dramatically.
- Vehicles with a pass through in the center console have seat ing for four. The long cen
ter console between the two rear seats is
not a seat ing pos ition. Therefo re, a safety
belt is not provided.
S eat s and stor age
{!) Tips
Correct ly adjusted head restraints and safety
belts are an extremely effective combination
of safety features.
Memory function
Description
Appl ies to vehicles: wi th memo ry fu nct io n
The memory f unct ion allows you to quickly and
easily store and recall personal seating profiles
for the driver . The memory function is operated
t h rough the master key and the memo ry buttons
in the driver 's door.
T he driver's seating p rofile is stored and assigned
to the master key each time the vehicle is locked.
When you open the door, the seat profile is auto matically reca lled. If two people use one vehicle,
it is recommended that each person always uses
"their own" ma ster key.
Up to 2 seat profi les can be stored in the memory
buttons in the driver's door. Once they are stored,
these seat profiles can be selected at any time.
In addition to the driver's seat settings, you can
also store and access the exterior mirror adjust
ment settings* using the remote contro l key or
memory bu tton.
Remote control key
App lies to vehicles: wit h seat memory
To assign the dr iver 's seat settings to the remote
control key when locking the veh icle, the function
must be activated in the radio or MMI*
"' Select:
!CAR I function button> Seat adjust-
ment > Driv er's seat > Remot e con trol k ey
>
on.Or
"' Select :
~ ,c~ A~R~I function button> Car sy stems *
contro l butto n > Vehicle s etting s> Seat s>
Driver 's seat > Remote control key > On .
(D Tips
If you do not want anothe r drive r's sett ings to
be assigned to the remote key, switch
off the
memory function usin g the rad io or MMI * or
the
ION/OF F I button ¢ page 58.
57
Page 60 of 254
Seats and storage
Memory button s
Applies to vehicles: with seat memory
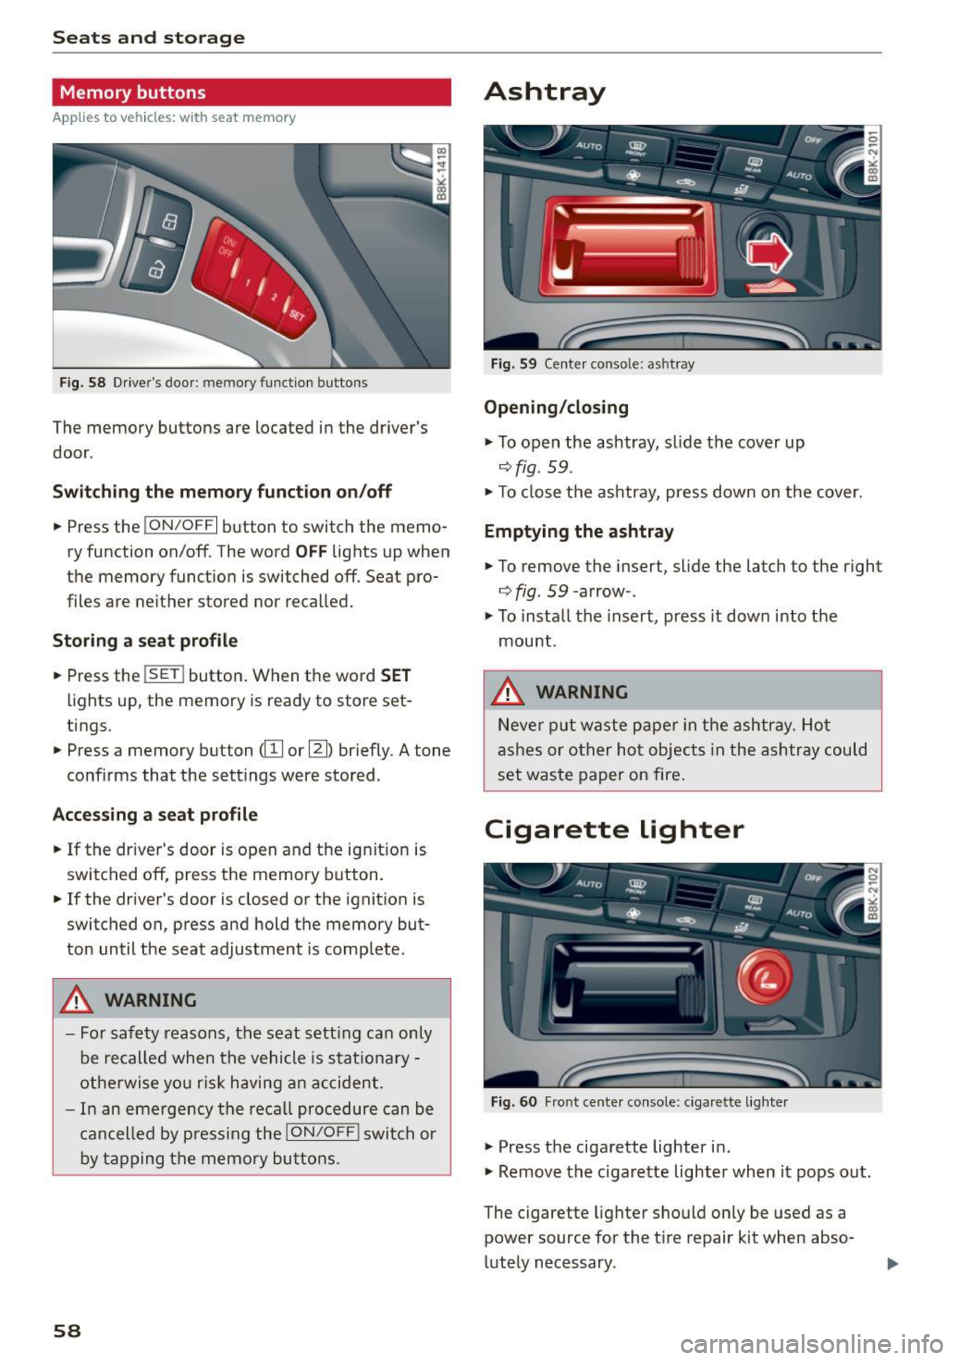
Fig. 58 Drive r's door : me mory function buttons
The memo ry buttons are located in the driver's
door .
Switching the memory function on/off
• Press the !ON/O FF I button to switch the memo
ry function on/off. The word
OFF lights up when
the memo ry function is switched off . Seat pro
files are neither stored nor recalled.
Storing a seat profile
• Press the !SE T! button. When the word SET
lights up, the memory is ready to store set
tings.
• Press a memory button
([I I or ~) briefly . A tone
confirms that the sett ings were stored.
Accessing a seat profile
• If the driver's door is open and the ig nit ion is
switch ed off, press the memory button.
• If the driver's door is closed or the ignition is
switched on, press and hold the memory but
ton until the seat adjustment is comp lete .
.&_ WARNING
- For safety reasons, the seat sett ing can only
be recalled when the vehicle is stat ionary -
otherwise you risk having an accident .
- In an emergency the recall procedure can be
cancelled by pressing the
!ON/OFF I switch or
by tapping the memory buttons.
58
Ashtray
Fig. 59 Center console: as htray
Opening/closing
• To open the ashtray, slide the cover up
Qfig . 59 .
• To close the ashtray, press down on the cover.
Emptying the ashtray
• To remove the insert, slide the latch to the right
Qfig. 59 -arrow -.
• To install the insert, press it down into the
mount .
.&_ WARNING
-
Never put waste paper in the ashtray. Hot
ashes or other hot objects in the ashtray could
set was te paper on fire .
Cigarette lighter
Fig. 60 Front center console: cig arette lighter
• Press the cigarette lighter in .
• Remove the cigarette lighter when it pops out.
The cigarette lighter should only be used as a
power source for the t ire repair kit when abso
lutely necessary .