AUDI RS7 SPORTBACK 2014 Owners Manual
Manufacturer: AUDI, Model Year: 2014, Model line: RS7 SPORTBACK, Model: AUDI RS7 SPORTBACK 2014Pages: 292, PDF Size: 73.56 MB
Page 211 of 292
-Blend must contain not more than 15%
MTBE.
Seasonally adjusted gasoline
Many gasoline grades are blended to perform
espec ially we ll for winter or summer driving.
During seasonal change-over, we suggest that
you fill up at busy gas stat ions where the sea
sonal adjustment is more likely to be made in
time .
(D Note
-Methanol fuels which do not meet these
requirements may cause corrosion and
damage to plastic and rubber compo
nents in the fuel system .
- Do not use fue ls that fail to meet the
specified criter ia in this chapter.
- If you are unable to determine whether
or not a particular fue l blend meets the
specifications, ask your service station or
its fuel supp lier.
- Do not use fuel for which the contents
cannot be identified.
- Fuel system damage and performance
problems resulting from the use of fuels
different from those specified are not
the responsibility of Audi and are not
covered under the New Vehicle or the Emission Control System Warranties.
- If you experience a loss of fuel economy
or driveability and performance prob l ems due to the use of one of these fuel
blends, we recommend that you switch
to unblended fuel.
Gasoline additives
A major concern among many auto manufac
turers is carbon deposit build- up caused by
the type of gasoline you use.
Although gasoline grades differ from one manufacturer to another , they have certain
things in common. All gasoline grades contain
substances that can cause deposits to collect
on vital engine parts, such as fuel injectors
and intake valves. Although most gasoline brands include additives to keep engine and
Fuel supply and filling your fuel tank 209
fuel systems clean, they are not equally effec
tive .
A udi recommends using TOP TIER Detergent
Gasoline. For more info rmation on TOP TIER
Detergent Gasoline, please go to the official
website (www.toptiergas.com).
After an extended period of using inadeq uate
fuels, carbon deposit build-ups can rob your
engine of peak performance.
Q) Note
Damage or malf unct ion due to poor fue l
quality is not covered by the Aud i New Ve
hicle Limited Warranty.
Fuel tank
Fuel filler neck
The fuel filler neck is located on the right rear
side panel behind the fuel fille r flap.
If the power locking system should fail, you
can still open the flap manually -for deta iled
instruct ions see
c::;, page 211 .
You can find the fuel tank capacity of your ve
hicle in
c::;,page271.
The label on the inside of the fuel fi ller flap
tells you the correct fue l for your vehicle. For
more information about fuel specifications,
see
c::;, page 208.
Your vehicle fue l tank has an on board refuel
li ng vapor recovery system. This feature helps
to prevent fuel vapors from escaping from the
tank and polluting the environment while you refuel your vehicle . In order to fill the tank
properly while protecting the environment,
please fo llow this refueling procedure careful
ly.
_&. WARNING
Under normal operating conditions, never
carry additional fuel containers in your car.
Gas canisters and other containers used to
transport f uel can be dangero us. Such con
tainers, full or empty, may leak and could
cause a fire in a collision. If you must
•
•
Page 212 of 292
210 Fuel supply and filling your fuel tank
transport fuel to use for your lawn mower,
snow blower, etc., be very careful and al
ways observe local and state laws regard
ing the use, transportat ion and storage of
such fuel containers. Make certain the con
tainer meets industry standards (ANSI/
AS TM F852 -86) .
(D Note
Never drive your vehicle until the fuel tank
is completely empty. The irregular supply
of fuel can cause misfiring. Gasoline could
enter the exhaust system and damage the
catalyt ic converter.
Refuelling
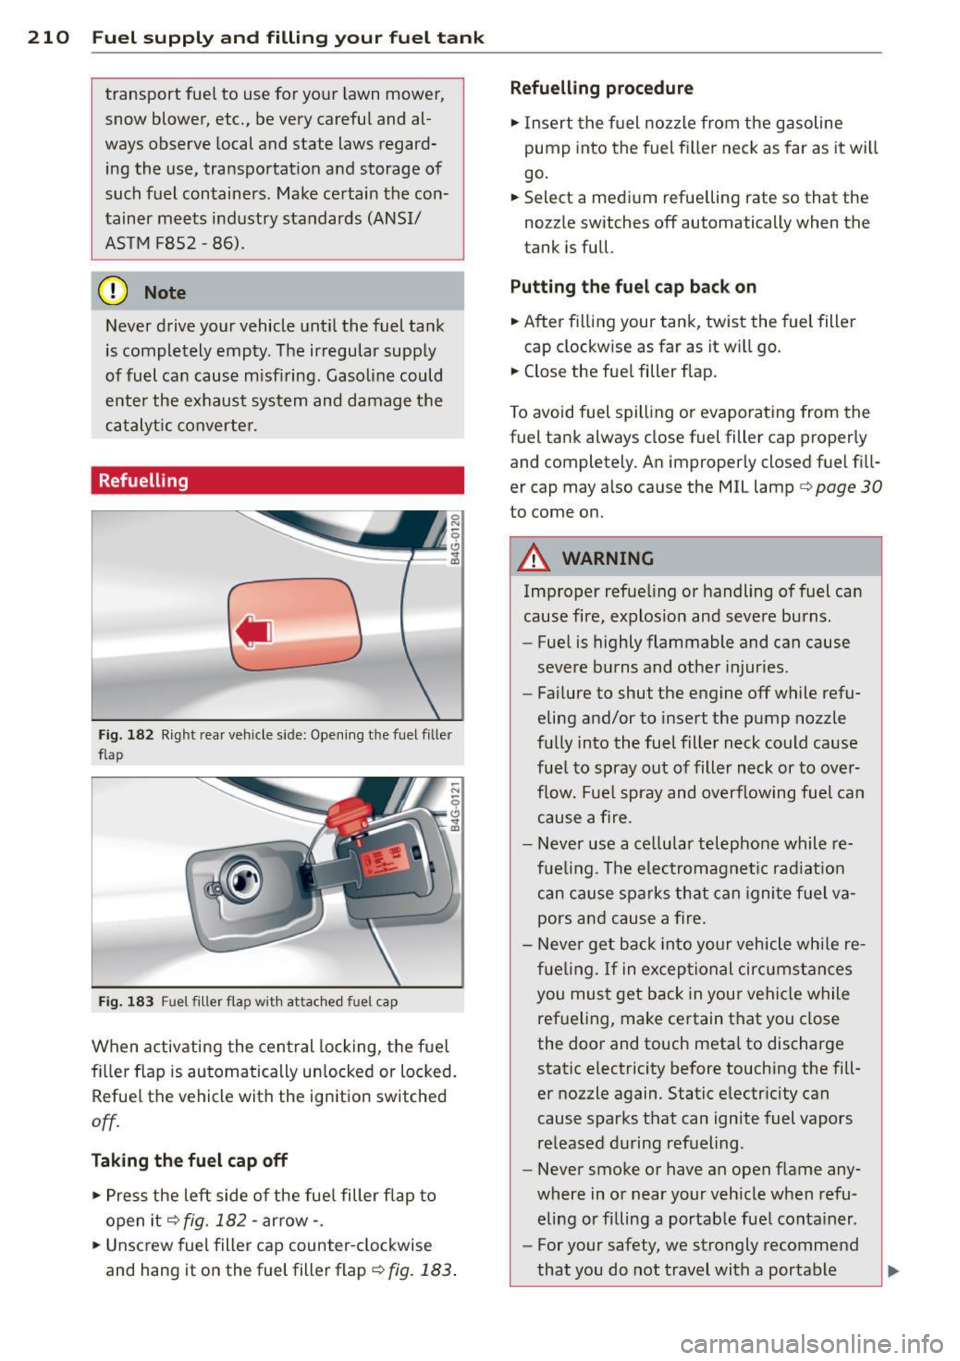
Fig. 182 Right rear vehicle side: Opening the fuel filler
flap
Fig . 183 Fuel filler flap with attached fuel cap
When activating the central locking, the fuel
fi ller flap is automatically un locked or locked.
Refuel the vehicle with the ignition switched
off.
Taking the fuel cap off
• Press the left side of the fuel filler flap to
open it
q fig. 182 -arrow-.
• Unscrew fuel filler cap counter-clockwise
and hang it on the fuel filler flap
¢ fig. 183.
Refuelling procedure
• Insert the fuel nozzle from the gasoline
pump into the fuel filler neck as far as it will
go .
• Select a med ium refuelling rate so that the
nozzle switches off automatically when the
tank is full.
Putting the fuel cap back on
• After filling your tank, twist the fuel filter
cap clockwise as far as it w ill go.
• Close the fue l filler flap.
T o avoid fuel spilling or evaporating from the
fuel tank always close fuel filter cap properly
and completely. An improperly closed fuel fill
er cap may also cause the MIL lamp¢
page 30
to come on.
A WARNING
Improper refue ling or handling of fuel can
cause fire, explosion and severe burns.
- Fuel is highly flammable and can cause
severe burns and other injuries.
- Fai lure to shut the engine off while refu
eling and/or to insert the pump nozzle
fully into the fuel filter neck could cause
fuel to spray out of filler neck or to over
flow. Fuel spray and overflowing fuel can
cause a fire.
- Never use a ce llular telephone while re
fue ling. Th e electromagnet ic rad iat ion
can cause sparks that can ignite fuel va
pors and cause a fire.
- Never get back into your vehicle whi le re
fueling.
If in exceptional circumstan ces
you must get back in your vehicle while
refueling, make certain that you close
the door and touch metal to discharge
static electricity before touching the fill
er nozzle again. Static electricity can
cause sparks that can ignite fuel vapors
released during refueling.
- Never smoke or have an open flame any
where in or near your veh icle when refu
eling or filling a portable fuel conta iner.
- For your safety, we strongly recommend
that you do not travel with a portable
Page 213 of 292
fuel container in your vehicle. The con
tainer, full or empty may leak and could
cause a fire, especially in a crash.
- If, under exceptional circumstances, you
must transport a portable fuel container,
please observe the following:
- Never fill a portable fuel container
while it is anywhere in or on the vehicle
(for example, in the lugga ge compart
ment, or on the tr unk). Static electrici
ty can bui ld up while fi lling and can ig
nite fuel vapors causing a fire .
- Always place a portable fuel container
on the ground before filling.
- Always keep the fi ller nozzle complete
ly inside the portable container before
and during filling.
- If filling a portable container made of
metal, the filler nozz le must always be
in contact with the container. Th is w ill
help prevent static electricity from dis
charging and cause a fire .
- Never sp ill fuel inside the vehicle or
luggage compartment. Fuel vapors are
h ighly flammable .
- Always observe local and state/provin
cial laws regarding the use, storage
and transportation of fuel containers .
- Make certain the fuel container meets
industry standards (ANSI/ ASTM
F852 -86) .
(D Note
If any fuel has spilled onto the car, it
should be removed immediately to prevent
damage to the paint.
~ For the sake of the environment
As soon as the correctly operated nozzle
sw itches off automatically for the first
time, the tank is full. Do not try to add
more fue l because fuel may spill out . In
add it ion, the expans ion space in the fuel
tank will be fi lled -causing the fuel to
overflow when it becomes warm and pol
lute the environment.
Fuel supply and filling your fuel tank 211
@ Tips
-Running your engine while refue lling
may cause vapors to escape or even
cause fuel to spill out of the tank. This
would then shut off the fuel nozzle be
fore the tank is full.
- Do not refuel your vehicle with the igni
tion switched on. The fuel gauge may
otherwise not ind icate the correct fuel
level after refuell ing .
- The fuel filler flap of your vehicle is not
locked when you lock the vehicle from
the inside.
Fuel filler flap emergency release
You can open the fuel filler flap by hand if the
power locking system should fail .
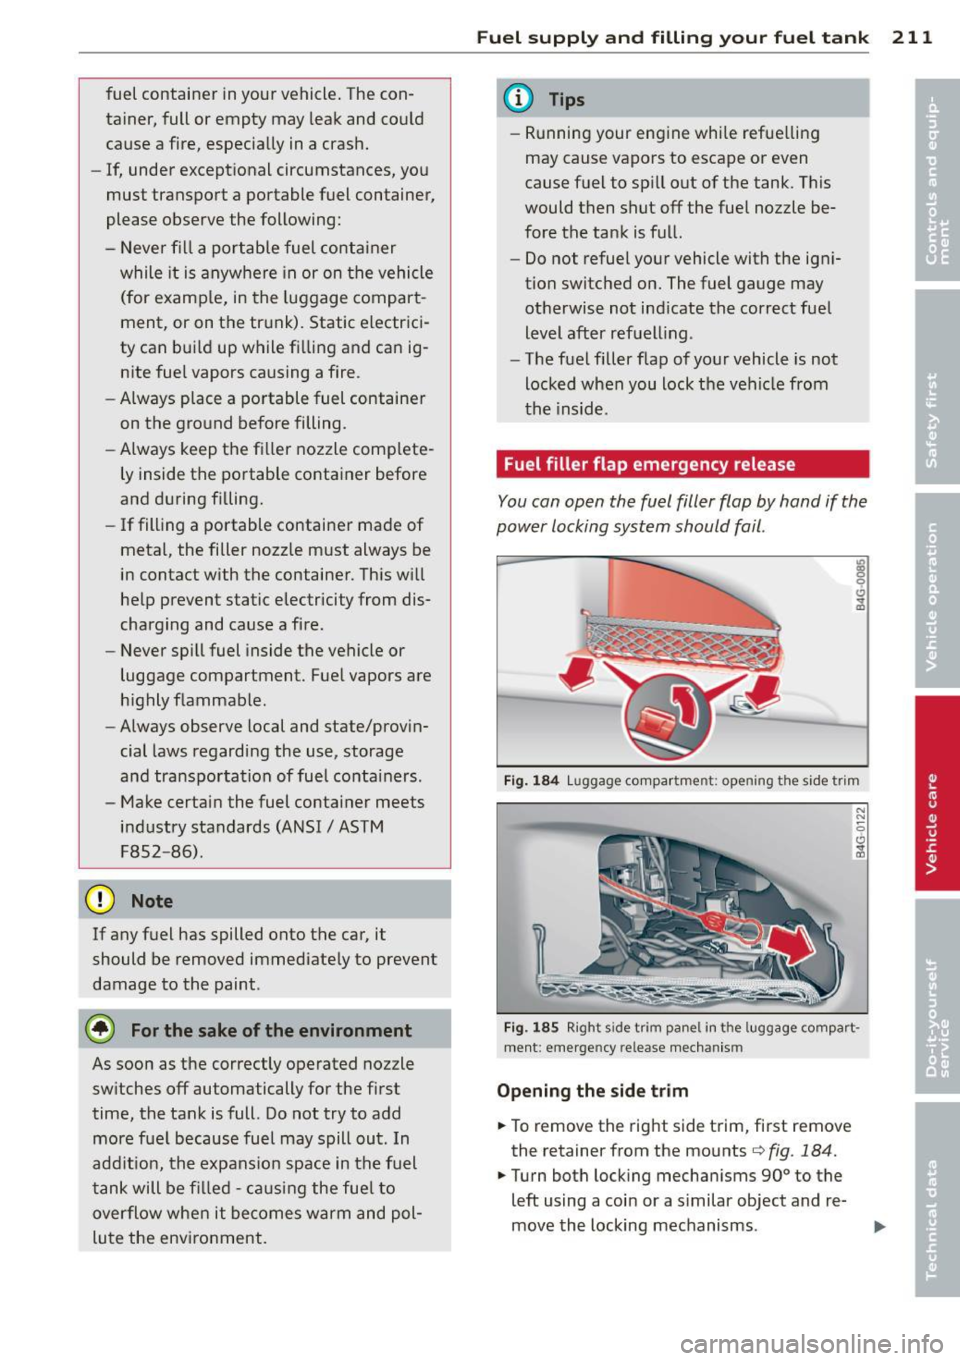
Fig. 184 Lug gage compart ment: ope ning th e side trim
N
"' 0
~
Fig . 185 Right s ide tri m pane l in t he luggage com part ·
ment : eme rge ncy re lease mechanis m
Opening the side trim
.. To remove the right side trim, first remove
the retainer from the mounts¢
fig. 184.
.. Turn both locking mechanisms 90° to the
left using a coin or a s imilar object and re-
move the locking mechanisms .
11J,,
Page 214 of 292
212 Fuel supply and filling your fuel tank
• Tilt the retainer upward and pu ll the trim
o ut. Lay the trim down on its side, because
there is an e lectrical wire on the bac k.
Fuel filler door emergency rel ease
The eme rgency re lease me chan ism is loc ated
behind the right side t rim pa ne l in the lug
gage compartment.
• Loosen the loop¢
fig. 185 from the retaine r
and then pull on the loop ca re fully ¢(D.
• Press on the le ft side of the fuel fille r doo r
to open ¢
page 210, fig. 182.
(D Note
On ly pull o n the loop un til you fee l resis t
a nce . You will not hear it release. Other
w ise you cou ld damage the emergency re
lease mechanism.
Page 215 of 292
Checking and filling Engine hood
Releasing the engine hood
The engine hood is released from inside the
vehicle .
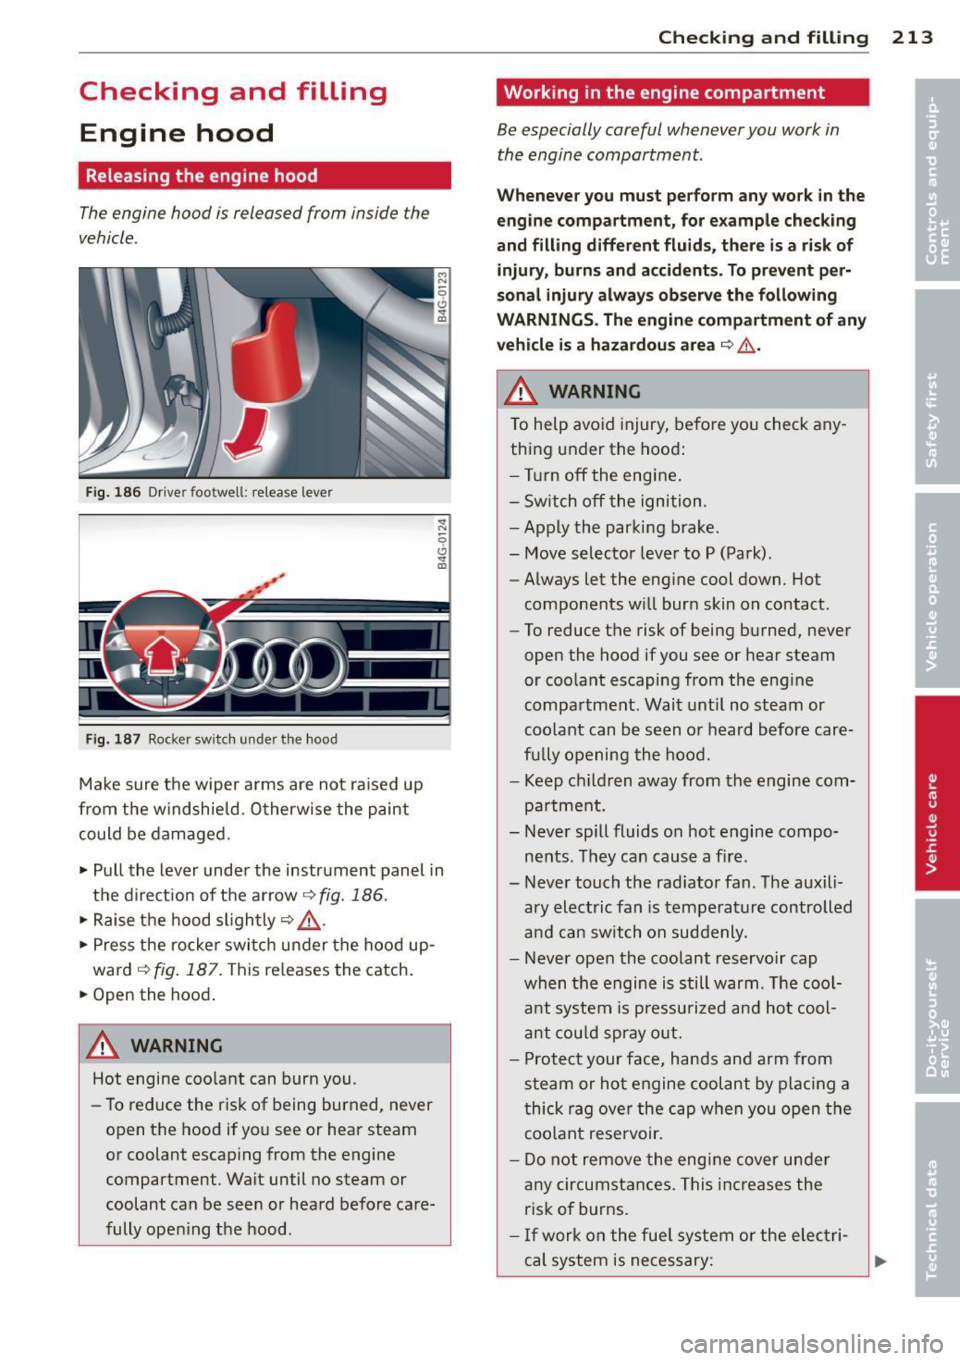
Fig. 186 Dr iver footwell: release lever
Fig. 187 Rocker switch under the hood
Make sure the wiper arms are not raised up
from the w indshield. Otherw ise the paint
could be damaged.
.. Pull the lever under the instrument panel in
the d irect ion of the arrow~
fig. 186.
.. Raise the hood slightly~ &-
.. Press the rocker switch under the hood up
ward
~ fig. 187. This re leases the catch .
.. Open the hood .
A WARNING
Hot engine coo lant can burn you.
- To reduce the r isk of being burned, never
open the hood if you see or hear steam
or coolant escaping from the engine
compartment . Wait until no steam or
coolant can be seen or heard before care
fully opening the hood.
Checkin g and fillin g 213
Working in the engine compartment
Be especially careful whenever you work in
the engine compartment.
W hen ev er y ou must p erform an y wor k in the
en gine com pa rtm ent , for e xample checking
a nd filling diff ere nt fluid s, th ere is a risk of
inju ry, burn s and accid ents. To pr eve nt p er
so nal inju ry always observ e the foll owing
W ARNING S. The engin e compartm ent of any
v e hicle i s a haza rdou s area
~ ,& .
h WARNING
To help avoid injury, before yo u check any
thing under the hood:
- Turn off the engine.
- Sw itch off the ignition.
- Apply the parking brake.
- Move selector leve r to P (Park).
- Always let the engine cool down. Hot
components w ill burn skin on contact .
- To reduce the risk of being burned, never
open the hood if you see or hear steam
or coo lant escaping from the engine
compa rtment. Wait unt il no steam or
coolant can be seen or heard before care
fu lly opening the hood.
- Keep ch ildren away from the engine com
pa rtment.
- Never sp ill fluids on hot engine compo
nents . They can cause a fire .
- Never touch the rad iator fan. The auxili
ary electric fan is temperat ure controlled
and can switch on suddenly .
- Never open the coolant reservoir cap
when the engine is still warm. The cool
ant system is p ressu rized and hot cool
a nt cou ld spray o ut.
- Protect your face, hands and arm from
steam or hot engine coolant by plac ing a
thick rag ove r the cap when you open the
coo lant rese rvoir.
- Do not remove the engine cover under
any circumstances. This inc reases the
ris k of burns.
- If work on the fue l system o r the elec tri
cal system is necessary:
Page 216 of 292
214 Check ing and filling
- Always disconnect the battery.
- Never smoke or work near heaters or open flames . Fluids in the engine com
partment could start a fire.
- Keep an approved fire extinguisher im
mediately available.
- To avoid electrical shock and persona l in
jury while the engine is running or being started, never touch:
- Ignition cables
- Other components of the high voltage
electronic ignition system.
- If you must perform a check or repa ir
with the engine running:
- Fi rst, fully apply the parking bra ke,
move se lec to r lever to P (Pa rk) .
- Always use extreme caution to preven t
clot hing, jewe lry, or long h air from ge t
ting caught in the radiator fan, V -belts
or other moving parts, or from contact ing hot parts. Tie back hair before
start ing, and do not wear cloth ing that
will hang or droop into the eng ine.
- Min imize exposure to emission and
chemica l hazards¢ ,&..
A WARNING
California Propos ition 65 Warning:
- Engine exhaust, some of its constituents,
and certa in veh icle components conta in
or emit chemicals known to the State of
Califor nia to cause cancer and b irth de
fec ts a nd reproduct ive ha rm. In addition,
certain fluids conta ined in vehicles and
certa in prod ucts of co mponent wear co n
ta in o r emi t chemicals known to the
State o f Ca lifornia to cause can cer and
birth defects or ot her reproductive harm. -
Battery posts, terminals and re lated ac
cessories conta in lead and lead com
pounds, chemicals known to the State of
California to cause cance r and reproduc
tive harms. Wash hands after handling .
(D Note
When adding flu ids, always make sure that
they are poured into the proper conta iner
or f iller opening, otherwise serious dam
age to vehicle systems w ill occur.
® For the sake of the environment
To detect leaks in time, inspect the vehicle
floor pan from underneath regularly. If
you see spots from oil or other ve hicle flu
i ds, have yo ur vehicle inspected by a n au
thori zed Audi dea le r.
Closing the engine hood
.,. Pull the hood down un til the pressure from
t he struts is reduced.
.,. Let the hood drop down and latch in p lace .
Do not try to push it shut; it may fail to en
gage ¢&_ .
A WARNING
-
A hood that is not completely latched
could fly up and b lock your view while dr iv
ing.
- When you close the engine hood, check it
to make sure the safety catch has p roper
ly engaged. The hood sho uld be flush
with the surrou nding vehicle body pa rts.
- If you notice while driv ing t hat the hood
is not s ecured prope rly, stop at onc e and
close it.
Page 217 of 292
Checking and fillin g 215
Engine compartment
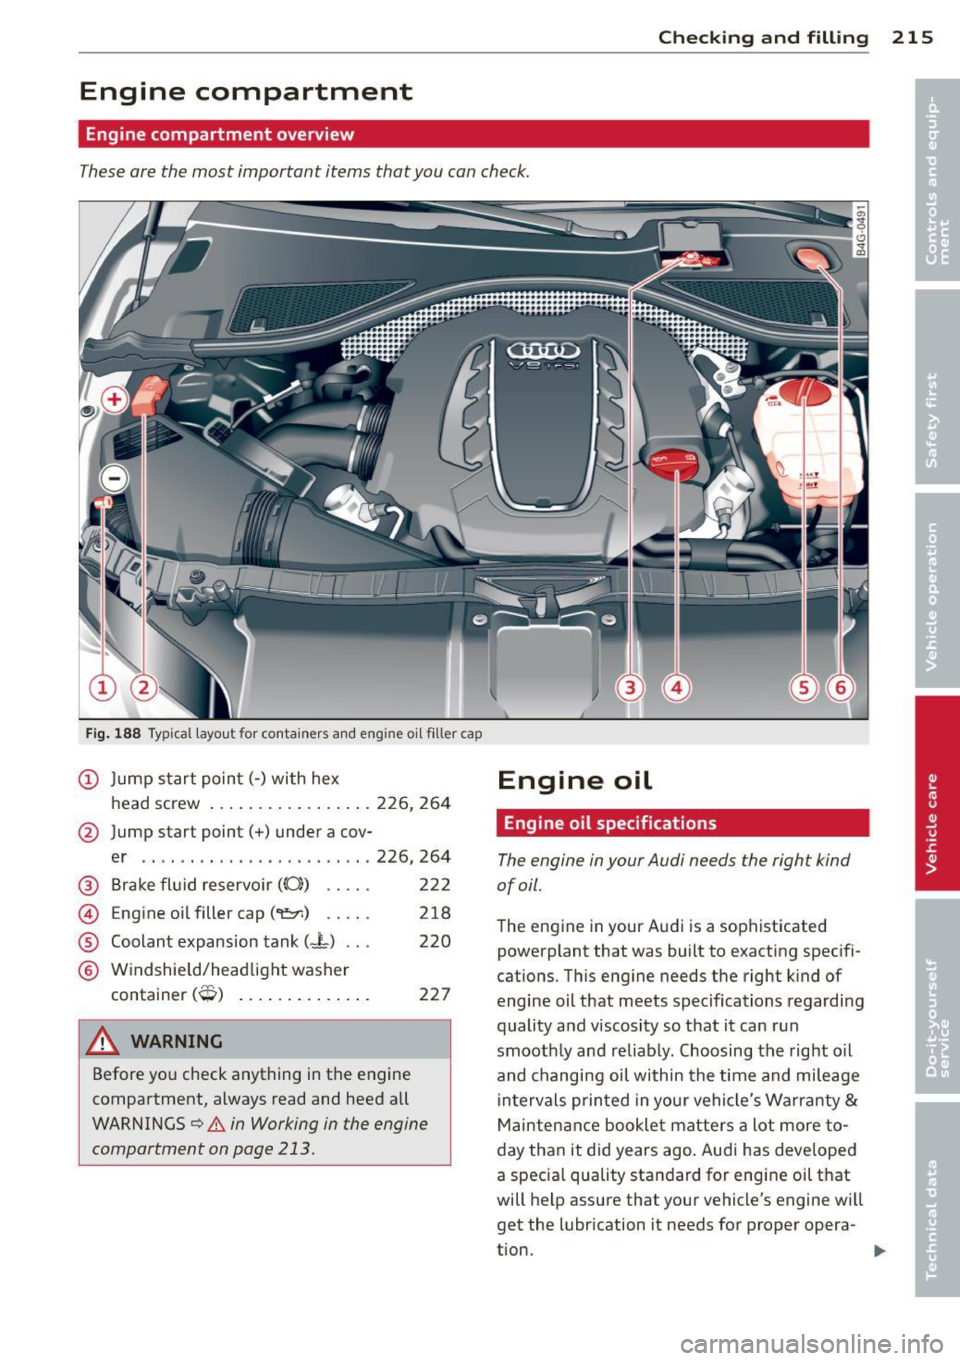
Engine compartment overview
These are the most important items that you can check.
Fig. 188 Typical l ayout for conta iners and engine o il filler cap
@ Jump start poin t(-) with hex
head screw .. .. ..... ... .. .. . 226, 264
@ Jump start point(+) under a cov-
er .. .. ... ..... ...... ...... 226, 264
@ Brake fl uid reservo ir ((0)) . . . . . 22 2
© Engine oil filler cap ("1:::r.) . . . . . 218
® Coolant expansion tank (-L) . . . 220
© W indshield/headlight washer
container
(0) . . . . . . . . . . . . . . 227
_& WARNING
Before you check anything in the engine
compartment, always read and heed all
WARNINGS
Q .&. in Working in the engine
compartment on page 213.
-
Engine oil
Engine oil specifications
The engine in your Audi needs the right kind
of oil.
T he eng ine in your Audi is a sophisticated
powerplant that was built to exacting specifi
cations. This eng ine needs the right k ind of
engine oil that meets specifications regarding
quality and viscosity so that it can r un
smooth ly and reliably. Choosing the right o il
and changi ng oil within the t ime and mileage
in tervals p rin ted in you r vehicle's Wa rranty
&
Maintenance booklet matters a lot more to
day than it did years ago . Audi has deve lope d
a specia l quality sta ndard for engine oil t hat
will help assure that your vehicle's engine w ill
get the lubrication it needs for proper opera
tion.
Page 218 of 292
216 Check ing and filling
Modern engine lubrication has taken a quan
tum leap in the last few years. Many synthetic
oils ava ilable today provide better engine lu
brication that can outlast traditional petrole
um-based oils, making them a smart choice
for use throughout the life of your Audi .
Whether you use synthetic or petroleum
based engine oil, the oil that you use must
conform to Audi 's oil quality standard
VW 502 00 to he lp keep your vehicle's engine
running smoothly and help prevent the for
mat ion of harmfu l deposits, sometimes called
"s ludge ," that ove r time can lead to expensive
repairs .
At the time of pr int ing , engine o ils available in
the U .S . and Canada that meet the exacting
specifi cations of A udi oi l standard VW 502 00
a re synthetic engine oils. This does not mean,
however, that every syn thetic engine oi l wi ll
meet Audi oil standard VW 502 00. So always
be sure that you use an approved oil.
To help prevent the format ion of harmful de
posi ts use only oi l with the fo llow ing specifi
cations printed on the oil container :
Audi oil standard VW 502 00
O il container labe ls may carry the specif ica
tion s ingly or in comb inat ion with other des ig
nations and oil qua lity standards .
Viscosity
Engine oi ls are graded according to their vis
cosity. The proper viscosity grade oil for your
engine depends on cl imactic or seasonal con
d itions where you drive. You can use oil with a
viscosity grade of SA E SW40 across all tem
pe ratu re ranges for normal driving conditions .
However, if eng ine o il viscos ity grade
SAE SW40 is no t ava ilable, you can a lso use
viscosity grade SAE SW-30 or SAE OW -40 as
long as it meets Audi o il quality standard
VW 502 00 specifications .
Because engine oil that meets the Audi oil
standard may not be available everywhere
when you need it, we strongly recommend
that you always carry with you an ext ra quart (
li te r) of oil that exp ress ly con forms to the
VW 502 00 spec ification, in case you have to
top
off the oil while on the road.
Only if the level of the o il is a t or be low the
min imum mark on the o il dipstick - and no oi l
that expressly conforms to Aud i oi l standard
VW 502 00 spec ificat ions is ava ilable -may
you top
off with a high quality engine oi l, pref
erably syn thet ic-based, that meets ACEA A3
or AP I SM spec ificat ions, but even then, only
in v iscosity grades SAE SW-40, SAE SW-30, o r
SAE OW- 40. However, during the ent ire time
be twee n oil change intervals, never top
off
with more than a total of 0.5 q t/lite r engine
o il that does no t conform to Audi o il specifica
tion VW 502 00.
For more informa tion about eng ine oi l tha t
has been approved for your veh icle, ple ase
contac t either yo ur authorized Aud i deale r or
Audi C ustome r Re lations at 1 (800) 82 2-2834
or visit o ur web site at www .audiusa.com or
www.aud icanada .ca. Here you w ill also find a
current list of oils (manufacturers, brand
names e tc.) tha t conform to Audi oil s tanda rd
vw 502 00 .
Changing the engine oil
The eng ine oi l and oil fi lter m ust be changed
according to the mileage (kilometers) and
time intervals specified in your ve hicle's War
ranty
& Maintenance booklet. Do not exceed
these intervals -harmful deposits from old
engine oil ca n reduce eng ine performance and
can lead to expensive engine repa irs .
Changi ng the oil at the recommended inter
vals is so very important because the lubricat ing proper ties of oil decrease gradually during
norma l veh icle use . If you are not sure when
you have your oil changed, ask your author ized Audi Serv ice Adv isor.
Under some circumstances the engine oil
shou ld even be cha nged more frequent ly .
Change oil more often if you drive mostly
sho rt distances, operate the ve hicle in dusty
areas o r most ly unde r stop-and-go t raff ic con-
di tions, o r when you use your vehi cle where .,..
Page 219 of 292
temperatures stay below freezing point for l ong periods.
Detergent add itives in the o il w il l make fresh
oil look dark after the eng ine has been run
ning fo r a short time . This is norma l and is not
a reason to change the oi l more often than
recommended.
D am ag e or m alfun ction s due to lack of
ma intenanc e
It is essential that you change your oil at the
r ecommended inte rva ls using only engine o il
t hat complies wi th A udi oi l standard
VW 502 00 . Your Limited New Vehicle War
ranty does not cover damage or malfunctions
d ue to fa ilure to fo llow recommended mainte
nance and use requ irements as set forth in
the Audi Owner's Manua l and Warranty
&
Maintenance book let . Your dea ler will have to
deny warranty coverage u nless you present to
the dea ler p roof in the fo rm of Serv ice or Re
pa ir Orde rs that all s chedu led maintenance
wa s pe rformed in a t imely manner .
Engine oil consumption
The engine in your vehicle dep ends on an ade
quate amount of oil to lubricate and cool all
of its moving parts.
In o rder to provide effective lubrication and
cool ing of i nternal engine components, a ll in
ternal comb ustion eng ines consume a cert ain
amo unt of o il. Oil cons umption varies from
engine to engine and may change significantly
over the life of the engine. Typ ica lly, engines
with a specified break-in per iod (see
¢
page 198) consume more oil during the
break-in per iod than they consume after oil
consumption has stabilized .
Under norma l conditions, the rate of oil con
sumpt ion depends on the quality and viscosity
of the oil, the RPM (revo lutions per m inute) at
which the engine is operated, the amb ient
temperature and road condit ions. Furthe r fac
tors ar e the amount of o il d ilution from wate r
condensation or fuel residue and the ox ida
tion level of the oi l. As any engine is s ubje ct to
Checkin g and fillin g 217
wear as m ileage builds up, the oil consump
tion may increase over time until replacement
of worn components may become necessary.
Wi th a ll these variab les coming into p lay, no
standard rate of oil consumpt ion can be es
tablished or specified. There is no alternative
to regular and frequent check ing of the o il lev
el, see
Note .
If the yellow engine oil leve l warning symbo l
in the instrument cluster
II li ghts up, you
sho uld check the oil leve l as soon as possib le
¢
page 218. Top off the oil at your earliest
convenience
¢ page 218.
A WARNING
Before you c heck anythi ng i n the engine
com partment, always read a nd heed all
WARNINGS¢ .&.
in Working in th e engine
c ompartment on page 213.
(D Note
D riving w ith an insufficient o il level is like
ly to cause sever e damage to the engine .
(D Tips
- The oil pressure warning display. is
not an indicator of the oil le vel. Do not
rely on it . Instead, check the oil level in
your engine at regu lar intervals, pref
erably ea ch time you refuel, and always
before going on a long trip .
-If you have the impression yo ur engi ne
c ons umes ex ce ss ive amoun ts of o il, we
recommend that you consul t your Au di
de aler to have the cause of your concern
properly diagnosed . Keep in mind that
the accurate meas urement of o il con
sumption requires great care and may
take some t ime. Y our Audi dea ler has in
struct ions about how to measure oil con
sumption accurately.
-
•
•
Page 220 of 292
218 Check ing and filling
Checking the engine oil level
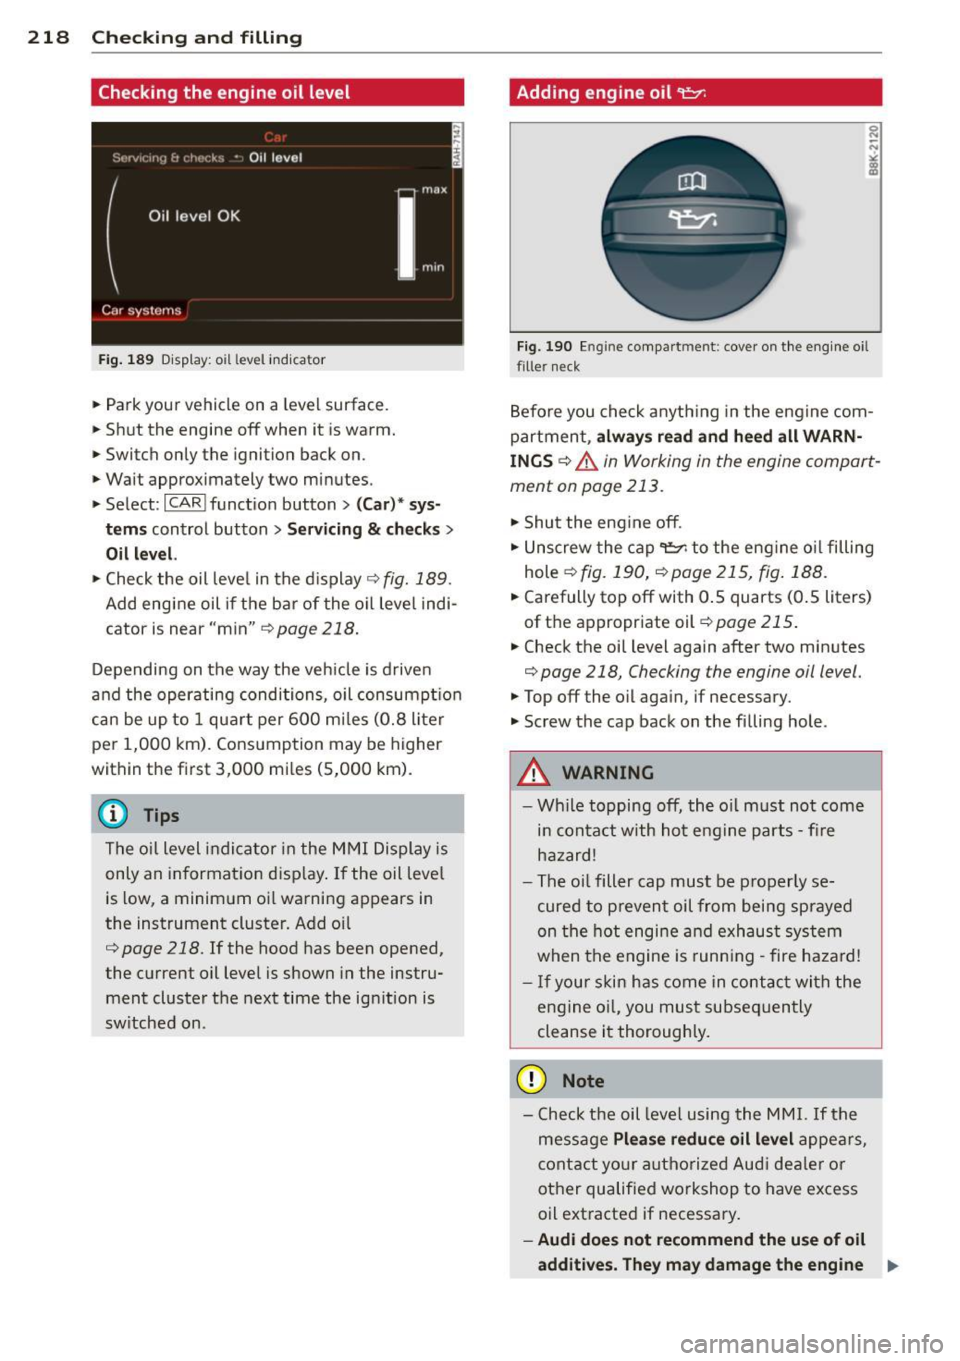
Fig. 189 Disp lay: oil level indica tor
• Park your vehicle on a level surface .
• Shut the engine off when it is warm.
• Switch only the ignition back on .
• Wait approximately two minutes.
• Select :
I CAR I function button> (Ca r)* sys
t e m s
control button > Se rv ici ng & ch ecks >
Oil l evel.
• Check the oil leve l in the d isplay r::;, fig. 189.
Add engine oil if the bar of the oil leve l indi
cator is near "min"
¢page 218.
Depending on the way the veh icle is driven
and the operating condi tions, oil consumpt ion
can be up to 1 qua rt per 600 m iles (0.8 liter
per 1,000 km) . Consumption may be higher
within the first 3 ,000 mi les (5,000 km).
@ Tips
The oil level indicator in the MMI Display is
only an information disp lay . If the oil leve l
is low, a minim um oil warning appears in
the instrument cluster. Add oil
r:::;, page 218. If the hood has been opened,
the current oil level is shown in the instru ment cluster the next time the ignition is
sw itched on .
Adding engin e oil 't:::r.
Fig. 190 Engin e compart men t: cover on the engine oi l
fille r neck
Befo re you check anyth ing in the engine com
partment,
a lw ay s re ad and h eed all WARN
IN GS
r::;, .&. in Working in the engine compart
ment on page 213.
• Shut the eng ine off .
• Unscrew the cap
't=;rl to the eng ine oi l filling
hole
¢ fig. 190, r:=:,page 215, fig. 188 .
• Carefully top off with 0 .5 quarts (0 .5 liters)
of the appropr iate oil¢
page 215.
• Check the oil level again after two minutes
r:::;, page 218, Checking the engine oil level.
• Top off the oil again, if necessary.
• Screw the cap back on the filling hole .
.&_ WARNING
--Wh ile topping off, the o il m ust not come
in conta ct with hot engine parts - fire
hazard!
- The oi l filler cap must be properly se
cured to prevent oil from being sprayed
on the hot engine and exhaust system
when the engine is runn ing -fire haza rd!
- If you r skin has come in contact with the
engine o il, you must subsequen tly
cleanse it thoroughly.
(D Note
- Check the oil level using the MMI. If the
message
Ple ase redu ce oil l evel appears,
contact you r authorized Aud i deale r or
other qualified workshop to have excess
oil extracted if necessary.
- Audi d oes n ot r ecommend the u se of o il
a dd iti ve s. The y may dama ge the en gine
II>-