ECO mode AUDI RS7 SPORTBACK 2014 Owner's Guide
[x] Cancel search | Manufacturer: AUDI, Model Year: 2014, Model line: RS7 SPORTBACK, Model: AUDI RS7 SPORTBACK 2014Pages: 292, PDF Size: 73.56 MB
Page 247 of 292
risk of a wheel loss . If the tightening tor
que of the wheel bolts is too low, they
can loosen and come out when the vehi
cle is moving. If the tightening torque is
too high, the whee l bolts and threads
can be damaged and the wheel can be
c ome loose.
(D Note
The spec ified torque for the wheel bo lts is
90 ft lb (120 Nm) w ith a tolerance of ± 7,4
ft lb(± 10 Nm) . Torque wheel bo lts d iago
na lly . After chang ing a wheel, the torque
m ust be che cked as soon as possib le w it h a
t orque wrenc h -preferab ly by an a utho r
ized Audi dealer or qualified workshop.
Low aspect ratio tires
Your Audi is factory-equipp ed with low aspect
ratio t ires. These t ires have been thorough ly
tested and been selected spec ifically for your
model for the ir superb performance, road feel
and handling unde r a va riety of driving condi
tions. Ask your a uthorized Aud i dea le r fo r
mo re deta ils.
T he low aspect ratio of these tires is indicated
by a nume ral of
55 or less in the tire's size
des ignation . T he numeral represents the rat io
of the ti re's sidewall height in relat io n t o its
tread wid th expressed in per cen tage . C o nven
tional t ires have a height/width ra tio of 60 or
mo re.
Th e performan ce of low -aspe ct-ratio tir es is
parti cularl y se nsitive to improper inflation
pressure . It is therefore impor tant that low
a s pect ratio tire s are inflated to the specified
pressure and that the inflation pre ssure is
regularly checked and maintained. Ti re pres
sures should be checked at least once a
month and always before a long trip
c::> page 234, Checking tire pressure .
What you can do to avoid tire and rim
damage
Low aspect ratio tires can be damaged more
eas ily by impact with potho les, curbs, gu llies
Tire s an d wheel s 245
or r idges on the road, partic ularly if the tire is
u nderinflated.
In orde r to minimize t he occ urren ce of impact
dam age to the tires o f your vehi cle, we recom
mend that you observe the following p reca u
tions:
- Always ma int ain re commended inflation
pressu res . Check your tire pressu re eve ry
2,000 miles ( 3,000 km) and add air if neces
sary.
- Dr ive ca re fu lly on roads with potholes, deep
gullies o r ridges. The impact from driving
through or over such obstacles can damage
your tires. Impact with a curb may also cause damage to your tires .
- After any impact, immed iate ly inspect your
tires or have them inspected by the nearest
au thor ized Audi dealer. Replace a damaged
tire as soon as possible .
- Inspect your tires every 2,000 m iles (3,000
km) for damage and wear. Damage is no t al
ways easy to see . Damage can lead to loss of
air a nd under inflat ion, which could eventu
ally cause tire failure .
If you believe that a
t ire may have been damaged, rep lace the
t ire as soon as possib le.
- These tires may wear more quickly tha n oth
ers.
- Please also remember that, while these tires
de live r respon sive handling, they may ride
less comfo rtably and m ake more noise tha n
other choi ces .
Reduced performance in winter /cold
season conditions
A ll ti res are designed for cer ta in p urposes.
T he low aspect ratio, ult ra h igh performance
tires originally installed on your vehicle are i n
tended for maxim um dry and wet road per
f ormance and handling. They are not suitable
for cold , snowy or icy weather condi tions. If
you drive under those circumstances, you
shou ld equ ip your vehicle w it h all -season or
winter tires, which offer bette r traction under
those conditions. We suggest you use the rec
ommended snow o r all-season t ires specified
f o r yo ur vehicle , or t hei r equivalent . .,..
•
•
Page 249 of 292
-Do not change the tire pressure when the
temperature of the tire is high. This
could result in serious damage to the tire
and even cause the tire to burst, increas
ing the risk of an accident.
- A tire with low pressure flexes more. This
heats the tire up too much . Th is could
cause the tread to separate and even
cause the tire to burst, increasing the
risk of an accident .
- The tire pressure monitoring system
does not warn about damage or defects
in the tire construct ion that could cause
the tire to burst, for examp le. Inspect
your ti res regularly.
@) For the sake of the environment
Low tire pressure increases fuel consump
tion and tire wear.
(D Tips
-If tires are replaced, the sensors/valves
do not need to be removed or replaced.
Just replace the valve stem and, if neces
sary, the valve and the wheel electronics.
If you have questions, see your author
ized Audi dealer or a qualified workshop.
- Using the tire mobility kit can results in
an incorrect display or a malfunction in
the tire pressure monitoring system.
Have the sensors replaced by an author
ized Audi dealer or a qualified workshop.
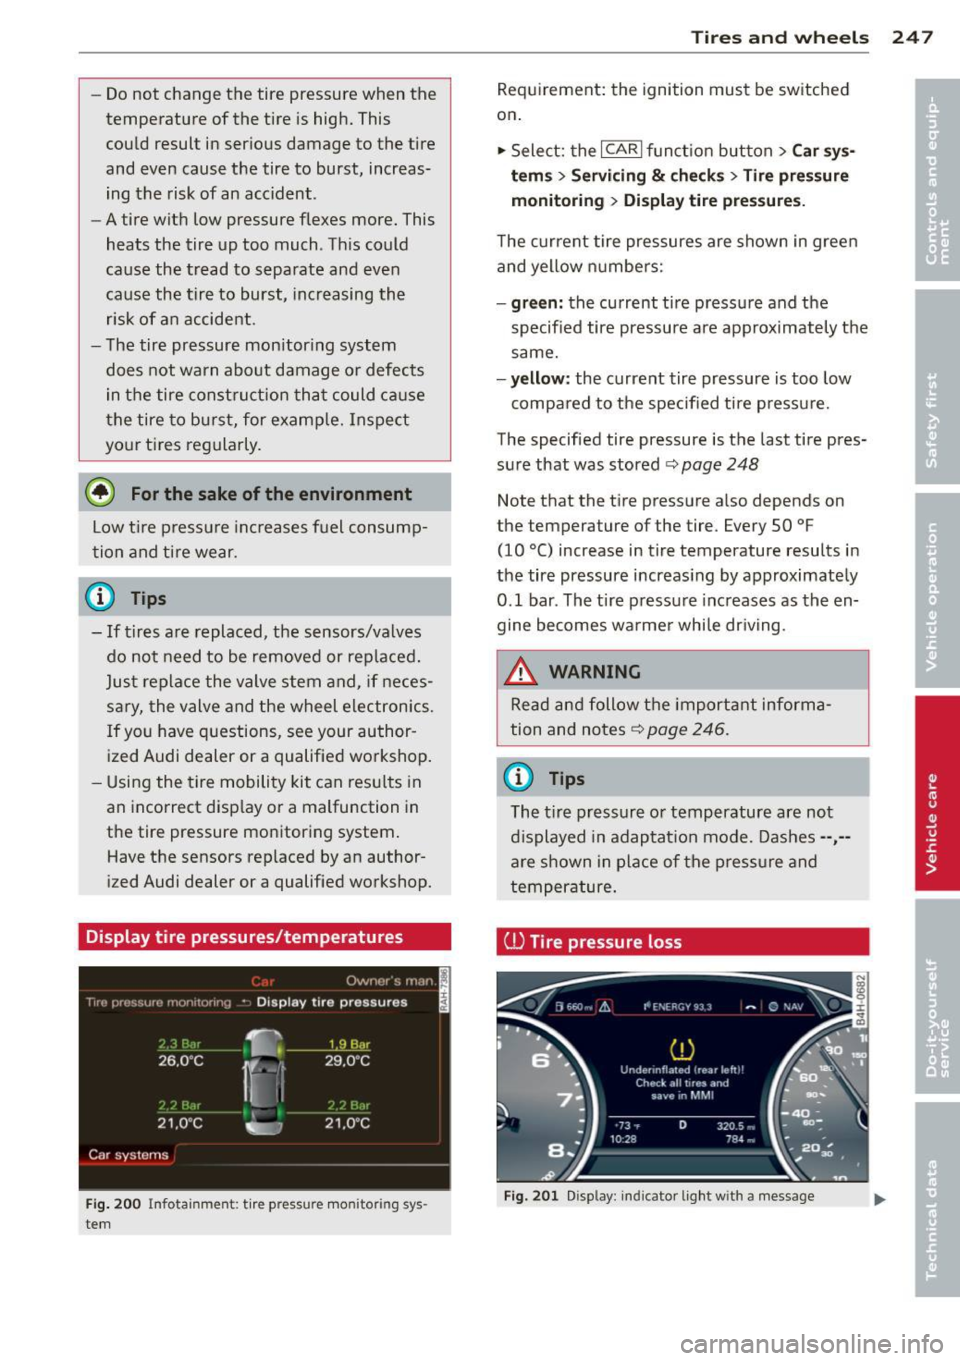
Display tire pressures/temperatures
Fig. 200 Infotai nm en t: t ire pres sur e mo nito rin g sys
tem
Tires and wheels 247
Requirement: the ignition must be switched
on .
'" Select: the
I CAR I function button > Car sys
tem s
> Servicing & checks > Tire pressure
monitoring
> Di sp lay tire pressures.
The current tire pressures are shown in green
and yellow numbers:
-green: the current tire pressure and the
specified tire pressure are approximately the
same.
-yellow: the current tire pressure is too low
compared to the specified tire pressure.
The specified tire pressure is the last tire pres
sure that was stored
c::> page 248
Note that the tire pressure also depends on
the temper ature of the tire . Every 50 °F
(10
°() increase in tire temperature results in
the tire pressure increas ing by approximately
0.1 bar . The tire pressure increases as the en
gine becomes warmer while driving .
.&_ WARNING
Read and follow the important informa
tion and notes
c::> page 246 .
© Tips
The t ire pressure or temperature are not
displayed in adaptat ion mode. Dashes--,-
are shown in place of the pressure and
temperature.
ill Tire pressure loss
Fig. 201 Disp lay: in dic ator light w ith a message
-
Page 262 of 292
260 Fuses and bulbs
Fuses and bulbs
Fuses
Replacing fuses
Fuses that have blown will have metal strips
that have burned through.
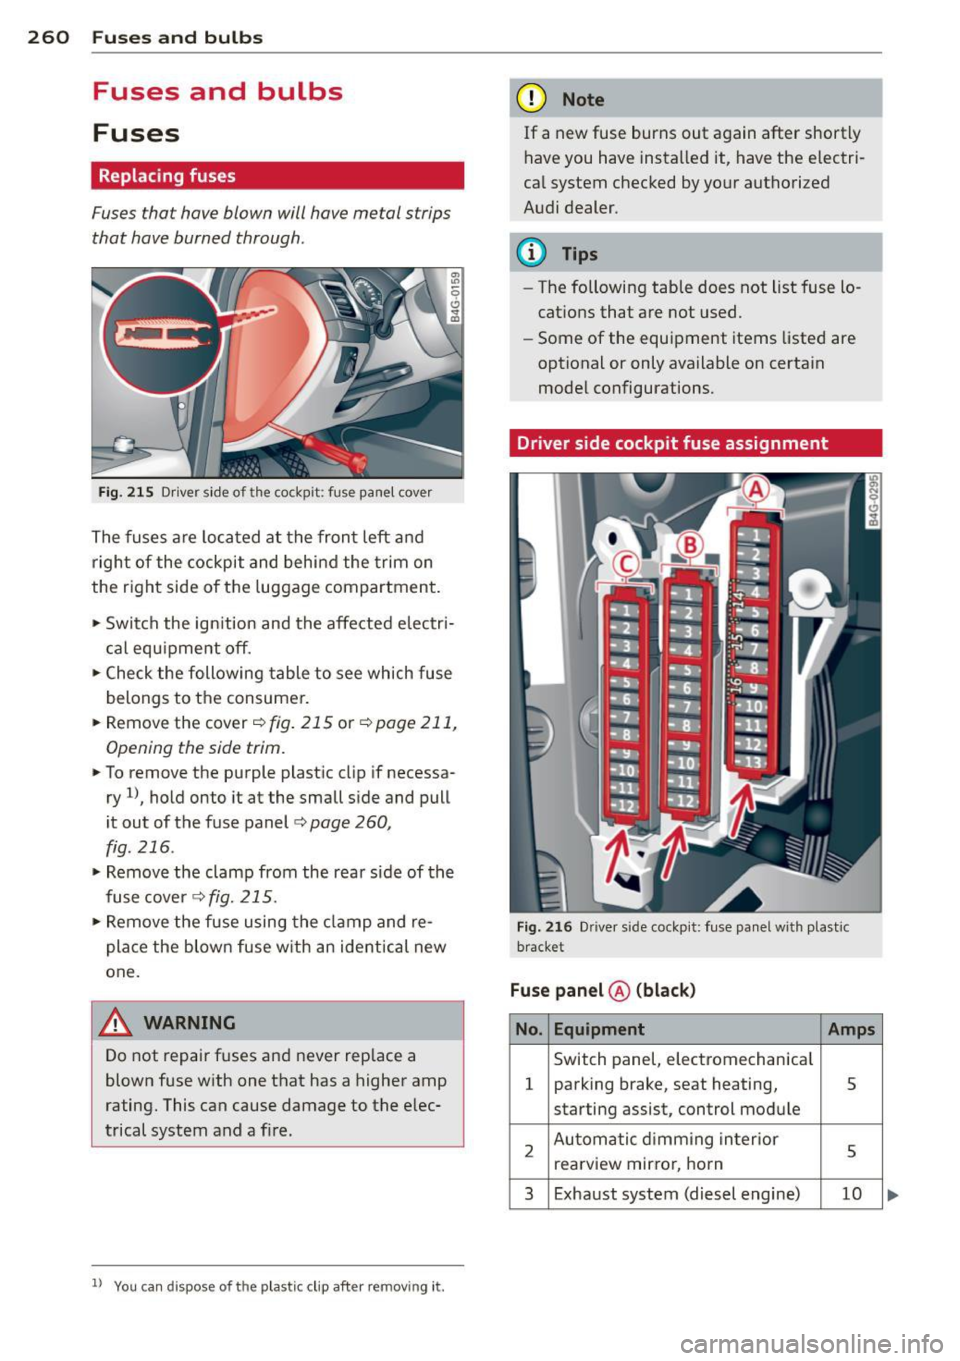
Fig. 215 Driver side of the cockpit: fuse panel cover
The fuses are located at the front left and
right of the cockpit and behind the trim on
the right side of the luggage compartment.
• Switch the ign ition and the affected electri
cal equ ipment off.
• Check the following table to see which fuse
belongs to the consumer.
• Remove the cover ¢
fig. 215 or¢ page 211,
Opening the side trim.
• To remove the purple plastic clip if necessa
ry
ll, hold onto it at the small side and pull
it out of the fuse panel
c:> page 260,
fig. 216 .
• Remove the clamp from the rear s ide of the
fusecover <>fig.
215.
• Remove the fuse using the clamp and re
pla ce the blown fuse w ith an ident ical new
one.
A WARNING
Do not repair fuses and never replace a
blown fuse with one that has a higher amp
rating. This can cause damage to the elec
trical system and a fire.
ll You can dis pose of the plastic clip after re moving it.
(D Note
If a new fuse burns out again after shortly
have you have installed it, have the electri
cal system checked by your authorized
Audi dealer.
(D Tips
-The following table does not list fuse lo
cations that are not used.
- Some of the equipment items listed are
optional or only available on certain
model configurations.
Driver side cockpit fuse assignment
Fig. 216 Dr ive r side cockpit: fuse panel with plastic
bracket
Fuse panel ® (black)
No. Equipment Amps
Switch panel, electromechanical
1 parking brake, seat heating, 5
starting assist, control module
2 Automatic dimming interior
5 rearview mirro r, horn
3 Exhaust system (diesel engine) 10
Page 267 of 292
@ Tips
The disc harged battery must be properly
connected to the vehicle's electrical sys
tem. When jump starting or charg ing the
battery, never connect the negative
ground cable to the batte ry negat ive post
because the ba tte ry manager system must
be ab le to detect the battery's state of
charge. Always connect the negative
g round cab le to the negative ground pos t
of t he battery manager cont ro l unit.
Use of jumper cables
Make sure to connect the jumper coble
clomps in exactly the order described b elow!
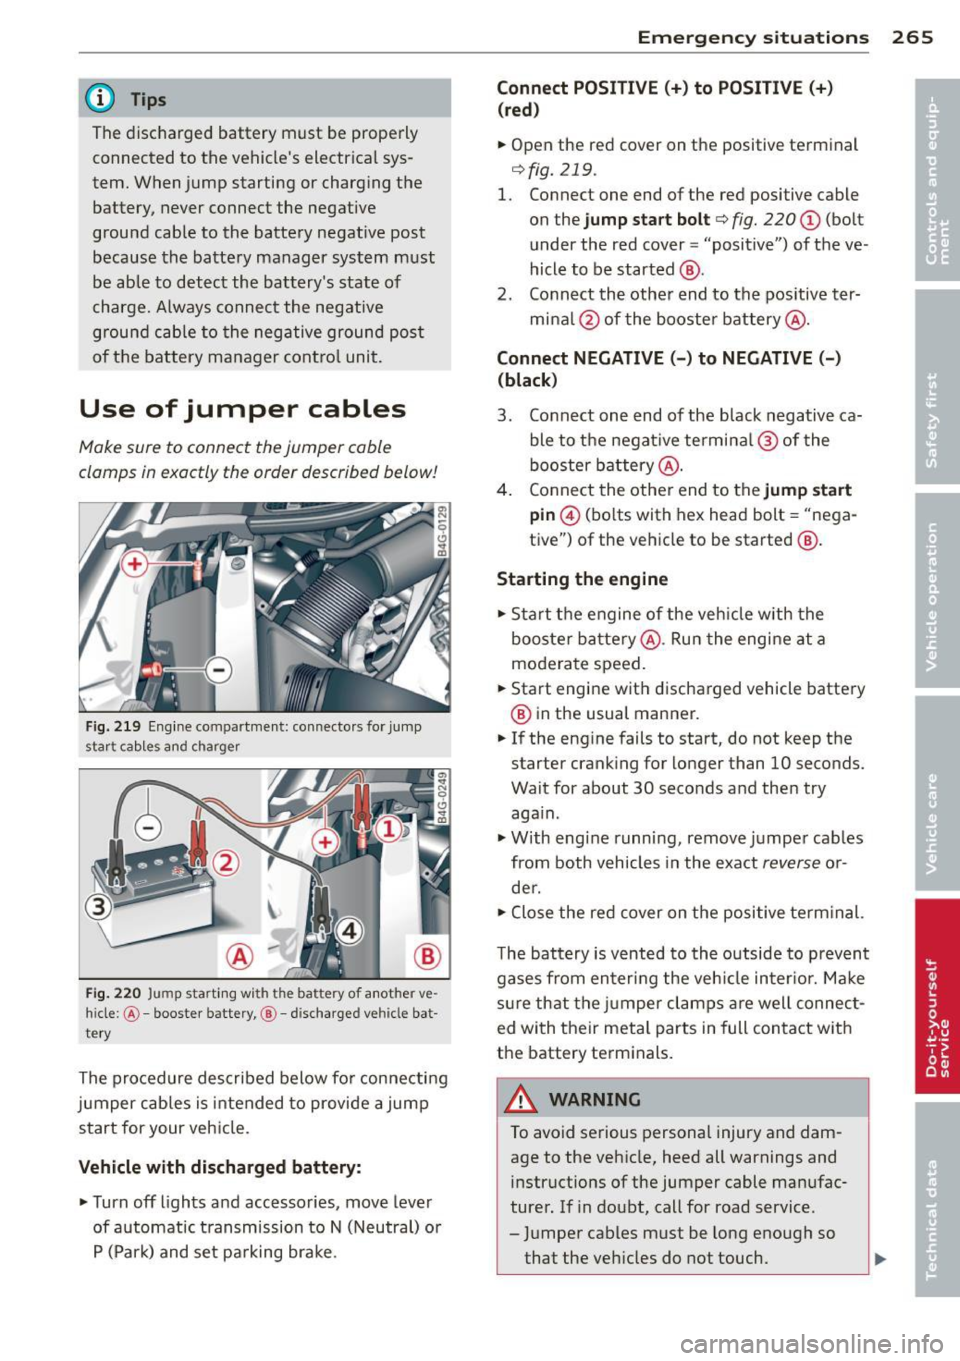
Fi g. 21 9 Eng ine co mpar tment: connecto rs for jum p
s tar t cab les and ch arg er
F ig. 220 Jump start in g w ith t he ba ttery of a not her ve ·
hi cle :
@-booster battery, ®-disc harged ve hicle bat
te ry
The procedure des cribed below fo r connecti ng
jumper cables is intended to provide a jump
start for your veh icle.
Vehicle with discharged battery :
• Turnoff lights and accessories, move lever
of automatic t ransmission to N (Neu tral) o r
P ( Par k) and set pa rking brake .
Emergenc y situ ation s 265
Connect POSI TIVE(+) to POSITIVE(+)
(red )
• Open the red cov er on the posit ive te rminal
¢ fig. 219 .
1. Connect one end of the red positive cable
on the jump sta rt bolt
¢ fig. 220 (D (bolt
under the red cover = "positive") of the ve
hicle to be started @.
2 . Connect th e othe r end to the pos itive ter-
mi na l@ of the booster battery @.
Connect NEGATIVE( -) to NEGATIVE(-)
(black )
3. Connect one end of the black negative ca ble to the negat ive termi na l@ of the
booster b attery @.
4. Connect the othe r end to the jump start
pin @ (bo lts w ith hex head bolt = "nega
tive") of the vehicle to be started @.
Starting the engine • Sta rt the e ngine of the veh icle w ith the
booste r ba tte ry @ . Ru n the engi ne at a
modera te speed.
• Start engine w it h discha rged vehicle battery
@ in the usual manner.
• If the eng ine fails to start, do not keep the
starter c ranking for longer than 10 seconds.
Wait for about 30 seco nds a nd the n try
aga in .
• With eng ine runni ng,
remove ju mpe r cab les
from both vehicles in the exact
reverse o r
de r.
• Close the re d
cover on the positive te rm inal.
T he battery is v ented to th e outside to p rev ent
gases from en ter ing the veh icle in ter io r. Ma ke
s ur e th at the jumper clamps are well connec t
ed with their meta l parts in full con ta ct w ith
the battery term inals.
,8. WARNING
To avoid se rious personal injury and dam
age to the veh icle, heed all warnings and
instructions of the jumper cable man ufac
ture r. If in doubt, call for road service .
- Ju mpe r cables m ust be long enough so
that the veh icles d o not touch.
-
Page 275 of 292
Consumer Information
Warranty coverages
Your Audi is covered by the following war
ranties :
-New Vehicle Limited Warranty
- Limited Warranty Against Corrosion Perfo-
ration
- Emissions Control System Warranty
- Emissions Performance Warranty
- California Emissions Control Warranty (USA
vehicles only)
- California Emissions Performance Warranty
(USA vehicles only)
Detailed information regarding yo ur warran
ties can be found in your
Warranty & Mainte
nance booklet .
Operating your vehicle
outside the U.S.A. or
Canada
Government regulations in the United States
and Canada require that automobiles meet
specific emission regulations and safety
standards. Therefore, veh icles built for the
U.S.A. and Canada differ from vehicles sold in
other countries .
I f you p lan to take your vehicle outside the
continental limits of the United States or Can
ada, there is the possibility that:
- unleaded fuels for vehicles with cata lytic
converter may not be available;
- fuel may have a considerably lower octane
rating . Improper fuel may cause engine
damage;
- service may be inadequate due to lack of
proper service facilities, tools or testing
equipment;
- replacement parts may not be readily availa
ble.
- Navigation systems for vehicles built for the
U.S.A. and Canada will not necessari ly work
in Europe, and may not work in other coun
tries outside North America .
Consumer Information 273
@ Note
Audi cannot be responsible for mechanical
damage that could result from inadequate
fuel, serv ice or parts availab ility.
Audi Service Repair
Manuals and Literature
Audi Offic ial Factory Service Manuals and Lit
erature are published as soon as possible after
model introduct ion. Service manuals and lit
erat ure are available to order from the Audi
T echnical Literature Ordering Center at:
www.audi.techliterature.com
Maintenance
' General
Your vehicle has been designed to help keep
maintenance requirements to a m inimum.
However, a certain amount of regular mainte
nance is still necessary to assure your vehicle's
safety, economy and reliability . For detailed
vehicle maintenance consult your Warranty &
Maintenance booklet.
Under difficult operating conditions , for ex
ample at extremely low outside temperatures,
in very dusty regions, etc., some service work
shou ld be pe rformed between the intervals
specified. This applies particularly to:
- oil changes, and
- cleaning or replacing the air fi lter.
@ For the sake of the environment
By regu larly maintaining your veh icle, you
help make sure that emission standards
are maintained, thus min imizing adverse
effects on the environment.
Important considerations for you and
your vehicle
T he increasing use of electron ics, soph isticat
ed fuel injection and emission control sys
tems, and the genera lly increasing technica l
complexity of today's automobiles, have ..,_
•
•
Page 281 of 292
Child restraints
Dang er of using chi ld rest raints in th e
front seat . . . . . . . . . . . . . . . . . . . . . . . . 144
Where can I get addit ional information
about child restra ints and their use? . . 186
Ch ild restra int system anchors ... .. .. . 182
Ch ild safety .. ................ ... ... 168
Convertible locking retracto r . . . . . . . . . 179
I mportant safety instr uctions fo r using
ch ild safety seats ......... .. .. .. .. . 172
I mportant things to know when dr iv ing
with chi ld ren .... ..... ... .. .. .. ... 168
T ether anchors . . . . . . . . . . . . . . . . . . . . 185
Tether straps ............ .... .. .. . 185
C hild safety loc k
Rear doors ..... .. .... ... .. .. .. .... 4 0
Ch ild safety seats . . . . . . . . . . . . . . . . . . . 17 4
B ooste r seats . .. .. .... ... .. .. .. .. . 177
Conver tible c hild seats .... .. .. .. .. . 175
Conve rtible locking re tra cto r .. .. .. .. . 179
H ow do I properly ins tall a child safety
seat in my vehicle? ..... ... .. .. .. .. . 172
Infant seats . . . . . . . . . . . . . . . . . . . . . . 17 4
Instal ling .. ............. .... .. ... 179
Instal ling a child restraint us ing the
LATC H system ... .... ... .. .. .. .. .. . 184
LA TC H system ............... ... ... 184
L ower ancho rages ......... ... ... .. 183
M ount ing and releas ing the ancho rage
hook .. .. .. .. ............. .. .. ... 184
Safety ins truc tions ........ .. .. .. .. . 172
Unused safety belts on the rear seat .. 17 4
Cigarette lig hter . . . . . . . . . . . . . . . . . . . . . 59
C leaning ... . ............. .... .. .. . 203
Climate con trol (four-zone)
Operation . . . . . . . . . . . . . . . . . . . . . . . . . 70
Clock ..... ... ...... ............. ... 26
C losing
Rear lid . . . . . . . . . . . . . . . . . . . . . . . . . . . 38
Sliding/tilting su nroof ..... .. .. .. .. .. 42
Cold ti re inflat ion pressure ... .. .. .. .. . 23 2
Com ing home ..... .. ...... .. .. .. .. .. 4 6
Compartments . ........... .. .. .. .... 60
Com plian ce .. ............. .... .. .. . 276
Consume r Info rmation . . . . . . . . . . 131, 273
Consumption (fue l) . . . . . . . . . . . . . . . . . . 24
Contact ing N HTSA ......... .. .. .. .. . 13 1
Inde x 279
Controls
Cleaning . ... .. .... . ... ...... ... .. 205
Convenie nce key . . . . . . . . . . . . . . . . . . . . . 36
Star ting the engine ............ .. .. . 74
Stopping the eng ine (STAR T ENGIN E
STOP b utton) .. .... . ... ...... ... .. . 7S
Switching the ignition on .... ... .. .. . 74
U nlocking and loc king vehicle . ... .. .. . 36
Conve rtib le child sa fe ty seats ..... .. .. 17S
Convertib le locking retractor
Activati ng .... ... .. ..... .......... 181
Deact ivati ng .. ... .. ..... .......... 181
U sing to secure a child safety seat l.79, 181
Coolant
refer to Eng ine coolant ......... .. .. 220
Cooling mode (automatic climate control) 70
Cruise cont ro l
Changi ng speed .. ................. . 80
P rese tt ing your speed .......... .. .. . 80
S wi tching off .. .. .. . .. ... .... ... .. . 80
Switching on . . . . . . . . . . . . . . . . . . . . . . . 79
Warning/indicator lights ..... ... .. .. . 22
( upholder .. .. .. .. .... ........... .. . 60
Curve light .. .. .. .. .. ............... . 96
Cylinder on demand System ... ... .. .. . 26
D
Data recorde r . . . . . . . . . . . . . . . . . . . . . . 189
Date d isp lay .. .. .. .. . .. .. ..... ... .. . 26
Daytime running lights . ... .... ... .. .. . 44
Decla rat io n of compliance
Adaptive c ruise cont ro l ......... .. .. 276
A udi s ide ass ist ...... ......... .. .. 276
C e ll phone package ... ...... ... .. .. 276
Co nvenience key .... . .. ..... ... .. .. 276
E lectronic immobi lizer .. ..... ... .. .. 276
Homelink universal remote control . .. 276
Remote contro l key ............ .. .. 276
Tire pressure mo nitor ing system . .. .. 276
Decorative pa rts/trim
Cleaning . ... .... .. . .. .. ..... ... .. 205
D EF
Wh at does this mea n when it appears in
t h e tr ip odomete r display? ...... .. .. . 26
Defec tive light bu lb warni ng ......... .. 21
•
•