door lock AUDI RS7 SPORTBACK 2016 Owner's Manual
[x] Cancel search | Manufacturer: AUDI, Model Year: 2016, Model line: RS7 SPORTBACK, Model: AUDI RS7 SPORTBACK 2016Pages: 282, PDF Size: 70.78 MB
Page 77 of 282
Your vehicle is equipped with an electromechani
cal parking brake. The parking brake is designed
to prevent the vehicle from rolling unintentional
ly and replaces the hand brake.
I n addition to the norma l functions of a tradi
tional hand brake, the electromechanica l parking
brake provides various convenience and safety
functions.
When starting from rest
- The integ ral starting assist helps you w hen
driving by automatically releasing the parking
brake
r=:> page 75, Starting from o stop .
-When starting on inclines, the starting assist
prevents the vehicle from unintentiona lly roll
ing back . The braking force of the parking brake
is not released until sufficient driving force has
been built up at the wheels.
Emergency brake function
An emergency brake ensures that the vehicle can
be slowed down even if the
normal brakes fai l
r=:> page 76, Emergency broking function.
A WARNING
-
Do not press the accelerator pedal inadver
tently if the vehicle is stat ionary but the en
gine is running and a gear is selected. Other
w ise the vehicle will start to move immediate
ly and could result in a crash.
(D Tips
- If the parking brake is applied with the igni
tion switched off, the indicator lights in the
switch and -(USA models)/ . (Cana-
da models) in the instrument cluster will go
out after a certain period of time.
- Occasiona l noises when the park ing brake is
applied and released a re normal and are not
a cause for concern.
- When the vehicle is parked, the park ing
brake goes th rough a se lf-test cycle at regu
lar int ervals. Any associated noises are nor
mal.
Parking
• Press the brake pedal to stop the vehicle.
D riving
• Pull the switch~ to set the parking brake .
• Place the selector lever in P .
• Turn the engine off
r=:> .&, .
• Turn the steering wheel when parking on in
clines so that the wheels w ill roll into the curb
if the vehicle starts moving .
A WARNING
=
-Always take the vehicle key with you when
leaving the vehicle, even for a sho rt period
of time. This applies particularly when chil
d ren remain in the vehicle. Otherwise chil
dren cou ld start the engine, release the
parking brake or operate e lectrical equip
ment such as power windows, which in
creases the risk of an accident.
- No one should remain in the vehicle when it
is locked, especially chi ldren. Locked doors
make it more d ifficult for emergency work
ers to get into the vehicle, wh ich puts lives
at risk.
Starting from a stop
The start assist function ensures that the park
ing broke is released automatically upon start
ing.
Stopping and setting the parking brake
• Pull the switch~ to set the parking brake .
Starting and automatically releasing the
parking brake
• When you press the acce lerator peda l, the
parking brake is automatica lly re leased and
your veh icle begins to move .
T he parking brake can be set if you must stop the
vehicle at a stop light or in traffic. The vehicle does not have to be held with the brake pedal.
The parking brake elim inates the tendency to
creep when a selector lever posit ion is engaged.
The parking brake releases automatically and the
vehicle begins to move as soon as you press the
accelerator pedal as usual.
Starting on hills
When starting on incl ines, the hill start assist
prevents the vehicle from unintentionally rolling
Ill>
75
Page 105 of 282
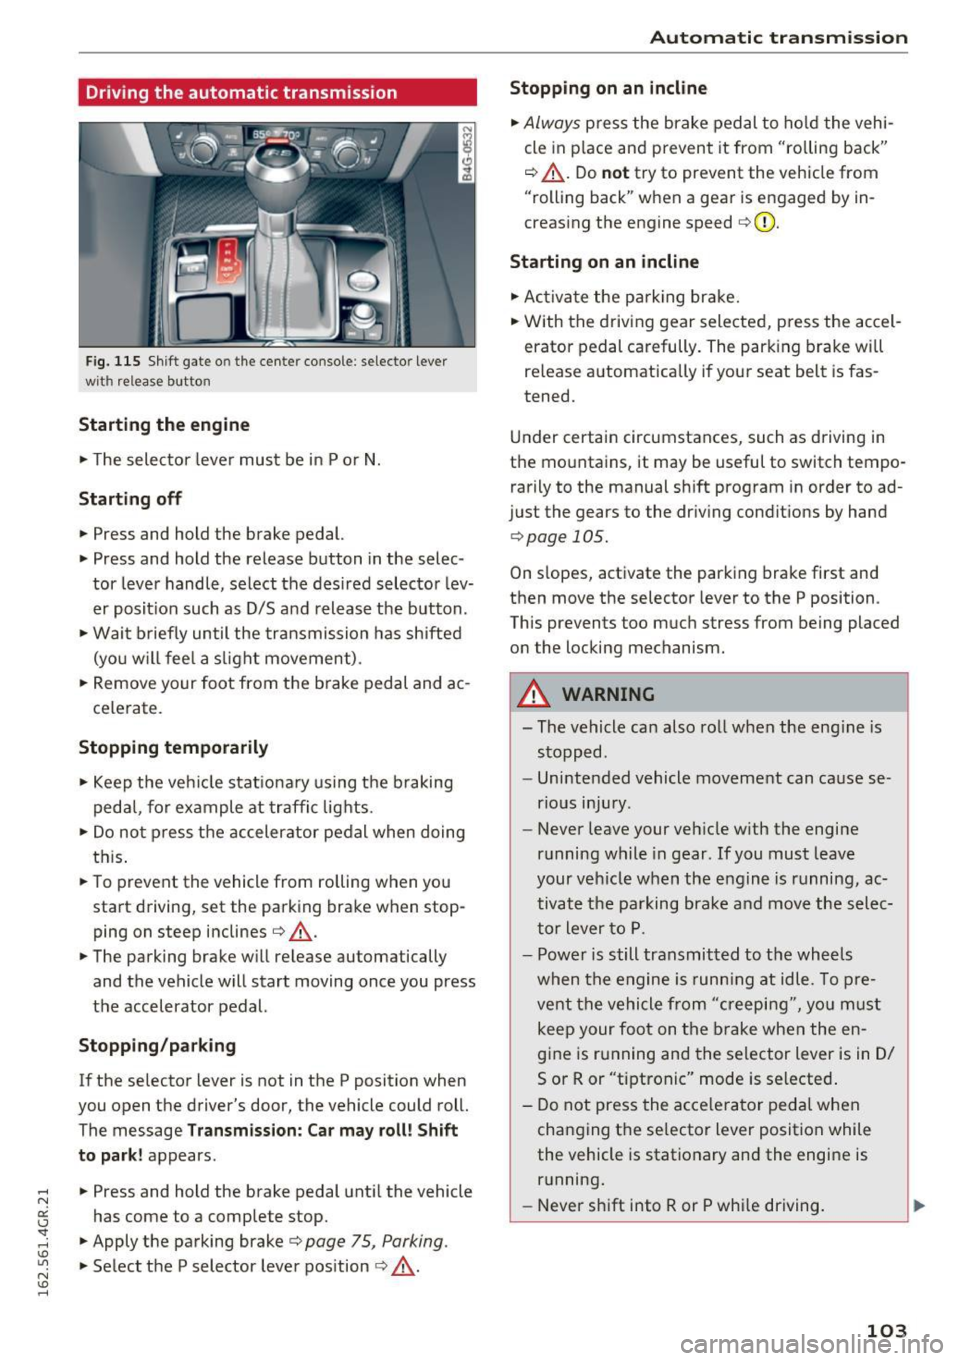
Driving the automatic transmission
Fig. 115 Shif t gate o n the cente r conso le : selecto r lever
wi th release button
Starting the engine
.. The selector lever must be in P or N.
Starting off
.. Press and hold the brake pedal.
.. Press and hold the release button in the selec
tor lever handle, select the desired selector lev
er posit ion such as D/S and release the button .
• Wait briefly until the transmission has shifted
(you w ill feel a slight movement) .
.. Remove your foot from the b rake pedal and ac
celerate.
Stopping temporarily
.. Keep the vehicle stationary using the braking
pedal, for example at traffic lights.
.. Do not press the accelerator pedal when doing
this .
.. To prevent the vehicle from rolling when you
start driving, set the parking brake wh en stop
ping on steep inclines¢,& .
.. The parking brake will release au tomatically
and the vehicle will start moving once you press
the accelerator pedal.
Stopping/ parking
If the selector lever is not in the P position when
you open the drive r's door, the vehicle could roll.
The message
Transmission: Car may roll! Shift
to park!
appears .
.. Press and hold the brake pedal until the vehicle
has come to a complete stop .
.. Apply the parking brake¢
page 75 , Parking .
.. Select the P selector lever position ¢ ,& .
Automatic transmission
Stopping on an incline
.. Always press the brake pedal to hold the vehi
cle in pla ce and prevent it from "ro lling back"
¢ ,& . Do
not try to prevent the vehicle from
"rolling back" when a gear is engaged by in
creasing the engine speed ¢CI) .
Starting on an incline
.. Activate the parkin g brake .
.. With the driving gear selected, press the accel
erator pedal carefully. The parking brake will
releas e automatically if your seat belt is fas
tened.
Under certain circumstances, such as driving in
the mountains, it may be useful to switch tempo
rarily to the manual shift program in order to ad
ju st the gears to the driving conditions by hand
¢ page 105 .
On slopes, activate the parking brake first and
then move the selector lever to the P position .
This prevent s too much stress from being placed
on the locking mechanism.
A WARNING
=
- The vehicle can also roll when the eng ine is
stopped .
- Unintended vehicle movement can cause se
rious injury .
- Never leave your veh icle w ith the engine
running while in gear . If you must leave
your veh icle when the engine is running, ac
tivate the parking brake and move the selec
tor lever to P.
- Power is still transmitted to the wheels
when the engine is runn ing at idle. To pre
vent the vehicle from "creeping", yo u must
keep your foot on the brake when the en
gine is running and the selector lever is in D/
5 or R or "tiptronic" mode is selected .
- Do not press the accelerator pedal when
changing the se lector lever position while
the vehicle is stationary and the engine is running .
- Never shift into R or P whi le driving.
103
Page 126 of 282
Driving safety
moving. Objects can becom e trapped under
the brake pedal and accelerator pedal caus ing a loss of vehicle control.
Storing cargo correctly
loading the luggage compartment
All luggage and other objects must be properly
stowed and secured in the luggage compart
ment .
Loose items in the luggage compartment can
shift suddenly, changing vehicle handling charac
teristics . Loose items can also increase the risk of
serious personal injury in a sudden vehicle ma neuver or in a collision.
.., Distribute the load evenly in the luggage com
partment.
.., Always place and properly secure heavy items in
the luggage compartment as far forward as
possible.
... Secure luggage using the tie-downs provided
c::;, page 62, Luggag e compartm ent.
... Make sure that the rear seatback is securely
la tched in place .
A WARNING
Improperly stored luggage or other items can
fly through the vehicle causing serious per sonal injury in the event of hard braking or an
accident . To help reduce the risk of serious
personal injury :
- Always put objects , for example, luggage or
other heavy items in the luggage compart
ment.
- Always secure objects in the luggage com
partment using the tie-down hooks and
suitable straps.
A WARNING
Heavy loads will influence the way your vehi
cle handles. To help reduce the risk of a loss
of control leading to serious personal injury:
- Always keep in mind when transporting
heavy objects, that a change in the center of
gravity can also cause changes in vehicle
handling:
124 -
Always distribute the load as evenly as
possible.
- Place heavy objects as far forward in the
luggage compartment as possible .
- Never exceed the Gross Axle Weight Rating
or the Gross Vehicle Weight Rating specified
on the safety compliance sticker on the left
door jamb. Exceeding permissible weight
standards can cause the vehicle to slide and
handle differently.
- Please observe information on safe driving
c::;,page 118.
A WARNING
To help prevent poisonous exhaust gas from
being drawn into the vehicle, always keep the
rear lid closed while driving .
- Never transport objects larger than those fitting completely into the luggage area be
cause the rear lid cannot be fully closed.
-If you absolutely must drive with the rear lid
open, observe the following notes to reduce
the risk of poisoning:
- Close all windows,
- Close the power roof*,
- Open all air outlets in the instrument pan-
el,
- Switch off the air recirculation,
- Set the fresh air fan to the highest speed.
A WARNING
-
Always make sure that the doors, all win
dows, the power roof* and the rear lid are se
curely closed and locked to reduce the risk of
injury when the vehicle is not being used.
- After closing the rear lid, always make sure
that it is properly closed and locked .
- Never leave your vehicle unattended espe
cially with the rear lid left open. A child
could crawl into the vehicle through the lug
gage compartment and close the rear lid be
coming trapped and unable to get out. Be ing trapped in a vehicle can lead to serious
personal injury.
- Never let children play in or around the vehi
cle.
Page 167 of 282
_& WARNING
A child in a child safety seat installed with the
LATCH lower anchorages or with the standard
safety belt or a child in a booster seat on the
rear seat could play with unused rear seat
safety belts and become entangled. This
could cause the child serious personal injury
and even death.
- Always secure unused rear seat safety belts
out of reach of children in child seats such
as by properly routing them around the head restraint of the seat where the child
restraint is installed .
- Never activate the convertible locking re tractor when routing the safety belts around
the head restraints.
Child seats
Infant seats
Babies and infants up to about one year old and
20 lbs. or 9 kg need special rearward-facing
child restraints that support the bock, neck and
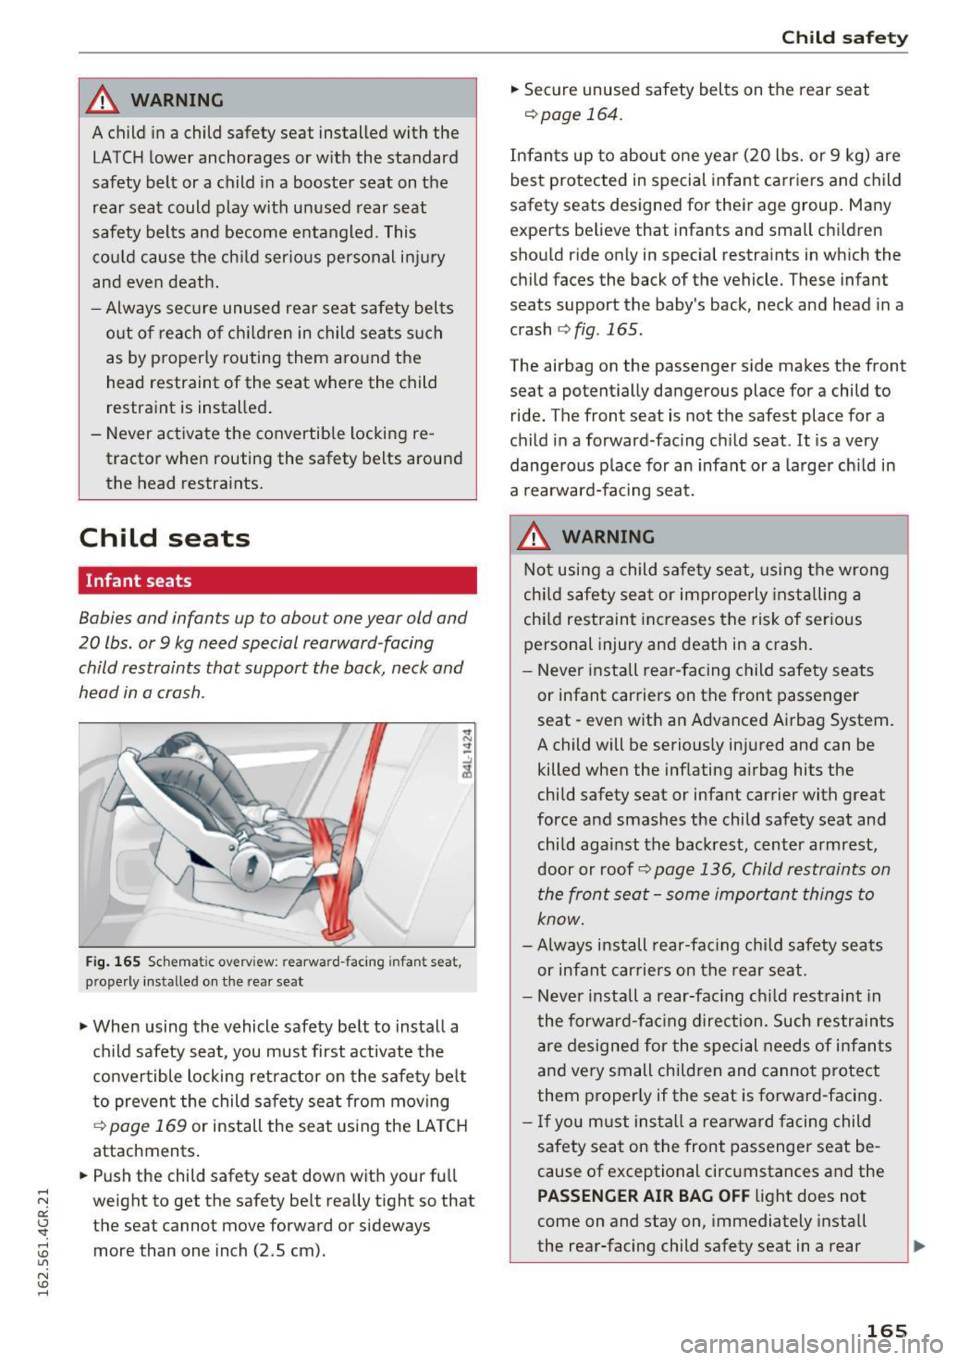
head in a crash .
Fig. 165 Schemat ic overview: rearwa rd-facing infant seat,
properly installed on the rear seat
"'When using the vehicle safety belt to install a
child safety seat, you must first activate the
convertible locking retractor on the safety belt
to prevent the child safety seat from moving
~ page 169 or install the seat using the LATCH
attachments.
"'Push the child safety seat down with your full
weight to get the safety belt really tight so that
the seat cannot move forward or sideways
more than one inch (2.S cm).
Child safety
"' Secure unused safety belts on the rear seat
¢page 164.
Infants up to about one year (20 lbs. or 9 kg) are
best protected in special infant carriers and child
safety seats designed for their age group. Many
experts believe that infants and small children
should ride only in special restraints in which the
child faces the back of the vehicle. These infant
seats support the baby's back, neck and head in a
crash
¢fi g. 165.
The airbag on the passenger side makes the front
seat a potentially dangerous place for a child to
ride. The front seat is not the safest place for a
child in a forward -facing child seat . It is a very
dangerous place for an infant or a larger child in
a rearward-facin g seat.
_& WARNING
Not using a child safety seat, using the wrong
child safety seat or improperly installing a
child restraint increases the risk of serious
personal injury and death in a crash.
- Never install rear-facing child safety seats
or infant carriers on the front passenger
seat -even with an Advanced Airbag System.
A child will be seriously injured and can be
killed when the inflating airbag hits the
child safety seat or infant carrier with great
force and smashes the child safety seat and child against the backrest, center armrest,
door or roof¢
page 136, Child restraints on
the front seat -some important things to
know.
- Always install rear-fac ing child safety seats
or infant carriers on the rear seat.
- Never install a rear-facing child restraint in
the forward -facing direction. Such restraints
are designed for the special needs of infants
and very small children and cannot protect
them properly if the seat is forward-facing.
- If you must install a rearward facing child
safety seat on the front passenger seat be
cause of exceptional circumstances and the
PASSENGER AIR BAG OFF light does not
come on and stay on, immedia tely install
the rear-facing child safety seat in a rear
165
Page 172 of 282
Child safety
children, especially those 12 years and younger,
should always ride in the back seat properly re
strained for their age and size.
.&_ WARNING
-
Improperly installed child safety seats in
crease the risk of serious personal injury and
death in a collision.
- Always make sure that the safety belt re
tractor is locked when installing a child
safety seat . An unlocked safety belt retrac
tor cannot hold the child safety seat in place during normal driving or in a crash.
-Always buckle the child safety seat firmly in
place even if a child is not sitting in it . A
loose child safety seat can fly around during
a sudden stop or in a collision.
- If the rear set backrest is not securely latch
ed, the child and the child restraint will be
thrown forward together with the backrest and will strike parts of the vehicle interior.
The child can be seriously injured or killed.
- Never install rear-facing child safety seats
or infant carriers on the front passenger
seat. A child will be seriously injured and
can be killed when the passenger airbag in
flates.
- The inflating airbag will hit the child safety
seat or infant carrier with great force and
will smash the child safety seat and child against the backrest, center armrest, door
or roof .
- Always install rear-facing child safety seats
or infant carriers on the rear seat.
- Forward-facing child safety seats or infant
carriers installed on the front passenger's
seat may interfere with the deployment of
the airbag and cause serious injury to the child.
- It is safer to install a forward-facing child
safety seat on the rear seat .
- Always read and heed all WARNINGS when
ever using a child restrained in a vehicle is
being used~
page 159. Special precautions
apply when installing a child safety seat on
the front passenger seat~
page 136, Child
restraints on the front seat -some impor
tant things to know.
170
.&_ WARNING , .
Always take special precautions if you must
install a forward or rearward-facing child re
straint on the front passenger's seat in excep
tional situations:
- Whenever a forward or rearward-facing child restraint is installed on the front pas
senger seat, the
PASSENGER AIR BAG OFF
light must come on and stay on whenever
the ignition is switched on.
- If the PASSENGER AIR BAG OFF light does
not come on and stay on, perform the
checks described
~ page 146, Monitoring
the Advanced Airbag System.
- Take the child restraint off the front passen
ger seat and install it properly at one of the
rear seat positions if the
PASSENGER AIR
BAG OFF
light does not stay on whenever
the ignition is switched on.
- Improper installation of child restraints can
reduce their effectiveness or even prevent
them from providing any protection.
- An improperly installed child restraint can
interfere with the airbag as it deploys and
seriously injure or even kill the child.
- Always carefully follow the manufacturer's
instructions provided with the child safety
seat or carrier .
- After checking to make sure that the child
restraint is properly installed, make certain
that the child restraint is correctly recog nized by the capacitive passenger detection
system in the front passenger seat and that
the
PASSENGER AIR BAG OFF light signals
the correct front passenger frontal airbag
status.
.&_ WARNING
Forward-facing child restraints:
- Always make sure the forward-facing seat
has been designed and certified by its man
ufacturer for use on a front seat with a pas
senger front and side airbag.
- Never put the forward-facing child restraint
up, against or very near the instrument pan-
-
el. .... ....._ ______________ _J~
Page 173 of 282
-Always move the passenger seat into its
rearmost position in the seat's fore and aft
adjustment range, as far away from the air
bag as possible before installing the for
ward-facing child restra int. The backrest
must be adjusted to an upright posit ion.
- Make sure that the
PA SSEN GER AIR BAG
OFF
light comes on and stays on all the time
whenever the ignition is switched on.
A WARNING
Rearwa rd-facing child restra ints:
- A ch ild in a rearward-facing child safety seat
installed on the front passenger seat wi ll be
seriously injured and can be killed if the
front airbag inflates - even with an Ad
vanced Airbag System .
- The inflating a irbag w ill hit the child safety
seat or infant carrier with great force and
will smash the chi ld safety seat and chi ld
against the backrest, center armrest, door
or roof.
- Always be especially careful if you must in
stall a rearward facing child safety seat on
the front passenger seat in exceptional c ir
cumstances.
- Make sure that the
PAS SENGER AIR BA G
OFF
light comes on and stays on all the time
whenever the ignition is switched on.
- If the
PASSENGER AIR BAG OFF light does
not come on and stay on, immediately in
stall the rear-facing ch ild safety seat in a
rear seat ing pos ition and have the airbag
system inspected by your Aud i dealer .
Activating the convertible locking retractor
Use the convertible locking retractor to secure a
child restraint.
Always heed the child safety seat manufacturer's
instructions when installing a child restraint in
your vehicle. To act ivate the convertible locking
retractor:
.. Place the child restraint on a seat, preferab ly
on the rear seat.
.. Slowly pull the belt all the way out .
Child safety
.. Route it around or through the child restraint
be lt path ¢
A.
.. Push the ch ild safety seat down with your full
weight to get the safety belt really tight.
.. Insert the belt tongue into the buckle for that
seating position .
.. Guide the safety belt back into the retractor un
til the belt lies flat and snug on the child safety
seat .
.. You shou ld hear a "cl icking" noise as the belt
winds back into the inertia reel. Test the con
vertible locking retractor by pulling on the belt.
You shou ld no longer be able to pull the belt
out of the retractor. The convertib le locking re
tractor is now activated.
.. Make sure that the red release button is facing
away from the child restraint so that it can be
unbuckled quickly .
.. Pull on the belt to make sure the safety belt is
properly t ight and fastened so that the seat
canno t move fo rwa rd or s ideways mo re than
one inch (2.S cm).
A WARNING .......... -
Using the wrong ch ild restraint or an improp
erly installed child restraint can cause serious
personal injury or death in a crash.
- Always make sure that the safety belt re-
tractor is locked when installing a child
safety seat. An unlocked safety be lt retrac
tor cannot hold the ch ild safety seat in place
during normal driving or in a crash .
- Always buckle the child safety seat firmly in
place even if a ch ild is not sitt ing in it. A
loose child safety seat can fly around dur ing
a sudden stop or in a crash .
- Always make sure the seat backrest to which
the child restraint is installed is in an up
right position and securely latched into
place and cannot fo ld forward. Othe rw ise,
the seatback with the child safety seat at
tached to it could fly forward in the event of
an accident or other emergency situation.
- Always read and heed all WARNINGS when
ever using a child restrained in a vehicle is
being used ¢
page 159. Special precautions
apply when instal ling a child safety seat on
the front passenger seat
¢page 136, Child II>
171
Page 202 of 282
Fuel and Refueling
(D Note
Never drive your vehicle until the fuel tank is
completely empty. The irregular supply of
fuel can cause misfiring. Gasoline could enter
the exhaust system and damage the catalytic
converter .
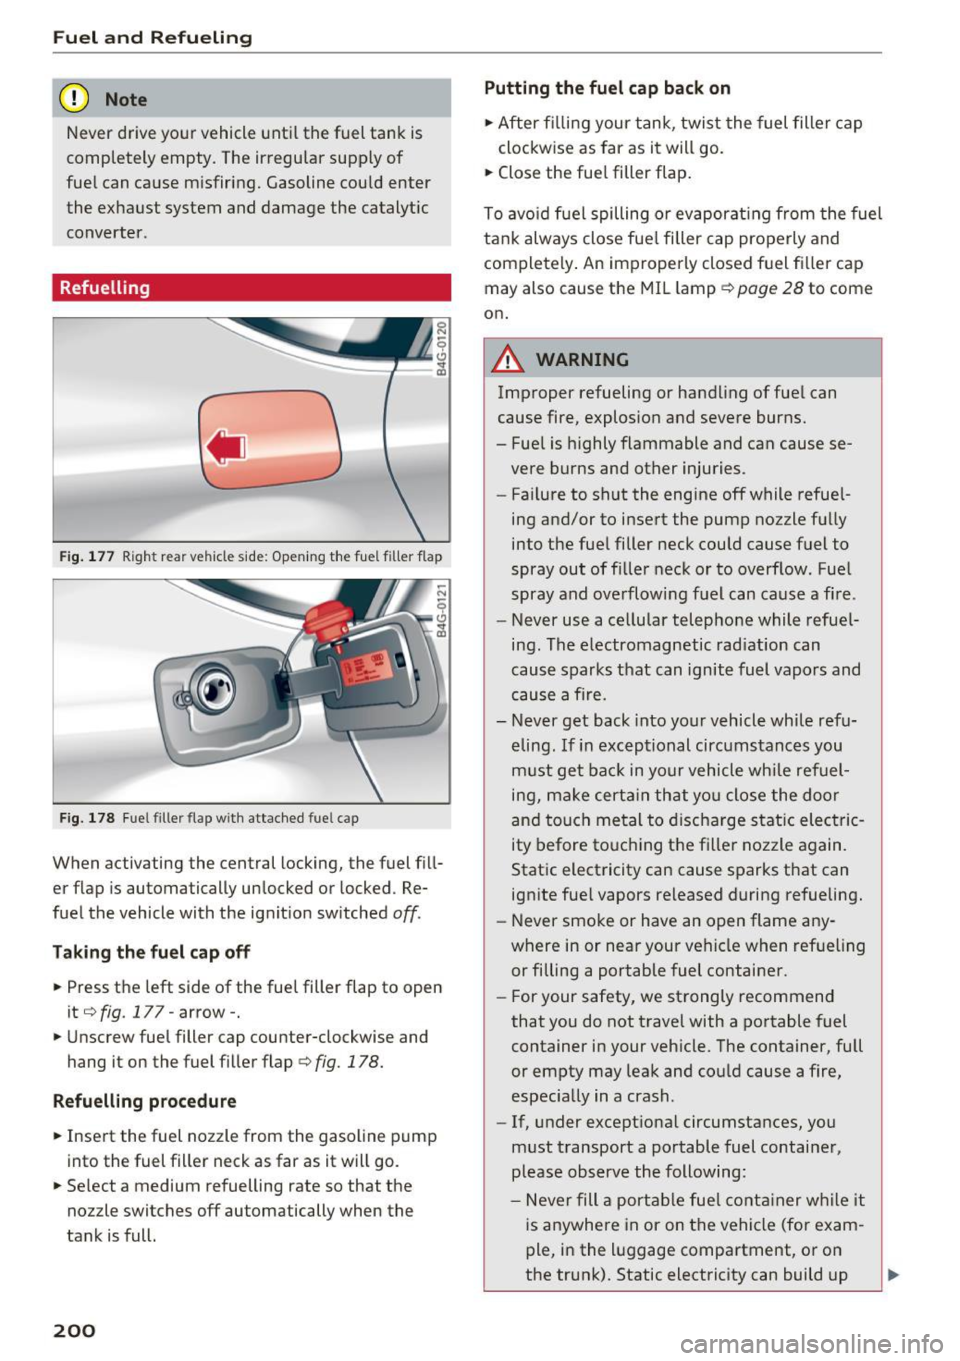
Refuelling
Fig. 177 Right rear vehicle side: Opening the fuel filler flap
Fig. 178 Fuel filler flap w ith attached fuel cap
When activating the central locking, the fuel fill
er flap is automatically unlocked or locked. Re
fuel the vehicle with the ignition switched
off.
Taking the fuel cap off
.. Press the left side of the fuel filler flap to open
it
9 fig. 177-arrow- .
.. Unscrew fuel filler cap counter-clockwise and
hang it on the fuel filler flap¢
fig. 178.
Refuelling procedure
.. Insert the fuel nozzle from the gasoline pump
into the fuel filler neck as far as it will go.
.. Select a medium refuelling rate so that the
nozzle switches off automatically when the
tank is full.
200
Putting the fuel cap back on
.. After filling your tank, twist the fuel filler cap
clockwise as far as it will go.
.. Close the fuel filler flap.
To avoid fuel spilling or evaporating from the fuel
tank always close fuel filler cap properly and
completely. An improperly closed fuel filler cap
may also cause the MIL lamp ¢
page 28 to come
on.
A WARNING
Improper refueling or handling of fuel can
cause fire, explosion and severe burns. -
- Fuel is highly flammable and can cause se
vere burns and other injuries .
- Failure to shut the engine off while refuel
ing and/or to insert the pump nozzle fully
into the fuel filler neck could cause fuel to
spray out of filler neck or to overflow. Fuel
spray and overflowing fuel can cause a fire.
- Never use a cellular telephone while refuel
ing. The electromagnetic radiation can
cause sparks that can ignite fuel vapors and
cause a fire.
- Never get back into your vehicle while refu
eling.
If in exceptional circumstances you
must get back in your vehicle while refuel
ing, make certain that you close the door
and touch metal to discharge static electric
ity before touching the filler nozzle again.
Static electricity can cause sparks that can
ignite fuel vapors released during refueling.
- Never smoke or have an open flame any
where in or near your vehicle when refueling
or filling a portable fuel container .
- For your safety, we strongly recommend
that you do not travel with a portable fuel
container in your vehicle. The container, full
or empty may leak and could cause a fire,
especially in a crash .
- If, under exceptional circumstances, you
must transport a portable fuel container,
please observe the following:
- Never fill a portable fuel container while it
is anywhere in or on the vehicle (for exam
ple, in the luggage compartment, or on
the trunk). Static electricity can build up
Ii>-
Page 203 of 282
while filling and can ignite fuel vapors causing a fire.
- Always place a portable fuel conta iner on
the ground before filling.
- Always keep the filler nozz le completely
inside the portab le container before and
during filling.
- If fill ing a portable container made of
metal, the filler nozzle must always be in
contact with the container . This will help
prevent static electricity from discharging
and cause a fire.
- Never spi ll fuel inside the vehicle or lug
gage compartment. Fuel vapors are h ighly
flammable.
- Always observe local and state/provincia l
laws regarding the use, storage and trans
portation of fuel containers.
- Make certa in the fuel conta iner meets in
dustry standards (ANSI/ ASTM F852-86).
CD Note
If any fuel has spilled onto the car, it should
be removed immediately to prevent damage
to the paint .
@ For the sake of the environment
As soon as the correctly operated nozzle
switches off automatically for the first t ime,
the tank is full. Do not try to add more fuel
because fuel may spill out. In addition, the
expansion space in the fuel tank will be filled -
causing the fuel to overflow when it becomes
warm and pollu te the environment.
@ Tips
- Running your engine while refuelling may
cause vapors to escape or even cause fuel to
spill out of the tank. This would then shut
off the fuel nozzle before the tank is full.
- Do not refuel your vehicle with the ignition
switched on. The fuel ga uge may otherwise
not indicate the correct fue l level after refu
elling.
- The fuel filler flap of your vehicle is not
l ocked when you lock the vehicle from the
i nside.
Fuel and Refueling
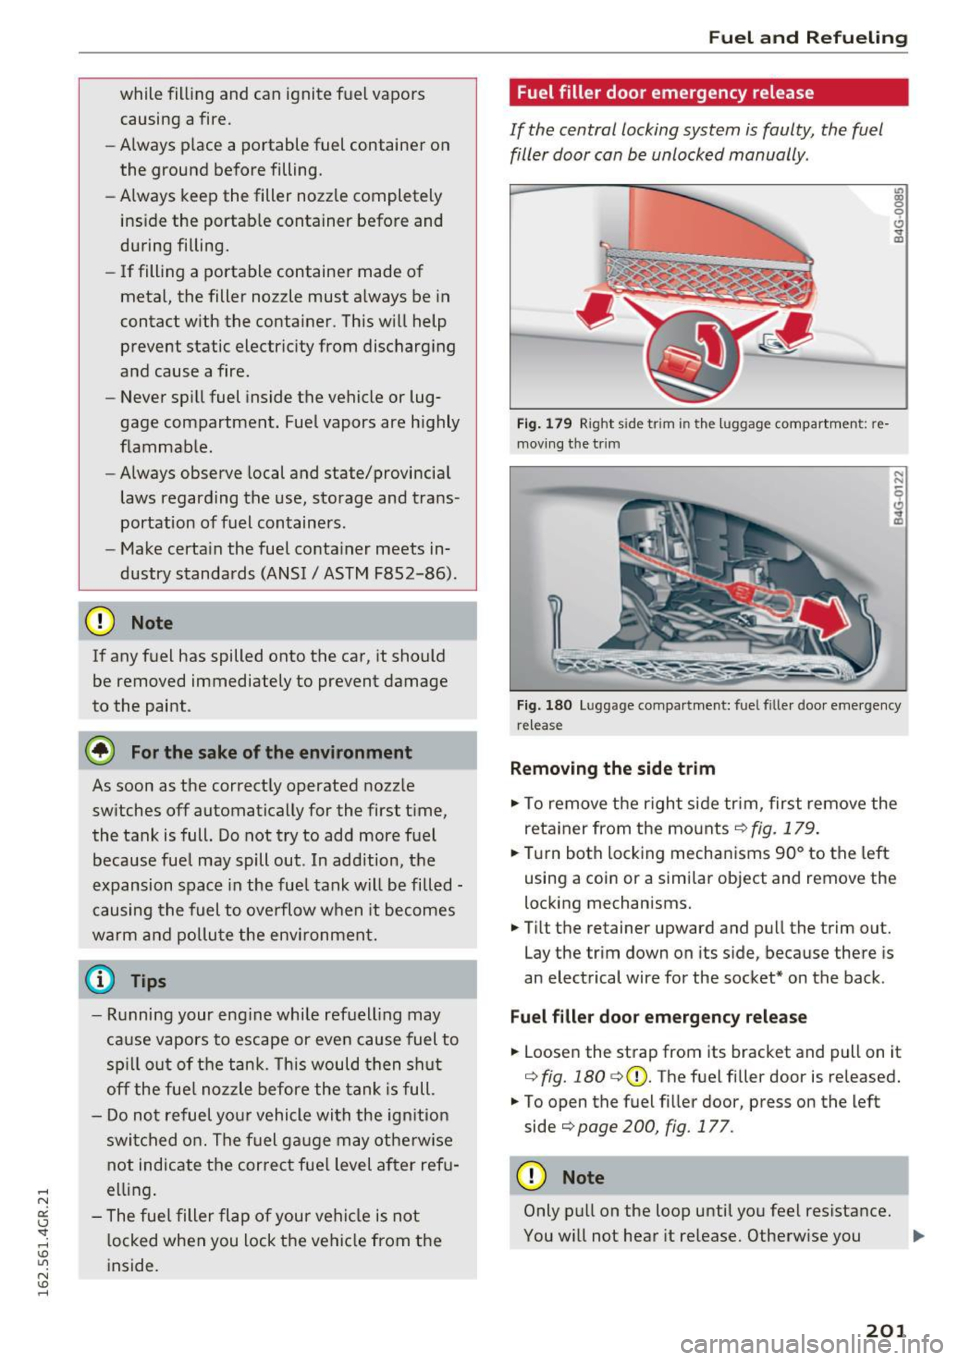
Fuel filler door emergency release
If the central locking system is faulty, the fuel
filler door can be unlocked manually.
Fig. 179 Right s ide t rim in t he lu ggage compartm en t: re
moving the t rim
Fig. 180 Lu ggage compa rtment: fuel fill er door emergency
release
Removing the side trim
.,. To remove the right side tr im, first remove the
reta iner from the mounts
c:> fig. 179.
... Turn both locking mechanisms 90° to the left
using a coin or a similar object and remove the
locking mechanisms.
• Tilt the retainer upward and pull the trim out.
Lay the trim down on its side, because there is
an electrical wire for the socket* on the back .
Fuel filler door emergency release
... Loosen the strap from its bracket and pull on it
c:> fig. 180 c:>(D. The fuel filler door is released.
.,. To open the fuel filler door, press on the left
side
c:> page 200, fig. 177.
CD Note
Only pull on the loop until you feel resistance.
You w ill not hear it re lease. Otherwise you ..,.
201
Page 253 of 282
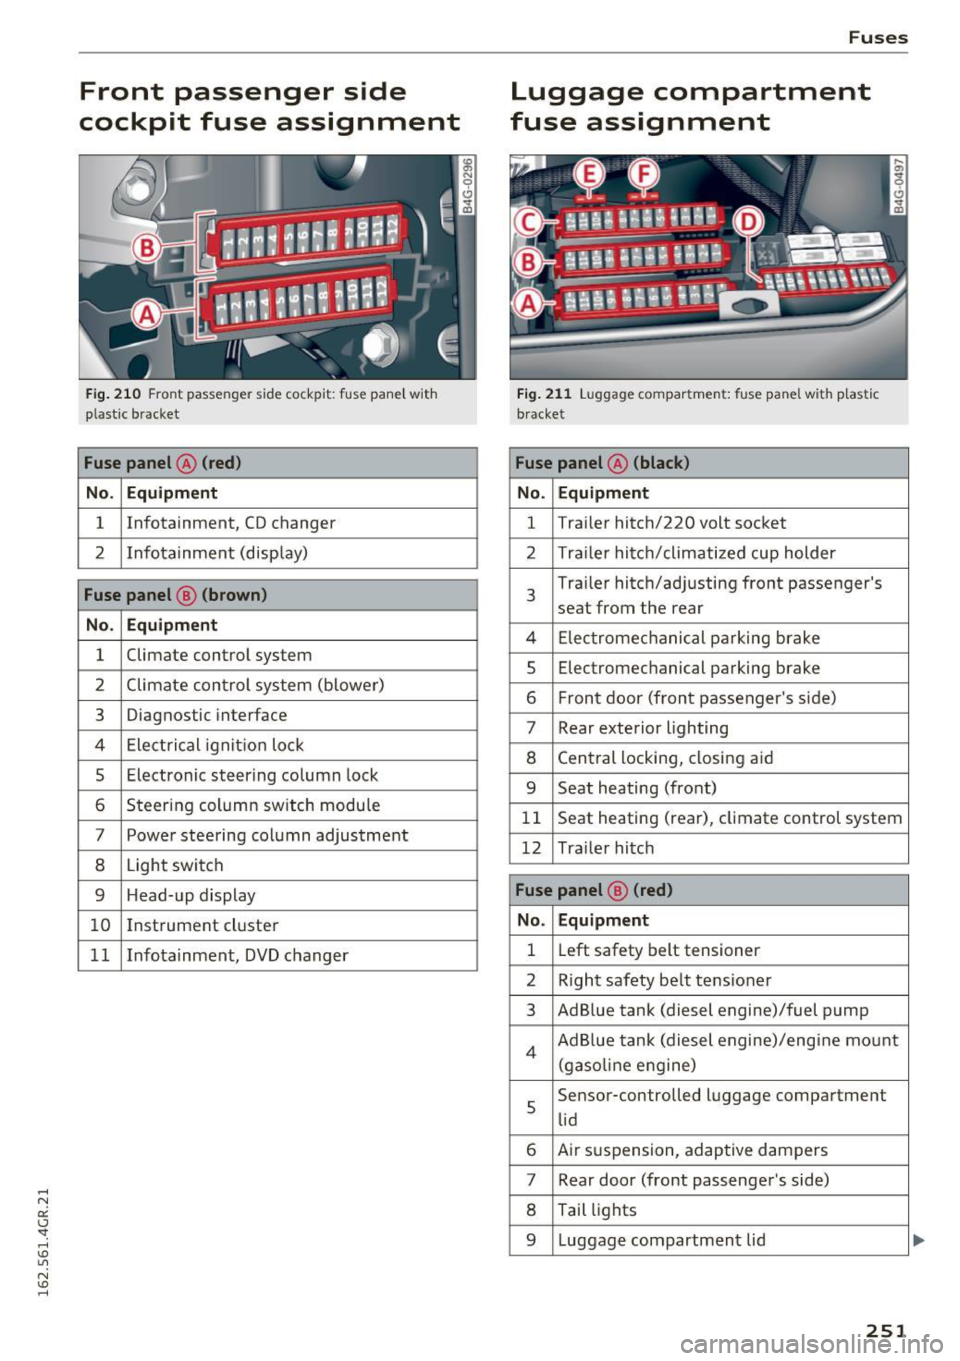
Front passenger side
cockpit fuse assignment
F ig. 21 0 Front passenger side cockpit: f use pane l w it h
p las tic bracket
Fuse panel @ (red )
No . Equipment
1 Infotainment, CD changer
2 I
nf otainment (disp lay)
Fuse panel @ (brown )
No . Equipment
1 Climate control system
2 Climate cont
rol sys tem (blowe r)
3 Diagnostic interface
4 Ele ctrical ignit io n lock
5 Electronic steering column lock
6 Steer ing col umn sw itch module
7 Power steering column adjustment
8 Light switch
9 Head-up display
1 0 I
nst rument cluste r
1 1 Infotainment, DVD changer
Fuses
Luggage compartment
fuse assignment
F ig . 2 1 1 Luggage compa rtment: fuse panel with p last ic
b racket
Fuse panel @ (black )
No . Equipment
1 Tra
iler hitc h/220 volt socket
2 Tra ile r hi tc h /climati zed cup holder
3
Tra iler hitch/ad justing front passenger's
seat from the rear
4 El ec tromec ha nic al pa rking brake
5 Electromec hanical parking brake
6 F ront door (front passenger's s ide)
7 Rear exterior lighting
8 Cen tral locking, closi ng a id
9 Seat heating (front)
1 1 Seat heating (rear), climate control system
12 Tra ile r hitc h
Fuse panel @ (red)
No . Equipment
1 L
eft safety belt tensioner
2 R igh t safety be lt tens ione r
3 Ad B lue tank (diesel engine)/fuel pump
4 Ad B lue tank (diesel engine)/eng ine mo unt
(gaso line e ngine)
s
Sensor-controlled l uggage compartment
li d
6 Air s uspension, adaptive dampers
7 Rear door (front passenger's side)
8 Tail lights
9 Luggage compartmen t lid
251
...
Page 271 of 282
D
Data recorder . . . . . . . . . . . . . . . . . . . . . . . . 179
Date display . . . . . . . . . . . . . . . . . . . . . . . . . . 25
Daytime running lights . . . . . . . . . . . . . . . . . 43
Declaration of compliance
Adapt ive cruise control . . . . . . . . . . . . . . . 265
Audi side assist . . . . . . . . . . . . . . . . . . . . . 265
Cell phone package . . . . . . . . . . . . . . . . . . 265
Convenience key . . . . . . . . . . . . . . . . . . . . . 265
Electronic immobilizer. . . . . . . . . . . . . . . . 265
Garage door opener (Homelink) . . . . . . . . 265
Remote control key . . . . . . . . . . . . . . . . . . 265
Tire pressure monitoring system . . . . . . . 265
Defective light bulb warning Indicator light . . . . . . . . . . . . . . . . . . . . . . . 20
Defrosting (windows)
Deluxe automatic climate control . . . . . . . .
69
DEF (instrument cluster) . . . . . . . . . . . . . . . . 25
Determining correct load limit ... .. .. .. . 231
Dimensions . . . . . . . . . . . . . . . . . . . . . . . . . . 260
Dimming the rearview mirror . . . . . . . . . . . .
48
Distance driven . . . . . . . . . . . . . . . . . . . . . . . . 23
Door/rear lid warning . . . . . . . . . . . . . . . . . . . 22
Doors Child safety lock . . . . . . . . . . . . . . . . . . . . . . 39
Driver information system . . . . . . . . . . . . . . . 22
Boost . . . . . . . . . . . . . . . . . . . . . . . . . . . . . . 26
CD/radio display. . . . . . . . . . . . . . . . . . . . . . 22
Door/rear lid warning . . . . . . . . . . . . . . . . . 22
Efficiency program . . . . . . . . . . . . . . . . . . . . 24
Engine oil temperature display . . . . . . . . . . 26
Exterior temperature display . . . . . . . . . . . 22
On-board computer . . . . . . . . . . . . . . . . . . . 23
Service interval display . . . . . . . . . . . . . . . 216
Shifting indicator . . . . . . . . . . . . . . . . . . . . . 26
Driver seating position . . . . . . . . . . . . . . . . .
119
drive select
adaptive air suspension/sport . . . . . . . . . . . 95
Adaptive dampers . . . . . . . . . . . . . . . . . . . . 95
Curve light . . . . . . . . . . . . . . . . . . . . . . . . . . 95
Engine sound . . . . . . . . . . . . . . . . . . . . . . . . 95
Safety belt tensioner . . . . . . . . . . . . . . . . . . 95
Sport differential . . . . . . . . . . . . . . . . . . . . . 95
Drive select . . . . . . . . . . . . . . . . . . . . . . . . . . . 95
Driving economically . . . . . . . . . . . . . . . . . .
190
Driving safely . . . . . . . . . . . . . . . . . . . . . . . . 118
Index
Driving through water . . . . . . . . . . . . . . . . . 188
Driving time . . . . . . . . . . . . . . . . . . . . . . . . . . 23
Duplicate key . . . . . . . . . . . . . . . . . . . . . . . . . 30
Dust filter
refer to Pollutant filter . . . . . . . . . . . . . . . . 67
Dynam ic steering
Indicator light
E
184
Easy seat entry . . . . . . . . . . . . . . . . . . . . . . . . 72
Economy tips (efficiency program) . . . . . . . . 24
Efficiency program . . . . . . . . . . . . . . . . . . . . . 24
Electromechanical parking brake Operation . . . . . . . . . . . . . . . . . . . . . . . . . . .
74
Releasing and closing . . . . . . . . . . . . . . . . . 7 4
Warning/indicator lights . . . . . . . . . . . . . . .
14
Electromechanical steering . . . . . . . . . . . . . 184
Indicator light . . . . . . . . . . . . . . . . . . . . . . 184
Electronic differential lock
Indicator light . . . . . . . . . . . . . . . . . . . . . . .
18
Electronic Differential Lock . . . . . . . . . . . . . 180
Electronic differential lock (EDL)
Warning/indicator lights . . . . . . . . . . . . . . . 18
Electronic immobilizer . . . . . . . . . . . . . . . . . . 31
Electronic power control (EPC)
warning/ind icator light . . . . . . . . . . . . . . . .
19
Electronic stabili zation control
Indicator light . . . . . . . . . . . . . . . . . . . . . . .
18
Electronic Stabilization Contro l . . . . . . . . . . 180
Sport mode . . . . . . . . . . . . . . . . . . . . . . . . 181
Emergency actuation
Doors . . . . . . . . . . . . . . . . . . . . . . . . . . . . . . 36
Emergency flasher . . . . . . . . . . . . . . . . . . . . .
46
Warning/indicator lights . . . . . . . . . . . . . . . 21
Emergency operation Emergency braking function (parking brake) .7.6
Fuel filler door . . . . . . . . . . . . . . . . . . . . . .
201
Luggage compartment lid . . . . . . . . . . . . . . 38
Sunroof . . . . . . . . . . . . . . . . . . . . . . . . . . . . .
41
Emergency release
Selector lever . . . . . . . . . . . . . . . . . . . . . . . 106
Emergency starting . . . . . . . . . . . . . . . . . . . 253
Energy management . . . . . . . . . . . . . . . . . .
186
Engine
Compartment . . . . . . . . . . . . . . . . . . . . . . . 205
Coolant . . . . . . . . . . . . . . . . . . . . . . . . . . . . 209
269