technical data AUDI S3 2011 Workshop Manual
[x] Cancel search | Manufacturer: AUDI, Model Year: 2011, Model line: S3, Model: AUDI S3 2011Pages: 320, PDF Size: 75.79 MB
Page 105 of 320

_________________________________________________ W_ a_ r_m _ a_ n_d_ c_ o_ ld _ ___.lfll
Applies to vehicles : wi th electr ically heate d front se ats
Electrically heated front seats
With the ignition on, the seat cushion and backrest of the
front seats can be heated.
Fig. 10 4 Center
console: thumbw heels
f o r fr ont se at heating
Use the thumbwheels in the center console=> fig. 104 to
turn on and adjust front seat heating. An infinite range of
positions are possible .
- Roll the thumbwheel
© (driver's seat) or@ (front
passenger's seat) from position (0 ) upward in order to
activate the heating elements.
- Select the desired temperature setting from positions 1
through 6.
When the heating element is activated, the numbers on the thumb
wheel w ill illuminate .
0 Note
To prevent possible damage to the heating elements, do not kneel on
the seats or apply a heavy load to relatively small areas of the seat. •
Contro ls a nd e quip
m en t Vehicle
OP-eration
App lies to vehicles : with eng ine preheater
Engine preheater
Use of the engine preheater is recommended when the
ambient temperature is below -5 °F (-20 °C) .
Fig. 10 5 I n the le ft
fro nt b umper: engine
prehea ter connection
soc ket
T he engine preheater slow ly warms the engine coolant using a
heating element when the vehicle is parked. The included cable
4>
must be connected to a 120 Volt Ground Fault Circuit (GFI) protected
outlet that is protected from water (in your garage, for instance).
When the coo lant is preheated, the engine reaches its operating
temperature more qu ickly and will use less fuel and produce fewer
polluting emissions during the warm-up phase.
Preheat ing the engine can take up to 3 hours depending on the
temperature outside.
Conn ect ing th e engin e pr ehe ate r
• Only use the cable provided.
• All cables and connectors that are used must not be damaged
=> & .
• Open the cover=> fig. 105
G) .
• Plug the connecting cable into the socket@=>& .
4
) The cable is delivered with veh icles in Canada as standard equipment. The ca
ble can be obtained from an authorized Audi deale r for vehicles in the USA.
Vehicle care Do-it-yourselt service iTechnical data
Page 107 of 320
___________________________________________________ O_ n_ t_h _e_ r_o _a_ d __ _
On the road
Steering
Adjustable steering wheel
The height and reach of the steering wheel con be
adjusted .
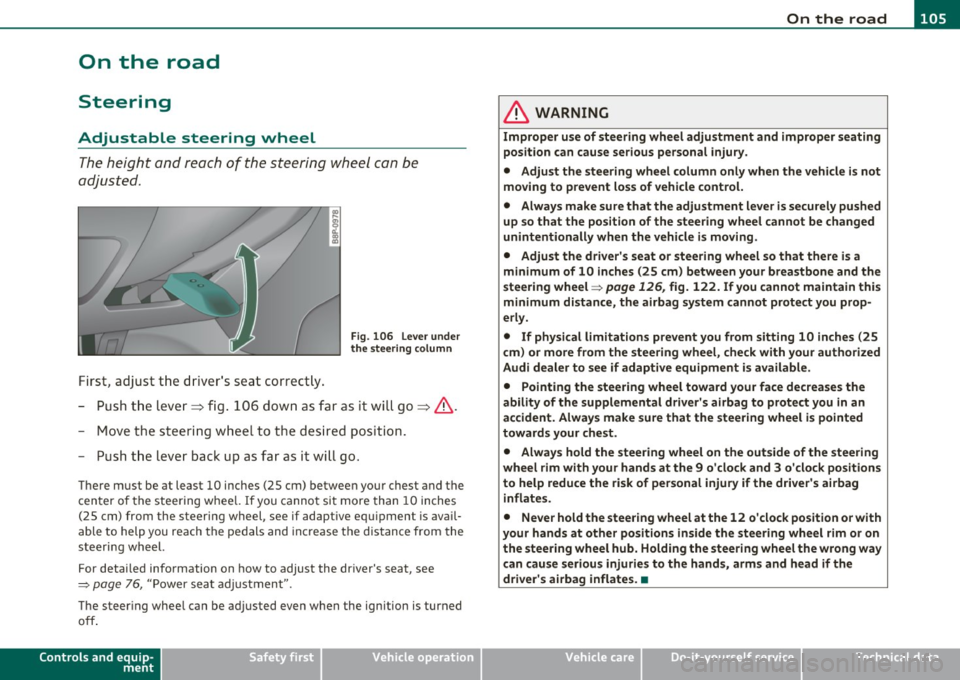
First, adjust t he dr iver's seat correct ly.
Fi g. 106 Leve r und er
the s tee ring column
-Pu sh t he lever~ fig. 106 down as far as it wi ll go~ &.
- Move th e st eeri ng wheel to t he desire d position.
- Push t he lever back up as fa r as it wi ll go.
There must be at least 10 inches (25 cm) between your chest and the
c en ter of the steer ing w hee l. If you cannot si t more than 10 inches
(25 cm) from the steering wheel, see if adaptive equ ipment is avai l
able to help you reach the pedals and increase the distance from the
steeri ng wheel.
For detai led info rmation on how to adjust the dr iver's seat, see
=> page 76, "Power se at adj ustment".
The steer ing whee l can be adjusted even when the ignition is turned
off .
Controls and equip
ment Safety first
& WARNING
Improper use of steering wheel adjustment and improper seating
position can cause serious personal
injury .
• Adjust the steer ing whe el column only when the vehicle is not
moving to prevent loss of vehicle control.
• Always make sure that the adjustment lever is securely pushed
up so that the position of the steering wheel cannot be changed
unintentionally when the vehicle is moving .
• Adjust the dr iver 's seat or steering wheel so that there is a
m inimum of 10 inches (25 cm) between your breastbone and the
steering wheel=>
page 126, fig. 122. If you cannot maintain this
minimum distance, the airbag system cannot protect you prop
erly.
• If physical limitations prevent you from sitting 10 inches (25
c m) or more from the steering wheel, check with your authorized
Audi dealer to see if adaptive equipment is available .
• Pointing the steering wheel toward your face decrea ses the
ability of the supplemental driver's a irbag to prote ct you in an
accident. Always make sure that the steer ing wheel is pointed
towards your che st .
• Always hold the steering wheel on the outside of the steering
wheel rim with your hands at the 9 o'clo ck and 3 o'clock position s
to help reduce the risk of personal injury if the driver's airbag
inflates .
• Never hold the steer ing wheel at the 12 o 'clock position or with
your hands at other positions inside the steering wheel rim or on
the steering wheel hub. Holding the steering wheel the wrong way
can cause serious injurie s to the hand s, arms and head if th e
driver 's airbag inflates. •
Vehicle care Technical data
Page 109 of 320
_________________________________________________ O_ n_ t_ h_ e_ r _o_ a_d _ __.fflll
Starting and stopping the engine
Starting the engine
The engine can only be started with your original Audi
key.
N ... q
i
Vehicles with a gasoline engine:
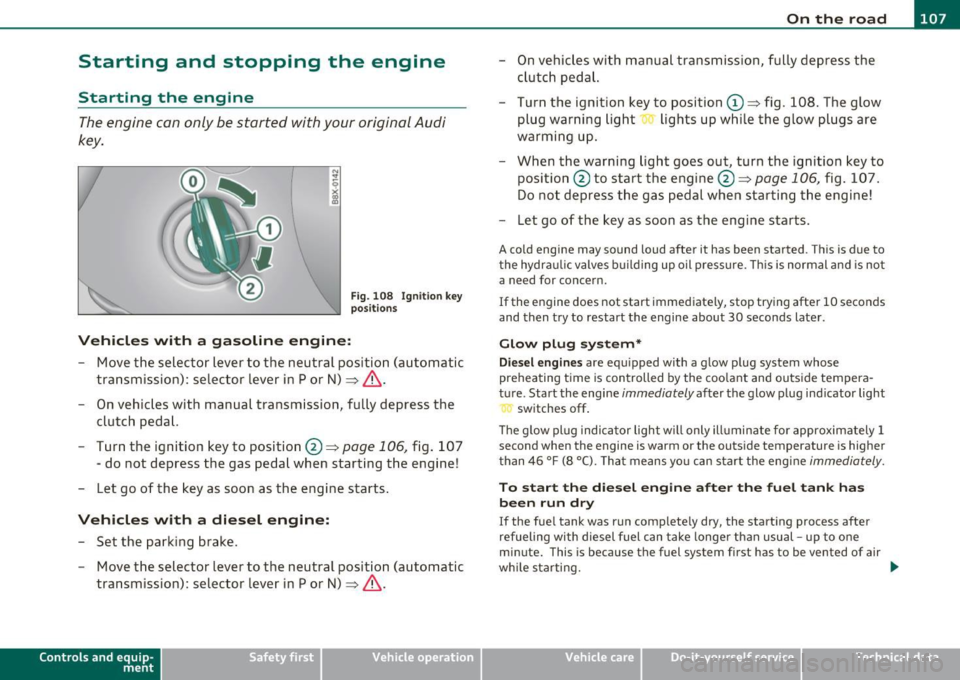
Fig . 10 8 Ignition key
p osit ion s
- Move the selector lever to the neutra l position (automatic
transmission): selector lev er in P or N) =>
& .
- On vehicles with manual transmission, fully depress the
clutch pedal.
- Turn the ignition key to position@ =>
page 106, fig. 10 7
- do not depress the gas pedal when star ting t he engine!
- Let go of the key as soon as the engine starts .
Vehicles with a diesel engine:
- Set the park ing b rake .
- Move the selector lever to the neutral position (automatic
transmission): selector lever in P or N) =>
& .
Con tro ls a nd e quip
m en t Vehicle
OP-eration
- On vehicles with manual transmission , fu lly depress the
cl utch peda l.
- Turn the ignition key to posi tion
(D => fig . 108. The g low
plug warning light lights up whi le the glow plugs are
warming u p.
- When the warning light goes out, turn the ig nition key to
posi tion @to start the engine @ =>
page 106, fig. 107 .
Do not depress t he gas pedal when starting t he engine!
- Let go o f the key as soon as the engi ne starts.
A cold engine may sound loud after it has been started . Th is is due to
t he hydra ulic valves buil ding up oil p ress ure. This is normal and is not
a need for concern.
If the engine does not start immediately, stop try ing after 10 seconds
and then try to restart the engine about 30 seconds later .
Glow plug system*
Diesel engines are equipped with a glow p lug system whose
preheating t ime is con trolled by the coo la nt and outs ide tempera
t u re . Start the engine
immediately af ter the glow p lug ind icator light
sw itches off .
Th e g low pl ug indica tor light w ill only ill uminate fo r approximately 1
second when the engine is warm or the outs ide temperature is higher
than 46 °F (8 °C). Tha t means yo u ca n sta rt the engi ne
immediately.
To start the diesel engine after the fuel tank has
been run dry
If the fue l tank was run complete ly dry, the start ing process after
refueling with diesel fuel can take longe r than usual -up to one
minute. This is because the fuel system first has to be vented of air
wh ile starting. _,.
Vehicle care Do-it-yourselt service Technical data
Page 111 of 320
_________________________________________________ O_ n_t_ h _ e_ ro_ a_d __ _
Releasing the parking brake
- Pull th e parking brak e leve r u p sligh tly and pr ess the
r ele ase b utt on at t he sam e tim e:::::;,
page 108, fig. 10 9
-a rrow-.
- Keep the release button pressed and lower the par kin g
brake:::::;, &,.
If you should drive off w ith the park ing brake still set, a warning tone
wi ll sou nd and t he following will appear in t he ins trumen t cluster to
remind you to release the parking brake:
Parking brake set
Th e p arking br ake wa rning comes on on ly af ter you have d riven for
longer than 3 seconds and faster than 5 mph (5 km/h).
T he pa rk in g bra ke wa rning ligh t Brake (U SA)/
(CD) (C DN) i lluminates
w hen the park ing b rake is set and you sw itch on the ign ition.
& WARNING
Always release the parking brake completely. A partially engaged
brake will overheat the rear brakes , reduce their effectiveness and
cause excessive wear. This could lead to brake failu re and an acci
dent.
0 Note
O nly a fter the vehicle has co me to comp lete stop, sho uld you firmly
se t the par king brake and either move the gearshift lever into 1st .
gear (manual t ransm iss ion) or
move the se lector leve r into "P" (Auto
matic transm ission). •
Controls and equip
ment Safety first
Parking
To p
reven t a parked ve hic le fr om rolli ng away, th ere a re
a fe w thing s yo u s hould do.
Wh en you par k yo ur vehic le, do t he foll owing:
- Stop the veh ic le usi ng the brake pedal.
- Set t he parking bra ke firmly .
- Mov e th e s ele ctor lev er i nto the
P p osi tio n (automatic
transmission)
or mo ve the g ears hift leve r i nto 1st . gear
(manual transmission) :::::;, &,.
- Swit ch o ff t he eng ine and rem ove the igniti on key fr om
t he ign ition l ock .
What else you should do when parking your vehicle
on an incline or decline
T u rn t he st eer ing whee l so tha t if the vehicle s hould start to roll, it
will roll into t he curb.
If you are par king on a
decline (the front of your ve hicl e facing down
hill), turn the fron t w heels to t he rig ht so t hat they point
toward the
curb.
If you are pa rking o n an incline (t he fon t of yo ur vehi cle facing uphill),
turn the front wheels to the left so that they point
away from the
curb.
Move the se lector lev er into the P p os it ion (automatic transmission)
or move the gearsh ift lever i nto 1st . gear (manual transmis sion ).
& WARNING
This is how you can reduce the risk of injury when leaving your
vehicle.
• Never park the vehicle where it can come in contact with dry
grass, spilled fuel or any other flammable materials.
Vehicle care Technical data
Page 113 of 320
________________________________________________ ..::O :::.:.,: n:...t~ h :...!.::: e:...!.. ro~ a:_::d!..,_ __
- Drive at the sp eed yo u wish to set.
- Press button © to set that speed .
The disp lay=> page 110, fig . 111 w ill show the set speed. T he d is p lay
may vary depending on the type of display in your veh icle. The ind i
cator light
CRUISE (US mode l) I 0" (Canadian model) w ill also light up
in the instr ument cluster .
& WARNING
• Alway s pay attention to traffi c even wh en the cruise control i s
switch ed on. You are always responsible for your speed and the
distance between your vehicle and other vehicle s.
• For safety reasons , the cruise control should not be used in the
city, in stop-and-go traffi c, on twi sting road s and when road
conditions are poor (such as ice , fog, gravel, heavy rain and hydro
planing ) · risk of accident .
• Turn off the cruise control temporarily when entering turn
lanes, highway exit lane s or in con struction zone s.
• Please note that inadvertently "resting" your foot on the accel ·
erator pedal cau ses the crui se control not to brake . This i s becau se
the cruise control is ove rridden by the driver 's accele rat ion .
[ i ] Tips
• Vehicles with manual transmission : You can atta in the set speed
only if the curren tly engaged gear allows i t and the eng ine is no t
stressed . Shift ing to a higher or lowe r gear promptly w ill allow the
eng ine to run smooth ly .
• The cru ise contro l cannot ma inta in a constant speed when driving
downhil l. The vehi cle will accelerate under its own weigh t. Downshift
to a lower gear or use the brakes to slow down .•
Controls and equip
ment Safety first
Changing speed
- Press lev
er i n t he 0 or O directio n=:::;, page 110, fig. 110
to inc rease or d ecr eas e yo ur sp eed.
- Release the lever to save t hat speed .
Change speed in increments o f 1 mph (1 km/h) by lightly pressing the
lever. If you keep the leve r presse d down, yo u will alte r your s peed in
S mph (10 km/h) increments .
You can also press t he accelerator pedal down to increase your s peed,
e .g . if you want to p ass someone. The speed you save d earlier wi ll
resume as soon as yo u re lease the accelerator pedal.
If, however, you exceed yo ur saved speed by 5 mph (1 0 km/h) fo r
longer than S m inutes, the cruise contro l will turn off temporarily .
Th e symbo l will go out b ut the save d speed will be retaine d.•
Presetting your speed
You can preset your d esir ed sp eed whil e the vehicle is not
moving.
- Turn on the ignition.
- Pull leve r into positio n
CD~ page 110, fig . 110.
- Press the lever in the
0 or O di rec tion to increase or
d ecr eas e y our sp eed.
- Release the lever to save t hat spe ed .
Thi s fu nction makes it possible, for example, to save the speed yo u
w ant befo re drivi ng on the highway . Once on t he highw ay, act ivate
the cruise contro l by pu lling the leve r toward
(D . •
Vehicle care Technical data
Page 115 of 320
On the road -
----------------
[I) Tips
The wa rn in g/i nd ic a tor light I in the inst rument cluste r comes on in
the event of a malfunction. Drive to the closest authorized Audi
dealer as soo n as possi ble and have the malfunction rep air ed. •
Controls and equip
ment Safety first
Vehicle care Technical data
Page 117 of 320
Transmission Ill
----------------
S tronic transmission
Applies to veh icles: w ith S tron ic ®
Introduction
Your vehicle is equipped with a S tronic transmission, also called a
double-clutch system/transmiss ion.
Power is transferred between the engine and the transm ission by
means of two independent clu tches. They replace the torq ue
converter of conventional automat ic transmiss ions and allow the
vehicle to a cce le rate witho ut a no ticeable b reak in the powe r flow .
With the a id of tiptroni c, the gears can optionally be shifted
manu
ally ~ page 119 . •
A ppli es to ve hicles : with S tro nic ®
Selector lever positions
All the selector lever positions are explained in this
section.
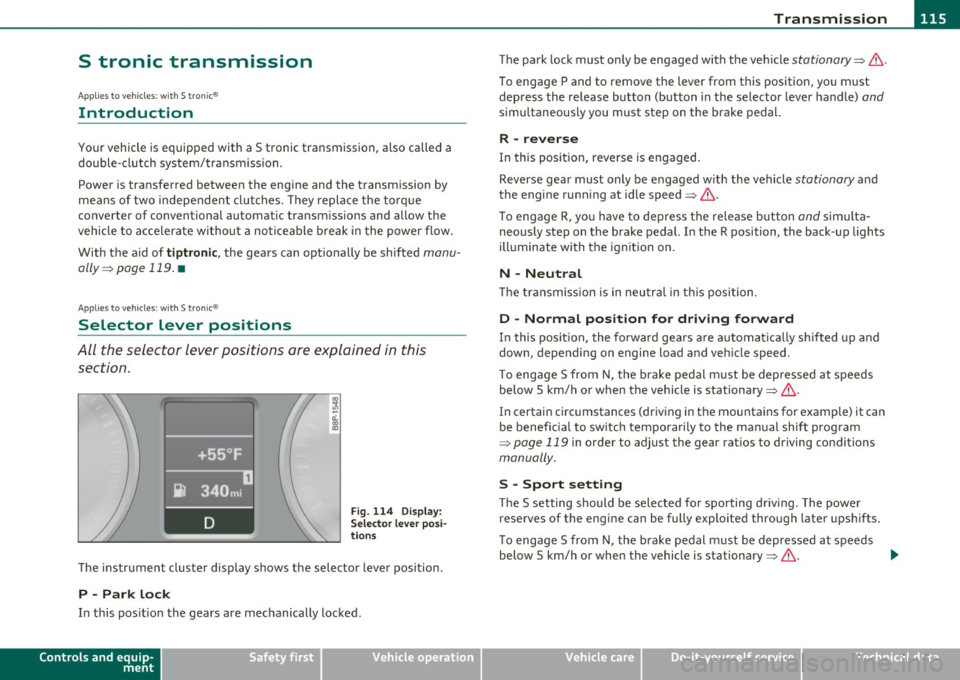
Fig. 114 D ispl ay:
Sel ect or le v er po si
t io ns
T he instr ument cluster display shows the selecto r lever position .
P -Park lock
In this pos it ion the gears are mechanically locked.
Controls and equip
ment Safety first The park
lock must on ly be engaged with the veh icle
stationary~ &.
To engage P and to remove the lever from this position, yo u m ust
depress the release bu tton (button in the selector lever handle)
and
simu ltaneously you must step on the brake pedal.
R -reverse
In this pos it ion, reverse is engaged.
Reverse gear must only be engaged with the vehicle
stationary a nd
the engine runn ing at idle speed~& .
T o engage R, yo u ha ve to dep ress t he release b utton
and s imulta
neously step on the brake pedal. In the R position, the back -up lights
ill uminate with the ign it ion on.
N -Neutral
Th e tra nsmiss ion is in neu tral in t his posi tion.
D -Normal position for driving forward
In this pos it ion, the forward gea rs a re a utoma tic a lly s hif ted up and
down, depending on engine load and ve hicle speed.
T o engage S from N, the brake pedal m ust be depressed at speeds
below 5 km/h or when the vehicle is stationary~&.
In certain circ umstances (driving in the mountains for example) it can
be benefic ia l to sw itc h t emporar ily to the ma nual shift prog ram
~ page 119 in order to adjust the gear rat ios to driving conditions
manually.
S -Spo rt setting
Th e S setting should be selected fo r spo rting dr iv ing. The power
reserves of the engine can be fully exploited through later upshifts .
T o engage S from N, the b rake pedal m ust be depresse d at speeds
below 5 km/h or when the vehicle is stationary~&. .,_
Vehicle care Technical data
Page 119 of 320
____________________________________________________ T _r_a _n_ s_m _ i_s _s_ i_ o _ n _ ___.fflll
The selector lever lock is effective only when the vehicle is stationary
and at speeds below 5 km/h. At highe r speeds, the lock in the N posi
tion is automatically switched off.
The selector lever is not locked when rapid shifts are made through
the N position (e.g . from R to D) . T h is allows you to "rock" the vehicle
if it becomes stuck. If the lever is in the N position for more than
1 second with the brake pedal not depressed, the selector lock
engages automatically.
Release button
The release button in the selector lever handle prevents accidental
shifts into certain selector lever pos itions. When you press the
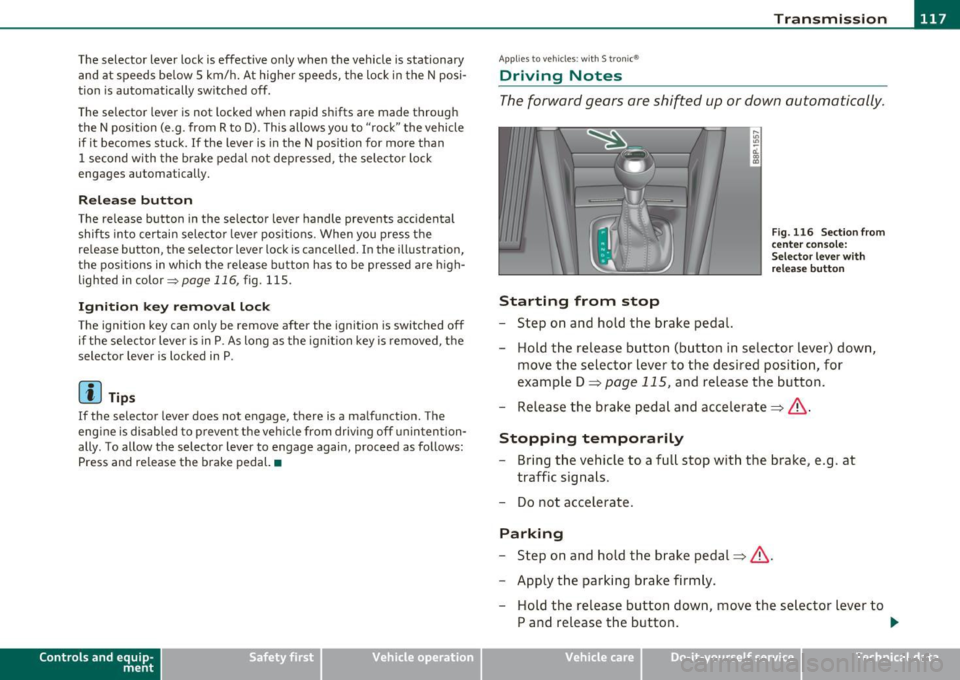
release button, the selector lever lock is cancelled. In the illustration,
the positions in which the release button has to be pressed are h igh
lighted in color::::>poge
116, fig . 115 .
Ignition k ey remo val l ock
The ignition key can only be remove after the ignition is switched off
if the selector lever is in P. As long as the ignit ion key is removed, the
selector lever is locked in P.
[ i ) Tips
If the selector lever does not engage, there is a malfunction . The
eng ine is disabled to prevent the vehicle from driv ing off unintention
ally. To allow the selector lever to engage again, proceed as follows:
Press and release the brake pedal.•
Contro ls a nd e quip
m en t Vehicle
OP-eration
Applies to vehicles : w ith S tronic®
Driving Notes
The forward gears are shifted up or down automatically .
Starting from stop
-Step on and hold the brake pedal.
Fig. 116 Section from
ce nter conso le:
Selector lever with
r elease button
- Hold the release button (button in selector lever) down,
move the selector lever to the desired position, for
example D =:;,
page 115, and relea.se the button.
- Release the brake pedal and accelerate=:;,& .
Stopping temporarily
-Bring the vehicle to a full stop with the brake, e.g . at
traffic signals.
- Do not accelerate .
Parking
-Step on and hold the brake pedal=:;,&.
- Apply the parking brake firmly.
- Hold the release button down, move the selector lever to
P and release the button. .,.
Vehicle care Do-it-yourselt service iTechnical data
Page 121 of 320
____________________________________________________ T _r_a _n_ s_m _ i_s _s_ i_ o _ n_---J_
& WARNING
Hill D escent Assist cannot overcome physical limitations, so it
m ay not be possible to maint ain a c onstant vehicle speed under all
circum stances . Always be re ady to apply the brakes. •
Applie s to v ehicles: w ith S tron ic ®
tiptronic operation
Tiptronic allows the driver to shift gears manually.
Con tro ls a nd e quip
m en t
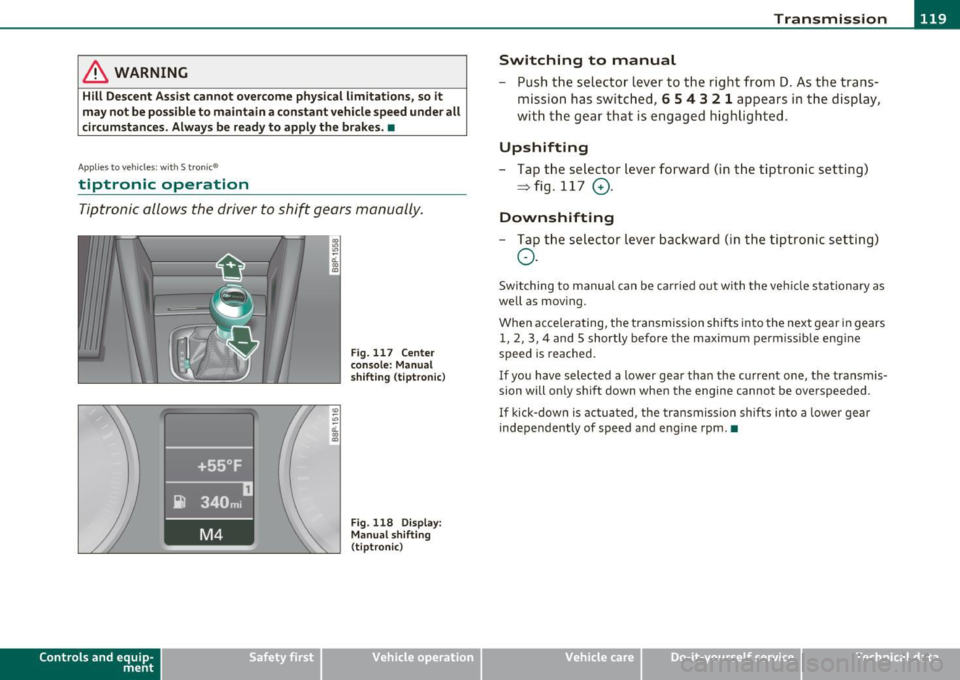
Fig . 11 7 Ce nter
con sole : Manual
s hift ing (tiptronic )
Fig. 118 Dis play:
Man ual shifti ng
( tiptr oni c)
Vehicle OP-eration
Switching to manual
-Push t he selector lever to t he righ t from 0 . As t he trans
mission has switc hed ,
6 5 4 3 2 1 appears in the d isplay,
with th e gear that is engaged h ig hligh ted.
Upshifting
-Tap t he se lector lever forward ( in t he t iptronic setting)
~ fig .117 0.
Downshifting
-Tap the sele ctor l ever bac kwar d (in th e tiptr oni c sett ing)
o .
Swi tching to manual can b e ca rried o ut with th e ve hicle sta tionary as
well as mov ing.
Whe n acce le ra ting, the t ransmission shifts into the next gear in gears
1 , 2, 3, 4 and 5 shortly before the maximum perm issib le eng ine
speed is reached.
If you h ave se lect ed a lower ge ar than the c urrent one, the tr ansmis
sion will only shift down when the engine cannot be overspeeded.
If kick-down is ac tua ted, the tra nsmiss io n sh ifts into a lowe r gear
inde pendently of speed and e ng ine rpm .•
Vehicle care Do-it-yourselt service iTechnical data
Page 123 of 320
Transmission -_____________ _.;..____;_~~
-With your ri ght foot, step on the accelerator to the wi de
open t hrottle positio n or Kickdown . The engine speed
settles at about
3,200 rpm.
- Take your left foot o ff the brake.
& WARNING
• Always adapt your driving to the traffic flow.
• Only use Launch Control when road and traffic condition s allow
it and other dri ver s will n ot be endangered or annoyed by your
driving and the acceleration of the vehicle.
• Make sure that ESP remains enabled . With the ESP disabled,
the vehicle could brake awa y, particula rly on a slick and slippery
road -risk of skidding!
• Once a cceleration i s fin ished , switch ASR on again by briefl y
pushing the ESP button. •
Applie s to v ehic le s: wit h S tron ic ®
Back-up program
In the event of a system malfunction, there is an back -up
program.
I n the even t of system ma lfunct ion, the automati c transmis sion
switches to the fail-safe mode. All of the se lector lever posit ion
displays fo r the automat ic transmiss ion are hi ghligh ted with a ligh t
background in the instrument cluster display . In some cases you
canno t drive in the reverse gear a ny mo re.
If the transmiss ion sw itc hes to fa il-safe mode, you should take the
vehicle to an authorized Aud i dealership as soon as possible to have
the cond itio n corrected. •
Contro ls a nd e quip
m en t Vehicle
OP-eration
Applies to veh icles : w ith S t ron ic ®
Emergency release for selector lever
If the vehicle's power supply fails, the selector lever can
be released in an emergency .
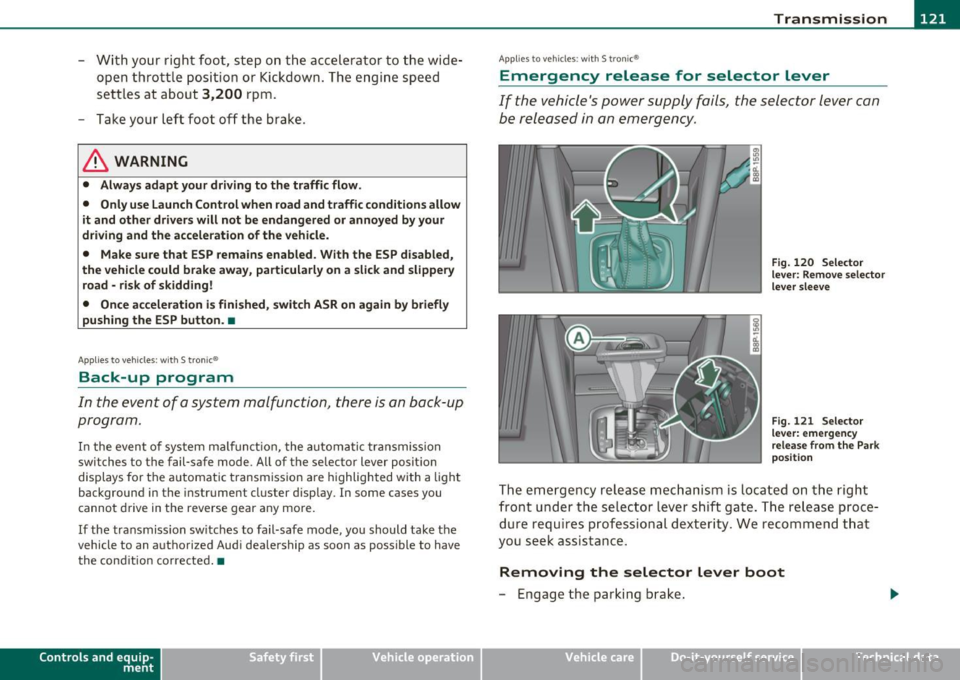
Fig. 120 Selector
le ve r: R em ov e se le ct or
l e ve r sleev e
Fig. 12 1 Selector
l e ve r: em ergen cy
relea se fro m the P ark
p os iti on
The em ergency release m echanism is loca ted on th e right
front u nder the se lector lev er shift gate . The re lease p roc e
dure requ ires profess ional dext eri ty. We recommend t hat
you seek assis tance.
Removing the selector Lever boot
- Engage the par king bra ke.
Vehicle care Do-it-yourselt service iTechnical data