instrument cluster AUDI S3 2012 User Guide
[x] Cancel search | Manufacturer: AUDI, Model Year: 2012, Model line: S3, Model: AUDI S3 2012Pages: 280, PDF Size: 70.11 MB
Page 42 of 280
40 Opening and closing
Rear power locking switch
There is also a power locking switch in the
rear center console for passengers sitting in
the rear.
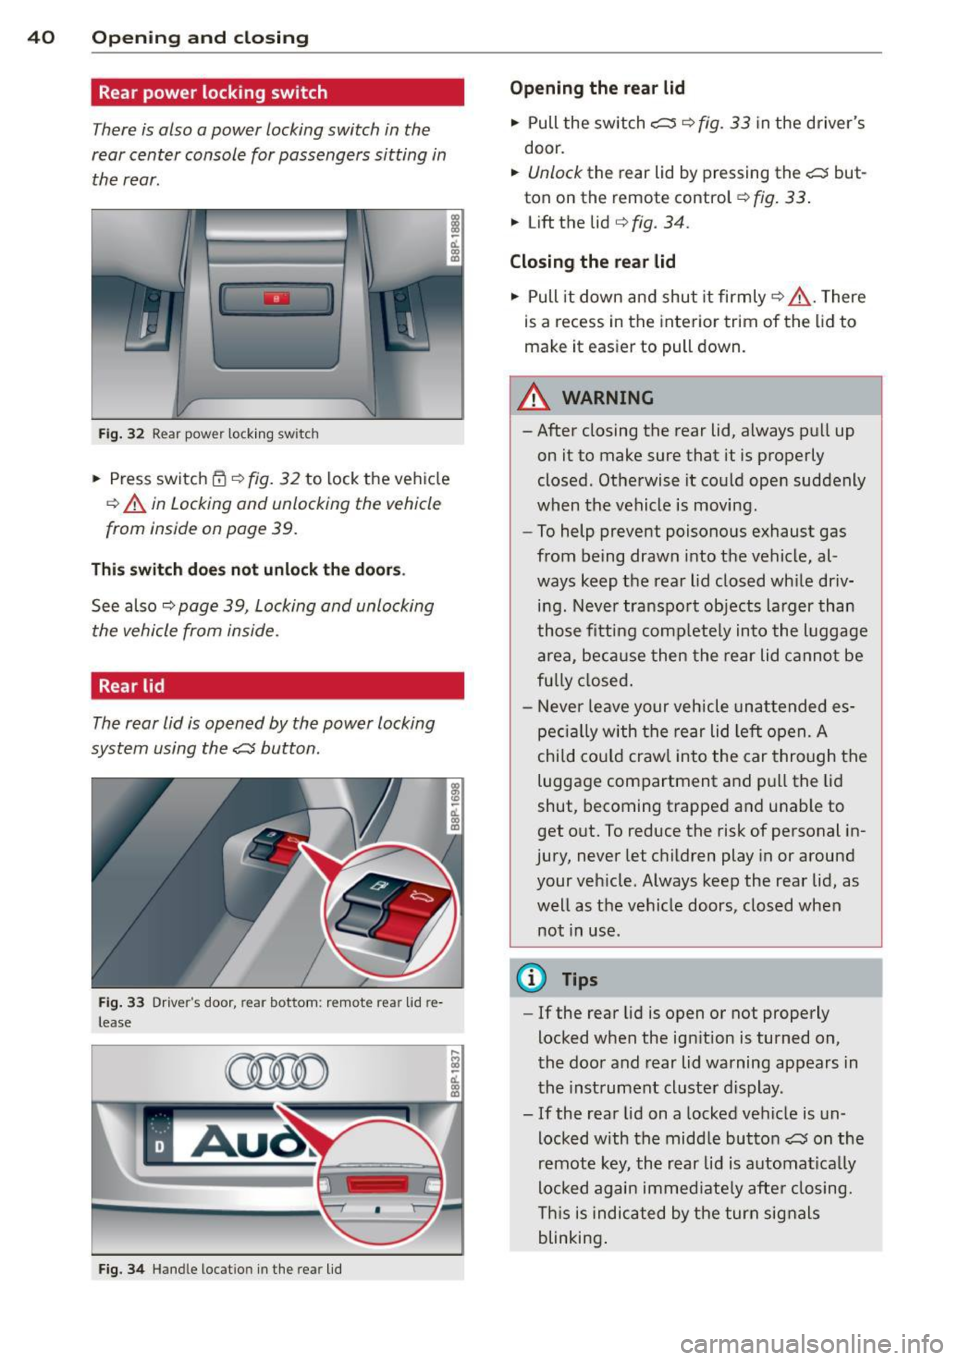
Fig. 32 Rear power locking switch
.. Press switch~¢ fig. 32 to lock the vehicle
¢ A in Locking and unlocking the vehicle
from inside on page 39.
This switch does not unlock the doors.
See also ¢ page 39, Locking and unlocking
the vehicle from inside.
Rear lid
The rear lid is opened by the power locking
system using the
c:J button.
Fig. 33 Driver 's door, rear bottom: remote rear lid re
lease
Fig. 34 Hand le locat ion in the rear lid
,...
!:I -ct. co
.. Pull the switch i;:;:::::::5 ¢ fig. 33 in the driver's
door.
.. Unlock the rear lid by pressing the c:J but-
ton on the remote control
Q fig. 33 .
.. Lift the lid ¢ fig. 34.
Closing the rear lid
.. Pull it down and shut it firmly¢ A . There
is a recess in the interior trim of the lid to
make it easier to pull down.
A WARNING
-
-After closing the rear lid, always pull up
on it to make sure that it is properly
closed. Otherwise it could open suddenly
when the vehicle is moving.
- To help prevent poisonous exhaust gas
from being drawn into the vehicle, al
ways keep the rear lid closed while driv
ing. Never transport objects larger than
those fitting completely into the luggage
area , because then the rear lid cannot be
fully closed.
- Never leave your vehicle unattended es
pecially with the rear lid left open. A
child could crawl into the car through the
luggage compartment and pull the Lid
shut, becoming trapped and unable to
get out. To reduce the risk of personal in
jury, never let children play in or around
your vehicle. Always keep the rear lid, as
well as the vehicle doors, closed when not in use.
(D Tips
-If the rear lid is open or not properly
locked when the ignition is turned on,
the door and rear lid warning appears in
the instrument cluster display.
- If the rear lid on a locked vehicle is un
locked with the middle button
c:J on the
remote key, the rear lid is automatically
locked again immediately after closing.
This is indicated by the turn signals
blinking.
Page 51 of 280
:l:D Front fog lights
Use the light switch to turn on the front fog
lights.
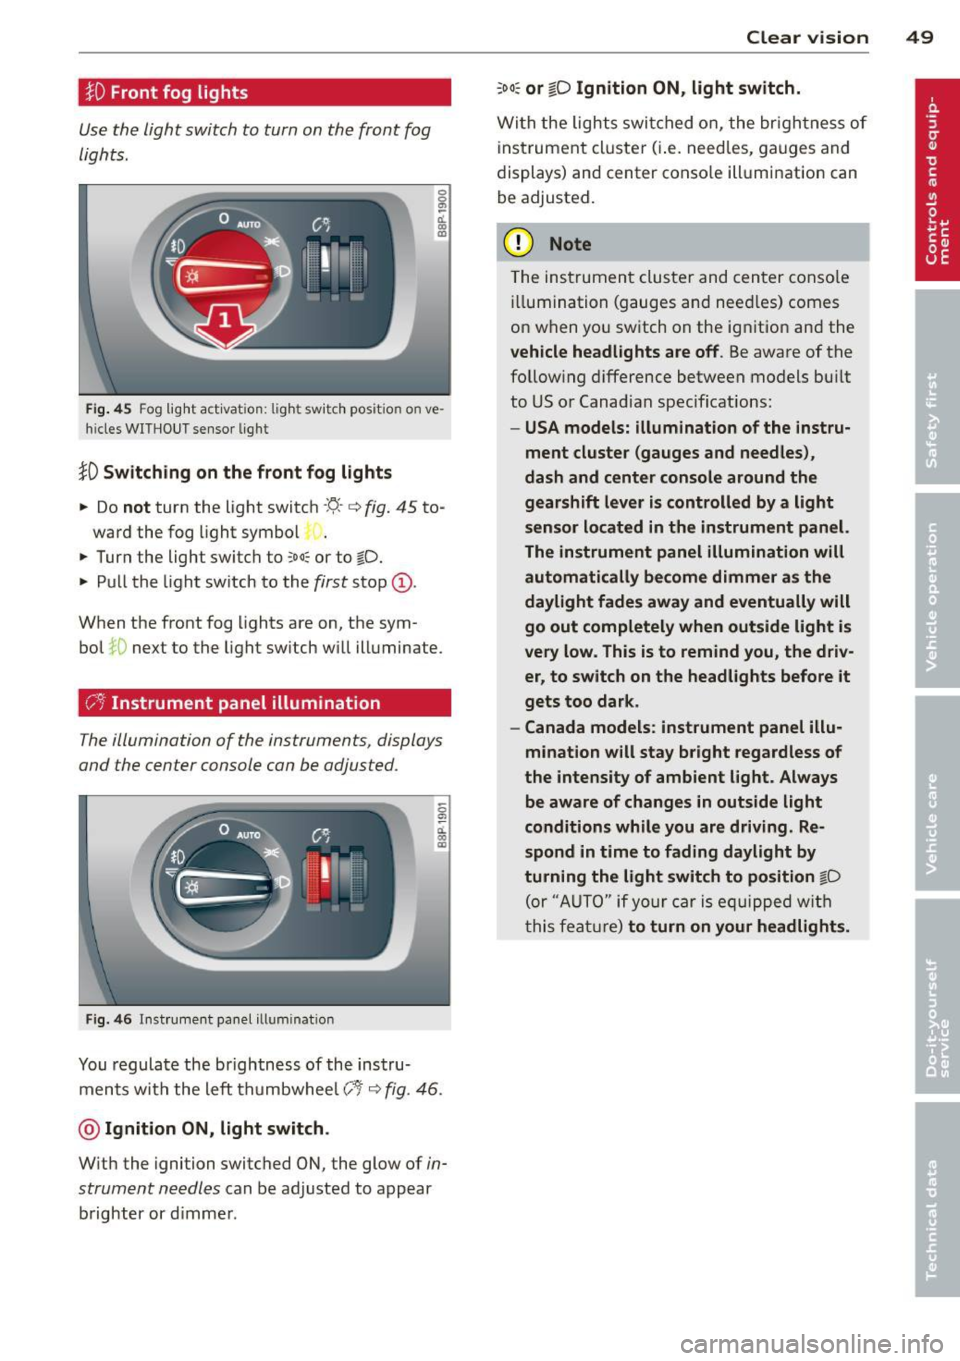
Fig. 45 Fog light act ivat ion: light sw itc h pos it ion o n ve
h icles WITHO UT sensor light
}D Switching on the front fog lights
.. Do not turn the light switch -"t;.. -<=> fig. 45 to-
ward the fog light symbol
.. Turn the light switch to
coo: or to @:D.
.. Pull the light switch to the first stop (D.
When the front fog lights are on, the sym
bol
:iO next to the light switch will illuminate.
C:t:t Instrument panel illumination
The illumination of the instruments, displays
and the center console can be adjusted .
Fig. 46 In st rum ent pa nel illum inat ion
0
"' d. .. m
You regulate the brightness of the instru
ments with the left thumbwhee l
Co/<=> fig. 46 .
@ Ignition ON, light switch.
With the ignition switched ON, the glow of in
strument needles
can be adjusted to appear
brighter or d immer.
Clear vision 49
:oo: or io Ignition ON, light switch.
With the lights swit ched on, the brightness of
instrument cluste r (i.e. needles, gauges and
displays) and center console illumination can
be adjusted.
(D Note
The instrument cluster and center console
ill umination (gauges and need les) comes
on when you switch on the ignition and the
vehicle headlights are off . Be aware of the
follow ing difference between models built
to US or Canadian specifications:
-USA models: illumination of the instru
ment cluster (gauges and needles),
dash and center console around the
gearshift lever is controlled by a light
sensor located in the instrument panel.
The instrument panel illumination will
automatically become dimmer as the
daylight fades away and eventually will
go out completely when outside light is
very low. This is to remind you, the driv
er, to switch on the headlights before it
gets too dark.
- Canada models: instrument panel illu·
mination will stay bright regardless of
the intensity of ambient light. Always be aware of changes in outside light
conditions while you are driving. Re
spond in time to fading daylight by
turning the light switch to position
gD
(or "AUTO " if your car is equipp ed with
th is feature)
to turn on your headlights.
Page 52 of 280
50 Clear vis ion
Emergency flasher
The emergency flasher makes other motorists
aware that you or your vehicle are in an emer
gency situation .
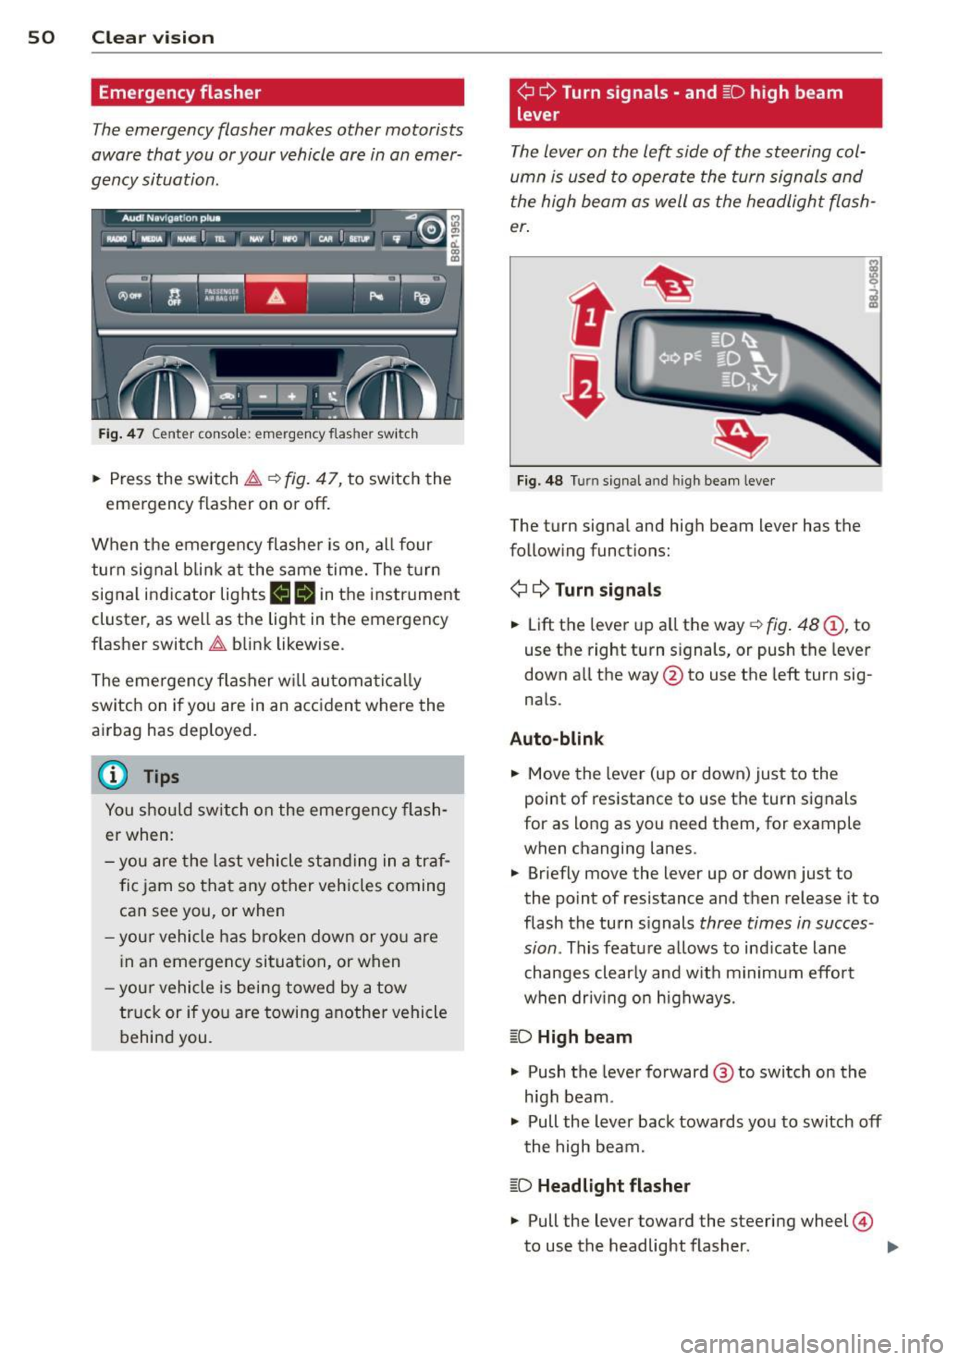
Fig. 47 Center console: emergency flasher switch
.. Press the switch ~ c:> fig. 47, to switch the
emergency flasher on or off.
When the emergency flasher is on, a ll four
turn signal b link a t the same time. The t urn
signal indicator lights
liliN in the instrument
cluster, as we ll as the light in the emergency
f lasher switch ~ blink likewise .
The emergency f lasher w ill automa tica lly
switch on if you are in an accident where the
ai rbag has deployed.
(D} Tips
You shou ld switch on the emergency flash
er when:
- you are the last vehicle st anding in a tr af
fic jam so that any other veh icles coming
can see you, or when
- you r vehicle has broken down or yo u are
i n an emergency situation, or when
- you r vehicle is being towed by a tow
truck or if yo u are towing a nothe r vehicle
behind you.
¢ Q Turn signals - and ~D high beam
lever
The lever on the left side of the steering col
umn is used to operate the turn signal s and
the high beam as well as the headlight flash
er .
t
'
F ig. 48 Tu rn signal and high beam lever
The turn signal and high beam lever has the
following functions:
¢ Q Turn signals
.. Lift the lever up a ll the way c:> fig. 48 (D , to
use the right turn signals, or push the leve r
down all the way @to use the left turn sig
nals.
Auto -blin k
.. Move the lever (up or down) just to the
point of resistance to use the turn signals
for as long as you need them, for example
when changing lanes.
.. Briefly move the lever up or down just to
the point of resistance and then release it to
flash the turn s ignals
three times in succes
sion .
This featu re allows to ind icate lane
changes clearly and w ith minimum effo rt
when driv ing on highways.
~D High beam
.. Push the lever forward @ to switch on the
h igh beam .
" Pull the lever back towards you to switch off
the high beam.
~D Headlight flasher
" Pull the lever toward the steering wheel@
to use the headlight flasher. ..,_
Page 53 of 280

Notes on these featur es
- The turn signals only work with t he ignition
switched on. The indicator lights
B or IN in
the instrument cluster¢
page 13 also b link.
- After yo u have turned a corner, the turn sig-
nal switches off a utomatica lly.
- The
high beam works only when the head
lights are on. The indicato r light
II in the
instrument cluster illuminates when the
high beams a re on.
- The
headlight flasher wo rks only as long as
you hold the lever -even if there are no
lights switched on. The indicator light
II in
the instrument cluster illuminates when you
use the headlight f lasher.
(D Note
Do not use the high beam or headlight
flasher if you know that these could be
blind ing oncoming traffic.
Interior lights
Interior lights and glove compartment
light
The interior lights include the both reading
lights for the driver and the front passenger.
............. ...... ... ........... ... J :·:::: ::::::::: : :: :::::::::::: . :: : .. :: ::::::::···· .......... ::::::::: :: ::: :! mmr ·::::m :: mu
... mmi ~ mim g gm,
II IIGI II
Fig. 49 Control pa nel above winds hield : interior light
switches
L ight switch¢ fig. 49 has the follow ing func
tions:
Door cont act activation
• Move the sw itch to the center pos it io n. The
forward dome light is turned on/off by the contact switches on any of the doors.
Clear vi sion 51
Forward dome light on
• Move the swit ch to position I. The forwa rd
dome light goes on and stays on regardless
of door position.
Forward dome light off
• Move the swi tch to position 0 . The light will
no t go on regard less of door position .
Glove compartment light
• Open the glove compartment -the light in
the glove compartment automatically illu
m inates as long as the side marker lights or
head lights are on. When you close the glove
compa rtme nt, the light goes off.
Wi th the interio r light sw itch at the door con
tact (center) posit ion, the forward dome light
i ll uminates whenever you u nlock the veh icle
or open a door. The dome ligh t goes out after
approximately 30 seconds after you have
closed the door . Likewise, when you lock your
vehicle or switch on the ignition, the dome
li ght goes out.
If you leave a door open, the dome light w ill
go out after ten minutes to conserve battery
charge.
A d immer automa tica lly contro ls t he b rig ht
ness of the lights when they a re switche d on .
Interior lights and forward reading
lights
App lies to vehicles: wit h lig ht pac kage
The interior lights include the both reading
lights for the driver and the front passenger.
• •
Fi g. 50 Control panel above w inds hield: inter ior ligh t
switc hes
0 0 ....
~ CJ) a,
Page 96 of 280
94 On the road
Cruise control
Switching the system on
The cruise control system makes it possible to
drive at a constant speed starting at 20 mph (30 km/h) .
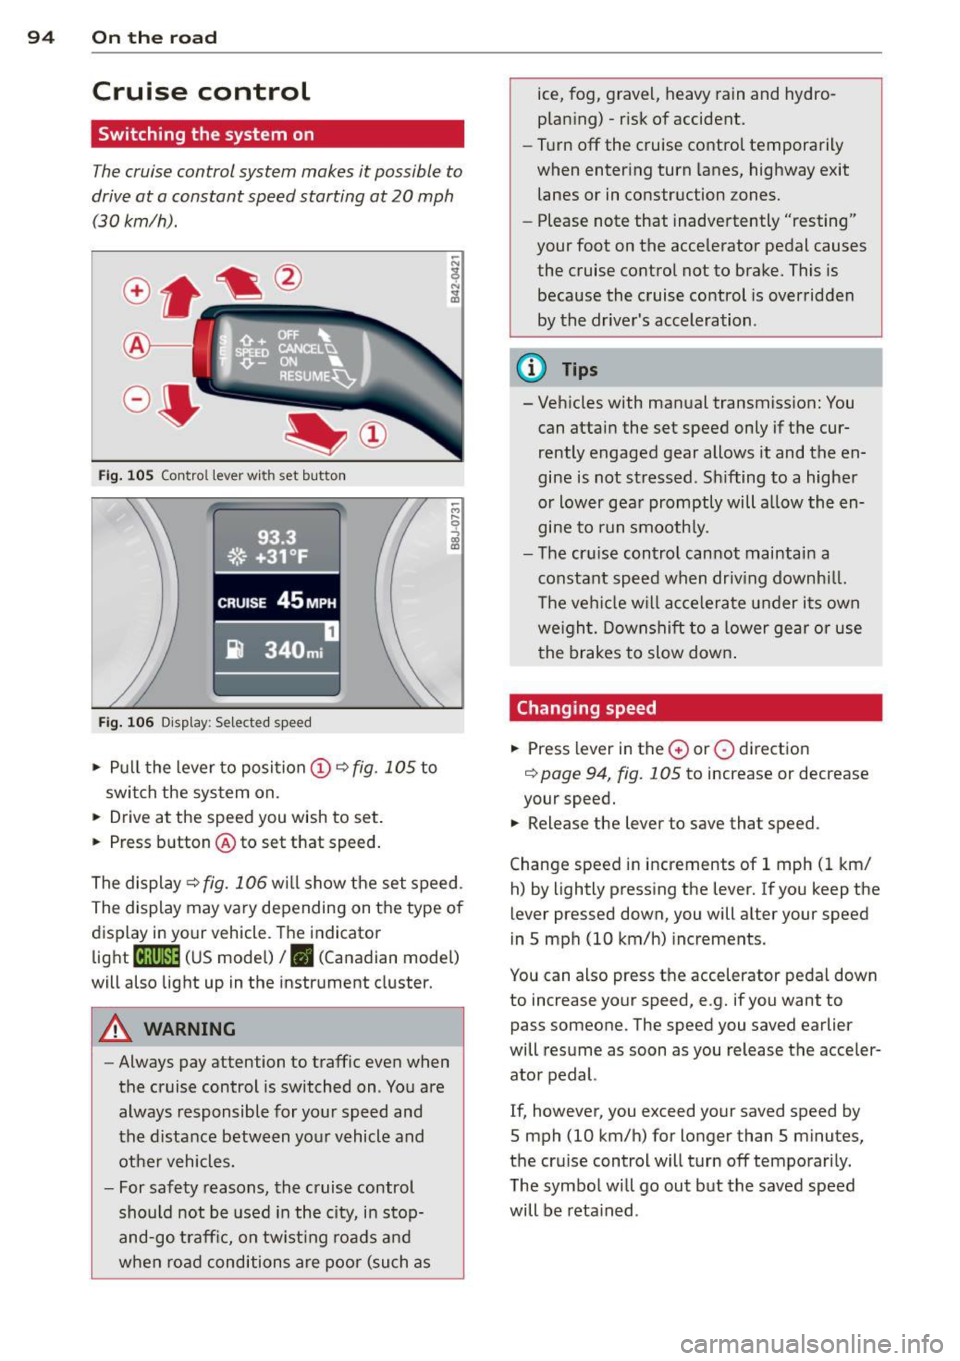
Fig. 105 Control lever wi th set button
Fi g. 106 Disp lay: Se lected speed
• Pull t he lever to posi tion (D ¢ fig . 105 to
switch the sys tem on.
• Drive at the speed you wish to set .
• Press b utton @ to set that speed .
The display
¢fig. 106 will show the set s peed .
The display may v ary depending on t he type o f
display in yo ur vehicle. The indicator
light
[ifj11 )~1~ (US mode l) I. (Canadian mode l)
will also light up in the instrument cluster.
A WARNING
- Always pay attention to traffic even when
the cruise control is switched on . You are
always responsible for your speed and
the distance between yo ur vehicle and
othe r vehicles .
- For safety reasons, the c ruise control
sho uld not be used in the city, in stop
and -go traff ic, on twist ing roads an d
when ro ad conditions are poo r (such as ice,
fog, gravel, heavy rain and hydro
plan ing) -risk of accident.
- Turn off the cruise contro l temporarily
when enter ing turn lanes, highway exit
lanes or in construction zones.
- Please note that inadvertently "resting"
your foot on the accelerator pedal causes
the cruise co ntrol not to brake. This is
because the cruise control is over ridden
by the dr ive r's acceleration.
(D Tips
- Veh icles with man ual transmiss ion: You
can attai n the set speed only if the cur
rently engaged gear allows it and the en
gine is not stressed . Sh ifting to a highe r
o r low er gea r promptly will a llow the en
gine to r un smooth ly.
- The cr uise control can not mainta in a
constant speed when driv ing downhi ll.
T he vehi cle w il l accele rate under i ts own
we ight. Dow nshift to a lower ge ar or use
the brakes to slow down .
Changing speed
• Press lever in the 0 or 0 direct io n
¢ page 94, fig. 105 to increase or decrease
your speed.
• Release the lever to save that speed .
Change speed in increments of 1 mph (1 km/
h) by lightly pressing the lever. I f you keep the
lever pressed down, you will alter your speed
in S mph (10 km/h) increments.
You can also press t he accelerator pedal down
to increase your speed, e.g. if you want to
pass someone. The speed you saved earlier
will resume as soon as you release the acceler
ator pedal.
If, however , you exceed yo ur saved speed by
5 mph (10 km/h) for longer than 5 minutes,
the cru ise control will turn off temporari ly.
T he symbo l will go out but the saved speed
will be reta ined .
Page 98 of 280
96 Transmis sion
Transmission
Manual transmission
Gearshift lever
Applies to vehicles: with manual transmission
The clutch pedal must be depressed all the
way before you can start the engine .
The manual transmission in your Audi is
equipped with an
interlock-feature.
• Depress the clutch pedal all the way.
• Start the engine with the gearshift lever in
Neutral and the clutch pedal depressed.
(D Note
Always depress the clutch pedal fully when
changing gears. Do not hold the vehicle on
a hill with the clutch pedal partially de
pressed. This may cause premature clutch
wear or damage .
@ Tips
-Resting your hand on the gearshift lever
knob while driving will cause premature
wear in the transmission.
- The back-up lights go on when you shift
i nto Reverse with the ignition on.
Gearshift pattern (6-speed manual
transmission)
Applies to vehicles: with 6-speed manual transmission
Fig. 108 Gearshift pattern: 6 -speed manual t ransmis
sion
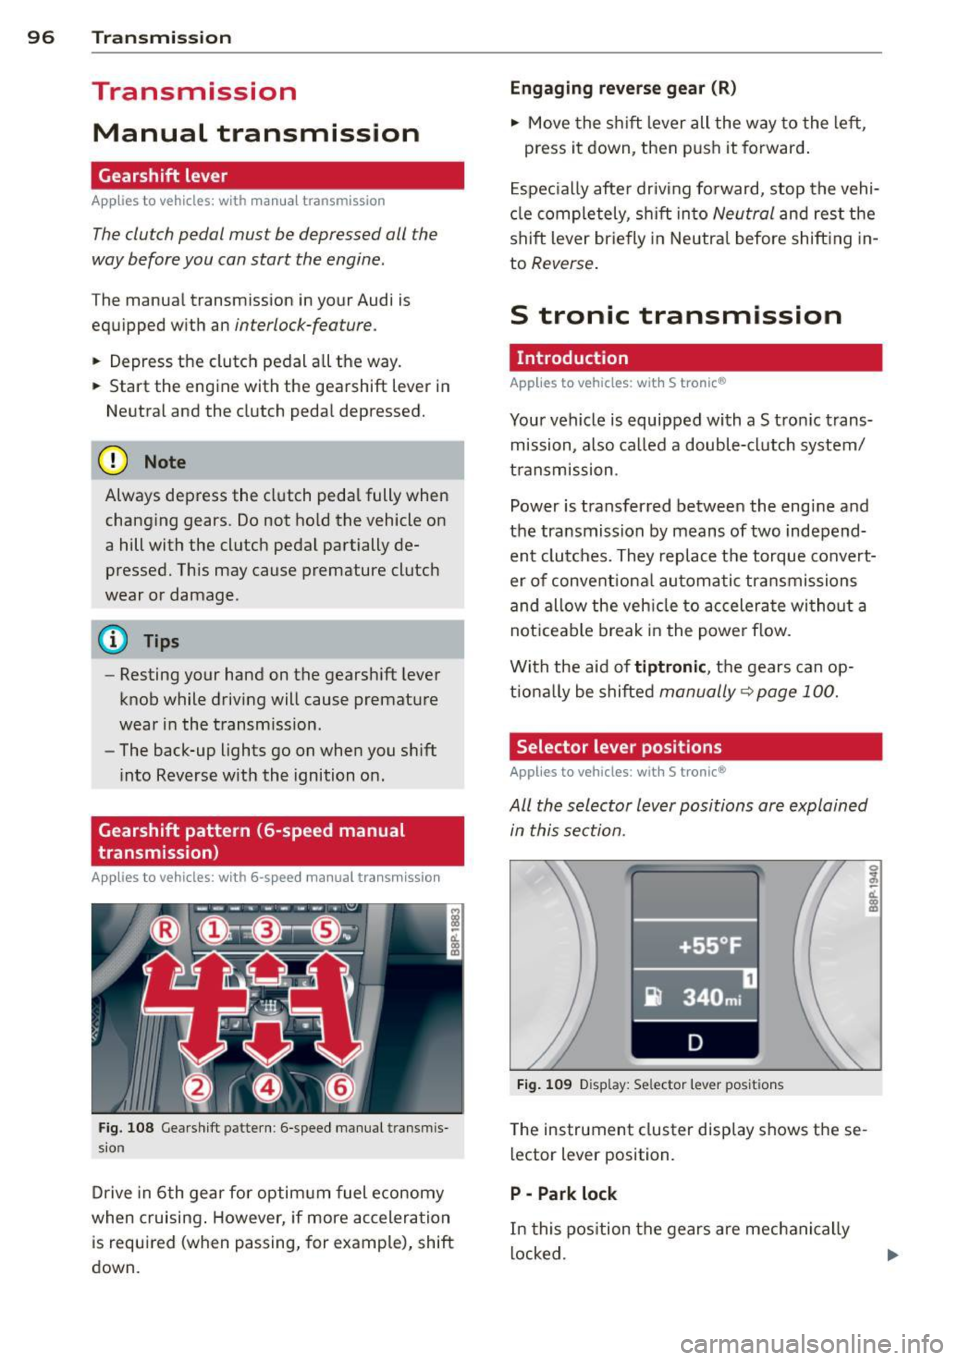
Drive in 6th gear for optimum fuel economy
when cruising . However, if more acceleration
is required (when passing, for example), shift
down.
Engaging reverse gear (R)
• Move the shift lever all the way to the left,
press it down, then push it forward.
Especially after driving forward, stop the vehi
cle completely, shift into
Neutral and rest the
shift lever briefly in Neutral before shift ing in
to
Reverse.
S tronic transmission
· Introduction
Applies to vehicles: with S tronic®
Your vehicle is equipped with a S tronic trans
mission, also called a double-clutch system/
transmission .
Power is transferred between the engine and
the transmission by means of two independ ent clutches. They replace the torque convert
er of conventiona l automatic transmissions
and allow the vehicle to accelerate without a
not iceable break in the power flow.
With the aid of
tiptronic, the gears can op
t ionally be shifted
manually ~ page 100.
Selector lever positions
Applies to vehicles: with S tronic®
All the selector lever positions are explained
in this section.
~-. -·~•-~ _ .. _....,-l
•+55 °F '
i} 340 mi
D
Fig. 109 Disp lay: Se lector lever posi tions
The instrument cluster display shows these
lector lever position.
P -Park lock
In this position the gears are mechanically
locked.
Page 103 of 280
@ Tips
With the gear selector lever in either "D"
or "S" the transmiss ion will sw itch back to
the automatic mode if you do not use the paddles within approx. 30 seconds.
Kick-down feature
Applies to vehicles: with S tronic®
The kick-down feature allows maximum ac
celeration .
If you depress the accelerator pedal fully be
yond the full-thrott le position, the transmis
sion automatically downshifts one gear, de pending on vehicle speed and engine rpm. The
upsh ift into the next higher gear takes place
as soon as the max imum specified engine
speed is reached.
A WARNING
Please note that the drive wheels can spin
if the kick-down is used on a smooth s lip
pery road -ris k of skid ding!
Launch Control Program
Applies to vehicles: with Launch Control and S tronic® and
Gasoline engine only
The Launch Control Program permits maxi
mum acceleration .
In order to use launch Control, the ASR (Anti
Slip Regulation) must be disabled. When ASR is disabled, the ESP warning/ind icator
light
G1 in the instrument cluste r illuminates .
So that la unch Control ca n be used, the en
g ine must be at ope rating temperature a nd
the steer ing wheel mus t not be tu rned.
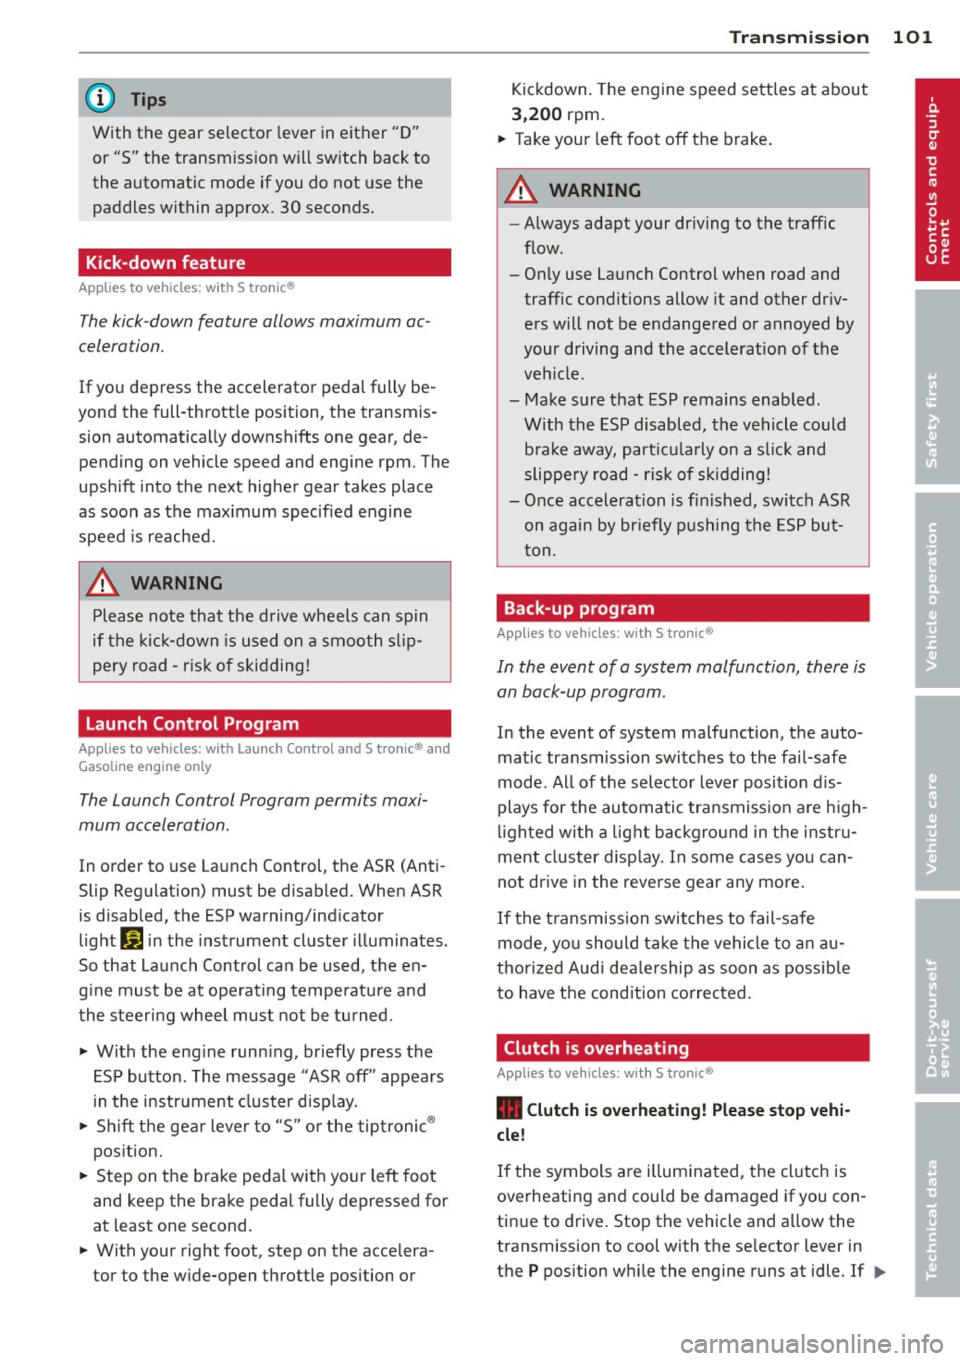
... With the eng ine run ning, briefly press the
ES P bu tton. The message "ASR off" appea rs
in the instrument cluster d isp lay.
... Sh ift th e gea r lever to "5" or the tip tronic ®
pos it ion.
... Step on t he b rake peda l w it h your left foot
and keep the brake peda l fully depressed for
at least one second.
... With your right foot, step on the accelera
tor to the w ide-open throttle position o r
Transm iss ion 10 1
Kickdown. The engine speed sett les at about
3 ,200 rpm.
... Take your left foot
off the b rake .
A WARNING
-Always adapt your dr iving to the traffic
f low.
- On ly use launch Control when road and
traffic cond itions allow it and other dr iv
ers will not be endangered or annoyed by
your driving and th e acce le rat ion of the
veh icle.
- Ma ke sure that ESP remains enab led.
W ith the ESP disabled, the vehicle could
brake away, part icu la rly on a s lick and
slippe ry r oad - ri sk of s kidding!
- Once acceleration is finished, switch ASR
on again by br iefly pushing t he ESP but
ton.
Back-up program
Applies to vehicles: with S tronic®
-
In the event of a system malfunction, there is
an back-up program.
In the event of system malfunction, the auto
matic transmission switches to the fa il-safe
mode . All of the selecto r lever posi tion d is
plays for the au toma tic tra nsmission a re high
li gh ted wi th a ligh t background in t he i nstr u
ment cluster d isp lay . In some cases yo u can
not drive in the reve rse gear any more .
If the t ransmission swit ches to fail-safe
mode, yo u should ta ke the ve hicl e to an a u
thorized Aud i dea le rship as soon as possib le
to have the condition corrected.
Clutch is overheating
Applies to vehicles: with S tronic®
• Clutch is overheating! Please stop vehi
cle!
If the symbols are i llum ina ted, the clutch is
ove rheati ng and could be dama ged if you con
tin ue to drive . Stop the vehicle and a llow the
transmission to cool with the se lector lever in
the
P position w hile the engine runs at idle . If Iii-
Page 115 of 280
Safety belts
General notes
Always wear safety belts!
Wearing safety belts correctly saves lives!
This chapter explains why safety belts are nec
essary, how they work and how to adjust and
wear them correctly.
~ Read all the information that follows and
heed all of the instructions and WARNINGS.
A WARNING
Not wearing safety belts or wearing them
improperly increases the risk of serious
personal injury and death.
- Safety belts are the single most effective
means available to reduce the risk of se
rious injury and death in automobile acci
dents. For your protection and that of
your passengers, always correctly wear
safety belts when the vehicle is moving.
- Pregnant women, injured, or physically
impaired persons must also use safety
belts. Like all vehicle occupants, they are
more likely to be seriously injured if they
do not wear safety belts. The best way to
protect a fetus is to protect the mother -
throughout the entire pregnancy.
Number of seats
Your Audi has a total of five seating positions:
two in the front and three in the rear. Each
seating position has a safety belt.
A WARNING
Not wearing safety belts or wearing them
improperly increases the risk of serious
personal injury and death.
- Never strap more than one person, in
cluding small children, into any belt. It is
especially dangerous to place a safety
belt over a child sitting on your lap.
- Never let more people ride in the vehicle
than there are safety belts available.
Safety belts 113
-Be sure everyone riding in the vehicle is
properly restrained with a separate safe
ty belt or child restraint.
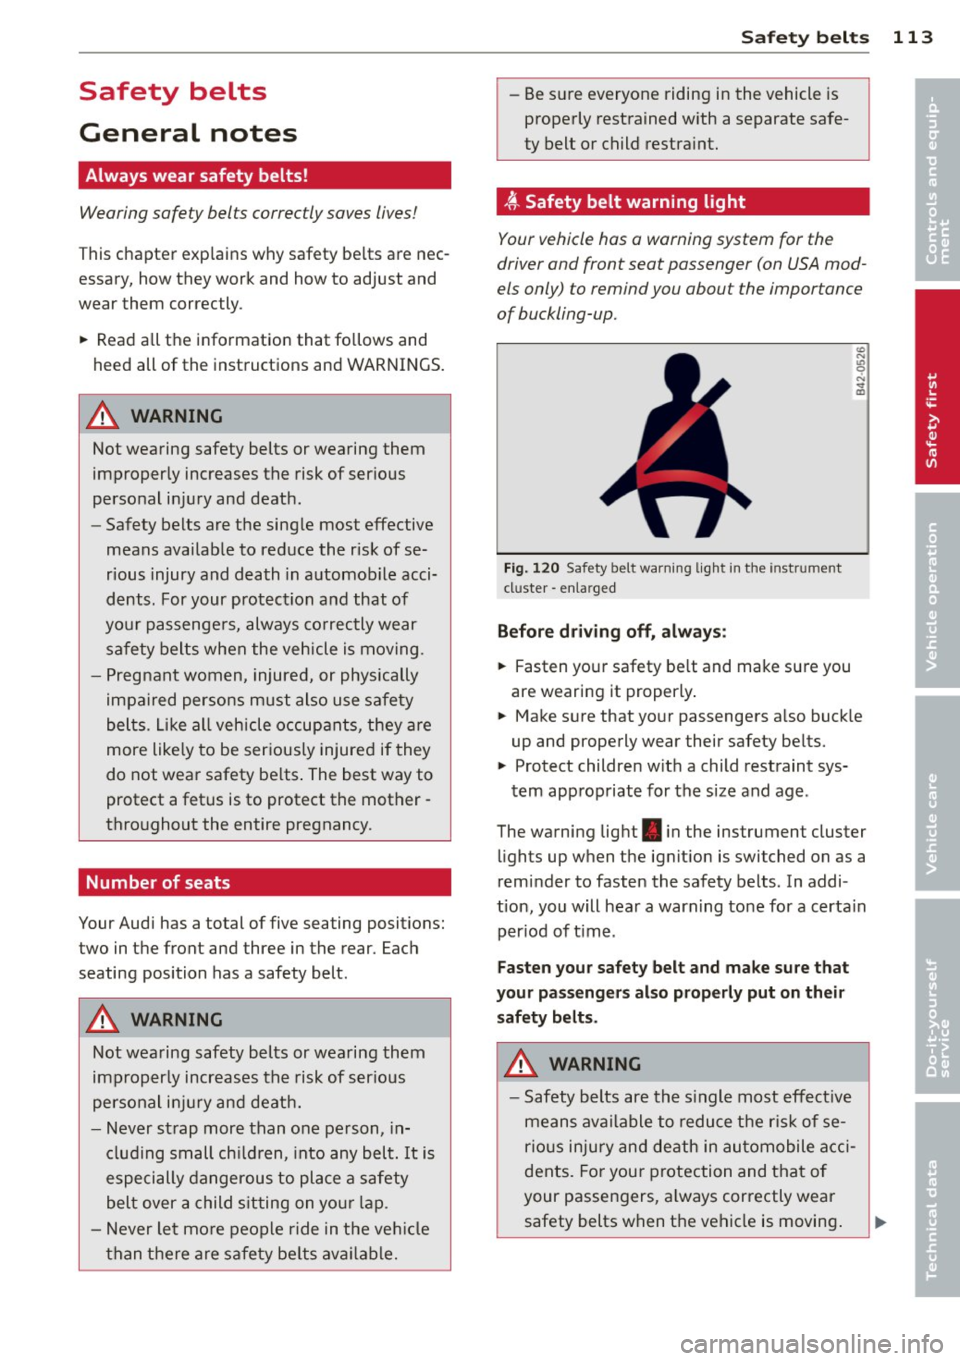
~ Safety belt warning light
Your vehicle has a warning system for the
driver and front seat passenger (on USA mod
els only) to remind you about the importance
of buckling-up.
Fig. 120 Safety belt warning light in the instr ument
cl uster -enla rged
Before driving off, always:
~ Fasten your safety belt and make sure you
are wearing it properly.
~ Make sure that your passengers also buckle
up and properly wear their safety belts.
~ Protect children with a child restraint sys-
tem appropriate for the size and age .
The warning light . in the instrument cluster
lights up when the ignition is switched on as a
reminder to fasten the safety belts. In addi
tion, you will hear a warning tone for a certain period of time .
Fasten your safety belt and make sure that
your passengers also properly put on their
safety belts.
A WARNING
- Safety belts are the single most effective
means available to reduce the risk of se
rious injury and death in automobile acci
dents. For your protection and that of
your passengers, always correctly wear
safety belts when the vehicle is moving.
•
•
Page 126 of 280
124 Airbag system
Even though your vehicle is equipped with an
Advanced Airbag System, make certain that
all chi ldren, especially those 12 years and
younger, a lways ride in the back seat properly
restrained for their age and size. The airbag
on the passenger side makes the front seat a potentially dangerous place for a ch ild to ride.
The front seat is not the safest place for a
child in a forward-facing child safety seat. It
can be a very dangerous place for an infant or
a child in a rearward-facing seat.
The Advanced Airbag System in your veh icle
has been certified to comply with the require
ments of United States Federal Motor Vehicle
Safety Standard 208 as applicable at the time
your vehicle was manufactured.
The Standard requires the front a irbag on the
passenger side to be turned off ("sup
pressed") if a child up to about one year of
age restrained in one of the rear-facing or for
ward -facing infant restraints listed in Federal
Motor Vehicle Safety Standard 208 with which
the Advanced Airbag System in your vehicle
was certified has been installed on the front passenger seat . For a listing of the child re
strai nts that we re used to certify compliance
with the US Safety Standard
r=v page 145.
The PASSENGER AIR BAG OFF light in the in
strument panel te lls you when the front Ad
vanced A irbag on the passenger side has been
turned off by the e lectronic control unit.
Each t ime you turn on the ignition, the
PAS
SENGER AIR BAG OFF
light will come on for a
few seconds and:
- will stay on if the front passenger seat is not
occupied,
- will stay on if there is a small child or child restraint on the front passenger seat,
- wi ll go off if the front passenger seat is oc
cupied by an adult as registered by the
weight-sensing mat
r=v page 133, Monitor
ing the Advanced Airbag System .
The PASSENGER AIR BAG OFF light comes on
when the control un it detects a total weight
on the front passenger seat that requires the
front airbag to be turned off.
If the total weight on the front passenge r
seat is more than that of a typica l 1 year -old
chi ld but less than the weight of a small
adult, the front airbag on the passenger side
can deploy (the
PASSENGER AIR BAG OFF
light does not come on). If the PASSENGER
AIR BAG OFF
light does not come on, the
front airbag on the passenger side has not
been turned off by the electronic con trol unit
and can deploy if the control unit senses an
impact that meets the cond itions stored in its
memory .
For example, the airbag may deploy if:
-a small ch ild that is heav ier than a typical 1
year-old ch ild is on the front passenger seat
( re gard less of whether the child is in one of
the child safety seats listed
r=v page 145), or
- a child who has outgrown ch ild restraints is
on the front passenger seat.
If the front passenger airbag is turned off, the
PASSENGER AIR BAG OFF light comes on in
the instrument cluster and stays on.
The front airbag on the passenger s ide may
not deploy (the PASSENGER AIR BAG OFF
light does not illum inate and stay lit) even if a
small adult or teenager, or a passenger who is
not sitting upright with their back against a
non-reclined backrest with their feet on the
vehicle floor in front of the seat is on the front
passenger seat
r=v page 104, Proper seating
position for the driver.
If the front passenger airbag deploys, the
Federal Standard requires the airbag to meet
the "low risk" deployment criteria to reduce
the risk of injury t hroug h interaction with the
airbag. "Low risk" deployment occurs in those
crashes that take place at lower dece lerat ions
as defined in the electronic control unit
r=v page 133, PASSENGER AIR BAG OFF light .
Always remember, a child safety seat or infant
carr ier installed on the front seat may be
struck and knocked out of posit ion by the rap
idly inflat ing passenger's airbag in a frontal
collision . The air bag could greatly reduce the
effectiveness of the ch ild restraint and even
seriously injure the child during inflation .
Page 131 of 280
the forward-facing child restraint. The backrest must be adjusted to an upr ight
posit ion.
- Make sure that the
PASSENG ER AI R BA G
OFF
light comes on and stays on all the
t ime whenever the ignition is switched
on.
Advanced Airbag System components
The front passenger seat in your vehicle has a
l ot of very important parts of the Advanced
Airbag System in it. These parts include the
weight-sens ing ma t, sensors, wiring, brack
ets, and mo re. The function of the system in
the front passenger seat is checked by the
e lectronic control unit when the ignition is on .
The control unit monitors the Advanced Air bag System and turns the airbag indicator
light on when a malfunction in the system
components is detected. The function of the
airbag ind icator light is described in greater
deta il below. Because the front passenger
seat contains impo rtant parts of the Ad
vanced A irbag System, you m ust take care to
p revent it from being damaged. Damage to
the seat may prevent the Advanced Airbag for
the front passenger seat from doing its job in
a crash .
The front Advanc ed Airbag Syst em
con sis ts o f th e following :
-Crash sensors in the front of the vehicle that
measure vehicle acceleration/deceleration
to provide information to the Advanced Air bag System about the severity of the crash.
-An electronic control unit, with integrated
crash sensors for front and side impacts .
The cont ro l unit "decides" whether to fire
the front airbags based on the information r eceived from the c rash sensors. The control
unit a lso "dec ides" whet her the safety be lt
pretensione rs should be activated.
- An Advanced Airbag with gas generator for
the d river ins ide the steer ing whee l hub.
- An Advanced Airbag with gas generator in
s ide t he instr ument pane l for the front pas
senger.
A irbag system 129
- A weight-sensing mat under the upho lstery
padding of the front passenger seat cushion
that measures the total weight on the seat .
The informat ion reg istered is sent continu
ously to the electron ic control unit to regu
late deployment of the front Advanced Air
bag on the passenger side.
- An airbag monitoring system and ind icator
light in the instrument cluster
¢page 133.
-The PASSENGER AIR BAG OFF light comes
on and stays on in the center of the instru
ment panel
c:::> page 133, fig . 134 and tells
you when the front Advanced Airbag on the passe nger side has been tu rned off.
- A senso r below the safety belt latch fo r the
front seat passenger to measure the tension
on the safety be lt. T he ten sion on the safety
be lt and the weight regis tered by the
weight -sensing mat he lp the control unit
"decide" whether the front airbag fo r the
front passenger seat should be turned off or not
¢ page 123, Child restraints on the
front seat -some important things to
know.
-A sensor in the safety belt latch for the driv
er and for the front seat passenger that
senses whether that safety belt is latched or
not and transmits this information to the
electronic contro l un it .
A WARNING
D amage to the front passenger seat can
p revent the front airbag from wor king
properly.
- Imp roper repai r or d isassembly of the
fr on t passenge r and dr iver seat will pre
vent the Advanced Airbag System from
functioning p roperly.
- Repairs to the front passenger seat must
be pe rformed by qualified and p roperly
trained workshop personne l.
- Never remove the front passenger or driver seat from the vehicle .
- Never remove the upho lstery from the
front passenger seat .
- Never disassemble or remove p arts from
-
the sea t or disconnect wires from it. ..,.
•
•