AUDI S3 SEDAN 2015 Owners Manual
Manufacturer: AUDI, Model Year: 2015, Model line: S3 SEDAN, Model: AUDI S3 SEDAN 2015Pages: 282, PDF Size: 71.14 MB
Page 121 of 282
....,
N
0 > co
rl I.O
"'
"'
"'
rl
Switching on/off
Applies to vehicles: with parking system plus w it h rearv iew
camera
Switching on
• Shift into reverse, or
• Press the
P~A button in the center console
¢page 117, fig. 102. A short confirmation
tone sounds and the LED in the button turns
on.
Switching between the rearview camera and
optical display
• Press the Graphic control button ®
r::!.>page 119, fig . 108 to see the optica l display.
• Press the
Rear view contro l button to see the
rearview camera image.
Switching off
• Drive faster than 6 mph (10 km/h), or
• Press the
P,qA button, or
• switch the ign ition off.
@ Tips
The v isual display in the left pa rt of the dis
play should he lp you detect the critical veh icle
areas.
Cross parking
Appl ies to vehicles : with parking system plus with rearview
camera
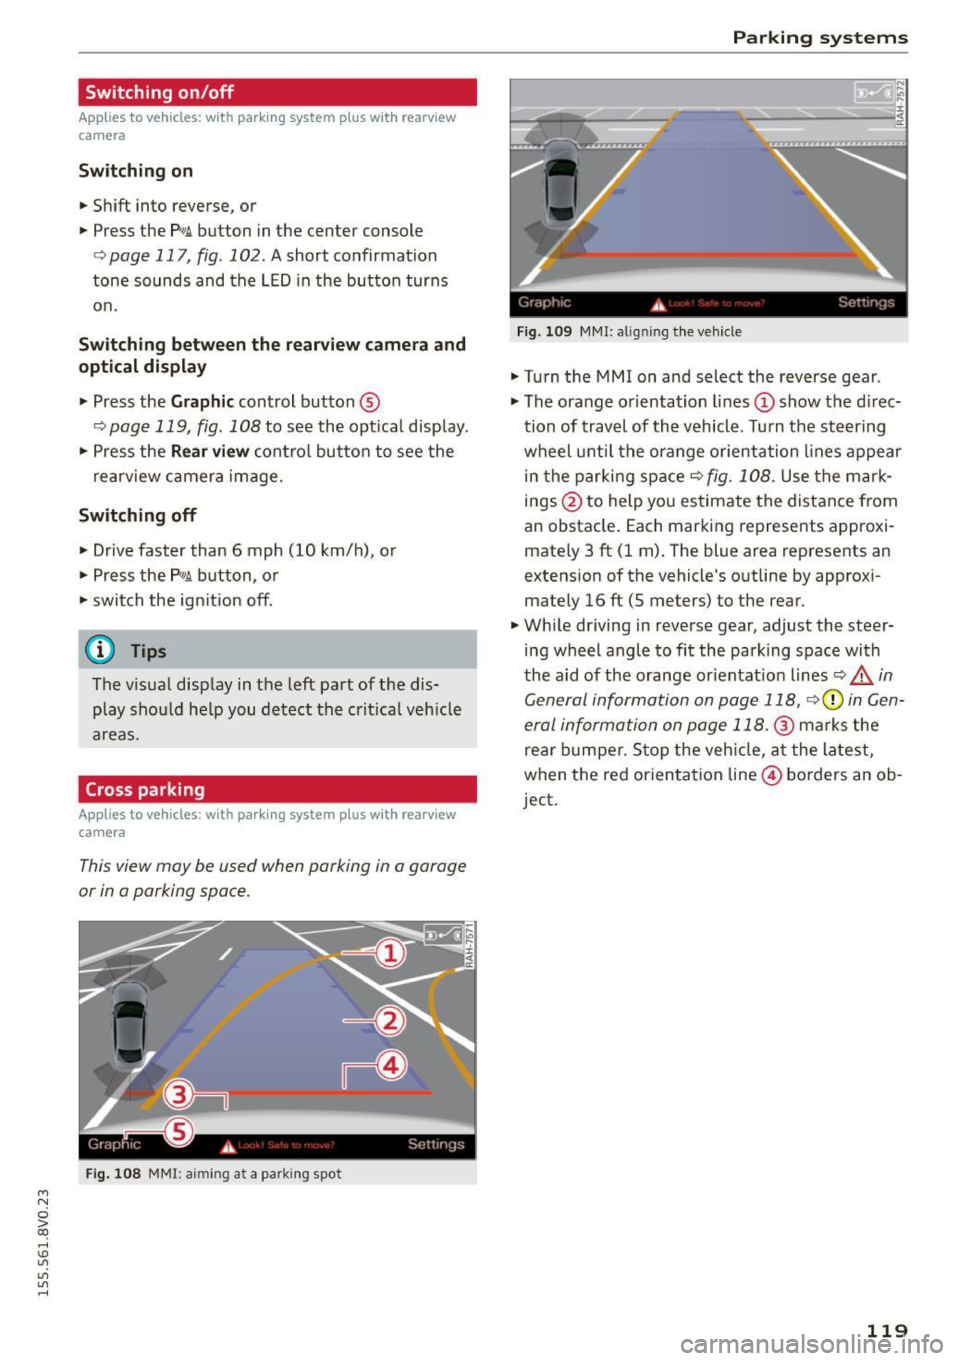
This view may be used when parking in a garage
or in a parking space.
Fi g. 108 MMI: aiming at a park ing spot
Parking systems
Gr,11;t I( i._ S,·T .. 1',lJ',
Fig. 109 MMI : aligning t he veh icle
• Turn the MM I on and select the reverse gear .
• The orange orientation lines
(D show the direc
tion of travel of the vehicle . Turn the steering
wheel unt il the orange orientation lines appear
in the parking space¢
fig. 108. Use the mark
in gs @ to help you estimate the distance from
an obstacle . Each marking represents approxi
mately 3 ft (1 m) . The blue area represents an
extens ion of the vehicle 's outline by approxi
mate ly 16 ft (5 meters) to the rear.
• Wh ile driving in reverse gear, adjust the steer
ing wheel angle to fit the park ing space with
the aid of the orange or ientat ion lines
Q A in
General information on page 118,
r::!.>0 in Gen
eral information on page 118.@
marks the
rea r bumper . S top the vehicle, at the latest,
when the red orienta tion line © borders an ob
ject.
119
Page 122 of 282
Parking systems
Parallel parking
Applies to veh icles: w ith pa rk in g system p lus w it h rearv iew
camera
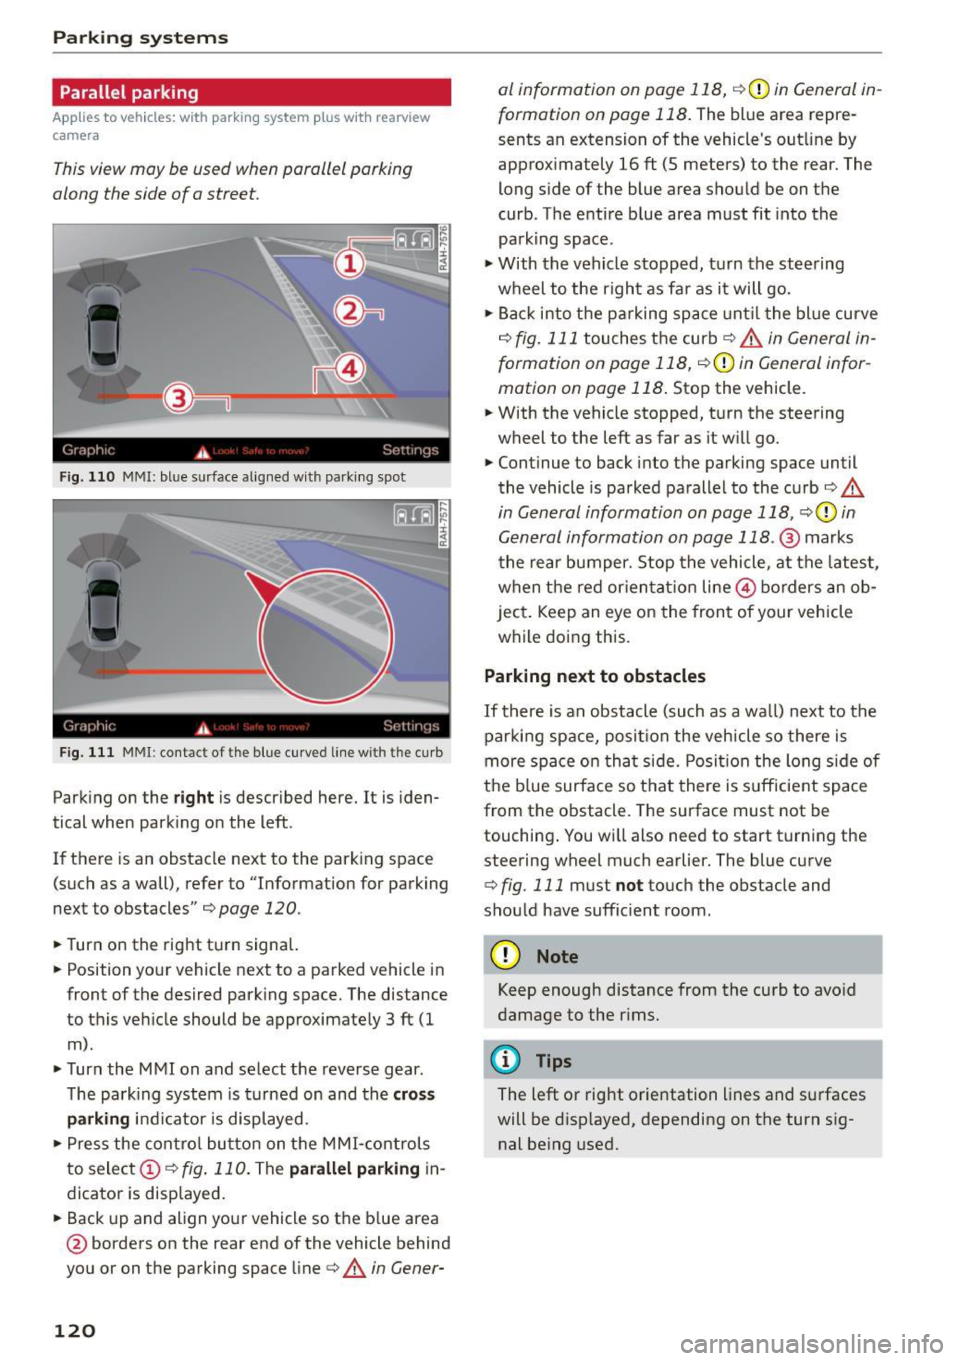
This view may be used when parallel parking
along the side of a street .
Fig. 110 MMI: blue surface aligned wit h parking spot
Fig. 111 MMI: contact of the blue curved line with the curb
Park ing on the right is described here. It is iden
tical when parking on the left .
If there is an obstacle next to the park ing space
(such as a wall), refer to "Information for parking
next to obstacles" ¢
page 120 .
.,. Turn on the right turn signal.
.,. Position your vehicle next to a parked vehicle in
front of the desired parking space. The distance
to this veh icle should be approximately 3 ft (1
m) .
.,. Turn the MMI on and select the reverse gear .
The park ing system is turned on and the
cross
parking indicator is displayed.
.,. Press the control button on the MMI-controls
to select
(D ¢ fig. 110. The parallel parking in
dicator is displayed .
.,. Back up and al ign your vehicle so the blue area
@ borders on the rear end of the vehicle behind
you or on the parking space line¢.&.
in Gener-
120
al information on page 118, ¢(Din General in
formation on page 118 .
The blue area repre
sents an extension of the vehicle's outline by
approximately 16
ft (5 meters) to the rear. The
long side of the blue area should be on the
curb . The entire b lue area must fit into the
parking space .
.,. With the vehicle stopped, turn the steering
wheel to the right as far as it will go .
.,. Back into the parking space until the blue curve
¢
fig. 111 touches the curb¢.&. in General in
formation on page 118, ¢(Din General infor
mation on page 118.
Stop the vehicle .
.,. With the vehicle stopped, turn the steering
wheel to the left as far as it will go .
.,. Continue to back into the parking space until
the vehicle is parked parallel to the curb¢.&.
in General information on page 118, ¢CI) in
General information on page 118 .@
marks
the rear bumper. Stop the vehicle, at the latest,
when the red orientat ion line @ borders an ob
ject. Keep an eye on the front of your vehicle
while doing this.
Parking next to obstacles
If there is an obstacle (such as a wall) next to the
parking space, position the veh icle so there is
more space on that side. Position the long side of
the blue surface so that there is suff icient space
from the obstacle. The surface must not be
touching . You will also need to start turning the
steering wheel much earlier. The blue curve
¢ fig. 111 must not touch the obstacle and
should have sufficient room .
(D Note
Keep enough distance from the curb to avo id
damage to the rims.
¢j) Tips
The left or right orientation lines and surfaces
will be disp layed, depending on the turn sig
nal being used.
Page 123 of 282
M N
0 > co ,...., \!) 1.1"1
1.1"1
1.1"1
,....,
Adjusting the display and the warning tones
App lies to vehicles: with pa rking system p lus/rearv iew cam
era
The display and warning tones con be adjusted in
the MMI.
~ Select: the I MENU ! button >Car> Systems *
control button > Driver assistance > Parking
aid.
Display
On* -
optical display is shown for the parking sys
tem plus, rearview camera image is shown for
parking system plus with rearv iew camera *.
Off -when the parking system is switched off, on
l y audible signals are given.
Warning tones
Front volume -
Volume for the front and side*
area
Rear volume -Volume for the rear area
Front frequency -Frequency for the front and
side* area
Rear frequency -Frequency for the rear area
Entertainment volume lowering -When the
parking system is turned on, the volum e of the
audio/video source is lowered.
The newly adjusted value is briefly heard from
the signal generator.
- The warning tones can also be adjusted di
re ctly from the visual d isplay or the rearview
camera image*. Simply press the
Settings
control button.
- The settings a re automatically stored and
ass igned to the remote control key that is in
use.
Error messages
Ap plies to vehicles: with park ing system p lus/rearv iew cam
era
There is an error in the system if the LED in the
p, ,1 A. button is blinking and you hear a continuous
Parking systems
alarm for a few seconds after switching on the
parking system or when the parking system is al
ready activated .
If the error is not corrected be
fore you switch
off the ignition, the LED in the P1
1,
button w ill blink the next time you switch on the
parking system by shift ing into reverse .
Parking system plus*
If a sensor is faulty, the~ symbol will appear in
front of/behind the vehicle in the MMI display. If
a rear sensor is faulty, only obstacles that are in
areas @and @are shown ¢
page 116, fig. 101.
If a front sensor is faulty, only obstacles that are
i n areas © and @are shown .
Drive to an authorized Audi dealer or authorized
Audi Serv ice Facility immediately to have the
malfunction corrected .
121
Page 124 of 282
Intelligent Technology
Intelligent Technology Notice about data
recorded by the Event
Data Recorder and
vehicle control modules
Event Data Recorder
This vehicle is equipped with an Event Data Re
corder (EDR). The main purpose of an EDR is to
record, in certain crash or near crash-like situa
tions, such as an airbag deployment or hitting a
road obstacle, data that will assist in understand
ing how a vehicle's systems performed. The EDR
is designed to record data related to vehicle dy
namics and safety systems for a short period of
time, typically 30 seconds or less. The EDR in this
veh icle is designed to record such data as:
- How various systems in your vehicle were oper
at ing;
- Whether or not the driver and passenger safety
belts were buckled/fastened;
- How far (if at all) the driver was depressing the
acce lerator and/or brake pedal; and,
- How fast the vehicle was traveling.
These data can help provide a better understand
ing of the circumstances in which crashes and in
juries occur. NOTE: EDR data are recorded by your
vehicle only if a non-trivial crash situation occurs;
no data are recorded by the EDR under normal
driving conditions and no personal data (e.g .,
name, gender, age, and crash location) are re
corded. However, other part ies, such as law en
forcement, could combine the EDR data with the
type of personally identify ing data routinely ac
qui red during a crash investigation.
To read data recorded by an EDR, special equip
ment is requ ired, and access to the vehicle or the
E DR is needed. In addition to the vehicle manu
facturer, other parties, such as law enforcement,
that have the specia l equipment, can read the in
formation if they have access to the veh icle or the
EDR.
Some state laws restrict the retrieval or down
loading of data stored by EDRs installed in a vehi
cle for the express purpose of retrieving data af-
122
ter an accident or crash event without the own
er's consent.
Audi will not access the EDR and/or similar data
o r g ive it to others -
- unless the veh icle owner (or lessee if the veh i
cle has been leased) ag rees; or
- upon the official request by the police; or
- upon the order of a court of law or a govern-
ment agency; or
- for the defense of a lawsuit through the judicial
discovery process .
- Audi may also use the data for research about
veh icle operation and safety performance or
provide the data to a third party for research
purposes without identifying the spec ific vehi
cle or information about the identity of its own
er or lessee and only after the recorded vehicle
data has been accessed.
Vehicle control modules
Your vehicle is also equipped with a number of
electronic contro l modules for var ious vehicle
systems, such as engine management, emission
control, airbags, and safety belts.
These electronic control modules record data during normal vehicle operation that may be
needed by trained technicians for diagnostic and
r epair pu rposes. The recording capabil ity of these
modules is lim ited to data (no sound is recorded).
Only a small amount of data is actua lly recorded
over a very limited period of time, or stored when
a system fau lt is detected by a contro l modu le.
Some of the data stored may relate to vehicle
speed, direction, or brak ing, as well as restraint
system use and performance in the event of a
crash. Stored data can also only be read and
down loaded w ith specia l equipment that is di
r ect ly connected to the vehicle.
(D Tips
Your vehicle may be equipped with Audi con
nect. Your use of certain Audi connect fea
tures requires wireless se rv ic es that are pro
v id ed by a third party wireless telecommuni
cations provider. For details regarding how in
formation obtained through Audi connect is
collected, processed, transmitted, used, and ..,..
Page 125 of 282
M N
0 > co ,...., \!) 1.1"1
1.1"1
1.1"1
,....,
shared, please see your contract with the
wireless telecommunications provider and the
"About Aud i connect" tab in your vehicle's
MMI: ! MENUI button> Audi connect > About
Audi connect .
Electronic stabilization
control (ESC)
Description
The E lectronic Stabilization Contro l (ESC) reinfor
ces driver safety. It reduces the risk of slipping
and improves driving stability. ESC detects criti
cal s ituations such as the vehicle oversteering
and understeering or the wheels a re spinning.
The vehicle is stabilized by applying the brakes or
reducing engine torque. Once the ESC is activat
ed, the indicator light
DJ blinks in the instru
ment cluster.
The fol low ing systems a re integrated in the ESC:
Anti-lock braking system (ABS)
ABS prevents the wheels from locking when brak
i ng. The vehicle can still be steered even during
hard braking . Apply steady pressure to the brake
pedal. Do not pump the pedal. A pulsing in the
brake pedal ind icates that the system is acting to
stabilize the vehicle .
Brake assist system
The brake assist system can decrease braking d is
tance . It increases braking power when the driver
presses the brake pedal quickly in emergency s it
uations. You must press and hold the brake pedal
unti l the dangerous sit uation is ove r. In vehicles
with adaptive cruise control *, the brake assist
system is more sensit ive if the distance detected
to the vehicle ahead is too small.
Anti-slip regulation (ASR)
ASR reduces engine power when the drive whee ls
begin spinning and adapts the force to the road
conditions. This makes it easier to start, acceler
ate and drive up inclines.
Intelligent Technology
Electronic differential lock (EDL)
The EDL brakes whee ls that are spinning and
trans fers the drive power to the other drive wheel
or whee ls if the vehicle is equipped with all wheel
drive*). This function is not available at higher
speeds.
In extreme cases, EDL automatically switches off
to keep the brake on the braked wheel from over
heating. The vehicle is still working correct ly. EDL
will switch on again automatically when condi
tions have returned to normal.
Steering recommendation
The ESC helps to stabilize the vehicle by changing
the steering torque .
Selective wheel torque control
Selective wheel torque control is used when dr iv
i ng on curves. The front wheel on the inside of
the curve o r both wheels on the inside of the
curve are braked selectively as needed . This al
lows more precise driving in curves .
Automatic post-collision braking system
The "Automat ic post -collision braking system"
can help to reduce the ris k of sliding and of other
collisions after an accident. If the airbag control
module detects a collision above a certain vehicle
speed, the vehicle is braked by the ESC.
T he vehicle does not brake automatically if:
- the driver presses the accelerator pedal, or
- the braking force generated by the pressed
brake pedal is greater than the brak ing force
that would be initiated by the system, or
- the ESC, the brake system or the vehicle electr i
cal system are not funct ion ing .
A WARNING
-The ESC and its integrated systems cannot
overcome the limits posed by natural phys i
cal laws. This is especially important on slip
pery or wet roads .
If the systems begin act
ing to stabilize your vehicle, you should im-
mediately a lter your speed to match the ..,.
123
Page 126 of 282
Intelligent Technology
road and traffic conditions . Do not let the in
c reased sa fety prov ided tempt you into tak
ing risks. Th is cou ld increase your r isk of a
collision .
- Please note the risk of a co llision increases
when d riving fast, especially through curves
and on slippery or wet roads, and whe n dr iv
i ng too close to obj ects ahead . T he ESC and
i t s integr ated sy ste ms cann ot a lways pre
ven t colli sion s -the re is s till a risk of acci
dent s!
- Press the ac celerator ped al carefully whe n
acc ele ratin g on eve n, slippe ry su rfac es su ch
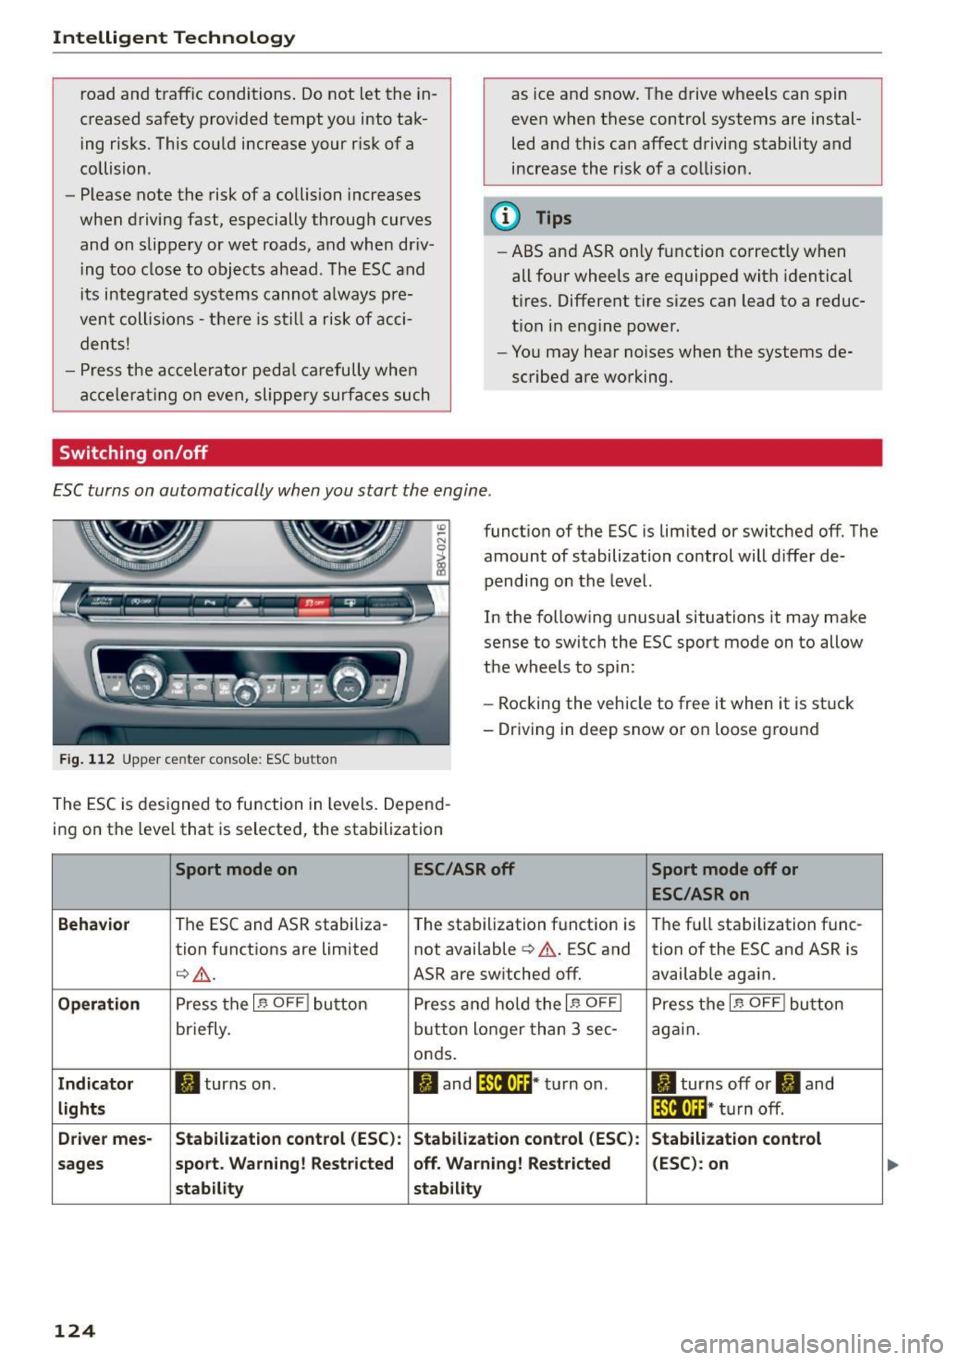
Switching on /off
as ice a nd snow . T he d rive wheels can spin
even wh en t hese control systems are instal
led and this ca n affect d riving stability and
increase the risk of a collis ion .
{!) Tips
-ABS an d ASR o nly fu nction co rrec tly when
all four wheels are equipped with identica l
t ir es . Differe nt tire s izes ca n lead to a reduc
t ion in e ngine powe r.
- Yo u may hear noises when t he systems de
sc rib ed ar e wo rking.
E SC turns on automatically when you start the engine .
Fig. 112 Upper ce nte r con so le : ESC butto n
functio n of the ESC is limited or switched off. The
amount of stabilization control will d iffer de
pend ing on the level.
In the fo llow ing unusual situations it may ma ke
sense to switch the ESC sport mode on to allow
t h e wheels to sp in:
- Rocking the vehicle to free it when it is st uck
- Driving in deep snow or o n loose g ro und
The E SC is d esigned to fu nction in levels . Depen d
i ng on the level that is se lected, the sta bilization
Sport mode on ESC/ASR off Sport mode off or
ESC/ASRon
Behavior
T he ESC and ASR stabiliza- The sta bilization f unct ion is T he f ull sta bilization f unc -
tion f unct ions a re lim ited not available¢& . ESC and
tion of the ESC and ASR is
¢ _& .
ASR are switched off. available again.
Operation Press t he I~ OFF ! bu tton P ress and hold t he I~ OFF I Pre ss th e I~ OFF ! bu tton
briefly. bu
tto n lon ger than 3 sec-
again.
onds.
Indicator II tur ns on. ltl and lf'tl•U~ * tu rn on . II turns off or II and
lights lf'tl•lH* turn off .
Driver mes- Stabilization control (ESC): Stabilization control (ESC) : Stabilization control
sages sport
. Warning! Restricted off . Warning! Restricted (ESC) : on
stab ility stability
124
Page 127 of 282
M N
0 > co ,...., \!) 1.1'1
1.1'1
1.1'1
,....,
A WARNING
You should only switch sport mode on or switch ESC/ASR off if your driving ab ilities and
road condit ions perm it.
- The stabilization function is limited when
sport mode is switched on. The dr iving
wheels could sp in and the veh icle could
swerve, especially on slick or slippery road
surfaces.
- There is no vehicle stabilization when ESC/
ASR are switched off.
(D Tips
- ESC/ASR cannot be switched off or sport
mode cannot be sw itched on if the cru ise
control system* or the adapt ive cruise con
trol* is switched on.
- Malfunctions in the Audi magnetic r ide may
make it impossible to sw itch the ESC/ASR
off or to switch spo rt mode o n.
Brakes
New brake pads
New brake pads do not achieve their full braking
effect during the first 250 mi (400 km). They
must be "broken in" f irst. Howeve r, you can com
pensate for the slightly reduced braking force by
press ing firmly on the b rake pedal. Avoid heavy
braking during the break -in period.
Wear
Brake pad wear is large ly dependent on the way
the veh icle is d riven and on operating co nditions.
This is especially t rue if you are driving frequent ly
in the city and on cu rves or with a sporty driving
style.
Operating noise
Noises may occur when braking depending on the
speed, b rak ing force and o utside conditions s uch
as tempe rat ure and h umid ity.
Effect of water and road s alt
In certain situat ions, for example after driving
throug h wate r, in heavy ra in, after overn ight con
densat ion or afte r wash ing you r car, the braking
In te llig ent T echnolog y
effect can be reduced by moisture or ice on the
brake rotors and brake pads . The brakes must be
"dried" first with a few careful brake applications.
At higher speeds and with the windsh ield wipers
turned on, the brake pads press against the b rake
rotors for a short amount of time . This action
wh ich is not felt by the driver happens at regular
intervals and facilitates a better reaction t ime for
the brakes in wet weather.
The braking effect can a lso be reduced if you are
driv ing on salted roads and you do not apply the
brakes for long periods of time. The layer of salt
on the brake rotors and pads must be worn off
first whe n the brakes a re applied .
Corro sio n
Leav ing the ve hicle parked for long periods of
t ime, low mileage and avoiding heavy braking can
contribute to corros ion on the brake rotors and
dirty brake pads.
If you usua lly avoid heavy b raking or if there is
corrosion present, occas ional heavy braking at
high speeds is recommended to clean the brake
rotors and pads¢,&.
Brake sy stem malfunct ion
if you notice that the b rake pedal travel has sud
denly gotten larger, then a brake circ uit may have
failed. Drive to an authorized Audi dealer or au
thori zed Audi Service Facility immediately to have
the problem cor rected. On the way there, dr ive
with reduced speed and keep in mind that a long
braking distance and increased pressu re on the
brake pedal will be necessa ry.
Low br ake fluid level
When the brake f lu id level is low, malfunct ions in
the brake system may occur. The brake flu id leve l
is electronically mon itored.
Brake boo ste r
The brake booster amplifies the pressure yo u ap
ply to the brake peda l.
It only works when the en-
gine is running.
IJ>
125
Page 128 of 282
Intelligent Technology
& WARNING
-New brake pads do not achieve their full
braking effect during the first 250 mi
(400 km). They must be "broken in" first .
However, you can compensate for the slight·
ly reduced braking force by pressing firmly
on the brake pedal. Avoid heavy braking dur·
ing the break-in period.
- Alway apply the brakes for the purpose of
cleaning the brake system when road and
traffic conditions permit. You must not en·
danger other road users. This increases the
risk of an accident.
- On steep slopes , reduce the speed and se
lect a lower gear or lower selector lever po·
sition. Drive as little as possible while press· ing the brake pedal and avoid putting your
left foot on the brake pedal while driving.
This could cause the brakes to overheat and impair the efficiency of the brakes .
- Do not let the brakes "grind" by always
keeping your foot on the brake pedal. This
can cause the brakes to overheat, increase
wear and increase braking distance unneces·
sarily.
- Certain weather and operating conditions
such as driving through water, driving in
heavy rain or driving after washing your
ve·
hide can impair the effectiveness of the
brakes. In the winter, ice may build up on
the brake pads, rotors and drums. Check
these components by braking carefully. Ap·
plying the brakes carefully several times
dries the brakes and removes ice build-up .
- The efficiency of the brakes can also be im·
paired by driving for long stretches on roads
covered with salt without using the brakes.
You can
remove salt deposits from the brake
rotors and pads by carefully applying the
brakes several times.
- If the front spoiler is damaged or you install
another spoiler, make sure the front wheel
brakes are ventilated properly . Otherwise,
the brake system could overheat, which re·
duces their effectiveness.
- Failure of a brake circuit impairs braking
performance, which increases braking dis·
126
tance. Avoid driving the vehicle and have it
towed it to the nearest authorized Audi
dealer or authorized Audi Service Facility .
- Never let the vehicle roll while the engine is
stopped because this increases the risk of an
accident .
-If the brake booster is not working, you will
have to press much harder on the brake ped·
al to compensate for the lack of the booster .
(D Note
-Never let the brakes "rub" by pressing the
pedal lightly when braking is not really nee·
essary. This causes the brakes to overheat
and increases braking distance and causes
wear .
- Before driving on a long stretch with steep
slopes, reduce your speed and shift to the
next lower gear This makes use of the en·
gine braking effect and relieves the brakes .
If you need to brake additionally, brake in
intervals and not continuously.
(D Tips
-If the brake booster is not working, you
must press the brake pedal with much more
force then normal.
- If you retrofit your vehicle with a front spoil·
er, wheel covers or similar items, make sure
that the air flow to the front wheels is not
interrupted. Otherwise the brake system
can become too hot.
Electromechanical
steering
The electromechanical steering supports the
driver's steering movements .
Power steering adapts electronically based on
the vehicle speed.
T he vehicle still has full steering functionality if
the power steering fails or when the engine is
stopped (towing). To steer, you must apply much
more force than usual.
Indicator lights and messages
• Do not drive vehicle: steering defective
Page 129 of 282
M N
0 > co ,...., \!) 1.1'1
1.1'1
1.1'1
,....,
If th is indicator light turns on and stays on and
this message appears, the power steering may have failed .
Do
not continue driving. See an authorized Aud i
dea ler or autho rized Audi Service Facility for as
sistance.
• Do not drive vehicle: steering defective
There is a malfunction in the electron ic steering
l ock. You cannot turn the ignition on .
Do
not tow your vehicle because it cannot be
steered. See an authorized Aud i dealer or author
ized Audi Service Fac ility for assistance .
'-:r,ij Steering malfunction: you can continue driv
ing
If the indicator light turns on, the steering whee l
may be more difficult to move or more sensitive
than usual. The steering wheel may also be at an
angle when dr iving straight.
Drive slow ly to an authorized Audi dealer or au
thor ized Audi Se rvice Facility to have the ma l
function corrected.
!II Steering lock: system fault! Please contact
Service
There is a malfunct ion in the electron ic steering
l oc k.
Drive to an authorized Aud i dealer or authorized
Aud i Service Facility immediately to have the
malfunction corrected.
_& WARNING
-
Have the system malfunction corrected as
soon as possible by an authorized Audi dealer
or authorized Audi Service Faci lity, as th is in
creases the risk of an accident .
(D Tips
If
the . or ,-:r-n indicator light only stays on
for a short time, you may continue driving.
Intelligent Technology
All wheel drive (quattro)
Applies to vehicles: with all w heel drive
In all wheel drive, all four wheels are powered.
General information
In all wheel dr ive, the dr iv in g power is divided be
tween all four whee ls . T his happens automatical
ly depending on your driving behavior as well as
the current road conditions . Refer to¢
page 123,
Electronic stabilization control (ESC).
The all wheel drive concept is designed for high
engine power. Your vehicle is exceptionally pow
erfu l and has excellent driving characteristics
both under normal driving conditions and on
snow and ice. Always read and follow safety pre cautions
q ,& .
Winter tires
By using all wheel drive, your vehicle has good
forward motion with standard tires in winter con
ditions. However, in winter we recommend using
winter or all season tires on
all four wheels, be
cause this will improve the
braking effect .
Snow chains
If
there are snow chain laws, snow chains must
also be used on vehicles with all wheel drive
q page 230, Snow chains.
Replacing tires
For vehicles with all wheel d rive, only wheels wi th
the same rolling circumference should be used.
Avoid wheels with different tread depths
qpage 221.
Offroad vehicle?
Your Audi is not an offroad vehicle -there is not
enough ground clearance. For this reason, avoid
difficult terra in. Refer to¢
page 259.
_& WARNING ~
-Also, in vehicles with a ll wheel drive, adapt
your driving style to the current road and
traffic cond itions . Do not let the increased
safety provided tempt you into taking risks.
- The braking ability of your veh icle is limited
to the tract ion of the wheels. In th is way, it
127
Page 130 of 282
Intelligent Technology
is not different from a two wheel drive vehi
cle. Do not be tempted to accelerate to a
high speed when the road is slippery th is in
creases the r isk of an accident.
- Note that on wet streets, the front wheels
can "hydrop lane" if driving at speeds that
are too high . Unlike front whee l drive
vehicles, the engi ne does not rev higher sud
denly when the vehicl e begins hyd rop laning.
Fo r th is r easo n, pay a ttent ion to the road
co ndi tions regardless of your speed.
Energy management
The starting ability is optimized
The en ergy management system manages the
electrical energy distribution and optimizes the
availability of electrical energy for starting the
engine.
When a ve hicle with a co nventional energy sys
tem is not driven for a long time, the battery is
drained by equipment (for example the immobil
izer) . In certa in circumstances , there cou ld may
not be eno ugh energy to start the engine .
Your vehicle is equipped w it h an intelligent ener
gy management system for distr ibut ing electric i
ty . T his sign ificantly improves the starting ability
and inc reases the battery life .
The energy management system Is made up of
battery diagnos is , idling cu rrent management
and dynamic energy management.
Battery diagnosis
The batte ry diagnosis determines the batte ry
charge leve l. The sensors determine the batte ry
voltage, the battery current , and the battery
t emperature . The current cha rge level and the
pe rformance of t he battery a re dete rmined based
on this .
Idling current management
The idling cu rrent management decreases the
energy used while parked. W it h the engine
sw itched off, it manages the energy d istribution
to the different electrical components . Date from
battery diagnosis is taken into account for this .
128
Depend ing on the ba tte ry charge leve l, electrical
equipment is switched off one item after the oth
er, to prevent the battery from dra ining and to
retain the start ing ability.
Dynamic energy management
While driv ing, dynam ic ene rgy management dis
tribu tes the appropriate amount o f energy to the
e lectrica l equ ipment. It control s the battery
charge level so that more ene rgy is not used then
i s be ing generated in order to maintain an opti
mal battery charge level.
(D Tips
'
- Energy management cannot overcome the
laws of p hys ics. Note that the charge level
and length of the battery life a re limited.
- When the sta rting ability is endangered, the
(•) indicator light t urns on
c:> page 19 .
What you should know
Maintaining the starting ability is the highest
priority.
A lot of st ress is placed on the battery when dr iv
ing sho rt distances, in traffic, and at cold t imes
of the year. A lot of energy is used but little is
generated.
It is also critical when the engine is
not ru nning but e lectr ica l equipment is sw itched
o n. In th is case, energy is used but none is gener
ated.
In sit uat ions like this, e nergy ma nagement w ill
active ly regu lated the distribution of energy .
Long periods without use
If you do not drive your vehicle for several days or
weeks, e lectr ica l cons umers are grad ually scaled
back or sw itched off. This reduces energy use and
ensures the ve hicle w ill be able to start after long
per iods of time . Some conven ience functions
suc h as opening w it h the remote co ntrol key may
not be available. These conve nience f unct ions
will be ava ila ble aga in once you swi tch the igni-
tion on and st art the eng ine . .,_