length AUDI S3 SEDAN 2015 Owners Manual
[x] Cancel search | Manufacturer: AUDI, Model Year: 2015, Model line: S3 SEDAN, Model: AUDI S3 SEDAN 2015Pages: 282, PDF Size: 71.14 MB
Page 51 of 282
....,
N
0 > co
rl I.O
"'
"'
"'
rl
Sun visors
C1o... ___ J
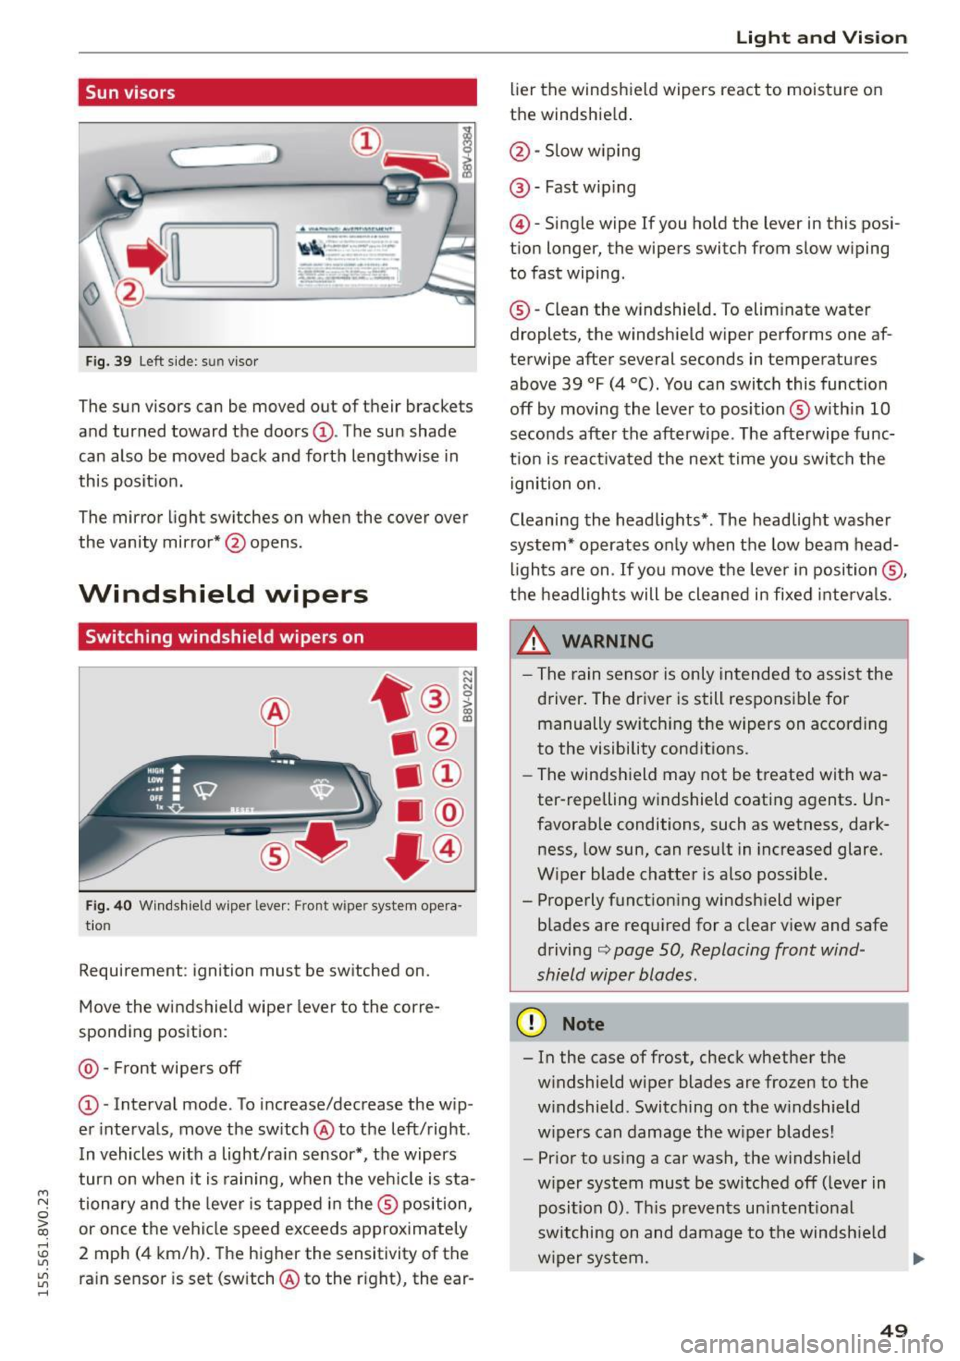
Fig. 39 Left side: su n viso r
The sun visors can be moved out of their brackets
and turned toward the doors@. The sun shade
can also be moved back and forth lengthwise in
this posit ion.
The mirror light switches on when the cover over
the vanity mirror* @opens .
Windshield wipers
Switching windshield wipers on
Fig. 40 Windshield wiper leve r: Front wiper system opera
tion
Requirement : ignition must be switched on.
Move the windshield wiper lever to the corre
sponding position:
@ -Front wipers off
@ -Interval mode. To increase/decrease the w ip
er intervals, move the switch @to the left/right .
I n vehicles with a light/ra in sensor*, the wipers
turn on when it is ra ining, when the veh icle is sta
tionary and the lever is tapped in the ® position,
or once the vehicle speed exceeds approximately
2 mph (4 km/h). The higher the sensitivity of the ra in sensor is set (switch @to the r ight), the ear-
Light and Visio n
lier the windshield wipers react to moisture on
the windshield .
@-Slow w iping
@ -Fast wip ing
@ -Single wipe If you ho ld the lever in this posi
tion longer, the wipers switch from slow wiping
to fast wiping.
® -C lean the w indshield. To elim inate water
droplets, the windsh ield wiper performs one af
terwipe after several seconds in temperatures
above 39 °F (4 °(). You can switch this function
off by moving the lever to position ® with in 10
seconds after the afterwipe. The afterwipe func
t ion is react ivated the nex t time you switch the
ignition on.
Cleaning the headlights*. The headlight washer
system* operates only when the low beam head
li ghts are on . If you move the lever in position @,
t h e headlights will be cleaned in fixed interva ls .
_& WARNING
- The rain sensor is only intended to assist the
driver. The driver is still responsible for manually switch ing the w ipers on according
to the visibility cond itions.
- The windshield may not be treated with wa
ter-repelling w indshield coat ing agents. Un
favorable conditions, such as wetness, dark
ness, low sun, can result in increased glare.
W iper blade chatter is also possib le.
- Properly function ing windsh ield wiper
b lades are req uired for a clear v iew and safe
driving
c::> page 50, Replacing front wind
shield wiper blades .
(D Note
- In the case of frost, check whether the
windshield wiper blades are fr ozen to the
w indshield. Switching on the w indshield
w ipers can damage the w iper blades!
- Prior to using a car wash, the windshield
w iper system must be sw itched off (leve r in
posit ion 0). T his prevents un intent ional
switching on and damage to the windsh ield
w iper system. .,.
49
Page 56 of 282
Seats and storag e
_& WARNING
Never place any objects in the driver's foot
well. An object could get into the pedal area and interfere w ith pedal function. In case of
sudden brak ing or an accident, yo u wou ld not
be able to brake or acce lerate.
Front passenger's seat
Always move the front passenger seat into the
rearmost position.
To avo id contact wit h the airbag while it is de
p loying, do not sit any closer to the instrument
panel than necessary and always wear the three
poi nt safety belt provided ad justed correctly . We
recommend that you adjust the passe nger's sea t
in the fol low ing manner:
• Bring the backrest up to an (a lmost) upright
pos ition .
Do not ride w ith the seat reclined .
• Fo r adjus table head restraints: adjust the head
rest rain t so the upper edge is as even as possi
ble with the top of your head . If that is not pos
s ible, try to adjust the head restraint so that it
is as close to this position as possib le
c> page 56. Move the head restraint so that it
is as close to the back of the head as possib le.
• Place your feet on the floor in front of the pas
senger's seat.
Front seats
Manual seat adjustment
Applies to veh icles: w ith manu ally a dju stable seats
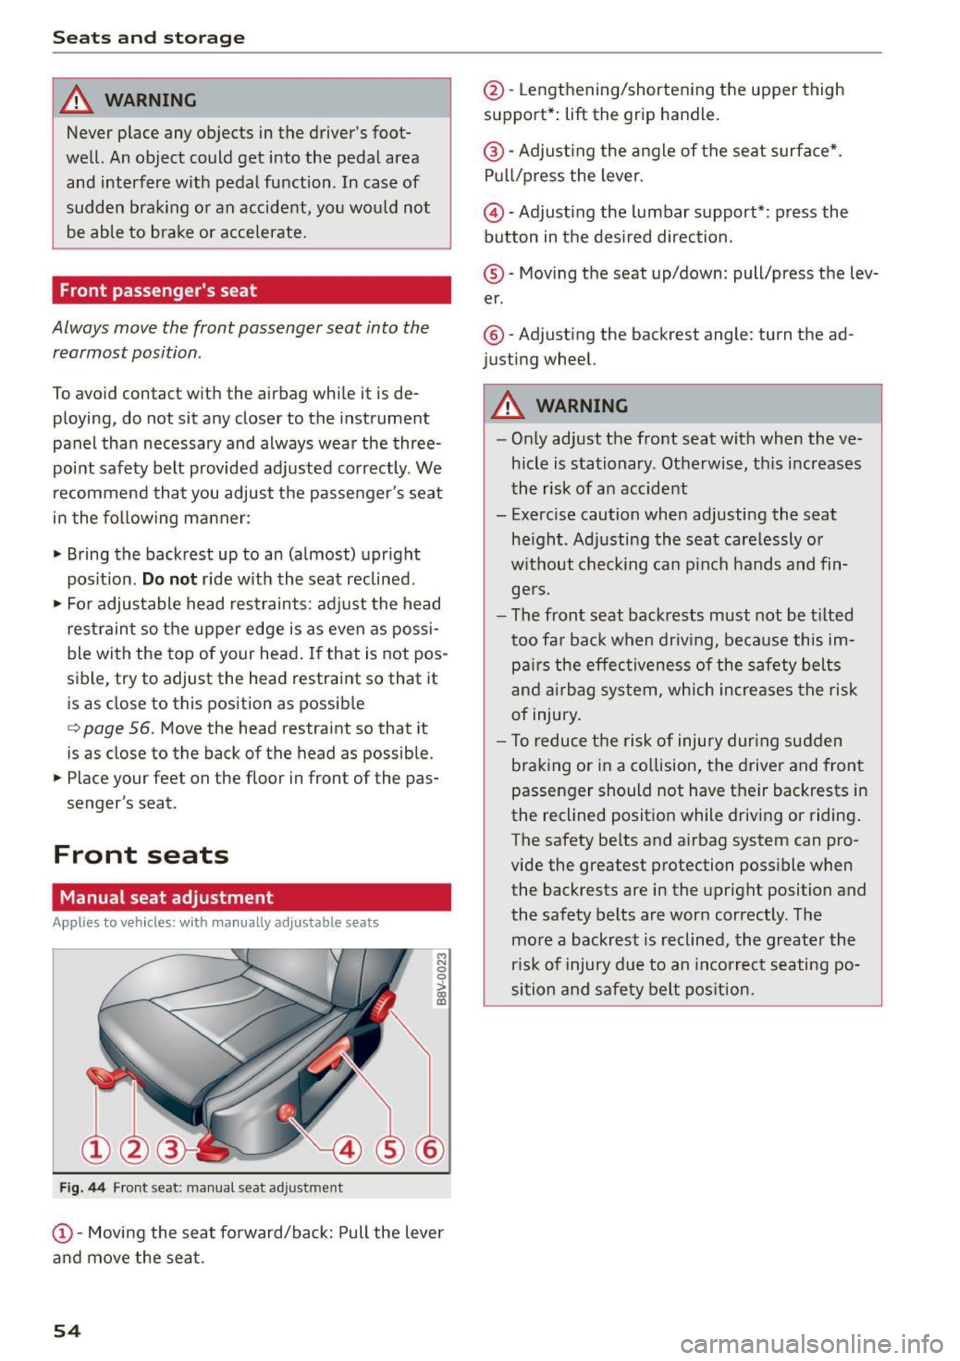
Fig . 44 F ront seat: manual seat adjustment
~ 0
>
"' m
@ -Movi ng the seat fo rward/ba ck: Pull the lever
a nd move the seat.
54
@ -Lengthening/shorten ing the upper thigh
support*:
lift the grip handle.
@ -Adjust ing the a ngle of the seat surface* .
P ull /press the lever.
© -Adjust ing the lumbar support*: press the
button in the des ired direction.
® -Moving t he seat up/down: pull/press the lev
er.
® -Adjusting the backrest angle: turn the ad
justing wheel.
_& WARNING
- On ly adjust the fro nt seat with whe n the ve
hicle is stationary . Otherwise, th is i ncreases
t he risk of an accident
- Exerc ise caution when adjusting the seat
he igh t. Ad justing the seat care lessly o r
w it h out check ing ca n pinch hands and fin
ge rs.
- The front seat back rests must not be t ilted
too fa r ba ck when driv ing, beca use thi s im
pa irs the effec tiveness of the s afety belts
a nd airbag system, which incre ases the risk
of injury.
- To reduce t he risk of injury dur ing su dden
braking or in a co llision, the driver and front
passenger should not have t heir backrests i n
the reclined posit io n while driving or riding .
The safety be lts and airbag system can pro
vide the greatest p rotection poss ible when
the backrests are in the upright position and
the safety belts are worn correctly . The
mo re a backrest is reclined , the greater the
r is k of i njury d ue t o an incorrec t seating po
si tion and safety belt pos ition.
Page 57 of 282
....,
N
0 > co
rl I.O
"'
"'
"'
rl
Power seat adjustment
Applies to vehicles: with power adjustable seats
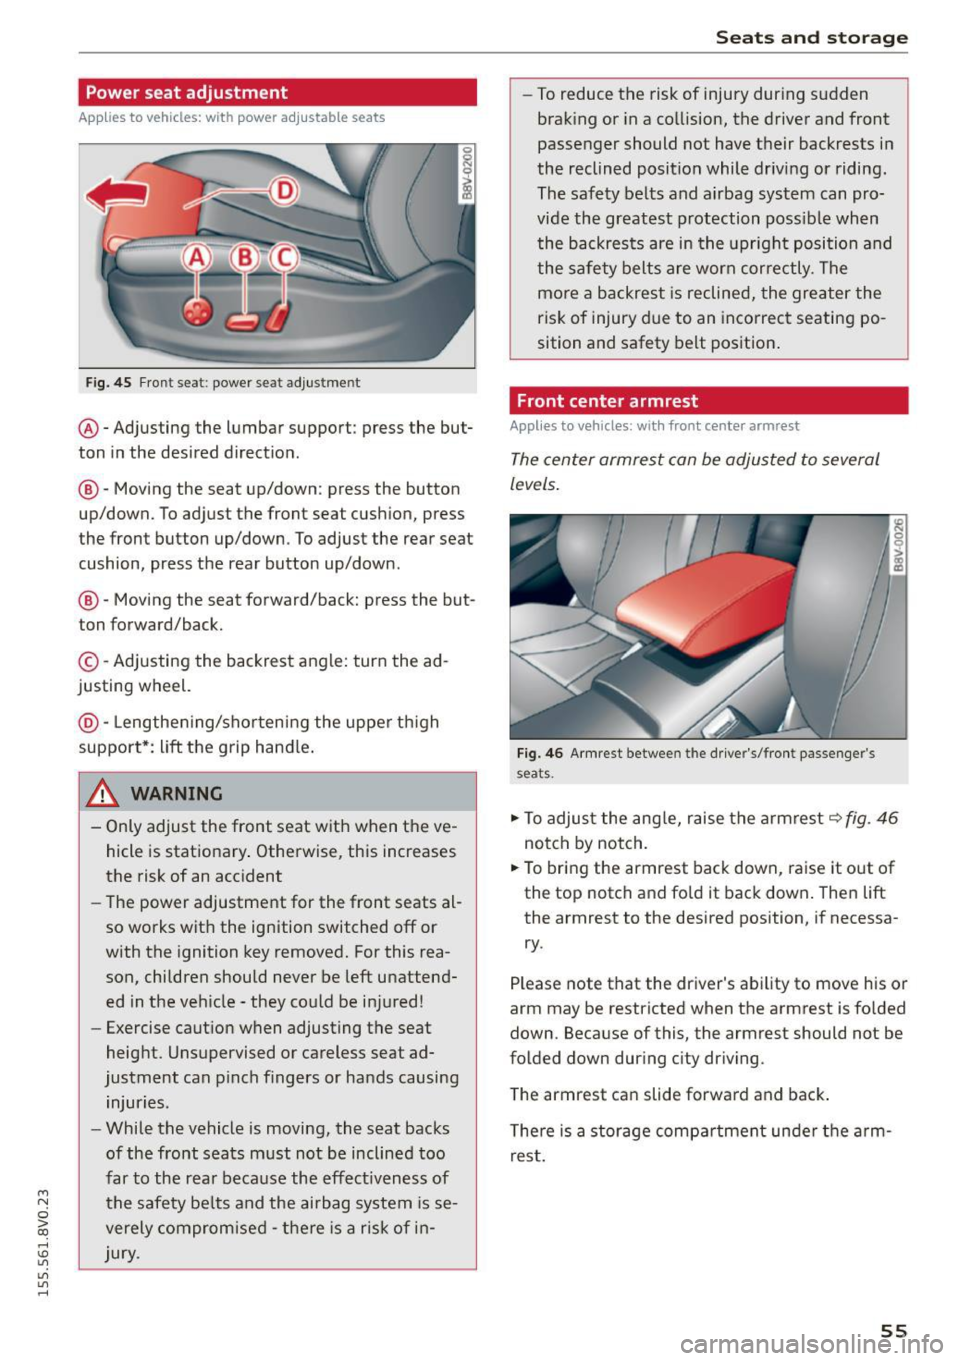
Fig. 45 Front seat: power seat adjus tment
@ -Adjusting the lumbar support: press the but
ton in the desired direction .
®-Moving the seat up/down: press the button
up/down. To adjust the front seat cush ion, press
the front button up/down . To adjust the rear seat
cushion, press the rear button up/down.
@ -Moving the seat forward/back: press the but
ton forward/back.
© -Adjusting the backrest angle: turn the ad
justing wheel.
@ -Lengthening/shortening the upper thigh
support*: lift the grip hand le.
A WARNING
- Only adjust the front seat with when the ve
hicle is stationary . Otherwise, this increases
the risk of an accident
- The power adjustment for the front seats al
so works with the ignition switched off or
with the ignition key removed. For this rea
son, children should never be left unattend ed in the vehicle - they could be injured!
- Exercise caution when adjusting the seat
height. Unsupervised or careless seat ad
justment can pinch fingers or hands causing
injuries.
- While the vehicle is moving, the seat backs
of the front seats must not be inclined too
far to the rear because the effect iveness of
the safety be lts and the airbag system is se
verely compromised -there is a risk of in
jury.
Seats and storage
- To reduce the risk of injury during sudden
braking or in a collision, the driver and front
passenger should not have their backrests in
the reclined position while driving or riding.
The safety belts and airbag system can pro
vide the greatest protection possible when
the backrests are in the upright position and
the safety belts are worn correctly. The
more a backrest is reclined, the greater the
risk of injury due to an incorrect seating po
sition and safety belt position.
Front center armrest
Applies to vehicles: wit h front center armrest
The center armrest can be adjusted to several
levels.
Fig. 46 Armrest between the driver's/front passenger's
seats .
.,.. To adjust the angle, raise the armrest ~fig. 46
notch by notch.
.,.. To bring the armrest back down, raise it out of
the top notch and fold it back down. Then lift
the armrest to the desired position, if necessa
ry.
Please note tha t the driver's ability to move his or
arm may be restricted when the armrest is folded
down. Because of this, the armrest should not be
folded down during city driving.
The armrest can slide forward and back.
There is a storage compartment under the arm
rest.
55
Page 73 of 282
M N
0 > co ,...., \!) 1.1'1
1.1'1
1.1'1
,....,
If you anticipate w hat you need to do next and
drive economically, you can easily cut your fue l
consumption by 10-15 percent. Th is sect ion will
g ive you some tips on how you can help the envi
ronment and your pocketbook.
The consumpt ion estimates as published by
ENVIRONMENTAL PROTECTION AGENCY (EPA)
and Transport Canada may not correspond to
your actual consumption on the road, which
w ill vary depend ing upon vehicle load and
speed, road and weather conditions, trip
length, e tc.
Drive smoothly and keep a lookout ahead
Vehicles use the most fuel when they are acceler
ating.
.. Avoid unnecessary accelerating and braking.
Vehicles use the most fuel when they are acceler
ating. If you anticipate what is going to happen next, you will need to brake less and, thus, accel
erate less. Let the vehicle coast whenever possi b le -for example when you see that the next traf
fic light is red.
Avoid full throttle
Driving at moderate speeds saves fuel and im
proves your mileage .
.. Try and keep well be low your car's max imum
speed .
Accelerating gently reduces fuel consumpt ion,
engine wear, and does not d isturb the env iron
ment .
Fue l consumption, exha ust emissions and eng ine
noise increase disproportionately at high speeds.
If you drive at approx imately t hree quarters of
top speed, fuel consumpt ion w ill be reduced by
one half . Never dr ive faste r than the posted
speed limit a nd weather conditions perm it.
Dri ving
Reducing unnecessary idling
Even when your car is just idling it burns up fuel .
.. Shut the eng ine off when you are not driving
the vehicle .
.. Do not warm up the vehicle by lett ing the en-
gine run at idle.
It is efficient to switch off the engine when stop
ped at ra ilroad crossings and long red lights.
Turning the engine off for just 30-40 seconds
saves more fuel than is b urned by starti ng the
engine aga in .
It takes a long t ime for the engine to warm up
fully when it is ru nning at idle. However, wear
and noxious emissions are espec ia lly hig h when
t h e engine is warming up. So you should d rive
away as soon as you sta rt the eng ine and avoid
run ning at high rpms w hile the eng ine is s till
warmi ng up .
@ Note
Do no t leave eng ine idl ing una ttended afte r
s ta rtin g.
If war ning lig hts s hou ld come on to
i ndica te imprope r operat ion, they would go
u nheede d. Extended idling also produces
heat, which could result in overheat ing or oth
er damage to the ve hicle or other property.
Regular maintenance
A badly tuned engine unnecessarily wastes a lot
of fuel.
.. Have your ve hicle serviced at reg ular in tervals.
B y havi ng your ve hicle regu la rly se rv iced by an
Audi dealer he lps to ensu re that it ru ns p rope rly
and economically. The condi tion of your veh icle
not only affects its sa fety and ability to ho ld i ts
val ue, it also affects
fuel consumption.
Check your oil each time you fill your tank.
The amou nt of oi l used is re lated to engine load
and speed.
It is normal for the oil consumption of a new en
gine to reach its lowest value after a certai n m ile-
age has been dr iven. ...,
71
Page 130 of 282
Intelligent Technology
is not different from a two wheel drive vehi
cle. Do not be tempted to accelerate to a
high speed when the road is slippery th is in
creases the r isk of an accident.
- Note that on wet streets, the front wheels
can "hydrop lane" if driving at speeds that
are too high . Unlike front whee l drive
vehicles, the engi ne does not rev higher sud
denly when the vehicl e begins hyd rop laning.
Fo r th is r easo n, pay a ttent ion to the road
co ndi tions regardless of your speed.
Energy management
The starting ability is optimized
The en ergy management system manages the
electrical energy distribution and optimizes the
availability of electrical energy for starting the
engine.
When a ve hicle with a co nventional energy sys
tem is not driven for a long time, the battery is
drained by equipment (for example the immobil
izer) . In certa in circumstances , there cou ld may
not be eno ugh energy to start the engine .
Your vehicle is equipped w it h an intelligent ener
gy management system for distr ibut ing electric i
ty . T his sign ificantly improves the starting ability
and inc reases the battery life .
The energy management system Is made up of
battery diagnos is , idling cu rrent management
and dynamic energy management.
Battery diagnosis
The batte ry diagnosis determines the batte ry
charge leve l. The sensors determine the batte ry
voltage, the battery current , and the battery
t emperature . The current cha rge level and the
pe rformance of t he battery a re dete rmined based
on this .
Idling current management
The idling cu rrent management decreases the
energy used while parked. W it h the engine
sw itched off, it manages the energy d istribution
to the different electrical components . Date from
battery diagnosis is taken into account for this .
128
Depend ing on the ba tte ry charge leve l, electrical
equipment is switched off one item after the oth
er, to prevent the battery from dra ining and to
retain the start ing ability.
Dynamic energy management
While driv ing, dynam ic ene rgy management dis
tribu tes the appropriate amount o f energy to the
e lectrica l equ ipment. It control s the battery
charge level so that more ene rgy is not used then
i s be ing generated in order to maintain an opti
mal battery charge level.
(D Tips
'
- Energy management cannot overcome the
laws of p hys ics. Note that the charge level
and length of the battery life a re limited.
- When the sta rting ability is endangered, the
(•) indicator light t urns on
c:> page 19 .
What you should know
Maintaining the starting ability is the highest
priority.
A lot of st ress is placed on the battery when dr iv
ing sho rt distances, in traffic, and at cold t imes
of the year. A lot of energy is used but little is
generated.
It is also critical when the engine is
not ru nning but e lectr ica l equipment is sw itched
o n. In th is case, energy is used but none is gener
ated.
In sit uat ions like this, e nergy ma nagement w ill
active ly regu lated the distribution of energy .
Long periods without use
If you do not drive your vehicle for several days or
weeks, e lectr ica l cons umers are grad ually scaled
back or sw itched off. This reduces energy use and
ensures the ve hicle w ill be able to start after long
per iods of time . Some conven ience functions
suc h as opening w it h the remote co ntrol key may
not be available. These conve nience f unct ions
will be ava ila ble aga in once you swi tch the igni-
tion on and st art the eng ine . .,_
Page 225 of 282
"' N
~
-Have an authorized Audi dealer or authorized Audi Service Facili
ty check the wheel alignment if
there is unusual wear.
-Have the wheels rebalanced if an imbalance is causing noticeable
vibration in the steering wheel.
If you do not, the tires and other
vehicle components could wear
more quickly .
Treadwe ar indic ato r
Original equipment tires contain
treadwear indicators in the tread pattern, which are bars that are
1/16 inch (1.6 mm) high and are
spaced even ly around the tire per
pend icular to the running direc
tion
¢ fig. 169. The letters "TW I"
or triangles on the tire sidewall indicate the location of the tread
wear indicators.
The tires have reached the mini mum tread depth
l) when they
have worn down to the treadwear
indicators. Replace the tires with
new ones¢ &.
Whe el rot ation
Rotating the wheels regularly is
recommended to ensure the tires
;;; l) Obey any applicable regu lation s in your ~
~ country . ....
Tires and wheels
wear evenly. To rotate wheels, in
stall the wheels from the rear
axle on the front axle and vice ver
sa. This will allow the tires to
have approximately the same
length of service life.
F or unidirectional tires, make sure
the tires are installed according to
the running direction indicated on
the tire sidewall¢
page 245.
Hidden damage
Damage to tires and rims can of
ten occur in locations that are hid
den. Unusual vibrations in the ve
hicle or pulling to one side may
indicate that there is tire damage .
Reduce your speed immed iately .
Check the tires for damage. If no
damage is visible from the out
side, drive slowly and carefully to
the nearest authorized Audi deal
er or authorized Audi Service Fa
cility to have the vehicle inspect
ed.
A WA RNING
-
Tread that has worn too low or
different tread depths on the
tires can reduce driving safety.
This can especially have a
223
Page 261 of 282
M N
0 > co ,...., \!) ..,.,
..,.,
..,., ,....,
Gross Axle We ight R atin g
The G ross Axle Weight Rating is the maximum
l oad that can be applied at each axl e of the vehi
cle ~.& .
Vehicle capacit y weight
The vehicle capac ity we ight (max. load) is listed
e ither on the dr iver's side B-pillar o r inside the
f u el filler flap .
& WARNING
-The actual Gross Axle Weight Rating at the
front and rear ax les should not exceed the
permissible weights, and their combination
must not exceed the Gross Vehicle Weight
Rating.
Dimensions
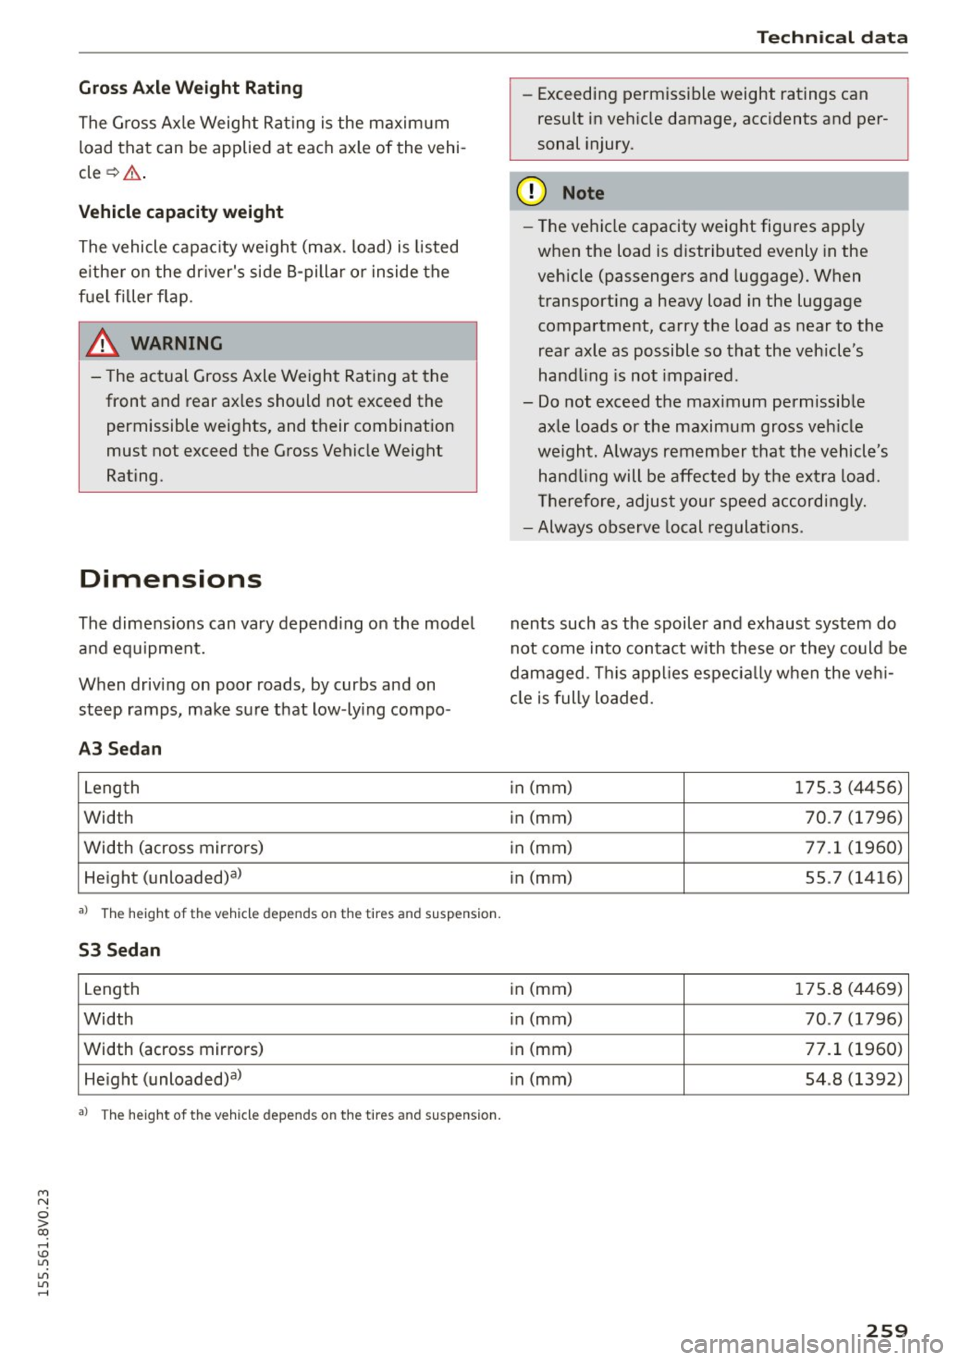
The dimens ions can vary depend ing on the mode l
a nd equipment.
When drivi ng on poor roads, by curbs and on
steep ramps, make sure t hat low -ly ing compo -
A3 Sedan
Length
Wid th
Width (across mir rors)
He ight (unloaded) al
al The he igh t of t he ve hicl e depe nds o n the tir es and s usp en si on .
53 Sedan
Length
Width
Width (across mirrors) He igh t (unloaded) al
al T he heig ht of t he vehi cle dep ends on t he tir es and s uspens ion .
Techni cal data
- Exceeding permiss ible weight ratings can
result in veh icle damage, acc idents and per
sonal injury.
(D Note
- The vehicle capacity weig ht figu res app ly
when the load is d istributed evenly in the
vehicle (passengers and luggage). When
transport ing a heavy load in the luggage
compartment, carry the load as near to the
rear axle as possible so that the vehicle 's
hand ling is not impaired .
- Do not exceed the maximum permissib le
ax le loads or the maximum gross veh icle
we igh t. Always remember that the vehicl e's
hand ling will be affected by the e xtra load.
T herefore, adjus t your speed accordingly.
- Always observe local regulat io ns.
nents such as the spoiler and exhaust system do
not come into contact with these o r they could be
damaged . Th is a pplies es pec ia lly w hen the veh i
cl e is fully loaded.
i n (mm)
1 75 .3 (44 56)
in (mm) 70 .7 (1796)
i n (mm) 77 .1 (1960)
in (mm) 55 .7 (1416)
in (mm) 1 75.8 (4469)
in (mm) 70 .7 (1796)
i n (mm) 77.1 (1960)
in (mm) 54 .8 (1392)
259