clock reset AUDI S4 CABRIOLET 2009 Owners Manual
[x] Cancel search | Manufacturer: AUDI, Model Year: 2009, Model line: S4 CABRIOLET, Model: AUDI S4 CABRIOLET 2009Pages: 340, PDF Size: 77.32 MB
Page 14 of 340

Instruments and warning/indicator lights
Instruments and warning/indicator lights
Instruments
Instrument cluster and controls
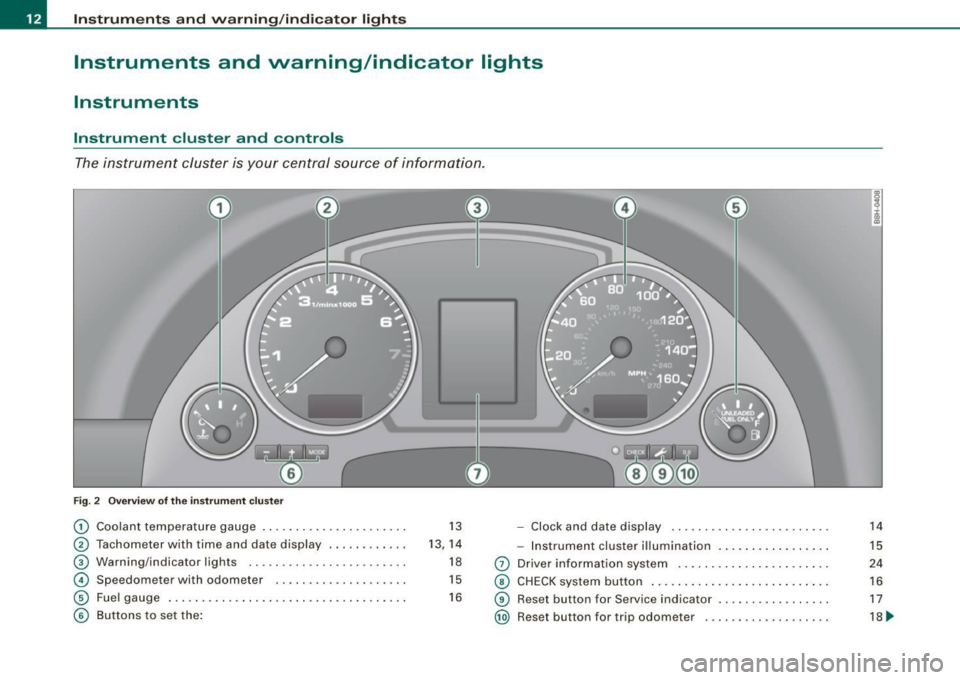
The instrument cluster is your central source of information.
Fig. 2 Overview of the instrument cluster
G) Coolant temperatu re gauge .. ..... ... ... .... ... . . 13 - Clock and date display .. .... ........ .... ... .. .
® Tachometer with time and date display . ....... ... . 13, 14 -Instrument cluster illumination ... .... .... ... .. .
® Warning/indicator l ights .. ... ....... ... ........ . 18 0 Driver information system ...... .... ....... .... . .
© Spe edometer with odometer . .... ...... ..... .. . . 15 © CHECK system button .......... ........... ..... .
© Fuel gauge ...... .... ....... ........ ........ .. . 16 © Reset but ton for Service indicator ................ .
© Buttons to set the: @ Reset button for trip odome ter .................. .
14
15
24
16
17
18 ~
Page 39 of 340

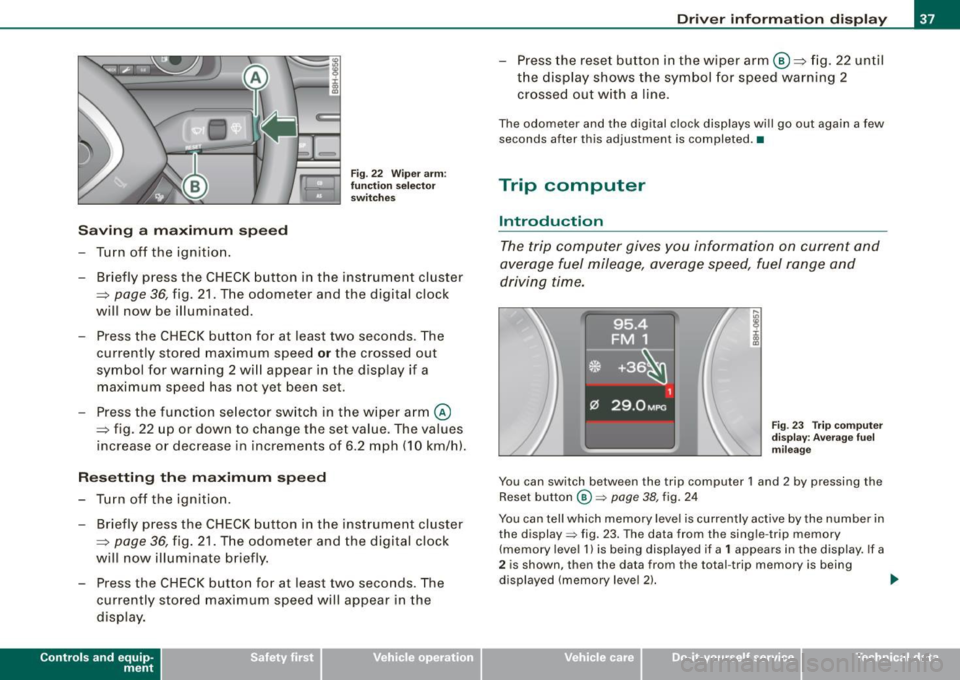
Saving a maximum sp eed
- Turn off the ignition .
Fig. 22 Wiper arm :
fu nc tio n se lec to r
switches
- Briefly press the CHECK button in the instrument cluster
=> page
36, fig. 21 . The odometer and the digital clock
will now be illuminated.
Press the CHECK button for at least two seconds. The
currently stored maximum speed
o r the crossed out
symbol for warning 2 wi ll appear in the display if a
maximum speed has not yet been set.
Press the function se lector switch in the wiper arm@
=> fig. 22 up or down to change the set value . The values
increase or decrease in increments of 6 .2 mph (10 km/h).
R ese tting th e m aximum sp eed
- Turn off the ignition .
- Briefly p ress the CHECK button in the instrument cluster
=> page 36, fig. 21. The odometer and the digital clock
will now illuminate briefly .
- Press the CHECK button for at least two seconds. The
cu rrently stored maximum speed will appear in the
disp lay.
Contro ls and eq uip
ment
Dri ver informa tio n di spl ay
- Press the rese t button in the wiper arm@=> fig. 22 until
t h e d isplay shows the symbol for spe ed warning 2
crossed out w ith a line .
The odometer and the digital clock disp lays wi ll go out again a few
seconds after this adjustment is completed .•
Trip computer
Introduction
The trip computer gives you information on current and
average fuel mileage, average speed, fuel range and
driving time.
F ig . 23 Tr ip co mput er
d is pl ay : Ave ra ge f uel
mi leage
You can switch between the trip computer 1 and 2 by pressing the
Reset button
@ => page 38, fig. 24
You can tell which memory level is currently active by the number in
the display => fig. 23. The data from the single -trip memory
(memory level 1 l is being displayed if a
1 appears in the display. If a
2 is shown, then the data from the total -trip memory is being
displayed (memory leve l 2) . ..,_
~ehicle care Technical data
Page 42 of 340

Driver inf orma tion d ispl ay
Some functions in your vehicle can be set, activated, and controlled
by
M enu s (e.g. Acoustic Park Assist*). With these menus you can
a lso select the information shown in the DIS disp lay, which operates
only with the ignition switched on. Operation is controlled by the
!Reset) button and the rocker switch on the wiper lever~
page 39,
fig. 25.
The
Start m enu shows you the different disp lay types :
Set
Check
Menu off
H el p
Each display type in the Start menu contains a submenu with addi
tional options.
S et
Check
Me nu off
H elp
Clock ~ page40
Computer
Speed alarm (speed
~ page35
warning)
Language (6 languages)
=> page40
Units (distance, fuel con-~ page40
sumption, temperature)
Service
~ page 17
All of the messages shown in vehicles without menu disp lay appear on the display screen.
The Help function helps you to make the right selection.
•
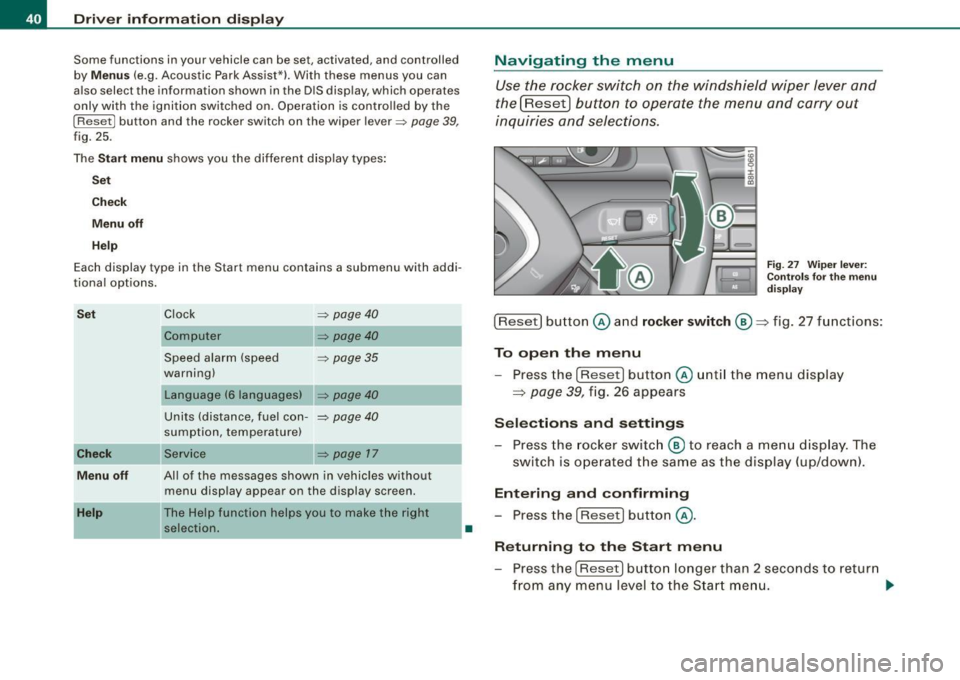
Navigating the menu
Use the rocker switch on the windshield wiper lever and
the[ResetJ button to operate the menu and carry out
inquiries and selections.
F ig . 27 Wipe r leve r:
Con trols for t he m en u
d is pl ay
!Reset] button @and rocker switch @=> fig. 27 functions:
To op en th e menu
- Press the
!Reset! button @unti l the menu display
=> page 39, fig. 26 appears
Sele ctions and setting s
- Press the rocker switc h
@ to reach a me nu display . The
switch is ope rated the sam e as the display (up/down).
Entering and confirming
- Press the
I Reset I button @.
R eturning to th e Start menu
- Press the
[Reset) butto n longer than 2 seconds to retur n
from any menu level to the Star t m en u. •
Page 71 of 340

forward goes much easier when done by two people. However, if no
assistance is available, you may find it easier to position yourself on
the rear seatbench and lift the power top up by grabbing it at the
center. •
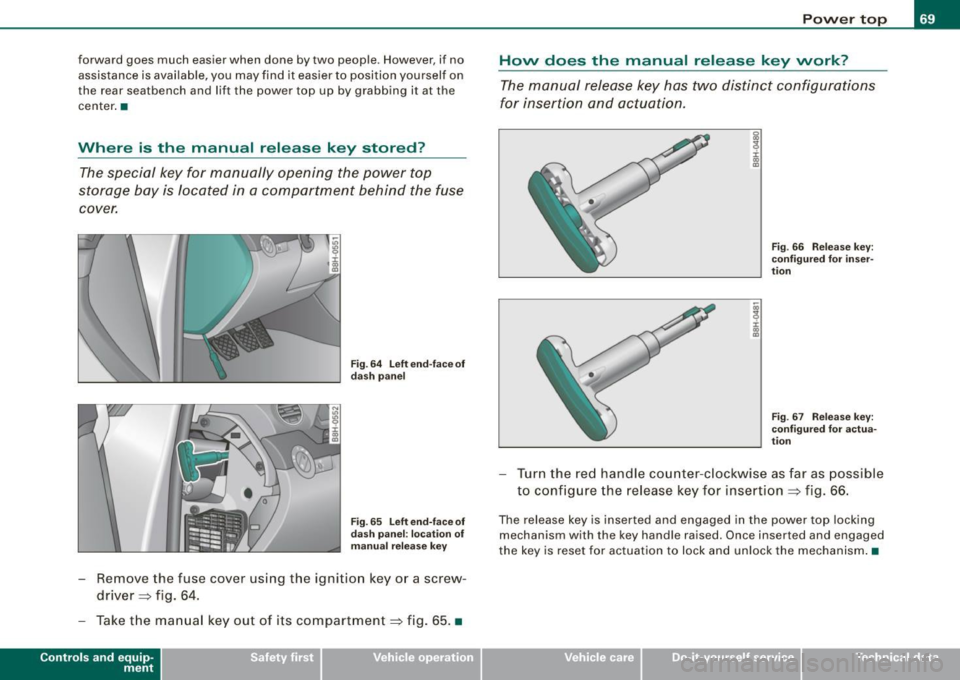
Where is the manual release key stored?
The special key for manually opening the power top
storage bay is located in a compartment behind the fuse
cover.
Fig. 64 Left end-face of
dash panel
Fig. 65 Left end-face of
dash panel: location of
manual release key
-Remove the fuse cover using the ignition key or a screw
driver=:> fig. 64.
- Take the manual key out of its compartment=:> fig. 65. •
Controls and eq uip
ment
Power top
How does the manual release key work?
The manual release key has two distinct configurations
for insertion and actuation.
g
9 :c: ., a,
j ., m
Fig . 66 Release key:
configured for inser
tion
Fig. 67 Release key:
configured for actua
tion
Turn the red handle counter-clockwise as far as poss ible
to configure the release key for insertion =:> fig. 66.
The release key is inserted and engaged in the power top locking
mechanism with the key handle raised. Once inserted and engaged
the key is reset for actuation to lock and unlock the mechanism. •
~ehicle care Technical data
Page 334 of 340

llffl _ __:._A..:.:IL: p :...:h..:.: a== b:..:e :...:t:.:..ic =-= a..:..l ..:..in :..:..:: d:...:e :.:x-=-----------------------------------------------
Opening and closing the windows 53
Operating locks with the fold-out key 53
Rear lid .......................... 55
Remote control ................ 48, 51
Un locking and locking vehicle ....... 51
Power outlets . . . . . . . . . . . . . . . . . . . . . . 106
Power seats Adjusting the seatback ............. 97
Adjustment . ...... .... .... .... ... 96
Folding the seatback forward ...... . 99
Power steering . . . . . . . . . . . . . . . . . . . . . 217
Power top . . . . . . . . . . . . . . . . . . . . . . . . . . 61
Care and cleaning ...... .... .. .... 233
Closing ........................ .. 62
Convenience close/open feature .. ... 63
Conven ience opening/closing ....... 63
Correcting a malfunct ion . . . . . . . . . . . 65
Display messages . . . . . . . . . . . . . . . . . 64
Genera l information . . . . . . . . . . . . . . . 61
Malfunction ...... ..... .. .... .... . 64
Manual operation . .... .... ...... .. 68
Opening ..................... .... 62
Variable storage bay . . . . . . . . . . . . . . . 64
Warning/indictor lights ........ .... 21
Wind deflector . . . . . . . . . . . . . . . . . . . . 66
Power window switches . . . . . . . . . . . . . . 59
In the driver's door ... .... ... ...... 59
In the front passenger's door . . . . . . . 60
Reactivating the system . . . . . . . . . . . . 60
Pregnant women Special considerations when wearing a safety belt . . . . . . . . . . . . . . . . . . . . . 165 Programming
the Homelink® universal re-
mote control . . . . . . . . . . . . . . . . . . . 139
Proper occupant seating positions .... 148
Proper safety belt position . . . . . . . . . . . 164
Proper seat ing position
Front passenger . . . . . . . . . . . . . . . . . 149
Occupants . . . . . . . . . . . . . . . . . . . . . . 148
Rear passengers 150
a
Quartz
clock . . . . . . . . . . . . . . . . . . . . . . . . . 14
quattro®
See All Wheel Drive ............... 218
Question
R
What happens to unbelted occupants? ..
161
Why safety belts? . . . . . . . . . . . . . . . . 159
Radiator fan ......... ............ ... 260
Radio Replacing . .... ... .... ........ ... 319
Rain sensor defective .. .... .... ....... 33
Reading lights .... ............. ...... 84
Rear ashtray . . . . . . . . . . . . . . . . . . . . . . . 105
Rear lid Locking/unlocking ............. ... . 55
Rear light
Defective ... .. ........ .... .... ... 35
Rear view mirror Inside rear view mirror .. .... ....... 88 Rear window defogger
..... .. ... .... . 116
Rearview mirror
See Mirrors ............ .... .... ... 88
Red symbols .. .... .... ... ........ ... 30
Refuelling .......................... 246
Release lever for engine hood ......... 249
Remote control ........ ...... .... . 48, 51
Resetting remote control ... .... .... 52
Un locking and locking . .... .... .... 51
Remote control garage door opener (Homelink®) ...... ... ..... .... . 139
Remote master key Battery replacement ..... ....... ... 48
Check light ....................... 48
Remote rear lid release ........... .... 56
Repair manuals ....... .... .... ...... 316
Repairs Airbag system
Replacing 182
Wheel rims ..... ................. 281
Replacing a fuse ...... .... .... ...... 300
Replacing a sound system .. .... ...... 319
Replacing light bulbs ...... .... .... .. 302
Replacing tires and wheels . ....... ... 280
Reporting Safety Defects ... .... ...... 155
Reset button . . . . . . . . . . . . . . . . . . . . . 15, 18
Resetting remote control ...... .... .... 52
Retractor . . . . . . . . . . . . . . . . . . . . . . . . . . 163
Rims Cast a lloy .. ........... .... ...... 237
Replacing .. ........... ........ .. 281
Stee l rims ...... .... ......... .... 236