sensor AUDI S6 2008 Workshop Manual
[x] Cancel search | Manufacturer: AUDI, Model Year: 2008, Model line: S6, Model: AUDI S6 2008Pages: 390, PDF Size: 88.42 MB
Page 306 of 390
___ C_h_ e_ c_k _in --== g'-- a_n _d_ f_il _li _n ..:::g:::..- ___________________________________________ _
le as t 50% b ut not mor e th an 60 % to maintain antifreeze protection
and cooling efficiency . If the coo lant frost protection is too low, the
coo lant could freeze and damage the vehicle heating and engine
cooling system.
For year -round driving, antifreeze is added at the factory for temper
atures down to:
• -31 °F ( -35 °C) USA
• -40 °F ( -40 °C) Canada.
You can m ix the
Gl 2 + coolant additive with other add itives (for
example
Gl 1 or Gl 2). A lways check with your authorized Audi
dea ler .
& WARNING
Before you check anyt hing in the engine comp artment , alw ays
re ad and heed all WARNINGS ~
& in "Working in the eng ine
co mpar tm ent " o n
pag e 297.
0 Note
• Before win ter sets in, have the coolant checked to see if the
coolant additive in your vehicle is sufficient to meet the climate
conditions. This is especia lly important if you live in a region where
the winter is extremely cold. I f necessary, increase the proportion of
coo lant additive to 60%.
• When adding coolant additive to your coo ling system,
remember:
-We recommend using only coolant additive
Gl 2+ (check the
label) for your vehicle. This coolant addit ive is available at autho
rized Audi dealers. Other types of antifreeze can significantly
reduce corrosion protect ion . T he resulting corrosion can cause a
loss of coolant and serious engine damage.
• Do not add any type of radiator leak sealant to your vehicle's
engine coolant. Adding radiator repair fluid may adversely affect the function and performance of your cooling system and cou
ld result
in damage not c overed by your New Vehicle Limited Warranty. •
Checking the engine coolant level
The engine coolant level can be checked with a quick
glance.
F ig . 235 Eng ine
c o mpartm ent : Cool ant
ex pa nsion tank
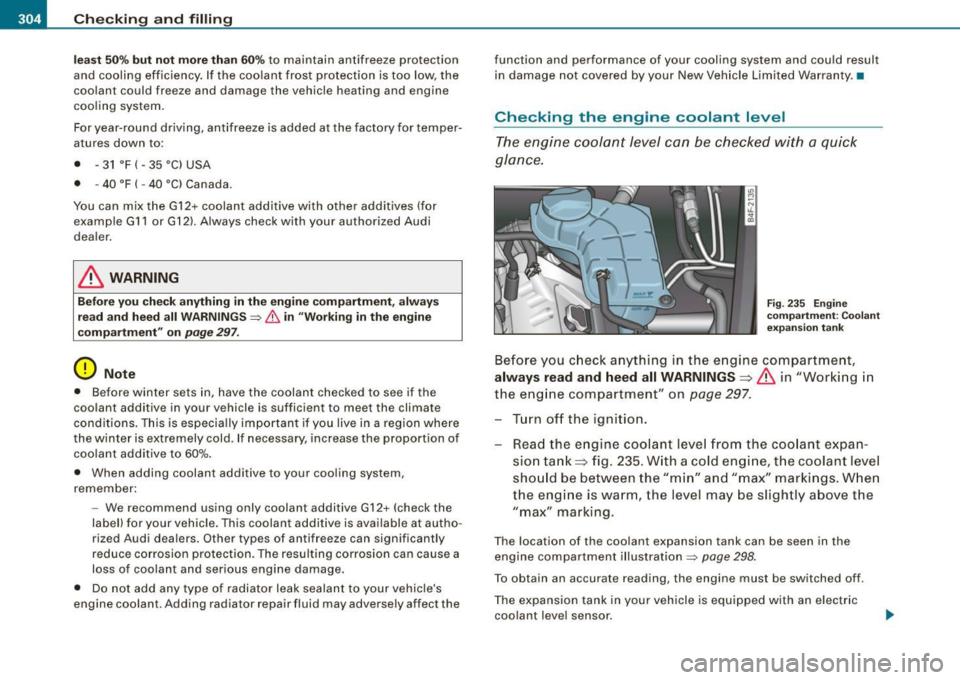
Before you check anything in the engine compartment,
always read and heed all WARNINGS~
& in "Working in
the e ngin e compa rtment" on
page 297 .
Turn off the ignition.
Re ad the en gine coo lant leve l from the coo lant exp an
sio n ta n k~ fig. 235. With a cold eng ine, the coolan t leve l
sho uld be between the "m in" and "max" markings. W hen
t h e eng ine is warm, the level may be s lightly abov e the
"max" marking .
The location of the coolant expansion tank can be seen in the
engine compartment illustration~
page 298.
To obtain an accurate reading, the engine must be switched off .
T he expansion tank in your vehicle is equipped with an e lectric
coo lant leve l sensor.
Page 307 of 390
_____________________________________________ C_h_ e_ c_k _in ~ g_ a_n _d_ f_il _li _n ~g __ _
•
When the coolant level is too low , the warning light in the Auto
Check System =>
page 33will blink un til you add coo lant and the
level has been restored to normal. Even though there is an electric
coolant leve l sensor, we still recommend you check the coo lant level
from time to time .
Coola nt lo ss
Coolant loss may indicate a leak in the cooling system . In the event
of coolant loss, the coo ling sys tem should be inspected immedi
ately by your authorized Audi dealer . It is not enough merely to add
coolant.
In a
s ealed system, losses can occur only if the boiling po int of the
coolant is exceeded as a result of overheating.
0 Note
Do not add any type of radiator leak sea lant to your vehicle's engine
coolant . Adding radiator repair fluid may adversely affect the func
tion and performance of your cooling system and could resu lt in
damage not covered by your New Vehic le Limited War ranty .•
Adding coolant
Be very careful when adding engine coolant.
Before you check anything in the engine compartment,
always read and heed all WARNINGS => & in "Working in
the engine compartment" on
page 297 .
- Tu rn off the engine .
- L et the engine coo l dow n.
- Place a t hick rag over the coolant expansion tank
=> page 304, fig . 235 and carefully tw ist t he cap counter
cloc kw ise
=> & .
- Add coolant. - Twist the cap
on agai n
tightly.
Replacement engine coolant must conform to exact specifications
=>
page 303, "Coolant". If in an emergency coolant additive G12 + is
not avai lable, do
not use a different additive . Use p lain water
instead until you can get the correct additive and can restore the
correct ratio . This should be do ne as soon as possible.
If you have lost a considerable amount of coolant, then you should
add cold antifreeze and cold water only when the engine is cold .
Always use
new engine coolant when refilling .
Do not fil l coolant above the "MAX" mark. Excess coolant will be
forced out through the pressure relief va lve in the cap when the
engine becomes ho t.
& WARNING
• The cooling system is under pressure and can get ver y hot.
Redu ce the risk of sc alding from hot coolan t by follow ing the se
s tep s.
- Turn off th e en gine and allo w it to cool down .
- Protect your fa ce , ha nd s and arm s from e sc a pi ng fluid and
s tea m by cov ering the c ap with a large , thick rag.
- Tur n the cap slo wly an d very ca refully in a counter -clockw is e
dire ction whil e applying light , downward pres sure on the top
o f the cap.
- To av oid bei ng burn ed , do n ot spill antifree ze or cool ant on
the e xhau st sy stem or h ot e ngi ne part s. Under cert ain co ndi
tion s, the ethylen e gl ycol in engin e co olant c an c atch fire .
• Antifr eeze is po iso nous. Alwa ys store antifree ze in its or igin al
c ontainer and well out of the reach of c hildren .
• If you dra in t he coola nt, it mu st b e ca ught and sa fel y stor ed in
a prop er container clearly mark ed "poi son ".
~
Vehicle care I t •
Page 329 of 390
________________________________________________ T_ i _r_e _s_ a_n_ d_ w_ h_ e_e _ l_s __ ,n
•
ture . For example, the numbers 2207 mean that the tire was
produced in the 22th week of 2007. The other numbers are
marketing codes that may or may not be used by the tire manufac
turer. This information is used to contact consumers if a tire defect
requires a recall.
Tire ply composition and materials used
The number of plies indicates the number of layers of rubber-coated
fabric in the tire. In general, the greater the number of plies, the
more weight a tire can support . Tire manufacturers also must indi
cate the materials in the tire, which include steel, nylon, polyester,
and others .
Maximum Load Rating
This number indicates the maximum load in kilograms and pounds
that can be carried by the tire.
Tire quality grading for treadwear, traction, and
temperature resistance
Tread wear, traction and temperature grades~ page 328.
Maximum Permissible Inflation Pressure
This number is the greatest amount of air pressure that should ever
be put in the tire under normal driving conditions.
Replacing tires or rims on vehicles equipped with tire
pressure monitoring system
The wheels on your vehicle are equipped with a sensor which
constantly monitors the air pressure inside the tire, and then trans
mits this information to the tire pressure monitoring system. If you
are going to replace the wheel rims on your vehicle, make sure the
new rims also have these sensors . The sensors must be compatible
with the tire pressure monitoring system on your vehicle.
If you install rims, which do not have the sensors, or have sensors
which are not compatible, then the tire pressure monitoring system
will not work properly. In this case, the tire pressure monitoring system would not be able to monitor the
tire pressure or warn you
if it is necessary.
• The battery inside of the tire pressure sensor has a limited
service life.
• Always drive with the valve stem caps securely mounted. We
recommend using factory installed valve stem caps. Ask your autho
rized Audi dealer to replace lost valve stem caps .
The installation of replacement tires with steel cord body plies in
the tire sidewall may cause malfunction of the tire pressure moni
toring system, and is not recommended (cord material information
in molded on the tire sidewall).
Always check your tire pressure monitoring system indicator after replacing one or more tires on your vehicle. If the tire pressure
monitoring system indicator flashes, or is on, your system is not
working properly. Your replacement tire might be incompatible with
your tire pressure monitoring system, or some component of the
tire pressure monitoring system may be damaged.
& WARNING
• Using incorrect or unmatched tires and/ or wheels or improper
tire and wheel combinations can lead to loss of control, collision
and serious personal injury.
• Always use tires, rims and wheel bolts that meet the specifica
tions of original factory-installed tires or other combinations that
have been specifically approved by the vehicle manufacturer.
• Tires age even if they are not being used and can fail suddenly,
especially at high speeds. Tires that are more than 6 years old can
only be used in an emergency and then with special care and at
lower speeds.
• Never mount used tires on your vehicle if you are not sure of
their "previous history." Old used tires may have been damaged
even though the damage cannot be seen that can lead to sudden
tire failure and loss of vehicle control.
~
Vehicle care I t •
Page 330 of 390
lllffll,.___T_ ir_e _ s_ a_ n_ d _ w __ h_e _e_ l_ s _______________________________________________ _
& WARN ING (continued )
• All four wheels mu st be fitted with radial tires of the same type,
si ze (rolling cir cumference ) and the same tread pattern. Driving
with different tires redu ces vehicle handling and can le ad to a loss
of control.
• If the spare tire is not the same as the tires that are mounted
on the vehi cle -for e xample with winter tires -only use the spare
t ire for a short period of time and drive w ith extra care . Refit the
normal road wheel as soon as safely possible.
• Never drive faster than the maximum speed for whi ch the tires
on your vehicle are rated becau se t ires that are driven faster than
their rated speed c an fail suddenly .
• Overload ing tires cause heat build-up , sudden tire failure,
including a blowout and sudden deflation and loss of control .
• Tempe rature grades apply to t ires that are properly inflated and
not over or underinflated.
• Fo r techni cal reasons it is not always possible to use wheels
from other vehicles -in some cases not even wheels from the
same vehicle model .
• If you install wheel trim discs on the vehicle wheels , make sure
that the air flow to the brakes is not blo cked . Reduced airflow to
the brakes can them to overheat , increasing stopping distances
and causing a collision .
• Run flat tires may only be u sed on vehicles that were equipped
with them at the factory . The vehicle must have a chas sis designed
for run flat tires and a factory -installed tire pressure monitoring
system that indi cates a loss of tire pressure . In corre ct u se of run
flat tires can lead to vehicle damage or accidents . Check with an
authori zed Audi dealer or tire specialist to see if your vehicle can
be equipped w ith run flat tires . If run flat tires are used , they must
be installed on all four wheels . Mi xing tire types is not permitted.
0 Note
• For technical reasons, it is not ge nerally poss ible to use the
whee l rims from other vehicles. This can ho ld t rue for whee ls of the
same ve hic le type.
• I f the s pa re tire is diffe rent from the tires that you have mo unted
o n your veh icle ( for e xample w inter t ires or w ide pro file t ires), the n
use the spare tire for a short period of time on ly and drive with extra
ca re. R ep lace the flat t ire w ith th e ti re m atc hin g the o thers o n your
vehic le as soon as possib le.
• I f you should put different w hee ls and t ires o n you r ve hicle (e.g.
winter wheels and tires), you must be certain that the wheels and
t ires are co mpat ible w ith the tire pressure monit oring syst em.
Otherwise the system will register a ma lfunction and a fau lt
m essage w ill be d isplayed . For more info rmatio n, con tact your Aud i
dea ler.
0 Note
• When insta lling new tires, be carefu l not to damage the va lves or
t ire pressu re m oni toring sys te m sensors .
• N ever drive without the valve stem cap. The va lves could get
damaged.
• I f the sensors must be replaced, then the valve must also be
r ep laced at t he same t ime .
~ For the sake of the environment
Dispose of o ld tires i n acco rdance wit h the local requ ire men ts .•
Uniform tire quality grading
• Tr ead wear
• Tr action AA A B C
• T emperature A B C
Page 346 of 390
-L___:W:..:..:. h.:.: a::.. t:...:: d:.:o:::....:. l..: d::. O ::::....: n:..:.:: O:..:W :.:..:. ? ____________________________________________ _
hub. Remove all dirt from these surfaces before remounting the
wheel. •
Tires with unidirectional tread design
Tires with unidirectional tread design must be mounted
with their tread pattern pointed in the right direction.
Using a spare tire with a tread pattern intended for use
in a specific direction
When using a spare tire with a tread pattern intended for use in a
specific direction, please note the following:
• The direction of rotation is marked by an arrow on the side of the
tire .
• If the spare tire has to be installed in the incorrect direction, use
the spare tire only temporarily since the tire will not be able to
achieve its optimum performance characteristics with regard to
aquaplaning, noise and wear.
• We recommend that you pay particular attention to this fact
during wet weather and that you adjust your speed to match road
conditions.
• Replace the flat tire with a new one and have it installed on your
vehicle as soon as possible to restore the handling advantages of a
unidirectional tire. •
Notes on wheel changing
Please read the information~ page 325, "New tires and replacing
tires and wheels " if you are going to use a spare tire which is
different from the tires on your vehicle.
After you change a tire:
• Check the tire pressure on the spare immediately after installa
tion . •
Have the wheel bolt tightening torque checked with a torque
wrench as soon as possible by your authorized Audi dealer or a qualified service station .
• With steel and alloy wheel rims, the wheel bolts are correctly
tightened at a torque of 90 ft lb (120 Nml.
• If you notice that the wheel bolts are corroded and difficult to
turn while changing a tire, they should be replaced before you check
the tightening torque.
• Replace the flat tire with a new one and have it installed on your
vehicle as soon as possible. Remount the wheel cover.
Until then, drive with extra care and at reduced speeds .
& WARNING
• If you are going to equip your vehicle with tires or rims which
differ from those which were factory installed, then be sure to read
the information
~ page 325, "New tires and replacing tires and
wheels".
• Always make sure the damaged wheel or even a flat tire and
the jack and tool kit are properly secured in the luggage compart ment and are not loose in the passenger compartment.
• In an accident or sudden maneuver they could fly forward,
injuring anyone in the vehicle .
• Always store damaged wheel, jack and tools securely in the
luggage compartment . Otherwise, in an accident or sudden
maneuver they could fly forward, causing injury to passengers in
the vehicle .
0 Note
Do not use commercially available tire sealants. Otherwise, the elec
trical components of the tire pressure monitoring system* will no
longe r work properly and the sensor for the tire pressure moni
toring system will have to be replaced by a qualified workshop. •
Page 348 of 390
llft!I Fuses and bulbs ..._ __________________________________________ _
[ i J Tip s
You are wel l advised to keep a supply of spare fuses in your vehicle .
Fuses with the proper ampere ratings are availab le at your Audi
dea ler. •
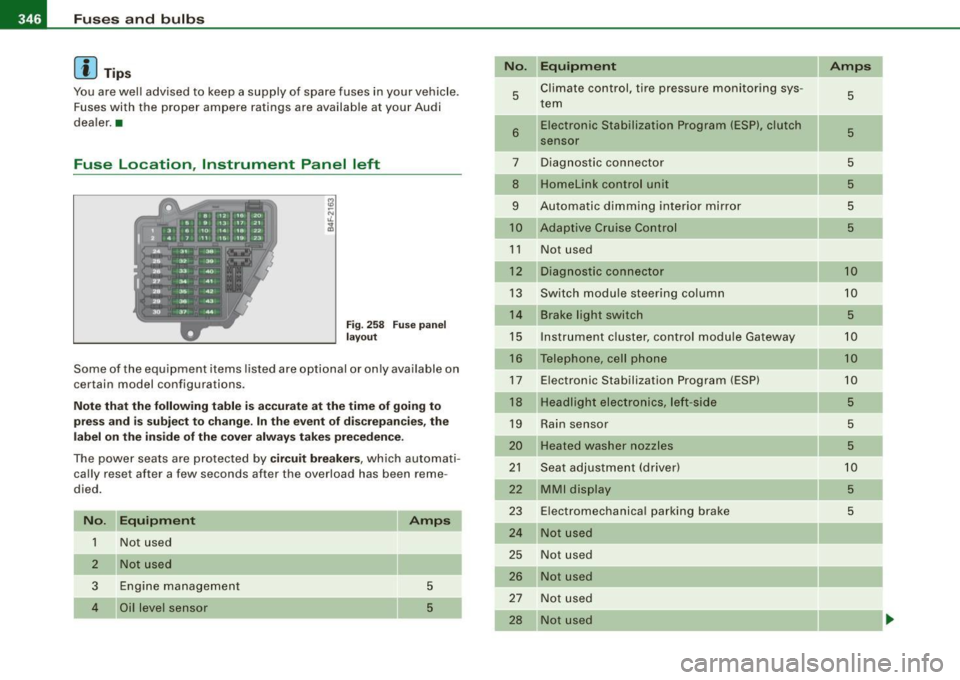
Fuse Location , Instrument Panel left
Fig . 258 Fuse pa nel
l ayo ut
Some of the equipment items listed are optional or only ava ilable on
certain model configurations .
Note th at t he fo llo wi ng t able i s acc urat e at th e time of goin g to
pr ess and is subject t o ch ang e. In th e eve nt of d iscrep ancie s, th e
labe l on th e in side of th e cover always ta kes prece de nce .
The power seats are protected by cir cuit br eaker s, which automati
cally reset after a few seconds after the overload has been reme
died.
N o. Equipm ent
1 Not used
2
3
4
Not used
Engine management
Oil level sensor Amps
5
5
No
.
5
6
..
7
8
9
10
1 1
12
13
14
15
16
17
18
19
20
21
22
23
24
25
26
27
28
Equipm ent
Climate cont rol , tire pressure monitoring sys
tem
Electronic Stabilization Program (ESP), clutch
sensor
Diagnostic connector
Homelink control unit
Automa tic dimming interior mirror
Adaptive Cruise Control
Not used
Diagnostic connector
Switch modu le steering column
Brake light switch
I nstrument c luster, control module Ga teway
Telephone, cell phone E lectronic Stabilization Program (ESP)
Headlight electronics, left -side
Rain sensor
Heated washer nozzles
Seat adjustment (driver)
MMI display
E lectromechanica l parking brake
Not used
Not used
Not used
N ot used
Not used Amps
5
5
5
5
5
5
10
10
5
10
10
10
5
5
5
10
5
5
-
Page 375 of 390
Alphab eti ca l ind ex -
-------------=----
Anti-loc k brake syst em
H ow the ABS system works ....... . 262
War ning/i ndicato r lights ... ....... .. 22
Anti -Slip Regulation System (ASR)
How the system works ............ 260
Anti-theft systems Anti-theft alarm system . .... .... ... 61
Electronic immobilizer ... .. .... .... 51
Ti lt sensors . ... .. .... ..... .. ... ... 62
Ashtray Front . ...... .... .... ...... .... .. 104
Rear .... ... .. .... .... ... .... .... 105
ASR How the Anti -Slip Regu lation System
works . ... .. .... .... ... .... .... 260
As terisk
What does it mean when something is marked with an asterisk? .. ... ...... 6
Audi Parking System Acoustic parking sys tem tips ...... . 179
Adjusting the chimes -option 1 ... .. 178
Adjusting the chimes -option 2 ... .. 179
General Information ... .. .... .... . 167
Notes on distance information ..... 177
P arking next to obstacles .......... 176
rear . .............. .......... ... 167
rear, with rear-view camera ........ 169
Rear -view camera -parking mode 1 173
Rear -view camera -parking mode 2 . 175
Rear -view camera (Rear View) .. .... 17 1
Rear -view camera coverage area . ... 173
Rear-view camera tips .. ...... .... . 180
Specia l parking situations .... .... . 176
Controls and equip
ment Safety first
Audi Parking System
(rear)
Adjusting the chimes ... .. .... .... 168
Audi Service Repair Manua ls and Li terature
366
AUTO mode AC climate contro ls ............... 113
Au to Safety Hotline ..... .... .... ..... 201
Auto -Check Control .. .... ...... ....... 30
Automatic belt retractor ... .. .... .... . 206
Automatic car wash
See Was hing .. ... ..... ....... .... 279
Automatic Shift Lock (ASU ........ 155, 162
Automatic transmission
6 -speed automatic transmission .. .. 153
Automatic Shift Lock (ASU ... .. 1 55, 162
Driving .......................... 153
Dynamic shift program ............ 156
Emergency release for selector lever 159
Emergency release for selector lever
(mult itronic®) ...... .... .... .... 1 66
Fail -safe mode . ...... .... .... .... 158
I gnition key safety lock ............ 125
Kick -down . ....... .... .... .... ... 156
Manual shift program ............. 157
multitronic® ................... .. 159
Selector lever ................ 154, 161
Shift buttons ................ 158, 165
Steering wheel with tiptron ic® . 158, 165
Average speed ....................... 40
Avo id damaging the vehicle ...... .... . 269
B
Battery .. ........ ....... ........ ... 307
Battery location inside the lu ggage
compartment . ...... ... .... .... . 308
Charging .. .... ....... ..... .... .. 3 10
Important warnings when working on the
battery ...... .... ... .... ...... . 308
J ump starting ..... .... ... .... .... 35 1
Low ...... ... .... .... ...... ... .. 265
Replacing the battery ..... .... ... . 311
State of charge . .... ...... .... ... . 265
Voltage .. .... .................... 37
Winter operation ......... .... .... 307
Working on the battery ........ .... 308
Before driving ... .... .... ..... .. .... 193
Blended gasoline ...... ... .... .... ... 29 1
Body cav ity sealing .......... ........ 284
Booster seats .. ... .. .... .... .... ... . 242
How do I properly insta ll a b ooster sea t in
my vehicle? ....... ........ .... . 24 2
Safety instructions ................ 242
Brake assistant ....... ... .... .... ... 263
Brake booster .. ...... .... ... .... .... 262
Brake fluid Changing the brake fluid .......... . 307
Checking the brake fluid leve l ...... 306
Reservoir .. .... .... ............. . 306
What is the correct brake fluid leve l? 306
What should I do i f the brake f luid warning
light comes on? .. ....... ........ 306
Brake light Defective ... .. .... .... .... ...... .. 27
Vehicle operation Vehicle care Do-it-yourself service Technical data
Page 378 of 390
llffl __ A_l.:,. p _h_ a_ b_e _t _ic _ a_l _in _ d_e _x ____________________________________________ _
Driver seat
See Seating position . . . . . . . . . . . . . . 194
Driver's seat . . . . . . . . . . . . . . . . . . . . . . . . 88
Driver's seat memory . . . . . . . . . . . . . . . . . 91
Activating remote control key .. ... .. 92
Recalling a seat posit ion ...... .... . 91
Storing a seat position . ........ .... 91
Driving messages ...... .... .... .... .. 30
Driving safely .... .... .... ...... .... 192
Driving time . ...... .. .... .... .... .... 40
Dup licate key ........... .... ... .... .. 48
DVD player for navigation system . . . . . . 99
Dynamic shift program .............. 163
E
Easy entry feature 124
Electric seat adjustment
S ee Power seat . . . . . . . . . . . . . . . . . . . 88
Electromechanica l parking brake
Emergency braking .. ...... ...... . 131
Malfunction ...... .... .... ....... 131
Operation . . . . . . . . . . . . . . . . . . . . . . . 129
Parking . . . . . . . . . . . . . . . . . . . . . . . . . 130
Rel easing and app lying .... ... .... 129
Starting off with a trailer ... ..... .. 131
Warning /indicator ligh ts ... .... .... 23
Electronic differential lock (EDU
How the system works . . . . . . . . . . . . 259
Warning /indicator lights ....... .... 22
Electronic immobilizer . ... .... .. . .. 15, 51
Electronic power contro l
(EPC) warning/indicator light ...... .. 19 Electronic stabili
zation program (ESP)
How the system works . ...... ..... 258
Wa rning/indicator lights ......... .. 19
Emergency braking . . . . . . . . . . . . . . . . . 131
Emergency closing Power sunroof ......... .... ... . 68, 69
Emergency flasher . . . . . . . . . . . . . . . . . . . 73
Wa rning/indicator lights ..... ...... 20
Emergency locking of doors ....... ... . 57
Emergency starting .. ... .... .... .... 351
Emergency towing ..... .... .... ... .. 354
Energy management ... .. .... .... ... 265
Battery power . . . . . . . . . . . . . . . . . . . 266
Driver notification 266
Engine Compartment . .... .... .... .... .. 298
Coolant ......................... 303
Hood ... .. .... .... .... .... .... .. 296
Starting ...... ........ .... .. 124, 125
Starting with jumper cables .. ..... 351
Stopping ........................ 126
Engine compartment Safety instructions .... ...... ..... 297
Working the engine compartment .. 297
Engine coolant system ........ .... ... 303
Adding coolan t ..... ........ .... . 305
Checking coo lant level .. ....... ... 304
Check ing the engine coolant level .. 304
Malfunction ......... .... .. .. .... . 33
Radiator fan ...... .. .. .... .... ... 306
Engine coolant temper .ature
Temperature gauge ...... ...... ... 13
Engine data .. ... ... .. .... .... ...... 363 Engine hood
Clos ing ... .... ... ... ... .. .... ... 297
How to release the hood . . . . . . . . . . 296
Engine oi l ..... ... .... .... .. .. ..... . 299
Adding ... .... .... .... .... ... ... 302
Additiv es .. ...... ..... .. .. .... ... 302
Changing . ....... .... ... .. ...... 302
Checking the engine oil level . .... .. 301
Indications and conditions requiring extra
checking .. ...... .... .......... 301
Oil consumption ... .... .... .... .. 300
Oil grades . ...... ... ... .... ..... . 299
Recommended oil che ck in tervals .. 301
Specif ication and viscosity .. .. .. ... 299
Engine oil leve l ... .... .... .. .. ..... .. 37
Engine oil pressure Malfunction .. .. .. .... .... .... .... 34
Eng ine oi l sensor defective .... .... .... 37
Environment Break -in period ........ ..... ..... 267
Catalytic converter .... .... ..... .. 268
Disposing of your vehicle battery .. . 311
Driving a t high speeds ............ 269
Driv ing to minimize pollution and noise .
269
Fuel .... .. .... .... .............. 293
Fuel economy ...... .... .. .. .... .. 269
Leaks under your vehicle ....... ... 297
Letting the vehicle stand and warm up ..
270
Proper disposal of drained brake fluid 307
P roper disposal o f drained engine
coo lant ..... .. .. .... .... ....... 305
Page 380 of 390
ffl __ A_l.:,. p _h_ a_ b_e _t _ic _ a_l _in _ d_e _x ____________________________________________ _
Headlights . . . . . . . . . . . . . . . . . . . . . . . . . . 70 I
Adap tive Light .... ..... ...... .... . 73
Defective . . . . . . . . . . . . . . . . . . . . . . . . 27
Front fog lights . . . . . . . . . . . . . . . . . . . 72
Headlight range control defective .. . 37
Switching off ..... .... .... ...... .. 70
Switching on ..... .... .... .. . ..... 70
Washer system . . . . . . . . . . . . . . . . . . . 80
Xenon headlights .... ........ .... . 70
Heated outside mirrors . . . . . . . . . . . . . . . 83
Heated sea ts
Front . . . . . . . . . . . . . . . . . . . . . . . . . . . 114
Rear ......... .... ....... .. .. ... 115
Heated steering wheel . . . . . . . . . . . . . . . 115
Heated washer jets
Wiper and washer system . . . . . . . . . . 78
Heavy clothing and safety b elts ... .... 205
High beam ........... ... .... ..... 70, 74
Warning /indicator lights ........... 22
High voltage warning label . ..... .. ... 360
Homelink® universal remote control 186
Hood Opening ...... ....... .... .. . .... 296
Re lease lever . . . . . . . . . . . . . . . . . . . . 296
Horn . . . . . . . . . . . . . . . . . . . . . . . . . . . . . . . 11
How many airbags does my vehicle have? . .
219
How often should I check my tire pr essures?
320 Ignition key
........... ........ .... . 124
Ignition lock ...... .... .... .... .... .. 124
Malfunction .. .... ... .... .... .. 35, 38
Ignition lock positions .......... ..... 124
Immobilizer .. .................. ..... 15
Important things to do before driving .. 193
Improperly worn safety be lts .... ... .. 210
Indicator lights ... ..... .. .... .. ... .. . 17
Airbag system . .......... .... 223, 224
PASSENGER AIR BAG OFF ......... 224
Infant seats .............. ....... ... 239
How do I properly insta ll an infant seat in
my veh icle? .. .... ..... .. .... ... 239
Safety instructions ..... ... .... ... 239
Inside rea r v iew mirror ....... ...... ... 82
Installing child safety seats Safety be lts ...... ............ ... 244
Instrument cluster illumination .... .... 16
Instruments and controls . . . . . . . . . . . . . 13
General illustration ....... .... .... . 11
Interior lights . ... ...... ...... ... .... 75
Rear ............... ... .... .... 75, 76
Inte rmittent wiping
Rain sensor ... ....... .... .... .... 78
J
How sa fe ty be lt tensioners work . . . . . . 210 Jack .... .... .... ... .... .... .... ... 336
Hydroplaning ... .. .. .... .... ... .... 324 Jump er cables .... .... .... .... .... .. 352
Jump-starting . ...... .. . ... ...... ... 351
K
Key .. .... .... ...... .... ... .... .... . 48
Battery replacement . ...... .... ... . 50
Coded settings .. .... ... .... .... .. 110
Convenience opening and closing of windows .... .... ... ... .... ... .. 65
Emergency key . ..... ...... .... .... 48
Key replacement . . . . . . . . . . . . . . . . . . 48
Master key ..... .. . .... .. . .. .. .... 48
Valet key . ........... .... .... ... .. 48
Key coded s ettings
Climate controls .. .... ..... .... .. 110
Key less entry remote control ... ... ..... 49
Kick-down multitronic® ... ... ... ... .. .... ... 163
tiptronic ® ... ..... .... ... ........ 156
L
Lane assist
Activating and deactivating 150
Description ............ .. .. .... .. 150
Instrument cluster indicator light ... 150
MMI settings ... .. .... .... .... .. . 151
Notes on instrument cluster display. 150
LATCH .... .... .... ... .... ..... .. ... 249
Description . ... .... .... .. . ... .... 249
Guidance fixtures for lower anchorages . .
250
Ins talling a child restraint .. ... ... . 252
Location . . . . . . . . . . . . . . . . . . . . . . . . 249
Moun ting and releasing the anchorage
hook ......... ....... .... ...... 253
Page 381 of 390
______________________________________________ A_ l:.!: p :...:h..:. a= b..:e :...: t:..:..i c.::....:.: a..:..l ..:.in :....:..:: d:.:e :.: x-=---"'
Leather . .... ....... ... . .... .. .. .... 286
Cleaning . .... .... ....... ........ 287
Leve l adjustment
See Adaptive Air Suspension . .... .. 182
Lifting jack . .... ........ ... .... .... . 341
Lifting vehicle ...................... 356
Light Exterior lighting in the mirror housing 73
leaving home ...... ..... .... .... .. 73
Light sensor defective ... .... ... .... .. 36
Lighting in the mirror housing ......... 73
Lights ........ .... .... .... ...... .... 70
Coming home ... .... .... .......... 71
Daytime running lights . .... .... .... 71
Emergency flashers . ... .. .... .... .. 73
Exterior lights . .... .... ... .... .... . 71
Front fog lights ...... .... ..... .. ..
72
Headlights .. ... ... .. .... .... .... . 70
High beam .................... 70, 74
High beam warning/indicator light . .. 22
Leaving home .... .... .... .... ..... 71
Rear fog lights ... .... .... .... .... . 72
Side marker lights .. ...... ...... ... 70
Turn signals .... .... .... .... .... .. 74
Xenon headlights ... ..... .. .. .... .. 70
Loading the luggage compartment .... 199
Loading the roof rack .... ....... .... . 102
Lockable backrest .... ....... .... .... . 96
Locking Power locking switch .... .... .... .. 56
Rear lid/trunk lid .................. 58
Remote control key .......... .... .. 54
Using the key .... .... ... ....... ... 55
Controls and equip
ment Safety first
Lower anchorage locator button
..... .. 249
Lower universa l anchorage bars (Canada) ..
249
Lower universal anchorages (Canada) .. 249
Luggage Stowing . .... ....... .... .... .... . 199
Luggage compartment ................ 96
Cargo net .... .... ...... ........ .. 98
DVD player for navigation system ... . 99
Expanding .... .... .... .... .... ... . 96
Fastening eyelets ... .... ....... .... 97
Side Compartment .. ....... .... ... 99
Ski sack . .... ....... .. .. .... .... . 100
See also Loading the luggage
compartment ..... .. ... ... .. .... 199
Lumbar support .... ....... .... .... ... 90
M
Maintenance ... ....... .... .... .... . 366
Malfunction Indicator Lamp (MIU .. .. 20, 29
Master key ... ........... ....... .... . 49
Battery replacemen t .. .... .... .. 49, 50
Check light ..... ........... .... ... 49
Mi leage
Average .. ..... ... .... .... .... ... . 40
Instantaneous ... ...... ... .. .... .. 40
Mirrors Activating the digital compass .... ... 85
Adjusting the anti -glare . .... ..... .. 82
Automatic dimming for the outside mirrors . .... .... .... ........ ... . 84
Automatically dimming inside mirror . 82
Inside day -night m irror .... .... .... . 82 Interior mirror
... .. .... .... ..... .. . 82
Outside mirrors ... .... .... .... .... 83
Recalling position of outside mirrors . 91
Storing position of outside mirrors . .. 91
Monitoring the Advanced Airbag System ..
223
multitronic® ........................ 159
Automatic Shift Lock (ASU ....... .. 162
Driving the multitronic® ... .... .... 160
Dynamic shift program .... .... .... 163
Fail-safe mode .... .... ... .... .... 165
Kick-down ....................... 163
Manual shift program ... .... .... .. 164
Se lector lever ... ... .. .... .... .... 161
Steering wheel with tiptronic® .... . 165
tiptronic .... .... .... .... .... ..... 164
N
Natural leather .... .... ... .. .... .... . 286
New tires and wheels . .... ..... ...... 325
NHTSA Contacting ..... .. ... ... .... .... . 201
Number of seats ...... ... .. .... .... . 202
0
Occupant seating positions .. ... .. .... 194
Octane rating .... .... .... .... ... .... 291
Odometer ... .... .... .... ... .... .... . 15
Oil
See Engine oil ... ...... .. . ... ..... 299
Older children and safety belts .... .... 243
Vehicle operation Vehicle care Do-it-yourself service Technical data