display AUDI S6 2009 Repair Manual
[x] Cancel search | Manufacturer: AUDI, Model Year: 2009, Model line: S6, Model: AUDI S6 2009Pages: 398, PDF Size: 43 MB
Page 165 of 398
Automatic transmission 11'11 __________________________ ___;__:..;____;_ ______ _
& WARNING (continued )
-When the selector lever is in a driving position , the vehi cle
may creep , even at idle speed . Therefore do not release the
parking brake or foot brake until you are ready to move ,
because power is transmitted to the wheels as soon as a
driving position is engaged.
- Do not accelerate while selecting a driving position. At this
time the engine must be at idle speed so that undue stress is
not placed on the clutches in the transmission.
- Remember : - even when stopped briefly with the automatic
transmission in "D", "S" or "R" , engine power is being trans
mitted to the wheels . Your vehicle could "creep " forward or
backward . When stopped , keep the brake pedal fully depressed
and use the parking brake if necessary to keep the vehicle from
rolling .
- If the sele ctor lever is unintentionally moved into N while you
are driving , take your foot off the accelerator pedal and wait for
the engine to return to idle speed before selecting a driving
position .
- Never shift into "R " or "P " when the vehicle is in motion .
- Never get out of the driver's seat when the engine is running.
- If you must get out of the vehicle , move the selector lever
securely into the P position and apply the parking brake firmly .
- If the engine must remain running, never have any driving
position engaged when checking under the hood. Make sure
the selector lever has securely engaged and is locked in "P "
with the parking brake firmly set :::::,
page 293, "Engine
compartment ". Otherwise , any increase in engine speed may
set the vehicle in motion , even with the parking brake
applied .•
Controls and equip
ment
Ap plies to vehic les : wit h m ultit ron ic® Conti nuous ly Va riable Transm ission (CVT)
Selector lever positions
This sec tion des cribes th e sele ctor lev er positi ons an d
dr iv ing ra ng es.
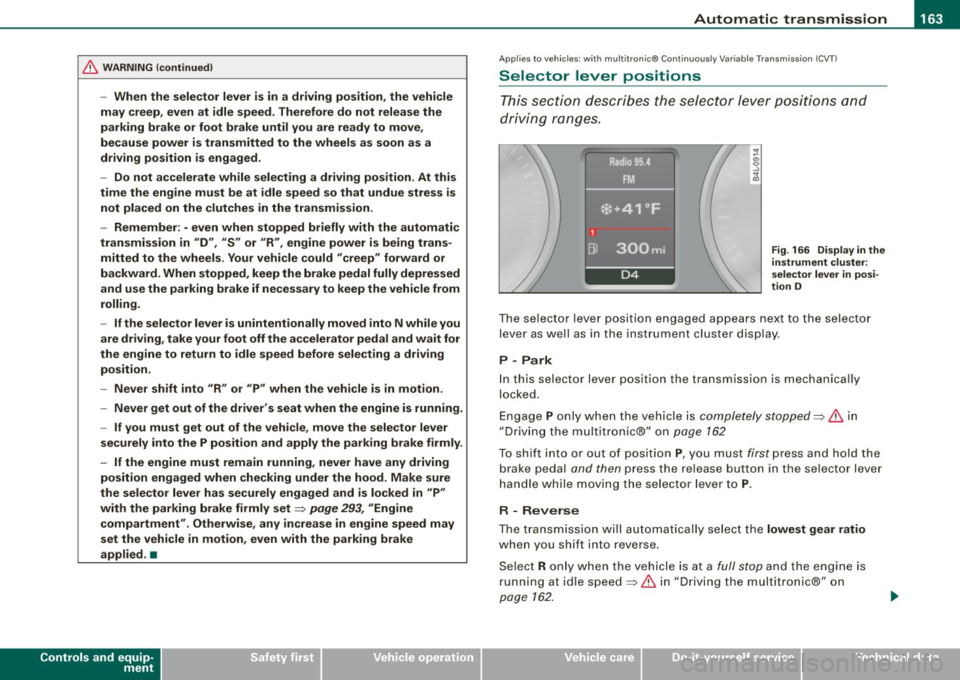
Fig . 166 Display in the
instrument clu ster:
se lector lever in posi ·
tion D
Th e se lecto r le ver p ositi on engag ed app ear s ne xt to th e selec tor
lev er as well as in the instrument cluste r disp lay .
P -Park
In this s electo r lever position the transmission is mechanica lly
lo cke d.
Eng age P on ly when t he veh ic le is
completely stopped=> 11::::. in
" Dr ivin g th e multitroni c®" on
page 162
To s hift int o or out o f pos ition P , you m ust firs t press a nd h old the
brake peda l
and then press the release button in th e se lector lever
h an dle whi le m oving the sele ctor l ev er to P .
R - Reverse
The tra nsm issio n w ill automat ica lly se lect the lowest gear ratio
when you sh ift into reverse .
S ele ct R only wh en th e ve hicle is at a
fu ll sto p and t he engine is
running at id le speed :::::, 11::::. in "Driving t he multitron ic®" on
page 162.
I • •
Page 168 of 398
-L~A~u~t~o~m~a~t ::,:i c~t::!r.!:a~n~ s~m!.!!:i s~ s ~ io~n :..._ ____________________________________________ _
An additional shift program allows the automat ic t ransmission to
select the p roper gear for uphill and downhill gradients.
This prevents the transmission from shifting up and down unneces sari ly on hills. The transmission will shift down to a lower gear ratio
when the driver presses the brake pedal on a downhill gradient . This
makes use of the braking effect of the engine without the need to
shift down manually.
If you are driving in hills and mountains, the transmission will
continuously adjust the gear ratio to the road grade. If you press the
brake pedal when driving downhi ll, the transmission will down shift
automatically . This increases the braking effect of the engine .
If the cru ise control is on when you are traveling downh ill, the trans
mission will automatically select a lower gear ratio in order to main
tain the set vehic le speed . This wil l cause the engine speed to
increase. •
Applies to v ehicles: wit h mult it ro n ic® Co ntin uous ly V ariab le Tra nsm iss io n (CVT )
tiptronic ® manual shift progr am
Using the manual shif t program ( tiptronic® J you can
manually shift between seven pre-programmed gear
r at io s ( tra nsmission p ositi ons).
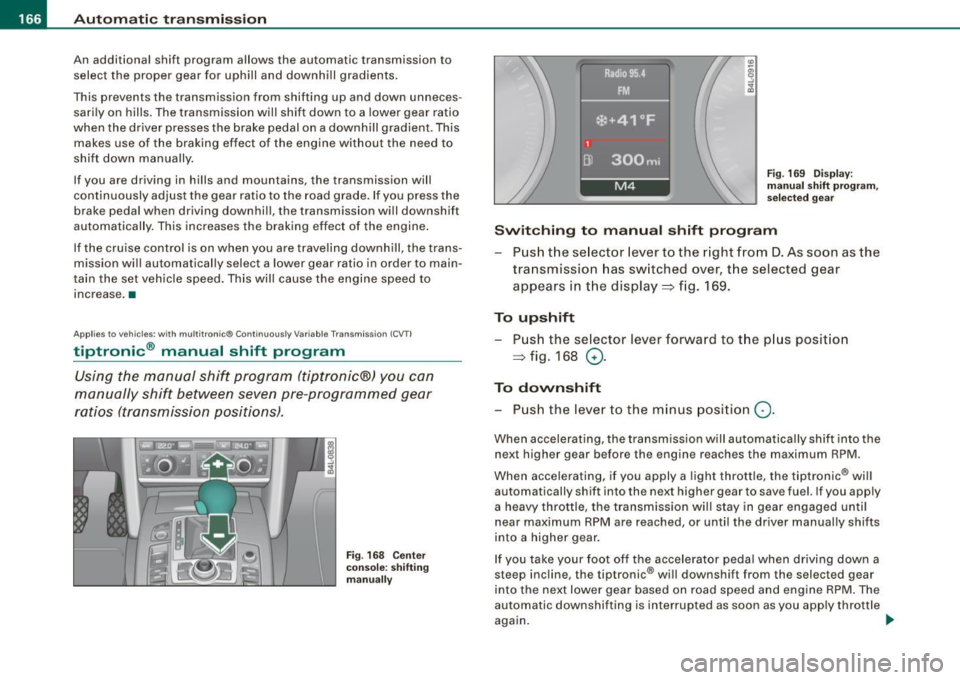
Fig . 16 8 C enter
c onsole : shifting
m anu ally Fi
g. 169 Di sp la y:
m anu al shift progr am ,
se lec ted ge ar
Switching to manual shift program
Pus h th e se lecto r leve r to the r ight from D. As soon as the
transmission has sw itched over, t he selected gear
ap pears in t he display ~ fig . 169.
To upshift Push the se lector lever forward to t he p lus position
~ fig.168
0-
To downshift
- Pu sh t he lever t o the minus posi tion
Q .
When accelerati ng, the transm ission wi II automatica lly shift into the
next higher gear before the engine reaches the maximum RPM.
When accelera ting, if you apply a ligh t thrott le, the tipt ron ic® wi ll
automatically shift into the next higher gear to save fuel. If you apply
a heavy throttle , the transmiss ion wi ll stay in gear engaged unti l
near maximum RPM are reached, or until the driver manually shifts
into a higher gear .
I f you take your foot off the accelerator peda l when driving down a
steep incline, the tiptronic ® will downshift from the selected gear
into the next l ower gea r based on r oad speed a nd engine RPM . The
automatic downshifting is interrupted as soon as you apply throttle
again . .,_
Page 172 of 398
• .___A_ u_d_ i _P _a_ r_ k_ i_ n ..:g=-- S_ y=-- s_t _ e _m _____________________________________________ _
Please note that low objects already signalled by a warning can
disappear fro m the system 's detectio n range and wil l n ot con tinu e
to be signa lled .
If the distance to an obstacle remains the same, the vo lume of the
d istance wa rni ng i s gradually reduced after a bout 4 seconds .
Approaching another obstacle wi ll result in the distance warning
sound ing at the nor mal vo lume agai n.
Malfunctions in the system
If a warnin g tone is audible for about five seconds when you turn on
the ignition, there is a ma lfunction in the system. Have the prob lem
corrected by y our aut horiz ed Aud i dealer .
Keep the sensors in the rear bumper c lean and free from ice so that
t he acoustic park ass is t sy ste m can f unction pro per ly .
& WARNING
• Sensors have dead spaces in which objects cannot be
detected . Be e specially alert for small children and animals , since
they are not always detected by the sensors.
• The Acoustic Parking System is not a substitute for the dr iver's
own caution and alertne ss. Ultimate respon sibility always
remains with the driver during parking and similar maneuvers .
Always watch where you are driving .
• You should always adjust the volume and frequen cy of the
chimes so that you can easily hear the acoustic distance warning
even if the radio is playing , the air-condit ioner blower is on High or
there i s a high level of out side noise .
- Check the settings whenever anyone else has driven the
vehicle before you.
0 Note
• Reme mber that l ow obstacles for wh ic h a warn ing has already
been issued may "dive" below the system's sensing zone if the
v e h icl e is be ing backed u p closer. In this cas e, th e wa rning so und shutting off does
not indicate that you have c
leared the obstacle .
In stea d, impact is im min ent.
• Objects such as trai ler hitches, chains, narrow posts or fences
cov ered by a t hin lay er of p ain t may no t always be dete cte d by t he
system . T hey can stil l damage your vehicle without warning.
[ i ] Tips
K eep the sensors in the rear bumper clean and free of snow and ice
so tha t the acou stic parki ng a ssis t system ca n fu nc tio n proper ly . •
Ap plie s to v ehic le s : w ith Audi P arki ng Syst em ( re arl
Adjusting the chimes
Th e vo lum e and t he pitc h (freq uency) o f th e c him es can
be adju ste d i n th e
MM/ .
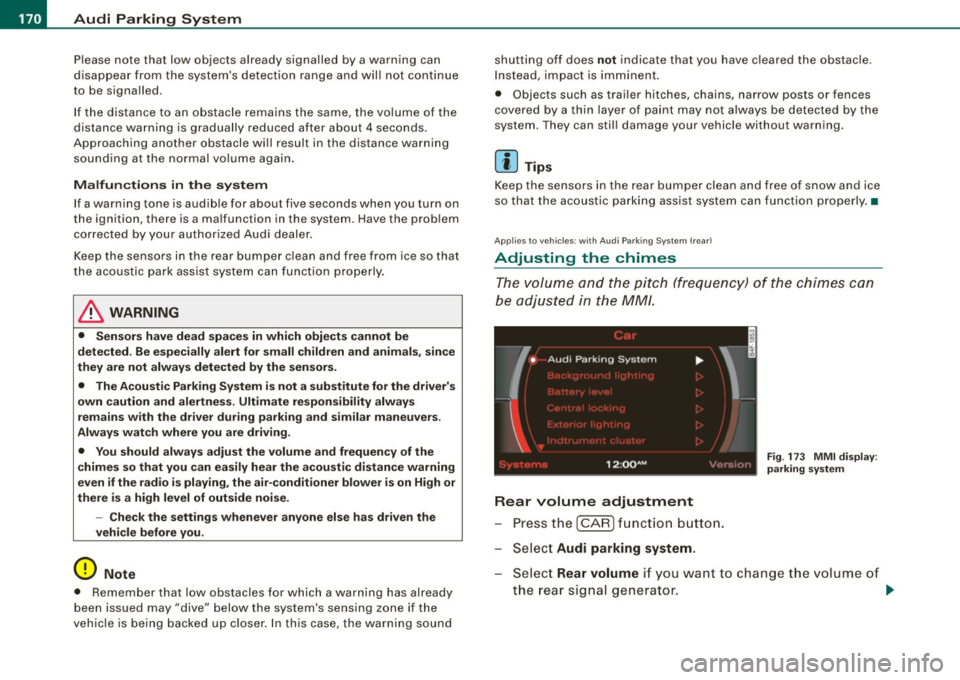
Rear volume adjustment
Pre ss th e [ CAR ] fun ctio n butt on.
S el ect
Audi parking system.
Fig. 173 MMI display :
pa rking system
S elect Rear volume if you want to change t he volume of
t h e rear si gnal genera tor .
~
Page 174 of 398
-Audi Parking System -------=-=---------------
-
Switch the ignition off, the entire acoustic parking
system is automatically deactivated.
The rear-view camera will deactivate automatically when you shift
into a forward gear and drive faster than about 9 mph (15 km/h) .
The delay in deactivating the camera provides an uninterrupted
view behind the vehicle especially when maneuvering in tight parking spaces and prevents the picture from turning off the every
time you shift out of reverse.
The vehicle -obstacle distance at which the sensors start to measure
is
about:
To the side 2 ft (0.60 m)
Center rear 5.2 ft (1.60 ml
Backing up
Distance notification when backing up starts when an obstacle is
detected that is within range of the Audi Parking System. As the
distance decreases, the time between the chimes gets shorter .
When the distance is less than
1 ft (0.30 m), the chime becomes a
continuous tone. Here, at the latest, you should stop backing up.
Please note that low objects already signaled by Audi Parking
System can become so close that they can no longer be detected
and will not continue to be signaled .
If the distance to an obstacle stays the same, the volume of the
distance signal chime is gradually reduced after about
4 seconds
(does not affect the continuous signal tone). Approaching another
obstacle will cause the distance signal to sound again at the normal
volume.
Distance signal tones
Distance is signaled by chimes from the rear signal generator. The
volume and the pitch of the chimes can be adjusted in the MMI
=>
page 180.
Rear-view camera (rear view)
The rear -view camera picture ~ page 175, fig. 179 appears in the
MMI Display as a mirror image . The rear-view camera picture has
orientation lines and marked surfaces projected into it, as an aid to
the parking process=>
page 173. The red line in the picture
=>
page 173, fig. 175 or=> page 173, fig. 176 indicates the collision
area . Here , at the latest, you should stop backing up~&.
If the warning message appears in the display but not the rear-view
camera picture, read and confirm the warning message. The
acoustic distance signal is always active.
If you press a function button on the MMI terminal, the rear -view
camera picture disappears. The rear-view camera picture reappears
the next time you park.
When the rear -view camera picture is displayed, you can adjust the
volume and frequency of the acoustic parking via the control button
with the
Settings function ~ page 181.
Further information on the warning message and the MMI terminal
can be found in the MMI instruction booklet.
& WARNING
• Sensors have blind spots in which objects cannot be detected.
Be especially careful to check for small children and animals
before backing up. Small children and animals will not always be
detected by the sensors.
• The Audi Parking System is not a substitute for being careful
and alert when backing up. Be especially careful during parking
and similar maneuvers. Always watch where you are driving and
make sure that nothing is in the way.
• Remember that low obstacles which have already been
signaled may pass below the system's sensing zone when the
vehicle is backing up. The fact that the signal stops does not mean
that you have cleared the obstacle. When the signal stops, impact is imminent . Objects such as trailer hitches, chains, narrow posts
or fences covered by a thin layer of paint may not always be
~
Page 175 of 398
Audi Parking System -
----------------=----=------'
& WARNING ! continued )
detected by the system . They can still damage your vehicle
without warning .
• Always make sure that the volu me and frequency of the chimes
i s adjusted so that you can easily hear the acousti c di stance signal
ev en if the radio is playing , the air- cond it ioner blower is on High or
there i s a high level of outs ide noise .
- Che ck the settings whenever someone else has driven the
vehicle before you.
• Improp er reliance on the Audi Parking System can cause colli
s ions and serious personal inju ry .
- Never rely only on parking assist when backing up.
- Always check rear view mirrors to make sure it is safe to back
up.
[ i ) Tips
• The rea r-view came ra pic ture is avai lable a s soon as the MMI
D isplay or the MMI is switched on, or the start-up phase is
completed.
• K eep the sensors in the rear bumper and the rear-view camera
len s clean a nd free of snow and ice, so that the Aud i Pa rking Syste m
can work properl y. Please follow the additional notes on
~ page 181 . •
Con tro ls and eq uip
ment
App lies to veh icles: with Audi Parking System ( rear) and rear-view camera
Rear-view camera (Rear View)
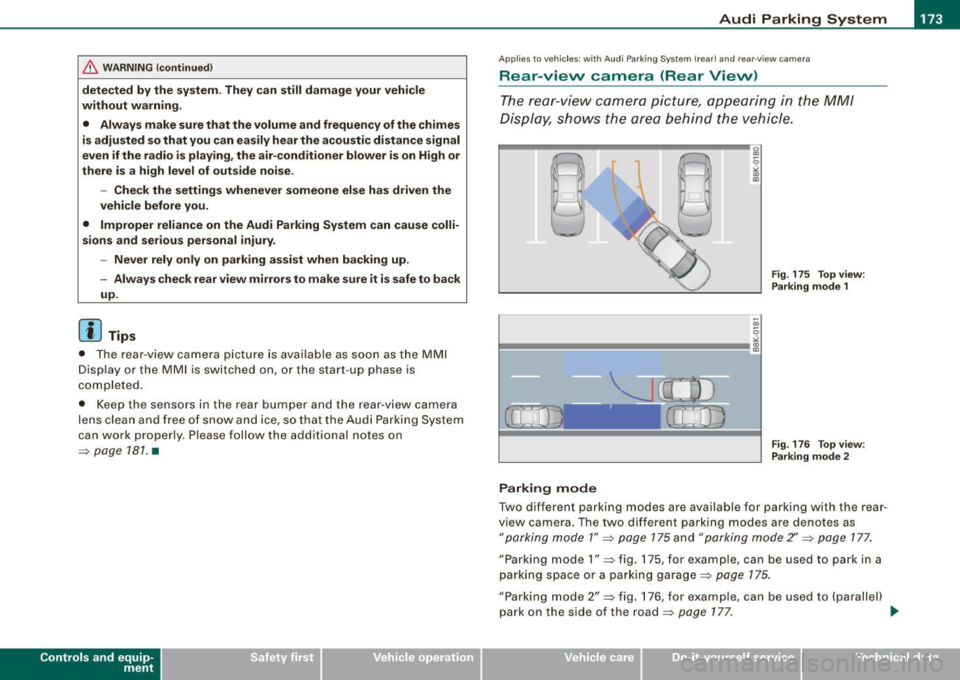
T he rea r-vie w camer a picture , appearing in the MM/
Display, s hows t he are a behin d t he veh icle.
9
"' co m
Fig . 1 7 5 T op view :
Pa rking mode 1
0
Fig . 17 6 T op view :
Parking mode 2
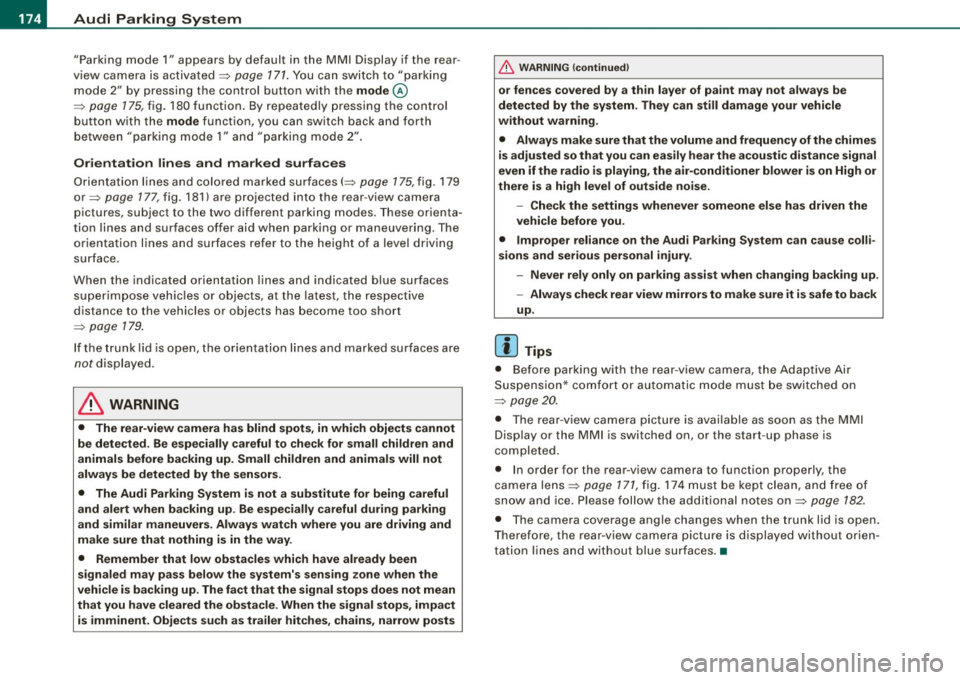
Parking mode
Two different parkin g modes are available for parking with the rear
v iew camera. The two different parking modes are denotes as
"parking mode 1" ~ page 175 a nd "parking mode 2" ~ page 177.
"Parking mode 1" ~ fig. 175, for e xamp le, can be used to park in a
parki ng space o r a par king garage ~
pag e 175 .
"Parking mode 2" ~ fig. 176, for example, can be used to {parallel)
park on the s ide of the road~
page 177. ..,
Vehicle care I I irechnical data
Page 176 of 398
_____ A_ u_d _ i_ P_ a_r _k _in _ g=- S--=- y_s _t _e _m ____________________________________________ _
"Parking mode 1" appears by default in the MMI Display if the rear
v iew came ra is activate d=>
page 171 . You can switch to " parki ng
mode
2" by pressing the control button with the mode @
=> page 175, fig. 180 function . By repeatedly p ressing the control
button with the
mode function, you can switch back and forth
between "parking mode
1 " and "pa rking mode 2".
Orientation lines and marked surfa ces
Orientati on l ines and col ored ma rke d surfaces( => page 175, fig . 179
or => page 177, fig. 181) a re projected into the rear -view ca mer a
pictu res, subject to the two diffe rent par king modes . These orienta
tion lines and surfaces offer aid when parking or maneuvering. The
orientation lines and su rfaces refer to the height of a leve l driving
sur face.
When the indicated orientation lines and indicated blue surfaces
sup erimpos e veh ic le s or o bjects, a t the lates t, t he respectiv e
d istance to the vehicles or objects has become too short
=>
p age 179 .
If the tr unk lid is open, the o rien tat io n lin es and marked su rfaces are
not displayed .
& WARNING
• The rear-view camera has blind spots , in which objects cannot
be detected . Be especially careful to check for small children and
animals before backing up . Small children and animals will not
always be detected by the sensors.
• The Audi Parking System is not a substitute for being careful
and alert when backing up . Be especially careful during parking
and similar maneuvers . Always watch where you are driving and
make sure that nothing is in the way.
• Remember that low obstacles which have already been
signaled may pass below the system 's sensing zone when the
vehicle is backing up . The fact that the signal stops does not mean
that you have cleared the obstacle . When the signal stops , impact
is imminent . Objects such as trailer hit ches, chains , narrow posts
& WARNING (continued )
or fences covered by a thin layer of paint may not always be
detected by the sy stem. They can still damage your vehicle
without warning .
• Always make sure that the volume and frequency of the chime s
is adjusted so that you can easily hear the acoustic distance signal
even if the radio is playing , the air -conditioner blower is on High or
there is a high level of outside noise .
- Check the settings whenever someone else has driven the
vehicle before you .
• Improper reliance on the Audi Parking System can cause colli
sions and serious personal injury .
- Never rely only on parking assi st w hen changing backing up .
- Always check rear view mirrors to make sure it is safe to back
up .
[ i ] Tips
• B efore parking with the rear -view camera, the Adaptive Air
Su spensi on* co mfort or automatic mode must be switched on
=>
page 20.
• The rea r-v iew ca mera pic ture is avai la bl e as soon as the M MI
Display or the MMI is sw itched on, or the start -up phase is
completed.
• I n order for the rear-view camera to function proper ly, the
c a m era len s=>
page 171 , fig. 17 4 mu st be kept clea n, a nd free of
snow and ice. P lease follow the additional notes on=>
page 182.
• The came ra c overage a ngle changes when the trunk lid is open .
T herefore, the rear-view camera picture is d isplayed without orien
t a tion lin es an d w ith out blue surfaces .•
Page 177 of 398
Audi Parking System -
----------------=----=------'
Applies to vehicles: with Audi Parking System (r ear) and rea r-v iew came ra
Rear -view camera coverage area
®
Fig . 177 Top view:
Rear-view camera
coverage area
Fig . 178 Side view :
Covered area 0 and
uncovered area
0 of
the rear-view camera
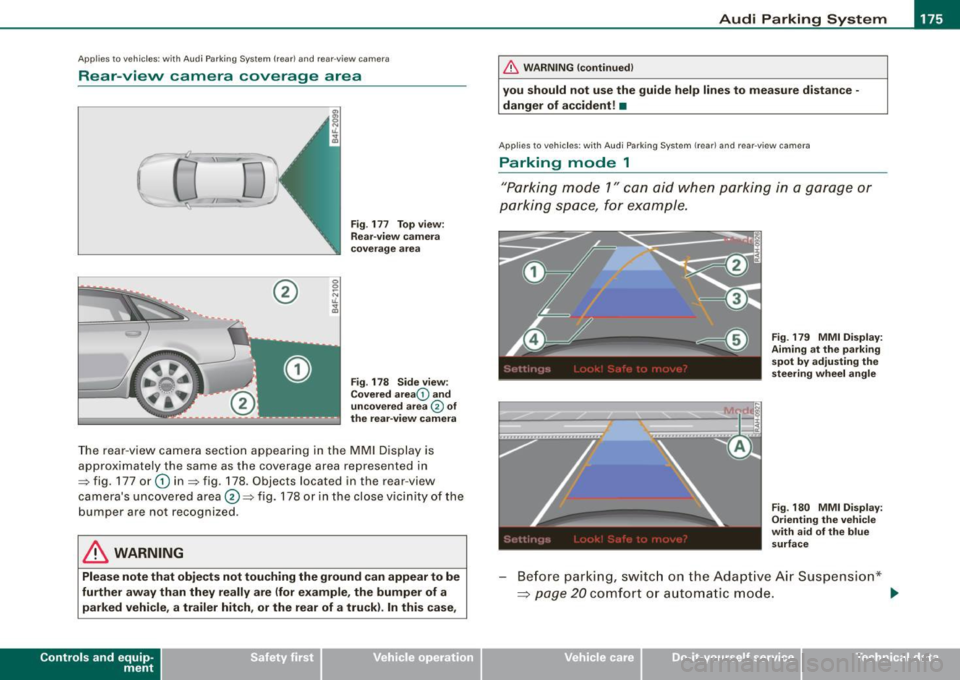
The rear-view camera section appearing in the MMI Display is
approximately the same as the coverage area represented in
=> fig. 177 or
G) in=> fig . 178. Objects located in the rear-view
camera's uncovered area@=> fig . 178 or in the close vicinity of the
bumper are not recognized.
& WARNING
Please note that objects not touching the ground can appear to be
further away than they really are (for example, the bumper of a
parked vehicle, a trailer hitch , or the rear of a truck) . In this case,
Contro ls and eq uip
ment
& WARNING !continued)
you should not use the guide help lines to measure distance -
danger of accident! •
Applies to veh ic les : w ith Aud i Park in g Sys tem (re ar) and rear-view camera
Parking mode 1
"Parking mode 1" can aid when parking in a garage or
parking space, for example .
M I ij
~------------------:
Fig. 179 MMI Display:
Aiming at the parking
spot by adjusting the
steering wheel angle
Fig . 180 MMI Display:
Orienting the vehicle
with aid of the blue
surface
Before parking, switch on the Adaptive Air Suspension*
~ page 20 comfort or automatic mode. .,,_
Vehicle care I I irechnical data
Page 178 of 398
-L-___:.A...:.:; u..:d .:.: i..: P;___;:; a.:..r .:.:k .:.:in .:.. g~ S.::..!. y..:s ..:t ..:e .:..m .:..:.... ___________________________________________ _
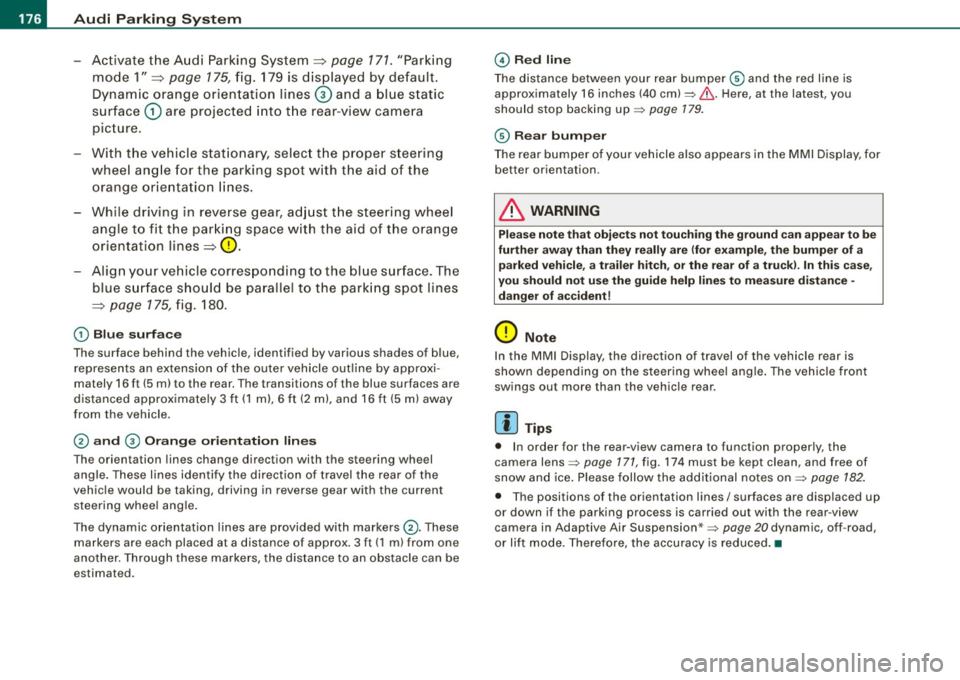
-Activate the A udi Parking System~ page 171. "Parki ng
mode 1"
~ page 175, fig . 179 is d isplayed by default .
Dynamic orange orien tation lines
G) and a blue s tat ic
surface
G) are projected into the rear -view camera
picture.
With the vehicle stat ionary, selec t the proper steering
wheel ang le for the parking spot with the aid of the
orange or ie ntation lines.
- While driving in reverse gear, ad just t he steering wheel
angle to fi t the parki ng space with the aid of the orange
orientation lines~
0.
- Align your vehicle corresponding to the blue surface. The
blue s urface should be parallel to the park ing spot lines
~ page 175, fig . 180.
G) Blu e surface
The surface behind the vehic le, identified by various shades of b lue,
represents an extension of the outer vehicle out line by approxi
mately 16 ft (5 ml to the rear. The transitions of the blue surfaces are
distanced approximate ly 3 ft ( 1 ml, 6
ft (2 m), and 16 ft (5 m) away
from the vehicle.
© a nd 0 Orang e orie nta ti on lin es
The orientation lines change direction with the steering wheel
ang le . These lines identify the direction of travel the rear of the
vehic le would be taking, driving in reverse gear with the current
steer ing whee l ang le .
The dynamic orientation lines are provided with markers©-These
markers are each placed at a distance of approx. 3 ft ( 1 m) from one
another. Through these markers, the distance to an obstacle can be
estimated .
©Redli ne
The distance between your rear bumper® and the red line is
approximately 16 inches (40 cm):::::,&. Here, at the latest, you
should stop backing up:::::,
page 179.
® Rear bum per
The rear bumper of your vehicle also appears in the MMI Display, for
better orientation.
& WARNING
Ple ase n ote t hat obje cts n ot tou ch ing th e ground can ap pear to be
fu rther away th an th ey re ally ar e (for example , the bumper of a
p arked vehi cle , a trai ler hit ch, o r th e rea r of a tr uck). In this case,
yo u shou ld not u se th e gu ide h elp lin es to mea sur e di stan ce -
d anger of accident !
0 Note
In the MMI Display, the direction of travel of the vehicle rear is
shown depending on the steering whee l ang le . The vehicle front
swings out more than the vehic le rear.
[ i ] T ip s
• In order for the rear-v iew camera to function proper ly, the
camera lens:::::,
page 171, fig. 174 must be kept clean, and free of
snow and ice. P lease follow the add itional notes on :::::,
page 182.
• The positions of the orientation lines/ surfaces are disp laced up
or down if the parking process is carried out with the rear -view
camera in Adaptive Air Suspension*:::::,
page 20 dynamic, off -road,
or lift mode. Therefore, the accuracy is reduced. •
Page 179 of 398
_____________________________________________ A_u_ d_ i _P _a_ r_ k_ i_n -=g a..- S-=y'--- s_ t_ e_ m __ ....J_
Ap plies to vehic les : w ith Au di Par kin g Sy stem (r ear) and rea r-v ie w came ra
Parking mode 2
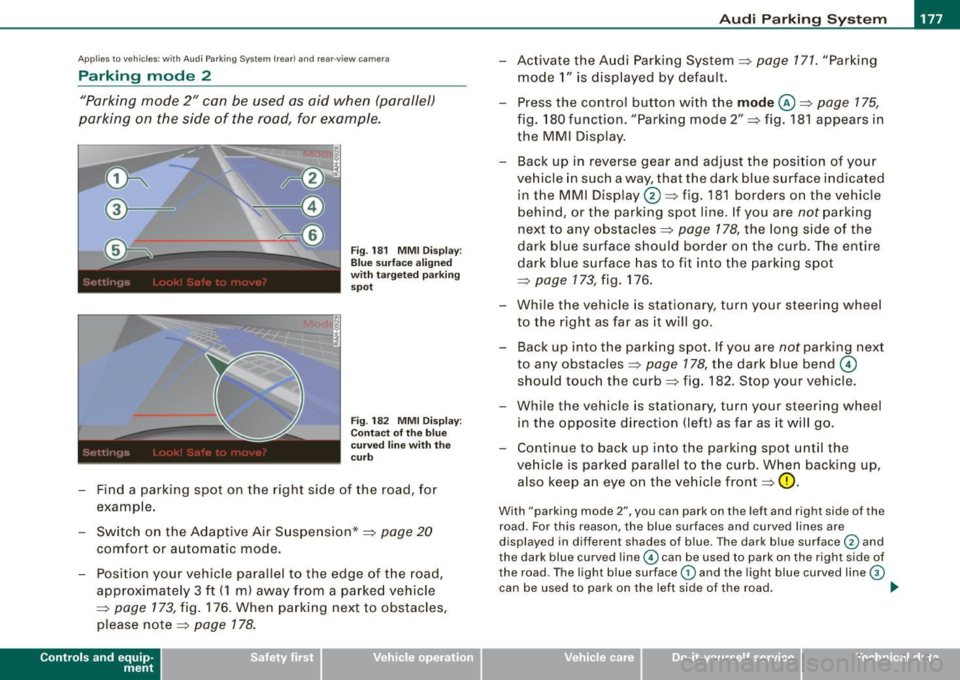
"Parking mode 2" can be used as aid when (parallel)
parking on the side of the road , for example.
Fig . 181 MMI Display:
Blue surface aligned
with targeted parking
spot
Fig . 182 MMI Display:
Contact of the blue
curved line with the
curb
- Find a parking spot on the right side of the road, for
example .
- Switch on the Adaptive Air Suspension*=>
page 20
comfort or automatic mode.
- Position your vehicle parallel to the edge of the road,
approximately 3 ft (1 m) away from a parked vehicle
=>
page 173, fig. 176. When parking next to obstacles,
please note=>
page 178.
Contro ls and eq uip
ment
- Activate the Audi Parking System => page 171. "Parking
mode 1" is displayed by default.
- Press the control button with the
mode @=> page 175,
fig. 180 funct ion . "Park ing mode 2" => fig. 181 appears in
the MMI D isplay.
- Back up in reverse gear and adjust the pos ition of your
vehicle in such a way, that the dark blue surface ind icated
in the MMI Display
0 => fig . 181 borders on the vehicle
be hind, or the parking spot line. If you are
not parking
next to any obstacles=>
page 178, the long side of the
dark blue surface should border on the curb. The ent ire
dark blue surface has to fit into the parking spot
=>
page 173 , fig. 176.
- While the vehicle is stationary, turn your steering wheel
to the right as far as it will go.
- Back up into the parking spot. If you are
not park ing next
to any obstac les =>
page 178, the dark blue bend ©
should touch the curb=> fig . 182. Stop your vehicle.
- Wh ile the vehicle is stat ionary, turn your steering whe el
i n the oppos ite direc tion (lef t) as far as it will go .
- Contin ue to back up into the park ing spot until the
vehicle is parked pa rallel to the curb. When backing up,
also keep an eye on the vehicle front=>
0.
With "parking mode 2 ", you can park on th e left a nd right sid e of the
road. Fo r this reason, the blue surfaces and curved l ines are
displ ayed in diffe ren t sh ades of blue . The dark blue surfa ce
0 and
the dark blue curved line© can be used to park on the right side of
t he road . The l igh t blue s urfa ce
G) and the light blue curved lin e G)
can be us ed to park on the left si de of the road . .,
Vehicle care I I irechnical data
Page 180 of 398
• .___A_ u_d_ i _P _a_ r_ k_ i_ n ..:g=-- S_ y=-- s_t _ e _m _____________________________________________ _
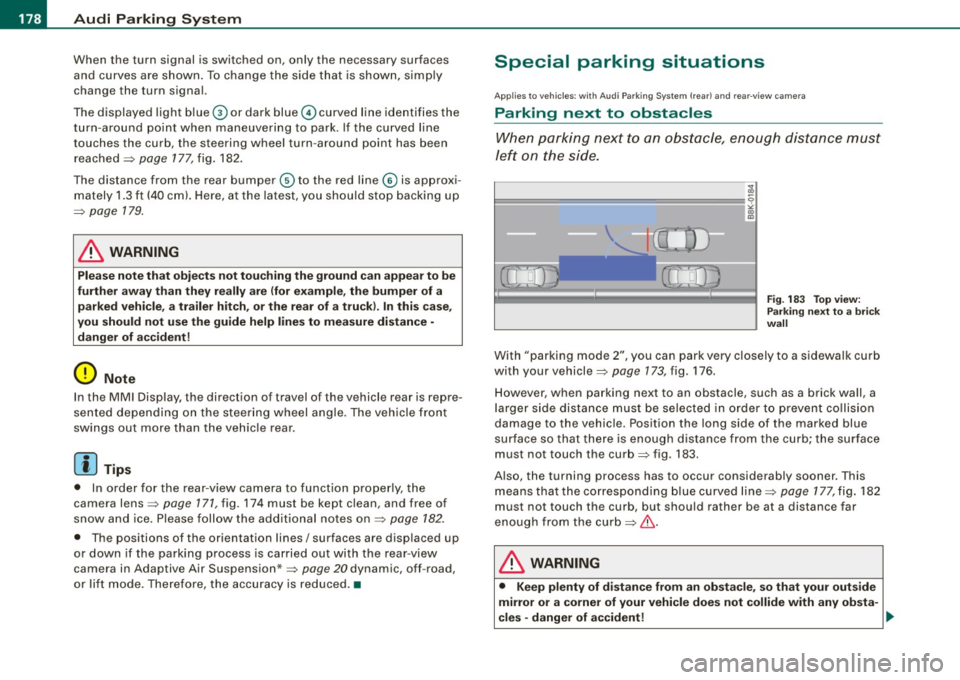
When the turn signal is switched on, only the necessary surfaces
and curves are shown. To change the side that is shown, simply
change the turn signal.
The displayed light blue® or dark blue © curved line identifies the
turn-around point when maneuvering to park. If the curved line
touches the curb, the steering wheel turn -around point has been
reached =>
page 177, fig. 182.
The distance from the rear bumper © to the red line@ is approxi
mately
1.3 ft (40 cm). Here, at the latest, you should stop backing up
=>
page 179.
& WARNING
Please note that objects not touching the ground can appear to be
further away than they really are (for example, the bumper of a parked vehicle, a trailer hitch, or the rear of a truck).
In this case,
you should not use the guide help lines to measure distance -
danger of accident!
0 Note
In the MMI Display, the direction of travel of the vehicle rear is repre
sented depending on the steering wheel angle. The vehicle front
swings out more than the vehicle rear .
[ i] Tips
• In order for the rear-view camera to function properly, the
camera lens=>
page 171, fig. 174 must be kept clean, and free of
snow and ice. Please follow the additional notes on=>
page 182.
• The positions of the orientation lines/ surfaces are displaced up
or down if the parking process is carried out with the rear-view
camera in Adaptive Air Suspension*=>
page 20 dynamic, off -road,
or lift mode. Therefore, the accuracy is reduced. •
Special parking situations
Applies to vehicles : with Audi Parkin g System (rea r) and rear-view camera
Parking next to obstacles
When parking next to an obstacle, enough distance must
left on the side.
=
Fig. 183 Top view:
Parking next
to a brick
wall
With "parking mode 2", you can park very closely to a sidewalk curb
with your vehicle=>
page 173, fig. 176.
However, when parking next to an obstacle, such as a brick wall, a
larger side distance must be selected in order to prevent collision
damage to the vehicle. Position the long side of the marked blue
surface so that there is enough distance from the curb; the surface
must not touch the curb=> fig.
183 .
Also, the turning process has to occur considerably sooner. This
means that the corresponding blue curved line=>
page 177, fig. 182
must not touch the curb, but should rather be at a distance far
enough from the curb=>&.
& WARNING
• Keep plenty of distance from an obstacle, so that your outside
mirror or a corner of your vehicle does not collide with any obsta-
cles -danger of accident! ..