horn AUDI S6 2009 Owners Manual
[x] Cancel search | Manufacturer: AUDI, Model Year: 2009, Model line: S6, Model: AUDI S6 2009Pages: 398, PDF Size: 43 MB
Page 13 of 398
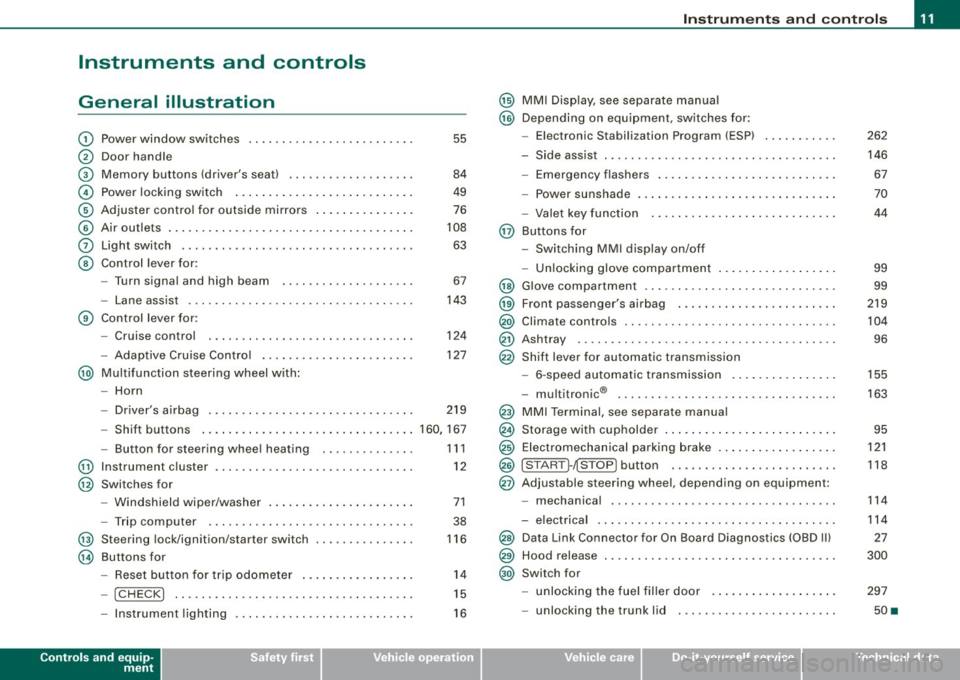
Instruments and controls
General illustration
G)
0
©
©
©
©
0
©
Power window switches ...... .... ..... .. ....... .
Door handle
Memory buttons (driver's seat)
Power locking switch .......................... .
Adjuster control for outside mirrors .. .... .... .... .
Air outlets ........ ... ...... .... ...... .... ... .. .
Light switch .... .... ........... .... .... .... ... .
Control lever for :
- Turn signal and high beam
- Lane assist .... .... ... .... .... .... .......... .
Control lever for:
- Cruise control
- Adaptive Cruise Contro l .......... ...... .... .. .
@ Multifunction steering wheel with:
- Horn
55
84
49
76
108
63
67
143
124
127
- Driver's airbag . . . . . . . . . . . . . . . . . . . . . . . . . . . . . . . 219
- Shift buttons ................................ 160, 167
@
@
@
@
-Button for steering wheel heating
Instrument cluster ... .... ... .... ...... ......... .
Switches for
- Windshield wiper/washer ..... ...... ..... .. ... .
- Trip computer ..... .. ..... ... .... ...... ... .. .
Steering lock/ignition/starter switch
Buttons for
- Reset button for trip odometer ... .. .... .... ... .
!CHECK] .. .... ....... .... .... ....... .... ... .
Instrument lighting .... ... .... .... ... ..... ... .
Controls and equip
ment
1 1 1
12
71
38
116
14
15
16
Instruments and controls
@ MMI Display, see separate manual
@ Depending on equipment, switches for:
- Electronic Stabilization Program (ESP)
- Side assist .. ... ..... .. .. .. .... .... .... ... ... .
- Emergency flashers .......................... .
- Power sunshade .... .... .... .... ... .... ..... . .
- Valet key function .... ....... ...... .... ...... .
@ Buttons for
- Switching MMI display on/off
- Unlocking glove compartment
@ Glove compartment ........... .... .... ......... .
@ Front passenger's airbag .. .... .... ... .. ...... .. .
@) Climate controls ......... .. .. .... .... .... .. . .. . .
@ Ashtray ..... .... .... ....... .... .... .... ... ... .
@ Shift lever for automatic transmission
- 6-speed automatic transmission .. .. .... .... ... .
I . .
® -
mu t1tron1c ... .... .... .... .... .... ... ...... .
@ MMI Terminal, see separate manual
@ Storage with cupholder . ........ ... .. .... .... ... .
@ Electromechanical parking brake ... .... .... .... .. .
@ ISTART ]-~STOP ] button .. ... ..... ... .... .... ... .
@ Adjustable steering wheel, depending on equipment:
- mechanica l .. .. .... .... ..... .. .... ..... ... .. .
- electrica l ... ...... .... ... .. .... .... ...... ... .
@) Data Link Connector for On Board Diagnostics (OBD II)
@ Hood release . .... .... ...... ... .. .... .... ... ... .
@) Switch for
unlocking the fuel filler door ..... ...... .... ... .
- unlocking the trunk lid . .... .... .... .... ... ... .
I • •
262
146 67
70
44
99
99
219
104
96
155
163
95
121
118
114
114
27
300
297
50 •
Page 47 of 398
When the function is switched on, the buttons for opening the rear lid and glove compartment have no function. However, please note
the following exceptions :
Exceptions
If the ignition has been switched on using the master key, you can
still open the glove compartment .
As long as the ignition is switched off, you can still open the rear lid
using the rear lid button on the
master key ,c::::s. The same holds true
for using the rear lid release handle in conjunction with the Conve nience key*.
For this reason, be sure to only hand over the
valet key to the person
who will take charge of your vehicle.
[ i] Tips
Be sure to activate the function before handing over the valet key to
someone else. The valet key only fits the lock in the driver's door and
the ignition lock. •
Power locking system
General description
The power locking system locks or unlocks all doors and
the rear lid simultaneously .
The power locking system in your vehicle incorporates the following
functions:
• Central locking function
• Selective unlock feature=>
page 48
• Remote control feature=> page 42
• Convenience key*=> page 52
• Anti-theft alarm system=> page 54
Controls and equip
ment
Opening and closing
All the doors and the rear lid are locked by the central locking
system when you lock the vehicle. You can set whether generally
only the driver's door or all doors and the rear lid should be
unlocked when you open the vehicle in the MMI menu
Central
locking
to suit your individual desires=> page 48.
Unlocking the vehicle
You can unlock the vehicle from outside either by using the remote
control
or by inserting and turning the key in the driver's door lock.
When you
unlock your vehicle:
• The anti -theft alarm system is deactivated briefly .
• The vehicle interior lights illuminate for approximately 30
seconds.
• All turn signal lights will flash twice when the car is unlocked .
• After unlocking the vehicle, you have 60 seconds to open a door
or the rear lid. Aft er 60 seconds, the vehicle automatically locks and
the anti-theft alarm system activates again.
The rear lid can be locked or unlocked either by using the remote
control
or by inserting and turning the key in the driver's door lock.
Unlocking the vehicle with the remote control will only
unlock the
rear lid, to
open it. the lid handle needs to be pressed.
Locking the vehicle
You can lock the vehicle from outside either by using the remote
control
or by inserting and turning the key in the drivers's door lock.
When you
lock the vehicle :
• All doors and the rear lid are locked .
• All turn signal lights will flash once when the car is locked .
• The anti-theft alarm system is activated . The horn of the anti
theft alarm system will sound and the anti -theft alarm system readi
ness light, located in the upper part of the driver's door panel, will
start to blink .
• The vehicle interior lights turn off.
I • •
Page 49 of 398
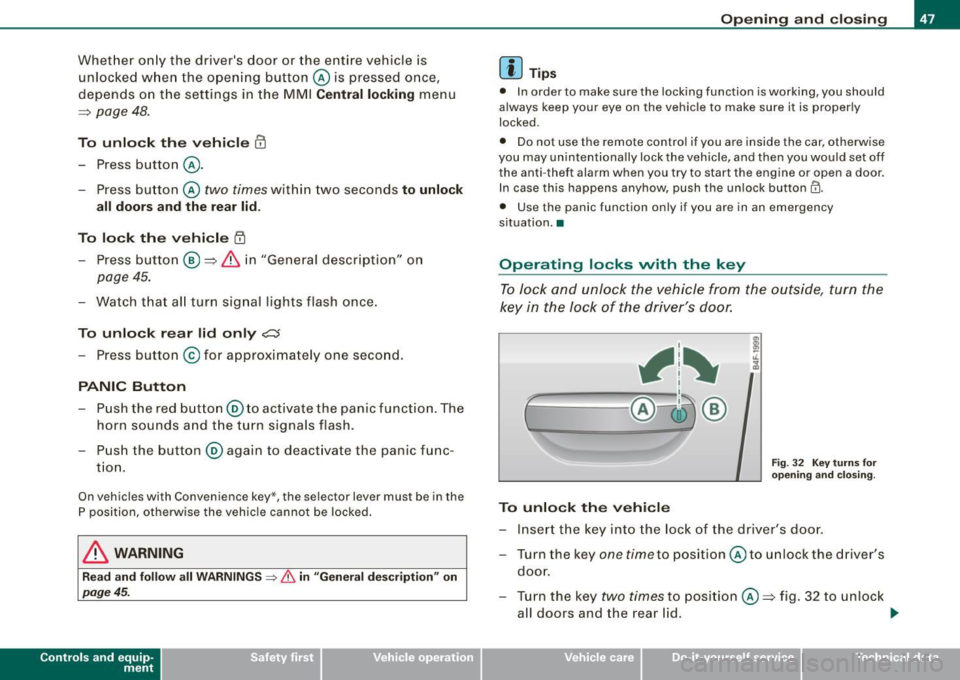
Whether on ly the driver's door or the entire vehicle is
unlocked w hen the o pen ing button © is pressed once,
depends on the settings in the MMI Central l ocking menu
=> page 48.
To unlock th e vehi cle CD
- Press button @.
- Press button @
two times within two seconds to unlock
all doors and the rear lid .
To lo ck th e vehicle
t'.D
- Press button ® => & in "General description" on
page 45.
- Watch that all turn signal lights flas h once .
To unlo ck r ear lid only
~
- Press button @ for app roximately one second .
PANIC Button
- Push the red button @to activate the panic function . The
horn sounds a nd t he turn signals flash.
- Push the button@ again to deact ivate the pa nic func
t io n.
On vehicles wi th Convenience key *, the sele ctor lever must be in the
P position, otherwise the vehic le cannot be locked.
& WARNING
Read and fo llow all WARNINGS ::::> & in "General de scription " on
page 45.
Con tro ls and eq uip
ment
Op ening and clo sing
[ i ] Tip s
• In order to make sure the locking function is working, you should
always keep your eye on the vehicle to make sure it is proper ly
locked .
• Do no t use the remote control if you are inside the car, otherwise
you may un intent ionally lock the vehicle , and then you would set off
the anti -theft alarm when you try to start the engine or open a door .
In case this happens anyhow, push the un lock button
II).
• Use the panic function only if you are in an emergency
s ituation. •
Operating locks vvith the key
To lock and unl ock the vehicle from the outside, turn the
key in the lock of the driver 's door.
, 1~
ff-= ~;:__, @-i3 ®
To unlock th e veh icle
F ig. 32 Key turn s for
o penin g and clos in g.
- Insert the key into the lock of the driver 's doo r.
- Turn the key
one time to posit ion @ to unlock the driver 's
doo r.
- Turn the key
two times to position @=> fig . 32 to unlock
all doors and the rear l id. .,_
Vehicle care I I irechnical data
Page 56 of 398
Opening and closing
& WARNING
• When you lock your vehicle from outside, nobody -especially
children - should remain inside the vehicle. Remember, when you
lock the vehicle from the outside the windows cannot be opened
from the inside.
• When you leave the vehicle, always remove the ignition key and
take it with you. This will prevent passengers (children, for example) from accidentally being locked in the vehicle should they
accidentally press the power locking switch in the front doors .
• Do not leave children inside the vehicle unsupervised. In an
emergency it would be impossible to open the doors from the
outside without the key.
[ i] Tips
It is not possible to re-open the door for a brief period directly after
closing it. This allows you to ensure that the doors are properly
locked .•
Anti -theft alarm system
Description
The anti-theft alarm triggers an alarm if anyone attempts
to break into the vehicle.
The anti-theft alarm system triggers an audible alarm and turns on
the emergency flasher if an unauthorized interference with the
vehicle is sensed by the system.
How is the anti-theft alarm system switched on?
The anti-theft alarm system is switched on when you lock the
vehicle. The system is activated approximately 30 seconds after the
vehicle is locked. The indicator light on top of the door trim start
flashing rapidly for 30 seconds and then blink slowly.
How is the anti-theft alarm system switched off?
The anti-theft alarm system is switched off only when you unlock
your vehicle. If you do not open a door within 60 seconds after you have unlocked with the remote control, the vehicle will lock itself
again automatically.
When will the anti-theft alarm system be triggered?
When the vehicle is locked, the alarm system monitors and protects
the following parts of the vehicle:
• engine compartment
• luggage compartment
• doors
• vehicle incline
• ignition
When the system is activated, the alarm will be triggered if one of
the doors, the engine hood or the rear lid are opened, or if the igni
tion is turned on or if the vehicle incline has been changed. The anti
theft alarm system will also go off when the battery is disconnected.
You can also trigger the alarm by pressing the PANIC button on your
remote control. This will alert other people in case of emergency .
Press the
PANIC button again to turn off the alarm .
How is the anti-theft alarm switched off when
triggered?
The alarm system is switched off when you unlock the vehicle or
when the ignition is switched on . The alarm will also switch itself off
when it comes to the end of its cycle.
Emergency flasher and horn
The emergency flasher will blink briefly and the horn sounds when
the doors, engine hood and rear lid are properly closed.
If the emergency flashers do not blink, or the horn does not sound,
check the doors, engine hood and rear lid to make sure they are
properly closed. If you close a door, the hood or the rear lid with the
~
Page 57 of 398
anti-theft alarm switched on, the emergency flashers will b link and
the horn will sound only after you have c losed the door or lid .
[ i J Tips
For the an ti-theft a larm system to function p rope rly, make sure a ll
vehicle doors and windows are c losed before leaving the vehicle .•
Tilt sensors -lQ
The tilt sensors t rigg er an alarm if they detect vehicle
movement.
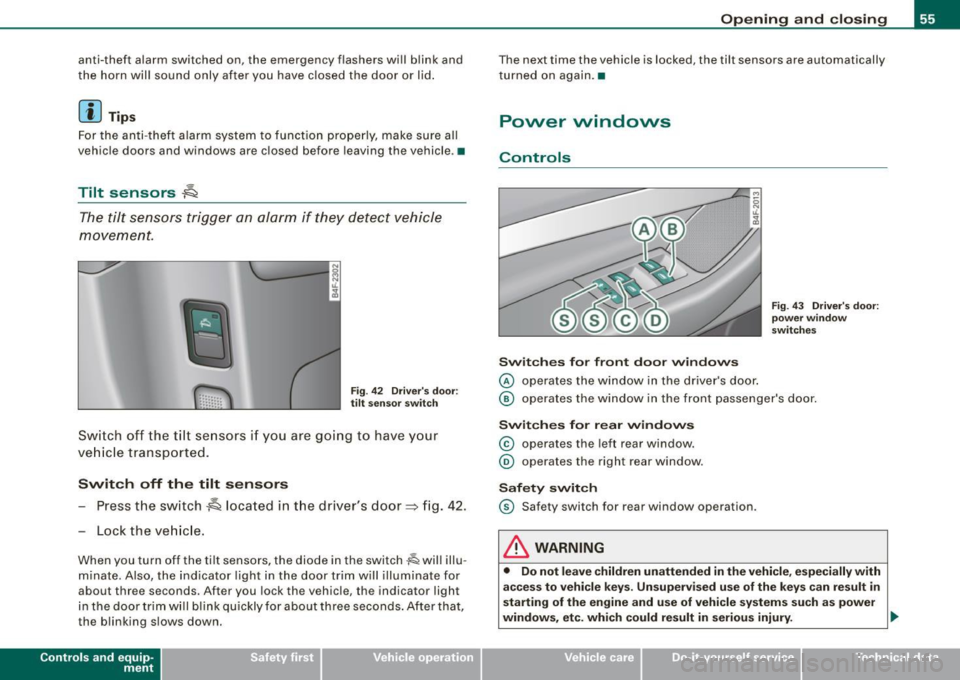
Fi g. 4 2 Driver's door:
tilt senso r switch
Sw it c h off the tilt se nsors i f you ar e go ing to have y our
ve hicle transported .
Switch off the tilt sensors
- Press the switch~ located in t he driver's door~ fig . 42.
- Lock the veh ic le.
When you turn off the tilt sensors, the diode in the switch~ will illu
m inate . Also, the ind icator light in the door trim wil l illuminate for
about three seconds. After you lock the v ehicl e, the indicator light
in the door trim wi ll blink quickly for about three seconds . After tha t,
the blinking slows down.
Con tro ls and eq uip
ment
Op ening and clo sing
The next time the vehicle is locked, the tilt sensors are automatically
turned on again .•
Power windows
Controls
Sw it c hes for fr ont do or window s
@ operates the window in the driver's door .
Fig. 43 Driv er's d oor:
pow er wind ow
s w it ch es
@ operates the window in the front passenger's door.
Switch es for rear window s
© operates the left rear window .
® operates the right rear window .
Safety swit ch
© Safety switch for rear window op eration.
& WARNING
• Do not l eave children unattended in the vehicl e, especially with
a cce ss to vehi cle keys . Un super vised u se of the ke ys c an result in
starting of the engine and use of vehi cle s ystem s suc h as power
windows , etc . which could re sult in seriou s injury. .,
Vehicle care I I irechnical data
Page 192 of 398
• ..__H_ o_m_ e_ L_ i_ n _k_ @_R __________________________________________________ _
9. The emergency flashers will flash three times (after
about 15-60 seconds) when the programming is
successful. Release the button on the remote control.
- To program more devices, repeat steps 4 to 9.
10. Press and hold the trained Homelink® button and
observe the indicator light@=> page 189, fig. 192.
- If the indicator light is solid/continuous, programming is
complete and your device should activate when you press and release the trained Homelink® button.
- If the indicator light blinks rapidly for 2 seconds and is
then a solid/continuous light, proceed with phase 3 to program a rolling code device.
Phase 3: rolling code programming
- A second person on a ladder who can safely reach the
garage door opener motor is recommended.
11. Locate the "learn" button on the garage door opener
motor (refer to the operating instructions for the opener,
as the location of this button may vary by manufacturer).
12. Press and release the learn button on the garage door
opener motor.
- Note: once the button is pressed, there are 30 seconds in
which to initiate the next step.
13. On the Homelink® keypad inside the vehicle, firmly
press and hold the Homelink ® button previously
programmed in phases 1 and 2 for two seconds and
release. Repeat this sequence
twice .
- Some vehicles may require the press/hold/release
sequence up to three times to complete the training
process.
- Homelink® should now activate your rolling code
equipped device.
If the 5 minute time limit is exceeded, the emergency flashers will
flash one time
to indicate that the process has been terminated. In
this case, repeat steps 4 through 9.
If the emergency flashers do not flash
three times (after about 15-
60 seconds), programming was not successful. In this case, repeat
steps 4 through 9 .
Remote control units for garage door openers in Canada are set to
stop transmitting radio frequency signals after two seconds. This
time may not b e sufficient for the Homelink® system to learn the
radio frequency signal. Perform all other steps as described
above. •
Applies to vehicles: with Horne link ® uni versa l remote contro l
Operating the HomeLink ® transmitter
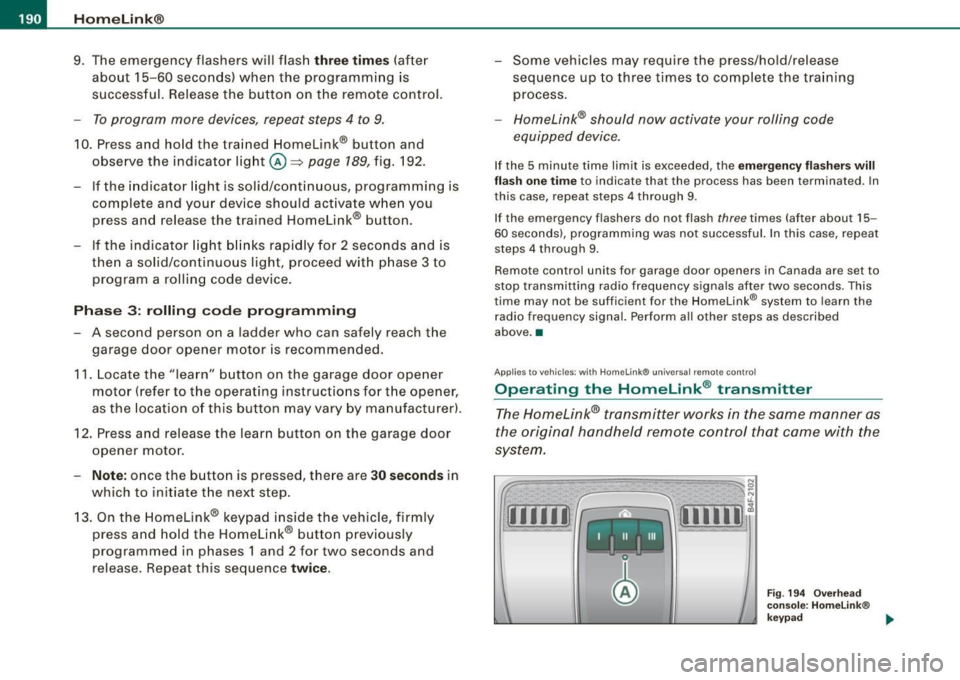
The Homelink® transmitter works in the same manner as
the original handheld remote control that came with the
system.
[iiiil~
I -I II I Ill
Fig. 194 Overhead
console: Homelink®
keypad ...
Page 231 of 398
__________________________________________________ A_ i_ r _b _a...; g::- s_ y=--- s_t _e _m __ fllll
& W ARNING (continued )
seating position and have the airbag system inspected by your
Audi dealer .
• A tight tether or other str ap on a rearward-fac ing child restr aint
attached to the front pas senger seat can put too much pressure
on the weight-sensing mat in the seat and reg ister more weight
than i s actually on the seat. The heavier weight registered can
make the system work as though an adult were on the seat and
deploy the Advanced Airbag when it must be suppressed causing
s erious or even fatal injury to the child .
• If, in exceptional circumstance s, you mu st in stall a forward
fac ing child restra int on the front passenger seat , always move the
seat into its rearmost position in the seat 's fore and aft ad just
ment range , as far away from the airbag a s possible . The backrest
must be adjusted to an upright position . Make sure that the
PASSENGER AIR BAG OFF light comes on and stay s on all the time
whenever the ignition is switched on .
& WARNING
• If the PASSENGER AIR BAG OFF light does not go out when an
adult is sitting on the front passenger seat after taking the steps
described above, make sure the adult is properly seated and
restrained at one of the rear seating positions .
• Have the airbag system inspected by your Audi dealer before
transporting anyone on the front passenger seat .
[ i ] Tips
If the weight -sensing mat in the front passenger seat detects an
e mp ty seat, the fro nt air b ag on the pa ssenge r sid e will be t urned
off, and the PASSENGER AIR BAG OFF l ight will stay on .
a
Controls and equip
ment Safety first
Vehicle operation
Repair, care and disposal of the airbags
Parts of the airbag system are insta lled at many different places on
your Au di. In sta ll in g, re moving, ser vic in g or re pair in g a part in an
area of the vehicle can damage a part of an a irbag system and
pre ven t that system fro m wo rki ng p rope rly in a co llision .
There are some important things you have to know to make sure
that the effectiveness of the system will not be impai red an d that
d iscarded components do not cause inju ry or po llute t he e nv iron
ment .
& WARNING
Improper care , servicing and repair procedures can increase the
risk of personal injury and death by preventing an airbag from
deploying when needed or deploying an airbag unexpectedly:
• Never cover , obstruct , or change the steering wheel horn pad
or airbag cover or the instrument panel or modify them in any way .
• Never attach any objects such as cupholders or telephone
mountings to the surfaces covering the airbag units.
• For cleaning the horn pad or instrument panel, use only a soft ,
dry cloth or one moi stened with plain water . Solvents or cleaners
c ould damage the airbag cover or change the stiffness or strength
of the material so that the airbag cannot deploy and protect prop
erly .
• Never repair , adjust , or change any parts of the airbag system.
• All work on the steering wheel , instrument panel , front seats or
electrical system (including the installation of audio equipment ,
c ellular telephones and CB radios , etc .I must be performed by a
qualified technician who has the training and special equipment
necessary .
• For any work on the airbag system , we strongly recommend
that you see your authorized Audi dealer or qualified workshop .
• Never modify the front bumper or parts of the vehicle body .
Vehicle care Do-it-yourself service Technical data
Page 355 of 398
Fuses and bul bs -_____________ -----=----.;....:..::.:....:.::;______J
No. Equipm ent
29 Not used
30 Not used
31 Back-up light switch, transmission, engine
components
Intelligent power mo dule driver (footwell l ight
32 and front headlights, horn, wiper system, elec
trically adjusta ble steering wheel)
33 Intelligent power modu le driver
(lights left-side)
---,--
34
35
36
37
38
39
I nte lligent power module driver
(lights right-side)
Not used
Headlight washer system
E lectronic Stabilization Program (ESP)
Wip er system
Door control module left -side
Horn
41 Heater fan
42 Control module electronic ignition lock/electri
cally adjustable steering wheel
43 Rear windsh iel d wiper (Avant)
44 Power window opener (left-side) Amps
15
30
25
25
30 25
30
15
25
40
30
15
35
-
•
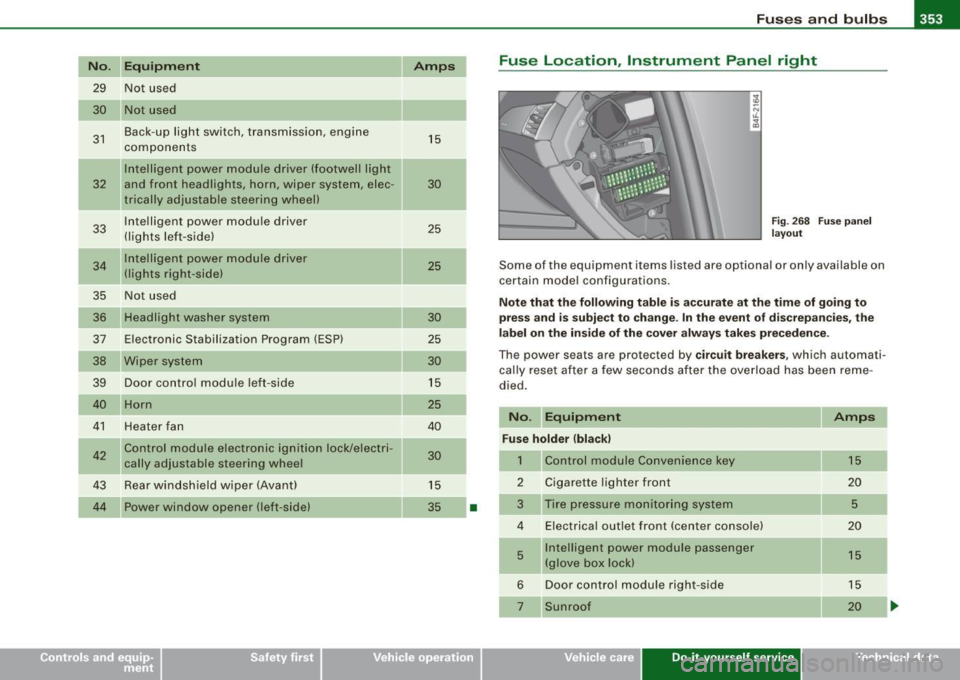
Fuse Location , Instrument Panel right
Fig. 2 68 F use pan el
la yo ut
Some of the equipment items listed are optional or on ly available on
certain model configu rations.
Note that the following table is ac curate at the time of g oing to
press and is subject t o change . In the eve nt of d iscrepan cies , th e
l a b el on t he in side of the cover alw ay s take s prec eden ce.
The power seats are protected by cir cuit breaker s, which automati
ca lly reset after a few seconds a fter the ove rload has been reme
died.
No . Equipment Amps
Fu se holder (bla ck )
1 Control module Convenience key 15
2
Cigarette lighter front 20
3
Tire pressure moni tor ing system 5
4 E lectrica l outlet front (center conso le) 20
5
Intelligent power module passenger 15 (glove box lock)
6 Door control module right -side 15
Sunroof 20
Vehicle care Do-it-yourself service irechnical data
Page 388 of 398
llffl __ A_l.:,. p _h_ a_ b_e _t _ic _ a_l _in _ d_e _x ____________________________________________ _
Glove compartment -emergency unlocking .
100
Gross Vehic le Weight Rating (GVWRl ... 367
H
Head restraints . . . . . . . . . . . . . . . . . . . . . 199
Adjusting . .... .... ....... ...... . 199
Front seats . . . . . . . . . . . . . . . . . . . . . . . 86
Insta llation and remova l .... ....... 87
Rear seats . . . . . . . . . . . . . . . . . . . . . . . 87
Headlight washer reservoir ........... 316
Headlights . . . . . . . . . . . . . . . . . . . . . . . . . . 63
Adaptive Light .... .... .... ...... .. 66
Defective . . . . . . . . . . . . . . . . . . . . . . . . 25
Front fog lights . . . . . . . . . . . . . . . . . . . 65
Headlight range control defective .. . 35
Switching off ..................... 63
Switching on . .................. .. 63
Washer system . . . . . . . . . . . . . . . . . . . 73
Xenon headlights . ...... ... .. .... . 63
Heat ed outside mirrors . . . . . . . . . . . . . . . 76
Heated seats
Front ............. .... ........ .. 110
Rear ..................... ...... 110
Heated steering wheel . . . . . . . . . . . . . . . 111
Heat ed washer jets
Wiper and washer system . . . . . . . . . . 71
Heavy clothing and safety belts .. .... . 208
High beam . . . . . . . . . . . . . . . . . . . . . . . 63, 67
Warning/indicator lights ........... 20
High voltage warning label . ........ .. 366
Homelink® universal remote control .. 188 Hood
Opening 300 Interior
lights ..... ... . .... .. . .. .. .... 68
Rear .. ..... ....... .... ... .... . 68, 69
Release lever .. ...... .... ..... ... 300 Intermittent wiping
Horn .. ...... ............ ....... .... 11
How many a irbags does my vehicle have? ..
222
How often should I check my tire pressures?
324
How safety belt pretensioners work .... 213
Hydroplaning .... .... .... .... ...... 328
I
Ignition key ........................ 116
Ignition lock .. .... .... .... .... .... .. 116
Malfunction .. .... ...... .... ... 33, 36
Ignition lock posit ions .......... ..... 116
Immobilizer ......................... 14
Important things to do before driving .. 195
Improperly worn safety be lts ......... 213
Indicator lights ...... ....... ....... .. 16
Airbag system ............... 226, 227
PASSENGER AIR BAG OFF ......... 227
Infant seats .......... .... ....... ... 243
How do I properly install an infant seat in my veh icle? ........ .... ... .. ... 243
Safety instructions ............... 243
Inside rear view mirror . ............. .. 75
Installing child safety seats
Safety belts . . . . . . . . . . . . . . . . . . . . . 248
Instrument cluster illumination . ... .... 16
Instruments and controls . . . . . . . . . . . . . 12
General illustration ................ 11 Rain sensor
... .... .... ...... .... . 71
J
Jack 342
Jumper cables ...................... 358
Jump-starting 357
K
Key ................................ 41
Battery replacement ............... 43
Coded settings ................... 102
Convenience opening and closing of windows .. ........ ......... .... 57
Emergency key ............ .... .... 41
Key replacement . . . . . . . . . . . . . . . . . . 41
Mast er key ................. ...... 41
Valet key .. ............ ...... ... .. 41
Key coded settings
Climate controls . . . . . . . . . . . . . . . . . 102
Key less entry remote control ... ........ 42
Kick -down
multitronic® ... .... .... ... .... ... 165
tiptronic® ............ ........ ... 158
L
Lane assist
Activating and deactivating 143
Description . . . . . . . . . . . . . . . . . . . . . . 143