interior lights AUDI S6 2009 Owners Manual
[x] Cancel search | Manufacturer: AUDI, Model Year: 2009, Model line: S6, Model: AUDI S6 2009Pages: 398, PDF Size: 43 MB
Page 47 of 398
When the function is switched on, the buttons for opening the rear lid and glove compartment have no function. However, please note
the following exceptions :
Exceptions
If the ignition has been switched on using the master key, you can
still open the glove compartment .
As long as the ignition is switched off, you can still open the rear lid
using the rear lid button on the
master key ,c::::s. The same holds true
for using the rear lid release handle in conjunction with the Conve nience key*.
For this reason, be sure to only hand over the
valet key to the person
who will take charge of your vehicle.
[ i] Tips
Be sure to activate the function before handing over the valet key to
someone else. The valet key only fits the lock in the driver's door and
the ignition lock. •
Power locking system
General description
The power locking system locks or unlocks all doors and
the rear lid simultaneously .
The power locking system in your vehicle incorporates the following
functions:
• Central locking function
• Selective unlock feature=>
page 48
• Remote control feature=> page 42
• Convenience key*=> page 52
• Anti-theft alarm system=> page 54
Controls and equip
ment
Opening and closing
All the doors and the rear lid are locked by the central locking
system when you lock the vehicle. You can set whether generally
only the driver's door or all doors and the rear lid should be
unlocked when you open the vehicle in the MMI menu
Central
locking
to suit your individual desires=> page 48.
Unlocking the vehicle
You can unlock the vehicle from outside either by using the remote
control
or by inserting and turning the key in the driver's door lock.
When you
unlock your vehicle:
• The anti -theft alarm system is deactivated briefly .
• The vehicle interior lights illuminate for approximately 30
seconds.
• All turn signal lights will flash twice when the car is unlocked .
• After unlocking the vehicle, you have 60 seconds to open a door
or the rear lid. Aft er 60 seconds, the vehicle automatically locks and
the anti-theft alarm system activates again.
The rear lid can be locked or unlocked either by using the remote
control
or by inserting and turning the key in the driver's door lock.
Unlocking the vehicle with the remote control will only
unlock the
rear lid, to
open it. the lid handle needs to be pressed.
Locking the vehicle
You can lock the vehicle from outside either by using the remote
control
or by inserting and turning the key in the drivers's door lock.
When you
lock the vehicle :
• All doors and the rear lid are locked .
• All turn signal lights will flash once when the car is locked .
• The anti-theft alarm system is activated . The horn of the anti
theft alarm system will sound and the anti -theft alarm system readi
ness light, located in the upper part of the driver's door panel, will
start to blink .
• The vehicle interior lights turn off.
I • •
Page 70 of 398
Clear vision
High beam
~D
-Push the lever forward 0 to switch on the high beam.
Pull the lever back towards you to switch off the high
beam.
Headlight flasher
~D
- Pull the lever toward the steering wheel © to use the
headlight flasher.
Notes on these features
• The turn signals only work with the ignition turned on. The indi
cator lights ¢ or¢ in the instrument cluster~ page 16 also blink.
• After you have turned a corner, the turn signal switches off auto
matically.
• The high beam works only when the headlights are on. The indi
cator light ~D in the instrument cluster illuminates when the high
beams are on.
• The headlight flasher works only as long as you hold the lever -
even if there are no lights turned on. The indicator light [Din the
instrument cluster illuminates when you use the headlight flasher.
0 Note
Do not use the high beam or headlight flasher if you know that these
could blind oncoming traffic. •
Interior lights
Front interior lights
The interior lights include reading lights for both the
driver and the front passenger.
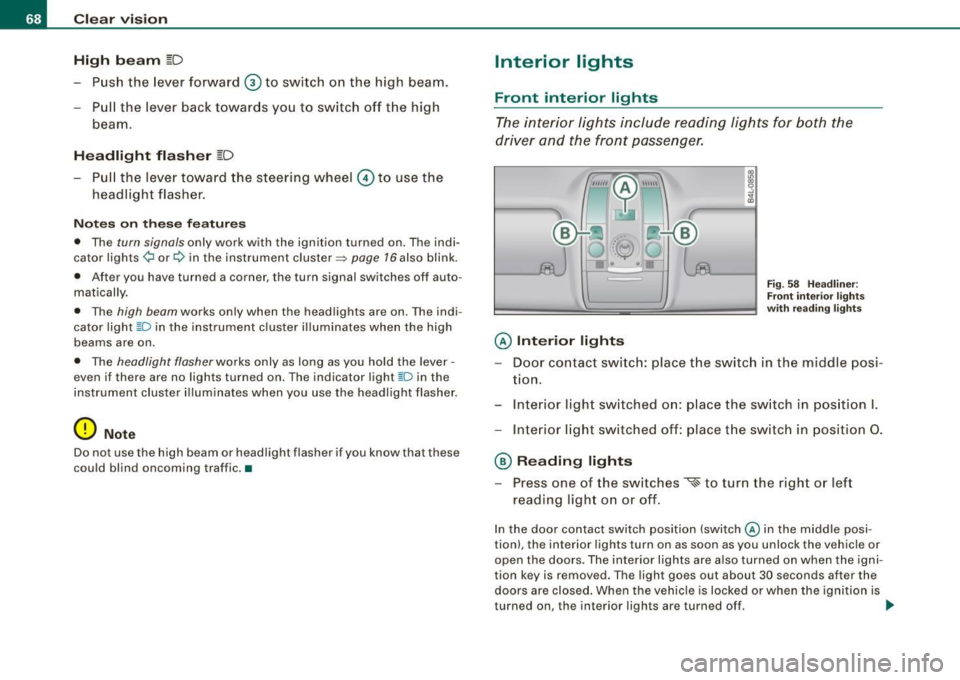
@ Interior lights
Fig . 58 Headliner :
Front interior lights
with reading lights
- Door contact switch: place the switch in the middle posi -
tion.
- Interior light switched on: place the switch in position I.
- Interior light switched off: place the switch in position 0.
@ Reading lights
- Press one of the switches
~ to turn the right or left
reading light on or off.
In the door contact switch position (switch@ in the middle posi
tion), the interior lights turn on as soon as you unlock the vehicle or
open the doors. The interior lights are also turned on when the igni
tion key is removed. The light goes out about 30 seconds after the
doors are closed. When the vehicle is locked or when the ignition is
turned on, the interior lights are turned off. ..,_
Page 71 of 398
When a door is open, the interior lights are turned off after about 10
minutes to prevent draining the battery.
The brightness of the lights is controlled automatically by a dimmer
when they are switched on and off. •
Rear int erior lights
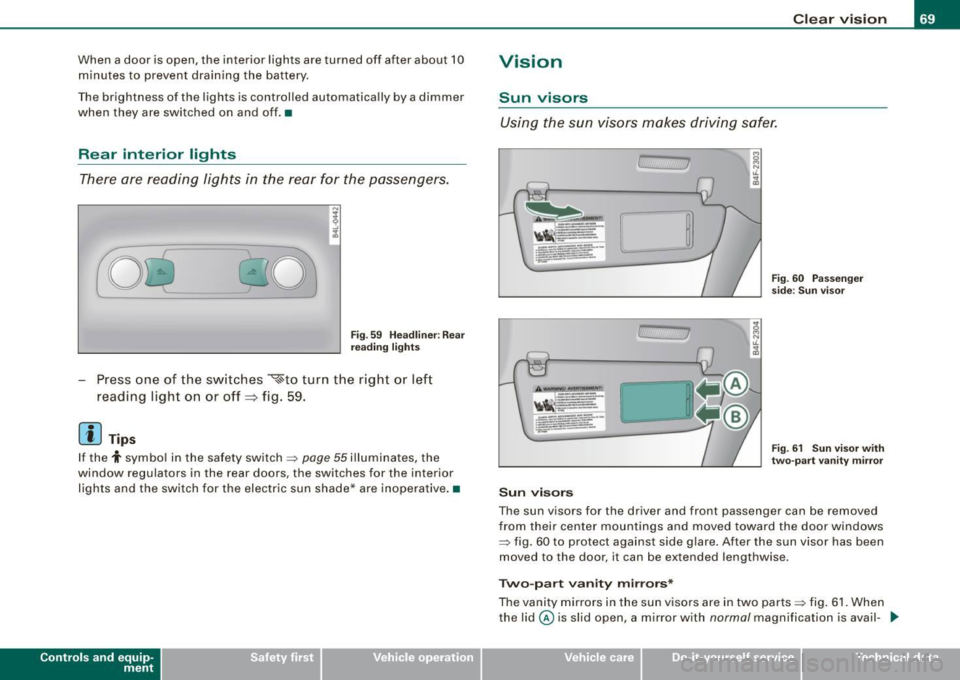
There are reading lights in the rear for the passengers.
-
0~ ·0 0
Fig. 59 Headliner: Rear
reading lights
- Press one of the switches ~to turn the right or left
reading light on or off =:> fig. 59.
[ i ) Tips
If the t symbo l in the safety switch~ page 55 illuminates, the
window regulators in the rear doors, the switches for the interior
lights and the switch for the electric sun shade* are inoperative .•
Con tro ls and eq uip
ment
Clear vision
Vision
Sun visors
Using the sun visors makes driving safer.
.1.
C, 7
Sun visors
Fig. 60 Passenger
side: Sun visor
Fig. 61 Sun visor with
two-part vanity mirror
The sun visors for the driver and front passenger can be removed
from their center mountings and moved toward the door windows
~ fig. 60 to protect against side glare . After the sun visor has been
moved to the door, it can be extended lengthwise.
Two-part vanity mirrors*
The vanity mirrors in the sun visors are in two parts ~ fig. 61. When
the lid@ is slid open, a mirror with
normal magnification is avail- .,_
Vehicle care I I irechnical data
Page 77 of 398
& WARNING
Be sure to in sp ec t the co n dition of your wip er bl ade s regularl y. See
your authori zed Audi de aler for replaceme nt blade s.
(D Note
To prevent damage to the wiper system:
• Always loosen blades which are frozen to the windshield before
operating wipers.
• Do not use gasoline, kerosene, paint thinner , or other solvents on
or near the wiper blades.
• Do not attempt to move the wipers by hand .
• The windshield wiper blades mus t only be replaced when in the
service position =>
page 73! Otherwise, you risk damaging the paint
on the hood or the windshield wiper motor.
[ i J Tips
Commercial hot waxes app lied by automatic car washes affec t the
cleanability of the windshie ld. •
Mirrors
Manual anti -glare adjustment
Standard setting
Move the sma ll lever ( located o n the bottom edge of t he
mirr or) to the front.
Anti-glare setting
-Move the sma ll lever ( loc ate d on t he bo ttom e dge of t he
m ir ror) to th e rear. •
Contro ls and eq uip
ment
Clear vision
A pp lies to vehicles: w ith automatically dimming in side mi rror w it h digita l com pass
Automatically dimming inside mirror
The automatic dimming function can be turned on and off
if required .
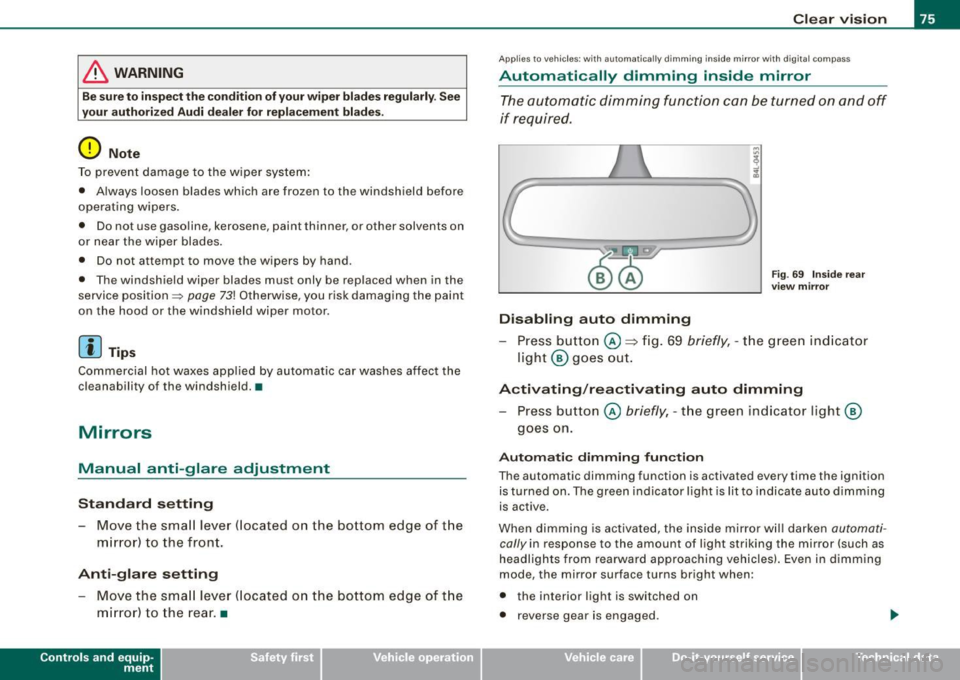
Disabling auto dimming
Fig . 69 In side rear
vi ew mirror
Pr ess button @ => fig. 69 briefly , -th e g reen ind ic ato r
light @ goes ou t.
Activating /rea ctivating auto dimming
Press button @ briefly, -th e green ind icator light @
goes on.
Automati c dimming fun ction
The automatic dimming function is activated every time the ignition is turned on. The green indicator light is lit to indica te auto dimming
is active .
When dimming is activated, the inside mirror w ill darken
automa ti
cally in response to the amount of light striking the mirror (such as
headlights from rearwa rd approaching vehicles). Even in d imm ing
mode, the mirror surface turns bright when:
• the interior light is switched on
• reverse gear is engaged .
Vehicle care I I irechnical data
Page 79 of 398
Depending on the outside temperature, the mirror surfaces are
heated unti l the ignition is switched off -even if the knob is no
longer in posi tion
@ .
We recommend folding * the outside mirrors flat to he lp when
par king your ve hicle or when maneuvering in very tight spaces .
Memory setting for the outside mirrors*
When the seat position is saved in the memory, the position of the
outside mirrors is saved at the same time~
page 84.
If the position o f the mi rror surface is changed o n a ti lted mirror, this
new pos ition wi ll be automatically saved to th e remote key when th e
vehicle is taken out o f reverse gear.
Tilting the passenger 's side out side mirror (on ly with
seat memory )
When you move the selector lever into R (Reverse), the mirror on the
front passenger's d oor (knob t urn ed to@ ~
page 76, fig. 70) will tilt
s lightly downward. This make is easier for you to see the curb when
you are backing into a parking space .
The mirror returns to its initia l position as soon as reverse gear is
disengaged and vehic le speed is above about 9 mph (15 km/h). The
mirror also returns to its initia l position if the switch is moved to the
driver's outside mirror
0 or the ignition is switched off.
Automatic anti -glare for the outside mirror s*
The outside mir ro rs dim at the same time as the inside mirro r. When
the ign ition is switched on, the mirrors automat ically dim
depending on the amount of light striking the mirrors (such as head
lights shining into the vehicle from the rear).
When you turn on the interior light, or wh en you move the selector
lever int o
R (Reverse), the ant i- g lare function stops a nd the mirro rs
return to their original condition (not darkened).
Controls and equip
ment
Cl ea r vision
0 Note
• Curved ( i.e . convex) mirror sur faces increase your fie ld o f view .
Remember that vehicles or other objects w ill appear smal ler and
f arther away than when seen in a flat mirror. If you use th is mi rror to
estimate distances of fol lowing vehicles when changing lan es, you
cou ld esti mate incor rect ly a nd cause an acc ident .
• I f the mirror housing is moved un intentionally (for example,
wh ile pa rking your veh ic le), then you must first fold the mirror elec
trically . Do not readjust the mirror housing manually. You cou ld
damage the motor which controls the mirror.
[ i ] Tips
If t here s hould be a malfunct io n in the electrica l system, you ca n
sti ll adjust the outside mirrors by pressing the edge of the mirror .•
Ap plies to vehicles: wit h automatic dimm in g for ou tsi de m irr ors
Automatic dimming for outside mirrors
The outside mirr ors are d immed t oge the r with the au tomati c
dimming of the inside mirror. When the ignition is switched on , the
mir ro rs darken automat ically depending on the light s triking the m
(e.g . headlights from the rear) .
When the interior lighting is switched on and when reverse gear is engaged, the mi rrors are switched back to the ir or iginal br ightness
(not dimmed).
_& WARNING
Broken glass of automatic dimming mirror can cause electrolyte
fluid leakage . Electrolyte fluid c an irritate skin , eyes , and respira
tory system .
• Repeated or prolonged exposure to electrolyte can c ause irrita -
tion to the respiratory system , e specially among people with .,_
I • •
Page 384 of 398
ll'IJ Alphabetical index
---=------------------------------------------------
Warning/indicator lights . .... . ... .. 22
Worn brake pads symbol . . . . . . . . . . . 35
B reak -in period . . . . . . . . . . . . . . . . . . . . . 271
Brake pads .. ...... .... ... ...... . 272
Tires .. .... ... .... .... ... .... ... 271
Bu lbs ..... ..... .... .... .... ....... 355
Bumper
cover
Caution when parking near a parking bar- rier or curb ...... ... .... .... ... 122
C
Ca lifornia Proposition 65 Warning ... .. 302
Battery specific . . . . . . . . . . . . . . . . . . 314
Capacities ....... ... .... .... ....... 369
Car care ....... ...... .... ... .... ... 282
Interior ......................... 289
Plastic and vinyl ...... ...... . .. .. 286
Weathers trips ...... ... .. ...... .. 287
Care of exterior .... ...... ... .... .... 282
Cargo area
See Loading the luggage compartment ..
201
Cargo net ..... ... .... .... ..... ...... 90
Catalytic converter . . . . . . . . . . . . . . . . . . 272
CD changer . . . . . . . . . . . . . . . . . . . . . . . . . 99
Centra l locking
Emergency locking .. ...... .. . .... . 50
Certification . . . . . . . . . . . . . . . . . . . . . . . 375
Changing a flat tire ...... .... .... ... 344
Changing a wheel . ... .... .... ....... 344
Changing engine oi l .. .... .... ...... . 306 Chassis
Undercoa ting . .... .... ...... ..... 288
See also Adaptive A ir Suspension .. . 184
CHECK button . . . . . . . . . . . . . . . . . . . . . . . 15
Check ing
Engine coolant level . ...... ....... 308
Checking tire pressure ....... ........ 323
Child restraints
Danger of using child restraints in the
front seat .... .... .... .... .... .. 217
What types of chi ld restraint anchors are
available? .... .... .... .... .... .. 251
Where can I get add itional informat ion
about chi ld restraints? ... .. .. .... 252
Child safety ...... ..... .. .... .. . 238, 243
Additional information . ........... 257
Booster seats . ... ... ....... ...... 246
Convertible chi ld safety seats .... .. 244
Convertible locking retractor . ...... 248
Guidance fixtures for lower anchorages
254
Important safety instructions for using chi ld safety seats .. . ......... ... 241
Important things to know when driving
with children ....... .... ... .. ... 238
Infant seats ... ... .... .... .... ... 243
Installing a child restraint using the
LATCH system . . . . . . . . . . . . . . . . . . 256
Lower anchorages ........ ... .... . 253
Mounting and releasing the anchorage hook .. ...... ........ .......... 257
Older children and safety belts ... .. 247
Saf ety bel ts and ol dler children ... .. 247
Teth er anchors .... .... ....... ... 257 Tether
strap ... .... .... ....... .. . 258
Which restraint sys tem should my older
chi ld wear? .......... .. .. .... .. 247
Child safety lock
rear doors (power) . .... .... .... ... . 51
Child safety seats .... .... .... .... ... 243
Conver tible locking re tractor .... ... 248
Danger of using child restraints in the
front seat ..................... . 217
How do I properly install a child safety
sea t in my vehicle? ...... ....... . 241
Installing .. .. .. .... ... .. .. .... ... 248
LATCH system . .... .... ... .... ... 256
Safety instructions .... .... .... ... 241
Cigarette lighter ........... .... ...... 97
Cleaning Alcantara (synthetic suede) .... ... . 292
Engine compartm ent ... ... .... ... 293
Fabrics and fabric cov erings ... .... 289
Ins trumen t panel .... ... ..... ... .. 290
Inte rio r ...... ....... ....... .. .. . 289
Leather ............. ....... .. ... 291
MMI display .. .. .. .... .... ...... . 289
MM I terminal . .... .... ... ... .. ... 289
Plastic and viny l ... .... .... .... ... 286
P lastic parts .... .. .... .... ....... 290
Safety belts . . . . . . . . . . . . . . . . . . . . . 293
Trim strips .. ...... .... ....... .. . 285
trim strips ...... ....... ...... .... 286
Cleaning and protection .......... ... 282
Climate control .. ... ...... ...... .... 102
Synchroni zing . .... ... ... ........ 104
Warm and cold ... .... ...... ... .. 102
Page 388 of 398
llffl __ A_l.:,. p _h_ a_ b_e _t _ic _ a_l _in _ d_e _x ____________________________________________ _
Glove compartment -emergency unlocking .
100
Gross Vehic le Weight Rating (GVWRl ... 367
H
Head restraints . . . . . . . . . . . . . . . . . . . . . 199
Adjusting . .... .... ....... ...... . 199
Front seats . . . . . . . . . . . . . . . . . . . . . . . 86
Insta llation and remova l .... ....... 87
Rear seats . . . . . . . . . . . . . . . . . . . . . . . 87
Headlight washer reservoir ........... 316
Headlights . . . . . . . . . . . . . . . . . . . . . . . . . . 63
Adaptive Light .... .... .... ...... .. 66
Defective . . . . . . . . . . . . . . . . . . . . . . . . 25
Front fog lights . . . . . . . . . . . . . . . . . . . 65
Headlight range control defective .. . 35
Switching off ..................... 63
Switching on . .................. .. 63
Washer system . . . . . . . . . . . . . . . . . . . 73
Xenon headlights . ...... ... .. .... . 63
Heat ed outside mirrors . . . . . . . . . . . . . . . 76
Heated seats
Front ............. .... ........ .. 110
Rear ..................... ...... 110
Heated steering wheel . . . . . . . . . . . . . . . 111
Heat ed washer jets
Wiper and washer system . . . . . . . . . . 71
Heavy clothing and safety belts .. .... . 208
High beam . . . . . . . . . . . . . . . . . . . . . . . 63, 67
Warning/indicator lights ........... 20
High voltage warning label . ........ .. 366
Homelink® universal remote control .. 188 Hood
Opening 300 Interior
lights ..... ... . .... .. . .. .. .... 68
Rear .. ..... ....... .... ... .... . 68, 69
Release lever .. ...... .... ..... ... 300 Intermittent wiping
Horn .. ...... ............ ....... .... 11
How many a irbags does my vehicle have? ..
222
How often should I check my tire pressures?
324
How safety belt pretensioners work .... 213
Hydroplaning .... .... .... .... ...... 328
I
Ignition key ........................ 116
Ignition lock .. .... .... .... .... .... .. 116
Malfunction .. .... ...... .... ... 33, 36
Ignition lock posit ions .......... ..... 116
Immobilizer ......................... 14
Important things to do before driving .. 195
Improperly worn safety be lts ......... 213
Indicator lights ...... ....... ....... .. 16
Airbag system ............... 226, 227
PASSENGER AIR BAG OFF ......... 227
Infant seats .......... .... ....... ... 243
How do I properly install an infant seat in my veh icle? ........ .... ... .. ... 243
Safety instructions ............... 243
Inside rear view mirror . ............. .. 75
Installing child safety seats
Safety belts . . . . . . . . . . . . . . . . . . . . . 248
Instrument cluster illumination . ... .... 16
Instruments and controls . . . . . . . . . . . . . 12
General illustration ................ 11 Rain sensor
... .... .... ...... .... . 71
J
Jack 342
Jumper cables ...................... 358
Jump-starting 357
K
Key ................................ 41
Battery replacement ............... 43
Coded settings ................... 102
Convenience opening and closing of windows .. ........ ......... .... 57
Emergency key ............ .... .... 41
Key replacement . . . . . . . . . . . . . . . . . . 41
Mast er key ................. ...... 41
Valet key .. ............ ...... ... .. 41
Key coded settings
Climate controls . . . . . . . . . . . . . . . . . 102
Key less entry remote control ... ........ 42
Kick -down
multitronic® ... .... .... ... .... ... 165
tiptronic® ............ ........ ... 158
L
Lane assist
Activating and deactivating 143
Description . . . . . . . . . . . . . . . . . . . . . . 143
Page 389 of 398
______________________________________________ A_ l_,_ p _h_ a_ b_e _t_i c_ a _ l _in _ d_e _ x __ lll
Instrument cluster indicator light ... 143
MMI settings .... .... ....... .... . 144
Notes on instrument cluster disp lay . 143
LATC H .... .... ... .. .... ...... .... .. 253
Description ...................... 253
Guidance fixtures for lower anchorages .
254
Installing a child restraint ........ .. 256
Location ... ... .... .... .... .... .. 253
Mounting and releasing the anchorage hook ... ............... ........ 257
Leather . ...... .. ........... ...... .. 290
Cleaning . ..... ... .... ..... .. .... 29 1
Leve l adjustment
See Adaptive Air Suspension . .... .. 184
Lifting jack . .... ... .... .... .... ..... 347
Lifting vehicle ... ... ............... . 362
Light
Exterior lighting in the mirror housing 66
leaving home ...... ... .. .... .... .. 66
Light sensor defective ................ 34
Lighting in the mirror housing ......... 66
Lights ........ .... .... .... .......... 63
Coming home ... .... .... .......... 64
Daytime running lights . .... .... .... 64
Emergency flashers . ... .. .... .... .. 67
Exterior lights ... .... .... ....... ... 64
Front fog lights .... .... .... .... ... 65
Headlights ....................... 63
High beam ... .... ....... .... .. 63, 67
High beam warning/indicator light ... 20
Leaving home ..................... 64
Rear fog lights ... .... .... ... .... .. 65
Controls and equip
ment Safety first
Side marker lights .
..... .. ... ..... . 63
Turn signals .. ... .... ... ... .. .... . 67
Xenon headlights .................. 63
Loading the luggage compartment .... 201
Loading the roof rack ................. 94
Lockable backrest ...... .... ... .. ... .. 88
Locking Power locking switch ....... .... ... 49
Rear lid/trunk lid ........... .. ... .. 50
Remote control key .... .... ....... . 46
Using the key . ............ ....... . 47
Lower anchorage locator button . .... .. 253
Lower universal anchorage bars (Canada) .. 253
Lower universal anchorages (Canada) . . 253
Luggage Stowing .. .... .... .... .... .... ... 20 1
Luggage compartment . .... .... .... ... 88
Cargo net .... ...... .... .... .... .. 90
DVD player for navigation system . ... 91
Expanding ... ....... .... .... ... .. . 88
Fastening eyelets ... .... ....... .... 90
Side Compartment ................ 91
Ski sack .......................... 92
See also Loading the luggage
compartment ...... .... ... .. .... 201
Lumbar support .. ......... ...... .... . 83
M
Maintenance .... ... ... .. .... .... ... 372
Malfunction Indicator Lamp (MIU .. .. 19, 27 Master key .
... .. .... .... ...... ... .. . 42
Battery replacement ... ... .... .... . 43
Check light ....................... 43
Mi leage
Average ... ... .... .... ... ..... ... . 38
Instantaneous .... .... .... .... .... . 38
Mirrors Activating the digital compass ... .. .. 78
Adjusting the anti -glare . ...... ..... 75
Automatic dimming for the outside mirrors .. ........... ........ .... 77
Automatical ly dimming inside mirror . 75
Inside day -night mirror .... .... ..... 75
Interior mirror ... .. .... ...... .... .. 75
Outs ide mirrors . ...... ...... .... .. 76
Recalling position of outside mirrors . 84
Storing position of outside mirrors ... 84
Monitoring the Advanced Airbag System ..
226
multitronic® ... .. .... .... ...... .... . 161
Automatic Shift Lock (ASL) ... .... .. 164
Driving the multitronic® . ...... .... 162
Dynamic shift program .. .... .... .. 165
Fail -safe mode .. .... ... .. .... .... 167
Kick -down ....................... 165
Manual shift program ..... .... ... . 166
Selector lever . ..... .. .... .... ... . 163
Steering wheel with tiptronic® ..... 167
tiptronic ...... .... .... ... ... ... .. 166 N
Natural leather . .......... .. .... .... . 290
New tires and wheels ... .... .... .... . 329
Vehicle operation Vehicle care Do-it-yourself service Technical data