seat memory AUDI S6 2009 Owners Manual
[x] Cancel search | Manufacturer: AUDI, Model Year: 2009, Model line: S6, Model: AUDI S6 2009Pages: 398, PDF Size: 43 MB
Page 13 of 398
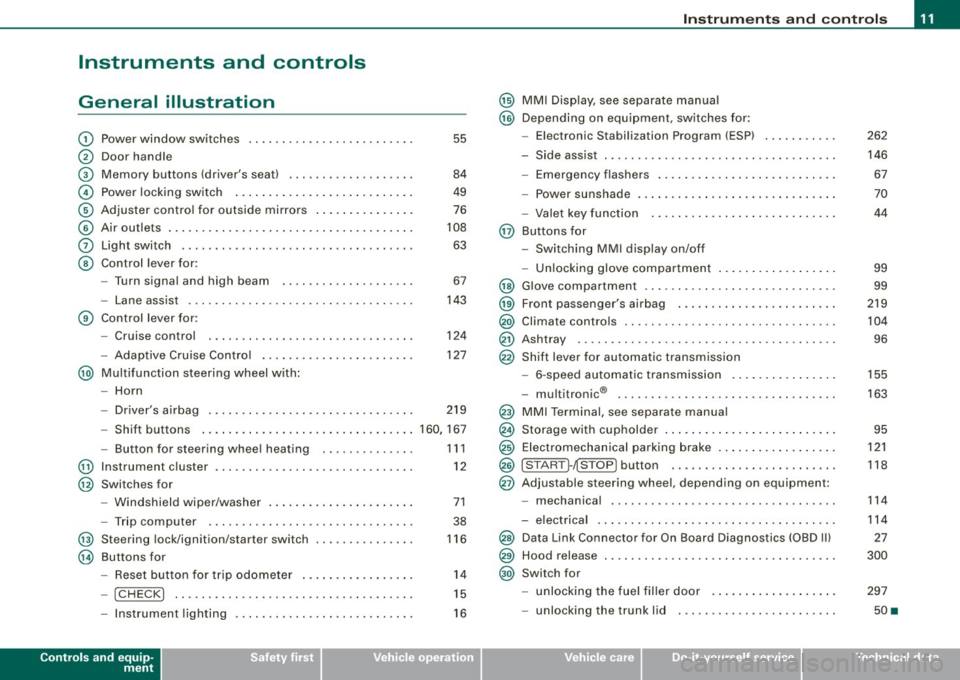
Instruments and controls
General illustration
G)
0
©
©
©
©
0
©
Power window switches ...... .... ..... .. ....... .
Door handle
Memory buttons (driver's seat)
Power locking switch .......................... .
Adjuster control for outside mirrors .. .... .... .... .
Air outlets ........ ... ...... .... ...... .... ... .. .
Light switch .... .... ........... .... .... .... ... .
Control lever for :
- Turn signal and high beam
- Lane assist .... .... ... .... .... .... .......... .
Control lever for:
- Cruise control
- Adaptive Cruise Contro l .......... ...... .... .. .
@ Multifunction steering wheel with:
- Horn
55
84
49
76
108
63
67
143
124
127
- Driver's airbag . . . . . . . . . . . . . . . . . . . . . . . . . . . . . . . 219
- Shift buttons ................................ 160, 167
@
@
@
@
-Button for steering wheel heating
Instrument cluster ... .... ... .... ...... ......... .
Switches for
- Windshield wiper/washer ..... ...... ..... .. ... .
- Trip computer ..... .. ..... ... .... ...... ... .. .
Steering lock/ignition/starter switch
Buttons for
- Reset button for trip odometer ... .. .... .... ... .
!CHECK] .. .... ....... .... .... ....... .... ... .
Instrument lighting .... ... .... .... ... ..... ... .
Controls and equip
ment
1 1 1
12
71
38
116
14
15
16
Instruments and controls
@ MMI Display, see separate manual
@ Depending on equipment, switches for:
- Electronic Stabilization Program (ESP)
- Side assist .. ... ..... .. .. .. .... .... .... ... ... .
- Emergency flashers .......................... .
- Power sunshade .... .... .... .... ... .... ..... . .
- Valet key function .... ....... ...... .... ...... .
@ Buttons for
- Switching MMI display on/off
- Unlocking glove compartment
@ Glove compartment ........... .... .... ......... .
@ Front passenger's airbag .. .... .... ... .. ...... .. .
@) Climate controls ......... .. .. .... .... .... .. . .. . .
@ Ashtray ..... .... .... ....... .... .... .... ... ... .
@ Shift lever for automatic transmission
- 6-speed automatic transmission .. .. .... .... ... .
I . .
® -
mu t1tron1c ... .... .... .... .... .... ... ...... .
@ MMI Terminal, see separate manual
@ Storage with cupholder . ........ ... .. .... .... ... .
@ Electromechanical parking brake ... .... .... .... .. .
@ ISTART ]-~STOP ] button .. ... ..... ... .... .... ... .
@ Adjustable steering wheel, depending on equipment:
- mechanica l .. .. .... .... ..... .. .... ..... ... .. .
- electrica l ... ...... .... ... .. .... .... ...... ... .
@) Data Link Connector for On Board Diagnostics (OBD II)
@ Hood release . .... .... ...... ... .. .... .... ... ... .
@) Switch for
unlocking the fuel filler door ..... ...... .... ... .
- unlocking the trunk lid . .... .... .... .... ... ... .
I • •
262
146 67
70
44
99
99
219
104
96
155
163
95
121
118
114
114
27
300
297
50 •
Page 44 of 398
Opening and closing
• For security reasons, replacement keys are only available from
Audi dealers. •
Master key with remote control
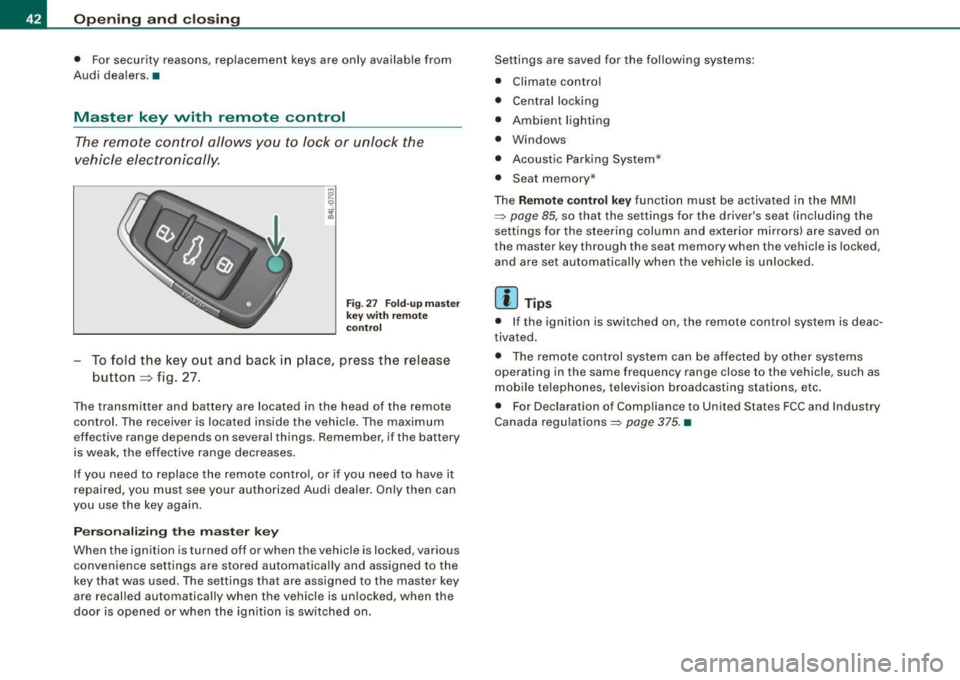
The remote control allows you to lock or unlock the
vehicle electronically .
Fig. 27 Fo ld -up m aste r
k ey with r emot e
c ontr ol
To fold the key out and back in place, press the release
button=> fig. 27.
The transmitter and battery are located in the head of the remote
control. The receiver is located inside the vehicle. The maximum
effective range depends on several things . Remember , if the battery
is weak, the effective range decreases .
If you need to replace the remote contro l, or if you need to have it
repaired, you must see your authorized Audi dealer . On ly then can
you use the key again.
Personalizing the master ke y
When the ignition is turned off or when the vehicle is locked , various
convenience settings are stored automatically and assigned to the
key that was used. The settings tha t ar e ass igned to the master key
are recal led automatically when the vehicle is unlocked, when the
door is opened or when the ignition is switched on . Settings are saved for the fo
llowing systems :
• Climate control
• Central locking
• Ambient lig hting
• Windows
• Acoustic Parking System*
• Seat memory *
T he
Remote control key function must be activated in the MM I
=:> page 85, so that the settings for the driver's seat (including the
settings for the steering column and exte rior mirrors) are saved on
the master key through the seat memory when the vehicle is locked,
and are set automatically when the vehicle is un locked .
[ i ] Tips
• I f the ignition is switched on, the remote c ontr ol system is deac
tivated.
• T he remote control system can be af fected by other systems
operating in the same frequency range close to the vehicle, such as
mobile telephones, television broadcasting stations, etc .
• For Declarat ion of Compliance to United States FCC and Industry
Canada regulations=:>
page 375. •
Page 79 of 398
Depending on the outside temperature, the mirror surfaces are
heated unti l the ignition is switched off -even if the knob is no
longer in posi tion
@ .
We recommend folding * the outside mirrors flat to he lp when
par king your ve hicle or when maneuvering in very tight spaces .
Memory setting for the outside mirrors*
When the seat position is saved in the memory, the position of the
outside mirrors is saved at the same time~
page 84.
If the position o f the mi rror surface is changed o n a ti lted mirror, this
new pos ition wi ll be automatically saved to th e remote key when th e
vehicle is taken out o f reverse gear.
Tilting the passenger 's side out side mirror (on ly with
seat memory )
When you move the selector lever into R (Reverse), the mirror on the
front passenger's d oor (knob t urn ed to@ ~
page 76, fig. 70) will tilt
s lightly downward. This make is easier for you to see the curb when
you are backing into a parking space .
The mirror returns to its initia l position as soon as reverse gear is
disengaged and vehic le speed is above about 9 mph (15 km/h). The
mirror also returns to its initia l position if the switch is moved to the
driver's outside mirror
0 or the ignition is switched off.
Automatic anti -glare for the outside mirror s*
The outside mir ro rs dim at the same time as the inside mirro r. When
the ign ition is switched on, the mirrors automat ically dim
depending on the amount of light striking the mirrors (such as head
lights shining into the vehicle from the rear).
When you turn on the interior light, or wh en you move the selector
lever int o
R (Reverse), the ant i- g lare function stops a nd the mirro rs
return to their original condition (not darkened).
Controls and equip
ment
Cl ea r vision
0 Note
• Curved ( i.e . convex) mirror sur faces increase your fie ld o f view .
Remember that vehicles or other objects w ill appear smal ler and
f arther away than when seen in a flat mirror. If you use th is mi rror to
estimate distances of fol lowing vehicles when changing lan es, you
cou ld esti mate incor rect ly a nd cause an acc ident .
• I f the mirror housing is moved un intentionally (for example,
wh ile pa rking your veh ic le), then you must first fold the mirror elec
trically . Do not readjust the mirror housing manually. You cou ld
damage the motor which controls the mirror.
[ i ] Tips
If t here s hould be a malfunct io n in the electrica l system, you ca n
sti ll adjust the outside mirrors by pressing the edge of the mirror .•
Ap plies to vehicles: wit h automatic dimm in g for ou tsi de m irr ors
Automatic dimming for outside mirrors
The outside mirr ors are d immed t oge the r with the au tomati c
dimming of the inside mirror. When the ignition is switched on , the
mir ro rs darken automat ically depending on the light s triking the m
(e.g . headlights from the rear) .
When the interior lighting is switched on and when reverse gear is engaged, the mi rrors are switched back to the ir or iginal br ightness
(not dimmed).
_& WARNING
Broken glass of automatic dimming mirror can cause electrolyte
fluid leakage . Electrolyte fluid c an irritate skin , eyes , and respira
tory system .
• Repeated or prolonged exposure to electrolyte can c ause irrita -
tion to the respiratory system , e specially among people with .,_
I • •
Page 86 of 398
Seats and storage
Seat memory
Applies to vehi cles : w ith seat memo ry
Driver's seat memory
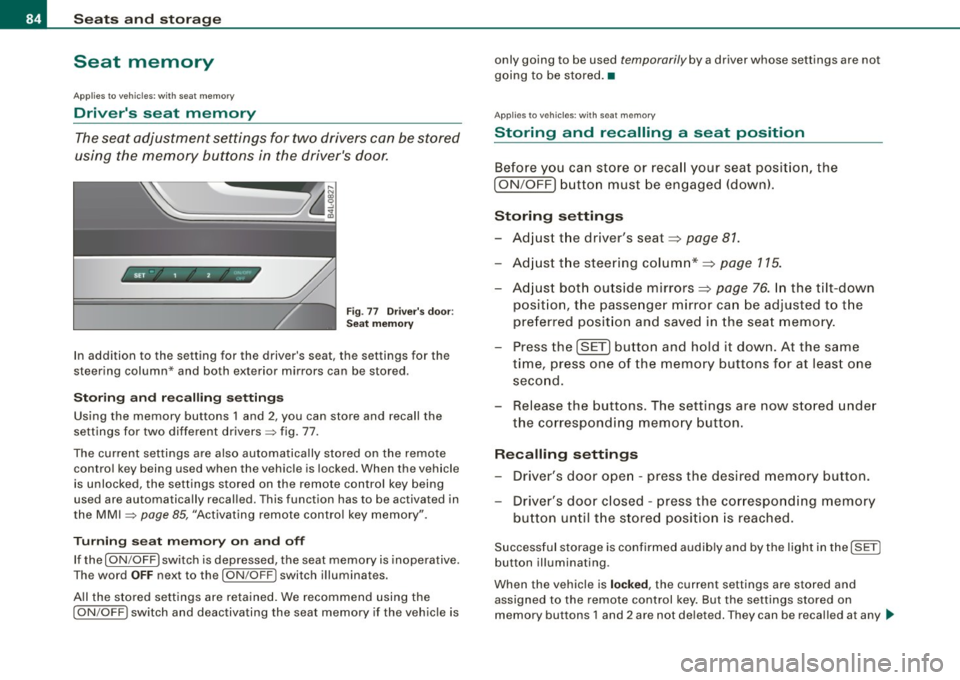
The seat adjustment settings for two drivers can be stored
using the memory buttons in the driver's door.
SET - 1 2 ~
Fig. 77 Driver's door:
Seat memory
In addition to the setting for the driver's seat, the settings for the
steering column* and both exterior mirrors can be stored.
Storing and recalling settings
Using the memory buttons 1 and 2 , you can store and recall the
settings for two different drivers=> fig. 77.
The current settings are also automatically stored on the remote
control key being used when the vehicle is locked. When the vehicle
is unlocked, the settings stored on the remote control key being
used are automatically recalled. This function has to be activated in
the MMI
=> page 85, "Activating remote control key memory".
Turning seat memory on and off
If the [ ON/OFF ) switch is depressed, the seat memory is inoperative.
The word
OFF next to the [ ON /OFF I switch illuminates.
All the stored settings are retained. We recommend using the
I ON/OFF) switch and deactivating the seat memory if the vehicle is only
going to be used
temporarily by a driver whose settings are not
going to be stored. •
Applies to v ehi cle s: wit h seat memory
Storing and recalling a seat position
Before you can store or recall your seat position, the
[ ON /OFF] button must be engaged (down).
Storing settings
-Adjust the driver's seat=> page 81.
- Adjust the steering column*=> page 115.
- Adjust both outside mirrors=> page 76. In the tilt-down
posit ion, the passenger mirror can be adjusted to the
preferred position and saved in the seat memory.
- Press the [SET] button and hold it down. At the same
time, press one of the memory buttons for at least one
second.
- Release the buttons. The settings are now stored under
the corresponding memory button.
Recalling settings
- Driver's door open -press the desired memory button.
- Driver's door closed -press the corresponding memory
button until the stored position is reached.
Successful storage is confirmed audib ly and by the light in the [ SETI
button illuminating .
When the vehicle is
locked , the current settings are stored and
assigned to the remote control key. But the settings stored on
memory buttons 1 and 2 are not deleted. They can be recalled at any .,_
Page 87 of 398
time. When the vehicle is unlocked, the settings stored on the
remote control key are restored.
If your vehicle is driven by other persons using your remote control
key, you should save your individual seat position on one of the
memory buttons. You can recall your settings again simply and
conveniently by pressing the corresponding memory button. When
the vehicle is locked , these settings are automatically re-assigned to
the remote control key and stored.
& WARNING
• For safety reasons, the seat setting can only be recalled when
the vehicle is stationary -otherwise you risk having an accident.
• In an emergency, the recall operation can be stopped by
pressing the [
ON/OFF) button or by briefly pressing any given
memory button. •
Applies to vehicles : w ith seat memory
Activating remote control key memory
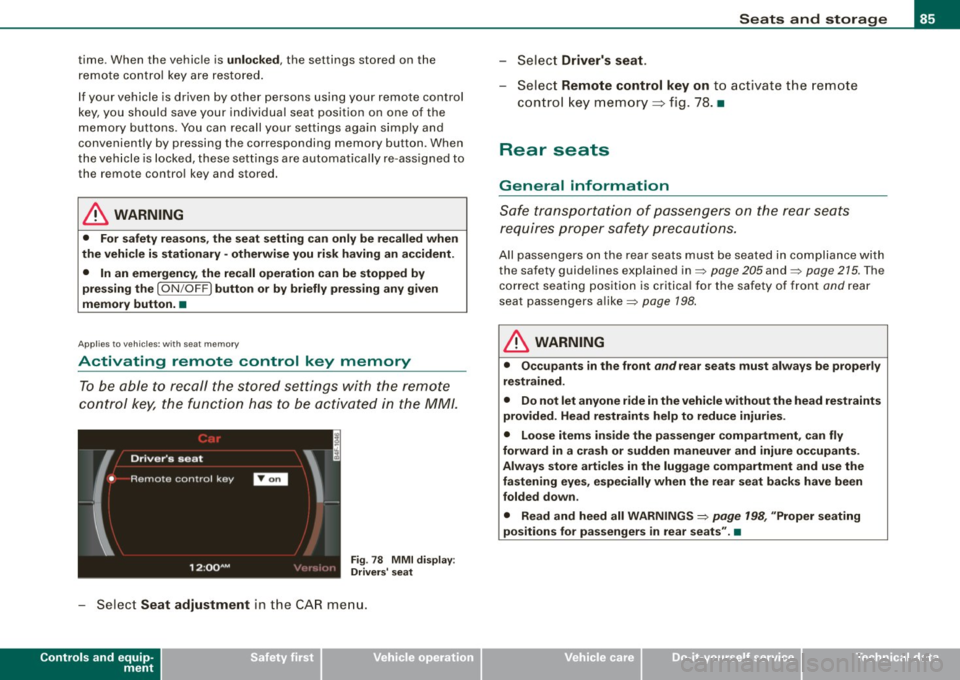
To be able to recall the stored settings with the remote
control key, the function has to be activated in the MM/.
Fig. 78 MMI display :
Drivers' seat
- Select Seat adjustment in the CAR menu.
Controls and equip
ment
Seats and storage
Select Driver's seat.
-Select Remote control key on to activate the remote
control key memory ~ fig. 78. •
Rear seats
General information
Safe transportation of passengers on the rear seats
requires proper safety precautions.
All passengers on the rear seats must be seated in compliance with
the safety guidelines explained in=> page 205 and=> page 215. The
correct seating position is critical for the safety of front and rear
seat passengers alike=> page 198.
& WARNING
• Occupants in the front and rear seats must always be properly
restrained.
• Do not let anyone ride in the vehicle without the head restraints
provided. Head restraints help to reduce injuries.
• Loose items inside the passenger compartment, can fly
forward in a crash or sudden maneuver and injure occupants.
Always store articles in the luggage compartment and use the
fastening eyes, especially when the rear seat backs have been
folded down .
• Read and heed all WARNINGS=>
page 198, "Proper seating
positions for passengers in rear seats". •
I • •
Page 117 of 398
On the road 1111
-------------------'
Applies to v ehi cles : wi th ele ctr ic ally a djuste d steer in g wh eel
Electrically adjusted steering vvheel
The he ight and re ach of the stee ring whe el can b e electr i
cally adj uste d to s uit t he d river .
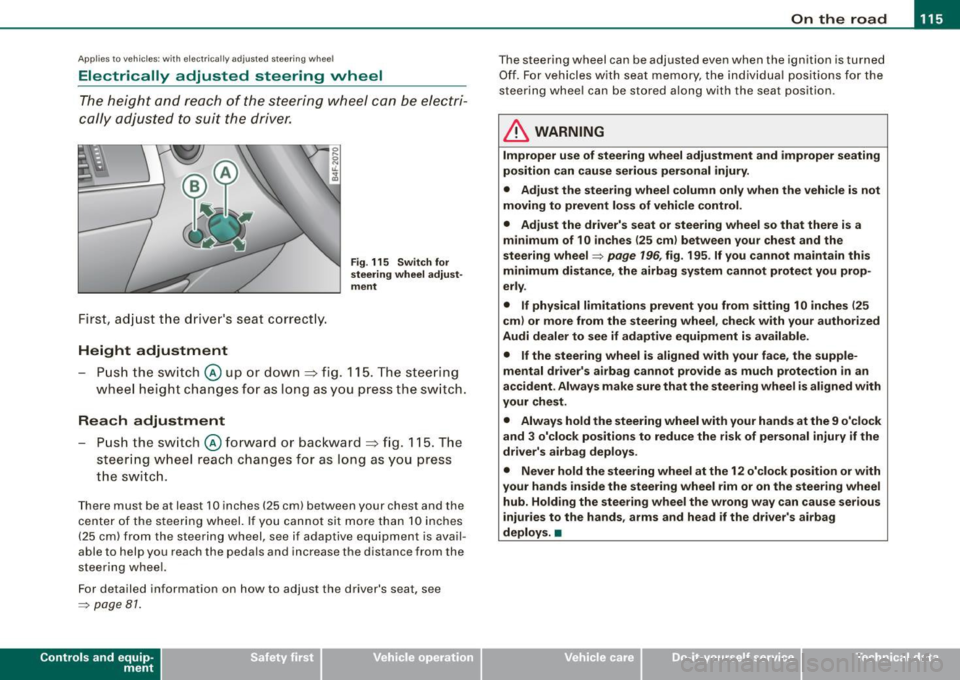
First, adjust the d river's seat co rrect ly.
Height adjustment
Fig . 115 Switch for
steering wheel adjust ·
ment
- Push the switch@ up or dow n=> fig. 1 15. T he steer ing
w heel he ight cha nges for a s long as you pre ss th e swi tc h.
Reach adjustment
- Push the s witch @ forw ard o r backwar d => fig . 11 5. T h e
s teer ing whe el reach ch an ges for as lon g as you pr ess
t h e s wit c h.
Ther e must b e at least 1 O in ches ( 25 cml betw een your chest and the
cen te r of th e st eer ing w hee l. If you cannot sit mo re than 1 0 in che s
(2 5 cm) from the stee rin g wh eel, se e if adaptive equ ipm ent is ava il
able to help you reach the pedals and increase the distance from the
st eeri ng whe el.
F or detailed info rmation on how to ad just the drive r's seat, see
~ pa ge 81.
Con tro ls and eq uip
ment
T he steering whe el can be adj ust ed even when the ignition is turn ed
O ff . F or vehi cle s with seat memory , the i ndividu al p osi tions fo r the
st eer in g w he el can be sto red a lon g w ith th e seat position.
& WARNING
Improper use of steering wheel adjustment and improper seating
position can cause serious personal injury.
• Adjust the steering wheel column only when the vehicle is not
moving to prevent loss of vehicle control .
• Adjust the driver's seat or steering wheel so that there is a
minimum of 10 inches (25 cm ) between your chest and the
steering wheel~
page 196 , fig. 195 . If you cannot maintain this
minimum distance , the airbag system cannot protect you prop
erly .
• If physical limitations prevent you from sitting 1 O inches (25
cml or more from the steering wheel , check with your authorized
Audi dealer to see if adaptive equipment is available.
• If the steering wheel is aligned with your face, the supple
mental driver's airbag cannot provide as much protection in an
accident . Always make sure that the steering wheel is aligned with
your chest .
• Always hold the steering wheel with your hands at the 9 o'clock
and 3 o'clock positions to reduce the risk of personal injury if the
driver's airbag deploys .
• Never hold the steering wheel at the 12 o'clock position or with
your hands inside the steering wheel rim or on the steer ing wheel
hub . Holding the steering wheel the wrong way can cause serious
injuries to the hands, arms and head if the driver's airbag
deploys. •
Vehicle care I I Technical data
Page 118 of 398
• ..__O_ n_ t_ h _e _ ro_ a_d __________________________________________________ _
Easy entry feature
The easy entry feature makes it easier to enter and exit the
vehicle by automatically adjusting the steering wheel.
Press the button @~ page 115, fig. 115 to turn the easy
entry feature on or off.
When the easy entry feature is turned on (button depressed), the
steering wheel moves up to the parked position when the ignition is
turned off. After you enter the vehicle, the steering wheel moves to
the stored position as soon as you turn on the ignition .
Easy entry feature on vehicles with memory seat*
For the stored steering wheel position to be recalled, the driver's
seat memory must be switched on
(I ON OFF I switch in depressed
position).
If the easy entry feature is switched off, the steering wheel moves to
the stored position as soon as you press the seat memory button. •
Ignition lock and ignition switch
Ignition key positions
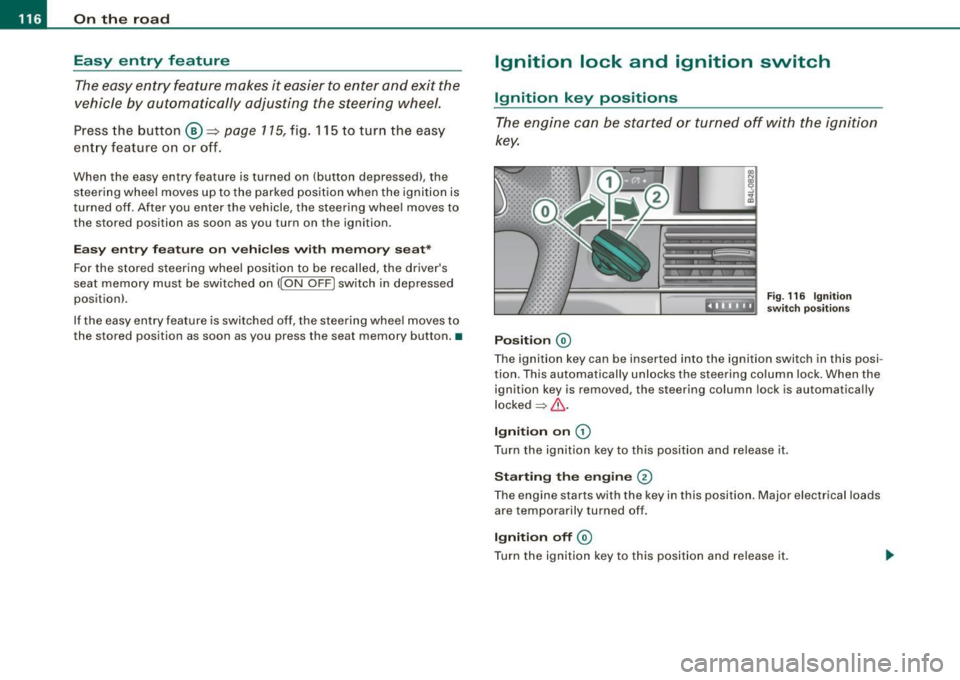
The engine can be started or turned off with the ignition
key.
Position @
Fig. 116 Ignition
switch positions
The ignition key can be inserted into the ignition switch in this posi
tion. This automatically unlocks the steering column lock. When the
ignition key is removed, the steering column lock is automatically
locked
~ & .
Ignition on 0
Turn the ignition key to this position and release it .
Starting the engine 0
The engine starts with the key in this position. Major electrical loads
are temporarily turned off.
Ignition off @
Turn the ignition key to this position and release it.
Page 219 of 398
__________________________________________________ A_ i_ r _b _a...; g::- s_ y=--- s_t _e _m __ fflllll
Child restraints on the front seat -some
important things to know
- Be sure to read the important information and head the
WARNINGS for important details about children and
Advanced Airbags :=>
page 238.
Even though your vehicle is equipped with an Advanced Airbag
System, make certain that all children, especially those 12 years and
younger, always ride in the back seat properly restrained for their age and size . The airbag on the passenger side makes the front seat
a potentially dangerous place for a child to ride . The front seat is not
the safest place for a child in a forward -facing child safety seat. It
can be a very dangerous place for an infant or a child in a rearward
facing seat.
The Advanced Airbag System in your vehicle has been certified to
comply with the requirements of United States Federal Motor
Vehicle Safety Standard 208 as applicable at the time your vehicle
was manufactured.
The Standard requires the front airbag on the passenger side to be
turned off ("suppressed") if a child up to about one year of age
restrained in one of the rear-facing or forward-facing infant
restraints listed in Federal Motor Vehicle Safety Standard 208 with
which the Advanced Airbag System in your vehicle was certified has been installed on the front passenger seat. For a listing of the child
restraints that were used to certify compliance with the US Safety
Standard =>
page 240.
The PASSENGER AIR BAG OFF light in the instrument panel tells you
when the front Advanced Airbag on the passenger side has been
turned off by the electronic control unit.
Each time you turn on the ignition, the
PASSENGER AIR BAG OFF
light will come on for a few seconds and:
• will stay on if the front passenger seat is not occupied,
Controls and equip
ment Safety first Vehicle operation
•
will stay on if there is a small child or child restraint on the front
passenger seat,
• will go off if the front passenger seat is occupied by an adult as
registered by the weight-sensing mat=>
page 226, "Monitoring the
Advanced Airbag System" .
The
PASSENGER AIR BAG OFF light comes on when the control unit
detects a total weight on the front passenger seat that requires the
front airbag to be turned off.
If the total weight on the front passenger seat is more than that of
a typical 1 year-old child but less than the weight of a small adult,
the front airbag on the passenger side can deploy (the
PASSENGER
AIR BAG OFF
light does not come on). If the PASSENGER AIR BAG
OFF
light does not come on, the front airbag on the passenger side
has not been turned off by the electronic control unit and can
deploy if the control unit senses an impact that meets the condi
tions stored in its memory.
For example, the airbag may deploy if:
• a small child that is heavier than a typical 1 year -old child is on
the front passenger seat (regardless of whether the child is in one
of the child safety seats listed=>
page 240), or
• a child who has outgrown child restraints is on the front
passenger seat.
If the front passenger airbag is turned off, the
PASSENGER AIR BAG
OFF
light comes on in the instrument cluster and stays on.
The front airbag on the passenger side may
not deploy (the
PASSENGER AIR BAG OFF light does not illuminate and stay lit) even
if a small adult or teenager, or a passenger who is not sitting upright
with their back against a non-reclined backrest with their feet on the
vehicle floor in front of the seat is on the front passenger seat
=>
page 196, "Proper seating position for the driver".
If the front passenger airbag deploys, the Federal Standard requires
the airbag to meet the "low risk" deployment criteria to reduce the risk of injury through interaction with the airbag . "Low risk" deploy
ment occurs in those crashes that take place at lower decelerations
I),
Vehicle care Do-it-yourself service Technical data
Page 223 of 398
Airbag syst em -----------------=~-
When a person is detected on the front passenger seat, weighing
more than the to tal weight of a child t hat is about 1 year old
restrained in one of the rear-facing or forward -facing infant
restraints (listed in Federa l Motor Vehicle Safety Standard
208 with
which the Advanced Airbag System in your vehicle was certified), the front airbag on the passenger side may or may not deploy .
The
PA SSENGER AIR BAG OFF light comes on when the e lectronic
control unit detects a total weight on the front passenger seat that
requires the front a irbag to be turned off . If the
PA SSENGER AIR BAG
O FF
light does not come on, the front airbag on the passenger side
has not been tu rned off by the contro l u nit and can dep loy if the
control unit senses an impact that meets the conditions stored in its
memory .
I f the total weight on the front passenger seat is more than that o f
a typical
1 year -old, but less than the we ight of a small adult, the
front airbag on the passenger side may dep loy (the
PA SS ENGER AIR
BAG OFF
l ight does not come on).
For example , the airbag may deploy if :
• a small ch ild that is heavier than a typ ical 1 year-o ld child is on
the front passenger seat (regardless of whether the child is in one
of the child sa fety seats listed ~
page 240),
• a child who has outgrown child res traints is on the front
passenger seat.
I f the front passenger airbag is turned off, the
PASSENGER AIR BAG
O FF
light in the cen ter of the instrument panel wi ll co me on and stay
on .
T he front airbag on the passenge r side may
not deploy (the
PAS SEN GER AIR BAG OFF light does not illuminate and stay lit) if:
• a small adult or teenager is on the front passenger seat
• a passenger who is not sitting upright with their back against a
non -reclined backrest with their feet on the vehicle floor in front of
the seat is on the front passenger seat.
I f the front passenger airbag dep loys, the Federal Standard requires
the airbag t o meet the "low risk" deployment criteria to help reduce
Controls and equip
ment Safety first Vehicle operation
the risk of injury through interaction with the airbag
. "Low risk"
dep loyment occurs in those crashes that ta ke place at l ower decel
erations as defined in the electronic contro l unit .~
page 226
Al way s remembe r:
Even though your vehicle is equipped with
Advanced Airbags, the safes t place for chi ldren is properly
restrained on the back seat. Please be sure to read the important
informat ion in t he sections tha t follow a nd be sure to heed a ll of the
WARNINGS.
& WARNING
To reduce the risk of injury when an airbag inflates , always wear
s afety belts prope rly.
• If you are unrestrained , leaning forward , sitt ing s ideways or out
of position in any w ay, your risk of injury i s mu ch higher .
• You will al so receive se riou s injurie s and could even be killed if
you are up against the airbag or too clo se t o it when it inflate s -
even with an Advanced Airbag=>
page 215 .
& WARNING
A child in a rearward -facing child safety seat in stalled on the front
pa ssenge r seat will be ser iou sly injured and can be killed if the
front airb ag inflate s -even with an Advanced Airbag System .
• Although the Advan ced Airbag S ystem in your vehicle is
de signed to turn off the front airbag when a rearward -fa cing child
restraint h as been in stalled on the front pa ssenger seat , nobod y
c an ab solutely guarantee that deployment i s impo ssible in all
c onceivable situations that may happen during the useful life of
your vehicle .
• The inflating airbag will hit the ch ild s afety seat or inf ant
c arrier with great force and will smash the chi ld safety seat and
c hild ag ain st the ba ckre st, center a rm re st, door , or roof .
• Alway s in stall rearward -facing child re straint s on the b ack
seat .
Vehicle care Do-it-yourself service Technical data
Page 386 of 398
___ A_l.:,. p _h_ a_ b_e _t _ic _ a_l _in _ d_e _x ____________________________________________ _
Doors
Power child safety lock .... .... .... . 51
Power side door closer . . . . . . . . . . . . . 48
Driver information system .... .... .... . 23
Digital speedometer .. ............ . 25
Driver information messages .. .... . 28
Open door or rear lid warning ... .... 25
Outside temperature disp lay .. . .... . 24
Sound system display . .... ...... .. 24
Driver seat
See Seating position . . . . . . . . . . . . . . 196
Driver's seat . . . . . . . . . . . . . . . . . . . . . . . . 81
Driver's seat memory . . . . . . . . . . . . . . . . . 84
Activating remote control key .. ... .. 85
Recalling a seat position .. .... .... . 84
Storing a seat position ..... ... .... . 84
Driving messages .... .... .... ... .... . 28
Driving safely .. .............. ...... 194
Driving time ........ .... ... ........ .. 38
Duplicate key ........................ 41
DVD player for navigation system . . . . . . 91
Dynamic shift program ... .... ... .... 165
E
Easy entry feature 116
Electric seat adjustment
See Power seat . . . . . . . . . . . . . . . . . . . 81
Electromechanica l parking brake
Emergency braking .... ....... .... 123
Malfunction ...... .... .... ...... . 123
Operation . . . . . . . . . . . . . . . . . . . . . . . 121
Parking . . . . . . . . . . . . . . . . . . . . . . . . . 122 Releasing and app
lying ... .. .. .... 121
Starting off with a trailer .. ........ 123
Warning/indicator lights ... .... .... 21
Electronic differential lock (EDU How the system works . .... ....... 263
Warning/indicator lights ....... .... 21
Electronic immobilizer .......... ... 14, 44
Electronic power control (EPC) warning/indicator light ... .... . 18
Electronic speed limiter ..... ....... ... 27
Electronic stabi lization program (ESP)
How the system works ............ 262
Warning/indicator lights ....... .... 18
Emergency braking . . . . . . . . . . . . . . . . . 123
Emergency closing Power sunroof . ... ..... ... .... . 60, 61
Emergency flasher . . . . . . . . . . . . . . . . . . . 67
Warning/indicator lights ........... 19
Emergency locking of doors .. ........ . 50
Emergency starting ........ .... ... .. 357
Emergency towing ... .... .... .... ... 360
Energy management . ....... ... .. ... 269
Battery power . . . . . . . . . . . . . . . . . . . 270
Driver notification 270
Engine Compartment . .... .... .... .... .. 302
Coolant ....... .... ... .... ....... 307
Hood ..... .... .... .... ........ .. 300
Starting .. .... ... .... .... ... 116,117
Starting with jumper cables ... .... 357
Stopping .. .... .... .... .... ...... 118 Engine compartment
Safety instructions . ....... .... ... 301
Working the engine compartment .. 301
Engine coolant system .. ...... ....... 307
Adding coolant .... ....... ....... 309
Checking coo lant level . .... .... ... 308
Checking the engine coo lant level .. 308
Malfunction .. .. .. .. .. .... .... .. . . 31
Radiator fan . .... .... .... .... .... 310
Engine coolant temperature
Temperature gauge ....... .... .... 12
Engine data ...... .... .... ...... .... 369
Engine hood Closing .... .. ... ..... ....... .... 301
How to release the hood . . . . . . . . . . 300
Engine oi l .......................... 303
Adding ... .... .... .... .... ...... 306
Additives .. .... .... .... ... .... ... 306
Changing .. .... .... ... ........ .. 306
Checking the engine oil level ....... 305
Indications and conditions requiring extra
checking .. ...... .... ...... .... 305
Oil consumption . ...... .... .... .. 304
Oil grades .. .... .... ... .... ...... 303
Recommended oil check intervals .. 305
Specification and viscosity .. ..... .. 303
Engine oi l leve l ... .... .... .... ...... . 35
Engine oil pressure
Malfunction ....... ....... ........ 32
Engine oil sensor defective .... .... ... . 35
Engine speed limitation ... .... .... .... 36