wheel AUDI S6 2009 Owners Manual
[x] Cancel search | Manufacturer: AUDI, Model Year: 2009, Model line: S6, Model: AUDI S6 2009Pages: 398, PDF Size: 43 MB
Page 6 of 398
Table of contents
Weights . . . . . . . . . . . . . . . . . . . . . . . 367
Dimensions . . . . . . . . . . . . . . . . . . . . 368
Data . . . . . . . . . . . . . . . . . . . . . . . . . . . 369
300 hp, 3.0 liter, 6 -cylinder engine 369
255 hp, 3.2 liter, 6 -cy lind er engine 370
350 hp, 8-cylinder engine . . . . . . . 371
Do-it-yourself service ... 34
1 Consumer Information . . . . . . . . . 372
What do I do now? . . . . . . . . . . . . . 342
Trunk escape handle . . . . . . . . . . . . 342
Jack, tools and spare wheel . . . . . . 342
Changing a wheel . . . . . . . . . . . . . . 344
Fuses and bulbs . . . . . . . . . . . . . . . . 351
Fus es . . . . . . . . . . . . . . . . . . . . . . . . . . 351
Bulbs ................... •...... 355
Emergency situations . . . . . . . . . . 357
Genera l . . . . . . . . . . . . . . . . . . . . . . . . 357
Starting by pushing or towing . . . . 357
Starting with jumper cab les . . . . . . 357
Use of juniper cables . . . . . . . . . . . . 358
Em ergency towing with commercia l
tow truck . . . . . . . . . . . . . . . . . . . . . . 360
Lifting vehicle . . . . . . . . . . . . . . . . . . 362
Technical data
General information
Explanation of technical data ... .
Vehicle identification ........... .
Displaying Vehic le Ident ification
Number in the MMI ......... ... . 365
366
366
366
367 Warranty
coverages ........... .
Operating your vehicle outside the
U.S.A. or Canada .............. .
Audi Service Repair Manuals and
Literature ..................... .
Maintenance .............. ... .
Additional accessories, modifications and parts
rep lacement .................. .
Dec laration of Compliance,
Telecommunications and Electron ic
Systems .................. .... . 372
372
372
372
374
375
Alphabetical index
. . . . . . 379
Page 13 of 398
Instruments and controls
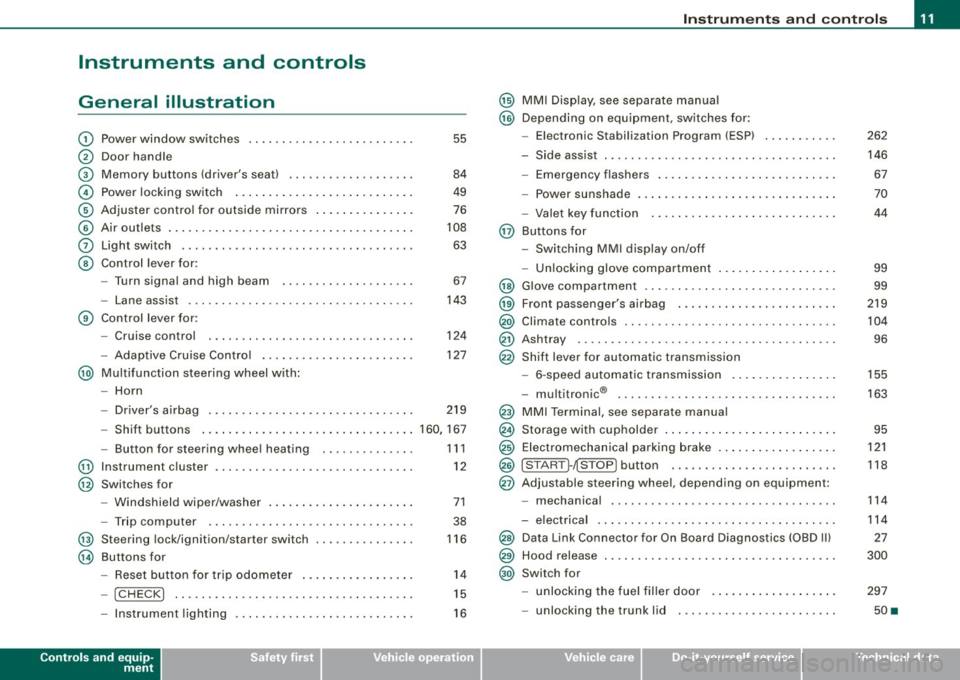
General illustration
G)
0
©
©
©
©
0
©
Power window switches ...... .... ..... .. ....... .
Door handle
Memory buttons (driver's seat)
Power locking switch .......................... .
Adjuster control for outside mirrors .. .... .... .... .
Air outlets ........ ... ...... .... ...... .... ... .. .
Light switch .... .... ........... .... .... .... ... .
Control lever for :
- Turn signal and high beam
- Lane assist .... .... ... .... .... .... .......... .
Control lever for:
- Cruise control
- Adaptive Cruise Contro l .......... ...... .... .. .
@ Multifunction steering wheel with:
- Horn
55
84
49
76
108
63
67
143
124
127
- Driver's airbag . . . . . . . . . . . . . . . . . . . . . . . . . . . . . . . 219
- Shift buttons ................................ 160, 167
@
@
@
@
-Button for steering wheel heating
Instrument cluster ... .... ... .... ...... ......... .
Switches for
- Windshield wiper/washer ..... ...... ..... .. ... .
- Trip computer ..... .. ..... ... .... ...... ... .. .
Steering lock/ignition/starter switch
Buttons for
- Reset button for trip odometer ... .. .... .... ... .
!CHECK] .. .... ....... .... .... ....... .... ... .
Instrument lighting .... ... .... .... ... ..... ... .
Controls and equip
ment
1 1 1
12
71
38
116
14
15
16
Instruments and controls
@ MMI Display, see separate manual
@ Depending on equipment, switches for:
- Electronic Stabilization Program (ESP)
- Side assist .. ... ..... .. .. .. .... .... .... ... ... .
- Emergency flashers .......................... .
- Power sunshade .... .... .... .... ... .... ..... . .
- Valet key function .... ....... ...... .... ...... .
@ Buttons for
- Switching MMI display on/off
- Unlocking glove compartment
@ Glove compartment ........... .... .... ......... .
@ Front passenger's airbag .. .... .... ... .. ...... .. .
@) Climate controls ......... .. .. .... .... .... .. . .. . .
@ Ashtray ..... .... .... ....... .... .... .... ... ... .
@ Shift lever for automatic transmission
- 6-speed automatic transmission .. .. .... .... ... .
I . .
® -
mu t1tron1c ... .... .... .... .... .... ... ...... .
@ MMI Terminal, see separate manual
@ Storage with cupholder . ........ ... .. .... .... ... .
@ Electromechanical parking brake ... .... .... .... .. .
@ ISTART ]-~STOP ] button .. ... ..... ... .... .... ... .
@ Adjustable steering wheel, depending on equipment:
- mechanica l .. .. .... .... ..... .. .... ..... ... .. .
- electrica l ... ...... .... ... .. .... .... ...... ... .
@) Data Link Connector for On Board Diagnostics (OBD II)
@ Hood release . .... .... ...... ... .. .... .... ... ... .
@) Switch for
unlocking the fuel filler door ..... ...... .... ... .
- unlocking the trunk lid . .... .... .... .... ... ... .
I • •
262
146 67
70
44
99
99
219
104
96
155
163
95
121
118
114
114
27
300
297
50 •
Page 23 of 398
Anti-lock brake system (ABS)
/ .J (USA models) / ~ (Canada models)
This warning/indicator light monitors the ABS and the
electronic differenti al l ock (EDLJ.
T he warning/indicato r ligh t will come on fo r a few seconds whe n the
ignition is switched on . The light will go out after an automatic
check sequence is completed .
There is a malfunction in the ABS when:
• The war ning/indi cat or l igh t does no t illu minate w he n yo u swi tch
on the ignition.
• The war ning/i ndicat or light does not go out aft er a few seconds .
• T he warning/indicator light il luminates while driving.
The brake system will still respond even without the assistan ce of
the ABS system. See you r authorized Audi dealer as soon as
possible to restore full braking performance.
For mo re in form ati on
re garding the ABS~
page 266 .
The ABS warning light and the brake warning light come on
together. The ABS will not work and you will notice a change in braking response and performance.
Malfun ction in the brake system
If the brake warning light~ page 22and the ABS warning illuminate
together there may be a malfunction in the ABS, a nd there may also
be a ma lfunction in the bra ke system itself~& .
I n the even t of a
malfunction in the brake system th e wa rn in g/in di
cator light
BRAKE (USA mode ls)/ (©) (Canada models) in the instrument
c lus ter flas hes . B y pres sing the [ C HE CK ] bu tton, you ca n bring u p a
driver message wh ich explains the malfunction in more deta il.
P lease note
~ page 30.
Controls and equip
ment
Instruments and warning /indi cator lights
Malfun ction in the electroni c differential lock (EDL )
The ED L wo rks toge ther wit h the ABS. T he ABS wa rn ing light w ill
come on if there is a ma lfunction in the EDL system~
page 263 . See
yo ur aut ho rized Aud i dea ler as soon as poss ib le.
& WARNING
• If the AU (USA models )/u (Canada models ) warning light
does not go out , or if it comes on while driving , the ABS system is
not working properly. The vehicle can then be stopped only with
the standard brakes (without ABS ). You will not have the protec
tion ABS provides. Contact your Audi dealer as soon as possible .
• USA models :
If the BRAKE warning light and the -warning
light come on together , the rear wheels could lock up first under
hard b raking . Rear wheel lock -up can cause loss of vehicle control
and an accident. Have your vehicle repaired immediately by your
autho riz ed Audi dealer or a qualified workshop. Drive slowly and
avoid sudden, hard brake applications .
• Canada models : If the brake warning light (CD) and the ABS
warning light ~ come on together , the rear wheels could lock up
first unde r hard braking . Rear wheel lock -up can cause loss of
vehicle control and an a ccident . Have your veh icle rep aired imme
diately by your authorized Audi dealer or a qualified workshop .
Drive slowly and avoid sudden, hard brake applications . •
Electromechanical parking brake
~E (USA models) / (®) (Canada models)
The warning/indicator li ght m onit ors the e lec tromech an
i c al park ing brake.
W ith the parking brake a pplied and th e ignition tur ned on, the
warning/ indicator light i lluminates. After t he ignition has been
tu rn ed off , th e warni ng/ indicato r ligh t co ntin ues to i llu mina te fo r
about 30 seconds . If t he parking brake is applied with t he ignition _,,
I • •
Page 24 of 398
Instruments and warning/indicator lights
turned off, the warning/indicator light illuminates for about 30
s e co nds.
The warnin g/indicator li ght wi ll go out when the par kin g brak e is
r e lea sed .
I f the wa rn in g/ind ica tor l ig ht flas hes co ntinu ously
after applying th e
par king brake, brakin g force is not sufficient to prevent the veh ic le
fr om r olling u nint enti onally. Ple as e n ote the foll owin g:
• If the s lope of the ground is too steep to park the vehicle, the
additio nal drive message appea rs
Caution: Vehicle parked too
steep .
• In the even t of a parking brake malf unc tion, the yel low I sym bol
appears in the instrument c luster display and the driver m essage
Parking brake malfunction! is displayed. Have the ma lfunct ion
repa ired as soo n as possible b y a qua lified Aud i deale rship. •
Brake system BRAKE (USA models) /(©) (Canada
models)
Th e warn ing/indicator light f lashes if brake fluid level i s
low, if there is an ABS sy stem malfunct ion or a par kin g
b ra ke malfun cti on.
The light illuminate s when the ignition i s turned on . It goes out afte r
the engine has been start ed. Thi s ind icates t hat th e bra ke w arni ng
light is functioning properly .
If the brake warning light does not light up when the engine is
cranking , there may be a malfun ction in the electrical system . In this
case , contact your Audi dealer .
If the b rake system warni ng/ind icator l ight flas he s, t here is a b rake
system malfunction . By pressing the [
CH ECK ] button, you can bring
up a dr ive r m essage w hic h exp la in s the mal funct io n i n mor e deta il
=>
page 30 .
If the ABS fai ls, the A BS warning/indicator lig ht _. (USA
mod els)/ (Ca nada mode ls) flas hes toget he r w ith th e brake sys te m
warn ing/ indicator lig ht=>
& -
(U SA mode ls): If the warni ng light BRAKE and the warning light
illumin ate t oget her, im medi ate ly contact yo ur a uth orized Aud i
dea ler or qua lified workshop to have all brake pads ins pected
=>
p age 35.
When the l ig ht comes on, an aud ible warning signal is also giv en .
& WARNING
• USA models : If the BRAKE warning light and the Af'l~ warning
light come on together , the rear wheels could lock up first under
hard braking . Rear wheel lock-up can cause loss of vehicle control
and an accident . Have your vehicle repaired immediately by your
authorized Audi dealer or a qualified workshop . Drive slowly and
avoid sudden, hard brake applications.
• Canada model s: If the brake warning light (Q)) and the ABS
warning light come on together , the rear wheels could lock up
first under hard braking . Rear wheel lock -up can cause loss of
vehicle control and an accident . Have your vehicle repaired imme
diately by your authorized Audi dealer or a qualified workshop .
Drive slowly and avoid sudden , hard brake applications.
• If the brake warning /indicator light does not go out after a few
seconds and the parking brake released, or lights up while you are
driving , the fluid level in the brake fluid reservoir is too low . If you
believe that it is safe to do so , proceed immediately at low speed
to the nearest authorized Audi dealer or qualified repair facility and have the brake system inspected .
• Always keep
in mind that after several brake applications , you
will need greater pressure on the brake pedal to stop your vehicle. Do not rely on strained brakes to respond with maximum stopping
power in critical situations . You must allow for increased braking
distances . The extra di stance used up by fading brakes could lead
to an a ccident. •
Page 33 of 398
& WARNING
• Always observe the warnings in => page 293, "Engine compart
ment", before opening the hood and checking the brake fluid.
• Driving with low brake fluid is a safety hazard . Stop the car and
get professional assistance.
• USA models : If the BRAKE warning light and the -warning
light come on together, the rear wheels could lock up first under
hard braking . Rear wheel lock-up can cause loss of vehicle control
and an accident. Have your vehicle repaired immediately by your
authorized Audi dealer or a qualified workshop. Drive slowly and
avoid sudden, hard brake applications.
• Canada models: If the brake warning light «D> and the ABS
warning light come on together, the rear wheels could lock up first under hard braking. Rear wheel lock-up can cause loss of
vehicle control and an accident. Have your vehicle repaired imme diately by your authorized Audi dealer or a qualified workshop .
Drive slowly and avoid sudden, hard brake applications. •
Engine cooling system malfunction _t
A malfunction in the engine cooling system must be
repaired as soon as possible.
When the -t symbol in the display blinks, then either the
engine coolant
temperature is too high, or the coolant level
is too low. An additional driver message can also be
displayed by pressing the [
CHECK] button:
Switch off engine and check coolant level
- Pull off the road .
- Stop the vehicle.
- Turn off the engine.
Controls and equip
ment
Driver information display
Check coolant level ~ page 308.
-Add coolant if necessary~ page 309 .
Continue driving only after the engine coolant
warning/indicator light goes out.
Contact your authorized Audi dealer for assistance if
necessary.
If the engine coolant level is correct, then the radiator fan may be
the cause of the malfunction.
If the O warning symbol (alternator malfunction) also lights up on
the instrument panel=>
page 30, then the fan belt may be damaged.
& WARNING
• If your vehicle should break down for mechanical or other
reasons, park at a safe distance from moving traffic, turn off the
engine and turn on the hazard warning lights =>
page 67, "Emer
gency flasher
A".
• Never open the hood if you see or hear steam or coolant
escaping from the engine compartment - you risk being scalded.
Wait until you can no longer see or hear steam or coolant escaping.
• The engine compartment of any vehicle is a dangerous area.
Before you perform any work in the engine compartment, turn of
the engine and allow it to cool. Follow the warning stickers
=>
page 293, "Engine compartment" .
0 Note
Do not continue driving if the -F-symbol illuminates. There is a
malfunction in the engine cooling system -you could damage your
engine .•
I • •
Page 68 of 398
![AUDI S6 2009 Owners Manual Clear vision
[ i] Tips
With the switch in AUTO front fog lights and rear fog lights cannot
be turned on in addition. •
Applies to vehic les: with Adapt ive Light
Adaptive Light AUDI S6 2009 Owners Manual Clear vision
[ i] Tips
With the switch in AUTO front fog lights and rear fog lights cannot
be turned on in addition. •
Applies to vehic les: with Adapt ive Light
Adaptive Light](/img/6/57595/w960_57595-67.png)
Clear vision
[ i] Tips
With the switch in AUTO front fog lights and rear fog lights cannot
be turned on in addition. •
Applies to vehic les: with Adapt ive Light
Adaptive Light
When making a turn or driving around tight corners, the
relevant area of the road is better illuminated.
Adaptive Light (making turns)
Fig. 55 Adaptive Light
when turning and driving through curves
An additional bulb in the headlight provides a cornering light@ in
addition to the low beam@:::::, fig. 55. Adaptive Light is switched on
and off automatically depending on driving conditions .
When you activate the turn signal lever, the Adaptive Light for the
same side is switched on. Please note that the turn signal lever must
engage.
Adaptive Light is not switched on if you only move the turn signal
lever to the point of resistance to signal a lane change :::::,
page 67,
"Turn signal ¢i ¢ and high beam lsD lever".
When driving around bends, Adaptive Light is controlled according
to steering wheel angle. • It is switched on in tight corners. • It
is not switched on in long, open bends .
Adaptive Light (in curves)
When driving through curves, the low beams © are automatically
controlled depending on driving speed and the steering wheel
angle.
The two main beams pivot at different angles so that there is no
unilluminated area in front of the vehicle.
[ i] Tips
• The system works up to a speed of about 43 mph (70 km/h). If the
speed is higher, it is not activated.
• Adaptive Light (in curves) functions at a speed of about 6 mph
(10 km/h) and is deactivated at speeds below about 4 mph
(6 km/h). •
Applies to vehi cles: with light pac kage
Perimeter lighting in the mirror housing
LEDs in the exterior mirror housing illuminate the ground
during entry.
This function ensures that when unlocking, the vehicle periphery is
illuminated in the dark. LEDs in the exterior mirror housing are
switched on. The function cannot be turned off separately. •
Page 70 of 398
Clear vision
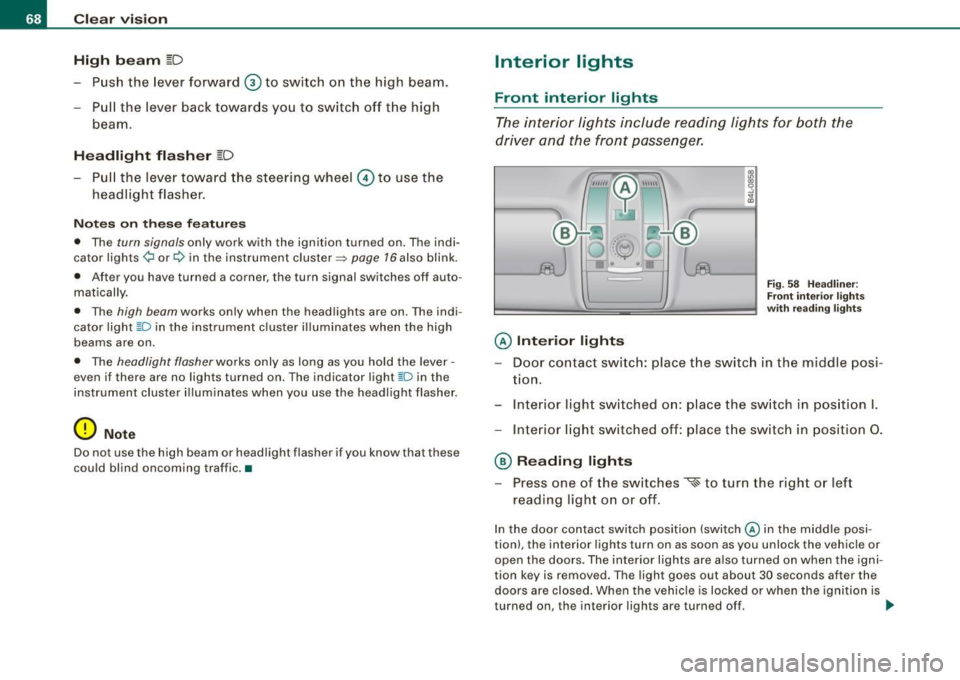
High beam
~D
-Push the lever forward 0 to switch on the high beam.
Pull the lever back towards you to switch off the high
beam.
Headlight flasher
~D
- Pull the lever toward the steering wheel © to use the
headlight flasher.
Notes on these features
• The turn signals only work with the ignition turned on. The indi
cator lights ¢ or¢ in the instrument cluster~ page 16 also blink.
• After you have turned a corner, the turn signal switches off auto
matically.
• The high beam works only when the headlights are on. The indi
cator light ~D in the instrument cluster illuminates when the high
beams are on.
• The headlight flasher works only as long as you hold the lever -
even if there are no lights turned on. The indicator light [Din the
instrument cluster illuminates when you use the headlight flasher.
0 Note
Do not use the high beam or headlight flasher if you know that these
could blind oncoming traffic. •
Interior lights
Front interior lights
The interior lights include reading lights for both the
driver and the front passenger.
@ Interior lights
Fig . 58 Headliner :
Front interior lights
with reading lights
- Door contact switch: place the switch in the middle posi -
tion.
- Interior light switched on: place the switch in position I.
- Interior light switched off: place the switch in position 0.
@ Reading lights
- Press one of the switches
~ to turn the right or left
reading light on or off.
In the door contact switch position (switch@ in the middle posi
tion), the interior lights turn on as soon as you unlock the vehicle or
open the doors. The interior lights are also turned on when the igni
tion key is removed. The light goes out about 30 seconds after the
doors are closed. When the vehicle is locked or when the ignition is
turned on, the interior lights are turned off. ..,_
Page 74 of 398
Clear vision
One-touch wiping
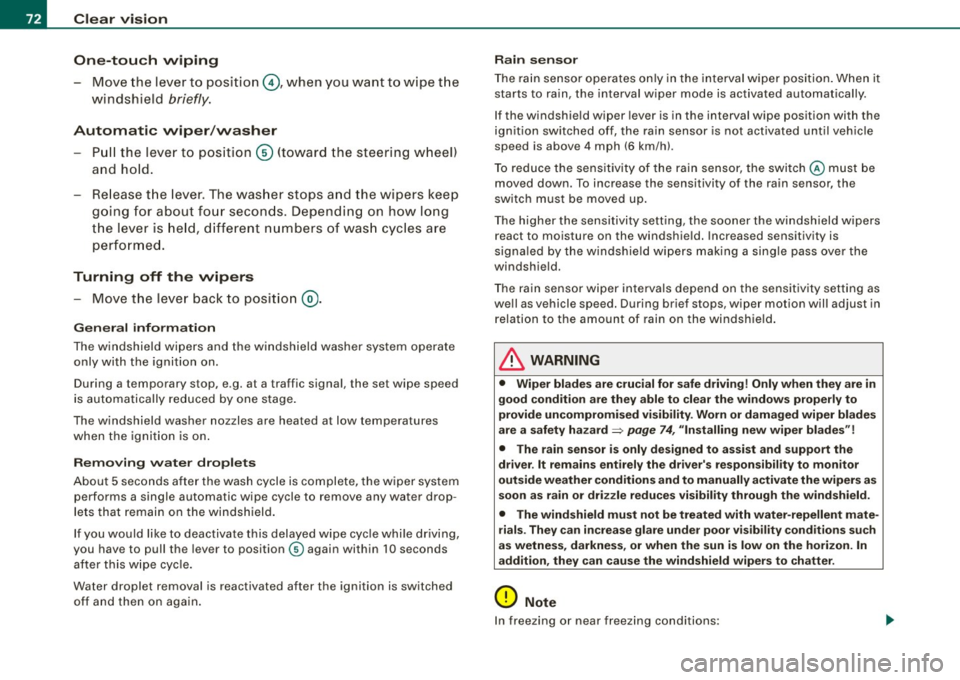
- Move the lever to position@, when you want to wipe the
windsh ield
briefly.
Automatic wiper /washer
- Pull the lever to pos ition © (toward the steering wheel)
and ho ld.
- Re lease t he lever. T he wash er stops a nd the wipers keep
g o ing for about fo ur secon ds. Dep ending on h ow long
t h e lever is held, d ifferent numbers of was h cyc les are
performed.
Turning off the wipers
- Move the lever back to position @ .
Gen era l inform ati on
The windshield wipers and the windshield washer system operate
only with the ignition on.
During a temporary stop, e.g. at a traffic signa l, the set wipe speed
is aut omatically reduced by one stage .
The windshield washer nozzles are heated at low temperatures
when the ignition is on .
Removing vv ater drop let s
About 5 seconds after the wash cycle is complete, the wiper system
performs a single automatic wipe cycle to remove any water drop
lets that remain on the windshield .
If you would like to deactivate this delayed wipe cyc le whi le dr iving,
you have to pull the lever to position © again within 10 seconds
af ter this w ipe cyc le .
Water droplet removal is reactivated after the ignition is switched off and then on again .
Rain se nsor
The ra in sensor operates on ly in the interval wiper position . When it
starts to rain, the interval wiper mode is activated automatically .
I f the windshie ld wiper lever is in the interval wipe position with the
ign ition sw itched off, the rain sensor is not activated unt il veh ic le
speed is above 4 mph (6 km/h) .
T o reduce the sens itivi ty of the rain sensor, the swi tch
© must be
moved down. To increase the sensitivity of the rain sensor, the
sw itc h must be moved up .
T he higher the sensitivity sett ing, the sooner the windshield wipers
react to moisture on the windshie ld. Increased sensitivity is
signa led by the windshie ld w ipers making a si ng le pass over the
windshield.
T he rain sensor wiper interva ls depend on the sens itivity setting as
we ll as vehicle speed. During brief stops, wiper motion will adjust in
r elation to the amount of rain on the windshield .
& WARNING
• Wiper blades are crucial for safe driving! Only when they are in
good cond ition are they able to clear the windo ws properly to
provide uncompromised visibility . Worn or d am aged wiper blades
are a safet y hazard ::::> page
74 , "I nst alli ng new wiper blades "!
• The rain sensor is only designed to a ssist and support the
dri ver . It remai ns entirel y the dr iver's respon sibil ity to monitor
out side weather conditions and to manually activate the wiper s as
so on a s rain or dri zzle reduce s vis ibility through the wind sh ield.
• The wind shield must not be treated with water -repellent mate
rials . The y can incre as e g la re under poor visibility condition s su ch
as wetness , darkne ss, or when th e sun is low on t he horizon. In
addition , they can cause the wind shield wiper s to ch att er.
0 Note
In freezing or near freezing conditions :
Page 82 of 398
Seats and storage
Seats and storage
General recommendations
Why is your seat adjustment so important?
The safety belts and the airbag system can only provide
maximum protection if the front seats are correctly
adjusted.
There are various ways of adjusting the front seats to provide safe
and comfortable support for the driver and the front passenger.
Adjust your seat properly so that :
• you can easily and quickly reach all the switches and controls in
the instrument panel
• your body is properly supported thus reducing physical stress
and fatigue
• the safety belts and airbag system can offer maximum protec
tion=>
page 215.
In the following sections , you will see exactly how you can best
adjust your seats.
There are special regulations and instructions for installing a child safety seat on the front passenger's seat. Always follow the informa
tion regarding child safety provided in=>
page 238, "Child Safety".
L1}. WARNING
Incorrect seating position of the driver and all other passengers
can result in serious personal injury.
• Always keep your feet on the floor when the vehicle is in motion
- never put your feet on top of the instrument panel, out of the
window or on top of the seat cushion. This applies especially to
the passengers. If your seating position is incorrect, you increase
the risk of injury in the case of sudden braking or an accident. If
& WARNING (continued)
the airbag inflates and the seating position is incorrect, this could
result in personal injury or even death.
• It is important for both the driver and front passenger to keep
a distance of at least 10 inches (25 cm) between themselves and
the steering wheel and/or instrument panel. If you're sitting any closer than this, the airbag system cannot protect you properly. In
addition, the front seats and head restraints must be adjusted to
your body height so that they can give you maximum protection.
• Always try to keep as much distance as possible between your
self and the steering wheel or instrument panel.
• Do not adjust the driver's or front passenger's seat while the
vehicle is moving. Your seat may move unexpectedly, causing
sudden loss of vehicle control and personal injury.
If you adjust
your seat while the vehicle is moving, you are out of position. •
Driver's seat
The correct seat position is important for safe and relaxed
driving.
We recommend that you adjust the driver's seat in the
following manner:
- Adjust the seat in fore and aft direction so that you can
easily push the pedals to the floor while keeping your
knees slightly bent=>&, in "Why is your seat adjustment
so important?".
Adjust the seatback so that when you sit with your back
against the seatback, you can still grasp the top of the
steering wheel. _..
Page 112 of 398
• ..__w_ a_ r_m _ a_ n_d_ c_ o_ ld __________________________________________________ _
Applies to veh ic les : with electr ically heated seats
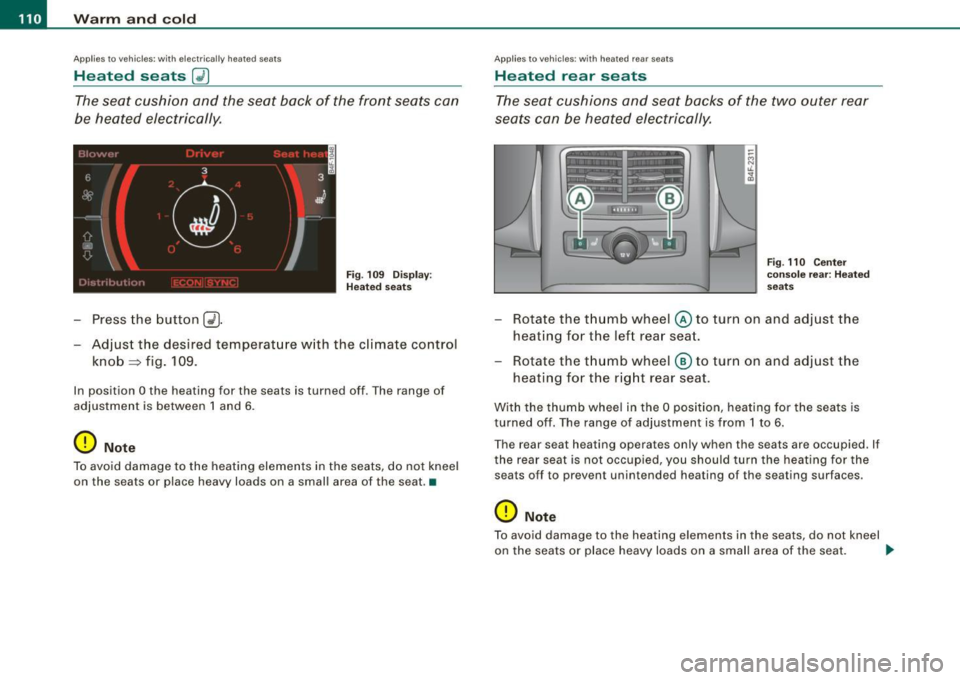
Heated seats ~
The seat cushion and the seat back of the front seats can
be heated electrically.
F ig. 10 9 Dis play:
H eated seats
- Press the button C~J
-Adjust the desired temperature w ith the climate control
knob~ fig. 109.
In position O the heating for the seats is turned off . The range of
adjustment is between 1 and 6.
0 Note
To avoid damage to the heating elements in the seats, do not kneel
on the seats or place heavy loads on a small area of the seat. •
Applies to vehicles: with heated rear seats
Heated rear seats
The seat cushions and seat backs of the two outer rear
seats can be heated electrically.
Fig. 110 Cen ter
co nsole re ar: H ea ted
seats
- Rotate the thumb wheel© to turn on and adjust the
heating for the left rear seat.
- Rotate the thu mb wheel ® to turn on and adjust the
heating for the rig ht rear seat.
With the thumb whee l in the O position, heating for the seats is
turned off. The range of adjustment is from 1 to 6.
The rear seat heating operates only when the seats are occupied. If
the rear seat is not occupied, you should turn the heating for the
seats off to prevent unintended heating of the seating surfaces .
0 Note
To avoid damage to the heating e lements in the seats, do not kneel
on the seats or place heavy loads on a small area of the seat. .,.