wheel bolts AUDI S6 2009 Owners Manual
[x] Cancel search | Manufacturer: AUDI, Model Year: 2009, Model line: S6, Model: AUDI S6 2009Pages: 398, PDF Size: 43 MB
Page 333 of 398
Tires and wheels -________________ w-.
•
ture. For exam ple , t he numbers 2 208 mean that the tire was
pr od uce d in the 22nd w eek o f 20 08 . T he ot her num bers a re
marketing cod es that may or may not b e used by the tire manufac
tu rer. This inf or ma tion is use d to conta ct consum ers if a tir e defec t
requires a recall.
Audi Original tire
Ti res with the identification "AO" or "R O" hav e been specia lly
m atc h ed wi th you r A ud i. We re comm end u sing on ly these tire s
becaus e they meet the highest standards re garding safety and
dri ving c haracter istic s when used correctly . You r aut horized Audi
d ealer w ill glad ly prov ide you with mor e information .
Tire ply composition and materials used
The number of p li e s indicates the numb er of layers of rubber -coat ed
fabric i n the tir e . In genera l, the grea te r the number of pl ies, th e
mo re we ig ht a t ire can suppo rt. T ire ma nufactu rers also must ind i
cate the materia ls in the tire, which include steel, ny lon, polyester,
and oth ers .
Maximum Load Rating
This numb er ind icat es the maximum load in kil ograms and pou nds
th at ca n be ca rried by t he tire.
Tire qual ity grading for treadvvear , traction , and
temperature resistance
T read wear , traction and temperature grades::::;, page 332.
Maximum Permissible Inflation Pressure
This number is the greatest amount of air pressure that should ever
be put in the t ir e u nder nor mal d riving co nd it ion s.
& WARNING
• Using incorrect or unmatched tires and / or wheels or improper
tire and wheel combinations can lead to loss of control , collision
and serious personal injury .
& WARNING (continued )
• Always use tires, rims and wheel bolts that meet the specifica
tions of original factory -installed tires or other combinations that
have been spec ifically approved by the veh icle manufacturer .
• Tires age even if they are not being used and can fail suddenly,
especially at high speeds . Tires that are more than 6 years old can
only be used in an emergency and then with special care and at
lower speeds .
• Never mount used tires on your vehicle if you are not sure of
their "previous history." Old used tires may have been damaged
even though the damage cannot be seen that can lead to sudden
tire failure and loss of vehicle control.
• All four wheels must be fitted with radial tires of the same type ,
size (rolling circumference ) and the same tread pattern. Driving
with different tires reduces vehicle handling and can lead to a loss of control.
• If the spare tire is not the same as the tires that are mounted
on the vehicle - for example with winter tires - only use the spare
tire for a short period of time and drive with extra care . Refit the
normal road wheel as soon as safely possible.
• Never drive faster than the maximum speed for which the tires
on your vehicle are rated because tires that are driven faster than
their rated speed can fail suddenly.
• Overloading tires cause heat build -up, sudden tire failure ,
includ ing a blowout and sudden deflation and loss of control.
• Temperature grades apply to tires that are properly inflated and
not over or underinflated .
• For technical reasons it is not always possible to use wheels
from other vehicles -in some cases not even wheels from the
same vehicle model.
• If you install wheel trim discs on the vehicle wheels , make sure
that the air flow to the brakes is not blocked. Reduced airflow to
the brakes can them to overheat , increasing stopping distances
and causing a collision.
~
Vehicle care I t •
Page 337 of 398
Tires and wheels -_______________________ ..::...:..:..-=::.......:.:..;::..:....____;___
•
Wheel bolts
Wheel bolts must always be tightened to the correct
torque.
The design of wheel bolts is matched to the factory installed rims. If
different rims are fitted, the correct wheel bolts with the right length
and correctly shaped bolt heads must be used. This ensures that
wheels are fitted securely and that the brake system functions
correctly.
In certain circumstances, you may not use wheel bolts from a
different vehicle - even if it is the same model~
page 374.
& WARNING
Improperly tightened or maintained wheel bolts can become loose
causing loss of control, a collision and serious personal injury.
• Always keep the wheel bolts and the threads in the wheel hubs
clean so the wheel bolts can turn easily and be properly tightened.
• Never grease or oil the wheel bolts and the threads in the wheel
hubs. They can become loose while driving if greased or oiled,
even if tightened to the specified torque.
• Only use wheel bolts that belong to the rim being installed.
• Never use different wheels bolts on your vehicle.
• Always maintain the correct tightening torque for the wheel
bolts to reduce the risk of a wheel loss.
If the tightening torque of
the wheel bolts is too low, they can loosen and come out when the
vehicle is moving. If the tightening torque is too high, the wheel bolts and threads can be damaged and the wheel can become
loose.
0 Note
The specified torque for the wheel bolts is 90 ft lb (120 Nm) with a
tolerance of ± 7,4 ft lb(± 10 Nm). Torque wheel bolts diagonally.
After changing a wheel, the torque must be checked as soon as possible with a torque wrench
-preferably by an authorized Audi
dealer or qualified workshop. •
Low aspect ratio tires
Your Audi is factory-equipped with low aspect ratio tires. These tires
have been thoroughly tested and been selected specifically for your
model for their superb performance, road feel and handling under
a variety of driving conditions. Ask your authorized Audi dealer for
more details.
The low aspect ratio of these tires is indicated by a numeral of 55 or
less in the tire's size designation. The numeral represents the ratio
of the tire's sidewall height in relation to its tread width expressed
in percentage. Conventional tires have a height/width ratio of 60 or
more.
The performance of low-aspect-ratio tires is particularly sensitive to improper inflation pressure. It is therefore important that low
aspect ratio tires are inflated to the specified pressure and that the
inflation pressure is regularly checked and maintained. Tire pres
sures should be checked at least once a month and always before a
long trip~
page 323, "Checking tire pressure" .
What you can do to avoid tire and rim damage Low aspect ratio tires can be damaged more easily by impact with
potholes, curbs, gullies or ridges on the road, particularly if the tire
is underinflated.
In order to minimize the occurrence of impact damage to the tires
of your vehicle, we recommend that you observe the following
precautions:
• Always maintain recommended inflation pressures . Check your
tire pressure every 2,000 miles (3,000 km) and add air if necessary.
• Drive carefully on roads with potholes, deep gullies or ridges.
The impact from driving through or over such obstacles can
damage your tires. Impact with a curb may also cause damage to
your tires. ..,
Vehicle care
I t •
Page 345 of 398
What do I do now? 111111 _______________________________ ....:..:..:..:..:.:..:--=.:..::....:.....:.:...::..___;__ _ __,J
& WARNING !continued)
• Never start or run the engine while the vehicle is supported by
the jack.
• If you must work under the vehicle, always use safety stands
specifically designed for this purpose.
• Never use the hexagonal socket in the handle of the screw
driver to loosen or tighten the wheel bolts.
• Always make sure the spare tire and even a flat tire are secured
in place and not loose, otherwise they could fly forward, causing
personal injury to passengers in the vehicle in an accident or
sudden maneuver. •
Tools
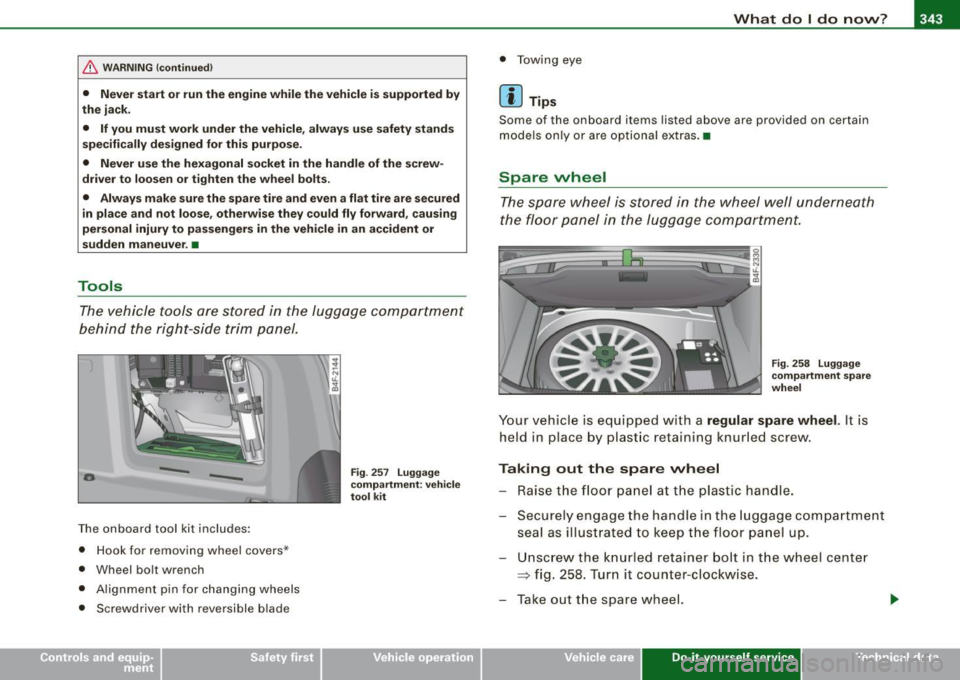
The vehicle tools are stored in the luggage compartment
behind the right-side trim panel.
-
-
The onboard tool kit includes:
• Hook for removing wheel covers *
• Wheel bolt wrench
• Alignment pin for changing wheels
• Screwdriver with reversible blade
Fig. 257 Luggage
compartment: vehicle
tool kit
• Towing eye
[ i] Tips
Some of the on board items listed above are provided on certain
models only or are optional extras.•
Spare wheel
The spare wheel is stored in the wheel well underneath
the floor panel in the luggage compartment.
Fig. 258 Luggage
compartment spare
wheel
Your vehicle is equipped with a regular spare wheel. It is
held in place by plastic retaining knurled screw.
Taking out the spare wheel
- Raise the floor panel at the plastic handle.
- Securely engage the handle in the luggage compartment
seal as illustrated to keep the floor panel up.
Unscrew the knurled retainer bolt in the wheel center
=> fig. 258. Turn it counter-clockwise.
- Take out the spare wheel.
Vehicle care Do-it-yourself service irechnical data
Page 347 of 398
_______________________________________________ W_ h_ a_t _ d_ o_ l _d _o_ n_ o _ w_ ? __ IIII
•
& WARNING (continued)
front wheel is lifted off the ground, placing the Automatic Trans
mission in "P" {Park) will
not prevent the vehicle from moving.
• Before you change a wheel , be sure the ground is level and firm.
If necessary, use a sturdy board under the jack.
• After installing the spare wheel, make sure that you replace the
flat tire/wheel in its storage area properly and tighten the knurled
retaining screw securely. •
Changing a vvheel
When you change a wheel, follow the sequence described
below step-by-step and in exactly that order.
1. Act ivate the vehicle jack mode (only vehicles with Adap
tive Air Suspension) ~
page 186.
2. Remove the decorative wheel cover*. For more details
see also ~
page 346, "Decorative wheel covers".
3. Loosen the
wheel bolts ~ page 346.
4. Locate the proper mounting point for the jack and align
the jack below that point~
page 347.
5. Lift the car with the jack~ page 347.
6. Remove the wheel with the flat tire and then install the
spare
~ page 348.
7. Tighten all wheel bolts lightly.
8.
Lower the vehicle with the jack.
9. Use the wheel bolt wrench and
firmly tighten all wheel
bolts
~ page 346.
10. Replace the decorative wheel cover*.
11. Deactivate the veh icle jack mode (only vehicles with
Adaptive Air Suspension)~
page 186.
& WARNING
Always read and follow all WARNINGS and information => & in
"Raising the vehicle" on
page 347 and => page 349. •
After changing a vvheel
A wheel change is not complete without the doing the
following.
- Store and secure the wheel you replaced in the spare
wheel well.
- Replace the tools and the jack in their proper location.
-Check the tire pressure on the spare wheel immediately
after mounting it.
- As soon as possible, have the
tightening torques on all
wheel bolts checked with a torque wrench. The correct
tightening torque is 90 ft lb (120 Nm).
- Have the flat tire
replaced as soon as possible.
[ i] Tips
• If you notice that the wheel bolts are corroded and difficult to
turn while changing a tire, they should be replaced before you check
the tightening torque.
• Drive at reduced speed until you have the tightening torques
checked. a
Do-it-yourself service
Page 348 of 398
-L--____:W:...:....:. h.:..: a::.. t:....: d.:..:o:....:. l...: d::.. o ..:.... n:..:..:: o...:vv ...:...;. ? ____________________________________________ _
Applies to veh ic les : with decorative wheel covers
Decorative wheel covers
The decorative wheel covers must be removed first to
access the wheel bolts.
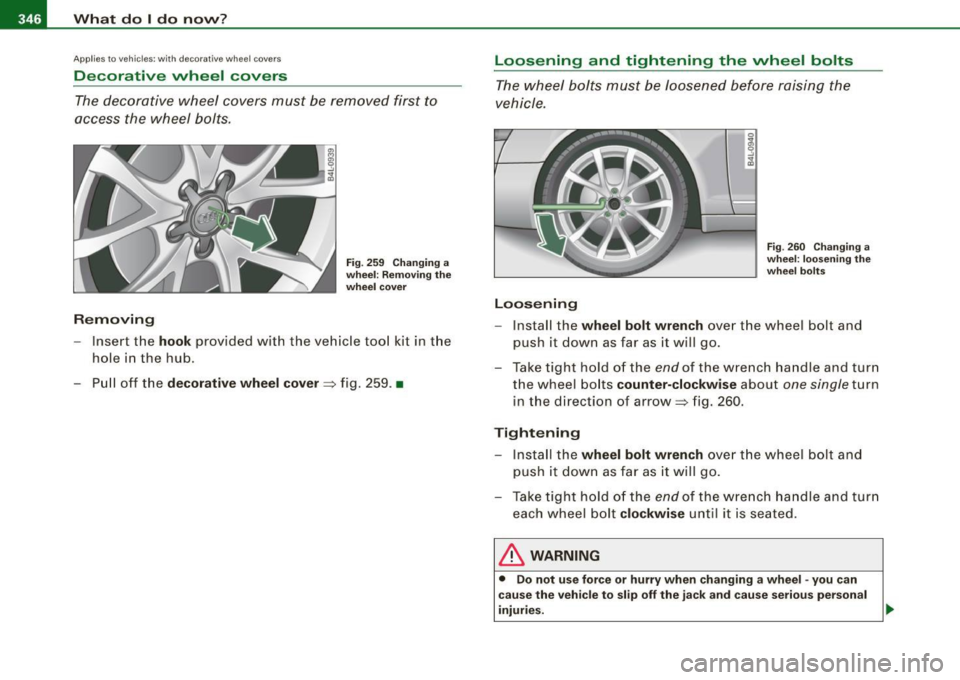
Removing
Fig. 259 Changing a
wheel: Removing the
wheel cover
- Insert the hook provided with the vehicle tool kit in the
hole in the hub.
- Pull off the decorative wheel cover=> fig. 259. •
Loosening and tightening the wheel bolts
The wheel bolts must be loosened before raising the
vehicle.
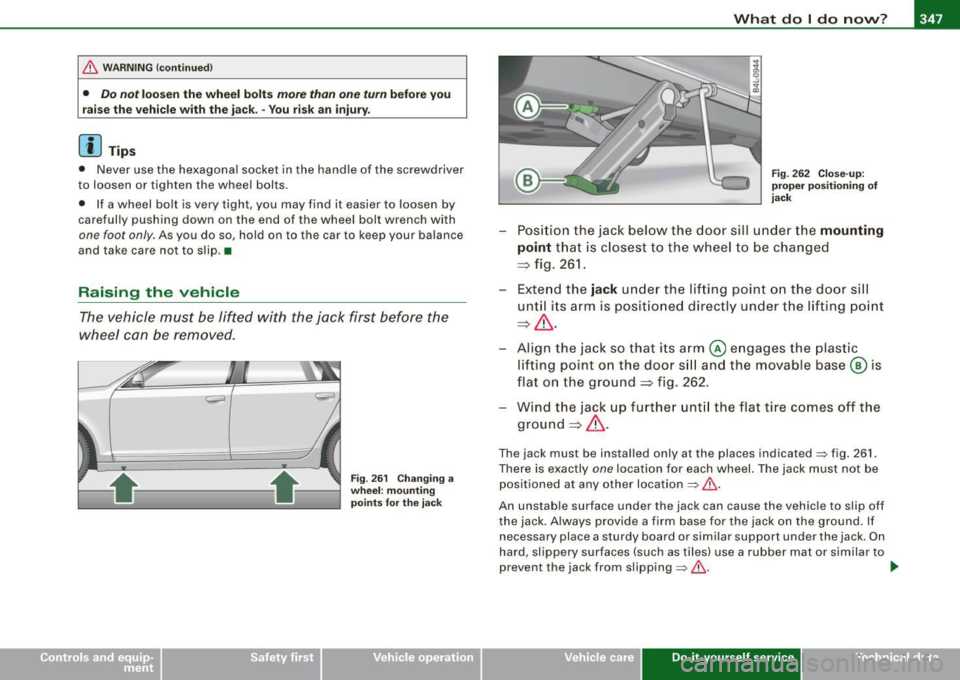
Loosening
Fig. 260 Changing a
wheel: loosening the
wheel bolts
- Install the wheel bolt wrench over the wheel bolt and
push it down as far as it will go.
- Take tight hold of the
end of the wrench handle and turn
the wheel bolts counter-clockwise about
one single turn
in the direction of arrow~ fig. 260.
Tightening
- Install the wheel bolt wrench over the wheel bolt and
push it down as far as it will go.
- Take tight hold of the
end of the wrench handle and turn
each wheel bolt clockwise until it is seated.
& WARNING
• Do not use force or hurry when changing a wheel · you can
cause the vehicle to slip off the jack and cause serious personal
injuries.
Page 349 of 398
_____________________________________________ W_ h_ a_t _d_ o_l _ d_o _ n_o_ w_ ? _ __._
& WARNING !continued)
• Do not loosen the wheel bolts more than one turn before you
raise the vehicle with the jack . - You risk an injury.
[ i J Tips
• Never use the hexagonal socket in the handle of the screwdriver
to loosen or tighten the wheel bolts .
• If a wheel bolt is very tight, you may find it easier to loosen by
carefully pushing down on the end of the wheel bolt wrench with
one foot only . As you do so, hold on to the car to keep your balance
and take care not to slip .•
Rais ing the vehicle
The vehicle must be lifted with the jock first before the
wheel con be removed.
Fig. 261 Changing a
wheel: mounting
points for the jack Fig
. 262 Close-up:
proper positioning of
jack
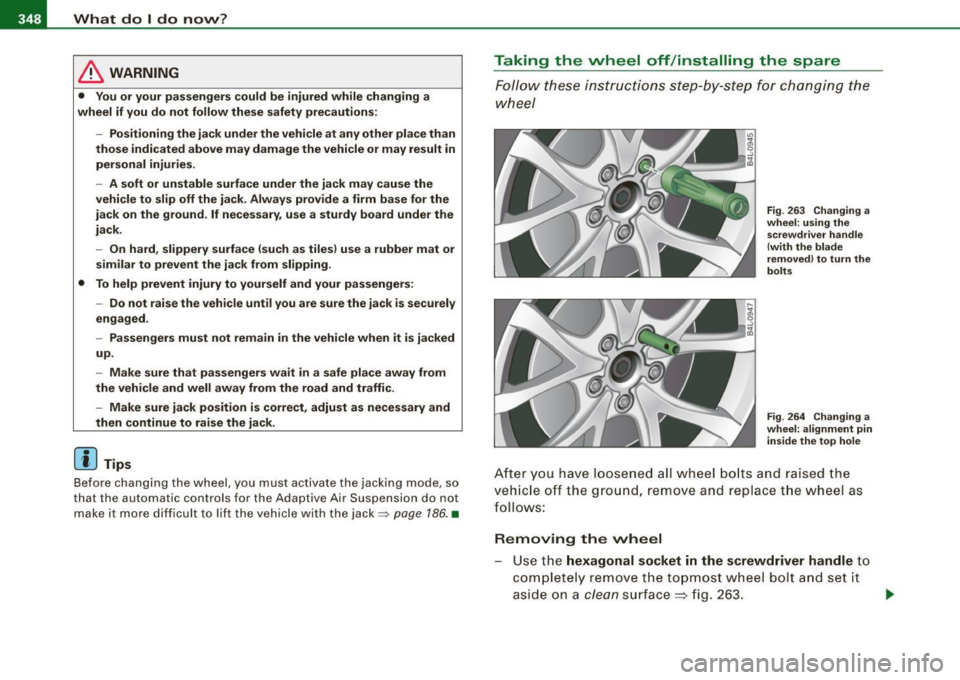
- Position the jack below the door sill under the mounting
point
that is closest to the wheel to be changed
:::;, fig. 261 .
- Extend the
jack under the lifting point on the door sill
until its arm is positioned directly under the lifting point
:::;, & .
- Align t he jack so that its arm @ engages the plastic
lifting point on the door sill and the movable base@ is
flat on the ground :::;, fig. 262.
- Wind the jack up further until the flat tire comes off the
ground :::;,& .
The jack must be installed only at the places indicated=> fig. 261.
There is exactly
one locat ion for each wheel. The jack must not be
positioned at any other location
=> & .
An unstable surface under the jack can cause the vehicle to slip off
the jack . Always provide a firm base for the jack on the ground. If
necessary place a sturdy board or similar support under the jack. On
hard, slippery surfaces (such as tiles) use a rubber mat or similar to
prevent the jack from slipping=> &. .,_
Vehicle care Do-it-yourself service Technical data
Page 350 of 398
111!1...__W_ h_ a _ t_d_ o_ l _d _o_ n_ o_ w_ ? ______________________________________________ _
& WARNING
• You or your passengers could be injured while changing a
wheel if you do not follow these safety precautions:
- Positioning the jack under the vehicle at any other place than
those indicated above may damage the vehicle or may result in
personal injuries.
- A soft or unstable surface under the jack may cause the
vehicle to slip off the jack. Always provide a firm base for the
jack on the ground.
If necessary, use a sturdy board under the
jack.
- On hard, slippery surface (such as tiles) use a rubber mat or
similar to prevent the jack from slipping.
• To help prevent injury to yourself and your passengers: -Do not raise the vehicle until you are sure the jack is securely
engaged.
- Passengers must not remain in the vehicle when it is jacked
up.
- Make sure that passengers wait in a safe place away from
the vehicle and well away from the road and traffic.
- Make sure jack position is correct, adjust as necessary and
then continue to raise the jack.
[ i ] Tips
Before changing the wheel, you must activate the jacking mode, so
that the automatic controls for the Adaptive Air Suspension do not
make it more difficult to lift the vehicle with the jack =>
page 186. •
Taking the wheel off /installing the spare
Follow these instructions step-by-step for changing the
wheel
Fig . 263 Changing a
wheel: using the
screwdriver handle
(with the blade
removed) to turn the
bolts
Fig . 264 Changing a
wheel: alignment pin
inside the top hole
After you have loosened all wheel bolts and raised the
vehicle off the ground, remove and replace the wheel as
follows:
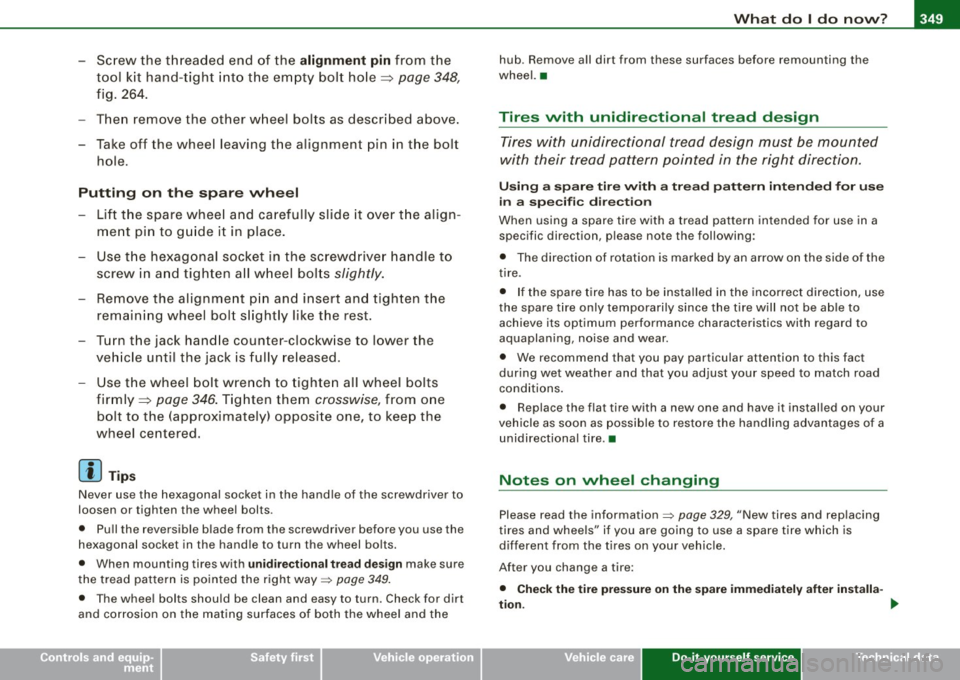
Removing the wheel Use the hexagonal socket in the screwdriver handle to
completely remove the topmost wheel bolt and set it
aside on a
clean surface ~ fig. 263. .,_
Page 351 of 398
_______________________________________________ W_ h_ a_t _ d_ o_ l _d _o_ n_ o _ w_ ? __ ffllll
•
- Screw the th readed end of the a lignment pin from the
tool k it hand-tight into the em pty bolt hole~ page 348,
fig. 264 .
- Then remove the other w heel bolts as described above.
- Take off the wheel leaving the al ignment pin in the bolt
hole.
Putting on the spar e wheel
- Lift the spare whee l and carefully slide it over t he align
ment pin to g uide it in place .
- Use the hexagonal socket in the screw drive r ha ndle t o
screw in a nd tighten a ll w heel bol ts slightly .
- Remove the alignment p in and insert and tighten the
remaini ng wheel bol t slightly like the rest.
- Turn the jack hand le counter -clockwise to lower the
ve hicle until the jack is fully released .
- Use the wheel bolt wrench to tighten all wheel bolts
firmly ~ page 346 . Tighten them crosswise, from one
bolt to the (approximately) opposite one, to keep the
wheel centered .
[ i J Tip s
Never use the hexagonal socke t in the hand le of the screwdriver to
loosen or tighten the wheel bolts .
• Pull the reversible blade from the screwdriver before you use the
hexagonal socket in the hand le to turn the wheel bo lts .
• When mounting tires with
unidire ctional tre ad de sign make sure
t he tread pattern is po inted the right way~
page 349.
• T he wh ee l bolts should b e clean and easy to turn . Check for dirt
and corrosion on the mating surfaces of both the wheel and the hub
. Remove all dirt from these surfaces before remounting the
wheel. •
Tires with unidirectional tread design
Tires with unidirectional tread design must be mounted
with their tread pa ttern pointed in the right dire ction .
Using a spare tire with a tread patte rn intended f or use
in a s pec ific direc tio n
When using a spare tire with a t read pattern intended for use in a
specific direction, please note the following :
• The direction of rotation is marked by an arrow on the side of the
tire .
• I f the spare tire has to be insta lled in the incorrect direction, use
the spare t ire only temporarily since the tire will not be ab le to
achieve its optimum performance characteristics wi th regard to
aquaplaning , noise and wear.
• We recommend that you pay particular attention to this fact
dur ing wet weather and that you ad just your speed to match road
conditions .
• Replace the flat tire with a new one and have it installed on your
vehicle as soon as p ossible to res tore the handling advantages of a
unidirectional tire. •
Notes on wheel changing
Please read the information~ page 329, "New tires and replacing
tires and whee ls" if you are going to use a spare tire which is
different from the tires on your vehic le.
Aft er you change a tire :
• Check the tire pre ssure on the spare im mediat ely a fter in stalla -
tion . _,,,
Do-it -yourself service
Page 352 of 398
11111.___W_ h_ a _ t_d_ o_ l _d _o_ n_ o_ w_ ? ______________________________________________ _
• Have the wheel bolt tightening torque checked with a torque
wrench as soon a s possible by your authorized Audi dealer or a
qualified service station .
• With steel and alloy wheel rims , the wheel bolts are correctly
tightened at a torque of 90
ft lb (1 20 Nm ).
• If you notice that the wheel bolts are corroded and difficult to
turn while changing a tire , they should be repla ced before you check
the tightening torque .
• Replace the flat tire with a new one and have it installed on your
vehicle as soon as possible . Remount the wheel cover.
Until then , drive with extra care and at redu ced speeds .
& WARNING
• If you are going to equip your vehicle with tires or rims which
differ from those which were factory installed , then be sure to read
the information
=> page 329 , "New tires and replacing tires and
wheels" .
• Always make sure the damaged wheel or even a flat tire and
the jack and tool kit are properly secured in the luggage compart
ment and are not loose in the passenger compartment .
• In an accident or sudden maneuver they could fly forward ,
injur ing anyone in the vehicle .
• Always store damaged wheel , jack and tools securely in the
lugg age compartment . Otherwise , in an accident or sudden
maneuver they could fly forward, cau sing injury to passengers in
the vehi cle .
0 Note
Do not use commercially available ti re sealants . Otherwise, the elec
t rical components of the tire pressu re monitor ing sys tem* will no
longer work properly and the sensor for the tire pressure moni
to ring system wi ll hav e to be r eplace d by a qua lifi ed wo rkshop. •
Page 393 of 398
______________________________________________ A_ l_,_ p _h_ a_ b_e _t_i c_ a _ l _in _ d_e _ x __ _
Luggage compartment ... ... . ..... . 91
Ski sack . .... .... .... .... ..... .. .. 92
Storage compartment
Expanding . ... ...... .. ... .. .... ...
88
Sun shade .. .... .... ... .... ... .... .. 70
Sun visors .. .... ... ... ..... ...... ... 69
Suspension
See Adaptive Air Suspension . .... .. 184
Switches
Emergency flashers .. .... .... .... ..
67
Power sunroof .... ... .... .... .... . 58
Rear window defogger ... ... . ... .. 108
Symbols
Red . ...... .. ..... ... ..... .. .....
29
Yellow .. .. ... ... .... .... ... .... .. 33
Synchronizing climate control . ... .... 104
T
Tachometer . .... .... .... ... .... .... . 13
Tank f lap
Unlocking the fuel filler flap by hand
299
Technical modifications ........ .... .. 375
Temperature
Climate controls .. .... .... ... .... .
106
Setting for the driver's and front pass en-
ger's side ... ...... .... ... .... ..
106
Tether strap ...... .... .. ....... ..... 258
Securing the upper te ther strap 259
The first 1,000 miles (1,500 km) and
afterwards .. .... ... .... .... ....
271
Tie -downs .. .... .... .... ... .... .... 203
Tilt sensors ..... .... .... ... .. .. ..... 55
Controls and equip ment Safety first
Tips for the environmen
t
Saving fuel ... ... .... ...... .......
94
Using the air conditioner only when
necessary .. ... ..... .... .... ... .
. . ® t1ptronic ... .... .... .... .... .... .. .
Au tomatic Shift Lock (ASU ... ..... .
109
155
157
Driving .. . ... ... ... .. .. .. ... . ... . 155
Dynamic shift program ...... ...... 158
Fail -safe mode .. ....... .... .... .. 160
Kick -down .... .. . ... .. ...... ..... 158
Manual shift program .. ... .... .... 159
S elector lever .... .... ...... ..... . 156
Tire pressure . ... ... .... ... .... .... . 323
Tire pressure monitoring syst em .. .... 336
Loss of air pressure ... .... ..... 19 ,337
Malfunction . .... .... ...... ...... 337
Resetting tire pressures .. .. .. .... . 338
Tire servic e lif e ........ ... .. .... .... 327
Tires .. .... . ... ... . ... .... .... .... . 317
Service life . .... . ... ..... .... .... 327
speed rating letter code ... .... .... 330
Tire manufacturing date .... . ... ... 330
Tire specificat ions ... ..... ... ... .. 330
Tread depth .. ... ..... ... .... .... 327
Uniform tir e quality grading ..... ... 332
Winter tires ......... ........ .... . 333
Tires and vehicle load limits ... ...... . 325
Tires and wheels
Checking tire pressure . ... .... ....
323
Cold tire inflation pressure .... .... . 321
Dimensions . .... ... .. ...... .. .... 329
General notes ... ...... ..... ..... . 317
Glossary of tire and loading terminology
318
New tires and wheels .... .... .... . 329
Replacing ... .. .. .... .... .... .. . . 329
Snow chains .. ... .... ... . ... ..... 334
Tires and v ehicle load limits . ...... . 325
Wh eel bolts .. ... ........ ... .. .... 335
Winter tires ... .... ... ... .... ... .. 333
Tires/Wheels
Low aspect ratio tires ... .. .... .. . .
335
Tire pressure monitoring sys tem . 19, 336
Tools ...... ... .. .... .... ...... .... . 343
Torn or frayed safety b elts .... ... .. .. . 208
Touch -up paint ... .. .... .... .... .. .. 286
Towing
Front eyelet .. .. .. .... .... .... ....
360
Rear eyelet ... .... ....... .. ...... 361
Tow truck procedures .. ...... .... . 360
TPMS
Tire pressure monitoring system ....
337
Trailer towing .... ... ... .. ....... ... . 276
Operating instructions . ... ... ... .. 277
Technical r equ irem ents ... .... 276 , 277
Trailer towing tips ....... ..... .... 278
Transmission
tiptronic® ... ... .... .... .... .....
155
Transport Canada ...... ........ .... . 204
Tread Wear Indicator (TWll .... ... .... . 327
Trip computer
Fuel consumption . ... ... .... ..... .
38
Mileage . ... .. .... .... .. .... .... .. 38
Single -trip memory .. .... . .... ... .. 39
Total -trip memory ...... .... ... .. .. 39
Vehicle operation Vehicle care Do-it-yourself service Technical data