check engine light AUDI S8 2008 User Guide
[x] Cancel search | Manufacturer: AUDI, Model Year: 2008, Model line: S8, Model: AUDI S8 2008Pages: 404, PDF Size: 52.7 MB
Page 33 of 404
button, you can bring up a driver message which explains
the malfunction in more detail.
Stop vehicle and check brake fluid level
- Pull off the road.
- Stop the vehicle.
- Turn off the engine.
- Check the brake fluid level ::::>
page 317.
-Contact your nearest authorized repair facility if neces-
sary.
Brake fault ! Drive carefully to nearest workshop
- Drive carefully to the nearest authorized repair facility
and have the malfunction corrected
=> &.
Parking brake ! Please contact workshop
- If the warning/indicator light flashes when the vehicle is
stationary or after the ignition is turned on, check to see
if the parking brake can be released. Drive to an autho
rized repair facility as soon as possible and have the
malfunction corrected. If the parking brake cannot be
released, contact your nearest authorized repair facility.
- If the warning/indicator light flashes while you are
driving, it is possible that the traction control or the
emergency brake has malfunctioned. It is possible that
the parking brake cannot be applied. It is also possible
that the parking brake cannot be released after it has
been applied. Drive to an authorized Audi dealer to have
the malfunction corrected.
Controls and equip
ment
Driver information display
If the ABS, ESP and the brake force distribution fail , the ABS
warning/indicator light and the ESP warning/indicator light come
on along with the brake system malfunction warning/indicator light
=>& .
& WARNING
• Always observe the warnings in => page 299, "Engine compart
ment", before opening the hood and checking the brake fluid.
• Driving with low brake fluid is a safety hazard. Stop the car and
get professional assistance .
• USA models: If the BRAKE warning light, the !';. warning light and
the ABS warning light come on together, the rear wheels could
lock up first under hard braking. Rear wheel lock-up can cause loss
of vehicle control and an accident. Have your vehicle repaired
immediately by your authorized Audi dealer or a qualified work
shop. Drive slowly and avoid sudden, hard brake applications.
• Canada models: If the brake warning light ((D), the 1$ warning
light and the ABS warning light
0 come on together, the rear
wheels could lock up first under hard braking. Rear wheel lock-up can cause loss of vehicle control and an accident . Have your
vehicle repaired immediately by your authorized Audi dealer or a qualified workshop . Drive slowly and avoid sudden, hard brake
applications. •
Engine cooling system malfunction -L
A malfunction in the engine cooling system must be
repaired as soon as possible.
When the -L symbol in the display blinks, then either the
engine coolant
temperature is too high, or the coolant level
is too low. An additional driver message can also be
displayed by pressing the
[CHECK] button:
Switch off engine and check coolant level
Page 34 of 404
Driver information display
-Pull off the road.
-Stop the vehicle.
-Turn off the engine .
-Check coolant level ~ page 315.
-Add coolant if necessary~ page 316.
-Continue dr iv ing only after the eng ine coolant
warning/indicator light goes out.
-Contact your authorized Audi dealer for assistance if
necessary .
If the engine coolant le ve l is correct, then the radiato r fan may be
the cause of the malfunction.
I f the generator warning/indicator light should also illuminate
~ page 18, then the fan belt may be damaged.
& WARNING
• If your vehicle should break down for mechanical or other
reasons, park at a safe distance from moving traffic, turn off the
engine and turn on the hazard warning lights
~ page 73, "Emer
gency flasher
A".
• Never open the hood if you see or hear steam or coolant
escaping from the engine compartment
-you risk being scalded.
Wait until you can no longer see or hear steam or coolant
escaping.
• The engine compartment of any vehicle is a dangerous area.
Before you perform any work in the engine compartment, turn of
the engine and allow it to cool. Follow the warning stickers
~ page 299, "Engine compartment".
0 Note
Do not continue driving if the-~-symbol illuminates. There is a
malfunction in the engine cooling sys tem -you could damage your
engine. •
Engine oil pressure malfunction ~
The red engine oil pressure warning symbol requires
immediate service or repair. Driving with a low -oil -pres
sure indication is likely to inflict severe damage to the engine.
If the ~ symbol appears in the display and blinks, the oil
pressure is too low. An additional driver message can also
be displayed by pressing the !CHECK] button:
Switch off engine and check oil level
Immediate actions
-Pull off the road.
-Stop the vehicle.
-Turn off the engine.
-Check the engine oil level with the dipstick ~ page 311.
Dipstick readings checks too low
-Top off oil to the proper level~ page 312.
-Make sure that the oil pressure warning symbol ~
appears no longer in the display before you start driving
again. ~
Page 36 of 404
Driver inf orma tio n displ ay
Yellow symbols
A yellow symbol means WARNING.
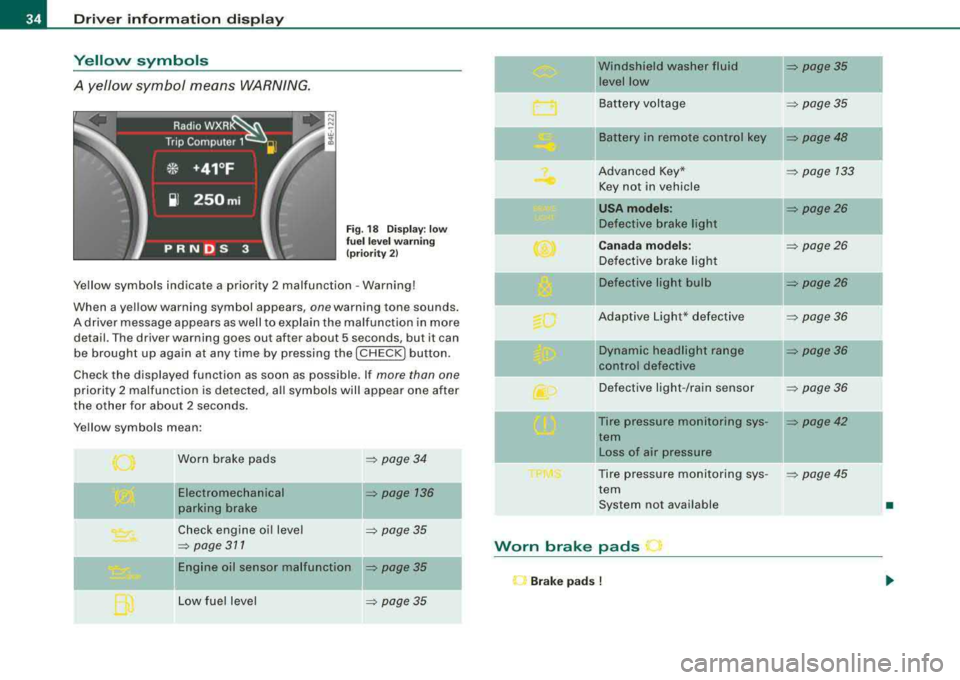
Fig . 18 Display: low
fu el l eve l warn in g
(pr iori ty 2)
Yellow symbols indicate a priority 2 malfunction - Warning!
When a yellow warning symbol appears,
one warning tone sounds.
A driver message appears as well to explain the malfunction in more detail . The driver warning goes out after about 5 seconds, but it can
be brought up again at any time by pressing the [ CHECK
I button.
Check the displayed function as soon as possible . If
more than one
priority 2 malfunction is detected, all symbols will appear one after
the other for about 2 seconds .
Yellow symbols mean:
Worn brake pads
Electromechanical
parking brake
Check engine oi l level
=> page 311
= page 34
=> page 136
=> page 35
Engine oil sensor malfunction => page 35
Low fue l level => page 35
-
Windshield washer fluid = page35
level low ~
Battery voltage => page35
-
II Battery in remote control key = page48
Advanced Key* = page 133
Key not in vehicle
USA mod els: = page26
Defective brake light
Canad a m od els: => page26
Defective brake light
Defective light bulb
=> page26
Adaptive Light* defective => page36
-
Dynamic headlight range => page36
ll contro l defective
Defective light -/rain sensor
= page36
--Tire pressure monitoring sys-= page42
tern
II Loss of air pressure
Tire pressure monitoring sys -
= poge45
tern
System not available
•
Worn brake pads
l"J Br ake pad s !
Page 37 of 404
If the symbol illuminates, contact your authorized Audi dea ler to
have the front brake pads inspected (on that occas ion have the rear
brakes inspected as wel l to be
safe!. •
Checking the engine oil level ~
~-Please c hec k oil le vel
When the symbo l illuminates, check the engine oi l leve l as soon as
possible=> page 311 . Add oil if necessary=> page 312 . •
Engine oil sensor defective ~ ....
~ ... Oil le vel ! sen sor defe cti ve
If the symbo l illuminates, contact your authorized Audi dea ler and
have the oi l sensor inspected . Unt il you have this done, check the o il
level each time you refuel just to be on the safe
side => page 311. •
Fuel supply too low Bil
Bu Please refuel
When the symbol i lluminates, th is means there are abou t 2.4
gallons (9 l itres) of fue l left in the fue l tank . Time to refuel.
=> page 302 .
If the symbo l lights up, even when there is ample fuel in the tank,
and the text
Tan k sys tem m alfunct ion ! Conta ct w ork shop appears
in the disp lay, there is a fault in the system. Contact a qual ified work
shop to have the fau lt rectified .•
Windshield washer fluid level too low ~
~ Ple ase top up washer fluid
Controls and equip ment
Driver information di splay
If the symbo l illuminates, add windshie ld washer fluid to the washer
system and a lso to the headlig ht washer
sys tem => page 323. •
Battery voltage 0
If the battery 's state o f charge is not in the optimal range, the 0
symbo l is shown in the display and the driver message L ow batter y
charge: b attery will be charged while driving
appears .
Whi le this driver not ification is displayed, you have to be prepared
for limited starting capability .
Drive r m essa ge a ppear s a nd go es out ag ain
If th is d rive r message appears after the ign ition is turned on or
wh ile dr iving and it goes out again after a wh ile, the battery has
been adequately recharged.
Dri ver messa ge ap pears a nd does not g o out ag ain
If t his drive r notif ication appea rs after the ignition is t urned o n or
wh ile driving and does not go out again, the battery's state of
charge is not in the opti mal range. Start ing capab ility is restricted.
Have the battery c hecked at a dea lership as soon as possible. •
Applies to vehi cles : with Advanced Key
Key not in vehicle ..?c
.,J. Key not in vehi cle
This message appears toget her with the ..J. symbol when the
remote control key is removed from the vehicle whi le the engine is
run ning. This is to remind you that you s hould not continue your trip
without your key.
I f the remote control key is no longer i n the vehicle, you w ill not be
able to start the engine aga in after you have switched off the igni
tion. In addition to this, you will not be able to lock the vehic le from
the outside. •
Page 51 of 404
is pressed. If the check light does not flash, the battery is dead and
has to be replaced .
In addition, when the battery is dead the
!i, symbol appears in the
instrument cluster display as well as the message:
!i, Pl ease chang e key batte ry
We recommend having the battery changed by an Audi Dealer .•
Electronic immobilizer
The immobilizer helps to prevent unauth orized use of
y o ur vehicle.
A computer chip inside your key automatica lly deactivates the e lec
t ronic immobilizer when you insert the key in the ignition lock, or on
vehic les with Advanced Key*, when the key is inside the vehicle .
When you remove the key from the ignition lock, or on vehicles with
Advanced Key, when you remove the key from the vehicle, the elec
t ronic immobilizer is automatically activated once again.
If an unauthorized key was used,
S AFE is disp layed continuous ly in
the odometer disp lay field.
& WARNING
Alw ays tak e the k ey with you wh en you le ave th e vehicl e. The k ey
ca n di sarm th e ele ctr onic engin e immobili zer and permit an un au
thorized p ers on to start th e eng in e and enable opera tion of the
v ehicle system s such as power window or power sunroof l eading
to ser iou s per son al in jur y.
[ i ] Tip s
• Your engine can on ly be started using the factory -equipped key.
• You may not be able to start your vehic le if an ignition key of a
different vehicle make is also located on your set of keys .•
Controls and equip
ment
Openin g and clo sing
Certification
The remote control device comp lies with
• USA models: Part 15 of the FCC Rules .
• Can ad a m odels: RSS -210 of Industry Canada .
Operation is subject to the f ollowing conditi ons :
• this device may not cause harmful interference, and
• t his device must accept any interfere nce rece ived, i ncluding
interference that may cause undes ired operation.
0 Note
The manufacturer is not responsib le for ANY RA DIO OR TV interfer
ence caused by unauthorized modifications to this equipment .
Changes or modifications to this unit not express ly approved by the
party responsible for compliance could void the user's authority to
operate the equipment. •
Power locking system
General description
The power locking system locks or unlocks all doors and
the rear lid simultaneously.
The power locki ng system in your veh ic le incorporates the following
functions:
• Central lock ing function
• Selective unlock
feature=> page 52
• Remote contro l feature=> page 48
• Advanced Key *=> page 59
• Anti -theft alarm system=> page 67
Page 61 of 404
for the power sun blinds* in the side windows . In addition to this,
t he rear climate contro l* is set to the
PA SS IV E mode. This means
that the climate controls in the front adjust the heating and venti la
tion in the rear of the
ve hicle => page 125.
[ i ] Tips
• I n order to activate the child safety lock on the left and the right
s ide, you have to press the two safety buttons in succession.
• Make certa in that the indica tor light in the corresponding safety
button illuminates when the child safety lock is activated .•
Advanced Key
A pplies to vehicles : with Advance d Key
Description
Opening your vehicle and starting the engine with the key
still in your pocket.
T he Advanced Key features is a keyless system which gives you the
possibility to lock and unlock your vehic le, as wel l as to start the
engine without having to use your key.
It does not matter if you have your key in your jacket pocket or in
your briefcase. As soon as you get within a certain distance to the
vehic le, t he system senses that your are approaching, it makes a
quick check to see if you are "authorized" and then it does the
following:
• unlocks the
veh ic le => page 60 .
• locks the vehicle => page 60.
• switches on the ignition and starts the engine when you press
t he [ START] button. You do not have to insert your key into the ign i
tion
lock=> page 131.
Controls and equip ment
Openin g and clo sing
& WARNING
• When you lock your vehi cle from out side , nobod y -espe cially
c hildren - should remain in side the vehicle. Remembe r, when you
lock the vehi cle from the out side the windo ws cannot be opened
from the in side.
• Wh en yo u le ave the vehi cle , al ways remove the ignition ke y and
t ak e it with you. Thi s will prevent pa ssenger s (children , for
e x ample ) from accident ally bein g locked in th e vehicle should the y
accid entally pre ss the powe r lo cking swit ch in the door s.
• Do not l eav e children in side the vehi cle un super vis ed . In an
emerg ency it would be impo ssible to open the doors from the
out side without the key .
[ i ] Tip s
• For the Advanced Key to properly work, you must a lways have
your vehicle key with you .
• The vehic le will lock or un lock the doors only if an authorized key
comes within 5 ft (1 .5 meters) from one of the vehic le doors or the
rear lid .
• You can st ill lock or unlock your vehic le using the remote control
key buttons, however the se lector lever must in the P position .•
Page 63 of 404
& WARNING (continued)
lock the vehicle from the outside the windows cannot be opened
from the inside.
• When you leave the vehicle, always remove the ignition key and
take it with you. This will prevent passengers (children, for example) from accidentally being locked in the vehicle should they
accidentally press the power locking switch in the doors.
• Do not leave children inside the vehicle unsupervised. In an
emergency it would be impossible to open the doors from the
outside without the key.
[ i] Tips
It is not possible to open the door immediately after it has been
locked. This is intentional to allow you to check proper locking of all
vehicle doors. •
Anti-theft alarm system
The anti-theft alarm triggers an alarm if anyone attempts
to break into the vehicle.
The anti-theft alarm system triggers an audible alarm and turns on
the emergency flasher if an unauthorized interference with the
vehicle is sensed by the system.
How is the anti-theft alarm system switched on?
The anti-theft alarm system is switched on when you lock the
vehicle. The system is activated approximately 30 seconds after the
vehicle is locked . The indicator lights on top of the driver's and front
passenger's door trim start flashing rapidly for 30 seconds and then
blink slowly.
Controls and equip ment
Opening and closing
How is the anti-theft alarm system switched off?
The anti-theft alarm system is switched off only when you unlock
your vehicle . If you do not open a door within 60 seconds after you
have unlocked with the remote control, the vehicle will lock itself
again automatically.
When will the anti-theft alarm system be triggered?
When the vehicle is locked, the alarm system monitors and protects
the following parts of the vehicle:
• engine compartment
• luggage compartment
• doors
• ignition
When the system is activated, the alarm will be triggered if one of
the doors, the engine hood or the rear lid are opened, or if the igni
tion is turned on. The anti-theft alarm system will also go off when
the battery is disconnected.
Unlocking the rear lid by inserting and turning the key inside the
rear lid locking cylinder will trigger the optical and acoustic alarm .
You can also trigger the alarm by pressing the PANIC button on your
remote control. This will alert other people in case of emergency.
Press the
PANIC button again to turn off the alarm.
How is the anti-theft alarm switched off when
triggered?
The alarm system is switched off when you unlock the vehicle or
when the ignition is switched on. The alarm will also switch itself off
when it comes to the end of its cycle .
Emergency flasher and horn
The emergency flasher will blink briefly and the horn sounds when
the doors, engine hood and rear lid are properly closed.
If the emergency flashers do not blink, or the horn does not sound,
check the doors, engine hood and rear lid to make sure they are
properly closed. If you close a door, the hood or the rear lid with the
.,,.
Page 71 of 404
Clear vision
Lights
Switching the headlights on and off -'t/-·
In the "AUTO" position, a light sensor automatically
s w itches t he head- and taillights on and off in respo nse to
l igh t con ditions.
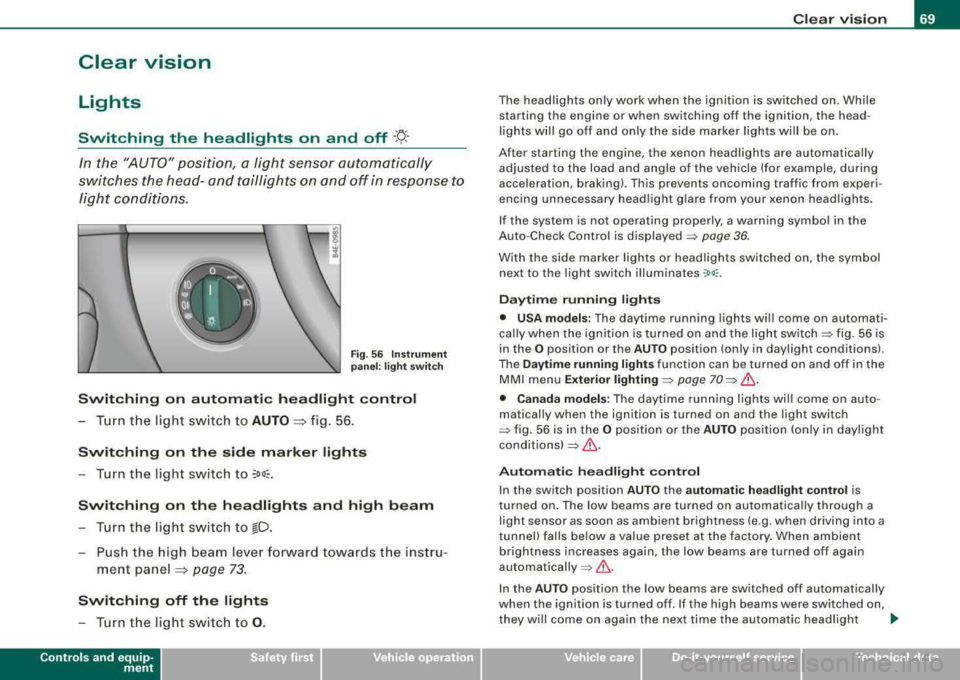
Fig . 56 In stru ment
pan el: lig ht sw itch
Switching on automatic headlight control
- T urn th e light switch to AUTO => fig. 56 .
Switching on the side marker lights
- Turn the light switch to ~oo~.
Switching on th e headlights and high beam
- T urn t he light swi tch to io.
- Push the high beam leve r forw ard towards t he instru -
me nt panel
=> page 73 .
Switching off the lights
- T urn t he light switch to 0 .
Contro ls a nd eq uip
ment
Clear vision
The head lights only work when the ignition is switched on . While
starting the engine or when switching off the ignition, the head
lights will go off and only the side marker lights will be on.
After starting the engine, the xenon headlights are automatically
adjus ted to the load and angle of the vehic le (for example, during
acceleration, braking) . This prevents oncoming traffic from experi
encing unnecessary headlig ht g lare from your xenon head ligh ts .
If the system is not operating properly, a warning symbol in the
Auto -Check Control is displayed
=> page 36.
With the side marker lights or head ligh ts switched on, the sym bol
next to the light switch illuminates
:oo: .
Daytime running lights
• USA models : The daytime running lights wi ll come on automati
ca lly when the ig nition is turned on and the ligh t
switch=> fig. 56 is
in the
O position or the AUTO position (only in day light conditions).
The
Daytime running lights function can be turned on and off in the
MMI menu
Exterior lighti ng => page 70 => & .
• Canada models: The dayti me ru nn ing lights wi ll come on auto
matically when the ignition is turned on and the light switch
::::> fig. 56 is in the O position or the AUTO p o siti on (only in daylight
conditions)
=> & .
Automati c headligh t control
In the switch position AUTO the a utomatic headligh t cont rol is
turned on . The low beams are turned on automa tica lly through a
light sensor as soon as ambient brightness (e.g . when driving into a
tunnel) fa lls below a value preset at the factory . When ambient
brightness increases again, the low beams are turned off again
automatically =>& .
In the AUTO pos it ion the low beams are switched off automatically
when the ignition is turned off. If the high beams were switched on,
they w ill come o n again the next time the automatic head ligh t
~
Vehicle care I I irechnical data
Page 83 of 404
ture on the windshield. The rain sensor wiper intervals depend on
t he sensitivi ty setting as well as vehic le speed . Dur ing brief s tops,
wiper motion wil l adjust in re lation to the amount of rain on the
windshield .
During br ief stops, e.g. at a red light, wiper mot ion wil l auto mati
ca lly be reduced to the next lower speed . Wipers a lready turning at
low speed. change to i nterm ittent w ip ing.
When the ignition is turned on, the washer jets are heated .
With the low beam headlights switched on, p ull the wiper lever
towards you only briefly to clean the windshield. Ho ld ing the w iper
lever wou ld a lso engage the headlight washer system each time you
clean the w inds hie ld and wou ld dra in t he washer flu id reservoir
pr ematurely .
& WARNING
• Wiper bl ade s are cruc ial for safe driving! Only when they are in
good condition are they able to clear the window s properly to
provide uncompromising visibilit y. Worn or damaged wiper blades
are a safety hazard
::::> page 82 , "In stalling new wiper blade s"!
• The rain sensor is only designed to a ssist and support the
driver . It r em ains entirely th e driver' s respon sibility to monitor
outside weather condit ions and to manually activate the wipers as
s oon a s rain or drizzle reduces visibility through the windshield.
• The windshield mu st not be treated with water-repellent mate
rials . They c an in crea se gl are under poor visibility condition s such
as wetness , darkness , or when the sun is low on the horizon. In
addition , they can cau se the wind shield wipers to chatter.
0 Note
In free zing or near freezing conditions:
• Always check that the wiper b lades are not frozen to the glass
be fore you turn the w ipe rs on. Loosen a wiper b lade w hich is frozen
Controls and equip ment
Clea r vision
in place before operating the wipers to prevent damage to the wiper
bl ade or the wiper motor.
• Do not use the wipers to clear a frosted window. Using the
wipers as a conve nien t ice scraper will des troy the wiper blades .
• Before you take your vehic le to an automatic car wash, make sure
you have the w inds hield w iper system switched o ff (lever in p osition
O), otherwise the windshield wiper system could get damaged in the
car was h if it should suddenly come o n.
[ i ] Tips
• Make sure the washer flu id reservo ir in the engine compartmen t
is topped off before going on a long trip . Look
up:::> page 323 for
check ing and f illing the washer conta iner.
• I f you sw itch off the ignition with the windshield wiper lever st ill
in the inte rval wi pe pos ition and t hen com e back a wh ile la ter a nd
drive off, the rain sensor wil l reactivate itself after the vehicle speed
has e xceeded 4 mph (6 km/h) .
• Worn or dirty windshie ld wiper b lades cause smearing which
ca n affect t he opera tion of the ra in senso r. Check the condi tion of
your windshield wiper b lades regu lar ly . •
Headlight washer system
The he adlight washer sy stem cle ans the he adlig h ts.
-Oper ate the win dshiel d w ip er/was her sy stem G) wit h th e
hea dlights t urned o n by ho ld ing th e l ever fo r lo nge r than
on e seco nd ::::.,
page 80, fig. 76.
The washe r jets extend f orward out of the fron t bumper dr iven by
water pressure to spray the front head lights with water .
You should inspect the head lights regu lar ly (for examp le when refu -
e ling) a nd c lean o ff any sol id dirt or i nsects from the lenses.
~
Page 139 of 404

_________________________________________________ O_ n_ t_h _e _ ro_ a_d _ ___._
0 Note
If the warning/indicator light (U.S. models : BRAKE, Canadian models:
malfunction. By pressing the
I CHECK] button , you can bring up a
driv er m essage which explains the malfunction in more detail. If the
message
Parking brake! Please contact workshop appears, there is
a parking brake malfunction which you should have r epaired imme
diately by an authorized
dealership => page 30. •
Cruise control
Switching the system on
The cruise control system makes it possible to drive at a
constant speed starting at 20 mph (30 km/h).
rr- -- ...--,,-~------ -~ ----,-~
Contro ls a nd eq uip
ment
.... S? w ;f,
Fig . 149 Control lever
with set button Fig
. 150 Display:
Selected speed
Pull the lever © to position G) ~ fig. 149 to switch the
system on.
Drive at the speed you wish to set.
- Press button
® to set that speed.
The display => fig. 150 will show the set speed . The display may vary
depending on the type of display in your vehicle. The indicator light
CRUISE (US model)/ 0 (Canadian model) will also ligh t up in the
instrument cluster .
The speed is kept constant via an engine output adjustment or active brake intervention .
& WARNING
• Always pay attention to traffic even when the cruise control is
switched on. You are always responsible for your speed and the
distance between your vehicle and other vehicles.
• For safety reasons, the cruise control should not be used in the
city, in stop-and-go traffic, on twisting roads and when road condi
tions are poor (such as ice, fog, gravel, heavy rain and hydro
planing) -risk of accident.
• Turn off the cruise control temporarily when entering turn
lanes, highway exit lanes or in construction zones.
Vehicle care
I I irechnical data