turn signal AUDI S8 2008 Owners Manual
[x] Cancel search | Manufacturer: AUDI, Model Year: 2008, Model line: S8, Model: AUDI S8 2008Pages: 404, PDF Size: 52.7 MB
Page 13 of 404
Instruments and controls
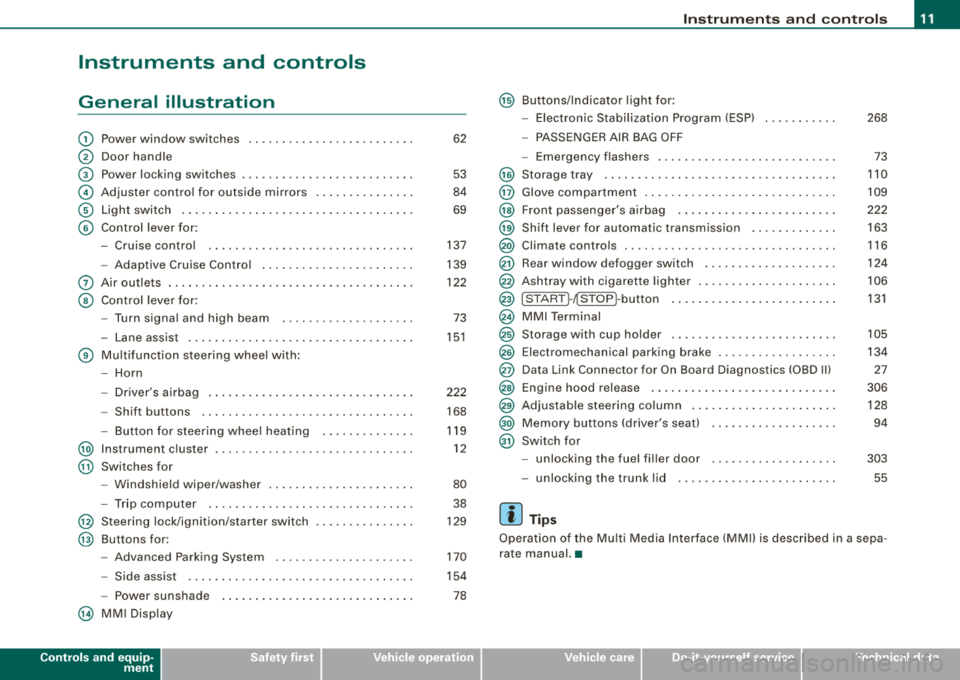
General illustration
G) Power window switches ........................ .
@ Door handle
G) Power locking switches ..... .. .... .... .... ...... .
© Adjuster contro l for ou tside mirrors ...... .... .... .
© Light switch .. ...... .... ... .... .... .... ..... .. .
© Contro l lever for:
- Cruise control .... .... ...... ....... ...... ... .
- Adaptive C ru ise Contro l .... .... .... .... .... .. .
0 Air outlets ... .. .... .... .... .... ... .... .... .... .
@ Contro l lever for:
- Turn signal and high beam ....... ... .. .... ... .
- La ne assist .. ...... ... .... .... .... ... .... ... .
© Multi function steering wheel with :
- Horn
- Driver's a irbag .. ...... ... .... .... .... .... ... .
- Shift buttons ............................... .
Button for steer ing whee l heating ........ ... .. .
@ Instrument c luster .. ... .... .... ....... .... .... . .
@ Switches for
- Windshield wiper/washer ............... ...... .
- Trip computer .... ....... .... .... .... .... ... .
@ Steering lock/ignit ion/starter switch
@ Buttons for:
- Advanced Parking System .. .... .... .... .... .. .
- Side assist ................................. .
- Po wer sunshade
@ MM I Disp lay
Controls and equip
ment
62
53
84
69
137
139
122
73
15 1
222
168
119 12
80 38
129
170
154
78
Ins trum ents and controls
@ Buttons/Indicator l ight for :
- Electronic Stabilization Program (ESP) 268
- PASSE NGER AIR BAG OFF
- Emergency flashers . . . . . . . . . . . . . . . . . . . . . . . . . . . 73
@ Storage tray . . . . . . . . . . . . . . . . . . . . . . . . . . . . . . . . . . . 110
@ Glove compartment . . . . . . . . . . . . . . . . . . . . . . . . . . . . . 109
@ Front passe nger's airbag . . . . . . . . . . . . . . . . . . . . . . . . 222
@ Shift lever for automatic transmission . . . . . . . . . . . . . 163
@ Climate controls . . . . . . . . . . . . . . . . . . . . . . . . . . . . . . . . 116
@ Rear window defogger switch . . . . . . . . . . . . . . . . . . . . 124
@ Ashtray with cigarette lighter . . . . . . . . . . . . . . . . . . . . . 106
@ ISTAR T~~ STOP ~butto n . . . . . . . . . . . . . . . . . . . . . . . . . 131
@ MMI Terminal
@ Storage with cup holder . . . . . . . . . . . . . . . . . . . . . . . . . 105
@ Electromechanical parking brake . . . . . . . . . . . . . . . . . . 134
@ Data Link Connector for On Board Diagnostics (OBD Ill 27
@ Engine hood release . . . . . . . . . . . . . . . . . . . . . . . . . . . . 306
@ Adjustable s teering co lumn . . . . . . . . . . . . . . . . . . . . . . 128
@ Me mory buttons (driver's seat) . . . . . . . . . . . . . . . . . . . 94
@ Switch for
- unlocking the fuel fil ler door
- unlocking t he tr unk l id
[ i ] Tips
303
55
Operation of the Mu lt i M edia In terface (MMI) is described in a sepa
rate manual. •
Page 19 of 404
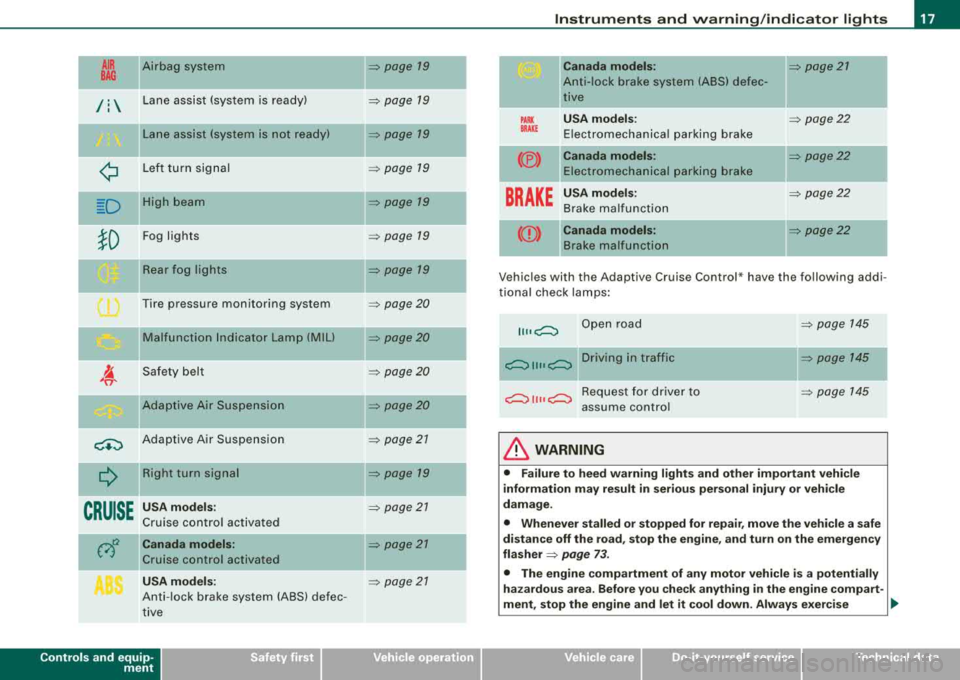
tl~ Airbag system
--
/: Lane assist (system is ready)
Lane assist (system is not ready)
¢ Left turn signal
--D High beam
}D Fog lights
Rear fog lights
Tire pressure monitoring sys tem
Malfunction Indicator Lamp (MIU
Safety belt
Adaptive Air Suspension
<+:) Adaptive Air Suspension Right turn signal
--
CRUISE
--
USA models:
Cruise control activated
Canada models:
Cruise control activated
USA models:
Anti-lock brake system (ABS) defec
tive
Controls and equip ment
=> page 19
-
=> page 19
=> page 19
=> page 79
-=> page 19
=> page 79
=> page 19
=> page 20
=> page 20
=> page 20
=> page20
=> page 21
=> page 79
-
=> page 27
=> page 27
-
=> page 21
Instruments and warning/indicator lights
PARK BRAKE
(®)
----
Canada models:
Anti-lock brake system (ABS) defec
tive
USA models :
Electromechanical parking brake
Canada models: Electromechanical parking brake
-
BRAKE
USA models:
Brake malfunct ion
--((D) Canada models:
Brake malfunction
=> page 27
=> page 22
=> page 22
-
=> page 22
-
=> page22
V ehicl es wi th th e Adaptive Cruis e Control * have the follow ing addi
tional check lamps:
Open road
~ 1111 ~ Driving in traffic
~ 1111 ~ Request for driver to
assume control
& WARNING
=> page 145
=> page 145
=> page 145
• Failure to heed warning lights and other important vehicle
information may result in serious personal injury or vehicle
damage.
• Whenever stalled or stopped for repair, move the vehicle a safe
distance off the road, stop the engine, and turn on the emergency
flasher
=> page 73.
• The engine compartment of any motor vehicle is a potentially
hazardous area. Before you check anything in the engine compart-
ment, stop the engine and let it cool down. Always exercise
~
Page 21 of 404
warning/indicator light should go out to show that the system is
fully functional again.
For more information about the
ESP=> page 268. •
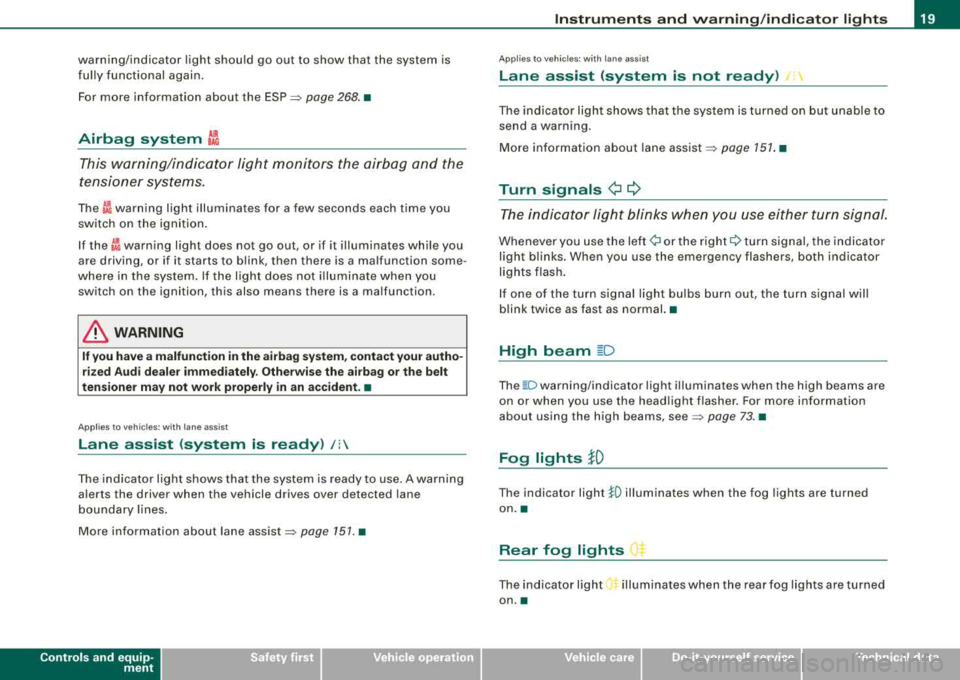
Airbag system C:,
This warning/indicator light monitors the airbag and the
tensioner systems.
The ffi warning light illuminates for a few seconds each time you
switch on the ignition.
If the m warning light does not go out, or if it illuminates while you
are driving, or if it starts to blink, then there is a malfunction some
where in the system. If the light does not illuminate when you
switch on the ignition, this also means there is a malfunction.
& WARNING
If you have a malfunction in the airbag system, contact your autho
rized Audi dealer immediately. Otherwise the airbag or the belt
tensioner may not work properly in an accident. •
Applies to v ehicl es: w it h l ane ass is t
Lane assist (system is ready) /:
The indicator light shows that the system is ready to use . A warning
alerts the driver when the vehicle drives over detected lane
boundary lines.
More information about lane
assist=> page 151. •
Controls and equip
ment
Instruments and warning/indicator lights
Applies to vehi cles : wi th la ne ass is t
Lane assist (system is not ready) /:
The indicator light shows that the system is turned on but unable to
send a warning .
More information about lane
assist=> page 151. •
Turn signals ¢ Q
The indicator light blinks when you use either turn signal.
Whenever you use the left ¢i or the right Q turn signal, the indicator
light blinks . When you use the emergency flashers, both indicator
lights flash.
If one of the turn signal light bulbs burn out, the turn signal will
blink twice as fast as normal. •
High beam ~D
The ~D warning/indicator light illuminates when the high beams are
on or when you use the headlight flasher. For more information
about using the high beams,
see => page 73. •
Fog lights JO
The indicator light !0 illuminates when the fog lights are turned
on. •
Rear fog lights ()$
The indicator light O* illuminates when the rear fog lights are turned
on .•
Page 26 of 404
Driver inf orma tio n displ ay
Driver information display
Introduction
General notes
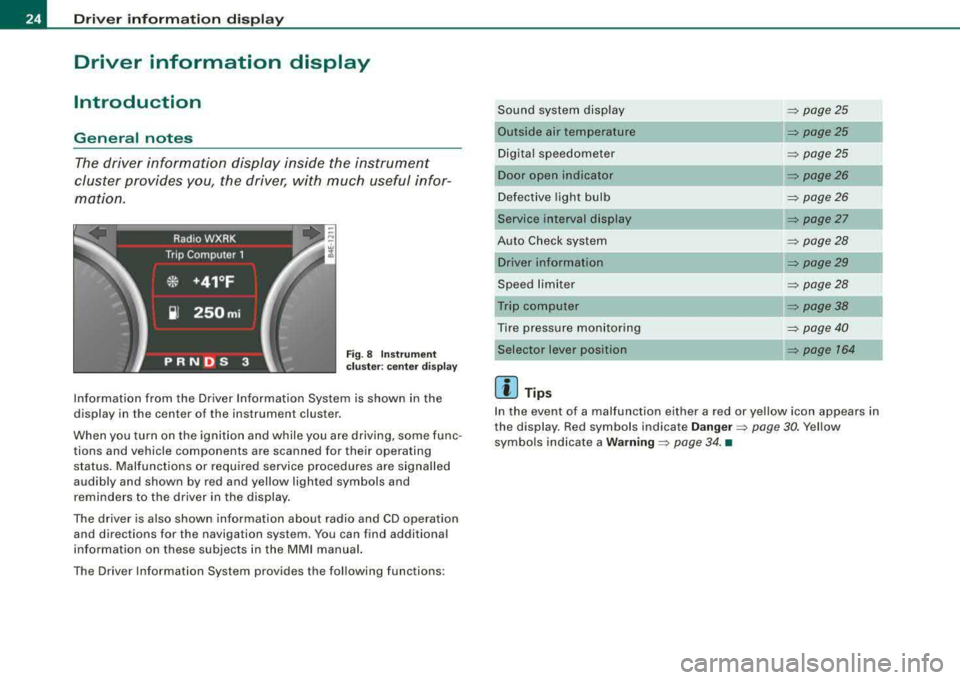
The driver information display inside the instrument
cluster provides you, the driver, with much useful infor
mation.
F ig. 8 Inst rum ent
c luster : center d is pl ay
Information from the Driver Information System is shown in the
display in the center of the instrument cluster.
When you turn on the ignition and while you are driving, some func
tions and vehicle components are scanned for their operating status. Malfunctions or required service procedures are signalled
audibly and shown by red and yellow lighted symbols and
reminders to the driver in the display.
The driver is also shown information about radio and CD operation and directions for the navigation system. You can find additional
information on these subjects in the MMI manual.
The Driver Information System provides the fol lowing functions : Sound system display
=> page25
Outside air temperature => page25
Digital speedometer
=> page25
Door open indicator => page26
Defective light bulb
=> page26
Service interval display => page27
Auto Check system
=> page28
Driver information => page29
Speed limiter
=> page28
Trip computer => page38
Tire pressure monitoring
=> page 40
Selector lever position => page 764
[ i ] Tips
In the event of a malfunction either a red or yellow icon appears in
the display. Red symbols indicate
D ang er => page 30. Yellow
symbols indicate a
W arning => page 34 . •
Page 30 of 404
Driver inf ormation displ ay
If the light illuminates, the e lectronic speed limiter may also be
malfunction ing. For more
information => page 28, "Electronic speed
limiter".
An impro perl y c los ed fu el fi ller c ap m ay also ca use the MIL light t o
illumina te
=> page 303. •
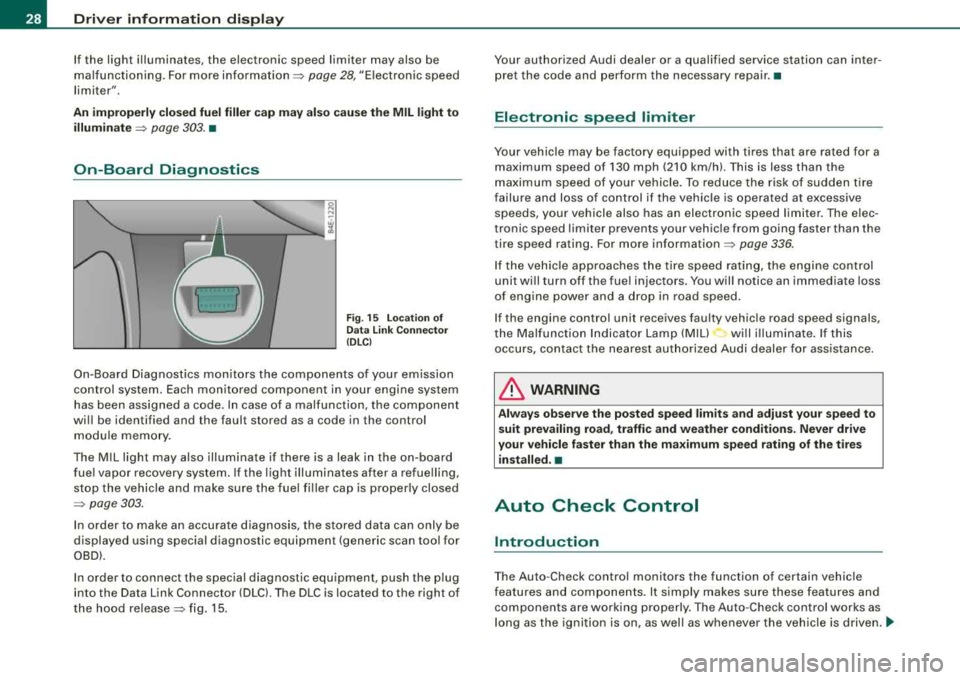
On-Board Diagnostics
Fig . 15 Locatio n of
D ata Link Connecto r
(DL Cl
On-Board Diagnost ics mon itors the components of your emission
control system. Each monitored component in your engine system
has been assigned a code . In case of a malfunction, the component
wi ll be identified and the fault stored as a code in the control
module memo ry.
The MIL light may a lso illuminate if there is a leak in the on-board
fue l vapor recovery system . If the light ill uminates after a refue lling,
stop the vehicle and make sure the fue l fi ller cap is proper ly closed
=> page 303.
In order to make an accurate diagnosis, the stored data can o nly be
displayed using special diagnostic equipment (generic scan tool for
OBD).
In order to connect the spec ial diagnostic equipment, push the p lug
into the Data Link Connector (DLC). The DLC is located to the right of
the hood re lease
=> fig. 15. Your authorized Audi dealer or a qua
lified service station can inter
pret the code and perform the necessary repair. •
Electronic speed limiter
Your vehicle may be factory equipped with tires t hat are rated for a
maximum speed of 130 mph (210 km/h). This is less than the
maximum speed of your vehicle. To reduce the risk of sudden t ire
failure and loss of control if the vehicle is operated at excessive
speeds, your vehicle also has an electronic speed limiter. The e lec
tronic speed limiter prevents your vehic le from going faster than the
tire speed rating . For more
information => page 336.
lf the veh ic le approaches the tire speed rating, the engine control
unit wi ll turn off the fue l injectors. You will notice an immediate loss
of engine power and a drop in road speed.
If the engine contro l unit receives faulty vehic le road speed signals,
the Ma lfunction Indicator Lamp (MIU
C:, wi ll i lluminate . If this
occurs, contact the nearest authorized Audi dealer for ass istance.
& WARNING
Al ways obser ve the po ste d speed limit s and adju st yo ur speed to
s uit prevailing road , traffic and we ath er condition s. N ever driv e
yo ur ve hicle f aster than the m aximum speed rating of the tire s
i nstalled .•
Auto Check Control
Introduction
T he Auto -Check contro l monitors the function of certain vehic le
features and components. I t simply makes sure these features and
components are working properly. The Auto -Check control works as
l ong as t he igni tion is on, as wel l as whenever the vehicle is
driven. ~
Page 52 of 404
Openin g and clos ing
All the doors and the rear lid are locked by the central locking
system when you lock the vehicle. You can se t whether generally
only the driver's door or all doors and the rear lid should be
unlocked when you open the vehicle in the MM I menu
C entral
l ock ing
to suit your individual desires=> page 52.
Unlocking the veh icle
You can un lock the vehicle from outside ei ther by using the remote
control
or by turning the key inside the driver's door lock. When you
unlo ck your vehic le:
• The anti -theft alarm system is deactivated briefly .
• The vehicle interior l ights illuminate for approximate ly 30
seconds .
• All turn signal lights will flash twice when the car is unlocked.
• Afte r unlocking the vehic le, you have
60 seconds to open a door
or the rear lid . After
60 seconds, th e vehicle automatically locks and
t he anti -theft a lar m system activates agai n.
The rear lid can be locked or unlocked e ither by using the remote
control
or by turning the key inside the driver 's door lock. Unlocking
the vehic le wit h the remote contro l will on ly
unlock the rear lid, to
open it , the lid handle needs to be pressed.
Lo ckin g the vehicle
Yo u can lock the vehicle from outside either by using the remote
control
or by turning the key inside the dr ivers's door lock . When
you
lo ck the veh ic le:
• All doors and the rear lid are locked.
• All turn signal lights will flash once when the car is locked .
• The anti-theft alarm system is activated. The horn of the anti
theft alarm system will sound and the anti -theft a larm system readi
ness l ight, located in the upper part o f the driver's door panel, w ill
start to blink .
• The vehicle interior l ights turn off.
Unlo cking and l ocking th e vehicle using the Ad vanced
Key *
The Ad van ced Key * feature is a keyless system which allows you to
unlock the vehicle via sensors in the door hand le . Locking is likewise
keyless using a lock button . Each door is equ ipped w ith a sensor and
lock button.
Power side door closer*
The veh icle is equipped with a power side doo r c lose r. When closing
a door, you s imp ly need to gently push on the door . The door w ill
t hen automa tically c lose by
itse lf => page 53 .
Autom atic l ockin g
The automatic lock ing fea ture locks all the vehicle doors and the
rear lid when you drive faster than
9 mph ( 1 5 km/hl. This funct ion
can be turned on and off in the MMI
Central locking Menu
=> page 52 .
You can unlock the vehicle from the inside by :
• r emovi ng the key from the ignition switc h (the vehicle wi ll auto
matically un lock itse lf) or
• pressing the unlock part of the power lock swi tch
m or
pulling the door handle (once to open the door) .
& WARNING
• When you lock your veh icle from out sid e, nobody -espe cially
children - should remain in side the vehicle. Remember , when you
l oc k the vehicle from the out side the windo ws ca nnot be opened
from the inside .
• When you leave the vehi cle , alwa ys remove the ignition key and
take it with you. Thi s will prevent passengers (children , for
e x ample) from ac cidentally being l ocked in the vehi cle should they
ac cidentally pre ss the power locking switch in the doors .
~
Page 53 of 404
fl::. WARNING (c o ntinue d)
• Do not le av e children in side th e vehicle un supervis ed. In an
emergen cy it would be i mpo ssi ble to op en the do ors fr om th e
out side without the ke y.
[ i J Tips
• In the event of a crash with airbag deployment all locked doors
will be automat ically unlocked to give access to the vehicle occu
pants from the outside.
• If the power locking system should malfunction , you can lock
each door individually using the vehicle
key => page 54.
• If the power locking system shou ld fail, you can still open the
fue l tank flap in an
emergency => page 305.
• You are we ll advised not to keep valuables inside an unattended
vehic le, visible or not. Even a properly locked vehic le cannot provide
the security of a safe .•
Unlocking and locking the vehicle with the
remote control
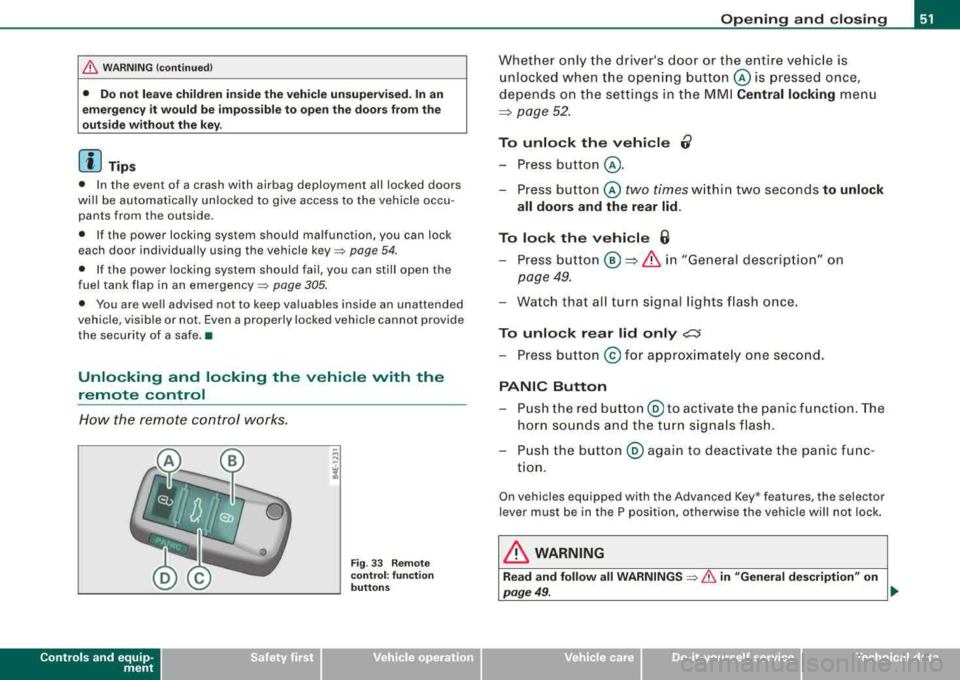
How the remote control works.
Contro ls a nd eq uip
ment
Fig . 33 Remote
co ntr ol: fu nction
bu tto ns
Op ening and clo sing
Whether only the driver's door or the entire vehicle is
unlocked when the ope ning button © is pressed once,
depends on the settings in the MMI
Central locking menu
~ page 52.
To unlo ck the vehi cle 0
-Press button @ .
-Press button © two times within two seconds to unlock
all doors and the rear lid.
To lock th e vehi cle 6
-Press button @ ~ & i n "Gene ral descrip tion" on
page 49.
-Wa tch that all turn signal lights flash once.
To unlo ck rear lid only ,;;::::J
-Press button @ for approx imate ly one second.
PANIC Button
-P ush the red butto n@ to ac tivate the panic f unction. The
horn sounds and the t urn signals flash .
-Push the button @ aga in to deactivate the panic func
t ion.
On vehicles equipped with the Advanced Key * features, the selector
lever must be in the P position, otherwise the vehicle will not lock .
& WARNING
Read and follo w all WARNINGS => & in "General de scription " on
page 49 . .,,_
Vehicle care I I irechnical data
Page 74 of 404
Clear vision
0 Note
The rear fog lights can distract drivers behind you, so, they should be turned on
only in conditions of very poor visibility. Always
observe local regulations when using the rear fog lights.
[ i] Tips
With the switch in AUTO front fog lights and rear fog lights cannot
be turned on in addition. •
Applies to vehic les: with Adapt ive Ligh t
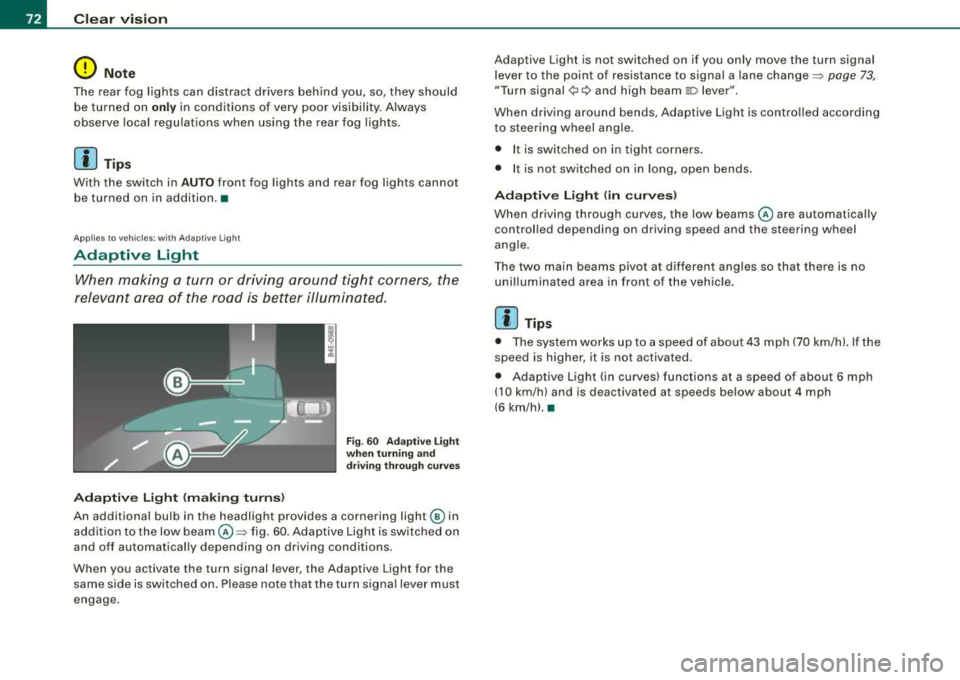
Adaptive Light
When making a turn or driving around tight corners, the
relevant area of the road is better illuminated.
Adaptive Light (making turns)
Fig. 60 Adaptive Light
when turning and
driving through curves
An additional bulb in the headlight provides a cornering light@ in
addition to the low
beam @~ fig. 60. Adaptive Light is switched on
and off automatically depending on driving conditions .
When you activate the turn signal lever, the Adaptive Light for the
same side is switched on. Please note that the turn signal lever must
engage. Adaptive Light is not switched on if you only move the
turn signal
lever to the point of resistance to signal a lane
change~ page 73,
"Turn signal¢ c:> and high beam 110 lever ".
When driving around bends, Adaptive Light is controlled according
to steering wheel angle .
• I t is switched on in tight corners.
• It is not switched on in long, open bends.
Adaptive Light (in curves)
When driving through curves, the low beams @are automatically
controlled depending on driving speed and the steering wheel
angle.
Th e two main beams pivot at different angles so that there is no
unilluminated area in front of the vehicle.
[ i] Tips
• The system works up to a speed of about 43 mph (70 km/h). If the
speed is higher, it is not activated.
• Adaptive Light (in curves) functions at a speed of about
6 mph
(10 km/h) and is deactivated at speeds below about 4 mph
(6 km/h).•
Page 75 of 404
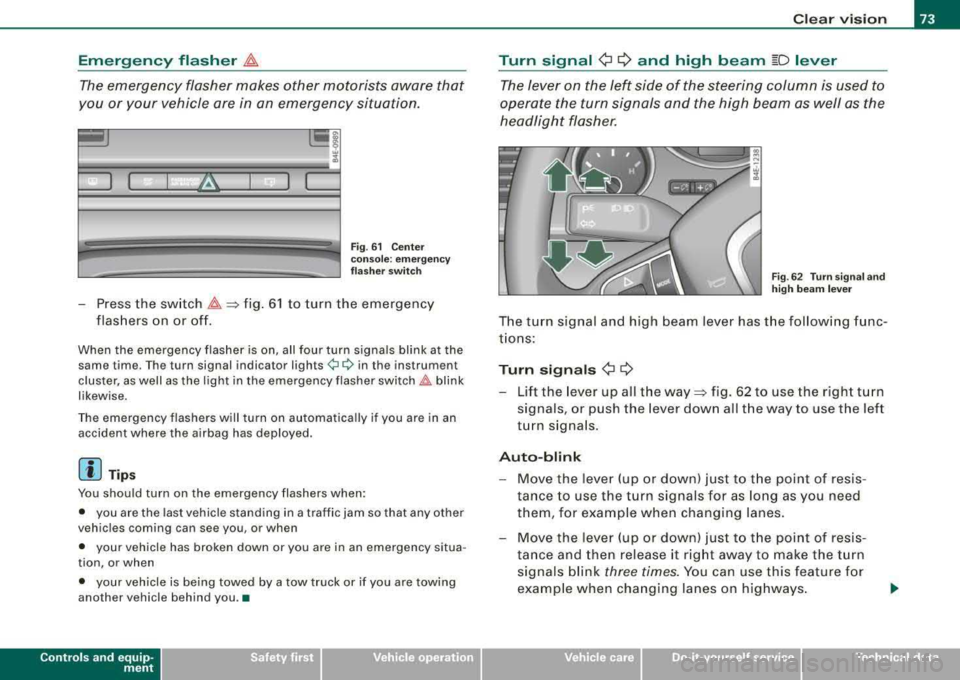
Emergency flasher ~
The emergency flasher makes other motorists aware that
you or your vehicle are in an emergency situation.
I
Fig . 61 Center
console : emergency
flasher switch
- Press the switch ~=>fig. 61 to turn the emergency
flashers on or off.
When the emergency flasher is on, all four turn signals blink at the
same time . Th e turn signal indi cator
ligh ts ¢¢ in th e instrum en t
cluster, as well as the light in the emergency flasher
switch~ blink
likewise .
The emergency flashers will turn on automatically if you are in an
accident where the airbag has deployed.
[ i] Tips
You should turn on the emergency flashers when:
• you are the last vehicle standing in a traffic jam so that any other
vehicles coming can see you , or when
• your vehicle has broken down or you are in an emergency situa
tion , or when
• your vehicle is being towed by a tow truck or if you are towing
another vehicle behind you .•
Contro ls a nd eq uip
ment
Clear vision
Turn signal
¢ ¢ and high beam [D lever
The lever on the left side of the steering column is used to
operate the turn signals and the high beam as well as the
headlight flasher.
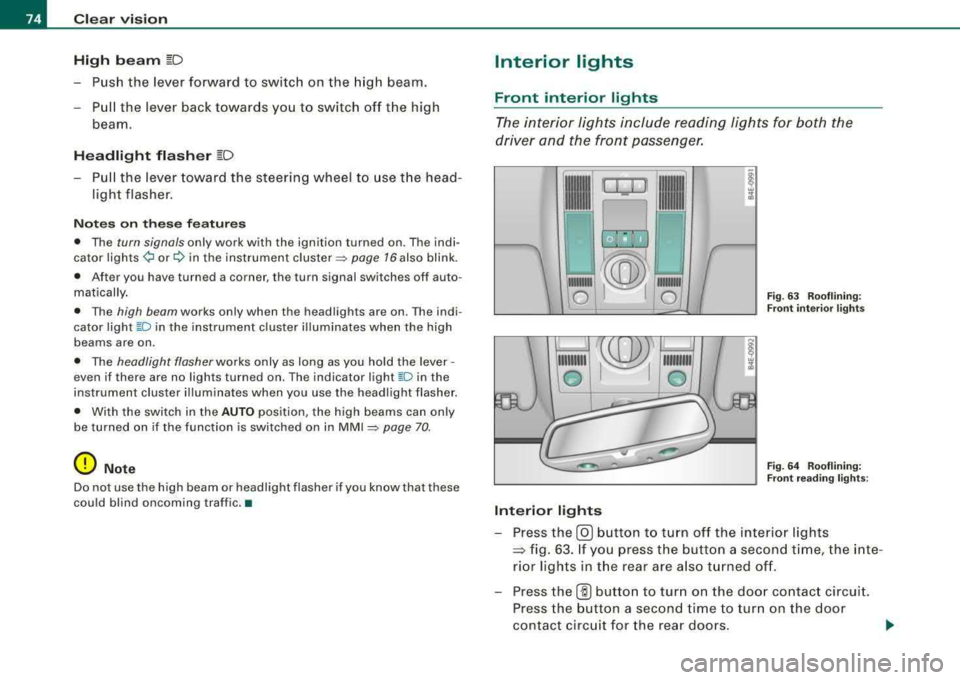
Fig . 62 Turn signal and
high beam lever
The turn s ignal and high beam lever has the following func
tions:
Turn signals ¢ ¢
- Lift the lever up all the way=> fig. 62 to use the right turn
signals, or push the lever down all the way to use the left
turn signals .
Auto-blink
-Move the lever (up or down) just to the point of resis
tance to use the turn signals for as long as you need
them, for example when chang ing lanes.
- Move the lever (up or down) just to the point of resis
tance and then release it right away to make the turn
signals blink
three times. You can use this feature for
example when changing lanes on highways.
Vehicle care I I irechnical data
Page 76 of 404
Clear vision
High b eam
~D
Push the lever forward to switch on the high beam.
- Pull the lever back towards you to switch off the high
beam .
Headlight flasher ~D
- Pull the lever toward the steering wheel to use t he head
light flasher .
Notes on the se feature s
• The turn signals only work with the ignition turned on . Th e indi
cator
l ights ¢ or¢ in the instrument cluster ~ page 16 also blink .
• After you have turned a corner, the turn signal switches off auto
matical ly .
• The high beam works only when the head lights are on . The indi
cator light
~D in the instrument cluster illuminates when the high
beams are on.
• The headlight flasher works only as long as you hold the lever -
even if ther e are no lights turned on. The indicator light
~D in the
instrument cluster illuminates when you use the headl ight flasher.
• With the switch in the
AUTO position, the high beams can only
be turned on if the function is switched on in MM I
=> page 70.
0 Note
Do not use the high beam or headlight flasher if you know that these
could blind oncoming traffic .•
Interior lights
Front interior lights
T he in terior lights include rea ding ligh ts for b oth the
d river and the fr ont passenge r.
--
1111
, I I, . II
-
~
•
'
'.(ZW
ro ,1@1
111111111
0
Interior lights
-
®
111111111
...
/!
111111111
0 Fig . 6 3 Rooflining:
Fr ont inter ior light s
Fi g. 64 Rooflining:
F ront readin g ligh ts:
- Press the @J button to tur n off the interior lights
~ fig . 63. If you pre ss the butt on a secon d time, the inte
ri o r ligh ts in the rear ar e also t urned off .
- Press the
(ID butto n to turn on the door contact circui t.
Press the button a second time to tur n on the door
contact circ uit for the rear doors .