engine AUDI S8 2009 Owners Manual
[x] Cancel search | Manufacturer: AUDI, Model Year: 2009, Model line: S8, Model: AUDI S8 2009Pages: 408, PDF Size: 91.63 MB
Page 320 of 408
-~_C_ h_e _c _ k_ i_n ...:::g::;...._ a_n_ d_ f_ i_ll _in -'g:::;.._ ___________________________________________ _
& WARN ING (c o ntinued )
• Turn off the engine and all ow it to c ool down .
• Protect your f ace, hand s and arms from e scaping flu id and
s te am by covering the cap w ith a large , thick rag .
• Turn the cap slowly a nd ve ry ca re fu lly
in a c ounter -clockw ise
dire ction while applying light , downward pres sure on the top of
the cap.
• To avoid being burned , do not spill antifree ze or coolant on the
e x hau st sy stem or hot eng ine parts . U nde r certain conditions , the
ethylene glycol in engine coolant can cat ch fire .
0 Note
Do not add any type of radiator leak sealan t to your vehic le's engine
coolant. Adding radiator repair fluid may adversely affect the func
tio n and performance of your coo ling system and could resu lt in
damage not covered by your New Vehicle Limited Warranty .
[ i J Tips
On vehicles with the 12 -cylinder engine, the expansion tank is
located under a cover .•
Adding coolant
Be very careful when adding engine coolant.
Before you check a nything in the e ngine compartment,
alway s read and heed all WARNINGS=:> & in "Working in
the engine compartment" on
page 309.
Turn off the engine.
Let the engine coo l down. -
Pla ce a t hick rag over t he co ola nt expansio n tank
=:> page 317, fig . 269 and carefully tw ist the cap cou nter
clockw ise
=:> & .
- Add cool ant.
Twist the cap on again
tightly .
Replacement engine coolant mus t conform to exact specifications
=> page 316, "Coolan t". Even in an emergency, if coolant additive
G 12+ +, G12 + or G12 is not availab le, do
not use a different additive.
Use plain water instead until you can get the correct additive and
can restore the correct ratio . This should be done as soon as
possible.
I f you have lost a cons iderable amount of coolant, then you should
add cold antifreeze and cold water only when the engine is cold .
A lways use
new engine coolant when refil ling .
Do not fi ll coo lant above the "MAX" mark . Excess coolant wil l be
f orced out through the p ressure relief valve in the cap when the
eng ine becomes hot.
& WARNING
• The cooling system i s under pre ssure and can g et very hot .
Redu ce th e risk of scalding from hot coolant by following these
s tep s.
- Turn off the e ngine a nd allo w it t o cool down .
- Protect your fac e, hand s and arms from e sc a ping fluid and
steam by covering the cap with a large, thi ck rag .
- Turn the cap slo w ly and very caref ully in a counter -clockwi se
dire ction while applying light , downward pres sure on the top
of the cap .
- To avoid being burned , do not sp ill antifreeze or cool ant on
the e xhau st sy stem o r hot e ngine part s. Under ce rtain condi -
tions , the ethylene glycol in engine cool ant can catch fire. _.,,
Page 321 of 408
Checking and filling 111111 _______________________________ =..:..:..::...:::...:...:~:....:...;_.:....::___--:::-------J
& WARNING !continued )
• Antifr eeze is po isonous. Always store antifreeze in it s original
c ontainer and well out of the re ach of children .
• If you drain the coolant, it must be caught and safely stored in
a proper co ntainer cle arly m arked "poi son ".
0 Note
• Coolant po llutes the environment and cou ld cause an engine
fire. Excess coolant will be forced out through the pressure relief
valve in the cap when the engine becomes hot.
• I f, in an emergency, only wa ter can be added, the correct ratio
between water and antifreeze=>
page 316 must be restored as soon
as possib le .
W For the sake of the environment
Drained coolant should not be reused. A lways dispose of used
coolant while observing all environ mental regula tions . •
Radiator fan
The radiator fan switches on au tomatically by i tself.
T he radiator fan is driven by the engine via the V-belt. The viscous
clutch regulates the speed of the fan according to the temperature
of the coo lan t.
An auxiliary electric radiator fan * switches on and off depending on
coolant tem perature and o ther vehic le opera ting condi tions.
After you switch the engine off , the auxiliary fan can continue
running for up to 10 minutes -even with the ignition off. It can even
switch on again later by itself=>&, if
• the temperature of the engine coolant rises due to the heat
bu ild -up from the engine i n the engine c ompar tment, or •
the engine compartment heats up because the vehicle is parked
in intense sunligh t.
& WARNING
• To reduce the ri sk of personal injury never touch the radiator
f a n .
• The aux iliary electric fan i s te mperature controlled and can
switch on suddenly even when the engine is not running .
• The au xiliary radiato r fan switche s on automatic ally when th e
eng ine coolant reache s a certain temperature and
will continue to
r un until the coo lant tempe rature drop s. •
Brake fluid
Checking brake fluid level
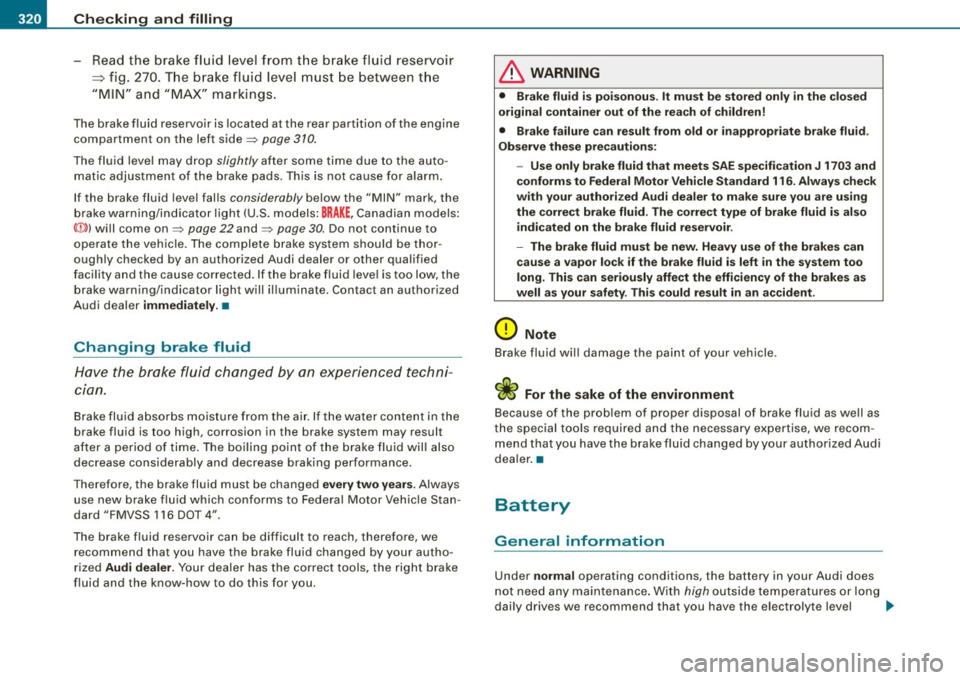
T he brake fluid level can be checked with a quick glance.
-w ;:;
Fig . 270 Engin e
c o mpartm ent: B ra ke
fluid r ese rvo ir
Before you check anything in the e ngine comp artmen t,
always read and heed all WARNINGS:::::> & in "Working in
t h e engi ne compartment" on
page 3 09. .,_
Vehicle care I I irechnical data
Page 322 of 408
-~_C_ h_e _c _ k_ i_n ...:::g::;...._ a_n_ d_ f_ i_ll _in -'g:::;.._ ___________________________________________ _
-Read the brake fluid level from the brake fluid reservoir
=> fig. 270. The brake fluid level must be between the
"MIN" and "MAX" markings.
The brake fluid reservoir is located at the rear partition of the engine
compartment on the left side~ page 310.
The fluid level may drop slightly after some time due to the auto
matic adjustment of the brake pads. This is not cause for alarm.
If the brake fluid level falls considerably below the "MIN" mark, the
brake warning/indicator light (U.S. models:
BRAKE , Canadian models:
«D> l will come on~ page 22 and~ page 30. Do not continue to
operate the vehicle. The complete brake system should be thor
oughly checked by an authorized Audi dealer or other qualified
facility and the cause corrected. If the brake fluid level is too low, the
brake warning/indicator light will illuminate. Contact an authorized
Audi dealer
immediately. •
Changing brake fluid
Have the brake fluid changed by an experienced techni
cian.
Brake fluid absorbs moisture from the air. If the water content in the
brake fluid is too high, corrosion in the brake system may result
after a period of time. The boiling point of the brake fluid will also
decrease considerably and decrease braking performance.
Th erefore, the brake fluid must be changed
every two years. Always
use new brake fluid which conforms to Federal Motor Vehicle Stan
dard "FMVSS 116 DOT 4".
The brake fluid reservoir can be difficult to reach, therefore, we
recommend that you have the brake fluid changed by your autho
rized
Audi dealer. Your dealer has the correct tools, the right brake
fluid and the know-how to do this for you.
& WARNING
• Brake fluid is poisonous. It must be stored only in the closed
original container out of the reach of children!
• Brake failure can result from old or inappropriate brake fluid .
Observe these precautions:
-Use only brake fluid that meets SAE specification
J 1703 and
conforms to Federal Motor Vehicle Standard 116. Always check
with your authorized Audi dealer to make sure you are using
the correct brake fluid. The correct type of brake fluid is also
indicated on the brake fluid reservoir .
- The brake fluid must be new. Heavy use of the brakes can
cause a vapor lock if the brake fluid is left in the system too
long. This can seriously affect the efficiency of the brakes as
well as your safety . This could result in an accident .
0 Note
Brake fluid will damage the paint of your vehicle.
~ For the sake of the environment
Because of the problem of proper disposal of brake fluid as well as
the special tools required and the necessary expertise, we recom
mend that you have the brake fluid changed by your authorized Audi
dealer. •
Battery
General information
Under normal operating conditions, the battery in your Audi does
not need any maintenance. With high outside temperatures or long
daily drives we recommend that you have the electrolyte level .,_
Page 323 of 408
Checking and filling -
---------------------=----"=---------
checked by a service facility. The electrolyte level should also be
checked each time the battery is charged =>
page 323.
Have the battery checked when you take your vehicle in for service.
You are well advised to replace a battery that is older than 5 years.
With certain types of airbag deployment, the battery is discon
nected from the vehicle electrical system for safety reasons=>.& in
"Repair, care and disposal of the airbags" on
page 234.
Disconnecting the battery terminals
Some vehicle functions (power window regulators, for example) are
lost if the battery terminals are disconnected. These functions have
to be relearned after the battery terminals are connected again. To
prevent this, the battery should only be disconnected from the
vehicle electrical system when absolutely necessary for repairs .
Vehicles not driven for long periods If you do not drive your vehicle over a period of several days or
weeks, electrical components are gradually cut back or switched off.
This reduces energy consumption and maintains starting capability
over a longer period
=> page 276.
Be aware that when you unlock your vehicle, some of the conve
nience functions may not operate, such as the Convenience key*,
the remote control or the power seat adjustment. The convenience
functions will be available again when you turn on the ignition and
start the engine.
Winter operation During the winter months, battery capacity tends to decrease as
temperatures drop. This is because more power is also consumed
while starting, and the headlights, rear window defogger, etc., are
used more often.
Avoid unnecessary power consump tion, particularly in city traffic or
when traveling only short distances. Let your authorized Audi dealer
check the capacity of the vehicle battery before winter sets in
=> page 323. A well charged battery will not only prevent starting
problems when the weather is cold, but will also last longer.
[ i] Tips
If your vehicle is left standing for several weeks at extremely low
temperatures, the vehicle battery should be removed and stored
where it will not freeze. This will prevent it from being damaged and
having to be replaced.•
Working on the battery
Be especially careful when working on or near the battery.
Fig . 271 Luggage
compartment: Right·
side storage compart
ment
Fig . 272 Luggage
compartment : Battery
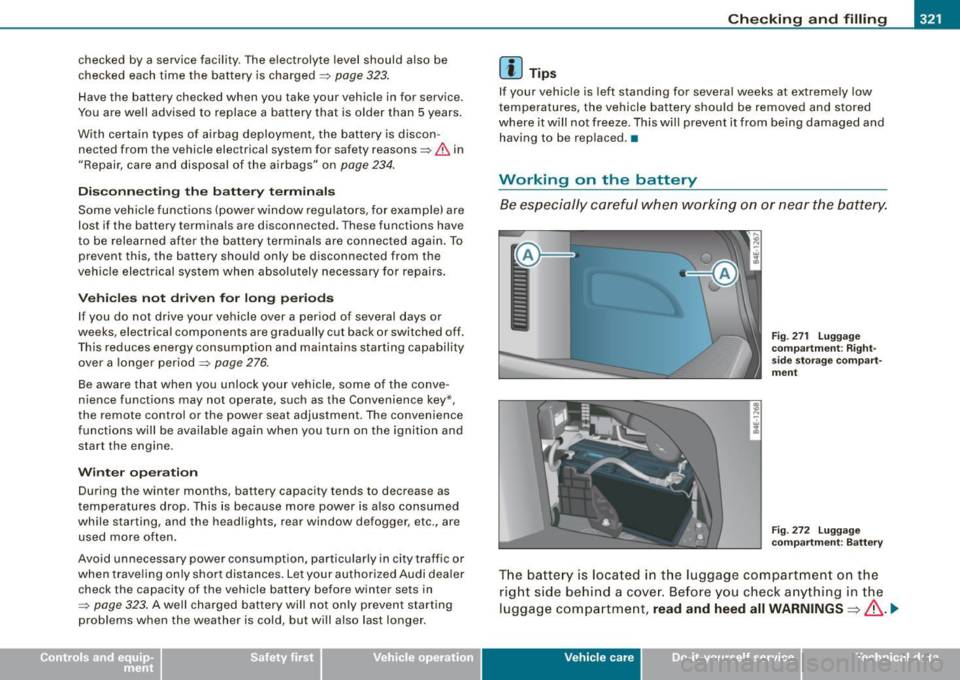
The battery is located in the luggage compartment on the
right side behind a cover. Before you check anything in the
luggage compartment,
read and heed all WARNINGS=>& . .,_
Vehic le care I I irechnical data
Page 324 of 408
-Checking and filling PW~--=----=----------------
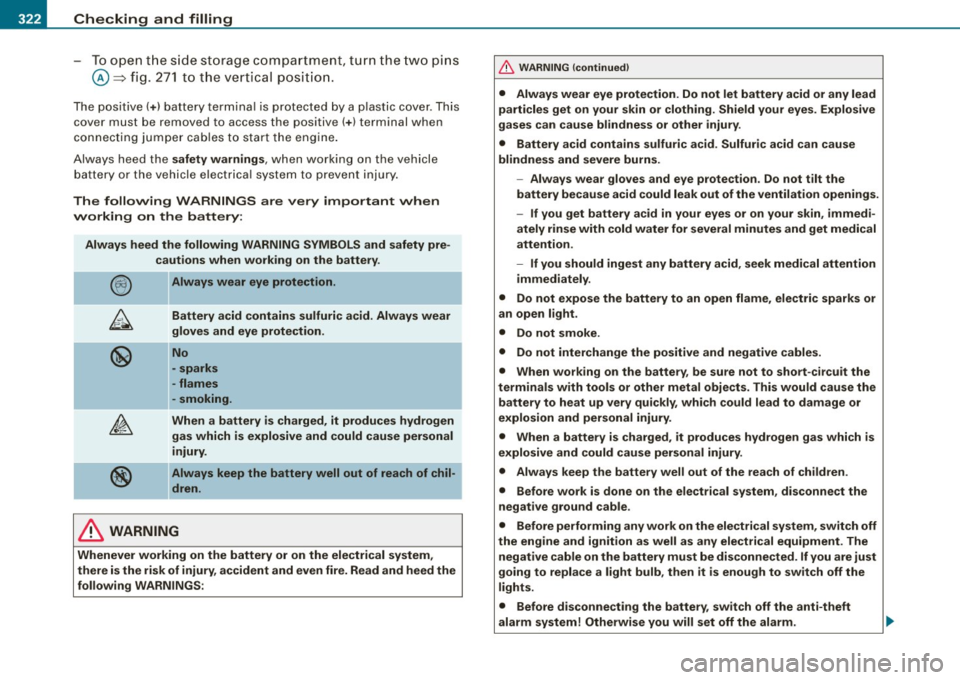
-To open the side storage compartment, turn the two pins
@ ~fig . 271 to the vertical position.
The positive(+) battery terminal is protected by a plastic cover . This
cover must be removed to access the positive(+) terminal when
connecting jumper cables to start the eng ine.
Always heed the safety warnings , when working on the vehicle
battery or the vehicle electrica l system to prevent injury.
The following WARNINGS are very important when
working on the battery:
Always heed the following WARNING SYMBOLS and safety pre
cautions when working on the battery .
@
®
Always wear eye prote ction .
Battery acid contains sulfuric acid. Always wear
gloves and eye protection .
No
• sparks
- flames
· smoking.
When a battery is charged, it produces hydrogen
gas which is explosive and could cause personal injury .
Always keep the battery well out of reach of chil
dren .
& WARNING
Whenever working on the battery or on the electrical system,
there is the risk of injury, accident and even fire. Read and heed the
following WARNINGS :
& WARNING (continued)
• Always wear eye protection. Do not let battery acid or any lead
particles get on your skin or clothing. Shield your eyes. Explosive
gases can cause blindness or other injury.
• Battery acid contains sulfuric acid. Sulfuric acid can cause
blindness and severe burns.
-Always wear gloves and eye protection . Do not tilt the
battery because acid could leak out of the ventilation openings.
- If you get battery acid in your eyes or on your skin, immedi
ately rinse with cold water for several minutes and get medical
attention.
- If you should ingest any battery acid , seek medical attention
immediately .
• Do not expose the battery to an open flame , electric sparks or
an open light .
• Do not smoke.
• Do not interchange the positive and negative cables.
• When working on the battery, be sure not to short-circuit the
terminals with tools or other metal objects. This would cause the battery to heat up very quickly, which could lead to damage or
explosion and personal injury.
• When a battery is charged, it produces hydrogen gas which is
explosive and could cause personal injury.
• Always keep the battery well out of the reach of children.
• Before work is done on the electrical system, disconnect the
negative ground cable.
• Before performing any work on the electrical system, switch off
the engine and ignition as well as any electrical equipment. The
negative cable on the battery must be disconnected. If you are just
going to replace a light bulb , then it is enough to switch off the
lights.
• Before disconnecting the battery, switch off the anti-theft
alarm system! Otherwise you will set off the alarm.
Page 325 of 408
Checking and filling -
--------------~-
•
& WARNING (continued)
• When disconnecting the battery, first disconnect the negative
cable and then the positive cable.
• Before reconnecting the battery, make sure all electrical
consumers are switched off. Reconnect the positive cable first and
then the negative cable. Never interchange the cables -this could
start a fire!
• Never charge a frozen or a thawed-out battery. It could
explode! If a battery has frozen, then it must be replaced. A
discharged battery can freeze over at 32 °F (0 °CI.
• Make sure the vent hose is always attached to the opening on
the side of the battery.
• Never use batteries which are damaged. There is the danger of
an explosion! Always replace a damaged battery.
& WARNING
California Proposition 65 Warning:
• Battery posts, terminals and related accessories contain lead
and lead compounds, chemicals known to the State of California
to cause cancer and reproductive problems. Wash hands after
handling.
0 Note
• Do not disconnect the vehicle battery when the ignition is
switched on or when the engine is running, otherwise, you will
damage electronic components in the electrical system.
• If your vehicle is going to stand for a long period of time without
being driven, protect the battery from "freezing", otherwise it will
be damaged and will then have to be replaced .•
Battery charging
Starting the engine requires a well charged battery.
Always read and heed all WARNINGS below=> & and => &
in "Working on the battery" on
page 321.
-Turn off the ignition and all electrical consumers.
- Make sure the area is well ventilated when you charge
the battery.
- Attach the red (positive
8) clamp of the charging equip
ment to the positive terminal of the battery and the black
(negative(:)) clamp to the jumper terminal.
- Only now plug the mains lead for the charging equip
ment into the wall outlet and turn it on=> &.
-Make sure the charging rate is not over 30 amps/14.8
Volt.
-When the battery is fully charged: Turn the charging
equipment off and remove the mains lead from the wall
outlet.
- Now remove the clamps for the charging equipment .
A discharged battery can freeze at temperatures of only O °C . Allow
a frozen battery to thaw completely before attempting to charge it
=> &. However, we recommend not using a thawed battery again
because the battery casing can be cracked due to ice formation and
can leak battery acid.
Battery charging (Maximum charging rate of 30
amps/14.8 Volt)
When charging at /ow voltages (e.g. with a trickle charger), the
battery cables do not have to be disconnected first. The battery caps
should
not be opened when charging a battery. ._.
Vehicle care I t •
Page 326 of 408
--~_C_ h_e _c _ k_ i_n _,g::;..._ a_n_ d_ f_ i_ll _in -'g=---------------------------------------------
It is not necessary to remove the battery from the lugga ge compart
men t, and it is als o not nec essary to disco nnect the cab les.
Fast charging the battery (charging rate above 14 .8
Volts )
For technical reasons do not use a battery charger that uses vo ltage
grea te r th an 14 .8 Vo lts to c harg e you r vehi cle 's bat te ry.
& WARNING
Charging a battery can be dangerou s.
• Always follow the operating instructions provided by the
battery charger manufacturer when charging your battery .
• Never charge a frozen battery . It may explode because of gas
trapped in the ice . Allow a frozen battery to thaw out first .
• Do not reuse batteries which were frozen. The battery housing
may have cracked and weakened when the battery froze.
• Charge the battery in a well ventilated area. Keep away from
open flame or electrical spark. Do not smoke . Hydrogen gas gener
ated by the battery is explosive.
• To reduce the dange r of explosion, never connect or disconnect
charger cables while the charger is operating.
• Fast charging a battery is dangerous and should only be
attempted by a competent technician with the proper equipment .
• Battery acid that may spill during charging should be washed
off with a solution of warm water and baking soda to neutralize
the acid .
0 Note
Never use a fast charger as a booste r to start the engine . T his wil l
s eri ously damage se nsit iv e elect ron ic c ompo nents, suc h as control
units, re lays, radio, etc ., as wel l as the battery charger .•
Battery replacement
Th e new ba tte ry must have th e s am e sp ecification s and
dim ensions as the origin al equ ipment b attery.
Intel ligent energy management in your vehicle is responsib le fo r
distr ib utin g th e e lectri ca l ene rgy th roug hout y ou r veh icle
~ page 2 76. T he inte lligent energy management system will keep
th e eng in e b attery c harged be tte r than veh icles w it h o ut th is sys tem.
T o make sure the addit ional electrical energy is avai lab le once aga in
aft er you have chang ed th e batt ery, w e recom mend that y ou install
batteries of the same type and manufacture only (the same as those
insta lled a t th e time you r vehicle was delive re d). Specification s are
li sted on th e battery housing . Your authorized Audi dea ler wi ll then
code the bat tery manage ment co nt ro l unit .
T he new batt ery must have the sa me capac ity, v oltage (12 volts),
amperage, construct ion and p lug sea ling.
Whe n inst allin g the bat tery, make sure t he ig nition a nd all elec trica l
consumers are turned off.
0 Note
Mak e sure t he ven tilation hose on t he side of the battery is
connec te d , otherwise fu mes or batt ery acid ca n lea k out.
ffi For the sake of the environment
Because of the problem of proper disposal of a battery, we recom
m end your authorized Aud i dealer chang e the batt ery for you.
Batteries contain su lfuric acid and lead and must alwa ys be
disposed of proper ly i n co mpl iance with all en vironm ental r eg ula
tions. D isposing of vehicle batteries improper ly is very dangerous to
t h e en viron men t.•
Page 327 of 408
Checking and filling -
---------------------=----"=---------
Windshield/headlight washer
container
F ig . 273 Engine
co mpartm ent : Wind
s hiel d and headl ig ht
wa sher fluid container
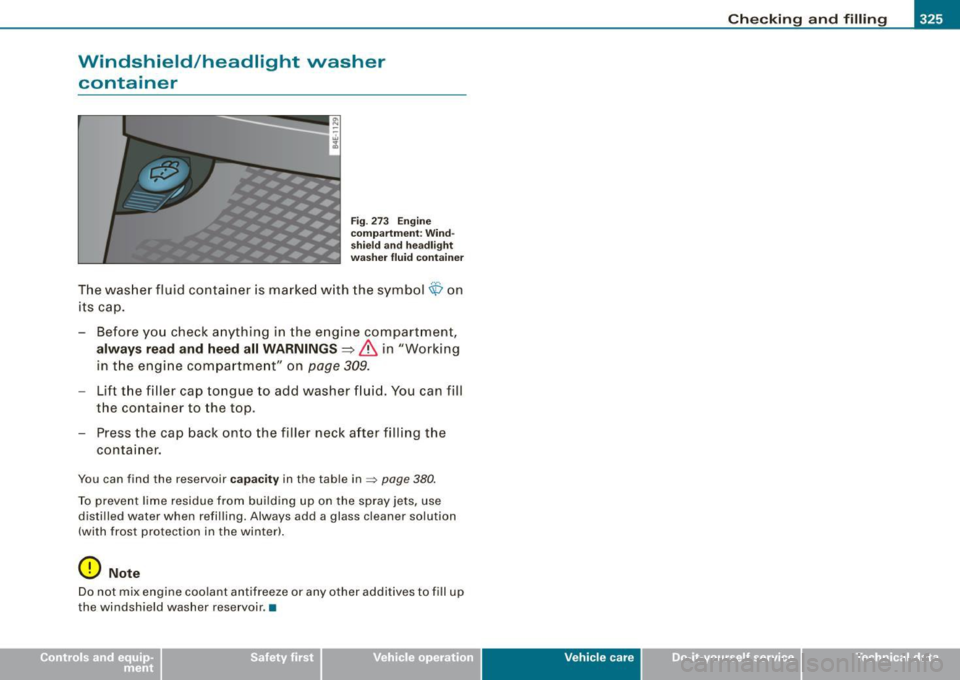
The was her fluid container is marke d w ith the symbol <$ on
its cap.
- Before you check anything in the e ngine compartment,
always read and heed all WARNINGS=>
& in "Working
in t he engi ne com partme nt" on
page 309.
- Lift the filler cap tongue to add washer f luid. You can fill
the container to the top .
- Press the cap back onto the filler neck after filling the
container .
You can find the reservoir ca paci ty in the table in=> page 380.
To prevent lime residue from building up on the spray jets, use
distilled water when refilling. Always add a glass cleaner solution
(with frost protection in the winter!.
0 Note
Do n ot m ix engine coo lant antifreeze or any other addi tives to fill up
the windshield washer reservoir .•
Vehic le care I I irechnical data
Page 333 of 408
Tires and wheels -________________ w-.
•
pressure label lists the recommended cold tire inflation pressures
for the vehicle at its maximum capacity weight and tires that were
on your vehicle at the time it was manufactured.
If you wish to improve comfort when operating the vehicle at
normal load (up to 3 occupants), you can adjust tire pressures to
those specified for normal vehicle load. Before operating the vehicle
at maximum load , you must increase the tire pressures to those
specified for maximum vehicle load
=> &.
Bear in mind that the tire pressure monitoring system* can only
monitor the tire pressures you have stored. The system does not
recognize the load condition of your vehicle .
The effec tiveness of the tire pressure mon itoring system* will be
impaired if you store normal load pressures but then operate the
vehicle at its maximum load=>&. See the
illustration=>
page 330, fig. 274 for the location of the label
either o n driver's side 8-pillar or inside the fuel filler flap (color of
the actual label and exact location on the vehicle will vary slight ly).
Note that the following tab le is accurate at the time of going to
press and is subject to change. In the event of discrepancies, the t ire
pressure label (On USA vehicles, the tire pressure label is located on
the driver's side 8-pillar. On Canada vehicles, the tire pressure label
is located either on the driver 's side 8-pillar or inside the fuel fil ler
flap) always takes precedence.
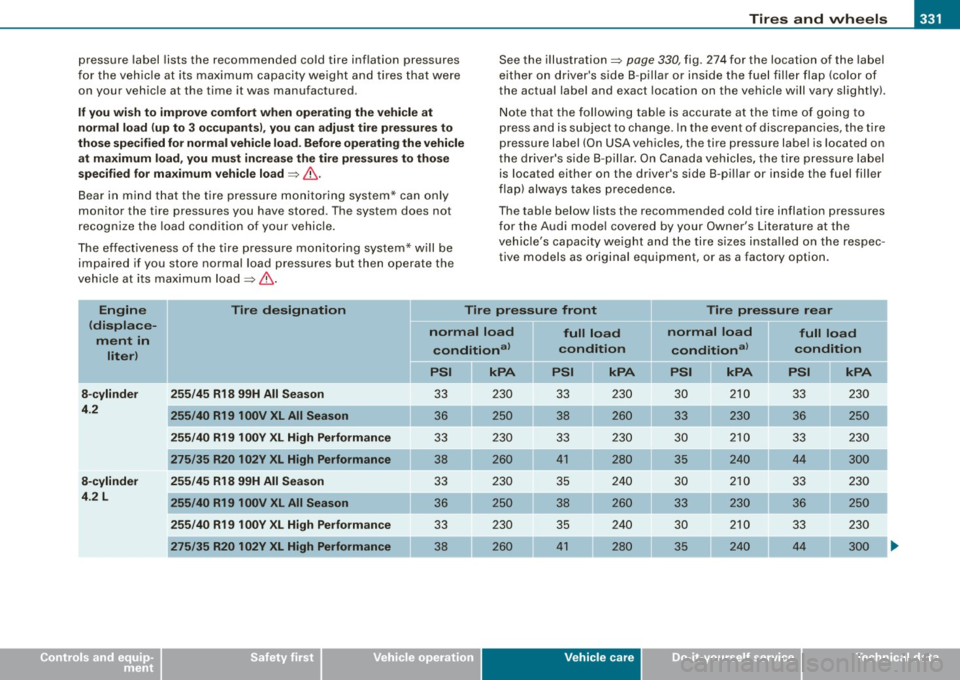
The table below lists the recommended cold tire inflation pressures
for the Audi mode l covered by your Owner's Literature at the
vehicle's capacity weight and the tire sizes installed on the respec
tive models as original equipment, or as a factory option.
Engine
(displace
ment in
liter) Tire designation
Tire pressure front Tire pressure rear
8-cylinder
4.2
8-cylinder
4 .2 L 255/45 R18 99H All Season
255/40 R19100V
XL All Season
255/40 R19
1 00Y XL High Performance
275/35 R20 102Y XL High Performance
255/45 R18 99H All Season
255/40 R19 100V XL All Season
255/40 R19 1 00Y XL High Performance
275/35 R20 102Y XL High Performance
normal load conditional
kPA
33 230
36 250
33 230
38 260 33 230
36 250
33 230
38 260
full load
condit ion
PSI
33 230
38 260
33 230
41 280
35 240
38 260
35 240
41 280
Vehicle care
normal load full load
conditional condition
kPA PSI kPA
30
210
33 230
33 230 36 250
30 210 33 230
35 240
44 300
30 210 33 230
33 230 36 250
30 210
33 230
35 240 44 300
I t •
Page 334 of 408
-Tires and wheels
PW-------------------
Engine II Tire designation Tire pressure front Tire pressure rear
( displa ce-
normal load full load normal load
full load
ment in
liter) condition
al condition
conditional condition
PSI
I I kPA PSI
kPA PSI II kPA II PSI II kPA
12-cylinder
255/45 R18 99H All Season 36 250 38 260 32 220 32 220
6 .0 Individual
rear seats 255
/40 R19 100V XL All Season 41 41 280 36 250 36 250
255 /40 R19 100Y
XL High Performance
36 250
38 260 32
220 32 220
275 /35 R20 102Y
XL High Performance 38 41 280 35 2 40 4 4 300
12 -cylinder 255 /45 R18 99H All Season 36 250 36 250 32 220 32 220
6 .0
255/40 R19 100V XL All Season 41
280 41 280 36 250 36 250
255 /40 R19 100V
XL High Performance 36 250 36 250 32 2 20 32 220
275 /35 R20 102Y XL High Performance
38 260 41 280 35 240 44 300
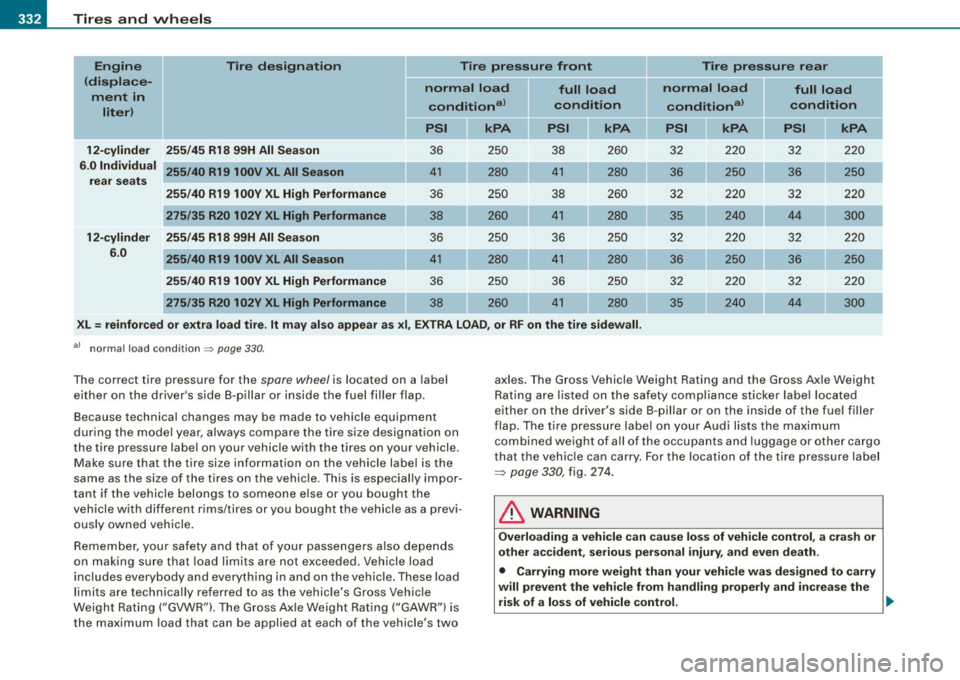
XL = reinforced or extra load tire . It may also appear as xi , EXTRA LOAD , or RF on the tire sidewall .
al norm al l oad cond it ion => pag e 330.
The cor rect tire pressure for the spare wheel is located on a label
either on the driver 's side B -pillar o r inside the fue l fil ler flap .
Because technica l changes may be mad e to vehicle equipmen t
du ring the mo del year, always co mpare the tire si ze designa tion on
the tire pressure label on your vehicle with the tires on your vehicle .
Make sure t hat the t ire size info rmati on on t he veh icle labe l is the
same as the size of the tires on the vehicle . This is especially impor
tan t if the vehicle bel ongs t o some one e lse or you boug ht the
vehic le with different rims/tires or you bought the vehicle as a previ
ously owned ve hicle.
Reme mbe r, you r safety an d that of your passengers a ls o depe nds
on making sure tha t load limi ts are not exceed ed. Vehicle load
inc ludes everybody and everyt hin g in an d on th e vehicle . T h ese load
limits are technical ly referred to as the vehicle's Gross Vehicle
Weigh t Ra ting ("GVWR"). The Gro ss Axle Weigh t Ra tin g ("GAWR") is
the maximum load that can be applied at each of the vehicle's two axles
. The G ross Vehic le We ight Rating and the Gross Axle Weight
Rat ing are lis ted on the safety compliance sticker labe l located
either on the driver 's side 8 -pillar or on the inside of the fue l fi ller
fl ap . The ti re p ressure label on you r Aud i lists the maximum
combined weight of a ll of the occupants and luggage or other cargo
th at th e vehic le can carry . Fo r the location o f the t ire pressure labe l
=> page 330, fig. 274.
& WARNING
Overload ing a vehicle can cause loss of vehicle control , a crash or
other accident, serious personal injury , and even death .
• Carrying more weight than your vehicle was des igned to carry
will prevent the vehicle from handling properly and increase the
risk of a loss of vehicle control . .,_